Nginx 错误日志配置
1、Nginx错误日志信息介绍:
error_log的语法格式及参数说明:
error_log file level;
关键字 日志文件 错误日志级别
其中,关键字error_log 不能改变,日志文件可以指定任意存放日志的目录,错误日志级别常见的有{debug,info,notice,wam,error,crit,alert,emerg},级别越高记录的信息越少,场景一般是wam,error,crit这三个级别之一,注意不要配置info等低级别,会带来巨大的磁盘I/O消耗。
error_log的默认值:
#default: error_log logs/error.log error;
可以放置的标签段位:
#context: main,http,server,location
编辑主配置文件nginx.conf 增加访问日志配置:
[root@lamp01 conf]# vim nginx.conf
worker_processes  1;
error_log logs/error.log error;
events {
    worker_connections  1024;
}
http {
    include       mime.types;
    default_type  application/octet-stream;
    sendfile        on;
    keepalive_timeout  65;

#nginx vhosts config
    include extra/www.conf;
    include extra/bbs.conf;
    include extra/status.conf;
}
刷新配置:
/application/nginx/sbin/nginx –t
/application/nginx/sbin/nginx –s reload
查看错误日志文件:
cat ../logs/error.log
[root@lamp01 conf]# cat ../logs/error.log
2019/01/08 21:01:39 [notice] 1453#0: signal process started
2019/01/08 21:20:42 [emerg] 1492#0: bind() to 0.0.0.0:80 failed (98: Address already in us
e)2019/01/08 21:20:42 [emerg] 1492#0: bind() to 0.0.0.0:80 failed (98: Address already in us
e)
2、Nginx访问日志介绍:
nginx软件会把每个用户访问网站的日志信息记录到指定的日志文件里,供网站提供分析用户浏览行为等,此功能由ngx_http_log_module模块来负责。
log_format 用来定义记录日志的格式(可以定义多种日志格式,取不同名字即可)
access_log 用来指定日志文件的路径及使用的何种日志格式记录日志。
nginx日志格式默认的参数配置如下:
log_format main '$remote_addr - $remote_user [$time_local] "$request" '
'$status $body_bytes_sent "$http_referer" '
'"$http_user_agent" "$http_x_forwarded_for"';
日志变量说明:
status http状态码,记录请求返回的状态,例如200、404、301等
request 用户的http请求起始行信息
time_local 记录访问时间与时区
http_referer 记录此次请求是从哪个链接访问过来的,可以根据referer进行防盗链设置
remote_addr 记录访问网站的客户端地址
remote_user 远程客户端用户名称
http_user_agent 记录客户端访问信息,例如:浏览器,手机客户端
body_bytes_sent 服务器发送给客户端的响应body字节数
http_x_forwarded_for 当前端有代理服务器时,设置web节点记录客户端地址配置,此参数生效的 前提是代理服务器上也要进行相关的x_forwarded_for设置
记录日志access_log参数说明:
语法:
access_log path [format [buffer=size [flush = time]] [if=condition]]
access_log path format gzip [=level] [buffer = size] [flush = time] [if = condition];
access_log syslog:server=address[,parameter=value] [format [if=condition]];
buffer=size 为存放访问日志的缓冲区大小,flush=time 为将缓冲区的日志刷到磁盘的时间,gzip[=level]表示压缩级别,[if = condition]:其他条件,一般的场景,这些参数都无需配置,极端优化才可能考虑这些参数。
access_log off off,表示不记录访问日志。
默认配置:access_log logs/access.log combined;
放置位置:http,server,location,if in location,limit_except
nginx记录日志的默认参数配置如下:
access_log logs/access.log main;
编辑主配置文件nginx.conf 增加错误日志配置:
[root@lamp01 conf]# vim nginx.conf
worker_processes  1;
error_log logs/error.log error;
events {
    worker_connections  1024;
}
http {
    include       mime.types;
    default_type  application/octet-stream;
    sendfile        on;
    keepalive_timeout  65;
    log_format  main  '$remote_addr - $remote_user [$time_local] "$request" '
                      '$status $body_bytes_sent "$http_referer" '
                      '"$http_user_agent" "$http_x_forwarded_for"';
#nginx vhosts config
    include extra/www.conf;
    include extra/bbs.conf;
    include extra/status.conf;
    access_log logs/access_www.log main;
}
刷新配置查看效果:
[root@lamp01 conf]# /application/nginx/sbin/nginx -t
nginx: the configuration file /application/nginx-1.6.3/conf/nginx.conf syntax is ok
nginx: configuration file /application/nginx-1.6.3/conf/nginx.conf test is successful
[root@lamp01 conf]# /application/nginx/sbin/nginx -s reload
[root@lamp01 conf]# curl www.jyw1.com
www.jyw1.com
[root@lamp01 conf]# curl bbs.jyw2.com
bbs.jyw2.com
[root@lamp01 conf]# cat ../logs/access_www.log
192.168.43.118 - - [08/Jan/2019:23:11:57 +0800] "GET / HTTP/1.1" 200 13 "-" "curl/7.19.7 (
x86_64-redhat-linux-gnu) libcurl/7.19.7 NSS/3.14.0.0 zlib/1.2.3 libidn/1.18 libssh2/1.4.2" "-"192.168.43.17 - - [08/Jan/2019:23:12:25 +0800] "GET / HTTP/1.1" 200 13 "-" "Mozilla/5.0 (W
indows NT 6.1; WOW64) AppleWebKit/537.36 (KHTML, like Gecko) Chrome/58.0.3029.110 Safari/537.36 SE 2.X MetaSr 1.0" "-"
在高并发场景下加上buffer和flush,可以提高网站的性能:
access_log logs/access_www.log main gzip buffer=32k flush=5s;
3、nginx访问日志轮询切割介绍:
默认情况nginx会把所有的访问日志生成一个指定的访问日志文件access.log里,时间长了会导致日志个头很大,不利于分析日志和处理,因此,有必要对nginx按天或按小时进行切割成不同的文件保留,这里使用按天切割方法:
思路解析:
将正在写入的Nginx日志文件(access_www.log)重命名为带当天日期的格式文件(20190109_access_www.log),然后重新加载Nginx,生成新的Nginx日志(access_www.log)
具体切割脚本如下:
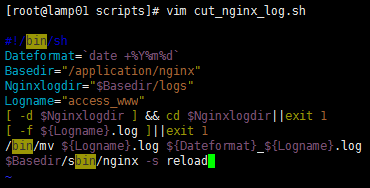
[root@lamp01 nginx]# cat /server/scripts/cut_nginx_log.sh
#!/bin/sh
Dateformat=`date +%Y%m%d -d -1day`         //定义时间
Basedir="/application/nginx"          //nginx安装目录
Nginxlogdir="$Basedir/logs"          //存放日志的目录
Logname="access_www"            //日志的名称
[ -d $Nginxlogdir ] && cd $Nginxlogdir||exit 1 //判断如果有存放目录就cd进去,否则退出
[ -f ${Logname}.log ]||exit 1   //判断如果不存在日志名称就执行下面命令,否则退出
/bin/mv ${Logname}.log ${Dateformat}_${Logname}.log  //把当前日志名重命名为时间日志名
$Basedir/sbin/nginx -s reload  //从新生成一个不带时间的日志文件
效果如下:
[root@lamp01 scripts]# vim cut_nginx_log.sh
[root@lamp01 scripts]# sh cut_nginx_log.sh
[root@lamp01 scripts]# ll /application/nginx/logs/
总用量 32
-rw-r--r--. 1 root  root     0 1月   9 00:00 20190109_access_www.log
-rw-r--r--. 1 root  root 15974 1月   7 22:59 access.log
-rw-r--r--. 1 root  root     0 1月   9 00:15 access_www.log
-rw-r--r--. 1 nginx root 11327 1月   9 00:15 error.log
-rw-r--r--. 1 root  root     5 1月   9 2019 nginx.pid
[root@lamp01 scripts]# date -s 2019-01-10
2019年 01月 10日 星期四 00:00:00 CST
[root@lamp01 scripts]# sh cut_nginx_log.sh
[root@lamp01 scripts]# ll /application/nginx/logs/
总用量 32
-rw-r--r--. 1 root  root     0 1月   9 00:00 20190109_access_www.log
-rw-r--r--. 1 root  root     0 1月  10 00:00 20190110_access_www.log
-rw-r--r--. 1 root  root 15974 1月   7 22:59 access.log
-rw-r--r--. 1 root  root     0 1月  10 00:00 access_www.log
-rw-r--r--. 1 nginx root 11447 1月  10 00:00 error.log
-rw-r--r--. 1 root  root     5 1月   9 21:35 nginx.pid
[root@lamp01 scripts]#
基于多个站点:修改多个站点配置文件
[root@lamp01 extra]# vim www.conf
[root@lamp01 extra]# vim bbs.conf
[root@lamp01 extra]# cat www.conf bbs.conf
    server {
        listen       80;
        server_name  www.jyw1.com jyw1.com;
        location / {
            root   html/www;
            index  index.html index.htm;
        }
       access_log logs/access_www.log main;
}
server {
        listen       80;
        server_name  bbs.jyw2.com jyw2.com;
        location / {
            root   html/bbs;
            index  index.html index.htm;
        }
       access_log logs/access_bbs.log main;
}
切割脚本修改如下:
[root@lamp01 scripts]# vim cut_nginx_log.sh

#!/bin/sh
Dateformat=`date +%Y%m%d`
Basedir="/application/nginx"
Nginxlogdir="$Basedir/logs"
Logname="access_www"
[ -d $Nginxlogdir ] && cd $Nginxlogdir||exit 1
[ -f ${Logname}.log ]||exit 1
/bin/mv ${Logname}.log ${Dateformat}_${Logname}.log
/bin/mv access_bbs.log ${Dateformat}_access_bbs.log
$Basedir/sbin/nginx -s reload
效果如下:
[root@lamp01 scripts]# date -s 2019-01-12
2019年 01月 12日 星期六 00:00:00 CST
[root@lamp01 scripts]# sh cut_nginx_log.sh
[root@lamp01 scripts]# ll /application/nginx/logs/
总用量 32
-rw-r--r--. 1 root  root     0 1月   9 00:00 20190109_access_www.log
-rw-r--r--. 1 root  root     0 1月  10 00:00 20190110_access_www.log
-rw-r--r--. 1 root  root     0 1月  12 00:00 20190112_access_bbs.log
-rw-r--r--. 1 root  root     0 1月  12 00:00 20190112_access_www.log
-rw-r--r--. 1 root  root     0 1月  12 00:01 access_bbs.log
-rw-r--r--. 1 root  root 15974 1月   7 22:59 access.log
-rw-r--r--. 1 root  root     0 1月  12 00:01 access_www.log
-rw-r--r--. 1 nginx root 11627 1月  12 00:01 error.log
-rw-r--r--. 1 root  root     5 1月   9 21:35 nginx.pid
[root@lamp01 scripts]#
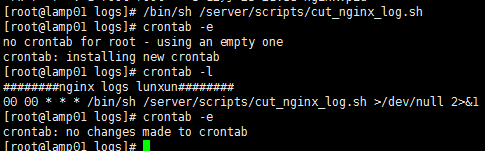
同时我们可以加入到定时任务里去:

 浙公网安备 33010602011771号