本地yum仓库搭建
第一种方法:
vsftp格式
cat   /server/scripts/YumServer.sh
#!/usr/bin/env bash

# FILE_NAME: YumRepoOffline.sh

# VERSION: 0.0.1

# MODIFY_DATE: 20201003

# AUTHOR: liupenghui

# CONTACT: 15094034633@163.com

# DESCRIBE: Build local yum repo offline

############################################################

## Warning:All rpm must be stored in the /opt/local_sync/

############################################################

# Check directory /local_basic, if it does not exist, create it;

# if there is a file with the same name, create a directory after backup

if [[ ! -d /opt/local_sync ]]; then
if [[ -e /opt/local_sync ]]; then
mv /opt/local_sync /opt/local_sync.bak
fi
mkdir /opt/local_sync
echo "All rpm must be stored in the /opt/local_sync/"
fi

# Add yum repository

cat > /etc/yum.repos.d/nginx.repo <<EOF
[nginx-stable]
name=nginx stable repo
baseurl=http://nginx.org/packages/centos/7/\$basearch/
gpgcheck=0
enabled=1
EOF
yum install -y epel-release
rpm -Uvh https://mirror.webtatic.com/yum/el7/webtatic-release.rpm

# Download RPM package in advance

yum install --downloadonly --downloaddir=/opt/local_sync/ createrepo \
wget make automake cmake gcc gcc-c++ kernel-devel pcre pcre-devel zlib-devel \
openssl openssl-devel patch libffi-devel python-devel bzip2-devel ncurses-devel \
sqlite-devel readline-devel tk-devel gdbm-devel db4-devel libpcap-devel xz-devel \
glibc glibc-devel systemd-devel libevent libevent-devel ntpdate yum-utils lrzsz \
net-tools sysstat htop nc iotop iftop lsof nmap glances nethogs bind-utils nfs-utils \
tcpdump vim mtr traceroute quagga bc tree telnet screen dos2unix mlocate ncompress \
psmisc zip unzip bash-completion bash-completion-extras rsync inotify-tools lsyncd \
httpd-tools httpd nginx mariadb-server redis keepalived ansible ntp openvpn easy-rsa \
php72w php72w-cli php72w-common php72w-devel php72w-embedded php72w-fpm php72w-gd \
php72w-mbstring php72w-mysqlnd php72w-opcache php72w-pdo php72w-xml tomcat \
php72w-pecl-memcached php72w-pecl-redis php72w-pecl-mongodb MySQL-python
# Make cache
yum clean all && yum makecache
# Install createrepo vsftpd
yum install -y wget make cmake gcc gcc-c++ pcre-devel zlib-devel openssl \
openssl-devel createrepo yum-utils vsftpd
# vsftpd conf
echo anon_root=/opt/local_sync/ >> /etc/vsftpd/vsftpd.conf
systemctl start vsftpd
systemctl enable vsftpd
# Create index
createrepo -po /opt/local_sync/ /opt/local_sync/
# 创建定时任务脚本
cat > /opt/local_sync/local_sync.sh <<EOF
#!/bin/bash
echo 'Local sync aliyum source'
DATETIME=`date +%F_%T`
exec > /var/log/local_sync_\$DATETIME.log
reposync -np /opt/local_sync
if [ $? -eq 0 ];then
createrepo --update /opt/local_sync/
echo "SUCESS: $DATETIME Local sync aliyum source successful"
else
echo "ERROR: $DATETIME Local sync aliyum source failed"
fi
EOF
# 将脚本加入到定时任务中
cat >> /var/spool/cron/root <<EOF
# Local sync aliyum source
#00 01 15 * * /bin/bash /opt/local_sync/local_sync.sh
EOF
#执行脚本
[root@m01 ~]# sh /server/scripts/YumServer.sh
第二种方法:HTTP本地yum仓库搭建
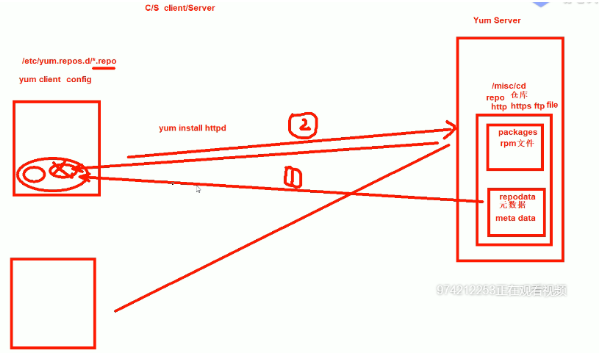
在centos7安装yum源:
1、本地自建yum仓库:首先需要启动神奇目录ls /misc/cd,用来挂载光盘,
1.安装autofs软件,并启动。
 [root@centos7-2 ~]# yum install autofs -y  # 安装autofs
 [root@centos7-2 ~]# systemctl start autofs  # 启动autofs
 [root@centos7-2 ~]# systemctl enable autofs  # 下次开机启动autofs
 [root@centos7-2 yum.repos.d]#mkdir -p /etc/yum.repos.d/bak/
 [root@centos7 yum.repos.d]# mv CentOS-Base.repo epel.repo bak
2.配置yum仓库
①[root@centos7 yum.repos.d]# cd /etc/yum.repos.d [root@centos7 yum.repos.d]# cat > base.repo <<EOF [base] name=cdrom base baseurl=file:///misc/cd gpgcheck=0 [epel] name=aliyun epel baseurl=https://mirrors.aliyun.com/epel/\$releasever/\$basearch/ gpgcheck=0 enabled=1 EOF yum repolist ls /var/cache/yum/x86_64/7/ yum clean all yum repolist ls /var/cache/yum/x86_64/7/ rm -rf /var/cache/yum/* ②[root@centos7 yum.repos.d]# cat base.repo [base] name=CentOS baseurl=file:///misc/cd gpgcheck=0 gpgkey=file:///misc/cd/RPM-GPG-KEY-CentOS-7 [epel] name=EPEL baseurl=https://mirrors.aliyun.com/epel/$releasever/$basearch/ gpgcheck=0 enabled=0
3.yum repolist 加载当前的yum源仓库
yum history undo 10 -y yum history redo 10 -y ######################################################## [root@centos7 yum.repos.d]# yum provides /etc/mime.types [root@centos7 yum.repos.d]# yum list installed#查询所有已安装的包 [root@centos7 yum.repos.d]# yum list all#查询所有
安装Http服务,并将/dev/sr0挂载到指定的目录下
 [root@centos7-2 yum.repos.d]#mkdir -pv  /var/www/html/centos/7/os/x86_64/ 新建一个类似光盘的路径目录
 [root@centos7-2 yum.repos.d]#yum install httpd -y  安装httpd服务
 [root@centos7-2 yum.repos.d]#systemctl start httpd  启动httpd服务
 [root@centos7-2 yum.repos.d]#mount /dev/sr0 /var/www/html/centos/7/os/x86_64  将本地光盘挂载到httpd网上
2.创建yum仓库
 [root@centos7-2 yum.repos.d]#vim base.repo  开始创建yum仓库
 [base]
 baseurl=http://10.0.0.200/CentOS/$releasever/os/$basearch
 gpgcheck= 0
 enable=1
yum repolist 加载当前的Yum源仓库
三:HTTP企业yum仓库搭建
服务端配置
基于httpd服务的yum源仓库
[root@centos7-2 ~]# yum install autofs -y # 安装autofs
[root@centos7-2 ~]# systemctl start autofs # 启动autofs
[root@centos7-2 ~]# systemctl enable autofs # 下次开机启动autofs
[root@centos7-2 yum.repos.d]#mkdir -p /etc/yum.repos.d/bak/
[root@centos7-2 yum.repos.d]#mv /etc/yum.repos.d/ /etc/yum.repos.d/bak/
yum repolist
ls /var/cache/yum/x86_64/7/
yum clean all
yum repolist
ls /var/cache/yum/x86_64/7/
rm -rf /var/cache/yum/*
[root@centos7-2 yum.repos.d]#vim base.repo 开始创建yum仓库
[base]
baseurl=http://10.0.0.200/CentOS/$releasever/os/$basearch
gpgcheck= 0
enable=1
[root@centos7-2 yum.repos.d]#yum install httpd -y 安装httpd服务
[root@centos7-2 yum.repos.d]#systemctl start httpd 启动httpd服务
[root@centos7-2 yum.repos.d]#mkdir -pv /var/www/html/centos/{6,7}/os/x86_64/ 新建一个类似光盘的路径目录
###访问10.0.0.200/centos
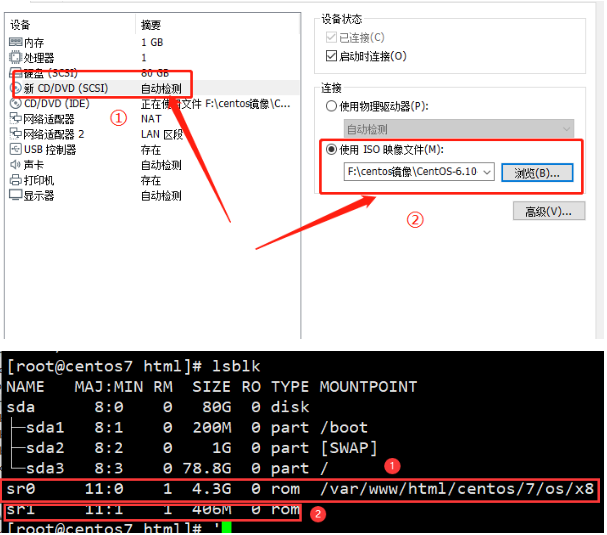
[root@centos7 html]# mount /dev/sr0 /var/www/html/centos/7/os/x86_64/
mount: /dev/sr0 is write-protected, mounting read-only
[root@centos7 7]#cd /var/www/html/centos/7
[root@centos7 7]#rz
###访问10.0.0.200/centos/7 刷新页面
[root@centos7 html]# echo " - - - " > /sys/class/scsi_host/host2/scan #添加centos6的光盘然后扫描
[root@centos7 html]# lsblk
NAME MAJ:MIN RM SIZE RO TYPE MOUNTPOINT
sda 8:0 0 80G 0 disk
├─sda1 8:1 0 200M 0 part /boot
├─sda2 8:2 0 1G 0 part [SWAP]
└─sda3 8:3 0 78.8G 0 part /
sr0 11:0 1 4.3G 0 rom /misc/cd
sr1 11:1 1 406M 0 rom
[root@centos7 html]# mount /dev/sr1 /var/www/html/centos/6/os/x86_64/
mount: /dev/sr1 is write-protected, mounting read-only
#客户端配置
[root@centos7 html]#cat yum.txt
http://10.0.0.200/centos/7/os/x86_64/
https://mirrors.aliyun.com/centos/7/os/x86_64/
[root@centos6 yum.repos.d]#cd /etc/yum.repos.d/
[root@centos6 yum.repos.d]#ls
[root@centos6 yum.repos.d]#mv base.repo{,.bak}
[root@centos6 yum.repos.d]#cat test.repo
①[test]
name=base yum
baseurl=http://10.0.0.200/centos/$releaserver/os/$basearch
gpgkey=http://10.0.0.200/centos/6/os/x86_64/RPM-GPG-KEY-CentOS-6
②[test]
name=base yum
mirrorlist=http://10.0.0.200/yum.txt#基于yum.txt文件的镜像源
gpgkey=http://10.0.0.200/centos/6/os/x86_64/RPM-GPG-KEY-CentOS-6
[root@centos6 yum.repos.d]#yum repolist
#dnf配置(epel8用)
[root@centos7 html]# mkdir dnf
[root@centos7 html]# cd dnf
[root@centos7 dnf]# ls
[root@centos7 dnf]#createrepo (rz上传rpm包)
[root@centos7 dnf]#cat /etc/yum.repos.d/dnf.repo
[dnf]
name=dnf
baseurl=http://10.0.0.200/dnf/
gpgcheck=0
[root@centos7 dnf]#yum repolist
[root@centos7 dnf]# createrepo .
[root@centos7 dnf]# ls
dnf-0.6.4-2.sdl7.noarch.rpm
dnf-conf-0.6.4-2.sdl7.noarch.rpm
libcomps-0.1.8-3.el7.x86_64.rpm
python2-libcomps-0.1.8-3.el7.x86_64.rpm
python-dnf-0.6.4-2.sdl7.noarch.rpm
repodata
#rpm包安装 wget http://springdale.math.ias.edu/data/puias/unsupported/7/x86_64/dnf-conf-0.6.4-2.sdl7.noarch.rpm wget http://springdale.math.ias.edu/data/puias/unsupported/7/x86_64//dnf-0.6.4-2.sdl7.noarch.rpm wget http://springdale.math.ias.edu/data/puias/unsupported/7/x86_64/python-dnf-0.6.4-2.sdl7.noarch.rpm yum install python-dnf-0.6.4-2.sdl7.noarch.rpm dnf-0.6.4-2.sdl7.noarch.rpm dnf-conf-0.6.4-2.sdl7.noarch.rpm python2-libcomps-0.1.8-3.el7.x86_64.rpm libcomps-0.1.8-3.el7.x86_64.rpm 配置文件:/etc/dnf/dnf.conf 仓库文件:/etc/yum.repos.d/ *.repo 日志: /var/log/dnf.rpm.log dnf 用法:与yum一致 dnf [options] <command> [<arguments>...] dnf --version dnf repolist dnf clean all dnf makecache dnf list installed dnf list available dnf search nano dnf history dnf history undo 1 [root@centos5]#find /misc/cd/ -name repodata -type d [root@centos5]#cat /etc/yum.repos.d/base.repo [base] name=base baseurl=file:///misc/cd/Server/ gpgcheck=0 [root@centos5]#yum repolist
程序包编译
程序包编译安装:
Application-VERSION-release.src.rpm --> 安装后,使用rpmbuild命令制作成二进制格式的rpm包,而后再安装
源代码-->预处理-->编译-->汇编-->链接-->执行
源代码组织格式:
多文件:文件中的代码之间,很可能存在跨文件依赖关系
C、C++:make 项目管理器
configure脚本 --> Makefile.in --> Makefile
java: maven
生产实践:(基于最小化安装的系统)
yum install gcc gcc-c++ glibc glibc-devel pcre pcre-devel openssl openssl-devel systemd-devel zlib-devel vim lrzsz tree screen lsof tcpdump wget ntpdate net-tools iotop bc zip unzip nfs-utils -y
编译安装
C语言源代码编译安装三步骤:
1. ./configure
(1) 通过选项传递参数,指定启用特性、安装路径等;执行时会参考用户的指定以及Makefile.in文件生成Makefile
(2) 检查依赖到的外部环境,如依赖的软件包
2、make 根据Makefile文件,构建应用程序
3、make install 复制文件到相应路径
开发工具:
autoconf: 生成configure脚本
automake:生成Makefile.in
注意:安装前查看INSTALL,README
./configure \
--prefix=/apps/httpd24 \
--sysconfdir=/etc/httpd \
--enable-ssl \
--enable-so \
[root@centos7 ~]# make -j


生成172.16.0.1_cobbler_ks_mirror_CentOS-X-x86_64_.repo
yum-config-manager --add-repo= http://172.16.0.1/cobbler/ks_mirror/7/
yum-config-manager --disable “仓库名" 禁用仓库
yum-config-manager --enable “仓库名” 启用仓库
yum-config-manager
yum命令的用法:
yum [options] [command] [package ...]
显示仓库列表:
yum repolist [all|enabled|disabled]
显示程序包:
yum list
yum list [all | glob_exp1] [glob_exp2] [...]
yum list {available|installed|updates} [glob_exp1] [...]
安装程序包:
yum install package1 [package2] [...]
yum reinstall package1 [package2] [...] (重新安装)
升级程序包:
yum update [package1] [package2] [...]
yum downgrade package1 [package2] [...] (降级)
检查可用升级:
yum check-update
卸载程序包:
yum remove | erase package1 [package2] [...]
查看程序包information:
yum info [...]
查看指定的特性(可以是某文件)是由哪个程序包所提供:
yum provides | whatprovides feature1 [feature2] [...]
清理本地缓存:
清除/var/cache/yum/$basearch/$releasever缓存
yum clean [ packages | metadata | expire-cache | rpmdb | plugins | all ]
构建缓存:yum makecache
搜索:yum search string1 [string2] [...]
以指定的关键字搜索程序包名及summary信息
查看指定包所依赖的capabilities:
yum deplist package1 [package2] [...]
查看yum事务历史:
yum history [info|list|packages-list|packages-info|
summary|addon-info|redo|undo|
rollback|new|sync|stats]
yum history
yum history info 6
yum history undo 6
日志:/var/log/yum.log
安装及升级本地程序包:
yum localinstall rpmfile1 [rpmfile2] [...]
(用install替代)
yum localupdate rpmfile1 [rpmfile2] [...]
(用update替代)
包组管理的相关命令:
yum groupinstall group1 [group2] [...]
yum groupupdate group1 [group2] [...]
yum grouplist [hidden] [groupwildcard] [...]
yum groupremove group1 [group2] [...]
yum groupinfo group1 [...]
四.基于nginx的yum仓库构建
1.为什么需要私有YUM仓库
 1.下载速度慢
 2.需要有外网
 3.有些Base源和epel源软件没有,需要单独创建下载源
2.需要的软件
 createrepo  生成元数据
 nginx   提供访问途径,当然也可以用ftp等方式
3.安装所用的软件
 yum install -y vim tree wget dos2unix nc nmap  net-tools sl cowsay  bash-completion     安装以下软件
 软件内容如下:
 vim                --- 编辑文本 vi升级版
 wget
 nc nmap net-tools  --- 和网络有关的命令
 sl cowsay          --- 搞笑软件包
 bash-completion    --- 对一些命令参数进行补全
软件无法正常通过yum下载思路排查
网络配置不正确(包括域名)
yum源是否更新(base、epel)
yum缓存手否清除(yum clean all)
 yum remove php-mysql-5.4 php php-fpm php-common
 rpm -Uvh https://dl.fedoraproject.org/pub/epel/epel-release-latest-7.noarch.rpm
 rpm -Uvh https://mirror.webtatic.com/yum/el7/webtatic-release.rpm
 yum install php71w php71w-cli php71w-common php71w-devel php71w-embedded php71w-gd php71w-mcrypt php71w-mbstring php71w-pdo php71w-xml php71w-fpm php71w-mysqlnd php71w-opcache -y
4.开启yum缓存
vim /etc/yum.conf

切换到该目录下并查看是否有rpm缓存包
 cd /var/cache/yum/x86_64/7/
 rpm -qa php*
 find . -type f -name "*.rpm"
5.准备软件仓库目录
[root@yum ~]# mkdir -p /data/yum
6.在当前yum缓存目录中直接查找移动到新创建的目录中
find . -type f -name "*.rpm"|xargs mv -t /data/yum
7.安装createrepo
[root@yum ~]# yum install createrepo -y
8.生成rpm仓库索引
 createrepo /data/yum
 ls /data/yum
9.将安装包下载到本地(注意软件包前面的空格)
yum install --downloadonly --downloaddir=/data/yum php71w php71w-cli php71w-common php71w-devel php71w-embedded php71w-gd php71w-mcrypt php71w-mbstring php71w-pdo php71w-xml php71w-fpm php71w-mysqlnd php71w-opcache
10.每次加入新的rpm包,更新yum仓库
createrepo --update /data/yum
11.安装nginx实现访问网站下载
 [root@web01 conf.d]# cat /etc/yum.repos.d/nginx.repo
 [nginx-stable]
 name=nginx stable repo
 baseurl=http://nginx.org/packages/centos/7/$basearch/
 gpgcheck=0
 enabled=1
 [root@yum ~]# yum -y install nginx
12.配置扩展目录下的文件(/etc/nginx/conf.d)
vim /etc/nginx/conf.d /local.conf
server {
listen 80;
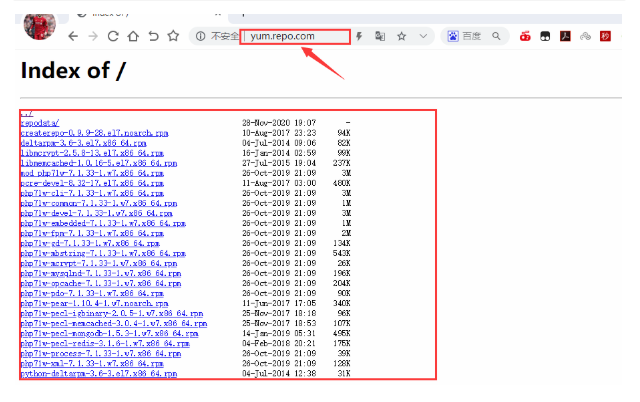
server_name yum.repo.com;
index index.html;
location / {
root /data/yum;
autoindex on;
autoindex_localtime on;
autoindex_exact_size off;
charset utf-8,gbk;
}
}
[root@yum ~]# nginx -t
[root@yum ~]# systemctl start nginx
windows主机添加10.0.0.200 yum.repo.com
13.更新序列表及清理旧缓存并生成新的缓存
 createrepo --update /data/yum
 yum check-update
 yum clean all
 yum makecache
第一步:安装软件程序(createrepo)
yum install createrepo -y
第二步:删除默认系统自带repo文件
rm -rf /etc/yum.repos.d/*
第三步:新建一个repo文件
 [root@nfs01 yum.repos.d]# cat /etc/yum.repos.d/local.repo
 [local-yum]
 name=local-yum
 baseurl=http://yum.repo.com
 enabled=1
 gpgcheck=0
第四步:清除yum缓存并生成新的缓存及更新yum列表
 yum clean all
 yum makecache
 yum check-update
客户端测试安装
 [root@nfs01 yum.repos.d]# yum repolist
 Loaded plugins: fastestmirror
 Loading mirror speeds from cached hostfile
 repo id             repo name                  status
 local-yum           local-yum                   25
 repolist: 25
 No package php-mcrypt available.
 Error: Nothing to do
 方法:
 yum install epel-release //扩展包更新包
 yum update //更新yum源
 yum install libmcrypt libmcrypt-devel mcrypt //再执行一遍
五:
nginx.conf 替换
#user nobody;
worker_processes 1;

#error_log logs/error.log;
#error_log logs/error.log notice;
#error_log logs/error.log info;

#pid logs/nginx.pid;


events {
worker_connections 1024;
}


http {
include mime.types;
default_type application/octet-stream;

#log_format main '$remote_addr - $remote_user [$time_local] "$request" '
# '$status $body_bytes_sent "$http_referer" '
# '"$http_user_agent" "$http_x_forwarded_for"';

#access_log logs/access.log main;

sendfile on;
#tcp_nopush on;

#keepalive_timeout 0;
keepalive_timeout 65;

#gzip on;

server {
listen 80;
server_name localhost;

#charset koi8-r;

#access_log logs/host.access.log main;

location / {
root html;
autoindex on;
autoindex_localtime on;
autoindex_exact_size off;
charset utf-8,gbk;
index index.html index.htm;
}

#error_page 404 /404.html;

# redirect server error pages to the static page /50x.html
#
error_page 500 502 503 504 /50x.html;
location = /50x.html {
root html;
}

# proxy the PHP scripts to Apache listening on 127.0.0.1:80
#
#location ~ \.php$ {
# proxy_pass http://127.0.0.1;
#}

# pass the PHP scripts to FastCGI server listening on 127.0.0.1:9000
#
#location ~ \.php$ {
# root html;
# fastcgi_pass 127.0.0.1:9000;
# fastcgi_index index.php;
# fastcgi_param SCRIPT_FILENAME /scripts$fastcgi_script_name;
# include fastcgi_params;
#}

# deny access to .htaccess files, if Apache's document root
# concurs with nginx's one
#
#location ~ /\.ht {
# deny all;
#}
}


# another virtual host using mix of IP-, name-, and port-based configuration
#
#server {
# listen 8000;
# listen somename:8080;
# server_name somename alias another.alias;

# location / {
# root html;
# index index.html index.htm;
# }
#}


# HTTPS server
#
#server {
# listen 443 ssl;
# server_name localhost;

# ssl_certificate cert.pem;
# ssl_certificate_key cert.key;

# ssl_session_cache shared:SSL:1m;
# ssl_session_timeout 5m;

# ssl_ciphers HIGH:!aNULL:!MD5;
# ssl_prefer_server_ciphers on;

# location / {
# root html;
# index index.html index.htm;
# }
#}

}
2.html文件下删除默认文件index.html
PS C:\nginx-1.18.0>./nginx.exe -s stop

启动nginx.exe
在html目录下加入所需的文件和压缩包

 浙公网安备 33010602011771号