[SwiftUI教程]8、使用UI控件
★★★★★★★★★★★★★★★★★★★★★★★★★★★★★★★★★★★★★★★★
➤微信公众号:山青咏芝(shanqingyongzhi)
➤博客园地址:山青咏芝(www.zengqiang.org)
➤GitHub地址:https://github.com/strengthen/LeetCode
➤原文地址:https://www.cnblogs.com/strengthen/p/11398880.html
➤如果链接不是山青咏芝的博客园地址,则可能是爬取作者的文章。
➤原文已修改更新!强烈建议点击原文地址阅读!支持作者!支持原创!
★★★★★★★★★★★★★★★★★★★★★★★★★★★★★★★★★★★★★★★★
在Google地标应用中,用户可以创建个人资料来表达自己的个性。要让用户能够更改其个人资料,您需要添加编辑模式并设计首选项屏幕。
您将使用各种常用的用户界面控件进行数据输入,并在用户保存更改时更新标记模型类型。
按照步骤构建此项目,或者下载完成的项目以自行探索。
一、显示用户个人资料
标记应用程序本地存储一些配置细节和首选项。在用户编辑其详细信息之前,它们将显示在没有任何编辑控件的摘要视图中。
第1步
首先,在Landmark组下创建一个名为Profile的新组,然后添加一个名为该组的视图。ProfileHost
该视图将同时包含配置文件信息的静态摘要视图以及编辑模式。ProfileHost
 1 import SwiftUI
 2
 3 struct ProfileHost: View {
 4     @State var profile = Profile.default
 5     var body: some View {
 6         Text("Profile for: \(profile.username)")
 7     }
 8 }
 9
10 struct ProfileHost_Previews: PreviewProvider {
11     static var previews: some View {
12         ProfileHost()
13     }
14 }
第2步
更换静态Text中与您在上一步中创建。Home.swiftProfileHost
现在主屏幕上的配置文件按钮会显示一个带有用户配置文件的模态。
 1 import SwiftUI
 2
 3 struct CategoryHome: View {
 4     var categories: [String: [Landmark]] {
 5         Dictionary(
 6             grouping: landmarkData,
 7             by: { $0.category.rawValue }
 8         )
 9     }
10
11     var featured: [Landmark] {
12         landmarkData.filter { $0.isFeatured }
13     }
14
15     @State var showingProfile = false
16
17     var profileButton: some View {
18         Button(action: { self.showingProfile.toggle() }) {
19             Image(systemName: "person.crop.circle")
20                 .imageScale(.large)
21                 .accessibility(label: Text("User Profile"))
22                 .padding()
23         }
24     }
25
26     var body: some View {
27         NavigationView {
28             List {
29                 FeaturedLandmarks(landmarks: featured)
30                     .scaledToFill()
31                     .frame(height: 200)
32                     .clipped()
33                     .listRowInsets(EdgeInsets())
34
35                 ForEach(categories.keys.sorted(), id: \.self) { key in
36                     CategoryRow(categoryName: key, items: self.categories[key]!)
37                 }
38                 .listRowInsets(EdgeInsets())
39
40                 NavigationLink(destination: LandmarkList()) {
41                     Text("See All")
42                 }
43             }
44             .navigationBarTitle(Text("Featured"))
45             .navigationBarItems(trailing: profileButton)
46             .sheet(isPresented: $showingProfile) {
47                 ProfileHost()
48             }
49         }
50     }
51 }
52
53 struct FeaturedLandmarks: View {
54     var landmarks: [Landmark]
55     var body: some View {
56         landmarks[0].image.resizable()
57     }
58 }
59
60 struct CategoryHome_Previews: PreviewProvider {
61     static var previews: some View {
62         CategoryHome()
63     }
64 }
第3步
创建一个名为take a instance 的新视图,并显示一些基本用户信息。ProfileSummaryProfile
配置文件摘要采用Profile值而不是绑定到配置文件,因为父视图管理此视图的状态。ProfileHost
 1 import SwiftUI
 2
 3 struct ProfileSummary: View {
 4     var profile: Profile
 5
 6     static let goalFormat: DateFormatter = {
 7         let formatter = DateFormatter()
 8         formatter.dateFormat = "MMMM d, yyyy"
 9         return formatter
10     }()
11
12     var body: some View {
13         List {
14             Text(profile.username)
15                 .bold()
16                 .font(.title)
17
18             Text("Notifications: \(self.profile.prefersNotifications ? "On": "Off" )")
19
20             Text("Seasonal Photos: \(self.profile.seasonalPhoto.rawValue)")
21
22             Text("Goal Date: \(self.profile.goalDate, formatter: Self.goalFormat)")
23         }
24     }
25 }
26
27 struct ProfileSummary_Previews: PreviewProvider {
28     static var previews: some View {
29         ProfileSummary(profile: Profile.default)
30     }
31 }
第4步
更新以显示新的摘要视图。ProfileHost
 1 import SwiftUI
 2
 3 struct ProfileHost: View {
 4     @State var profile = Profile.default
 5     var body: some View {
 6         VStack(alignment: .leading, spacing: 20) {
 7             ProfileSummary(profile: self.profile)
 8         }
 9         .padding()
10     }
11 }
12
13 struct ProfileHost_Previews: PreviewProvider {
14     static var previews: some View {
15         ProfileHost()
16     }
17 }
第5步
创建一个名为新视图构成所述从绘制路径和形状有关加息的一些描述性文字。HikeBadgeBadge
徽章只是一个图形,因此文本和修饰符使徽章的含义更清晰。HikeBadgeaccessibility(label:)
注意
修改器的两种不同用途将徽章配置为以300×300点的设计时尺寸的缩放形式进行渲染。frame(width:height:)
 1 import SwiftUI
 2
 3 struct HikeBadge: View {
 4     var name: String
 5     var body: some View {
 6         VStack(alignment: .center) {
 7             Badge()
 8                 .frame(width: 300, height: 300)
 9                 .scaleEffect(1.0 / 3.0)
10                 .frame(width: 100, height: 100)
11             Text(name)
12                 .font(.caption)
13                 .accessibility(label: Text("Badge for \(name)."))
14         }
15     }
16 }
17
18 struct HikeBadge_Previews: PreviewProvider {
19     static var previews: some View {
20         HikeBadge(name: "Preview Testing")
21     }
22 }
第6步
更新以添加具有不同色调的几个徽章以及获得徽章的原因。ProfileSummary
 1 import SwiftUI
 2
 3 struct ProfileSummary: View {
 4     var profile: Profile
 5
 6     static let goalFormat: DateFormatter = {
 7         let formatter = DateFormatter()
 8         formatter.dateFormat = "MMMM d, yyyy"
 9         return formatter
10     }()
11
12     var body: some View {
13         List {
14             Text(profile.username)
15                 .bold()
16                 .font(.title)
17
18             Text("Notifications: \(self.profile.prefersNotifications ? "On": "Off" )")
19
20             Text("Seasonal Photos: \(self.profile.seasonalPhoto.rawValue)")
21
22             Text("Goal Date: \(self.profile.goalDate, formatter: Self.goalFormat)")
23
24             VStack(alignment: .leading) {
25                 Text("Completed Badges")
26                     .font(.headline)
27                 ScrollView {
28                     HStack {
29                         HikeBadge(name: "First Hike")
30
31                         HikeBadge(name: "Earth Day")
32                             .hueRotation(Angle(degrees: 90))
33
34
35                         HikeBadge(name: "Tenth Hike")
36                             .grayscale(0.5)
37                             .hueRotation(Angle(degrees: 45))
38                     }
39                 }
40                 .frame(height: 140)
41             }
42         }
43     }
44 }
45
46 struct ProfileSummary_Previews: PreviewProvider {
47     static var previews: some View {
48         ProfileSummary(profile: Profile.default)
49     }
50 }
第7步
通过包含Animating Views和Transitions中的a 来完成配置文件摘要。HikeView
 1 import SwiftUI
 2
 3 struct ProfileSummary: View {
 4     var profile: Profile
 5
 6     static var goalFormat: DateFormatter {
 7         let formatter = DateFormatter()
 8         formatter.dateFormat = "MMMM d, yyyy"
 9         return formatter
10     }
11
12     var body: some View {
13         List {
14             Text(profile.username)
15                 .bold()
16                 .font(.title)
17
18             Text("Notifications: \(self.profile.prefersNotifications ? "On": "Off" )")
19
20             Text("Seasonal Photos: \(self.profile.seasonalPhoto.rawValue)")
21
22             Text("Goal Date: \(self.profile.goalDate, formatter: Self.goalFormat)")
23
24             VStack(alignment: .leading) {
25                 Text("Completed Badges")
26                     .font(.headline)
27                 ScrollView {
28                     HStack {
29                         HikeBadge(name: "First Hike")
30
31                         HikeBadge(name: "Earth Day")
32                             .hueRotation(Angle(degrees: 90))
33
34
35                         HikeBadge(name: "Tenth Hike")
36                             .grayscale(0.5)
37                             .hueRotation(Angle(degrees: 45))
38                     }
39                 }
40                 .frame(height: 140)
41             }
42
43             VStack(alignment: .leading) {
44                 Text("Recent Hikes")
45                     .font(.headline)
46
47                 HikeView(hike: hikeData[0])
48             }
49         }
50     }
51 }
52
53 struct ProfileSummary_Previews: PreviewProvider {
54     static var previews: some View {
55         ProfileSummary(profile: Profile.default)
56     }
57 }
二、添加编辑模式
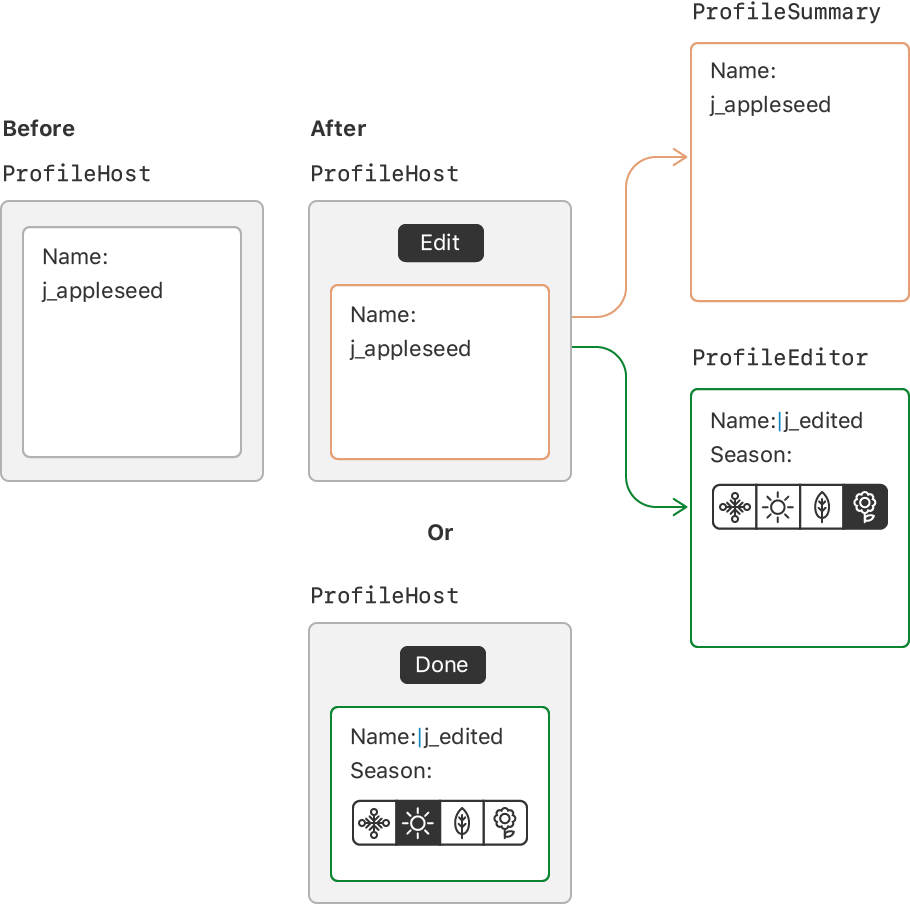
用户需要在查看或编辑其个人资料详细信息之间切换。您将通过向现有内容添加一个编辑模式,然后创建一个包含用于编辑单个值的控件的视图。EditButtonProfileHost

第1步
添加一个Environment关闭环境的视图属性。\.editMode
您可以使用此属性来读取和写入当前编辑范围。
 1 import SwiftUI
 2
 3 struct ProfileHost: View {
 4     @Environment(\.editMode) var mode
 5     @State var profile = Profile.default
 6     var body: some View {
 7         VStack(alignment: .leading, spacing: 20) {
 8             ProfileSummary(profile: profile)
 9         }
10         .padding()
11     }
12 }
13
14 struct ProfileHost_Previews: PreviewProvider {
15     static var previews: some View {
16         ProfileHost()
17     }
18 }
第2步
创建一个“编辑”按钮,用于打开和关闭环境的编辑模式。
 1 import SwiftUI
 2
 3 struct ProfileHost: View {
 4     @Environment(\.editMode) var mode
 5     @State var profile = Profile.default
 6     var body: some View {
 7         VStack(alignment: .leading, spacing: 20) {
 8             HStack {
 9                 Spacer()
10
11                 EditButton()
12             }
13             ProfileSummary(profile: profile)
14         }
15         .padding()
16     }
17 }
18
19 struct ProfileHost_Previews: PreviewProvider {
20     static var previews: some View {
21         ProfileHost()
22     }
23 }
第3步
添加用户配置文件数据的草稿副本以传递给编辑控件。
为了避免在确认任何编辑之前更新全局应用程序状态 - 例如在用户输入其名称时 - 编辑视图对其自身的副本进行操作。
 1 import SwiftUI
 2
 3 struct ProfileHost: View {
 4     @Environment(\.editMode) var mode
 5     @State var profile = Profile.default
 6     @State var draftProfile = Profile.default
 7
 8     var body: some View {
 9         VStack(alignment: .leading, spacing: 20) {
10             HStack {
11                 Spacer()
12
13                 EditButton()
14             }
15             ProfileSummary(profile: self.profile)
16         }
17         .padding()
18     }
19 }
20
21 struct ProfileHost_Previews: PreviewProvider {
22     static var previews: some View {
23         ProfileHost()
24     }
25 }
第4步
添加条件视图,显示静态配置文件或编辑模式的视图。
注意
目前,编辑模式只是一个静态文本字段。
 1 import SwiftUI
 2
 3 struct ProfileHost: View {
 4     @Environment(\.editMode) var mode
 5     @State var profile = Profile.default
 6     @State var draftProfile = Profile.default
 7
 8     var body: some View {
 9         VStack(alignment: .leading, spacing: 20) {
10             HStack {
11                 Spacer()
12
13                 EditButton()
14             }
15             if self.mode?.wrappedValue == .inactive {
16                 ProfileSummary(profile: profile)
17             } else {
18                 Text("Profile Editor")
19             }
20         }
21         .padding()
22     }
23 }
24
25 struct ProfileHost_Previews: PreviewProvider {
26     static var previews: some View {
27         ProfileHost()
28     }
29 }
三、定义配置文件编辑器
用户配置文件编辑器主要包含更改配置文件中各个详细信息的不同控件。配置文件中的某些项目(如徽章)不是用户可编辑的,因此它们不会出现在编辑器中。
为了与配置文件摘要保持一致,您将在编辑器中以相同的顺序添加配置文件详细信息。
第1步
创建一个名为的新视图,并包含对用户配置文件的草稿副本的绑定。ProfileEditor
视图中的第一个控件是a ,它控制和更新字符串绑定 - 在本例中是用户选择的显示名称。在创建文本字段时,您可以为字符串提供标签和绑定。TextField
 1 import SwiftUI
 2
 3 struct ProfileEditor: View {
 4     @Binding var profile: Profile
 5
 6     var body: some View {
 7         List {
 8             HStack {
 9                 Text("Username").bold()
10                 Divider()
11                 TextField("Username", text: $profile.username)
12             }
13         }
14     }
15 }
16
17 struct ProfileEditor_Previews: PreviewProvider {
18     static var previews: some View {
19         ProfileEditor(profile: .constant(.default))
20     }
21 }
第2步
更新条件内容以包括配置文件编辑器并传递配置文件绑定。ProfileHost
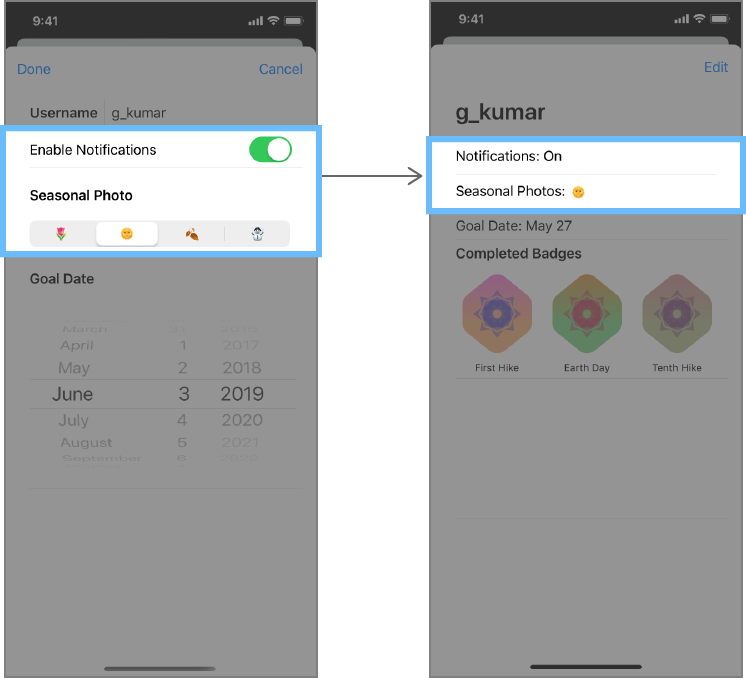
现在,点按“ 编辑”时会显示编辑个人资料视图。
 1 import SwiftUI
 2
 3 struct ProfileHost: View {
 4     @Environment(\.editMode) var mode
 5     @State var profile = Profile.default
 6     @State var draftProfile = Profile.default
 7
 8     var body: some View {
 9         VStack(alignment: .leading, spacing: 20) {
10             HStack {
11                 Spacer()
12
13                 EditButton()
14             }
15             if self.mode?.wrappedValue == .inactive {
16                 ProfileSummary(profile: profile)
17             } else {
18                 ProfileEditor(profile: $draftProfile)
19             }
20         }
21         .padding()
22     }
23 }
24
25 struct ProfileHost_Previews: PreviewProvider {
26     static var previews: some View {
27         ProfileHost()
28     }
29 }
第3步
添加与用户偏好相对应的切换,以接收有关地标相关事件的通知。
Toggles是打开或关闭的控件,因此它们非常适合布尔值,例如是或否首选项。
 1 import SwiftUI
 2
 3 struct ProfileEditor: View {
 4     @Binding var profile: Profile
 5
 6     var body: some View {
 7         List {
 8             HStack {
 9                 Text("Username").bold()
10                 Divider()
11                 TextField("Username", text: $profile.username)
12             }
13
14             Toggle(isOn: $profile.prefersNotifications) {
15                 Text("Enable Notifications")
16             }
17         }
18     }
19 }
20
21 struct ProfileEditor_Previews: PreviewProvider {
22     static var previews: some View {
23         ProfileEditor(profile: .constant(.default))
24     }
25 }
第4步
将Picker控件及其标签放入a中VStack,使标志性照片具有可选择的首选季节。
 1 import SwiftUI
 2
 3 struct ProfileEditor: View {
 4     @Binding var profile: Profile
 5
 6     var body: some View {
 7         List {
 8             HStack {
 9                 Text("Username").bold()
10                 Divider()
11                 TextField("Username", text: $profile.username)
12             }
13
14             Toggle(isOn: $profile.prefersNotifications) {
15                 Text("Enable Notifications")
16             }
17
18             VStack(alignment: .leading, spacing: 20) {
19                 Text("Seasonal Photo").bold()
20
21                 Picker("Seasonal Photo", selection: $profile.seasonalPhoto) {
22                     ForEach(Profile.Season.allCases.identified(by: \.self)) { season in
23                         Text(season.rawValue).tag(season)
24                     }
25                 }
26                 .pickerStyle(SegmentedPickerStyle())
27             }
28             .padding(.top)
29         }
30     }
31 }
32
33 struct ProfileEditor_Previews: PreviewProvider {
34     static var previews: some View {
35         ProfileEditor(profile: .constant(.default))
36     }
37 }
第5步
最后,在季节选择器下面添加一个,以使地标访问目标日期可以修改。DatePicker
 1 import SwiftUI
 2
 3 struct ProfileEditor: View {
 4     @Binding var profile: Profile
 5
 6     var dateRange: ClosedRange<Date> {
 7         let min = Calendar.current.date(byAdding: .year, value: -1, to: profile.goalDate)!
 8         let max = Calendar.current.date(byAdding: .year, value: 1, to: profile.goalDate)!
 9         return min...max
10     }
11
12     var body: some View {
13         List {
14             HStack {
15                 Text("Username").bold()
16                 Divider()
17                 TextField("Username", text: $profile.username)
18             }
19
20             Toggle(isOn: $profile.prefersNotifications) {
21                 Text("Enable Notifications")
22             }
23
24             VStack(alignment: .leading, spacing: 20) {
25                 Text("Seasonal Photo").bold()
26
27                 Picker("Seasonal Photo", selection: $profile.seasonalPhoto) {
28                     ForEach(Profile.Season.allCases.identified(by: \.self)) { season in
29                         Text(season.rawValue).tag(season)
30                     }
31                 }
32                 .pickerStyle(SegmentedPickerStyle())
33             }
34             .padding(.top)
35
36             VStack(alignment: .leading, spacing: 20) {
37                 Text("Goal Date").bold()
38                 DatePicker(
39                     "Goal Date",
40                     selection: $profile.goalDate,
41                     in: dateRange,
42                     displayedComponents: .date)
43             }
44             .padding(.top)
45         }
46     }
47 }
48
49 struct ProfileEditor_Previews: PreviewProvider {
50     static var previews: some View {
51         ProfileEditor(profile: .constant(.default))
52     }
53 }
四、延迟编辑传播
要使其如此编辑,在用户退出编辑模式之后才会生效,您在编辑期间使用其配置文件的草稿副本,然后仅在用户确认编辑时将草稿副本分配给真实副本。

第1步
添加确认按钮。ProfileHost
不像Cancel那个按钮提供的按钮应用编辑在其真实的个人资料数据关闭。EditButtonDoneaction
 1 import SwiftUI
 2
 3 struct ProfileHost: View {
 4     @Environment(\.editMode) var mode
 5     @State var profile = Profile.default
 6     @State var draftProfile = Profile.default
 7
 8     var body: some View {
 9         VStack(alignment: .leading, spacing: 20) {
10             HStack {
11                 if self.mode?.wrappedValue == .active {
12                     Button(action: {
13                         self.profile = self.draftProfile
14                         self.mode?.animation().wrappedValue = .inactive
15                     }) {
16                         Text("Done")
17                     }
18                 }
19
20                 Spacer()
21
22                 EditButton()
23             }
24             if self.mode?.wrappedValue == .inactive {
25                 ProfileSummary(profile: profile)
26             } else {
27                 ProfileEditor(profile: $draftProfile)
28             }
29         }
30         .padding()
31     }
32 }
33
34 struct ProfileHost_Previews: PreviewProvider {
35     static var previews: some View {
36         ProfileHost()
37     }
38 }
第2步
应用修改器以清除用户在点击“取消”按钮时选择丢弃的值。onDisappear(perform:)
否则,下次编辑模式激活时会显示旧值。
 1 import SwiftUI
 2
 3 struct ProfileHost: View {
 4     @Environment(\.editMode) var mode
 5     @State var profile = Profile.default
 6     @State var draftProfile = Profile.default
 7
 8     var body: some View {
 9         VStack(alignment: .leading, spacing: 20) {
10             HStack {
11                 if self.mode?.wrappedValue == .active {
12                     Button(action: {
13                         self.profile = self.draftProfile
14                         self.mode?.animation().wrappedValue = .inactive
15                     }) {
16                         Text("Done")
17                     }
18                 }
19
20                 Spacer()
21
22                 EditButton()
23             }
24             if self.mode?.wrappedValue == .inactive {
25                 ProfileSummary(profile: profile)
26             } else {
27                 ProfileEditor(profile: $draftProfile)
28                     .onDisappear {
29                         self.draftProfile = self.profile
30                     }
31             }
32         }
33         .padding()
34     }
35 }
36
37 struct ProfileHost_Previews: PreviewProvider {
38     static var previews: some View {
39         ProfileHost()
40     }
41 }

 浙公网安备 33010602011771号