在ubuntu上配置***的方法
1.安装python
命令:sudo apt-get install python
2.安装python的包管理器
命令:sudo apt-get install python-pip
3.安装***客户端
命令:sudo pip install ***
4.在本机上任一目录下新建***.json文件
内容为:
5.启动shawdowsocks客户端服务
在此目录下输入命令:sudo sslocal -c ***.json -d start
6.安装polipo
原因:在linux下并不能直接通过上述设置FQ,因为shawdowsocks是socks 5代理,需要客户端配合才能FQ。
命令:sudo apt-get install polipo
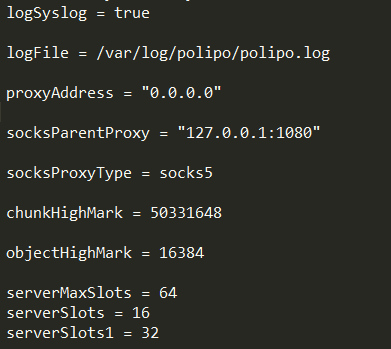
7.安装polipo后设置配置文件/etc/polipo/config
命令:sudo vi /etc/polipo/config
在此文件里添加如图所示
8.重启polipo服务
命令:sudo /etc/init.d/polipo restart
9.设置代理
注意通过polipo后,代理的端口要采用新的端口,默认127.0.0.1:8123。原1080端口不要用
9.1 设置终端代理(在终端内执行以下命令)
export http_proxy='http://127.0.0.1:8123/'
export https_proxy='http://127.0.0.1:8123/'
9.2 设置全局代理
命令:sudo vi /etc/profile
加入如下语句,保存:
export
http_proxy='http://127.0.0.1:8123/'
export
https_proxy='http://127.0.0.1:8123/'
命令:source /etc/profile 【运行此命令,配置修改才生效】
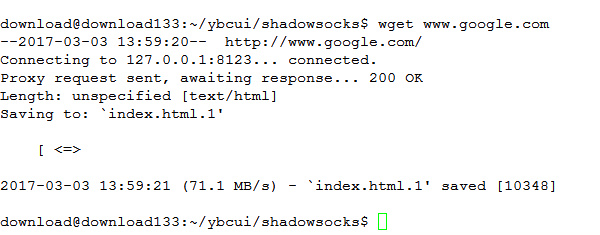
10.测试代理
在本地上,运行wget www.google.com 若看到200
OK则代理已设置成功
以上是在机器上装上全局代理,要想不使用代理,方法如下
命令:sudo vi /etc/profile
将export
http_proxy='http://127.0.0.1:8123/'
export
https_proxy='http://127.0.0.1:8123/'
这两条语句注释掉即
#export
http_proxy='http://127.0.0.1:8123/'
#export https_proxy='http://127.0.0.1:8123/'
修改后保存
命令:source /etc/profile 【运行此命令,配置修改才生效】

 浙公网安备 33010602011771号