Spring boot自定义starter
1. 原理分析
1.1 spring.factories 如何被加载
首先启动一个简单的springboot项目,后面依次是断点位置
-
启动类WebApplication.java
@SpringBootApplication public class WebApplication { public static void main(String[] args) { SpringApplication.run(WebApplication.class, args); } } -
Spring应用类SpringApplication.java
public static ConfigurableApplicationContext run(Class<?>[] primarySources, String[] args) { return new SpringApplication(primarySources)//这里是用来加载META-INF/spring.factories .run(args); //这里将加载的结果交给spring容器管理 } public SpringApplication(ResourceLoader resourceLoader, Class<?>... primarySources) { this.resourceLoader = resourceLoader; Assert.notNull(primarySources, "PrimarySources must not be null"); this.primarySources = new LinkedHashSet<>(Arrays.asList(primarySources)); this.webApplicationType = WebApplicationType.deduceFromClasspath(); //这里就是从spring.factories加载数据了,继续跟进去 setInitializers((Collection) getSpringFactoriesInstances(ApplicationContextInitializer.class)); setListeners((Collection) getSpringFactoriesInstances(ApplicationListener.class)); this.mainApplicationClass = deduceMainApplicationClass(); } -
SpringFactoriesLoader.java 加载
META-INF/spring.factories的所有配置public static List<String> loadFactoryNames(Class<?> factoryType, @Nullable ClassLoader classLoader) { String factoryTypeName = factoryType.getName(); return (List)loadSpringFactories(classLoader).getOrDefault(factoryTypeName, Collections.emptyList()); } private static Map<String, List<String>> loadSpringFactories(@Nullable ClassLoader classLoader) { MultiValueMap<String, String> result = cache.get(classLoader); if (result != null) { return result; } try { Enumeration<URL> urls = (classLoader != null ? classLoader.getResources(FACTORIES_RESOURCE_LOCATION) : ClassLoader.getSystemResources(FACTORIES_RESOURCE_LOCATION)); result = new LinkedMultiValueMap<>(); while (urls.hasMoreElements()) { URL url = urls.nextElement(); UrlResource resource = new UrlResource(url); Properties properties = PropertiesLoaderUtils.loadProperties(resource); for (Map.Entry<?, ?> entry : properties.entrySet()) { String factoryClassName = ((String) entry.getKey()).trim(); for (String factoryName : StringUtils.commaDelimitedListToStringArray((String) entry.getValue())) { result.add(factoryClassName, factoryName.trim()); } } } cache.put(classLoader, result); return result; } catch (IOException ex) { throw new IllegalArgumentException("Unable to load factories from location [" + FACTORIES_RESOURCE_LOCATION + "]", ex); } }这里我们可以测试一下
ClassLoader.getSystemResources(FACTORIES_RESOURCE_LOCATION))这个方法,会将META-INF/spring.factories所有的配置属性都找出@SpringBootApplication public class WebApplication { public static void main(String[] args) throws IOException { //测试直接加载的结果 String FACTORIES_RESOURCE_LOCATION = "META-INF/spring.factories"; Enumeration<URL> urls = ( ClassLoader.getSystemResources(FACTORIES_RESOURCE_LOCATION)); while (urls.hasMoreElements()) { URL url = urls.nextElement(); UrlResource resource = new UrlResource(url); Properties properties = PropertiesLoaderUtils.loadProperties(resource); for (Map.Entry<Object, Object> objectObjectEntry : properties.entrySet()) { System.out.println(objectObjectEntry.getKey() + ":" +objectObjectEntry.getValue()); } } //原springboot启动 SpringApplication.run(WebApplication.class, args); } }
1.2 加载完之后,如何交给Spring容器管理
-
进入run方法 SpringApplication.java
public static ConfigurableApplicationContext run(Class<?>[] primarySources, String[] args) { return new SpringApplication(primarySources)//这里是用来加载META-INF/spring.factories .run(args); //这里将加载的结果交给spring容器管理 } public ConfigurableApplicationContext run(String... args) { StopWatch stopWatch = new StopWatch(); stopWatch.start(); ConfigurableApplicationContext context = null; Collection<SpringBootExceptionReporter> exceptionReporters = new ArrayList<>(); configureHeadlessProperty(); //从类路径下META-INF/spring.factories获取SpringApplicationRunListeners SpringApplicationRunListeners listeners = getRunListeners(args); //回调所有的获取SpringApplicationRunListener.starting()方法 listeners.starting(); try { //封装命令行参数 ApplicationArguments applicationArguments = new DefaultApplicationArguments(args); //准备环境 ConfigurableEnvironment environment = prepareEnvironment(listeners, applicationArguments); //创建环境完成后回调SpringApplicationRunListener.environmentPrepared();表示环境准备完成 configureIgnoreBeanInfo(environment); //打印Banner图 Banner printedBanner = printBanner(environment); //创建ApplicationContext,决定创建web的ioc还是普通的ioc context = createApplicationContext(); //异常分析报告 exceptionReporters = getSpringFactoriesInstances(SpringBootExceptionReporter.class, new Class[] { ConfigurableApplicationContext.class }, context); //prepareContext运行完成以后回调所有的SpringApplicationRunListener的contextLoaded() prepareContext(context, environment, listeners, applicationArguments, printedBanner); //刷新容器,ioc容器初始化(如果是web应用还会创建嵌入式的Tomcat)//扫描,创建,加载所有组件的地方,(配置类,组件,自动配置) refreshContext(context); afterRefresh(context, applicationArguments); stopWatch.stop(); if (this.logStartupInfo) { new StartupInfoLogger(this.mainApplicationClass).logStarted(getApplicationLog(), stopWatch); } //所有的SpringApplicationRunListener回调started方法 listeners.started(context); //从ioc容器中获取所有的ApplicationRunner和CommandLineRunner进行回调, //ApplicationRunner先回调,CommandLineRunner再回调 callRunners(context, applicationArguments); } catch (Throwable ex) { handleRunFailure(context, ex, exceptionReporters, listeners); throw new IllegalStateException(ex); } try { listeners.running(context); } catch (Throwable ex) { handleRunFailure(context, ex, exceptionReporters, null); throw new IllegalStateException(ex); } //整个SpringBoot应用启动完成以后返回启动的ioc容器 return context; } -
最主要的prepareContext()方法,这里就是将bean交给IOC容器管理
private void prepareContext(ConfigurableApplicationContext context, ConfigurableEnvironment environment,
			SpringApplicationRunListeners listeners, ApplicationArguments applicationArguments, Banner printedBanner) {
    context.setEnvironment(environment);
    postProcessApplicationContext(context);
    //回调之前保存的所有的ApplicationContextInitializer的initialize方法
    applyInitializers(context);
    listeners.contextPrepared(context);
    if (this.logStartupInfo) {
        logStartupInfo(context.getParent() == null);
        logStartupProfileInfo(context);
    }
    // Add boot specific singleton beans
    ConfigurableListableBeanFactory beanFactory = context.getBeanFactory();
    beanFactory.registerSingleton("springApplicationArguments", applicationArguments);
    if (printedBanner != null) {
        beanFactory.registerSingleton("springBootBanner", printedBanner);
    }
    if (beanFactory instanceof DefaultListableBeanFactory) {
        ((DefaultListableBeanFactory) beanFactory)
        .setAllowBeanDefinitionOverriding(this.allowBeanDefinitionOverriding);
    }
    if (this.lazyInitialization) {
        context.addBeanFactoryPostProcessor(new LazyInitializationBeanFactoryPostProcessor());
    }
    // Load the sources
    Set<Object> sources = getAllSources();
    Assert.notEmpty(sources, "Sources must not be empty");
    load(context, sources.toArray(new Object[0]));
    listeners.contextLoaded(context);
}
2.自定义starter
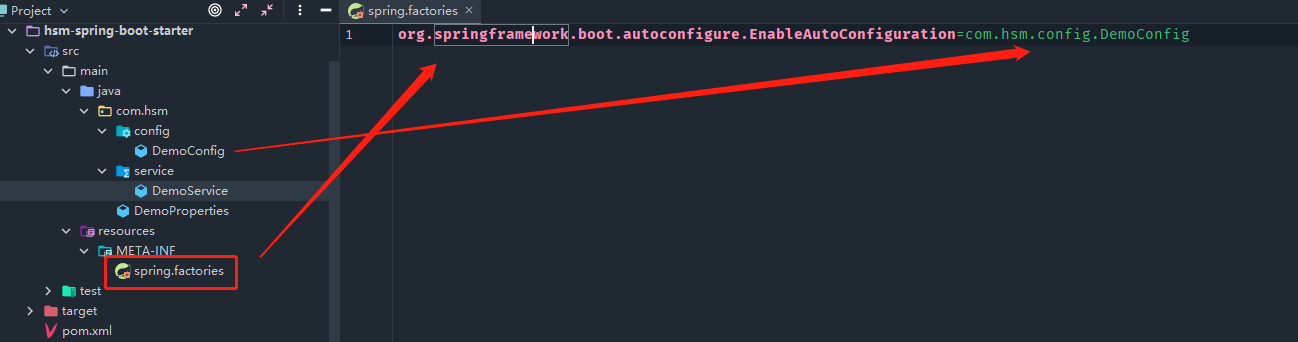
2.1 建立自己的starter项目 hsm-spring-boot-starter
- 目录结构
-
pom.xml
<?xml version="1.0" encoding="UTF-8"?> <project xmlns="http://maven.apache.org/POM/4.0.0" xmlns:xsi="http://www.w3.org/2001/XMLSchema-instance" xsi:schemaLocation="http://maven.apache.org/POM/4.0.0 http://maven.apache.org/xsd/maven-4.0.0.xsd"> <modelVersion>4.0.0</modelVersion> <parent> <groupId>org.springframework.boot</groupId> <artifactId>spring-boot-starter-parent</artifactId> <version>2.2.6.RELEASE</version> </parent> <groupId>com.hsm</groupId> <artifactId>hsm-spring-boot-starter</artifactId> <version>0.0.1-RELEASE</version> <properties> <maven.compiler.source>8</maven.compiler.source> <maven.compiler.target>8</maven.compiler.target> <java.version>1.8</java.version> </properties> <dependencies> <dependency> <groupId>org.springframework.boot</groupId> <artifactId>spring-boot-configuration-processor</artifactId> <optional>true</optional> </dependency> <dependency> <groupId>org.springframework.boot</groupId> <artifactId>spring-boot-starter</artifactId> </dependency> <dependency> <groupId>org.projectlombok</groupId> <artifactId>lombok</artifactId> <version>1.18.8</version> <optional>true</optional> </dependency> </dependencies> </project> -
DemoConfig.java
@EnableConfigurationProperties(DemoProperties.class) @ConditionalOnProperty(prefix = "demo",name = "isopen",havingValue = "true") public class DemoConfig { @Resource private DemoProperties demoProperties; @Bean(name = "demo") public DemoService demoService(){ return new DemoService(demoProperties.getSayWhat(), demoProperties.getToWho()); } } -
DemoProperties.java
@ConfigurationProperties(prefix = "demo") @Data public class DemoProperties { private String sayWhat; private String toWho; } -
DemoService.java
public class DemoService { public String sayWhat; public String toWho; public DemoService(String sayWhat, String toWho){ this.sayWhat = sayWhat; this.toWho = toWho; } public String say(){ return this.sayWhat + "! " + toWho; } } -
spring.factories
org.springframework.boot.autoconfigure.EnableAutoConfiguration=com.hsm.config.DemoConfig
3. 使用starter
-
pom.xml
<dependencies> <dependency> <groupId>com.hsm</groupId> <artifactId>hsm-spring-boot-starter</artifactId> <version>0.0.1-RELEASE</version> </dependency> <dependency> <groupId>org.springframework.boot</groupId> <artifactId>spring-boot-starter-web</artifactId> <version>2.2.6.RELEASE</version> </dependency> </dependencies> -
启动类
@SpringBootApplication public class WebApplication { public static void main(String[] args) throws IOException { SpringApplication.run(WebApplication.class, args); } } -
控制类
@RestController public class DemoController { @Resource(name = "demo") private DemoService demoService; @GetMapping("/say") public String sayWhat() { return demoService.say(); } } -
配置文件 application.properties
demo.isopen=true demo.say-what=hello demo.to-who=shf -
访问
localhost:8080/say

 浙公网安备 33010602011771号