IDEA使用Spring Boot官方的spring-boot-maven-plugin打包Docker推送至私服Harbor或Docker Desktop
一、打包Docker推送到私服Harbor
1、开启Docker服务器远程访问
# 首先查看docker配置文件所在位置
systemctl status docker

# 会输出如下内容:
● docker.service - Docker Application Container Engine
   Loaded: loaded (/usr/lib/systemd/system/docker.service; enabled; vendor preset: disabled)
   Active: active (running) since Thu 2021-12-16 17:51:51 CST; 23h ago
     Docs: https://docs.docker.com
 Main PID: 173507 (dockerd)

# 修改配置
vi /usr/lib/systemd/system/docker.service

# 添加 -H tcp://0.0.0.0:2375
ExecStart=/usr/bin/dockerd -H tcp://0.0.0.0:2375 -H fd:// --containerd=/run/containerd/containerd.sock

# 添加harbor镜像地址
vi /etc/docker/daemon.json

{
 "insecure-registries": ["192.168.3.15:8889"]
}

# 重新加载docker配置并重启docker服务
systemctl daemon-reload
systemctl restart docker.service
2、IDEA连接Docker

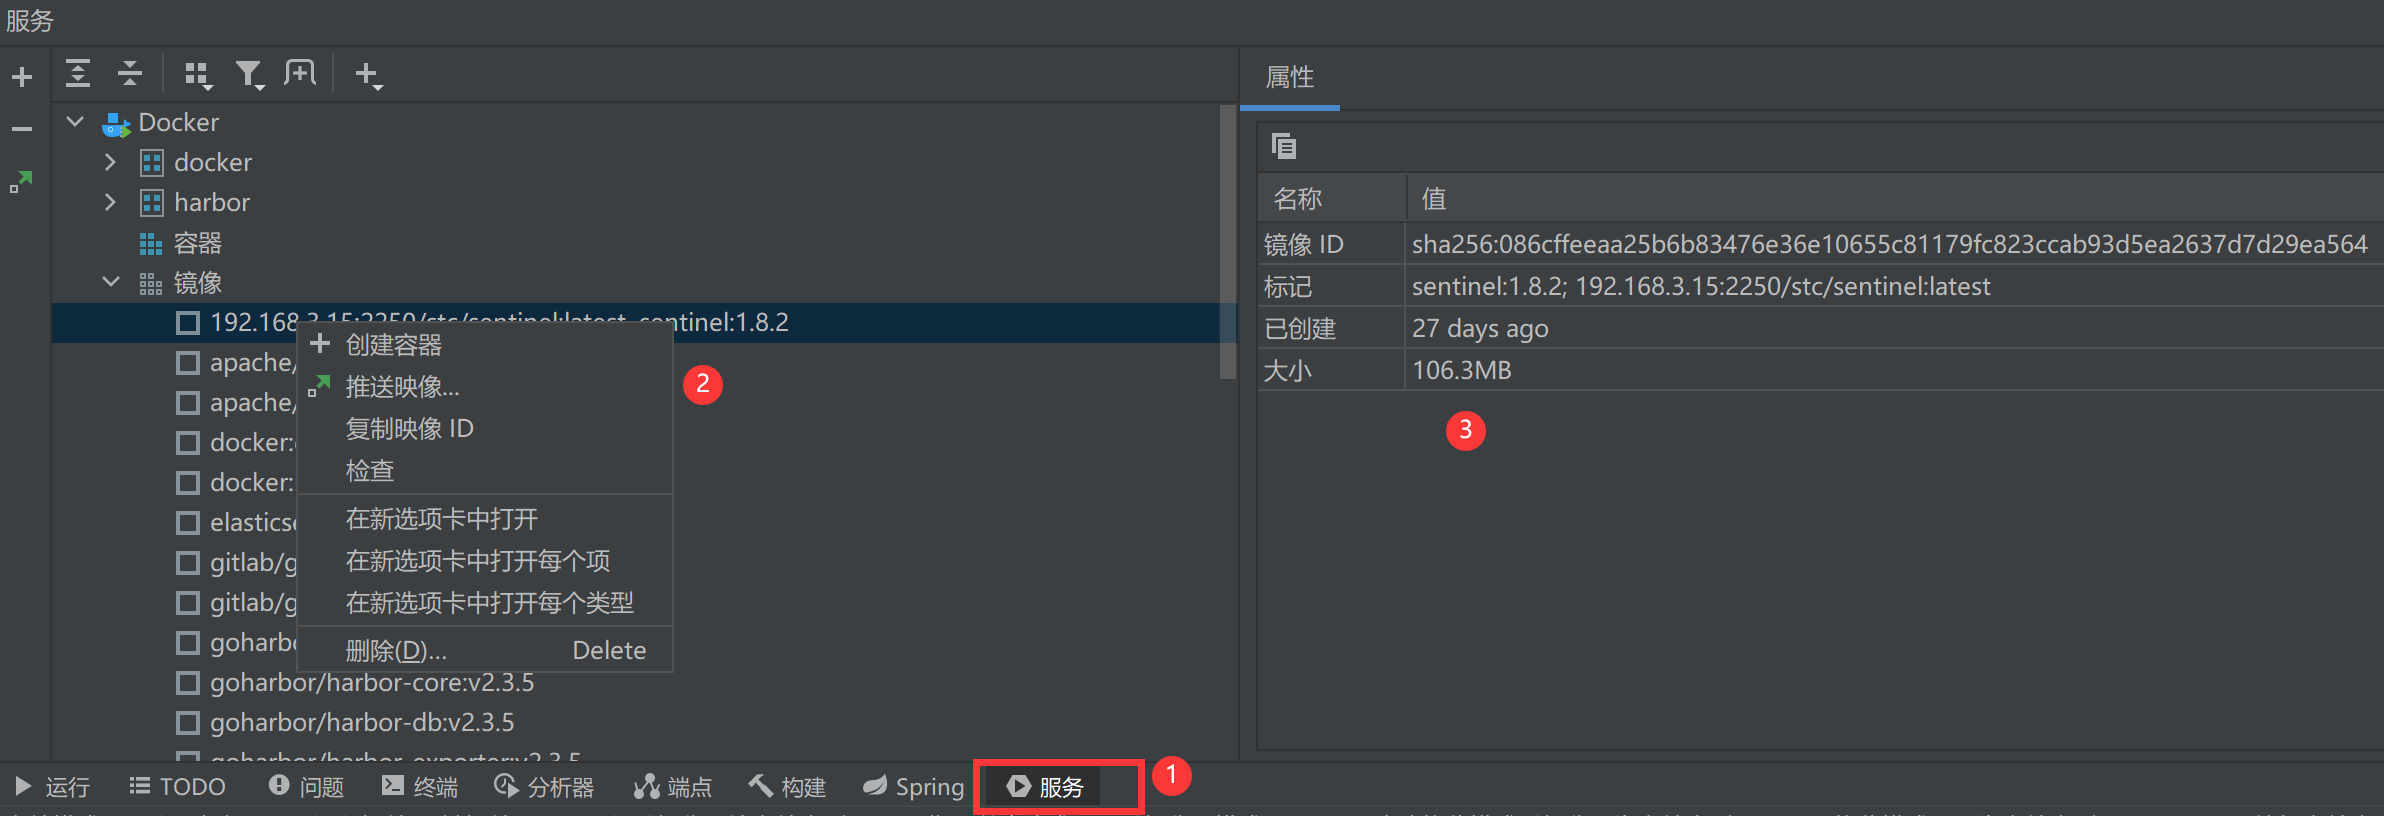
3、通过IDEA远程管理Docker
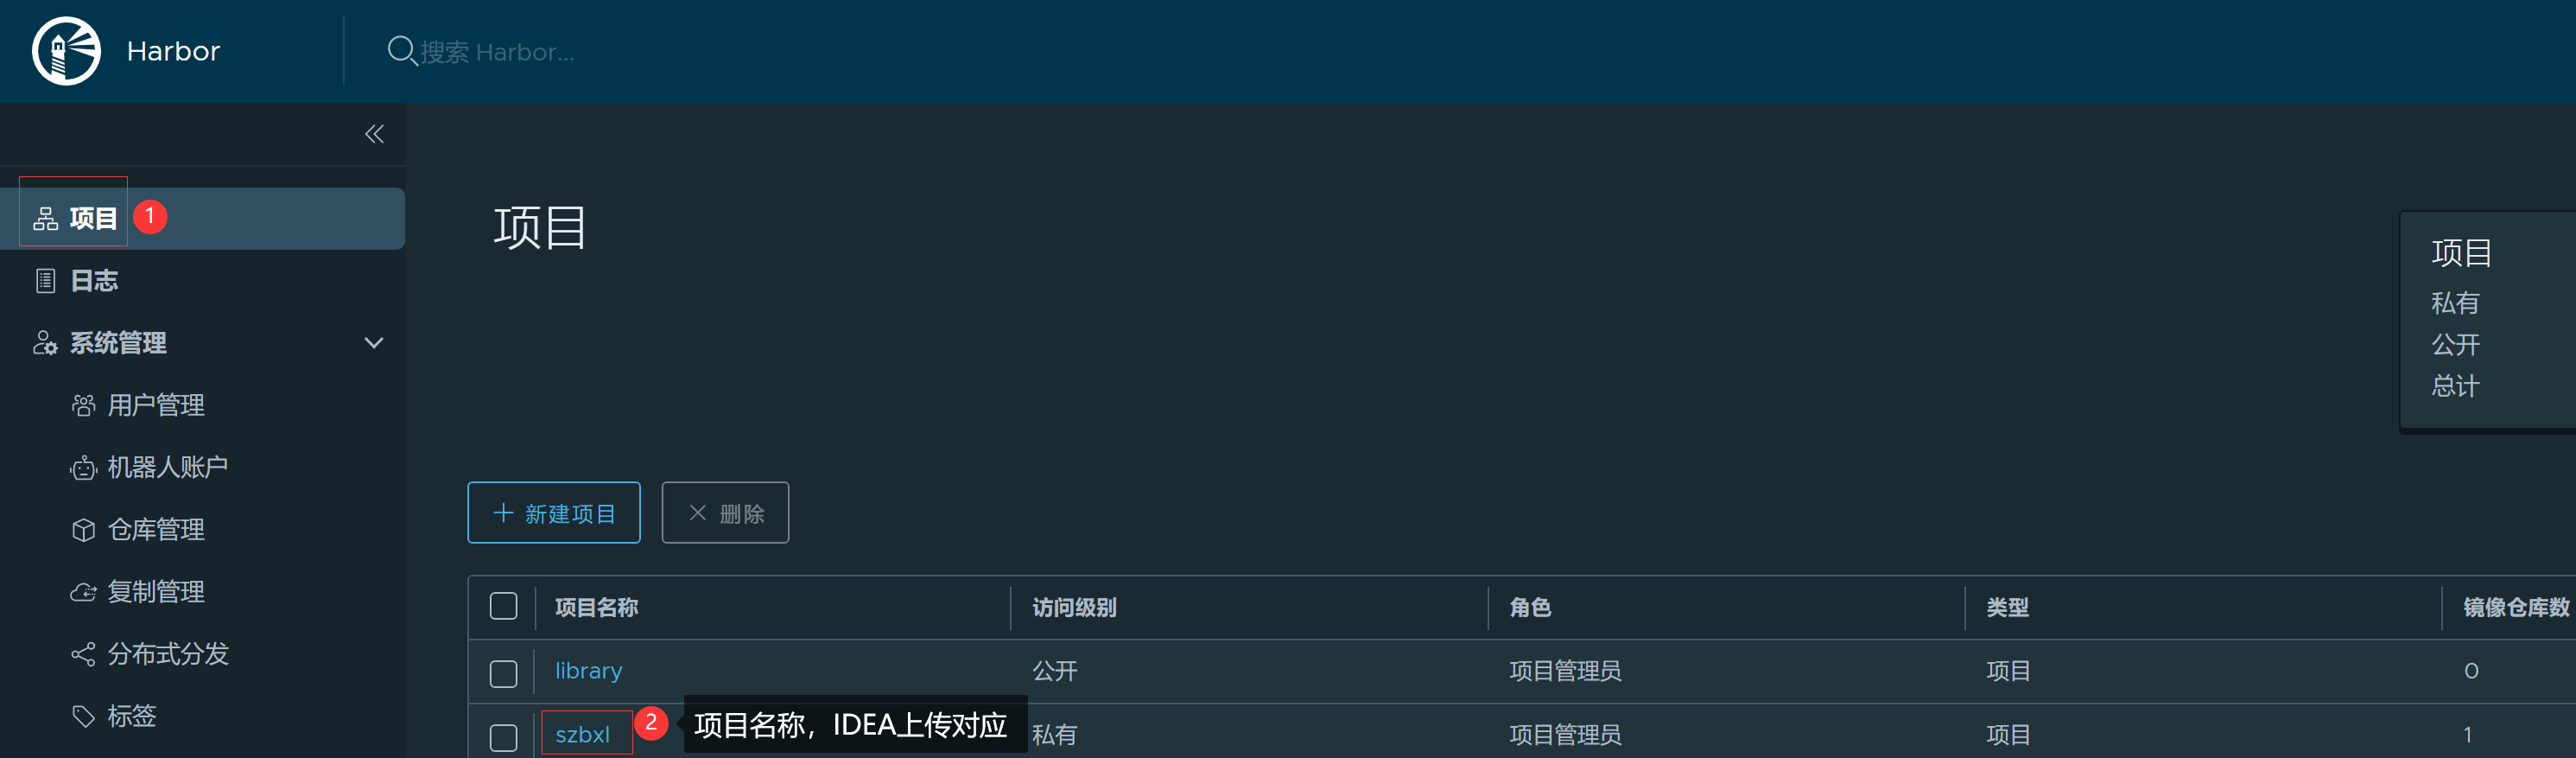
4、Harbor创建IDEA对应上传项目名称
5、在要打包的项目根目录下创Dockerfile文件
FROM openjdk:8-jre-alpine
LABEL author="Scode<stc66@qq.com>"
WORKDIR /usr/local/lib/
ADD ./target/szbxl-user-service-1.0.jar ./szbxl-user-service-1.0.jar
EXPOSE 802
ENTRYPOINT ["java","-jar","/szbxl-user-service-1.0.jar"]
6、配置spring-boot-maven-plugin Docker打包,镜像名称要包含Harbor地址及项目名称,不然无法成功推送至Harbor
<plugins>
	<plugin>
		<groupId>org.apache.maven.plugins</groupId>
		<artifactId>maven-compiler-plugin</artifactId>
		<configuration>
			<source>${java.version}</source>
			<target>${java.version}</target>
			<encoding>${project.build.sourceEncoding}</encoding>
		</configuration>
	</plugin>

	<plugin>
		<groupId>org.apache.maven.plugins</groupId>
		<artifactId>maven-jar-plugin</artifactId>
		<configuration>
			<archive>
				<manifestEntries>
					<!--jdk9以上需要-->
					<Add-Opens>java.base/java.lang java.base/java.lang.reflect</Add-Opens>
				</manifestEntries>
			</archive>
		</configuration>
	</plugin>

	<plugin>
		<groupId>org.apache.maven.plugins</groupId>
		<artifactId>maven-resources-plugin</artifactId>
		<configuration>
			<encoding>${project.build.sourceEncoding}</encoding>
		</configuration>
	</plugin>
</plugins>
<build>
<plugins>
<plugin>
<groupId>org.springframework.boot</groupId>
<artifactId>spring-boot-maven-plugin</artifactId>
<configuration>
<image>
<!--配置镜像名称-->
<name>192.168.3.15:8889/szbxl/${project.name}:${project.version}</name>
<!--镜像打包完成后自动推送到镜像仓库-->
<publish>true</publish>
<env>
<BPE_DELIM_JAVA_TOOL_OPTIONS xml:space="preserve"> </BPE_DELIM_JAVA_TOOL_OPTIONS>
<BPE_APPEND_JAVA_TOOL_OPTIONS>-Xms256m</BPE_APPEND_JAVA_TOOL_OPTIONS>
<BPE_APPEND_JAVA_TOOL_OPTIONS>-Xmx256m</BPE_APPEND_JAVA_TOOL_OPTIONS>
<BPE_APPEND_JAVA_TOOL_OPTIONS>-Xss256k</BPE_APPEND_JAVA_TOOL_OPTIONS>
</env>
</image>
<docker>
<!--Docker远程管理地址-->
<host>http://192.168.3.15:2375</host>
<!--不使用TLS访问-->
<tlsVerify>false</tlsVerify>
<!--Docker推送镜像仓库配置-->
<publishRegistry>
<!--推送镜像仓库用户名-->
<username>admin</username>
<!--推送镜像仓库密码-->
<password>123456</password>
<!--推送镜像仓库地址-->
<url>http://192.168.3.15:8889</url>
</publishRegistry>
</docker>
</configuration>
</plugin>
</plugins>
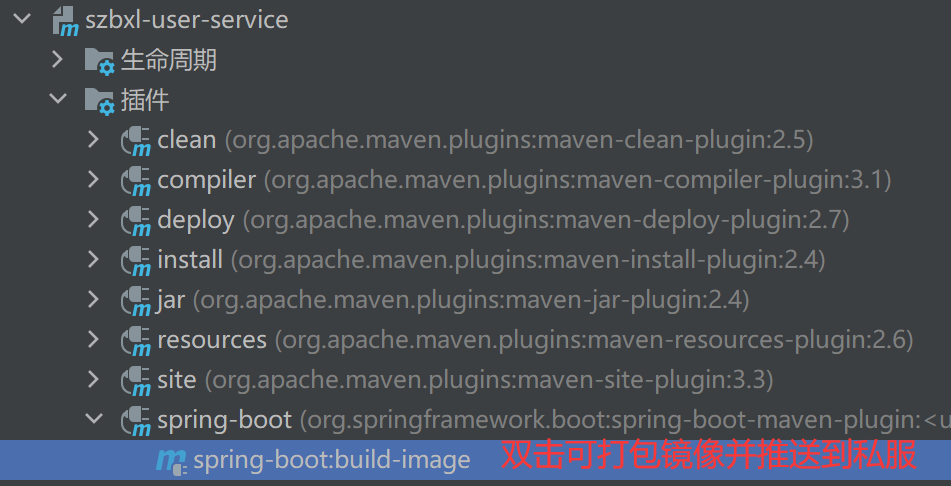
</build>7、双击spring-boot:build-image即可打包并上传到私服,打包过程中会从github下载很多插件,如果失败请多次重试
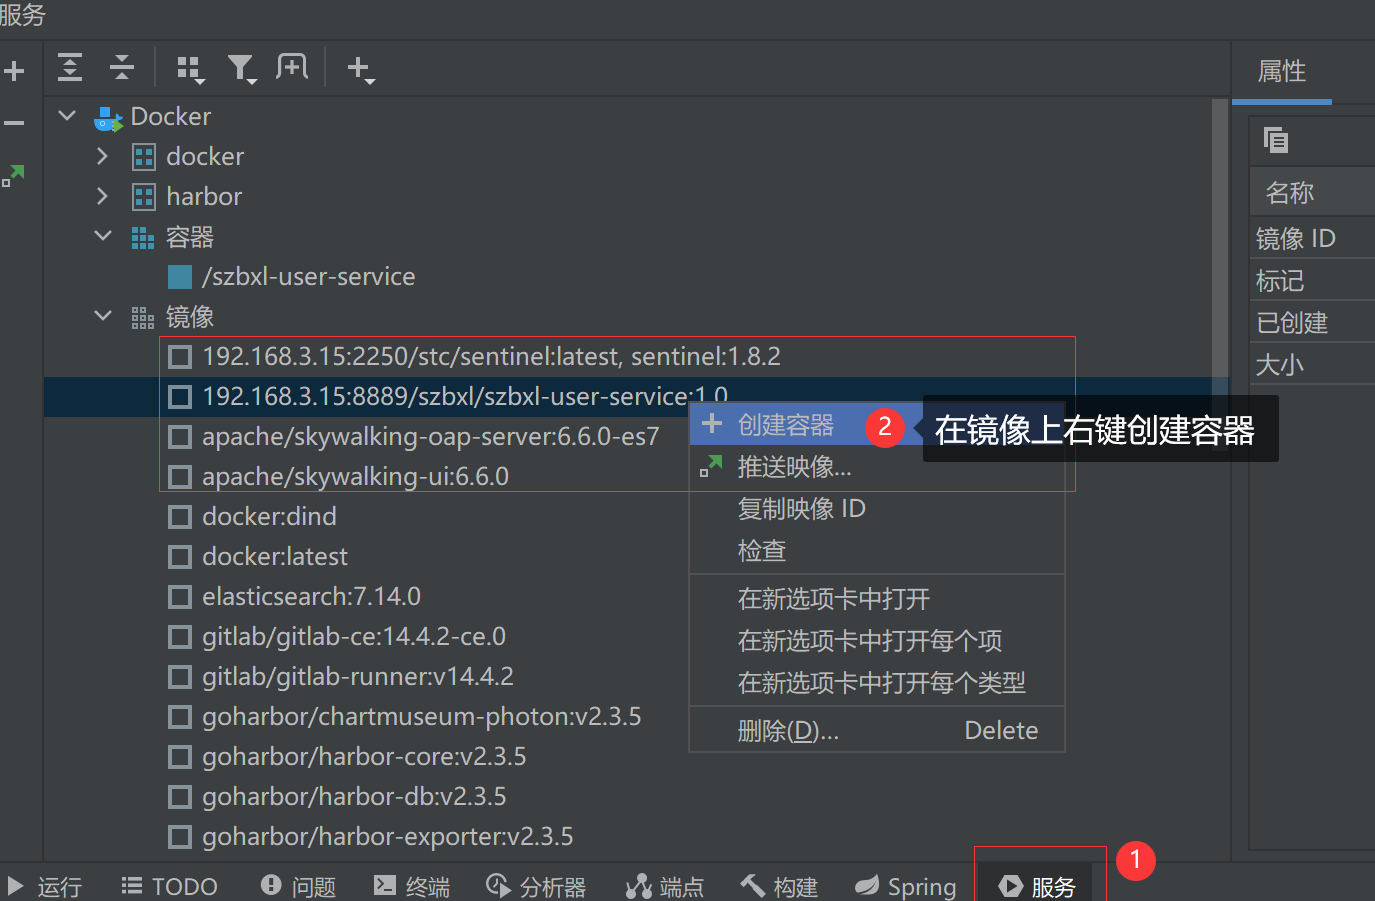
8、在IDEA里创建容器并运行
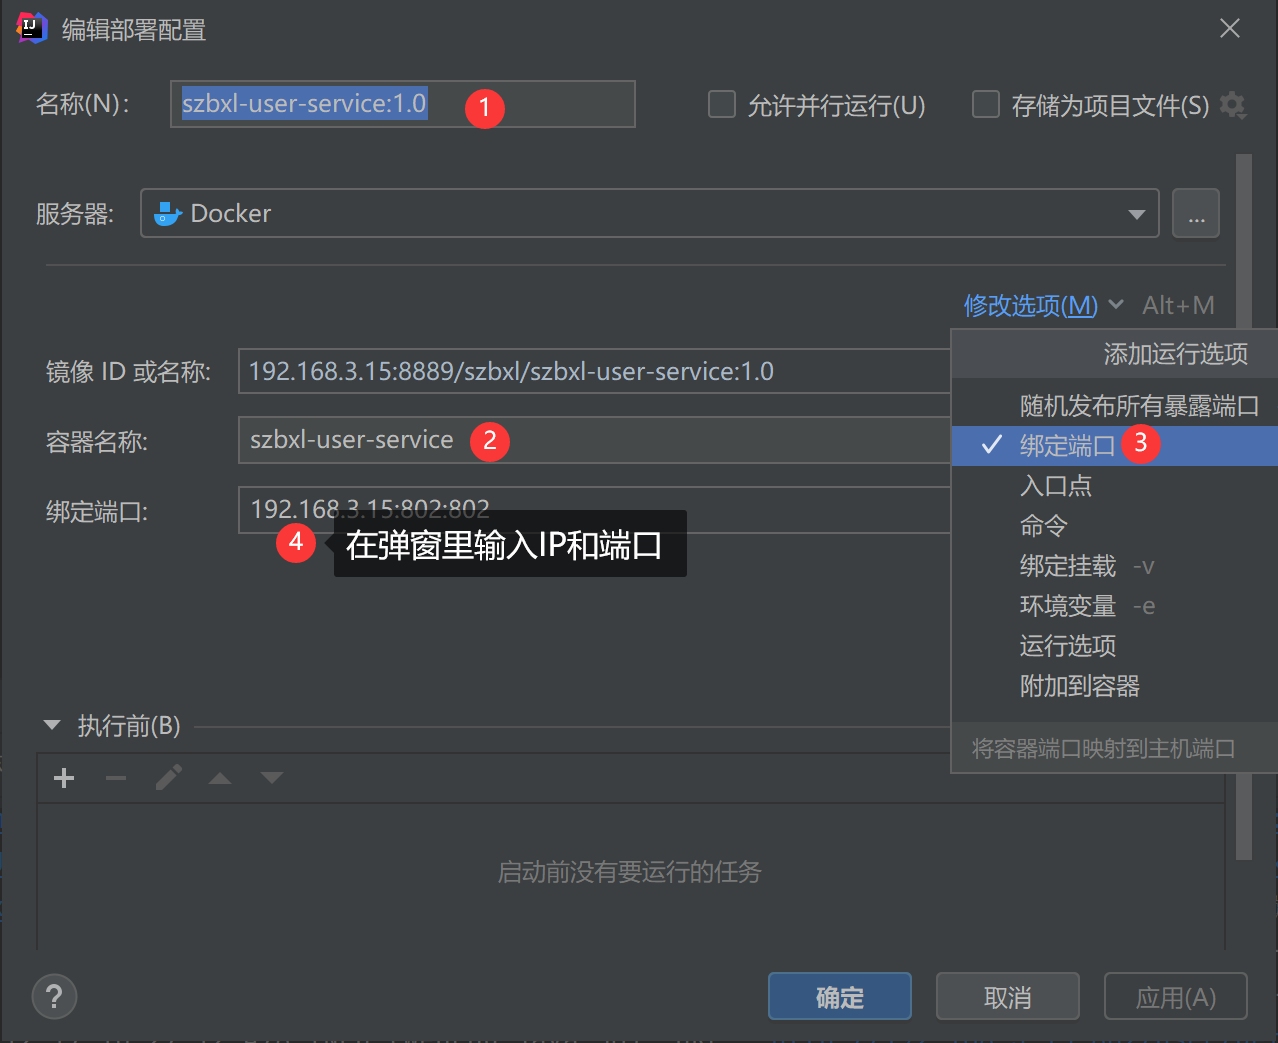
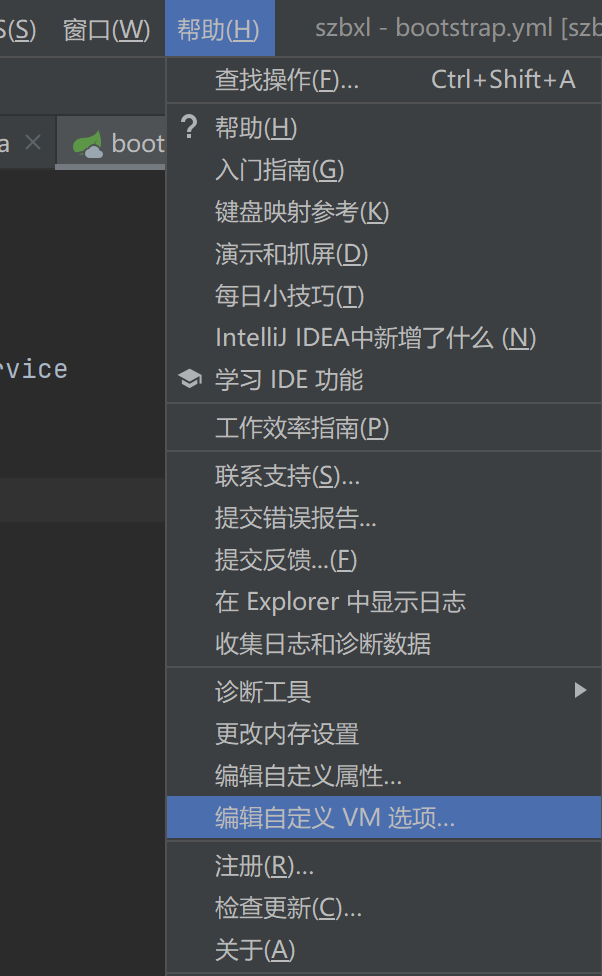
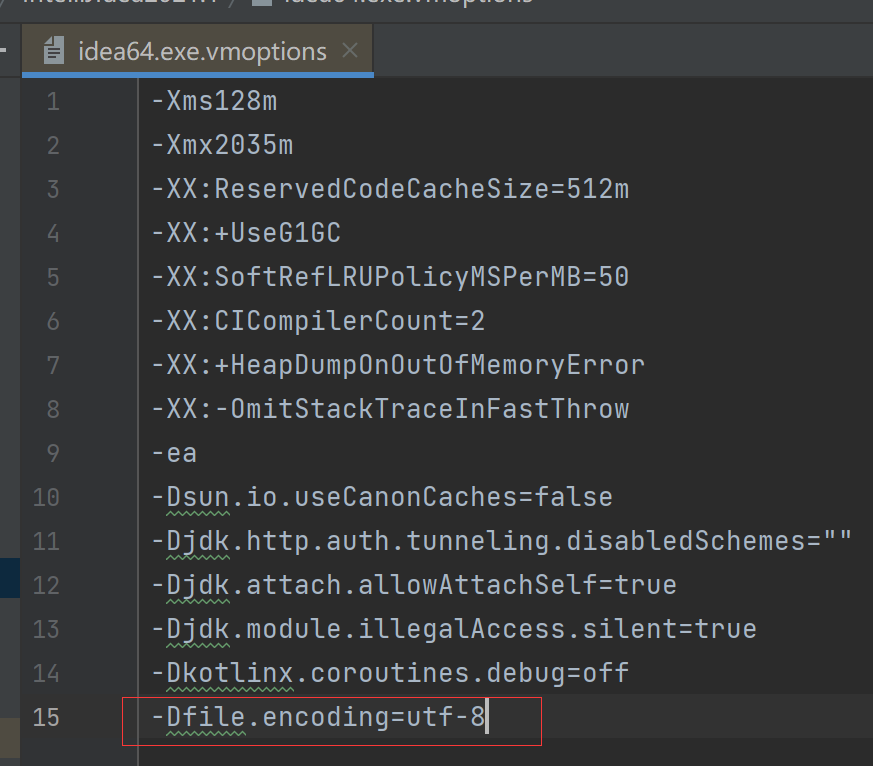
9、设置 IDEA VM支持查看容器中文日志(-Dfile.encoding=utf-8)
10、测试支持JDK9以上版本
<plugin>
	<groupId>org.apache.maven.plugins</groupId>
	<artifactId>maven-surefire-plugin</artifactId>
	<configuration>
			<argLine>
				--add-opens java.base/java.time=ALL-UNNAMED
				${surefireArgLine}
			</argLine>
	</configuration>
</plugin>二、IDEA打包镜像到Docker Desktop并上传到阿里云镜像
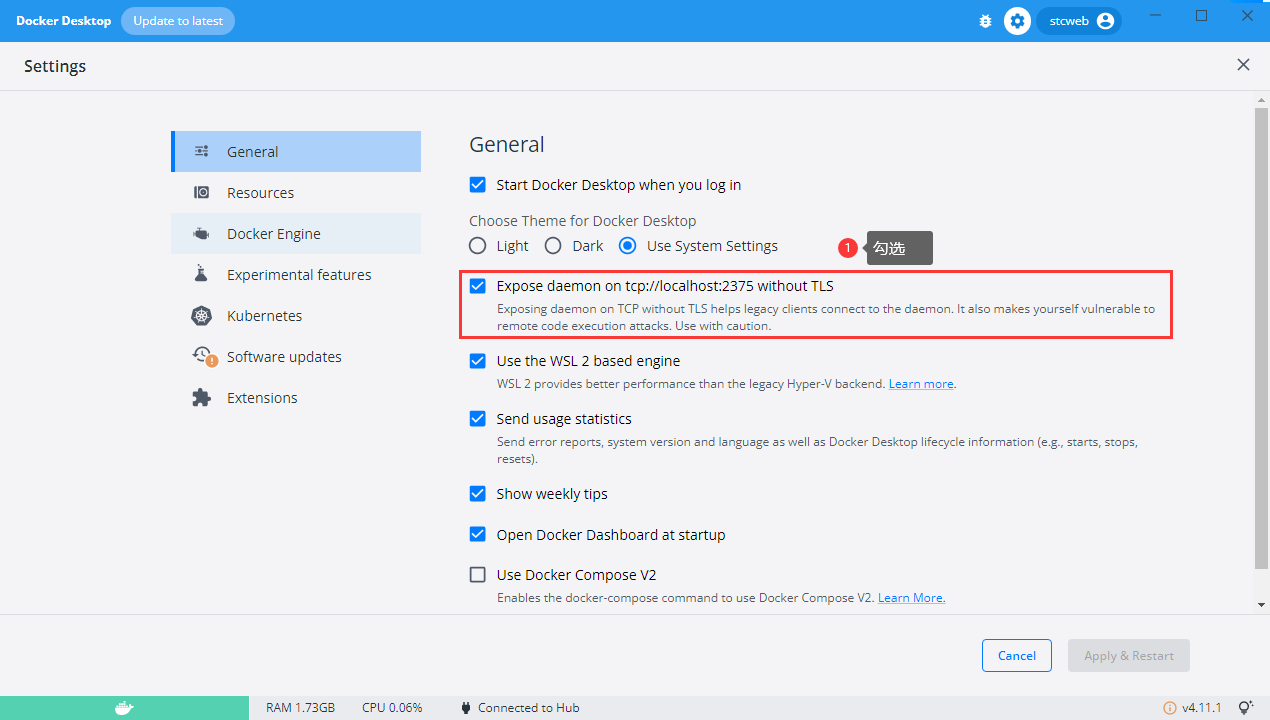
1、Windows安装Docker Desktop并上开启2375连接
2、配置镜像地址:

{
"builder": {
"gc": {
"defaultKeepStorage": "20GB",
"enabled": true
}
},
"experimental": false,
"registry-mirrors": [
"https://docker.1ms.run",
"https://docker.1panel.live",
"https://xc312rma.mirror.aliyuncs.com"
]
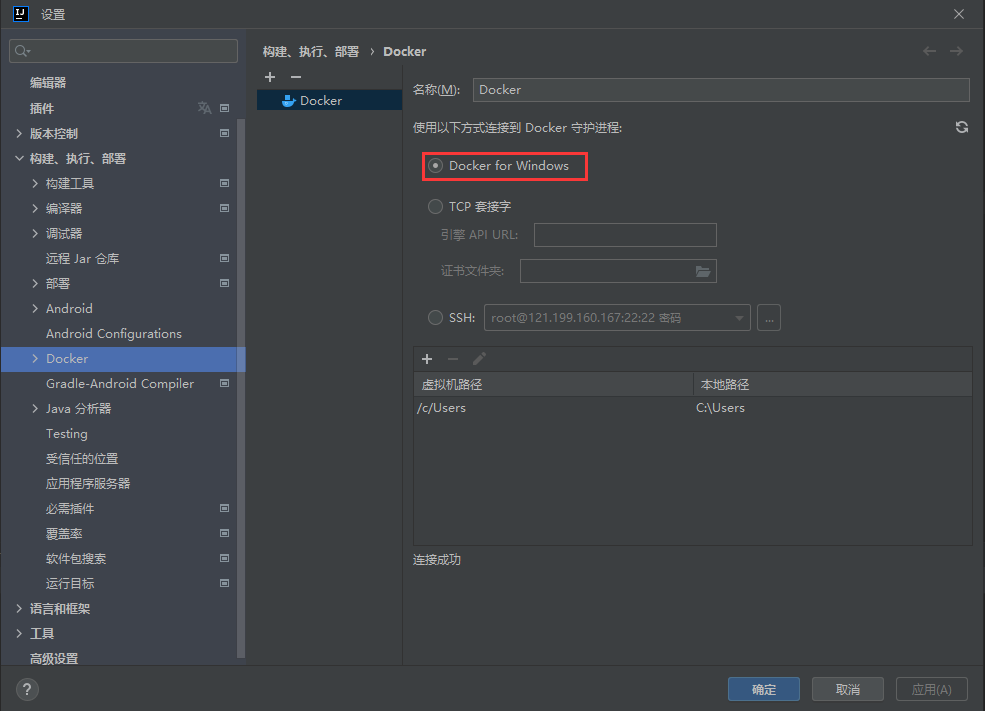
}3、IDEA连接Docker
4、IDEA编辑运行配置并添加Dockerfile配置:
clean package -U -DskipTests
--提示报错:Failed to deploy  Not connected to docker
--IDEA右键单击快捷键,选择 " 管理员取得所有权"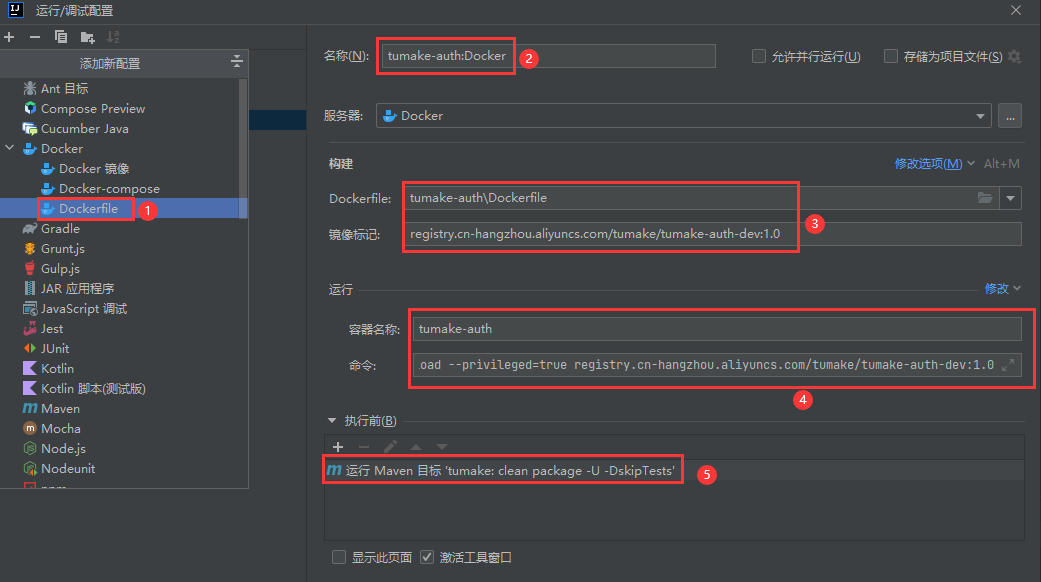
#命令
docker run -d --restart=always -p 801:801 --name tumake-auth -v /apps/tumake-auth/logs:/apps/logs -v /apps/tumake-auth/tmp:/tmp -v /apps/tumake-auth/upload:/apps/upload --privileged=true registry.cn-hangzhou.aliyuncs.com/tumake/tumake-auth-dev:1.0

docker run -d --restart=always -p 802:802 --name tumake-user-service -v /apps/tumake-user-service/logs:/apps/logs --privileged=true registry.cn-hangzhou.aliyuncs.com/tumake/tumake-user-service-dev:1.0

docker run -d --restart=always -p 800:800 --name tumake-gateway -v /apps/tumake-gateway/logs:/apps/logs --privileged=true registry.cn-hangzhou.aliyuncs.com/tumake/tumake-gateway-dev:1.0
5、运行Docker生成镜像并在IDEA终端通过阿里云镜像push上传命令上传Docker
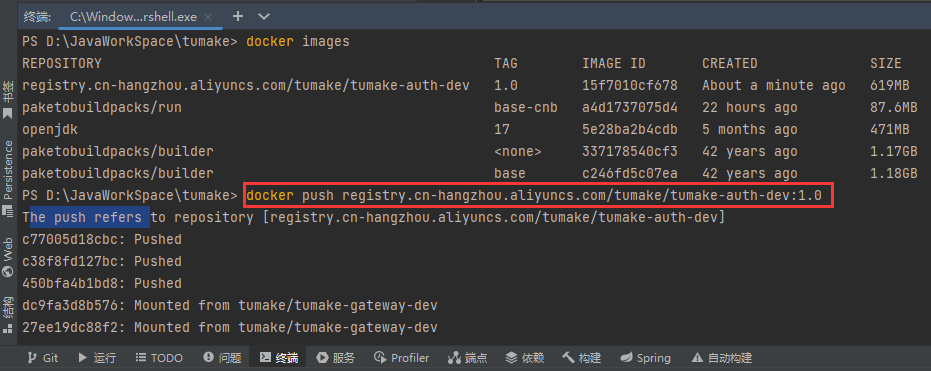
6、在服务器下载阿里云镜像并运行
三、IDEA2024直接打包Docker到本地虚拟机方法:
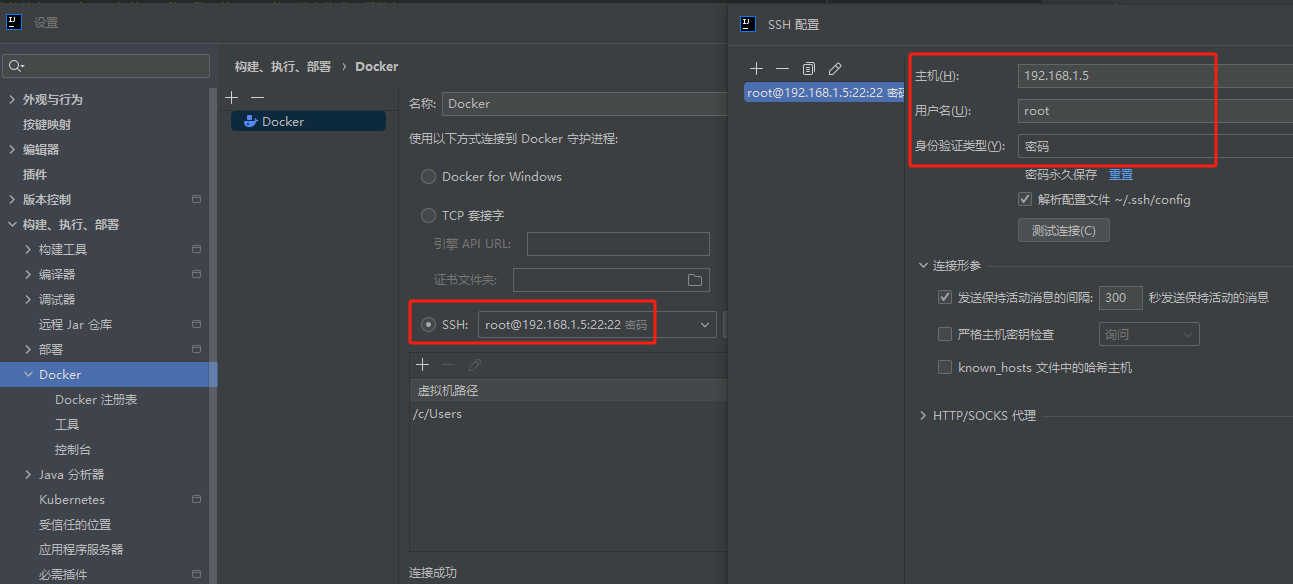
1、设置Docker远程连接虚拟机
2、IDEA2024版运行Docker提示报错“Cannot run program "docker.exe" (in directory...)”解决办法:
Docker下载:https://download.docker.com/win/static/stable/x86_64/
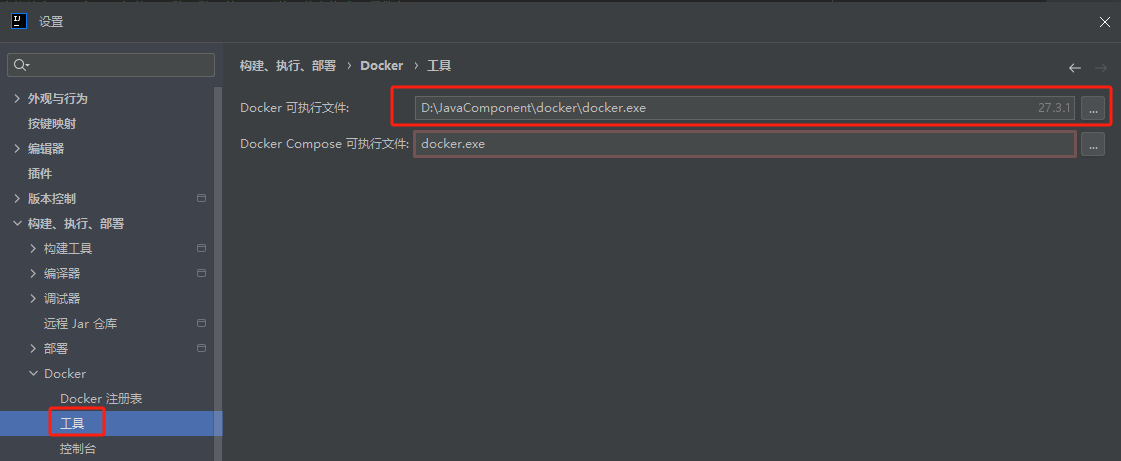
buildx下载:https://github.com/docker/buildx/releases
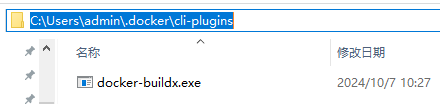
在用户目录下依次新建目录:.docker\cli-plugins,buildx-v0.17.1.windows-amd64.exe拷贝到cli-plugins目录下并重命名为:docker-buildx.exe
3、设置要打包的项目
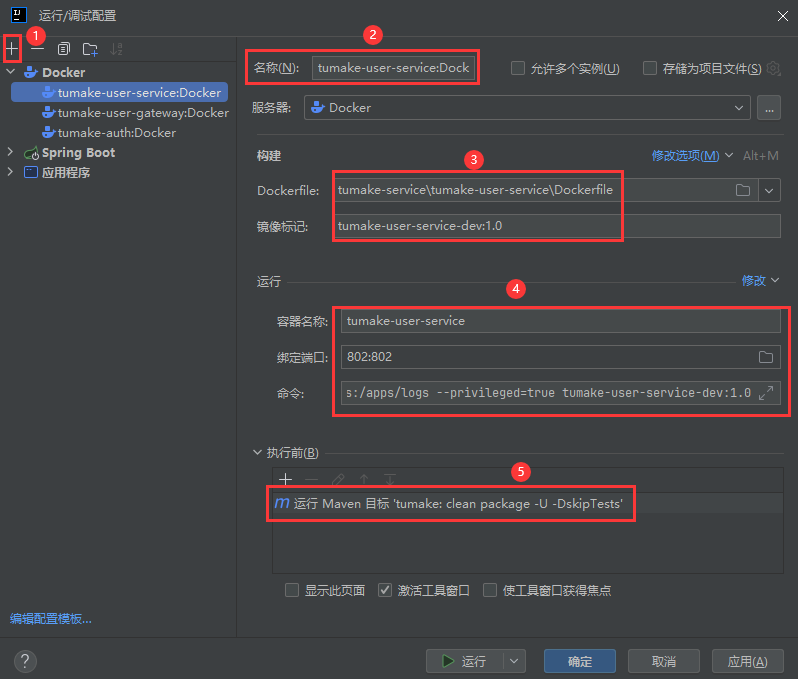
# 命令
docker run -d --restart=always -p 802:802 --name tumake-user-service -v /apps/tumake-user-service/logs:/apps/logs --privileged=true tumake-user-service-dev:1.0

# Maven目标
clean package -U -DskipTests
四、docker image镜像打包保存到另一台机加载
#打要要保存文件的路径
cd /home/docker/build/seata
#保存镜像为压缩文件
docker save -o seata.tar seataio/seata-server:2.0.0
#a、通过工具上传镜像压缩文件至另一台服务器并加载
cd /home/docker/build/seata
#b、scp命令上传文件到远程目标
scp aipuou.tar root@100.52.198.53:/home/docker/build/
#加载镜像文件
docker load -i seata.tar

 浙公网安备 33010602011771号