vue移动端底部菜单tabbar
如果没有目标作为支撑,只是虚幻的想提升自己,那么我们就像是在演戏一样,会觉得自己不是自己。 --阿德勒
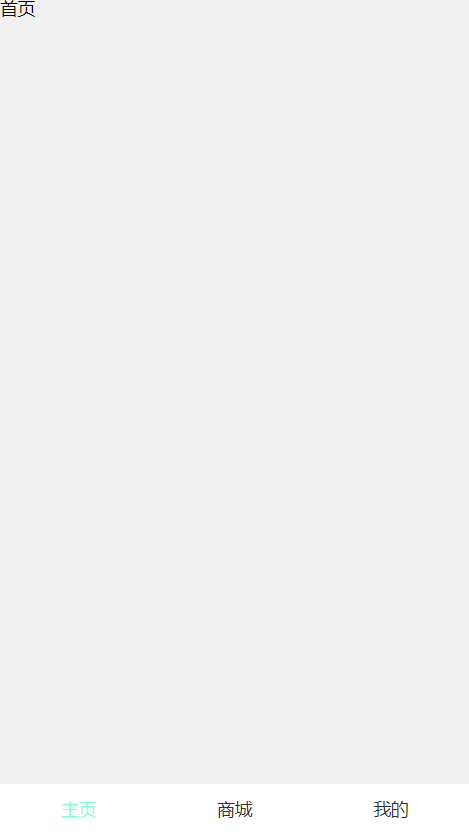
之前有同事问移动端怎么弄个底部tab,然后今天出个demo吧,最终效果如下:
一.首先用vue-cli新建项目,不知道怎么新建?:https://cli.vuejs.org/zh/guide/creating-a-project.html
二.删除框架中多余的东西(不是你自己新建的页面和组件等)比如给的view文件夹的例子,components文件夹下面的东西,app.vue里面和index.html里面的多余的东西,运行下,报错可能都是找不到路径等,自行解决。
三.app.vue文件代码如下(删除多余的代码):
<template>
  <div id="app">
    <router-view/>
  </div>
</template>

<style>
  #app{
    width:100%;
    height:100%;
    font-size:14px;
    background:#f1f1f1;
  }
</style>
四.在view文件夹下面新建4个vue文件,分别是:主体内容容器、主页、商城、我的。具体的代码如下(主页、商城、我的类似):
index.vue(主体容器)如下:
<template>
    <div class="index">
        <router-view></router-view>
        <tabBar :tabbarList="tabbarList" />
    </div>
</template>

<script>
import tabBar from '../components/tabbar'
export default {
    name:"index",
    components:{
        tabBar
    },
    data() {
        return {
            tabbarList:[
                {name:"主页",path:"/home"},
                {name:"商城",path:"/store"},
                {name:"我的",path:"/my"}
            ]
        }

    },
    mounted () {

    },
}
</script>

<style>

</style>
home.vue如下:
<template>
    <div>首页</div>
</template>
<script>
export default {
    name:"home",
    data() {
        return {

        }
    },
}
</script>
<style scoped>

</style>
五.tabbar组件代码:
<template>
    <div class="tabbar">
        <router-link v-for="(item,index) in tabbarList" :key="index"
        class="tab-item"
        :to="item.path"
        active-class="isActive">
            <div class="item-wrap">{{item.name}}</div>
        </router-link>
    </div>
</template>

<script>
export default {
    name:"tabBar",
    props:{
        tabbarList:Array
    },
    data() {
        return {
        }
    },
    methods: {
    },
}
</script>

<style scoped>
    .tabbar{
        width:100%;
        height: 40px;
        display: flex;
        justify-content: center;
        align-items: center;
        position: absolute;
        background: #ffffff;
        bottom: 0px;
        left: 0px;
    }
    .isActive{
        color:aquamarine;
    }
    .tab-item{
        flex:1;
        font-size:14px;
        height:100%;
    }
    .item-wrap{
        width:100%;
        height:100%;
        display: flex;
        justify-content: center;
        align-items: center;
    }
    a{
        text-decoration:none;
        color:#333;
    }
    a,a:hover,a:active,a:visited,a:link,a:focus{
        -webkit-tap-highlight-color:rgba(0,0,0,0);
        -webkit-tap-highlight-color: transparent;
        outline:none;
        background: none;
        text-decoration: none;
    }
</style>
六.router.js设置路由嵌套,代码如下:
import Vue from 'vue'
import Router from 'vue-router'

Vue.use(Router)

  const route = new Router({
    mode: 'history',
    base: process.env.BASE_URL,
    routes:[
      {
        path: '/',
        component:()=> import('../views/index.vue'),
        children:[
          {
            path:'',
            redirect:'/home'
          },
          {
            path:'/home',
            name:"home",
            component:()=>import('../views/home.vue')
          },
          {
            path:'/store',
            name:"store",
            component:()=>import('../views/store.vue')
          },
          {
            path:'/my',
            name:"my",
            component:()=>import('../views/my.vue')
          },
        ]
      },
    ]
  })


export default route
到此,demo已经完成。
总结:关键点router-view的用法

 浙公网安备 33010602011771号