
23. 对话框控件
一、对话框应用
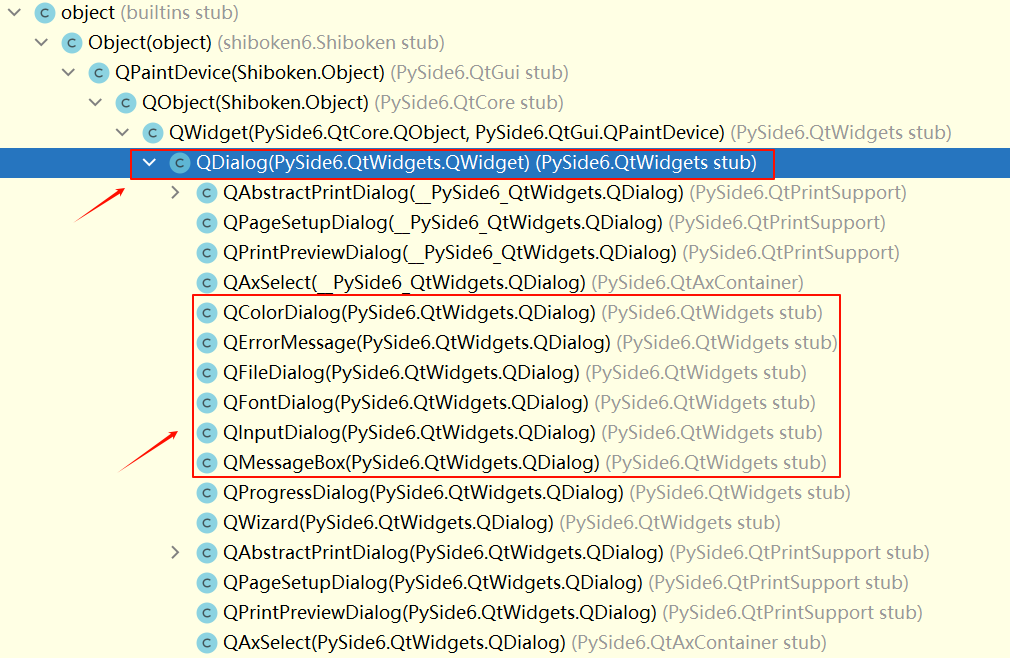
对话框窗口是一个用来完成简单任务或者和用户进行临时交互的顶层窗口,通常用于输入信息、确认信息或者提示信息。QDialog 类是所有对话框窗口类的基类。
按照运行时是否可以和其他窗口进行交互操作,对话框分为 模式(或模态)对话框 和 非模式对话框。对于 带有模式的对话框,只有在 关闭该对话框 的情况下才可以对其他窗口进行操作,而对于 非模式对话框,在没有关闭对话框的情况下,既可以对该对话框进行操作,也可以对其他窗口进行操作。
对话框在操作系统的管理器中没有独立的任务栏,而是共享父窗口的任务栏,无论对话框是否处于活跃状态,对话框都将位于父窗口之上,除非关闭或隐藏对话框。
我们可以在终端中使用 pip 安装 PySide6 模块。默认是从国外的主站上下载,因此,我们可能会遇到网络不好的情况导致下载失败。我们可以在 pip 指令后通过 -i 指定国内镜像源下载。
pip install pyside6 -i https://mirrors.aliyun.com/pypi/simple
国内常用的 pip 下载源列表:
- 阿里云 https://mirrors.aliyun.com/pypi/simple
- 清华大学 https://pypi.tuna.tsinghua.edu.cn/simple
- 中国科学技术大学 http://pypi.mirrors.ustc.edu.cn/simple
QDialog 是从 QWidget 类继承而来的,用 QDialog 类创建一般对话框实例的方法如下:
QDialog(parent:QWidget=None, f:Qt.WindowFlags=Default(Qt.WindowFlags))
其中 parent 是 QDialog 对话框的 父窗口,Qt.WindowFlags 枚举值的取值参考 QWidget 窗口部分。通常将 QDialog 对话框作为顶层窗口使用,在主程序界面中进行调用。
QDialog 类的常用方法如下:
# 实例方法
setModal(modal:bool) -> None                                                    # 设置对话框为模式对话框
setVisible(visible:bool) -> None                                                # 设置对话框是否可见

setResult(result:int) -> None                                                   # 设置对话框的返回值
result() -> int                                                                 # 返回对话框的返回值

setSizeGripEnabled(enable:bool) -> None                                         # 设置对话框的右下角是否有三角形
isSizeGripEnabled() -> bool                                                     # 返回对话框的右下角是否有三角形

# 槽方法
open() -> None                                                                  # 以模式方法显示对话框
exec() -> int                                                                   # 以模式方法显示对话框,并返回对话框的值
accept() -> None                                                                # 隐藏对话框,并将返回值设置成QDialog.Accepted,同时发送accepted()和finished(int)信号
done(r:int) -> None                                                             # 隐藏对话框,并将返回值设置成r,同时发送finished(int)信号
reject() -> None                                                                # 隐藏对话框,并将返回值设置成QDialog.Rejected,同时发送rejected()和finished(int)信号
QDialog 类的常用信号如下:
accepted()                                                                      # 执行accept()和done(int)方法时发射信号
finished(result:int)                                                            # 执行accept()、reject()和done(int)方法时发射信号
rejected()                                                                      # 执行reject()和done(int)方法时发射信号
对话框的模式特性可以用 setModal(modal:bool) 或 setWindowModality(modality:Qt.WindowModality) 方法设置,其中参数 modality 是 Qt.WindowModality 类型的枚举值,可以取值如下:
Qt.WindowModality.NonModal                                                      # 非模式,可以和程序的其他窗口进行交互操作
Qt.WindowModality.WindowModal                                                   # 窗口模式,在未关闭当前对话框时,将阻止该窗口与父窗口的交互操作
Qt.WindowModality.ApplicationModal                                              # 应用程序模式,在未关闭当前对话框时,将阻止与任何其他窗口的交互操作
显示对话框的方法有 show()、open() 和 exec() 三种。
如果对话框已经有模式特性,则用 show() 方法显示的对话框具有模式特性,如果对话框没有模式特性,则用 show() 方法显示的对话框没有模式特性。无论对话框是否有模式特性,用 open() 或 exec() 方法显示的对话框都是 模式对话框,其中用 open() 方法显示的对话框默认是 窗口模式,用 exec() 方法显示的对话框默认是 应用程序模式。
当程序执行到 show() 或 open() 方法时,显示对话框后,会继续执行后续的代码,而用 exec() 方法显示对话框时,需关闭对话框后才执行 exec() 语句的后续代码。
show()、open() 和 exec() 三种显示对话框的方法不会改变对话框的模式属性的值。这里所说的对话框的返回值不是在对话框的控件中输入的值,而是指 对话框被隐藏或删除时返回的一个整数,用这个整数表示用户对对话框的操作。
通常对话框上有 “确定” 按钮(或 OK 按钮)、“应用” 按钮(或 Apply 按钮)和 “取消” 按钮(或 Cancel 按钮)。单击 “确定” 按钮表示 接受和使用对话框中输入的值,单击 “取消” 按钮表示 放弃或不使用对话框中输入的值。
QDialog 定义了两个枚举类型常量 QDialog.DialogCode.Accepted 和 QDialog.DialogCode.Rejected,这两个常量的值分别是 1 和 0。可以用 setResult(result:int) 方法 为对话框设置一个返回值,用 result() 方法 获取对话框的返回值,例如单击 “确认” 按钮时,隐藏对话框,并把对话框的返回值设置成 setResult(QDialog.DialogCode.Accepted);单击 “取消” 按钮时,隐藏对话框,并把对话框的返回值设置成 setResult(QDialog.DialogCode.Rejected)。
QDialog 的 accept() 方法可以 隐藏对话框,并把对话框的返回值设置成 QDialog.DialogCode.Accepted。reject() 方法会隐藏对话框,并把对话框的返回值设置成 QDialog.DialogCode.Rejected。用 done(r:int) 方法会隐藏对话框,并把对话框的返回值设置成 r。
其实 accept() 方法调用的就是 done(QDialog.DialogCode.Accepted) 方法,reject() 方法调用的就是 done(QDialog.DialogCode.Rejected) 方法。如果对话框是用 exec() 方法显示的,则 exec() 方法会返回对话框的值,而 show() 和 open() 方法不会返回对话框的值。
新建一个 ui.py 文件,用来存放 UI 相关的代码。
from PySide6.QtWidgets import QWidget
from PySide6.QtWidgets import QDialog
from PySide6.QtWidgets import QToolBar
from PySide6.QtWidgets import QPushButton, QComboBox, QLineEdit, QTextEdit, QSpinBox
from PySide6.QtWidgets import QHBoxLayout, QVBoxLayout, QFormLayout
from PySide6.QtGui import QAction, QIcon, Qt
class MyUi:
def setupUi(self, window:QWidget):
window.resize(800, 600) # 1.设置窗口对象大小
layout = QVBoxLayout(window) # 2.创建一个垂直布局
self.toolBar = QToolBar() # 3.创建一个工具栏,并添加到布局中
layout.addWidget(self.toolBar)
self.toolBar.setToolButtonStyle(Qt.ToolButtonStyle.ToolButtonTextUnderIcon) # 4.设置工具栏的显示样式
self.add_info_action = QAction(icon=QIcon("assets/images/1.ico"), text="添加信息") # 5.创建一个动作,并添加到工具栏中
self.toolBar.addAction(self.add_info_action)
self.info_textEdit = QTextEdit(window) # 6.创建一个文本编辑框,并添加到布局中
layout.addWidget(self.info_textEdit)
self.info_textEdit.setReadOnly(True) # 7.设置文本编辑框为只读
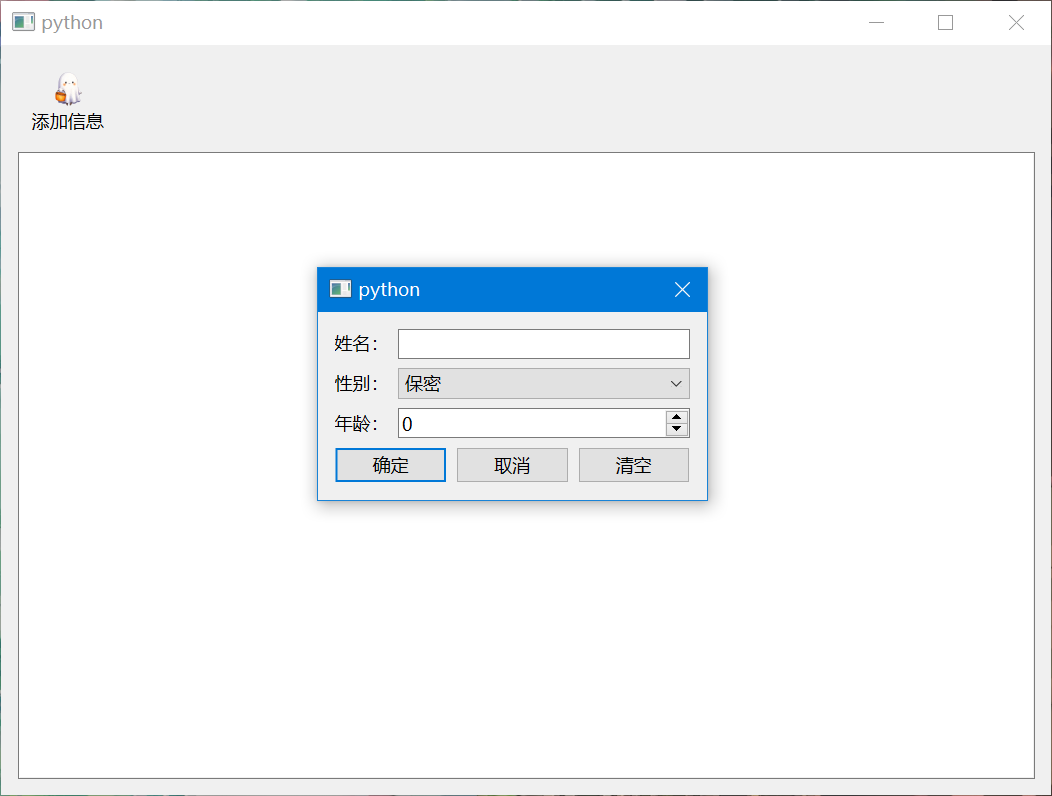
def dialog_setupUi(self, parent:QWidget):
self.dialog = QDialog(parent) # 1.创建一个对话框
veritical_layout = QVBoxLayout(self.dialog) # 2.创建一个垂直布局
form_layout = QFormLayout() # 3.创建一个表单布局,并添加到垂直布局中
veritical_layout.addLayout(form_layout)
self.name_lineEdit = QLineEdit() # 4.创建一个文本输入框,并添加到表单布局中
form_layout.addRow("姓名:", self.name_lineEdit)
self.gender_comboBox = QComboBox() # 5.创建一个下拉框,并添加到表单布局中
self.gender_comboBox.addItems(["保密", "男", "女"])
form_layout.addRow("性别:", self.gender_comboBox)
self.age_spinBox = QSpinBox() # 6.创建一个数字输入框,并添加到表单布局中
self.age_spinBox.setRange(0, 300)
form_layout.addRow("年龄:", self.age_spinBox)
horizontal = QHBoxLayout() # 7.创建一个水平布局,并添加到垂直布局中
veritical_layout.addLayout(horizontal)
self.ok_button = QPushButton("确定") # 8.创建一个按钮,并添加到水平布局中
horizontal.addWidget(self.ok_button)
self.cancel_button = QPushButton("取消")
horizontal.addWidget(self.cancel_button)
self.clear_button = QPushButton("清空")
horizontal.addWidget(self.clear_button)
新建一个 widget.py 文件,用来存放业务逻辑相关的代码。
import sys

from PySide6.QtWidgets import QApplication, QWidget

from ui import MyUi

class MyWidget(QWidget):
    def __init__(self):
        super().__init__()                                                      # 1.调用父类Qwidget类的__init__()方法

        self.__ui = MyUi()
        self.__ui.setupUi(self)                                                 # 2.初始化页面
        self.__ui.dialog_setupUi(self)                                          # 3.初始化对话框

        self.__ui.add_info_action.triggered.connect(self.add_info_action_triggered) # 4.动作被触发时发射信号

        self.__ui.ok_button.clicked.connect(self.ok_button_clicked)             # 5.按钮被点击时发射信号
        self.__ui.cancel_button.clicked.connect(self.cancel_button_clicked)
        self.__ui.clear_button.clicked.connect(self.clear_button_clicked)

    def add_info_action_triggered(self):
        self.__ui.dialog.open()                                                 # 1.打开对话框

    def ok_button_clicked(self):
        name = self.__ui.name_lineEdit.text()
        gender = self.__ui.gender_comboBox.currentText()
        age = self.__ui.age_spinBox.value()

        if name:
            self.__ui.info_textEdit.append(f"姓名:{name}, 性别:{gender}, 年龄:{age}")
            self.clear_button_clicked()
            self.__ui.dialog.accept()                                           # 1.隐藏对话框

    def cancel_button_clicked(self):
        self.clear_button_clicked()
        self.__ui.dialog.reject()                                               # 1.隐藏对话框

    def clear_button_clicked(self):
        self.__ui.name_lineEdit.clear()
        self.__ui.gender_comboBox.setCurrentIndex(0)
        self.__ui.age_spinBox.setValue(0)

if __name__ == "__main__":
    app = QApplication(sys.argv)                                                # 1.创建一个QApplication类的实例
    window = MyWidget()                                                         # 2.创建一个窗口
    window.show()                                                               # 3.显示窗口
    sys.exit(app.exec())                                                        # 4.进入程序的主循环并通过exit()函数确保主循环安全结束
二、信息对话框
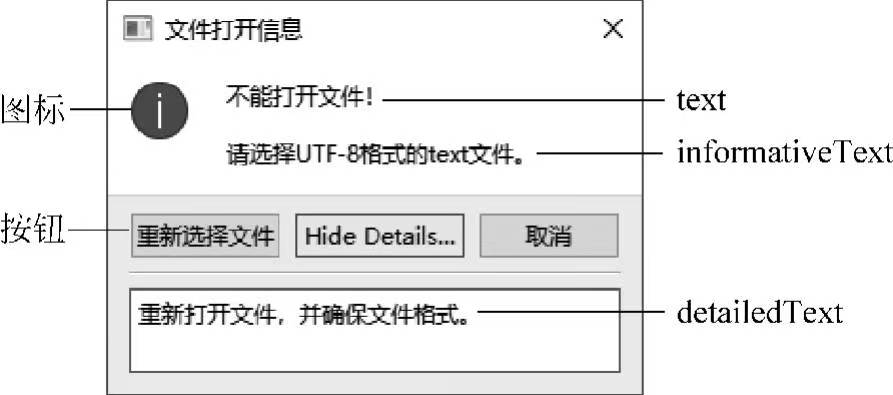
信息对话框 QMessageBox 用于向用户提供一些信息,或者询问用户如何进行下一步操作。信息对话框由 文本(text、informativeText、detailedText)、图标 和 按钮 3 部分构成,因此在建立信息对话框时,主要设置这 3 部分的参数。
用 QMessageBox 类创建信息对话框的方法如下:
QMessageBox(parent:QWidget=None)
QMessageBox(icon:QMessageBox.Icon, title:str, buttons:QMessageBox.StandardButtons=QMessageBox.StandardButton.NoButton, parent:QWidget=None, flags:Qt.WindowFlags=Qt.Dialog | Qt.MSWindowsFixedSizeDialogHint)
其中 icon 是 对话框中的图标,title是 对话框的标题,text 是 对话框中显示的文本,buttons 设置 对话框中的按钮,flags 设置 窗口的类型,使用默认值即可。
QMessageBox 类常用方法如下:
# 实例方法
setText(text:str) -> None                                                       # 设置信息对话框的文本
text() -> str                                                                   # 获取信息对话框的文本

setInformativeText(text:str) -> None                                            # 设置对话框的信息文本
informativeText() -> str                                                        # 获取对话框的信息文本

setDetailedText(text:str) -> None                                               # 设置对话框的详细文本
detailedText() -> str                                                           # 获取对话框的详细文本

setTextFormat(format:Qt.TextFormat) -> None                                     # 设置文本格式

setIcon(icon:QMessageBox.Icon) -> None                                          # 设置对话框的标准图标
icon() -> QIcon                                                                 # 获取对话框的标准图标

setIconPixmap(pixmap:QPixmap) -> None                                           # 设置对话框的自定义图标
iconPixmap() -> QPixmap                                                         # 获取对话框的自定义图标

setCheckBox(cb:QCheckBox) -> None                                               # 信息对话框中添加QCheckBox控件
checkBox() -> QCheckBox                                                         # 获取信息对话框中的QCheckBox控件

addButton(button:QMessBox.StandardButton) -> QPushButton                        # 对话框中添加标准按钮
addButton(text:str, role:QMessageBox.ButtonRole) -> QPushButton                 # 对话框中添加新建按钮,并返回新建按钮
addButton(button:QAbstractButton, role:QMessageBox.ButtonRole) -> None          # 对话框中添加按钮,并设置按钮的作用
button(which:QMessageBox.StandardButton) -> QAbstractButton                     # 获取对话框中的标准按钮

buttons() -> List[QAbstractButton]                                              # 获取对话框中按钮列表

buttonText(button:int) -> str                                                   # 获取按钮上的文本

buttonRole(button:QAbstractButton) -> QMessageBox.ButtonRole                    # 获取按钮的角色

removeButton(button:QAbstractButton) -> None                                    # 删除对话框中的按钮

setDefaultButton(button:QPushButton) -> None                                    # 设置默认按钮
setDefaultButton(button:QMessageBox.StandardButton) -> None                     # 将某一标准按钮设置为默认按钮
defaultButton() -> QPushButton                                                  # 获取默认按钮

setEscapeButton(button:QAbstractButton) -> None                                 # 设置Esc键关闭对话框的按钮
setEscapeButton(button:QMessageBox.StandardButton) -> None                      # 将某一标准按钮设置为Esc键关闭对话框的按钮
escapeButton() -> QAbstractButton                                               # 获取Esc键关闭对话框的按钮

clickedButton() -> QAbstractButton                                              # 获取用户点击的按钮

# 静态方法

# 用于快速构建信息对话框,除about()函数外,其它函数返回值是被单击的按钮或按钮的角色识别号

# 关于对话框
about(parent:QWidget, title:str, text:str) -> None

# 消息对话框
information(parent:QWidget, title:str, text:str, buttons:QMessageBox.StandardButton=QMessageBox.StandardButton.Ok, defaultButton:QMessageBox.StandardButton=QMessageBox.StandardButton.NoButton) -> QMessageBox.StandardButton

# 问答对话框
question(parent:QWidget, title:str, text:str, buttons:QMessageBox.StandardButton=QMessageBox.StandardButtons(QMessageBox.StandardButton.Yes | QMessageBox.StandardButton.No), defaultButton:QMessageBox.StandardButton=QMessageBox.StandardButton.NoButton) -> QMessageBox.StandardButton

# 警告对话框
warning(parent:QWidget, title:str, text:str, buttons:QMessageBox.StandardButton=QMessageBox.StandardButton.Ok, defaultButton:QMessageBox.StandardButton=QMessageBox.StandardButton.NoButton) -> QMessageBox.StandardButton

# 错误对话框
critical(parent:QWidget, title:str, text:str, buttons:QMessageBox.StandardButton=QMessageBox.StandardButton.Ok, defaultButton:QMessageBox.StandardButton=QMessageBox.StandardButton.NoButton) -> QMessageBox.StandardButton
用 QMessageBox 类常用信号如下:
buttonClicked(button:QAbstractButton) # 单击任意按钮时发射信号,参数是被单击的按钮
信息对话框的创建方法有两种:一种是 先创建信息对话框的实例对象,然后往实例对象中 添加文本、图标和按钮,最后用 show()、open() 或 exec() 方法 显示信息对话框;另一种是用 QMessageBox 提供的 静态函数 来 创建信息对话框。
信息对话框上显示的文本分为 text、informativeText 和 detailedText,如果设置了 detailedText,会出现 Show Details... 按钮,这 3 个文本分别用 setText(text:str)、setInformativeText(text:str)和 setDetailedText(text:str)方法设置。detailedText 文本只能以 纯文本 形式显示,text 和 informativeText 文本可以用 纯文本 或 富文本 的形式显示。用 setTextFormat(format:Qt.TextFormat) 方法设置是用纯文本还是富文本显示,其中参数 format 是 Qt.TextFormat 枚举值可以取值如下:
Qt.TextFormat.PlainText                                                         # 纯文本
Qt.TextFormat.RichText                                                          # 富文本
Qt.TextFormat.AutoText                                                          # 由系统决定
Qt.TextFormat.MarkdownText                                                      # Markdown文本
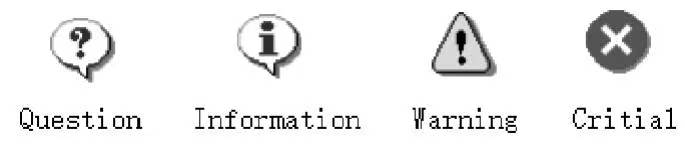
信息对话框的图标可以由用户自己定义,也可以使用 QMessageBox 提供的标准图标。自定义图标需要用 setIconPixmap(pixmap:QPixmap)方法定义,标准图标用 setIcon(icon:QMessageBox.Icon) 方法设置,其中参数 icon 是 QMessageBox.Icon 类型的枚举值,可以取值如下:
QMessageBox.Icon.NoIcon
QMessageBox.Icon.Question
QMessageBox.Icon.Information
QMessageBox.Icon.Warning
QMessageBox.Icon.Critical
这几种图标的样式如下所示:
信息对话框的按钮分为自定义按钮和标准按钮,不论哪种按钮都要赋予角色,按钮的角色用来说明按钮的作用。按钮的角色由枚举类型 QMessageBox.ButtonRole 确定,QMessageBox.ButtonRole 枚举值可以取的值下所示:
QMessageBox.ButtonRole.InvalidRole                                              # 不起作用的按钮
QMessageBox.ButtonRole.AcceptRole                                               # 接受对话框内的信息,例如OK按钮
QMessageBox.ButtonRole.RejectRole                                               # 拒绝对话框内的信息,例如Cancel按钮
QMessageBox.ButtonRole.DestructiveRole                                          # 重构对话框
QMessageBox.ButtonRole.ActionRole                                               # 使对话框内的控件产生变化
QMessageBox.ButtonRole.HelpRole                                                 # 显示帮助的按钮
QMessageBox.ButtonRole.YesRole                                                  # Yes按钮
QMessageBox.ButtonRole.NoRole                                                   # No按钮
QMessageBox.ButtonRole.ResetRole                                                # 重置按钮,恢复对话框的默认值
QMessageBox.ButtonRole.ApplyRole                                                # 确认当前的设置,例如Apply按钮
在信息对话框中添加的按钮可以是自定义的按钮,也可以是标准按钮。用 addButton(button:QAbstractButton, role:QMessageBox.ButtonRole) 方法或 addButton(text:str, role:QMessageBox.ButtonRole) 方法自定义按钮,前者将一个已经存在的按钮加入到对话框中,后者创建名称是 text 的按钮,同时返回该按钮;用 addButton(button:QMessageBox.StandardButton) 方法可以添加标准按钮,并返回按钮,添加按钮后可以为按钮设置槽函数。标准按钮已经有角色,参数 QMessageBox.StandardButton 用于设置标准按钮,标准按钮与其对应的角色如下所示。
QMessageBox.StandardButton.Ok                                                   # AcceptRole
QMessageBox.StandardButton.Open                                                 # AcceptRole
QMessageBox.StandardButton.Save                                                 # AcceptRole
QMessageBox.StandardButton.SaveAll                                              # AcceptRole
QMessageBox.StandardButton.Retry                                                # AcceptRole
QMessageBox.StandardButton.Ignore                                               # AcceptRole

QMessageBox.StandardButton.Cancel                                               # RejectRole
QMessageBox.StandardButton.Close                                                # RejectRole
QMessageBox.StandardButton.Abort                                                # RejectRole

QMessageBox.StandardButton.Discard                                              # DestructiveRole

QMessageBox.StandardButton.Apply                                                # ApplyRole

QMessageBox.StandardButton.Reset                                                # ResetRole
QMessageBox.StandardButton.RestoreDefaults                                      # ResetRole

QMessageBox.StandardButton.Help                                                 # HelpRole

QMessageBox.StandardButton.Yes                                                  # YesRole
QMessageBox.StandardButton.YesToAll                                             # YesRole

QMessageBox.StandardButton.No                                                   # NoRole
QMessageBox.StandardButton.NoToAll                                              # NoRole
默认按钮是按 Enter 键时执行动作的按钮,默认按钮用 setDefaultButton(button:QPushButton)方法或 setDefaultButton(button:QMessageBox.StandardButton)方法设置,若未指定,则根据按钮的角色来确定默认按钮。Esc 按钮是按 Esc 键时执行动作的按钮,Esc 按钮用 setEscapeButton(button:QAbstractButton)方法或 setEscapeButton(button:QMessageBox.StandardButton) 方法设置。如果没有设置 Esc 按钮,则将角色是 CancelRole 的按钮作为 Esc 按钮;如果只有一个按钮,则将这个按钮作为 Esc 按钮。
对话框上被单击的按钮可以用 clickedButton() 方法获得,也可通过信号 buttonClicked(QAbstractButton) 获得,单击按钮后发送该信号,并传递被单击的按钮。
我们可以用静态函数快速构建信息对话框,这些静态函数的格式如下。除 about() 函数外,其他函数返回值是被单击的按钮或按钮的角色识别号。
PySide6 中内置的 5 种不同类型的对话框在使用时是类似的,这里以消息对话框为例。
information(parent:QWidget, title:str, text:str, buttons:QMessageBox.StandardButton=QMessageBox.StandardButton.Ok, defaultButton:QMessageBox.StandardButton=QMessageBox.StandardButton.NoButton) -> Union[int, QMessageBox.StandardButton]
parent:表示 该窗口所属的窗口;title:字符串,表示 对话框的标题;text:字符串,表示对话框中的 提示内容;buttons:对话框上要 添加的按钮,多个按钮之间用|来连接。没有指定该值是,默认为 OK 按钮;defaultButton:默认选中的按钮,没有指定该值时,默认为第一个按钮;
修改 ui.py 文件的内容。
from PySide6.QtWidgets import QWidget
from PySide6.QtWidgets import QPushButton
from PySide6.QtWidgets import QHBoxLayout

class MyUi:
    def setupUi(self, window:QWidget):
        window.resize(800, 600)                                                 # 1.设置窗口对象大小

        layout = QHBoxLayout(window)                                            # 2.创建一个水平布局

        self.message_dialog_button = QPushButton("消息对话框")                    # 3.创建按钮对象,并添加到布局
        layout.addWidget(self.message_dialog_button)

        self.question_dialog_button = QPushButton("问答对话框")
        layout.addWidget(self.question_dialog_button)

        self.warning_dialog_button = QPushButton("警告对话框")
        layout.addWidget(self.warning_dialog_button)

        self.critical_dialog_button = QPushButton("错误对话框")
        layout.addWidget(self.critical_dialog_button)

        self.about_dialog_button = QPushButton("关于对话框")
        layout.addWidget(self.about_dialog_button)
修改 widget.py 文件的内容。
import sys

from PySide6.QtWidgets import QApplication, QWidget
from PySide6.QtWidgets import QMessageBox

from ui import MyUi

class MyWidget(QWidget):
    def __init__(self):
        super().__init__()                                                      # 1.调用父类Qwidget类的__init__()方法

        self.__ui = MyUi()
        self.__ui.setupUi(self)                                                 # 2.初始化页面

        self.__ui.message_dialog_button.clicked.connect(self.message_dialog)
        self.__ui.question_dialog_button.clicked.connect(self.question_dialog)
        self.__ui.warning_dialog_button.clicked.connect(self.warning_dialog)
        self.__ui.critical_dialog_button.clicked.connect(self.critical_dialog)
        self.__ui.about_dialog_button.clicked.connect(self.about_dialog)

    def message_dialog(self):
        select = QMessageBox.information(self, "消息", "这是一个消息对话框", QMessageBox.StandardButton.Yes | QMessageBox.StandardButton.No)
        if select == QMessageBox.StandardButton.Yes:
            QMessageBox.information(self, "提醒", "你点击的确定按钮")
        elif select == QMessageBox.StandardButton.No:
            QMessageBox.information(self, "提醒", "你点击的取消按钮")

    def question_dialog(self):
        select = QMessageBox.question(self, "问答", "这是一个问答对话框", QMessageBox.StandardButton.Save | QMessageBox.StandardButton.Cancel)
        if select == QMessageBox.StandardButton.Save:
            QMessageBox.information(self, "提醒", "你点击的保存按钮")
        elif select == QMessageBox.StandardButton.Cancel:
            QMessageBox.information(self, "提醒", "你点击的取消按钮")

    def warning_dialog(self):
        select = QMessageBox.warning(self, "警告", "这是一个警告对话框", QMessageBox.StandardButton.Retry | QMessageBox.StandardButton.Ignore)
        if select == QMessageBox.StandardButton.Retry:
            QMessageBox.information(self, "提醒", "你点击的重试按钮")
        elif select == QMessageBox.StandardButton.Ignore:
            QMessageBox.information(self, "提醒", "你点击的忽略按钮")

    def critical_dialog(self):
        select = QMessageBox.critical(self, "错误", "这是一个错误对话框", QMessageBox.StandardButton.Reset | QMessageBox.StandardButton.Ignore)
        if select == QMessageBox.StandardButton.Reset:
            QMessageBox.information(self, "提醒", "你点击的重试按钮")
        elif select == QMessageBox.StandardButton.Ignore:
            QMessageBox.information(self, "提醒", "你点击的忽略按钮")

    def about_dialog(self):
        QMessageBox.about(self, "关于", "这是一个关于对话框")

if __name__ == "__main__":
    app = QApplication(sys.argv)                                                # 1.创建一个QApplication类的实例
    window = MyWidget()                                                         # 2.创建一个窗口
    window.show()                                                               # 3.显示窗口
    sys.exit(app.exec())                                                        # 4.进入程序的主循环并通过exit()函数确保主循环安全结束
QMessageBox.about()关于对话框不能指定按钮。
三、错误对话框
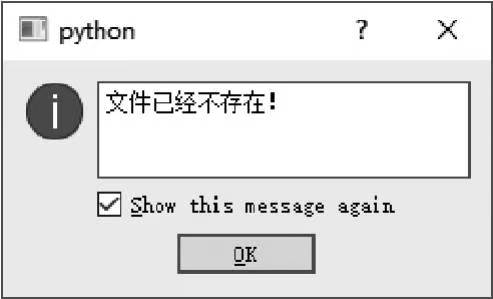
错误信息对话框 QErrorMessage 用于将程序运行时出现的错误内容显示出来。错误信息对话框 由一个 显示信息的文本框 和一个 勾选按钮 构成。
使用 QErrorMessage 类创建错误信息对话框实例的方法如下:
QErrorMessage(parent:QWidget=None)
错误信息对话框只有两个重载型槽函数 showMessage(message:str) 和 showMessage(message:str, type:str) ,执行该方法后立即显示对话框,其中 message 参数是 错误信息,type 参数指定 错误信息的类型。如果用户在对话框中不勾选 Show this message again,则遇到相同的错误信息或相同类型的错误信息时,将不再弹出对话框。
修改 ui.py 文件的内容。
from PySide6.QtWidgets import QWidget
from PySide6.QtWidgets import QPushButton

class MyUi:
    def setupUi(self, window:QWidget):
        window.resize(120, 70)                                                  # 1.设置窗口对象大小

        self.error_button = QPushButton("错误按钮", window)                       # 2.创建按钮
        self.error_button.setGeometry(20, 20, 80, 30)                           # 3.设置按钮的位置和尺寸
修改 widget.py 文件的内容。
import sys

from PySide6.QtWidgets import QApplication, QWidget
from PySide6.QtWidgets import QErrorMessage

from ui import MyUi

class MyWidget(QWidget):
    def __init__(self):
        super().__init__()                                                      # 1.调用父类Qwidget类的__init__()方法

        self.__ui = MyUi()
        self.__ui.setupUi(self)                                                 # 2.初始化页面

        self.error_message_dialog = QErrorMessage(self)                         # 3.创建错误对话框

        self.__ui.error_button.clicked.connect(self.error_message)              # 4.按钮点击时触发信号

    def error_message(self):
        self.error_message_dialog.showMessage("程序突然崩溃", "未知错误")          # 1.显示错误对话框

if __name__ == "__main__":
    app = QApplication(sys.argv)                                                # 1.创建一个QApplication类的实例
    window = MyWidget()                                                         # 2.创建一个窗口
    window.show()                                                               # 3.显示窗口
    sys.exit(app.exec())                                                        # 4.进入程序的主循环并通过exit()函数确保主循环安全结束
四、文件对话框
文件对话框 QFileDialog 用于 打开或保存文件时获取文件路径和文件名。在文件对话框中可以根据文件类型对文件进行过滤,只显示具有某些扩展名的文件。文件对话框的界面分为两种,一种是 PySide6 提供的界面,另一种是本机操作系统提供的界面,可以通过文件对话框的 setOption(option:QFileDialog.DontUseNativeDialog, on:bool) 方法设置显示的是哪种界面。对话框上的标签和按钮名称都可以通过对话框的属性进行修改。

用 QFileDialog 类创建文件对话框实例的方法如下所示:
QFileDialog(parent:QWidget=None, f:Qt.WindowFlags)
QFileDialog(parent:QWidget=None, caption:str='', directory:str='', filter:str='')
其中,caption 用于设置 对话框的标题,directory 设置 默认路径,filter 设置 过滤方式,只显示具有某种扩展名的文件。
QFileDialog 类常用方法如下:
# 实例方法
setAcceptMode(mode:QFileDialog.AcceptMode) -> None                              # 设置是打开还是保存对话框

setDefaultSuffix(suffix:str) -> None                                            # 设置默认的后缀名
defaultSuffix() -> str:                                                         # 返回默认的后缀名

saveState() -> QByteArray:                                                      # 保存对话框状态到QByteArray
restoreState(state:QByteArray) -> bool                                          # 从QByteArray恢复对话框状态

setNameFilter(filter:str) -> None                                               # 根据文件的扩展名设置过滤器
setNameFilters(filters:Sequence[str]) -> None                                   # 设置过滤器列表
nameFilters() -> List[str]:                                                     # 获取过滤器列表

selectFile(filename:str) -> None                                                # 设置初始选中的文件,可当作默认文件
selectedFiles() -> List[str]:                                                   # 获取被选中文件的绝对文件路径列表,如果没有选择文件,则返回值只有路径
selectNameFilter(filter:str) -> None                                            # 设置对话框初始名称过滤器
selectedNameFilter() -> str:                                                    # 获取被选中的名称过滤器
selectUrl(url:Union[QUrl, str]) -> None                                         # 设置对话框初始选中的文件
selectedUrls() -> List[QUrl]:                                                   # 获取被选中的文件的绝对文件路径列表,如果没有选择文件,则返回值只有路径

directory() -> QDir:                                                            # 获取对话框的当前路径
directoryUrl() -> QUrl:                                                         # 获取对话框的当前路径
setDirectory(directory:Union[QDir, str]) -> None                                # 设置对话框的初始路径

setFileMode(mode:QFileDialog.FileMode) -> None                                  # 设置文件模式,对话框是用于选择路径、单选个文件还是多个文件

setHistory(paths:Sequence[str]) -> None                                         # 设置对话框的浏览记录
history() -> List[str]                                                          # 获取对话框的浏览记录

setLabelText(label:QFileDialog.DialogLabel, text:str) -> None                   # 设置对话框上各标签或按钮的名称
labelText(label:QFileDialog.DialogLabel) -> str:                                # 获取对话框上标签或按钮的名称

setOption(option:QFileDialog.Option, on:bool=true) -> None                      # 设置对话框选项
testOption(option:QFileDialog.Option) -> bool                                   # 测试对话框选项

setViewMode(mode:QFileDialog.ViewMode) -> None                                  # 设置视图模式,对话框是显示文件列表还是显示图标

# 静态方法

# 打开文件对话框,获取路径或文件及过滤器
# 其中,caption是对话框的标题,dir是初始路径,fiilter是对话框中可选的过滤器,selectedFilter是对话框中已经选中的过滤器
# 除了getExistingDirectory()和getExistingDirectoryUrl()外,其它方法都是返回元组,元组的第一个参数是文件名或文件名列表,第二个参数是选中的过滤器
getExistingDirectory(parent:QWidget=None, caption:str='', dir:str='', options:QFileDialog.Option=QFileDialog.Option.ShowDirsOnly) -> str

getExistingDirectoryUrl(parent:QWidget=None, caption:str='', dir:Union[QDir, str]=Default(QUrl), options:QFileDialog.Option=QFileDialog.Option.ShowDirsOnly) -> QUrl

getOpenFileName(parent:QWidget=None, caption:str='', dir:str='', filter:str='', selectedFilter:str='', options:QFileDialog.Options=QFileDialog.Options()) -> tuple

getOpenFileNames(parent:QWidget=None, caption:str='', dir:str='', filter:str='', selectedFilter:str='', options:QFileDialog.Options=QFileDialog.Options()) -> tuple

getOpenFileUrl(parent:QWidget=None, caption:str='', dir:Union[QDir, str]='', filter:str=Default(QUrl), selectedFilter:str='', options:QFileDialog.Options=QFileDialog.Options()) -> tuple

getOpenFileUrls(parent:QWidget=None, caption:str='', dir:Union[QDir, str]='', filter:str=Default(QUrl), selectedFilter:str='', options:QFileDialog.Options=QFileDialog.Options()) -> tuple

getSaveFileName(parent:QWidget=None, caption:str='', dir:str='', filter:str='', selectedFilter:str='', options:QFileDialog.Option=QFileDialog.Option.ShowDirsOnly) -> tuple

getSaveFileUrl(parent:QWidget=None, caption:str='', dir:Union[QDir, str]='', filter:str=Default(QUrl), selectedFilter:str='', options:QFileDialog.Options=QFileDialog.Options()) -> tuple
QFileDialog 类常用信号如下:
currentChanged(path:str)                                                        # 在对话框中所选择的文件或路径发生改变时发射信号,参数是当前选择的文件或路径
currentUrlChanged(url:QUrl)                                                     # 在对话框中所选择的文件或路径发生改变时发射信号,参数是当前选择的文件或路径的QUrl对象
directoryEntered(directory:str)                                                 # 进入新路径时发射信号,参数是新路径的字符串
directoryUrlEntered(directory:QUrl)                                             # 进入新路径时发射信号,参数是新路径的QUrl对象
fileSelected(file:str)                                                          # 单击open或save按钮后发射信号,参数是选中的文件
filesSelected(files:List[str])                                                  # 单击open或save按钮后发射信号,参数是选中的文件列表
urlSelected(url:QUrl)                                                           # 单击open或save按钮后发射信号,参数是选中的文件的QUrl对象
urlsSelected(urls:List[QUrl])                                                   # 单击open或save按钮后发射信号,参数是选中的文件的QUrl对象列表
filterSelected(filter:str)                                                      # 选择新的过滤器后发射信号,参数是新的过滤器
文件对话框也用 show()、open() 和 exec() 方法 显示,最简便的方法是用 QFileDialog 提供的静态方法来打开文件对话框获取文件路径和文件名。
用 setFileMode(mode:QFileDialog.FileMode) 方法可以 设置对话框的文件模式,文件模式是指对话框显示的内容或允许选择的内容,其中参数 mode 是 QFileDialog.FileMode 类型的枚举值,可以取值如下:
QFileDialog.FileMode.AnyFile                                                    # 任意文件和文件夹,也可以输入不存在的文件或文件夹
QFileDialog.FileMode.ExistingFile                                               # 只能选择一个存在的文件,不能是文件夹或不存在的文件
QFileDialog.FileMode.Directory                                                  # 只能选择文件夹
QFileDialog.FileMode.ExistingFiles                                              # 可以选择多个存在的文件
用 setOption(option:QFileDialog.Option, on:bool=True) 方法设置文件对话框的外观选项,需在显示对话框之前设置,参数 option 是 QFileDialog.Option 类型的枚举值,可以取值如下:
QFileDialog.Option.ShowDirsOnly                                                 # 只显示文件夹
QFileDialog.Option.DontResolveSymlinks                                          # 不解析链接
QFileDialog.Option.DontConfirmOverwrite                                         # 存盘时若选择了存在的文件,不提示覆盖信息
QFileDialog.Option.DontUseNativeDialog                                          # 不使用操作系统的对话框
QFileDialog.Option.ReadOnly                                                     # 只读
QFileDialog.Option.HideNameFilterDetails                                        # 隐藏名称过滤器的详细信息
QFileDialog.Option.DontUseCustomDirectoryIcons                                  # 不使用用户的目录图标,有些系统允许使用
用 setAcceptMode(mode:QFileDialog.AcceptMode) 方法 设置文件对话框是打开对话框还是保存对话框,参数 mode 是 QFileDialog.AcceptMode 类型的枚举值,可以取值如下:
QFileDialog.AcceptMode.AcceptOpen                                               # 设置文件对话框为打开模式,这是默认值
QFileDialog.AcceptMode.AcceptSave                                               # 设置文件对话框为保存模式
用 setViewMode(mode:QFileDialog.ViewMode) 方法 设置对话框的视图模式,参数 mode 是 QFileDialog.ViewMode 类型的枚举值,可以取值如下:
QFileDialog.ViewMode.Detail                                                     # 详细显示
QFileDialog.ViewMode.List                                                       # 列表显示,只显示图标和名称
对话框上的标签和按钮的文字可以用 setLabelText(lable:QFileDialog.DialogLabel, text:str) 方法重新设置,其中参数 label 是 QFileDialog.DialogLabel 类型的枚举值,可以取值如下:
QFileDialog.DialogLabel.LookIn
QFileDialog.DialogLabel.FileName
QFileDialog.DialogLabel.FileType
QFileDialog.DialogLabel.Accept
QFileDialog.DialogLabel.Reject
过滤器 的作用是在文件对话框中只显示某些类型的文件,例如通过方法 setNameFilter("Picture(*.png*.bmp*.jpeg*.jpg") 设置过滤器后,对话框只显示扩展名为 png、bmp、jpeg 和 jpg 的文件。创建过滤器时,过滤器之间用空格隔开,如果有括号,则用括号中的内容作为过滤器,多个过滤器用两个分号 ;;隔开,例如 setNameFilter("Picture(*.png*.bmp);;text(*.txt)")。用 setNameFilter(str) 方法或 setNameFilters(Sequence[str]) 方法设置对话框中的过滤器。
修改 ui.py 文件的内容。
from PySide6.QtWidgets import QWidget
from PySide6.QtWidgets import QToolBar
from PySide6.QtWidgets import QTextEdit
from PySide6.QtWidgets import QVBoxLayout
from PySide6.QtWidgets import QFileDialog
from PySide6.QtGui import Qt, QAction, QIcon

class MyUi:
    def setupUi(self, window:QWidget):
        window.resize(800, 600)                                                 # 1.设置窗口对象大小

        layout = QVBoxLayout(window)                                            # 2.创建一个垂直布局

        self.toolBar = QToolBar()                                               # 3.创建一个工具栏,并添加到布局中
        layout.addWidget(self.toolBar)

        self.toolBar.setToolButtonStyle(Qt.ToolButtonStyle.ToolButtonTextUnderIcon)         # 4.设置工具栏的显示样式

        self.open_file_action = QAction(icon=QIcon("assets/images/1.ico"), text="打开文件")  # 5.创建一个动作,并添加到工具栏中
        self.toolBar.addAction(self.open_file_action)

        self.info_textEdit = QTextEdit(window)                                  # 6.创建一个文本编辑框,并添加到布局中
        layout.addWidget(self.info_textEdit)

        self.info_textEdit.setReadOnly(True)                                    # 7.设置文本编辑框为只读

    def file_dialog_setupUi(self, parent:QWidget|None=None):
        self.file_dialog = QFileDialog(parent)                                  # 1.创建文件对话框
        self.file_dialog.setFileMode(QFileDialog.FileMode.ExistingFiles)        # 2.设置多选
        self.file_dialog.setDirectory("E:\\")                                   # 4.设置初始磁盘
        self.file_dialog.setNameFilter("图片文件(*.jpg *.png);;视频文件(*.mp4 *.ts *.avi)") # 5.设置文件过滤器
修改 widget.py 文件的内容。
import sys

from PySide6.QtWidgets import QApplication, QWidget

from ui import MyUi

class MyWidget(QWidget):
    def __init__(self):
        super().__init__()                                                      # 1.调用父类Qwidget类的__init__()方法

        self.__ui = MyUi()
        self.__ui.setupUi(self)                                                 # 2.初始化页面
        self.__ui.file_dialog_setupUi(self)                                     # 3.初始化文件对话框

        self.__ui.open_file_action.triggered.connect(self.open_file)            # 4.动作被触发时发射信号

    def open_file(self):
        if self.__ui.file_dialog.exec():                                        # 1.判断是否选择了文件
            for info in self.__ui.file_dialog.selectedFiles():                  # 2.获取选择的文件信息
                self.__ui.info_textEdit.append(info)                            # 3.将信息添加到textEdit中

if __name__ == "__main__":
    app = QApplication(sys.argv)                                                # 1.创建一个QApplication类的实例
    window = MyWidget()                                                         # 2.创建一个窗口
    window.show()                                                               # 3.显示窗口
    sys.exit(app.exec())                                                        # 4.进入程序的主循环并通过exit()函数确保主循环安全结束
五、输入对话框
输入对话框 QInputDialog 用于 输入简单内容 或 选择内容,分为 整数输入框、浮点数输入框、文本输入框、多行文本输入框 和 下拉列表输入框 5 种。
输入对话框 由 一个标签、一个输入控件 和 两个按钮 构成。如果是 整数输入框,输入控件是 QSpinBox;如果是 浮点数输入框,输入控件是 QDoubleSpinBox,如果是 单行文本输入框,输入控件是 QLineEdit,如果是 多行文本输入框,输入控件是 QPlainTextEdit,如果是 下拉列表输入框,输入控件是 QComboBox 或 QListView。
使用 QInputDialog 类创建输入对话框实例的方法如下所示:
QInputDialog(parent:QWidget=None, flags:Qt.WindowFlags=Default(Qt.WindowFlags))
QInputDialog 类常用方法如下:
# 实例方法
setInputMode(mode:QInputDialog.Mode) -> None                                    # 设置输入对话框的类型
setOption(option:QInputDialog.Option, on:bool=true) -> None                     # 设置输入对话框的参数
testOption(option:QInputDialog.Option) -> bool                                  # 测试输入对话框的参数

setLabelText(text:str) -> None                                                  # 设置对话款中标签的名称

setOkButtonText(text:str) -> None                                               # 设置对话框中的确定按钮的名称
setCancelButtonText(text:str) -> None                                           # 设置对话框中的取消按钮的名称

setIntValue(value:int) -> None                                                  # 设置对话框中的整数输入框的值
intValue() -> int                                                               # 获取对话框中的整数输入框的值

setIntMinimum(min:int) -> None                                                  # 设置对话框中的整数输入框的最小值
setIntMaximum(max:int) -> None                                                  # 设置对话框中的整数输入框的最大值
setIntRange(min:int, max:int) -> None                                           # 设置对话框中的整数输入框的范围
setIntStep(step:int) -> None                                                    # 设置对话框中的整数输入框的步长

setDoubleValue(value:float) -> None                                             # 设置对话框中的浮点数输入框的值
doubleValue() -> float                                                          # 获取对话框中的浮点数输入框的值

setDoubleDecimals(decimals:int) -> None                                         # 设置对话框中的浮点数输入框的小数位数
setDoubleMinimum(min:float) -> None                                             # 设置对话框中的浮点数输入框的最小值
setDoubleMaximum(max:float) -> None                                             # 设置对话框中的浮点数输入框的最大值
setDoubleRange(min:float, max:float) -> None                                    # 设置对话框中的浮点数输入框的范围
setDoubleStep(step:float) -> None                                               # 设置对话框中的浮点数输入框的步长

setTextValue(text:str) -> None                                                  # 设置对话框中的文本输入框的值
textValue() -> str                                                              # 获取对话框中的文本输入框的值

setTextEchoMode(mode:QLineEdit.EchoMode) -> None                                # 设置对话框中的文本输入框的输入方式

setComboBoxItems(items:Sequence[str]) -> None                                   # 设置对话框中的下拉列表框的选项
comboBoxItems() -> List[str]                                                    # 获取对话框中的下拉列表框的选项

setComboBoxEditable(editable:bool) -> None                                      # 设置对话框中的下拉列表框是否可编辑

# 静态方法

"""
显示输入对话框,并返回输入的值和单击按钮的类型,其中,title是设置对话框的标题名称,label是对话框中标签的名称,
在对话框中点击Cancel按钮后,返回值是元组(0, False)或("", False)
"""
getInt(parent:QWidget, title:str, label:str, value:int=0, minValue:int=-2147483647, maxValue:int=2147483647, step:int=1, flags:Qt.WindowFlags=Qt.WindowFlags()) -> tuple[int, bool]

getDouble(parent:QWidget, title:str, label:str, value:float=0, minValue:float=-2147483647, maxValue:float=2147483647, decimals:int=1, flags:Qt.WindowFlags=Qt.WindowFlags(), step:float=1) -> tuple[float, bool]

getText(parent:QWidget, title:str, label:str, echo:QLineEdit.EchoMode=QLineEdit.Normal, text:str="", flags:Qt.WindowFlags=Qt.WindowFlags(), inputMethodHints=Qt.ImhNone) -> tuple[str, bool]

getMultiLineText(parent:QWidget, title:str, label:str, text:str="", flags:Qt.WindowFlags=Qt.WindowFlags(), inputMethodHints=Qt.ImhNone) -> tuple[str, bool]

getItem(parent:QWidget, title:str, label:str, items:Sequence[str], current:int=0, editable:bool=true, flags:Qt.WindowFlags=Qt.WindowFlags(), inputMethodHints=Qt.ImhNone) -> tuple[str, bool]
QInputDialog 类常用信号如下:
intValueChanged(value:int)                                                      # 输入对话框的整数值改变时发射信号
intValueSelected(value:int)                                                     # 单击OK按钮后发射信号
doubleValueChanged(value:float)                                                 # 输入对话框的浮点数值改变时发射信号
doubleValueSelected(value:float)                                                # 单击OK按钮后发射信号
textValueChanged(text:str)                                                      # 输入对话框的文本改变时发射信号
textValueSelected(text:str)                                                     # 单击OK按钮后发射信号
输入对话框分为 整数输入对话框、浮点数输入对话框 和 文本输入对话框,其中 文本输入对话框 又分为 单行文本输入对话框、多行文本输入对话框 和 列表输入对话框,列表输入对话框 通常是从 QComboBox 控件或 QListWiew 控件中选择内容。用 setInputMode(mode:QInputDialog.InputMode) 方法 设置输入对话框的类型,其中参数 mode 是 QInputDialog.InputMode 类型的枚举值,可以取值如下:
QInputDialog.InputMode.IntInput                                                 # 整数输入对话框
QInputDialog.InputMode.Double                                                   # 浮点数输入对话框
InputQInputDialog.InputMode.TextInput                                           # 文本输入对话框
对于 整数输入对话框,用 setIntValue(value:int) 方法可以 设置对话框初次显示时的值,用 intValue() 方法可以 获取单击 OK 按钮后的整数值。整数输入对话框中允许 输入值的范围 用 setIntMinimum(value:int)、setIntMaximum(value:int)方法设置,或者用 setIntRange(min:int, max:int)方法设置。整数输入对话框的 输入控件 是 QSpinBox,单击右侧上下箭头可微调整数,微调整数值变化的 步长 用 setIntStep(step:int) 方法设置。
对于 浮点数输入对话框,用 setDoubleValue(value:float) 方法可以 设置对话框初次显示时的值,用 doubleValue() 方法可以 获取单击 OK 按钮后的浮点数值。浮点数对话框中允许 输入值的范围 用 setDoubleMinimum(value:float)、setDoubleMaximum(value:float)方法设置,或者用 setDoubleRange(minfloat, max:float)方法设置。浮点数对话框的 输入控件 是 QDoubleSpinBox,单击右侧上下箭头可微调数据,浮点数值变化的 步长 用 setDoubleStep(step:float) 方法设置。
对于 文本输入对话框,默认的输入控件 是 QLineEdit,用 setOption(optin:QInputDialog.UsePlainTextEditForTextInput)方法将 QLineEdit 控件替换成 QPlainTextEdit,当用 setComboBoxItems(Sequence[str]) 方法 设置控件的项(item)时,输入控件替换成 QComboBox,如果设置成 setOption(option:QInputDialog.UseListViewForComboBoxItems),则输入控件替换成 QListView。
对于 文本输入对话框,用 setTextValue(text:str) 方法可以 设置对话框中初始文本,用 textValue() 方法 获取单击 OK 按钮后输入对话框的值。当输入控件是 QLineEdit 时,用 setTextEchoMode(mode:QLineEdit.EchoMode) 方法可以 设置 QLineEidt 控件的输入模式,其中,参数 mode 是 QLineEdit.EchoMode 类型的枚举值,可以取值如下:
QLineEdit.EchoMode.Norma                                                        # 正常显示
QLineEdit.EchoMode.NoEcho                                                       # 输入文字时,没有任何显示
QLineEdit.EchoMode.Password                                                     # 输入文字时,按照密码方式显示
QLineEdit.EchoMode.PasswordEchoOnEdit                                           # 失去焦点时,密码显示状态,编辑文本时,正常显示
修改 ui.py 文件的内容。
from PySide6.QtWidgets import QWidget
from PySide6.QtWidgets import QLineEdit
from PySide6.QtWidgets import QFormLayout

class MyUi:
    def setupUi(self, window:QWidget):
        window.resize(700, 500)                                                 # 1.设置窗口对象大小

        layout = QFormLayout(window)                                            # 2.创建一个表单布局

        self.name_lineEdit = QLineEdit()                                        # 3.创建QLineEdit控件,并添加到布局中
        self.name_lineEdit.setPlaceholderText("请输入姓名")
        layout.addRow("姓名", self.name_lineEdit)

        self.gender_lineEdit = QLineEdit()
        self.gender_lineEdit.setPlaceholderText("请输入性别")
        layout.addRow("性别", self.gender_lineEdit)

        self.age_lineEdit = QLineEdit()
        self.age_lineEdit.setPlaceholderText("请输入年龄")
        layout.addRow("年龄", self.age_lineEdit)

        self.score_lineEdit = QLineEdit()
        self.score_lineEdit.setPlaceholderText("请输入分数")
        layout.addRow("分数", self.score_lineEdit)
修改 widget.py 文件的内容。
import sys

from PySide6.QtWidgets import QApplication, QWidget
from PySide6.QtWidgets import QLineEdit
from PySide6.QtWidgets import QInputDialog

from ui import MyUi

class MyWidget(QWidget):
    def __init__(self):
        super().__init__()                                                      # 1.调用父类Qwidget类的__init__()方法

        self.__ui = MyUi()
        self.__ui.setupUi(self)                                                 # 2.初始化页面

        self.__ui.name_lineEdit.textEdited.connect(self.input_name)
        self.__ui.gender_lineEdit.textEdited.connect(self.input_gender)
        self.__ui.age_lineEdit.textEdited.connect(self.input_age)
        self.__ui.score_lineEdit.textEdited.connect(self.input_score)

    def input_name(self, text:str):
        name, flag = QInputDialog.getText(self, "姓名", "请输入姓名", QLineEdit.EchoMode.Normal, "小樱")
        if flag:
            self.__ui.name_lineEdit.setText(name)

    def input_gender(self, text:str):
        gender, flag = QInputDialog.getItem(self, "性别", "请输入选择性别", ("男", "女"), 1, False)
        if flag:
            self.__ui.gender_lineEdit.setText(gender)

    def input_age(self, text:str):
        age, flag = QInputDialog.getInt(self, "年龄", "请输入年龄", 0, 0, 100, 1)
        if flag:
            self.__ui.age_lineEdit.setText(str(age))

    def input_score(self, text:str):
        scrore, flag = QInputDialog.getDouble(self, "分数", "请输入分数", 0, 0, 100, 1)
        if flag:
            self.__ui.score_lineEdit.setText(str(scrore))

if __name__ == "__main__":
    app = QApplication(sys.argv)                                                # 1.创建一个QApplication类的实例
    window = MyWidget()                                                         # 2.创建一个窗口
    window.show()                                                               # 3.显示窗口
    sys.exit(app.exec())                                                        # 4.进入程序的主循环并通过exit()函数确保主循环安全结束
各个输入方法都返回一个元组,元组中的第一个元素是 输入数据,第二个元素是 布尔值。如果用户关闭了对话框或单击了 “Cancel” 按钮,则布尔值的值为 False。
六、字体对话框
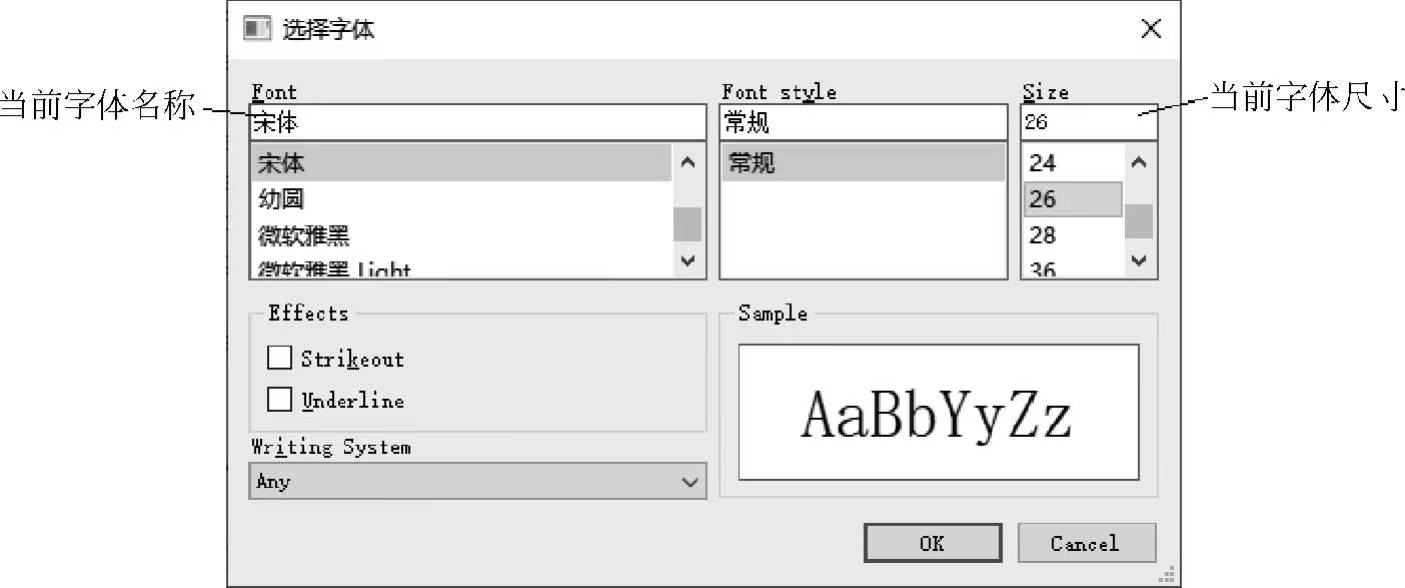
字体对话框 QFontDialog 用于 选择字体,其界面是 PySide6 已经编辑好的,用户可以直接在对话框中选择与字体有关的选项。
用 QFontDialog 类创建标准字体对话框的方法如下,其中 QFont 用于初始化对话框。
QFontDialog(parent:QWidget=None)
QFontDialog(font:QFont, parent:QWidget=None)
QFontDialog 类表示字体对话框,用户可以从中选择字体的大小、样式、格式等信息。QFontDialog 类中常用的方法如下:
# 实例方法
selectedFont() -> QFont                                                         # 获取在对话框中单击OK按钮后,最终选中的字体
setCurrentFont(font:QFont) -> None                                              # 设置字体对话框中当前的字体,用于初始化字体对话框
currentFont() -> QFont                                                          # 获取字体对话框中当前的字体
setOption(option:QFontDialog.FontDialogOption, on:bool=true) -> None            # 设置对话框的选项
testOption(option:QFontDialog.FontDialogOption) -> bool                         # 测试对话框的选项

# 静态方法
# 用模式方式初始化对话框,获取字体
# 参数initial是初始化字体,title是对话框标题
# 返回值是元组,第一个是是否成功,第二个是字体
# 如在对话框中单击OK按钮,bool为True,单击Cancel按钮,bool为False
getFont(parent:QWidget=None) -> tuple[bool, QFont]
getFont(initial:QFont, parent:QWidget=None, title:str="", options:QFontDialog.FontDialogOption=QFontDialog.FontDialogOptions()) -> tuple[bool, QFont]
QFontDialog 类中常用的信号如下:
currentFontChanged(font:QFont)                                                  # 在对话框中选择字体是发射信号
fontSelected(font:QFont)                                                        # 在对话框中单击OK按钮是发射信号
创建字体对话框的一种方法是先创建对话框实例对象,设置对话框的属性,然后用 show()、open() 或 exec() 方法显示对话框;另一种方法是直接用 getFont() 方法,getFont() 方法是静态方法,可直接使用 类名.getFont() 方法调用,也可用实例对象调用。
用 setOption(mode:QFontDialog.FontDialogOption, on=True) 方法 设置字体对话框的选项,其中参数 mode 是 QFontDialog.FontDialogOption 类型的枚举值,可以取值如下:
QFontDialog.FontDialogOption.NoButtons                                          # 不显示OK和Cancel按钮
QFontDialog.FontDialogOption.DontUseNativeDialog                                # 在Mac机上不使用本机字体对话框,使用PySide6的字体对话框
QFontDialog.FontDialogOption.ScalableFonts                                      # 显示可缩放字体
QFontDialog.FontDialogOption.NonScalableFonts                                   # 显示不可缩放字体
QFontDialog.FontDialogOption.MonospacedFonts                                    # 显示等宽字体
QFontDialog.FontDialogOption.ProportionalFonts                                  # 显示比例字体
用 selectedFont() 方法可以获取在单击 OK 按钮后,最终选中的字体。在对话框中单击 OK 按钮时,同时也发送信号 fontSelected(QFont),其中参数 QFont 是最后选中的字体。
用 setCurrentFont(font:QFont) 方法可以设置对话框显示时,初始选中的字体。在对话框中选择不同的字体时,会发送 currentFontChanged(font:QFont) 信号,其中参数 QFont 是当前选中的字体。
修改 ui.py 文件的内容。
from PySide6.QtWidgets import QWidget
from PySide6.QtWidgets import QToolBar
from PySide6.QtWidgets import QTextEdit
from PySide6.QtWidgets import QVBoxLayout
from PySide6.QtGui import Qt, QAction, QIcon

class MyUi:
    def setupUi(self, window:QWidget):
        window.resize(800, 600)                                                 # 1.设置窗口对象大小

        layout = QVBoxLayout(window)                                            # 2.创建一个垂直布局

        self.toolBar = QToolBar()                                               # 3.创建一个工具栏,并添加到布局中
        layout.addWidget(self.toolBar)

        self.toolBar.setToolButtonStyle(Qt.ToolButtonStyle.ToolButtonTextUnderIcon)             # 4.设置工具栏的显示样式

        self.choose_font_action = QAction(icon=QIcon("assets/images/1.ico"), text="选择字体")   # 5.创建一个动作,并添加到工具栏中
        self.toolBar.addAction(self.choose_font_action)

        self.textEdit = QTextEdit(window)                                       # 6.创建文本框控件,并添加到布局中
        self.textEdit.setText("小樱")
        layout.addWidget(self.textEdit)
修改 widget.py 文件的内容。
import sys

from PySide6.QtWidgets import QApplication, QWidget
from PySide6.QtWidgets import QFontDialog

from ui import MyUi

class MyWidget(QWidget):
    def __init__(self):
        super().__init__()                                                      # 1.调用父类Qwidget类的__init__()方法

        self.__ui = MyUi()
        self.__ui.setupUi(self)                                                 # 2.初始化页面

        self.__ui.choose_font_action.triggered.connect(self.choose_font)        # 3.动作被触发时发射信号

    def choose_font(self):
        flag, font = QFontDialog.getFont()                                      # 1.获取字体
        if flag:                                                                # 2.判断是否选择字体
            self.__ui.textEdit.setFont(font)                                    # 3.设置字体

if __name__ == "__main__":
    app = QApplication(sys.argv)                                                # 1.创建一个QApplication类的实例
    window = MyWidget()                                                         # 2.创建一个窗口
    window.show()                                                               # 3.显示窗口
    sys.exit(app.exec())                                                        # 4.进入程序的主循环并通过exit()函数确保主循环安全结束
QFontDialog 调用 getFont() 方法 弹出字体对话框。该方法返回一个 元组,元组中的第一个元素是 QFont 类型的,第二个元素是 布尔类型 的。在将字体设置到文本编辑框之前,需要先判断布尔值的值。如果值为 True,表明用户选择了一种字体,如果没有选择,而是单击 “关闭” 按钮或 “Cancel” 按钮,那么布尔值的值就是 False。family() 和 pointSize() 方法分别用来返回字体的名称和大小。
七、颜色对话框
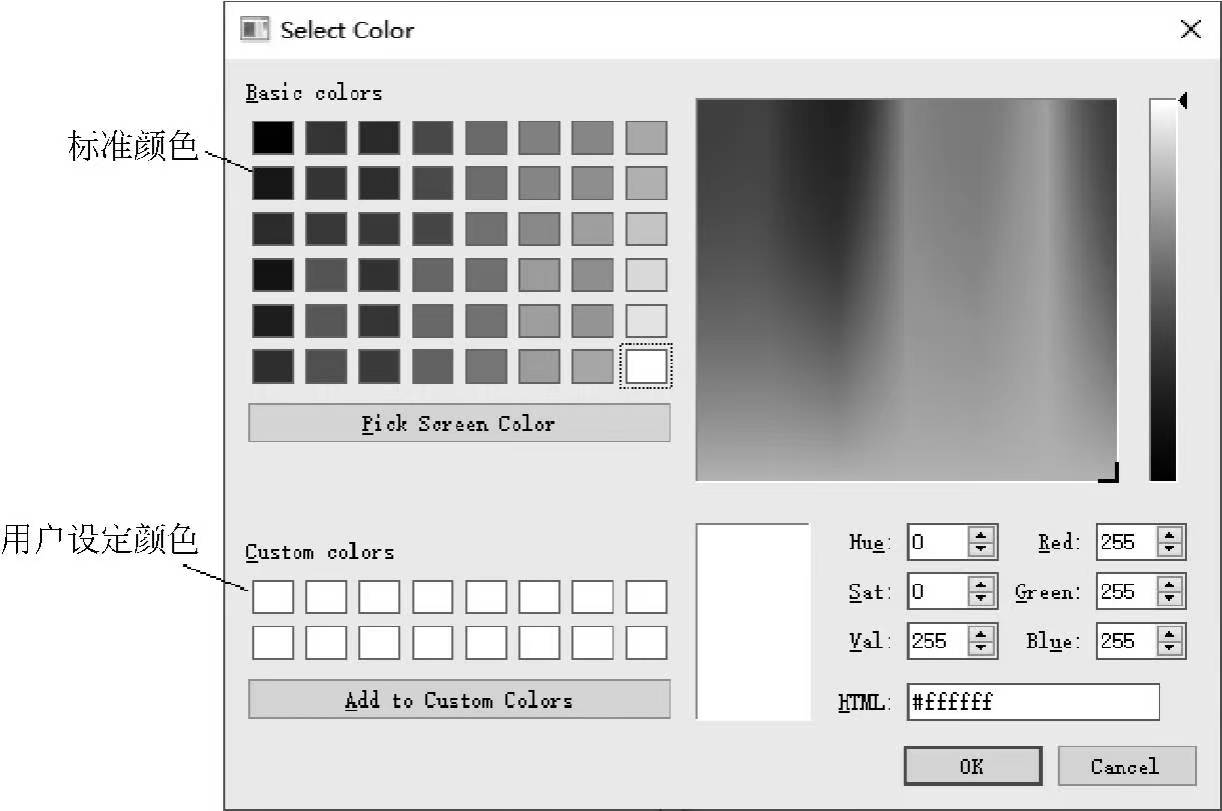
颜色对话框 QColorDialog 和字体对话框 QFontDialog 类似,也是一种标准对话框,供用户 选择颜色。在对话框中用户可以自己设定和选择颜色,还可使用标准颜色,另外用户也可保存自己设定的颜色。
用 QColorDialog 类创建标准颜色对话框的方法如下:
QColorDialog(parent:QWidget=None)
QColorDialog(color:QColor, parent:QWidget=None)
其中参数 QColor 用于 初始化对话框,还可以用 Qt.GlobalColor 和 QGradient 初始化颜色。
QColorDialog 类中常用的方法如下:
# 实例方法
selectedColor() -> QColor                                                       # 获取颜色对话框中单击OK按钮后选中的颜色

setCurrentColor(color: QColor) -> None                                          # 设置颜色对话框中当前选中的颜色,用于初始化对话框
currentColor() -> QColor                                                        # 获取颜色对话框中当前选中的颜色

setOption(option:QColorDialog.ColorDialogOption, on:bool=true) -> None          # 设置对话框的选项
testOption(option:QColorDialog.ColorDialogOption) -> bool                       # 测试对话框的选项

# 静态方法
setCustomColor(index:int, color:QColor) -> None                                 # 设置用户颜色
customColor(index:int) -> QColor                                                # 获取用户颜色

customCount() -> int                                                            # 获取用户颜色数量

setStandardColor(index:int, color:QColor) -> None                               # 设置标准颜色
standardColor(index:int) -> QColor                                              # 获取标准颜色

# 显示对话框获取颜色
getColor(initial:QColor=Qt.white, parent:QWidget=None, title:str="", options:QColorDialog.ColorDialogOptions=QColorDialog.ColorDialogOptions()) -> QColor
QColorDialog 类中常用的信号如下:
colorSelected(color:Color)                                                      # 在对话框中选择颜色是发射信号
currentColorChanged(color:Color)                                                # 在对话框中单击OK按钮是发射信号
颜色对话框的显示可以用 show()、open() 和 exec() 方法,也可以用 getColor() 方法。getColor() 方法是静态方法,直接使用 类名.getColor() 方法调用,也可用实例对象调用。
用 setOption(option:QColorDialog.ColorDialogOption,on=True) 方法 设置颜色对话框的选项,其中,参数 option 是 QColorDialog.ColorDialogOption 类型的枚举值,可以取值如下:
QColorDialog.ColorDialogOption.ShowAlphaChannel                                 # 在对话框上显示Alpha通道
QColorDialog.ColorDialogOption.NoButtons                                        # 不显示OK和Cancel按钮
QColorDialog.ColorDialogOption.DontUseNativeDialog                              # 不使用本机的对话框
颜色对话框中有标准的颜色,可以用 standardColor(index:int) 方法 获取标准颜色,用 setStandardColor(index:int, color:QColor) 方法 设置标准颜色。
颜色对话框可以存储用户指定的颜色,用 setCustomColor(index:int, color:QColor) 方法 设置用户颜色,用 customColor(index:int) 方法 获取用户颜色。
修改 ui.py 文件的内容。
from PySide6.QtWidgets import QWidget
from PySide6.QtWidgets import QToolBar
from PySide6.QtWidgets import QTextEdit
from PySide6.QtWidgets import QVBoxLayout
from PySide6.QtGui import Qt, QAction, QIcon

class MyUi:
    def setupUi(self, window:QWidget):
        window.resize(800, 600)                                                 # 1.设置窗口对象大小

        layout = QVBoxLayout(window)                                            # 2.创建一个垂直布局

        self.toolBar = QToolBar()                                               # 3.创建一个工具栏,并添加到布局中
        layout.addWidget(self.toolBar)

        self.toolBar.setToolButtonStyle(Qt.ToolButtonStyle.ToolButtonTextUnderIcon)             # 4.设置工具栏的显示样式

        self.choose_color_action = QAction(icon=QIcon("assets/images/1.ico"), text="选择颜色")  # 5.创建一个动作,并添加到工具栏中
        self.toolBar.addAction(self.choose_color_action)

        self.textEdit = QTextEdit(window)                                       # 6.创建文本框控件,并添加到布局中
        self.textEdit.setText("小樱")
        layout.addWidget(self.textEdit)

        font = self.textEdit.font()                                             # 7.获取文本框的字体
        font.setFamily("华文行楷")                                               # 8.设置字体名称
        font.setPointSize(48)                                                   # 9.设置字体大小
        self.textEdit.setFont(font)                                             # 10.设置文本框的字体
修改 widget.py 文件的内容。
import sys

from PySide6.QtWidgets import QApplication, QWidget
from PySide6.QtWidgets import QColorDialog

from ui import MyUi

class MyWidget(QWidget):
    def __init__(self):
        super().__init__()                                                      # 1.调用父类Qwidget类的__init__()方法

        self.__ui = MyUi()
        self.__ui.setupUi(self)                                                 # 2.初始化页面

        self.__ui.choose_color_action.triggered.connect(self.choose_color)      # 3.动作被触发时发射信号

    def choose_color(self):
        color = QColorDialog.getColor()                                         # 1.选择颜色
        if color.isValid():                                                     # 2.判断颜色是否有效
            self.__ui.textEdit.selectAll()                                      # 3.选中所有文本
            self.__ui.textEdit.setTextColor(color)                              # 4.设置颜色

if __name__ == "__main__":
    app = QApplication(sys.argv)                                                # 1.创建一个QApplication类的实例
    window = MyWidget()                                                         # 2.创建一个窗口
    window.show()                                                               # 3.显示窗口
    sys.exit(app.exec())                                                        # 4.进入程序的主循环并通过exit()函数确保主循环安全结束
QColorDialog 调用 getColor() 方法 弹出颜色对话框,返回的值是 QColor 类型的。在将颜色设置到文本编辑框之前,需要先调用 isValid() 方法 判断用户是否选择了颜色,如果没有选择,而是单击 “关闭” 按钮或 “Cancel” 按钮,那么 isValid() 就会返回 False。name() 方法 用于获取颜色的名称,格式是 #RRGGBB。red()、green() 和 blue() 分别用来获取红、绿、蓝 3 个颜色通道的值。
点击设置颜色之后,之前字体的颜色不会改变,如果我们想要改变之前字体的颜色,可以先选择字体,在设置颜色。
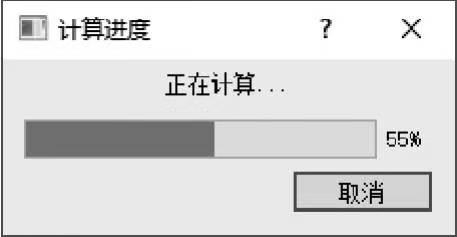
八、进度对话框
进度对话框 QProgressDialog 用于表明某项任务正在进行及任务的完成进度。进度对话框由 1 个标签 QLabel、1 个进度条 QProgressBar 和 1 个按钮 QPushButton 构成。进度对话框可以与定时器一起工作,每隔一段时间获取一项任务的完成值,再设置进度条的当前值。当然,如果任务能自动输出其完成值,可直接与进度条的槽函数 setValue(value:int) 连接。
用 QProgressDialog 类创建进度对话框的方法如下所示:
QProgressDialog(parent:QWidget=None)
QProgressDialog(title:str, text:str, min:int, max:int, parent:QWidget=None)
QProgressDialog 类中常用的方法如下:
# 实例方法
minimumDuration() -> int                                                        # 获取从创建到显示时的时间

value() -> int                                                                  # 获取进度条的当前值
minimum() -> int                                                                # 获取进度条的最小值
maximum() -> int                                                                # 获取进度条的最大值

setLabel(label:QLabel) -> None                                                  # 重新设置对话框中的标签
labelText() -> str                                                              # 获取对话框中标签的文本

setCancelButton(button:QPushButton) -> None                                     # 重新设置对话框中的取消按钮
wasCanceled() -> bool                                                           # 获取对话框是否被取消

setAutoClose(close:bool) -> None                                                # 调用reset()方法时,设置是否自动隐藏
autoClose() -> bool                                                             # 获取是否自动隐藏

setAutoReset(reset:bool) -> None                                                # 进度条的值达到最大时,设置是否自动重置
autoReset() -> bool                                                             # 获取进度条值达到最大时,是否自动重置

setBar(bar:QProgressBar) -> None                                                # 重新设置对话框中的设置进度条

# 槽函数
setMinimumDuration(ms:int) -> None                                              # 设置对话框从创建到显示出来的过滤时间

setValue(progress:int) -> int                                                   # 设置进度条的当前值
setMinimum(minimum:int) -> None                                                 # 设置进度条的最小值
setMaximum(maximum:int) -> None                                                 # 设置进度条的最大值
setRange(minimum:int, maximum:int) -> None                                      # 设置进度条的最小值和最大值

setLabelText(text:str) -> None                                                  # 设置对话框中标签的文本
setCancelButtonText(text:str) -> None                                           # 设置取消按钮的文本

forceShow() -> None                                                             # 强制显示对话框

cancel() -> str                                                                 # 取消对话框
reset() -> None                                                                 # 重置对话框
QProgressDialog 类中常用的信号如下:
canceled() # 单击对话框中的Cancel按钮后,发射信号,进度条被隐藏和重置
进度对话框可以不用 show() 等方法来显示,在创建进度对话框后,经过某段时间后对话框会自动显示出来,这段时间是通过 setMinimumDuration(duration:int) 来设置的。参数的单位是 毫秒,默认是 4000 毫秒,如果设置为 0,则 立即显示对话框。可以用 forceShow() 方法 强制显示对话框。设置这个显示时间的目的是防止任务进展太快,进度对话框一闪而过。
对话框如果设置了 setAutoClose(True),调用 reset() 方法 重置进度条 时,会 自动隐藏对话框。对话框如果设置了 setAutoReset(True),则进度条的值达到 最大值 时会调用 reset() 方法 重置进度条。
当单击对话框中的 Cancel 按钮或执行 cancel()方法时,会 取消对话框,并且会 重置和隐藏对话框,同时 wasCanceled() 的值为 True。
修改 ui.py 文件的内容。
from PySide6.QtWidgets import QWidget
from PySide6.QtWidgets import QToolBar
from PySide6.QtWidgets import QLabel
from PySide6.QtWidgets import QVBoxLayout
from PySide6.QtGui import Qt, QAction, QIcon

class MyUi:
    def setupUi(self, window:QWidget):
        window.resize(800, 600)                                                 # 1.设置窗口对象大小

        layout = QVBoxLayout(window)                                            # 2.创建一个垂直布局

        self.toolBar = QToolBar()                                               # 3.创建一个工具栏,并添加到布局中
        layout.addWidget(self.toolBar)

        self.toolBar.setToolButtonStyle(Qt.ToolButtonStyle.ToolButtonTextUnderIcon)             # 4.设置工具栏的显示样式

        self.pop_dialog = QAction(icon=QIcon("assets/images/1.ico"), text="弹出进度对话框")      # 5.创建一个动作,并添加到工具栏中
        self.toolBar.addAction(self.pop_dialog)

        self.label = QLabel(window)                                             # 6.创建文本框控件,并添加到布局中
        layout.addWidget(self.label)
修改 widget.py 文件的内容。
import sys

from PySide6.QtWidgets import QApplication, QWidget
from PySide6.QtWidgets import QProgressDialog
from PySide6.QtCore import QTimer

from ui import MyUi

class MyWidget(QWidget):
    def __init__(self):
        super().__init__()                                                      # 1.调用父类Qwidget类的__init__()方法

        self.__ui = MyUi()
        self.__ui.setupUi(self)                                                 # 2.初始化页面

        self.count = 0
        self.timer = QTimer()                                                   # 3.创建一个定时器对象

        self.__ui.pop_dialog.triggered.connect(self.pop_progress_dialog)        # 3.点击按钮后触发信号

        self.timer.timeout.connect(self.change_progress)                        # 4.定时器定时时间到触发信号

    def pop_progress_dialog(self):
        self.progressDialog = QProgressDialog(window)                           # 1.创建进度对话框控件

        self.progressDialog.setRange(0, 100)                                    # 2.设置进度对话框的范围
        self.progressDialog.setValue(0)                                         # 3.设置进度对话框的当前值为0
        self.progressDialog.setMinimumDuration(0)                               # 4.设置对话款从创建到出来的过渡时间
        self.progressDialog.setLabelText("任务正在进行中")                        # 5.设置进度对话框的标签文本
        self.progressDialog.setCancelButtonText("终止任务")                      # 6.设置进度对话框的取消按钮文本
        self.progressDialog.setAutoClose(True)                                  # 7.设置对话框调用reset()方法时自动隐藏
        self.progressDialog.setAutoReset(True)                                  # 8.设置进度条的值到达最大值,自动重置

        self.progressDialog.canceled.connect(self.cancel_task)                  # 9.取消按钮点击后触发信号

        self.timer.start(100)                                                   # 10.启动定时器

    def change_progress(self):
        if not self.progressDialog.wasCanceled():                               # 1.如果进度对话框没有关闭
            self.count += 1                                                     # 2.计数器加1
            if self.count <= 100:                                               # 3.如果计数器小于等于100
                self.progressDialog.setValue(self.count)                        # 4.设置进度对话框的当前值
                self.__ui.label.setText(f"当前进度:{self.count}%")               # 5.设置标签的文本
            else:                                                               # 6.如果计数器大于100
                self.count = 0                                                  # 7.将计数器重置为0
                self.__ui.label.setText("任务完成")                               # 8.设置标签文本
                self.timer.stop()                                               # 9.关闭定时器
        else:
            self.count = 0
            self.timer.stop()

    def cancel_task(self):
        self.__ui.label.setText("任务已取消")                                     # 1.设置标签文本

if __name__ == "__main__":#
    app = QApplication(sys.argv)                                                # 1.创建一个QApplication类的实例
    window = MyWidget()                                                         # 2.创建一个窗口
    window.show()                                                               # 3.显示窗口
    sys.exit(app.exec())                                                        # 4.进入程序的主循环并通过exit()函数确保主循环安全结束
九、向导对话框
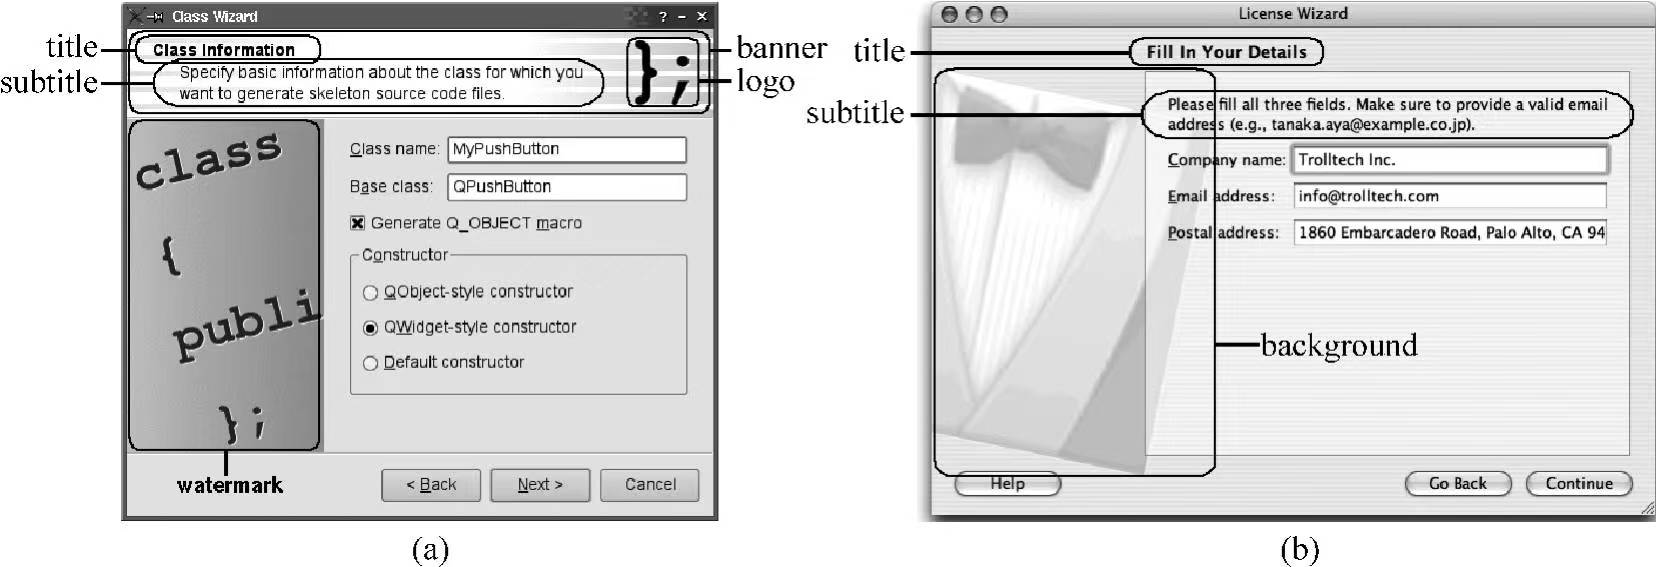
向导对话框 QWizard 由多页构成,可以引导客户按步骤完成某项工作。对话框的 顶部 是 横幅(banner),横幅 中有 标题、子标题 和 logo,左侧 是 水印区(watermark),底部 有 一排按钮,右侧 是 向导页的内容。
与其他对话框不同的是,向导对话框由多页构成,同一时间只能显示其中的一页,单击 Next 按钮或 Back 按钮可以 向后或向前显示其它页。对话框中的页是向导页 QWizardPage,向导页有自己的布局和控件,向导会为向导页分配从 0 开始的 ID 号。
向导对话框 QWizard 是从 QDialog 类继承来的,QWizardPage 是从 QWidget 类继承来的,用 QWizard 类和 QWizardPage 类创建实例对象的方法如下所示。
QWizard(parent:QWidget=None, flags:Qt.WindowFlags=Default(Qt.WindowFlags))
QWizardPage(parent:QWidget=None)
QWizard 类常用方法:
# 实例方法
addPage(page:QWizardPage) -> int                                                # 添加向导页,并返回ID
setPage(id:int, page:QWizardPage) -> None                                       # 用指定ID号添加向导页
removePage(id:int) -> None                                                      # 移除指定id的向导页

currentId() -> int                                                              # 返回当前向导页的ID
currentPage() -> QWizardPage                                                    # 返回当前向导页

hasVisitedPage(id:int) -> bool                                                  # 获取向导页是否被访问过
visitedIds() -> List[int]                                                       # 获取访问过的页的ID列表

page(id:int) -> QWizardPage                                                     # 返回指定ID的向导页
pageIds() -> List[int]                                                          # 获取向导页的ID列表

setButton(which:QWizard.WizardButton, button:QAbstractButton) -> None           # 添加某种用途的按钮
button(which:QWizard.WizardButton) -> QAbstractButton                           # 获取某种用途的按钮

setButtonLayout(layout:Sequence[QWizard.WizardButton]) -> None                  # 设置按钮的布局(相对位置)

setButtonText(which:QWizard.WizardButton, text:str) -> None                     # 设置按钮的文本
buttonText(which:QWizard.WizardButton) -> str                                   # 获取按钮的文本

setField(name:str, value:Any) -> None                                           # 设置字段的值
field(name:str) -> Any                                                          # 获取字段的值

setOption(option:QWizard.WindowOption, on:bool=true) -> None                    # 设置向导对话框的选项
options() -> QWizard.QWizardOptions                                             # 获取向导对话框的选项
testOption(option:QWizard.WindowOption) -> bool                                 # 测试是否设置了某个选项

setPixmap(which:QWizard.WizardPixmap, pixmap:Union[QPixmap, Qimage, str]) -> None   # 在对话框的指定区域设置图片
pixmap(which:QWizard.WizardPixmap) -> QPixmap                                   # 获取对话框的图片

setSideWidget(widget:QWidget) -> None                                           # 设置侧边栏

setStartId(id:int) -> None                                                      # 设置初始页
startId() -> int                                                                # 获取初始页

setTitleFormat(format:Qt.TextFormat) -> None                                    # 设置标题的格式
setSubTitleFormat(format:Qt.TextFormat) -> None                                 # 设置子标题的格式

setWizardStyle(style:QWizard.WizardStyle) -> None                               # 设置向导对话框的样式
wizardStyle() -> QWizard.WizardStyle                                            # 获取向导对话框的样式

cleanupPage(id:int) -> None                                                     # 清除内容,恢复默认值
initializePage(id:int) -> None                                                  # 初始化向导页
nextId() -> int                                                                 # 返回下一页的ID
validateCurrentPage() -> bool                                                   # 验证当前页的输入是否合法

# 槽方法
restart() -> None                                                               # 回到初始页
back() -> None                                                                  # 显示上一页
next() -> None                                                                  # 显示下一页
QWizard 类常用信号:
currentIdChanged(id:int)                                                        # 当前页面id改变时发射信号,参数是新页的id
customButtonClicked(which:int)                                                  # 单击自定义按钮时发射信号,参数是自定义按钮的索引
helpRequested()                                                                 # 单击帮助按钮时发射信号
pageAdded(id:int)                                                               # 添加向导页是发射信号,参数是新页的id
pageRemoved(id:int)                                                             # 移除向导页是发射信号,参数是被移除页的id
向导对话框的风格 用 setWizardStyle(style:QWizard.WizardStyle) 方法设置,其中参数 style 是 QWizard.WizardStyle 类型的枚举值,可以取值如下:
QWizard.WizardStyle.ClassicStyle
QWizard.WizardStyle.ModernStyle
QWizard.WizardStyle.MacStyle
QWizard.WizardStyle.AeroStyle
向导对话框的标题和子标题 由向导页的 setTitle(title:str) 方法和 setSubTitle(subTitle:str) 方法设置。虽然有向导页设置标题和子标题,但是它们会显示在 向导对话框的横幅 中。标题和子标题的格式 由向导对话框的 setTitleFormat(format:Qt.TextFormat) 方法和 setSubTitleFormat(format:Qt.TextFormat) 方法设置,其中参数 format 是 Qt.TextFormat 类型的枚举值,可以取值如下:
Qt.TextFormat.PlainText                                                         # 纯文本
Qt.TextFormat.RichText                                                          # 富文本
Qt.TextFormat.AutoText                                                          # 由系统决定
Qt.TextFormat.MarkdownText                                                      # Markdown文本
向导对话框的选项由 setOption(option:QWizard.WizardOption, on=True) 方法设置,其中参数 option 是 QWizard.WizardOption 类型的枚举值,可以取值如下:
QWizard.WizardOption.IndependentPages                                           # 向导页之间是相互独立的,相互间不传递数据
QWizard.WizardOption.IgnoreSubTitles                                            # 不显示子标题
QWizard.WizardOption.ExtendedWatermarkPixmap                                    # 将水印图片拓展到窗口边缘
QWizard.WizardOption.NoDefaultButton                                            # 不将Next按钮和Finish按钮设置成默认按钮
QWizard.WizardOption.NoBackButtonOnStartPage                                    # 在起始页中不显示Back按钮
QWizard.WizardOption.NoBackButtonOnLastPage                                     # 在最后页中不显示Back按钮
QWizard.WizardOption.DisabledBackButtonOnLastPage                               # 在最后页中Back按钮失效
QWizard.WizardOption.HaveNextButtonOnLastPage                                   # 在最后页中显示失效的Next按钮
QWizard.WizardOption.HaveFinishButtonOnEarlyPages                               # 在非最后页中显示失效的Finsh按钮
QWizard.WizardOption.NoCancelButton                                             # 不显示Cancel按钮
QWizard.WizardOption.CancelButtonOnLeft                                         # 将Cancel按钮放到Back按钮的左边
QWizard.WizardOption.HaveHelpButton                                             # 显示Help按钮
QWizard.WizardOption.HelpButtonOnRight                                          # 将帮助按钮放到右边
QWizard.WizardOption.HaveCustomButton1                                          # 显示用户自定义的第一个按钮
QWizard.WizardOption.HaveCustomButton2                                          # 显示用户自定义的第二个按钮
QWizard.WizardOption.HaveCustomButton2                                          # 显示用户自定义的第二个按钮
QWizard.WizardOption.NoCancelButtonOnLastPage                                   # 在最后页中不显示Cancel按钮
向导对话框和向导页都可以用 setPixmap(which:QWizard.WizardPixmap, pixmap:QPixmap) 方法 设置向导对话框中显示的图片,用向导对话框设置的图片作用于所有页,用向导页设置的图片只作用于向导页所在的页面,其中参数 which 是 QWizard.WizardPixmap 类型的枚举值,用于 设置图片放置的位置,可以取值如下:
QWizard.WizardPixmap.WatermarkPixmap
QWizard.WizardPixmap.LogoPixmap
QWizard.WizardPixmap.BannerPixmap
QWizard.WizardPixmap.BackgroundPixmap
用 setButton(which:QWizard.WizardButton, button:QAbstractButton) 方法 往对话框中添加某种用途的按钮,其中参数 which 是 QWizard.WizardButton 类型的枚举值,用于 指定按钮的用途,取值如下所示:
QWizard.WizardButton.BackButton                                                 # Back按钮
QWizard.WizardButton.NextButton                                                 # Next按钮
QWizard.WizardButton.CommitButton                                               # Commit按钮
QWizard.WizardButton.FinishButton                                               # Finish按钮
QWizard.WizardButton.CancelButton                                               # Cancel按钮
QWizard.WizardButton.HelpButton                                                 # Help按钮
QWizard.WizardButton.CustomButton1                                              # 用户自定义第一个按钮
QWizard.WizardButton.CustomButton2                                              # 用户自定义第二个按钮
QWizard.WizardButton.CustomButton3                                              # 用户自定义第三个按钮
QWizard.WizardButton.Stretch                                                    # 布局中的水平伸缩器
对话框中最多可以添加 3 个自定义的按钮,要使自定义按钮可见,还需要用 setOption(option:QWizard.WizardOption, on=True) 方法把自定义按钮显示出来。通常情况下 Next 按钮和 Finish 按钮是互斥的。
QWizardPage 类常用方法:
setButtonText(which:QWizard.WizardButton, text:str) -> None                     # 设置某种用途按钮的文字
buttonText(which:QWizard.WizardButton) -> str                                   # 获取指定用途的按钮的文本

setCommitPage(commitPage:bool) -> None                                          # 设置成提交页
isCommitPage() -> bool                                                          # 获取是否是提交页
setFinalPage(finalPage:bool) -> None                                            # 设置成最终页
isFinalPage() -> bool                                                           # 获取是否是最终页

setPixmap(which:QWizard.WizardPixmap, pixmap:QPixmap) -> None                   # 在指定区域设置图片
pixmap(which:QWizard.WizardPixmap) -> QPixmap                                   # 获取指定区域的图片
setTitle(title:str) -> None                                                     # 设置标题
title() -> str                                                                  # 获取标题
setSubTitle(subTitle:str) -> None                                               # 设置子标题
subTitle() -> str                                                               # 获取子标题

registerField(name:str, widget:QWidget, property:str=None, changed_signal:str=None) -> None     # 创建字段
setField(name:str, value:Any) -> None                                           # 设置字段的值
field(name:str) -> Any                                                          # 获取字段的值

validatePage() -> bool                                                          # 验证向导页中输入的内容
wizard() -> QWizard                                                             # 获取向导页所在的向导对话框
cleanupPage() -> None                                                           # 清除内容,恢复默认值
initializePage() -> None                                                        # 初始化向导页中的内容
isComplete () -> bool                                                           # 获取是否完成输入,以便激活Next按钮或Finish按钮
validatePage() -> bool                                                          # 验证向导页中输入的内容,若为True,则显示下一页
nextId() -> int                                                                 # 返回下一页的ID
QWizardPage 类常用信号:
completeChanged() # 当isCompleted()的返回值发生变化时发射信号
用向导页的 setCommitPage(commitPage:bool) 方法可以 把向导页设置成提交页,提交页上用 Commit 按钮替换 Next 按钮,且不能用 Back 或 Cancel 按钮来撤销。单击 Commit 按钮后,下一页的 Back 按钮失效。用 isCommit() 方法可以 获取该页是否是提交页。
用向导页的 setFinalPage(bool) 方法可以 把向导页设置成最后页,最后页上用 Finish 按钮替换 Next 按钮,此时用 nextId() 方法 获取下一页的 ID 时返回 -1。
向导对话框中的多个向导页之间的数据不能自动进行通信,要实现向导页之间的数据传递,可以将向导页上的控件属性定义成字段,并可以将控件属性与某信号关联,这样当属性值发生变化时发送信号,也可以通过字段设置或获取控件的属性值,字段对于向导对话框来说是全局性的。
字段的定义通过 registerField(name:str, widget:QWidget, property:str=None, changedSignal:str=None) 函数来实现,其中 name 是 字段名称,widget 是 向导页上的控件,property 是 字段的属性,changedSignal 是 与字段属性相关的信号。
定义好字段后,可以利用 setField(name:str, value:Any) 方法和 field(name:str) 方法设置和 获取字段的值。用 setDefaultProperty(className:str, property:str, changedSignal:str) 方法可以 设置某类控件的某个属性与某个信号相关联。
PySide6 对大多数控件能自动将某个属性与某个信号相关联。
| 控件 | 属性 | 关联的信号 |
|---|---|---|
| QAbstractButton | checked | toggled(bool) |
| QAbstractSlider | value | valueChange(int) |
| QComboBox | currentIndex | currentIndexChanged(ing) |
| QDateTimeEdit | dateTime | dateTimeChanged(QDatetime) |
| QLineEdit | text | textChanged(str) |
| QListWidget | currentRow | currentRowChanged(bool) |
| QSpinBox | value | valueChanged(int) |
当 isComplete() 函数的返回值为 True 时,会激活 Next 按钮或 Finish 按钮。可以重写该函数,用户在页面上输入信息后,当满足一定条件时改变 isComplete() 的返回值,以便激活 Next 按钮或 Finish 按钮。如果重写 isComplete() 函数,一定要确保 completeChange() 信号也能发送。
用户单击 Next 按钮或 Finish 按钮后,需要验证页面上输入的内容是否合法,这时会调用向导对话框的 validateCurrentPage()函数和向导页的 validatePage() 函数,通常需要重写这两个函数以便完成对输入内容的验证,如果返回 True 则显示下一页。
单击 Next 按钮后,在显示下一页之前,会调用向导页的 initializePage() 函数。可以重写该函数,以便根据前面的向导页的内容初始化本向导页的内容。
单击 Back 按钮后,在显示前一页之前,会调用向导页的 cleanupPage() 函数。可以重写该函数,以保证向导页能恢复默认值。
根据 nextId() 函数的返回值,决定要显示的下一页,如果没有后续页,则返回 -1。单击 Next 按钮和 Back 按钮都会调用 nextId() 函数,如果重写该函数,会根据已经输入和选择的内容让 nextId() 返回相应页的 ID 号,从而控制页面显示的顺序。
新建一个 wizrad.py 文件,用来存放向导对话框相关的代码。
from PySide6.QtWidgets import QWizard, QWizardPage
from PySide6.QtWidgets import QFormLayout
from PySide6.QtWidgets import QLineEdit, QSpinBox, QPushButton, QComboBox
from PySide6.QtWidgets import QMessageBox

# 向导页1
class WizardPage_1(QWizardPage):
    def __init__(self, parent=None):
        super().__init__(parent)                                                # 1.调用父类的__init__()方法

        self.setTitle("学生成绩输入系统")                                          # 2.设置主标题
        self.setSubTitle("基本信息")                                              # 3.置子标题

        form = QFormLayout(self)                                                # 4.创建表单布局

        self.name_lineEdit = QLineEdit()                                        # 5.创建单行文本框控件
        form.addRow("姓名: ", self.name_lineEdit)                                # 6.添加标签和单行文本框到表单布局中
        self.name_lineEdit.setPlaceholderText("请输入姓名")                       # 7.设置单行文本框控件的提示文本

        self.number_lineEdit = QLineEdit()
        form.addRow("学号: ", self.number_lineEdit)
        self.number_lineEdit.setPlaceholderText("请输入学号")

        self.name_lineEdit.textChanged.connect(self.isComplete)
        self.name_lineEdit.textChanged.connect(self.completeChanged_emit)

        self.number_lineEdit.textChanged.connect(self.isComplete)
        self.number_lineEdit.textChanged.connect(self.completeChanged_emit)

        self.registerField("name", self.name_lineEdit)                          # 8.创建字段
        self.registerField("number", self.number_lineEdit)

    # 重写isComplete()函数
    def isComplete(self):
        if self.name_lineEdit.text() != "" and self.number_lineEdit.text() != "":
            return True
        else:
            return False

    # 重写isComplete()函数后,需要重新发送信号
    def completeChanged_emit(self):
        self.completeChanged.emit()

    # 重写validatePage()函数
    def validatePage(self):
        if self.number_lineEdit.text().isdigit():                               # 确保输入的学号是数字
            return True
        else:
            QMessageBox.warning(self, "警告", "输入的信息有误,请重新输入")
            return False

# 向导页2
class WizardPage_2(QWizardPage):
    def __init__(self, parent=None):
        super().__init__(parent)                                                # 1.调用父类的__init__()方法

        self.setTitle("学生成绩输入系统")                                          # 2.设置主标题
        self.setSubTitle("详情信息")                                              # 3.设置副标题

        form = QFormLayout(self)                                                # 4.创建表单布局

        comboBox_gender = QComboBox()                                           # 5.创建下拉组合框控件
        comboBox_gender.addItems(["保密", "男", "女"])                            # 6.添加选项
        form.addRow("性别: ", comboBox_gender)                                   # 7.添加控件到表单布局中

        spinBox_age = QSpinBox()                                                # 8.创建整数选择控件
        spinBox_age.setRange(0, 300)                                            # 9.设置范围
        form.addRow("年龄: ", spinBox_age)                                       # 10.添加控件到表单布局中

        self.registerField("gender", comboBox_gender)                           # 11.创建字段
        self.registerField("age", spinBox_age)

# 向导页3
class WizardPage_3(QWizardPage):
    def __init__(self, parent=None):
        super().__init__(parent)                                                # 1.调用父类的__init__()方法

        self.setTitle("学生成绩输入系统")                                          # 2.设置标题
        self.setSubTitle("考试成绩")                                             # 3.设置子标题

        form = QFormLayout(self)                                                # 4.创建表单布局

        chinese_spinBox = QSpinBox()                                            # 5.创建小数选择控件
        chinese_spinBox.setRange(0, 150)                                        # 6.设置范围

        spinBox_math = QSpinBox()
        spinBox_math.setRange(0, 150)

        spinBox_english = QSpinBox()
        spinBox_english.setRange(0, 150)

        form.addRow("语文: ", chinese_spinBox)                                  # 7.添加控件到表单布局中
        form.addRow("数学: ", spinBox_math)
        form.addRow("英语: ", spinBox_english)

        self.registerField("chinese", chinese_spinBox)                          # 8.创建字段
        self.registerField("math", spinBox_math)
        self.registerField("english", spinBox_english)

# 向导对话框
class Wizard(QWizard):
    def __init__(self, parnent=None):
        super().__init__(parnent)                                               # 1.调用父类的__init__()方法

        self.setWizardStyle(QWizard.WizardStyle.ModernStyle)                    # 2.设置向导对话框的风格

        self.addPage(WizardPage_1(self))                                        # 3.添加向导页
        self.addPage(WizardPage_2(self))
        self.addPage(WizardPage_3(self))

        self.back_button = QPushButton("上一步")                                 # 4.创建按钮控件
        self.next_button = QPushButton("下一步")
        self.cancel_button = QPushButton("取消")
        self.finish_button = QPushButton("完成")

        self.setButton(QWizard.WizardButton.BackButton, self.back_button)       # 5.向导对话框中添加某种用途的按钮
        self.setButton(QWizard.WizardButton.NextButton, self.next_button)
        self.setButton(QWizard.WizardButton.CancelButton, self.cancel_button)
        self.setButton(QWizard.WizardButton.FinishButton, self.finish_button)


        self.setButtonLayout(                                                   # 7.设置向导对话框中按钮的布局
            [
                self.WizardButton.Stretch,
                self.WizardButton.CancelButton,
                self.WizardButton.BackButton,
                self.WizardButton.NextButton,
                self.WizardButton.FinishButton
            ]
        )
修改 ui.py 文件的内容。
from PySide6.QtWidgets import QWidget
from PySide6.QtWidgets import QToolBar
from PySide6.QtWidgets import QTextEdit
from PySide6.QtWidgets import QVBoxLayout
from PySide6.QtGui import Qt, QAction, QIcon

from wizard import Wizard

class MyUi:
    def setup_ui(self, window:QWidget):
        window.resize(800, 600)                                                 # 1.设置窗口对象大小

        layout = QVBoxLayout(window)                                            # 2.创建一个垂直布局,并设置为窗口对象的布局

        self.toolBar = QToolBar()                                               # 3.创建一个工具栏,并添加到布局中
        layout.addWidget(self.toolBar)

        self.toolBar.setToolButtonStyle(Qt.ToolButtonStyle.ToolButtonTextUnderIcon)         # 4.设置工具栏的显示样式

        self.add_info_action = QAction(icon=QIcon("assets/images/1.ico"), text="添加信息")  # 5.创建一个动作,并添加到工具栏中
        self.toolBar.addAction(self.add_info_action)

        self.info_textEdit = QTextEdit(window)                                  # 6.创建一个文本编辑框,并添加到布局中
        layout.addWidget(self.info_textEdit)

        self.info_textEdit.setReadOnly(True)                                    # 7.设置文本编辑框为只读

        self.wizard = Wizard()                                                  # 8.创建一个向导
修改 widget.py 文件的内容。
import sys

from PySide6.QtWidgets import QApplication, QWidget

from ui import MyUi

class MyWidget(QWidget):
    def __init__(self):
        super().__init__()                                                      # 1.调用父类Qwidget类的__init__()方法

        self.__ui = MyUi()
        self.__ui.setup_ui(self)                                                # 2.初始化页面

        self.__ui.add_info_action.triggered.connect(self.add_info)              # 3.动作被触发时触发信号
        self.__ui.wizard.finish_button.clicked.connect(self.wizard_finished)    # 4.单击完成按钮时触发信号

    def add_info(self):
        self.__ui.wizard.setStartId(0)                                          # 1.设置向导的起始页面
        self.__ui.wizard.restart()                                              # 2.重启向导
        self.__ui.wizard.open()                                                 # 3.打开向导对话框

    def wizard_finished(self):
        templte = "学号:{}, 姓名:{}, 性别:{}, 年龄:{}, 语文成绩:{}, 数学成绩:{}, 英语成绩:{}"
        text = templte.format(self.__ui.wizard.field("number"), self.__ui.wizard.field("name"),
                              self.__ui.wizard.field("gender"), self.__ui.wizard.field("age"),
                              self.__ui.wizard.field("chinese"), self.__ui.wizard.field("math"),
                              self.__ui.wizard.field("english"))
        self.__ui.info_textEdit.append(text)

if __name__ == "__main__":#
    app = QApplication(sys.argv)                                                # 1.创建一个QApplication类的实例
    window = MyWidget()                                                         # 2.创建一个窗口
    window.show()                                                               # 3.显示窗口
    sys.exit(app.exec())                                                        # 4.进入程序的主循环并通过exit()函数确保主循环安全结束

 浙公网安备 33010602011771号