Centos部属前后端项目
一、安装python3
# 下载并解压
cd /opt
wget https://www.python.org/ftp/python/3.6.3/Python-3.6.3.tgz
tar -zxf Python-3.6.3.tgz

# 编译安装
cd Python-3.6.3/
./configure --prefix=/opt/python3/
make && make install
二、下载node并解压
wget https://nodejs.org/dist/v10.15.0/node-v10.15.0-linux-x64.tar.xz
tar -xJf node-v10.15.0-linux-x64.tar.xz
三、添加环境变量
vim /etc/profile

# 在文件的末尾添加
PATH=/opt/python3/bin:/usr/local/sbin:/usr/local/bin:/usr/sbin:/usr/bin:/root/bin:/opt/node-v10.15.0-linux-x64/bin

# 保存退出,加载文件
source /etc/profile
四、安装虚拟环境工具virtualenvwrapper
pip3 install virtualenvwrapper

vim ~/.bashrc
# 添加以下代码

WORKON_HOME=~/Envs
VIRTUALENVWRAPPER_VIRTUALENV_ARGS='--no-site-packages'
VIRTUALENVWRAPPER_PYTHON=/opt/python3/bin/python3
source /opt/python3/bin/virtualenvwrapper.sh

# 保存,然后重新登陆
五、源码安装redis
cd /opt/
wget http://download.redis.io/releases/redis-4.0.12.tar.gz
tar -zxf redis-4.0.12.tar.gz
make && make install

# 创建配置文件
vim /etc/redis.conf

# 输入以下代码
port 6379
daemonize yes
protected-mode yes

# 启动
redis-server /etc/redis.conf
六、部署前端
[root@localhost luffy_boy]# cd /opt/luffy/07-luffy_project_01/
[root@localhost 07-luffy_project_01]# ls
build   dist        node_modules  package-lock.json  src
config  index.html  package.json  README.md          static

# 默认根据目录中的package.json安装相应的模块,生成node_modules文件夹
npm install

# 替换向后端发送请求的URL接口

# 打包vue项目,生成一个dist的静态文件夹(注意内存,内存不足会打包失败)
npm run build

七、部署后端
# 1.进入虚拟环境
# 2.安装对应的模块
pip3 install requirements.txt

# 3.进入项目的目录
# 4.创建uwsgi.ini
vim  uwsgi.ini

'''编写以下配置'''
[uwsgi]
# Django-related settings
# the base directory (full path)
chdir           = /opt/luffy/luffy_boy
# Django's wsgi file
module          = luffy_boy.wsgi
# the virtualenv (full path)
home            = /root/Envs/luffy
# process-related settings
# master
master          = true
# maximum number of worker processes
processes       = 1
# the socket (use the full path to be safe
socket          = 0.0.0.0:9000
#http =0.0.0.0:9000
# clear environment on exit
vacuum          = true
#后台运行uwsgi
#daemonize=yes

# 5.测试运行
uwsgi --ini uwsgi.ini
八、nginx的配置
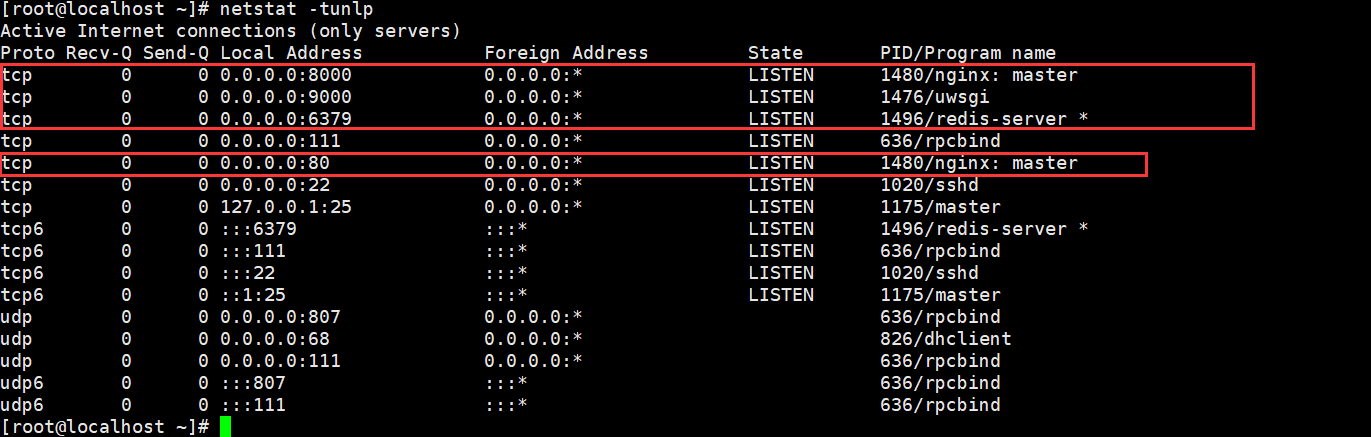
# 1.修改nginx的配置文件

server {
    listen       80;
    server_name  192.168.11.169;
    location / {
        root   /opt/luffy/07-luffy_project_01/dist;
        index  index.html index.htm;
    }
}

server {
    listen 8000;
    server_name 192.168.11.169;
    # 反向代理
    location /{
        uwsgi_pass 0.0.0.0:9000;
        include /opt/nginx/conf/uwsgi_params;
    }
}


# 启动nginx
/opt/nginx/sbin/nginx
九、安装并使用supervisor管理后端项目
# 1.退出虚拟环境
# 2.安装supervisor
easy_install supervisor

# 3.通过命令生成supervisor的生成配置文件
echo_supervisord_conf > /etc/supervisor.conf

# 4.修改配置文件
vim /etc/supervisor.conf

'''在末尾添加以下代码'''
[program:luffy]
command=/root/Envs/luffy/bin/uwsgi /opt/luffy/luffy_boy/uwsgi.ini
stopasgroup=true
killasgroup=true

# 5.保存退出,启动supervisor
supervisord -c /etc/supervisor.conf

# 6.请求后端项目
supervisorctl -c /etc/supervisor.conf start all
部署完成!!!

 浙公网安备 33010602011771号