一:对头像的所有像素进行访问,并UI图像进行像素取反
(一)for循环取反
import cv2 as cv
import numpy as np
def access_pixels(image): #对图像的所有像素进行访问
print(image.size)
height,width,channel = image.shape #每个像素3个通道,通道顺序b,g,r
print("height:%s\r\nwidth:%s\r\nchannel:%s\r\n"%(height,width,channel))
'''
height:608
width:343
channel:3
'''
for row in range(height):
for col in range(width):
for c in range(channel): #循环会变慢,经过625632循环
pv = image[row,col,c]
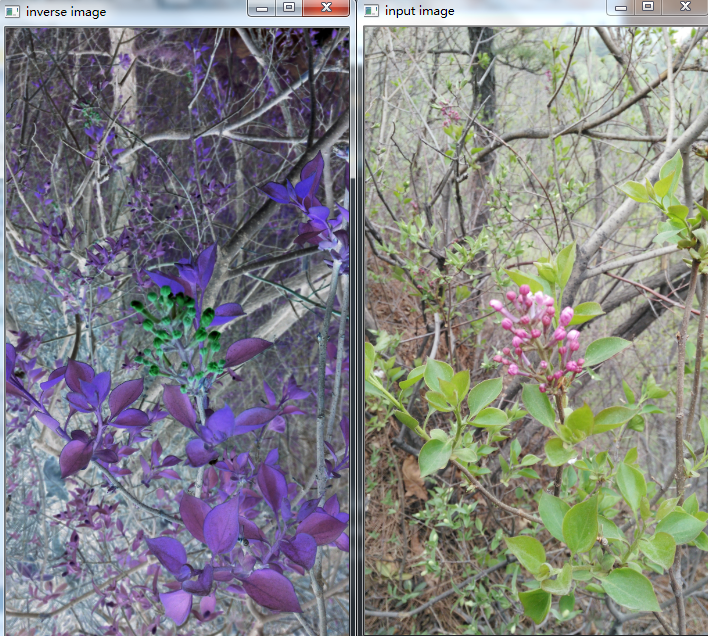
image[row,col,c] = 255 - pv #像素取反
cv.imshow("pixels_demo",image)
src = cv.imread("./1.png") #读取图片
cv.namedWindow("input image",cv.WINDOW_AUTOSIZE) #创建GUI窗口,形式为自适应
cv.imshow("input image",src) #通过名字将图像和窗口联系
t1 = cv.getTickCount() #获取时间,用于精度计时,操作系统启动所经过(elapsed)的毫秒数
access_pixels(src)
t2 = cv.getTickCount()
print((t2-t1)/cv.getTickFrequency()) #getTickFrequency()是获取一秒钟结果的点数,获取秒数
cv.waitKey(0) #等待用户操作,里面等待参数是毫秒,我们填写0,代表是永远,等待用户操作
cv.destroyAllWindows() #销毁所有窗口
625632
height:608
width:343
channel:3

15.740029368334588  #经历了15秒,是十分耗时的循环,我们可以使用Numpy数组访问,更加方便快捷
(二)使用内置方法取反(直接使用c代码执行,效率更高)
def inverse(image):
    img = cv.bitwise_not(image)
    cv.imshow("inverse image",img)
t1 = cv.getTickCount()  #获取时间,用于精度计时,操作系统启动所经过(elapsed)的毫秒数
inverse(src)
t2 = cv.getTickCount()
二:使用Numpy数组,创建图片
(一)使用多个信道创建图片
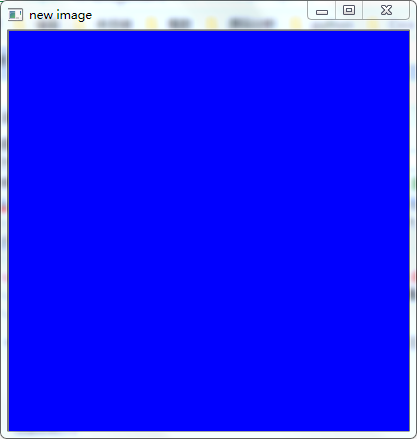
def create_img():
    img = np.zeros([400,400,3],np.uint8)    #创建一个三维数组高400,宽400,信号通道3个,初始都为0,每通道占8位个
    img[:,:,0] = np.ones([400,400])*255     #将0号通道下[400,400]面积使用ones设置为1,之后乘以255,将其设置为255,注意:3个信道分别是b,g,r所以这里显示为蓝色

    cv.imshow("new image",img)

create_img()
cv.waitKey(0)   #等待用户操作,里面等待参数是毫秒,我们填写0,代表是永远,等待用户操作
cv.destroyAllWindows()  #销毁所有窗口
(二)使用单个信道创建图像(灰度图像)
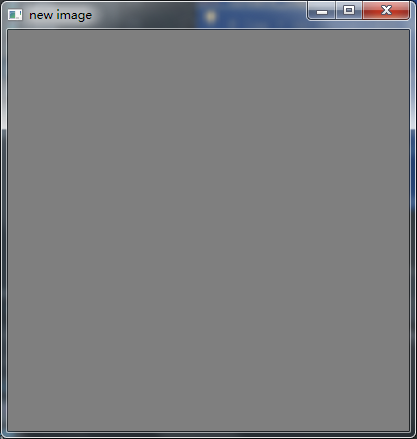
def create_img():
    img = np.zeros([400,400,1],np.uint8)  #创建一个只有一个信道的三维数组,初始为0
    img[:,:,0] = np.ones([400,400])*127  #修改这个图像的信道为127,灰色
    cv.imshow("new image",img)
或者(所以初始时候使用ones会更加灵活)
def create_img():
    img = np.ones([400,400,1],np.uint8)  #创建一个只有一个信道的三维数组,初始为1
    img = img * 127  #可以直接进行运算

    cv.imshow("new image",img)
    cv.imwrite(".3.png",img)  #可以进行保存
三:补充Numpy的使用

(一)二维数组的使用(选择正确的类型)
1.float类型
def create_arr():
    ml = np.ones([3,3],np.float32)  #float类型,允许小数存在
    ml.fill(122.388)
    print(ml)

create_arr()
[[122.388 122.388 122.388]
 [122.388 122.388 122.388]
 [122.388 122.388 122.388]]
2.int类型
def create_arr():
    ml = np.ones([3,3],np.uint8)  #不允许小数的存在,且有最大是255
    ml.fill(122.388)
    print(ml)

create_arr()
[[122 122 122]
 [122 122 122]
 [122 122 122]]
def create_arr():
    ml = np.ones([3,3],np.uint8)  #有位数限制,高位被截断了,低位留下了
    ml.fill(256.388)
    print(ml)

create_arr()
[[0 0 0]
 [0 0 0]
 [0 0 0]]
(二)维数转换reshape
def create_arr():
    ml = np.ones([3,3],np.uint8)
    ml.fill(122.388)
    m2 = ml.reshape([1,9])  #注意:转换维度,数组大小还是要一致的,不然报错
    print(m2)
[[122 122 122 122 122 122 122 122 122]]
(三)使用array自定义数组
def create_arr():
    m3 = np.array([[2,2,3],[4,5,6],[7,8,9]],np.uint8)
    print(m3)
[[2 2 3]
 [4 5 6]
 [7 8 9]]

 浙公网安备 33010602011771号