Android进程间通信(一):AIDL使用详解
一、概述
AIDL是Android Interface Definition Language的缩写,即Android接口定义语言。它是Android的进程间通信比较常用的一种方式。
Android中,每一个进程都有自己的Dalvik VM实例,拥有自己的独立的内存空间,进程与进程之间不共享内存,这就产生了进程间通信的需求。
二、语法
AIDL是Android接口定义语言,是一门语言,所以它拥有自己的语法和特性。
(一)数据类型
AIDL支持的数据类型包括以下几种:
- Java的8种基本数据类型:int,short,long,char,double,byte,float,boolean;
- CharSequence类型,如String、SpannableString等;
- ArrayList
,并且T必须是AIDL所支持的数据类型; - HashMap<K,V>,并且K和V必须是AIDL所支持的数据类型;
- 所有Parceable接口的实现类,因为跨进程传输对象时,本质上是序列化与反序列化的过程;
- AIDL接口,所有的AIDL接口本身也可以作为可支持的数据类型;
有两个需要注意的地方:
1、在Java中,如果一个对象和引用它的类在同一个package下,是不需要导包的,即不需要import,而在AIDL中,自定义的Parceable对象和AIDL接口定义的对象必须在所引用的AIDL文件中显式import进来,不管这些对象和所引用它们的AIDL文件是否在同一个包下。
2、如果AIDL文件中使用到自定义的Parceable对象,则必须再创建一个与Parceable对象同名的AIDL文件,声明该对象为Parceable类型,并且根据上一条语法规定,在AIDL文件中进行显式import。
(二)文件类型
- 所有AIDL文件都是以.aidl作为后缀的;
- 根据用途区分,AIDL文件的有两种,一种是用于定义接口,另一种是用于声明parceable对象,以供其他AIDL文件使用;
(三)定向tag
AIDL中,除了基本数据类型,其他类型的方法参数都必须标上数据在跨进程通信中的流向:in、out或inout:
1、in表示输入型参数:只能由客户端流向服务端,服务端收到该参数对象的完整数据,但服务端对该对象的后续修改不会影响到客户端传入的参数对象;
2、out表示输出型参数:只能由服务端流向客户端,服务端收到该参数的空对象,服务端对该对象的后续修改将同步改动到客户端的相应参数对象;
3、inout表示输入输出型参数:可在客户端与服务端双向流动,服务端接收到该参数对象的完整数据,且服务端对该对象的后续修改将同步改动到客户端的相应参数对象;
定向tag需要一定的开销,根据实际需要去确定选择什么tag,不能滥用。
深入理解tag:你真的理解AIDL中的in,out,inout么?
(四)其他
1、所有AIDL接口都是继承自IInterface接口的,IInterface接口中只声明了一个asBinder方法:
public interface IInterface
{
    /**
     * Retrieve the Binder object associated with this interface.
     * You must use this instead of a plain cast, so that proxy objects
     * can return the correct result.
     */
    public IBinder asBinder();
}
2、系统会帮我们为所有用于定义接口的AIDL文件生成相应的java代码,手写这份java代码与用AIDL系统生成实际上是一样的,AIDL可以方便系统为我们生成固定格式的java代码。
三、基本用法
在AndroidStudio中工程目录的Android视图下,右键new一个AIDL文件,默认将创建一个与java文件夹同级的aidl文件夹用于存放AIDL文件,且aidl文件夹下的包名与build.gradle中配置的applicationId一致,而applicationId默认值是应用的包名。
AIDL的底层是基于Binder实现的,而Binder机制也是一种请求-响应式的通信模型,请求方一般称为Client,响应方称为Server。
Demo介绍:在一个应用内部新起一个进程作为服务端,服务端提供addStudent和getStudentList两个方法,分别用于客户端向服务端添加Student数据和获取Student列表,Student是自定义对象,只有id和name两个属性。源码下载链接。
(一)服务端
新建AIDL文件,定义一个接口,在这个接口里声明两个方法,分别用于添加Student数据和获取所有Student数据,因为AIDL是接口定义语言,所以不能在AIDL文件里对方法进行实现:
/aidl/com/sqchen/aidltest/IStudentService.aidl
package com.sqchen.aidltest;

//显式import
import com.sqchen.aidltest.Student;

interface IStudentService {

    List<Student> getStudentList();

	//定向tag
    void addStudent(in Student student);
}
因为IStudentService.aidl接口中使用到的Student是自定义对象,不属于Java基本数据类型和CharSequence类型,所以按照语法规定,在IStudentService.aidl中需要显式import,同时我们要让Student实现Parceable接口,并且新建一个AIDL文件用于声明Student类是Parceable类型:
/aidl/com/sqchen/aidltest/Student.java
public class Student implements Parcelable {

    private int id;

    private String name;

    public Student(int id, String name) {
        this.id = id;
        this.name = name;
    }

    @Override
    public int describeContents() {
        return 0;
    }

    @Override
    public void writeToParcel(Parcel dest, int flags) {
        dest.writeInt(id);
        dest.writeString(name);
    }

    public void readFromParcel(Parcel parcel) {
        this.id = parcel.readInt();
        this.name = parcel.readString();
    }

    public static Parcelable.Creator<Student> CREATOR = new Parcelable.Creator<Student>() {
        @Override
        public Student createFromParcel(Parcel source) {
            return new Student(source);
        }

        @Override
        public Student[] newArray(int size) {
            return new Student[0];
        }
    };

    private Student(Parcel in) {
        this.id = in.readInt();
        this.name = in.readString();
    }

}
/aidl/com/sqchen/aidltest/Student.aidl
package com.sqchen.aidltest;

parcelable Student;
这里,我们是在src/main/aidl文件夹下创建Student.java的,实际上这将因为找不到Student.java而报错,因为在AndroidStudio中使用Gradle构建项目时,默认是在src/main/java文件夹中查找java文件的,如果把Student.java放在src/main/aidl对应包名下,自然就会找不到这个文件了,所以需要修改app的build.gradle文件,在sourceSets下添加对应的源文件路径,即src/main/aidl:
android {
    compileSdkVersion 28
    ...
    sourceSets {
        main {
            java.srcDirs = ["src/main/java", "src/main/aidl"]
        }
    }
}
在将src/main/aidl添加到sourceSets中重新构建项目后,在AndroidStudio的Android视图下,项目的目录结构将发生变化,此时会发现aidl文件夹不见了,而在java文件夹下,将出现两个一样包名的目录结构,但这只是在当前视图下的一种展示方式,将src/main/aidl下的文件也看作是java文件的存放位置,实际上当切换到Project视图时,会发现AIDL文件还是存在于aidl文件夹下,与java文件夹同级。
如果Student.java是放在src/main/java对应的包名路径下,则不需要这个步骤。
接着,创建一个Service用来响应Client端的请求:
/java/com/sqchen/aidltest/StudentService.java
public class StudentService extends Service {

    private static final String TAG = "StudentService";

    private CopyOnWriteArrayList<Student> mStuList;

    private Binder mBinder = new IStudentService.Stub() {

        @Override
        public List<Student> getStudentList() throws RemoteException {
            return mStuList;
        }

        @Override
        public void addStudent(Student student) throws RemoteException {
            mStuList.add(student);
        }
    };

    @Override
    public void onCreate() {
        super.onCreate();
        init();
    }

    private void init() {
        mStuList = new CopyOnWriteArrayList<>();
    }


    @Override
    public IBinder onBind(Intent intent) {
        return mBinder;
    }
}
在StudentService中,我们创建了一个Binder对象并在onBind方法中返回它,这个Binder对象继承自IStudentService.Stub,并实现了内部的AIDL方法。
我们用CopyOnWriteArrayList来存放mStuList对象,是因为AIDL方法是在服务端的Binder线程池中执行的,当有多个客户端同时连接时,可能存在多个线程同时访问mStuList对象的情况,而CopyOnWriteArrayList支持并发读写,可以保证线程安全。
按照AIDL的语法规定,只支持传输ArrayList对象,而CopyOnWriteArrayList不是继承自ArrayList,为什么也可以传输呢?这是因为AIDL中所支持的是抽象的List,而List只是一个接口,虽然服务端返回的是CopyOnWriteArrayList,但在Binder中,它会按照List的规范去访问数据并最终形成一个新的ArrayList给客户端。类似的还有ConcurrentHashMap。
为StudentService服务端另起一个进程,在AndroidManifest.xml配置文件中,声明android:process=":remote",即可创建一个新的进程实现单应用多进程,从而模拟进程间通信。这个进程的名字就是remote:
<service
    android:name="com.sqchen.aidltest.StudentService"
    android:process=":remote"
    android:enabled="true"
    android:exported="true"></service>
(二)客户端
因为客户端和服务端是在不同的进程中,所以客户端要想通过AIDL与远程服务端通信,那么必须也要有服务端的这份AIDL代码。
这里分为两种情况:
1、服务端与客户端是两个独立应用
把服务端的aidl文件夹整个复制到客户端的与java文件夹同级的目录下,保持客户端和服务端的aidl文件夹的目录结构一致。这种情况下需要注意的是,如果前面的Student.java文件是放置src/main/java对应包名路径下,则在拷贝aidl文件夹到客户端的同时,也要将对应的Student.java一并拷贝到客户端相同的包名路径下。
2、服务端与客户端是同一应用的不同进程
这种情况下因为客户端与服务端同属一个应用,两个进程都可以使用这份AIDL代码,则不需要拷贝。
客户端进程即主进程,在MainActivity.java中绑定远程StudentService,就可以向服务端进程remote发起请求了:
/java/com/sqchen/aidltest/MainActivity.java
public class MainActivity extends AppCompatActivity implements View.OnClickListener {

    private static final String TAG = "MainActivity";

    private final static String PKG_NAME = "com.sqchen.aidltest";

    private Button btnBind;
    private Button btnAddData;
    private Button btnGetData;
    private Button btnUnbind;

    private IStudentService mStudentService;

    private ServiceConnection mConnection = new ServiceConnection() {
        @Override
        public void onServiceConnected(ComponentName name, IBinder service) {
            mStudentService = IStudentService.Stub.asInterface(service);
            if (mStudentService == null) {
                Log.i(TAG, "mStudentService == null");
                return;
            }
        }

        @Override
        public void onServiceDisconnected(ComponentName name) {

        }
    };

    @Override
    protected void onCreate(Bundle savedInstanceState) {
        super.onCreate(savedInstanceState);
        setContentView(R.layout.activity_main);
        initView();
        initData();
    }

    private void initView() {
        btnBind = findViewById(R.id.btn_bind);
        btnAddData = findViewById(R.id.btn_add_data);
        btnGetData = findViewById(R.id.btn_get_data);
        btnUnbind = findViewById(R.id.btn_unbind);
        initListener();
    }

    private void initListener() {
        btnBind.setOnClickListener(this);
        btnAddData.setOnClickListener(this);
        btnGetData.setOnClickListener(this);
        btnUnbind.setOnClickListener(this);
    }

    private void initData() {
        mCallback = new ITaskCallback.Stub() {
            @Override
            public void onSuccess(String result) throws RemoteException {
                Log.i(TAG, "result = " + result);
            }

            @Override
            public void onFailed(String errorMsg) throws RemoteException {
                Log.e(TAG, "errorMsg = " + errorMsg);
            }
        };
    }

    @Override
    public void onClick(View v) {
        switch (v.getId()) {
            case R.id.btn_bind:
                bindStudentService();
                break;
            case R.id.btn_add_data:
                addData();
                break;
            case R.id.btn_get_data:
                getData();
                break;
            case R.id.btn_unbind:
                unbindStudentService();
                break;
            default:
                break;
        }
    }

    private void bindStudentService() {
        Intent intent = new Intent(this, StudentService.class);
        intent.setPackage(PKG_NAME);
        bindService(intent, mConnection, Context.BIND_AUTO_CREATE);
    }

    private void addData() {
        if (mStudentService == null) {
            Log.i(TAG, "mStudentService = null");
            return;
        }
        try {
            mStudentService.addStudent(new Student(1, "陈贤靖"));
        } catch (RemoteException e) {
            e.printStackTrace();
        }
    }

    private void getData() {
        if (mStudentService == null) {
            Log.i(TAG, "mStudentService = null");
            return;
        }
        try {
            List<Student> studentList = mStudentService.getStudentList();
            Log.i(TAG, "studentList = " + studentList);
        } catch (RemoteException e) {
            e.printStackTrace();
        }
    }

    private void unbindStudentService() {
        unbindService(mConnection);
        mStudentService = null;
    }

    @Override
    protected void onDestroy() {
        super.onDestroy();
        unbindStudentService();
    }
}
在MainActivity.java中,创建4个按钮,分别用于绑定服务、添加数据、获取数据、解绑服务:
1、绑定服务
通过bindService方式启动StudentService,ServiceConnection是用于监视服务端状态的一个接口,内部方法都在主线程被调用,所以不能在该接口的方法中进行耗时操作。
/**
 * Called when a connection to the Service has been established, with
 * the {@link android.os.IBinder} of the communication channel to the
 * Service.
 *
 * <p class="note"><b>Note:</b> If the system has started to bind your
 * client app to a service, it's possible that your app will never receive
 * this callback. Your app won't receive a callback if there's an issue with
 * the service, such as the service crashing while being created.
 *
 * @param name The concrete component name of the service that has
 * been connected.
 *
 * @param service The IBinder of the Service's communication channel,
 * which you can now make calls on.
 */
void onServiceConnected(ComponentName name, IBinder service);
onServiceConnected方法是在与Service建立连接时被调用,通过注释可以发现,如果绑定服务的过程中,Service端如果发生崩溃,该方法将不会被回调。
/**
 * Called when a connection to the Service has been lost.  This typically
 * happens when the process hosting the service has crashed or been killed.
 * This does <em>not</em> remove the ServiceConnection itself -- this
 * binding to the service will remain active, and you will receive a call
 * to {@link #onServiceConnected} when the Service is next running.
 *
 * @param name The concrete component name of the service whose
 * connection has been lost.
 */
void onServiceDisconnected(ComponentName name);
onServiceDisconnected方法是在与Service的连接断开时被调用,通过注释可以发现,当Service发生崩溃或者由于某种原因被杀死时,将触发该回调,但客户端与Service之间的绑定关系还是存在的,且ServiceConnection对象不会被移除,当Service在下一次被运行起来,那么还会再次触发onServiceConnected方法。
通过查看ServiceConnection源码可以知道,在onServiceConnected方法被触发之后,就可以对服务端Service进行操作了,但是服务端通过onServiceConnected返回给客户端的是IBinder对象,我们需要通过mStudentService = IStudentService.Stub.asInterface(service)将IBinder类型的service对象转化为IStudentService类型对象,然后就可以调用IStudentService的addStudent和getStudentList方法了。
2、添加数据
private void addData() {
    if (mStudentService == null) {
        Log.i(TAG, "mStudentService = null");
        return;
    }
    try {
        mStudentService.addStudent(new Student(1, "陈贤靖"));
    } catch (RemoteException e) {
        e.printStackTrace();
    }
}
先判断mStudentService对象是否初始化,不为空,则调用addStudent向服务端添加一个Student对象。
3、获取数据
private void getData() {
    if (mStudentService == null) {
        Log.i(TAG, "mStudentService = null");
        return;
    }
    try {
        List<Student> studentList = mStudentService.getStudentList();
        Log.i(TAG, "studentList = " + studentList);
    } catch (RemoteException e) {
        e.printStackTrace();
    }
}
先判断mStudentService对象是否初始化,不为空,则调用getStudentList方法获取服务端的Student列表数据。
4、解绑服务
private void unbindStudentService() {
    unbindService(mConnection);
    mStudentService = null;
}
在MainActivity的onDestory中或其他需要的地方调用该方法进行解绑服务。
以上就是AIDL的基本使用,流程可以概括为:
(1)创建服务端的AIDL文件,进行服务端方法的接口定义(IStudentService);
(2)创建服务端的Service,实现AIDL接口定义的方法,并将Binder对象通过onBind方法返回给客户端;
(3)创建客户端的AIDL文件,从服务端拷贝即可,但要保持AIDL文件的包名结构在服务端和客户端是一致的;
(4)客户端绑定服务端Service,在成功建立与Service的连接之后,拿到服务端返回的Binder对象,并将Binder对象转为AIDL接口类型的对象(IStudentService);
(5)通过IStudentService类型对象调用Service中的实现方法;
(6)在需要结束与服务端连接的时候,调用unbindService方法进行解绑;
在创建AIDL文件时,如果有报错,通常说明某个AIDL文件书写不规范,需要检查的点有:
1、自定义对象是否实现Parceable接口;
2、引用的AIDL对象是否显式import;
3、定向tag的使用是否正确;
4、定向tag为inout时,自定义对象是否同时实现writeToParcel和readFromParcel;
5、如果有修改过java文件的包名,检查AIDL文件的包名是否正确(是否与applicationId一致);
当发现问题并修改后,可以尝试Build->Clean Project或Build -> Rebuild以重新刷新或构建项目;
三、回调机制
在基本用法中,只实现了客户端向服务端发送调用请求的单向通信,但在很多场景下,同时也需要实现服务端主动向客户端发送数据进行双向通信,比如在观察者模式中,当有多个客户端绑定服务端,如果想要实现在服务端数据变化时主动通知所有与它建立绑定的客户端时,这个时候就需要用到AIDL的回调机制了。
在服务端aidl文件夹下新建一个AIDL文件,用于定义回调接口,并声明onSuccess和onFailed方法,这两个方法是用于业务层的,比如服务端添加数据失败时调用onFailed,取决于具体场景:
// ITaskCallback.aidl
package com.sqchen.aidltest;

interface ITaskCallback {

    void onSuccess(String result);

    void onFailed(String errorMsg);
}
修改IStudentService.aidl,添加register和unregister方法用于客户端注册回调和解除回调:
// IStudentService.aidl
package com.sqchen.aidltest;

import com.sqchen.aidltest.Student;
//注意:aidl接口也要显式import
import com.sqchen.aidltest.ITaskCallback;

interface IStudentService {

    List<Student> getStudentList();

    void addStudent(inout Student student);

    void register(ITaskCallback callback);

    void unregister(ITaskCallback callback);
}
修改StudentService.java:
package com.sqchen.aidltest;

import android.app.Service;
import android.content.Intent;
import android.os.Binder;
import android.os.IBinder;
import android.os.RemoteCallbackList;
import android.os.RemoteException;
import android.util.Log;

import java.util.List;
import java.util.concurrent.CopyOnWriteArrayList;

public class StudentService extends Service {

    private static final String TAG = "StudentService";

    private CopyOnWriteArrayList<Student> mStuList;

    private static RemoteCallbackList<ITaskCallback> sCallbackList;

    private Binder mBinder = new IStudentService.Stub() {

        @Override
        public void register(ITaskCallback callback) throws RemoteException {
            if (callback == null) {
                Log.i(TAG, "callback == null");
                return;
            }
            sCallbackList.register(callback);
        }

        @Override
        public void unregister(ITaskCallback callback) throws RemoteException {
            if (callback == null) {
                return;
            }
            sCallbackList.unregister(callback);
        }

        @Override
        public List<Student> getStudentList() throws RemoteException {
            return mStuList;
        }

        @Override
        public void addStudent(Student student) throws RemoteException {
            if (mStuList == null) {
                dispatchResult(false, "add student failed, mStuList = null");
            } else {
                mStuList.add(student);
                dispatchResult(true, "add student successfully");
            }
        }
    };

    @Override
    public void onCreate() {
        super.onCreate();
        Log.i(TAG, "onCreate");
        init();
    }

    private void init() {
        mStuList = new CopyOnWriteArrayList<>();
        sCallbackList = new RemoteCallbackList<>();
    }

    /**
     * 分发结果
     * @param result
     * @param msg
     */
    private void dispatchResult(boolean result, String msg) {
        int length = sCallbackList.beginBroadcast();
        for (int i = 0; i < length; i++) {
            ITaskCallback callback = sCallbackList.getBroadcastItem(i);
            try {
                if (result) {
                    callback.onSuccess(msg);
                } else {
                    callback.onFailed(msg);
                }
            } catch (RemoteException e) {
                e.printStackTrace();
            }
        }
        sCallbackList.finishBroadcast();
    }

    @Override
    public IBinder onBind(Intent intent) {
        return mBinder;
    }
}
在StudentService.java中,Binder对象实现了IStudentService.aidl中新声明的两个方法,register和unregister,并创建了一个RemoteCallbackList
RemoteCallbackList<E extends IInterface> 是系统专门提供的用于跨进程传递callback的一种接口,这个接口是泛型,支持管理所有AIDL接口。这里不能使用普通的List来存放callback,因为在进程间通信时,客户端的List对象和服务端接收到的List对象不在不同的内存空间中。正是因为不是在同一个内存空间中,不同进程之间的数据不能进行共享,所以才有进程间通信这个机制。
那么,为什么RemoteCallbackList能实现传输前后都是相同对象呢?查看RemoteCallbackList源码可以发现,其内部创建了一个ArrayMap用于保存callback:
ArrayMap<IBinder, Callback> mCallbacks = new ArrayMap<IBinder, Callback>();
这个Map的key是IBinder对象,而value是Callback对象,当客户端通过register方法注册回调时,将callback传递给服务端,服务端再通过RemoteCallbackList.register方法真正将回调进行保存:
//RemoteCallbackList
public boolean register(E callback, Object cookie) {
    synchronized (mCallbacks) {
        if (mKilled) {
            return false;
        }
        // Flag unusual case that could be caused by a leak. b/36778087
        logExcessiveCallbacks();
        IBinder binder = callback.asBinder();
        try {
            Callback cb = new Callback(callback, cookie);
            binder.linkToDeath(cb, 0);
            mCallbacks.put(binder, cb);
            return true;
        } catch (RemoteException e) {
            return false;
        }
    }
}
将我们关心的部分抽出来:
IBinder binder = callback.asBinder();
Callback cb = new Callback(callback, cookie);
mCallbacks.put(binder, cb);
将客户端传递过来的Callback对象转为IBinder对象作为key,封装一个Callback作为value。客户端传递过来的Callback对象虽然在服务端被重新序列化生成一个对象,但它们底层的Binder对象是同一个,所以可以实现Callback的跨进程传输。
在服务端注册客户端的回调后,服务端就可以通过这个回调主动向客户端传递数据了。比如,在addStudent中,当添加数据成功时,将操作的执行结果或者其他数据分发给所有向该服务端注册监听的客户端:
/**
 * 分发结果
 * @param result
 * @param msg
 */
private void dispatchResult(boolean result, String msg) {
    int length = sCallbackList.beginBroadcast();
    for (int i = 0; i < length; i++) {
        ITaskCallback callback = sCallbackList.getBroadcastItem(i);
        try {
            if (result) {
                callback.onSuccess(msg);
            } else {
                callback.onFailed(msg);
            }
        } catch (RemoteException e) {
            e.printStackTrace();
        }
    }
    //在调用beginBroadcast之后,必须调用该方法
    sCallbackList.finishBroadcast();
}
在客户端中创建ITaskCallback对象:
//MainActivity.java

ITaskCallback mCallback = new ITaskCallback.Stub() {
    @Override
    public void onSuccess(String result) throws RemoteException {
        Log.i(TAG, "result = " + result);
    }

    @Override
    public void onFailed(String errorMsg) throws RemoteException {
        Log.e(TAG, "errorMsg = " + errorMsg);
    }
};
修改ServiceConnection,在建立连接、调用onServiceConnected方法时,进行Callback的注册:
private ServiceConnection mConnection = new ServiceConnection() {
    @Override
    public void onServiceConnected(ComponentName name, IBinder service) {
        mStudentService = IStudentService.Stub.asInterface(service);
        if (mStudentService == null) {
            Log.i(TAG, "mStudentService == null");
            return;
        }
        try {
            if (mCallback != null) {
                Log.i(TAG, "mCallback != null");
                mStudentService.register(mCallback);
            } else {
                Log.i(TAG, "mCallback == null");
            }
        } catch (RemoteException e) {
            e.printStackTrace();
        }
    }

    @Override
    public void onServiceDisconnected(ComponentName name) {

    }
};
此时,客户端与服务端的连接已经建立,且客户端向服务端注册了回调,当客户端向服务端添加数据,服务端执行addStudent方法时,服务端会通过回调将添加数据的执行结果返回给客户端,从而实现了双向通信。
四、权限验证
默认情况下,如果没有加入权限验证功能,那么我们的远程服务是所有进程都可以进行连接的,从系统安全性的角度出发,我们还需要有相应的权限验证机制来保证系统的安全,有两种方式:
1、在建立连接之前
在客户端通过bindService方法绑定远程服务时,我们会在服务端的onBind方法中将Binder对象返回给客户端,那么我们可以在onBind方法中对来自客户端的请求进行权限验证。
2、在客户端请求执行服务端的AIDL方法时
实际上,每个AIDL方法都有一个唯一的方法标识code,服务端在Binder.onTransact中根据这个code判断并确定客户端想要调用的是哪个AIDL方法,所以,我们可以在Binder.onTransact中进行权限验证,拦截非法的客户端调用。
常用的权限验证机制有包名验证和权限验证,即根据客户端的包名或所声明的权限是否符合服务端要求来进行验证。
修改StudentService.java中的Binder对象:
private Binder mBinder = new IStudentService.Stub() {

	...

    @Override
    public boolean onTransact(int code, Parcel data, Parcel reply, int flags) throws RemoteException {
        //包名验证
        String[] packages = getPackageManager().getPackagesForUid(getCallingUid());
        String pkgName = null;
        if (packages != null && packages.length > 0) {
            pkgName = packages[0];
        }
        if (TextUtils.isEmpty(pkgName) || !pkgName.startsWith("com.sqchen")) {
            Log.i(TAG, "invalid pkgName : " + pkgName);
            return false;
        }
        return super.onTransact(code, data, reply, flags);
    }
};
这样,如果客户端的包名不是以"com.sqchen"开头的话,则认为是非法请求,在onTranscat中返回false将使得客户端的请求失败,从而达到权限验证的目的。
五、死亡回调
当客户端与服务端之间的连接断开,我们称之为Binder死亡,此时虽然客户端和服务端都在运行,但因为连接断开,客户端发出的请求是不会得到响应的,所以我们需要知道什么时候连接断开,以便进行重新绑定,或者执行其他操作。
前面在看ServiceConnection的源码时我们发现,当连接断开时,会调用onServiceDisconnected方法,所以,我们可以在这个方法进行重新绑定服务。
此外,Binder中还有两个很重要的方法,linkToDeath和unlinkToDeath,通过linkToDeath我们可以给Binder设置一个死亡代理IBinder.DeathRecipient,当Binder死亡时,将会调用DeathRecipient的binderDied方法。
修改MainActivity.java,创建一个死亡代理,当客户端与服务端建立连接时,为Binder设置死亡代理:
private IBinder.DeathRecipient mDeathRecipient = new IBinder.DeathRecipient() {
    @Override
    public void binderDied() {
        if (mStudentService == null) {
            return;
        }
        //解除死亡代理
        mStudentService.asBinder().unlinkToDeath(mDeathRecipient, 0);
        mStudentService = null;
        //重新绑定服务
        bindStudentService();
        Log.i(TAG, "binderDied, bindService again");
    }
};

private ServiceConnection mConnection = new ServiceConnection() {
    @Override
    public void onServiceConnected(ComponentName name, IBinder service) {
        mStudentService = IStudentService.Stub.asInterface(service);
        if (mStudentService == null) {
            Log.i(TAG, "mStudentService == null");
            return;
        }
        try {
        	//设置死亡代理
            mStudentService.asBinder().linkToDeath(mDeathRecipient, 0);
            if (mCallback != null) {
                Log.i(TAG, "mCallback != null");
                mStudentService.register(mCallback);
            } else {
                Log.i(TAG, "mCallback == null");
            }
        } catch (RemoteException e) {
            e.printStackTrace();
        }
    }

    @Override
    public void onServiceDisconnected(ComponentName name) {
        //也可以在这里重新绑定服务
    }
};
接着,我们模拟服务端意外死亡导致连接断开的情况,进入adb shell,查找服务端进程remote的pid,并kill掉:
E:\Blog\src\AIDLTest>adb shell
mido:/ # ps
USER           PID  PPID     VSZ    RSS WCHAN            ADDR S NAME
root         26112 28641    8968   1900 sigsuspend 74a7005e08 S sh
root         26116 26112   10540   1992 0          7115eac768 R ps
mido:/ # ps -A | grep com.sqchen
u0_a140      26015   745 5238588  68324 SyS_epoll_wait 7269051c40 S com.sqchen.aidltest
u0_a140      26046   745 5217176  39364 SyS_epoll_wait 7269051c40 S com.sqchen.aidltest:remote
mido:/ # kill 26046
然后,查看日志:
2019-04-05 21:43:00.530 26015-26015/com.sqchen.aidltest I/MainActivity: mCallback != null
2019-04-05 21:45:21.955 26015-26028/com.sqchen.aidltest I/MainActivity: binderDied, bindService again
2019-04-05 21:45:22.048 26015-26015/com.sqchen.aidltest I/MainActivity: mCallback != null
发现remote被kill之后,确实调用了DeathRecipient的binderDied方法,再次查看remote进程,观察发现remote进程的pid在被kill掉前后是不一样的,说明成功地重新绑定服务。
E:\Blog\src\AIDLTest>adb shell
mido:/ # ps -A | grep com.sqchen
u0_a140      26015   745 5239648  68328 SyS_epoll_wait 7269051c40 S com.sqchen.aidltest
u0_a140      26125   745 5217176  39604 SyS_epoll_wait 7269051c40 S com.sqchen.aidltest:remote
binderDied和onServiceDisconnected的区别:
1、binderDied早于onServiceDisconnected被调用(参考:linkToDeath机制了解和使用)
2、binderDied在客户端的Binder线程池被调用,不能在这个方法中访问UI,而onServiceDisconnected在客户端的UI线程被调用;
六、需要注意的地方
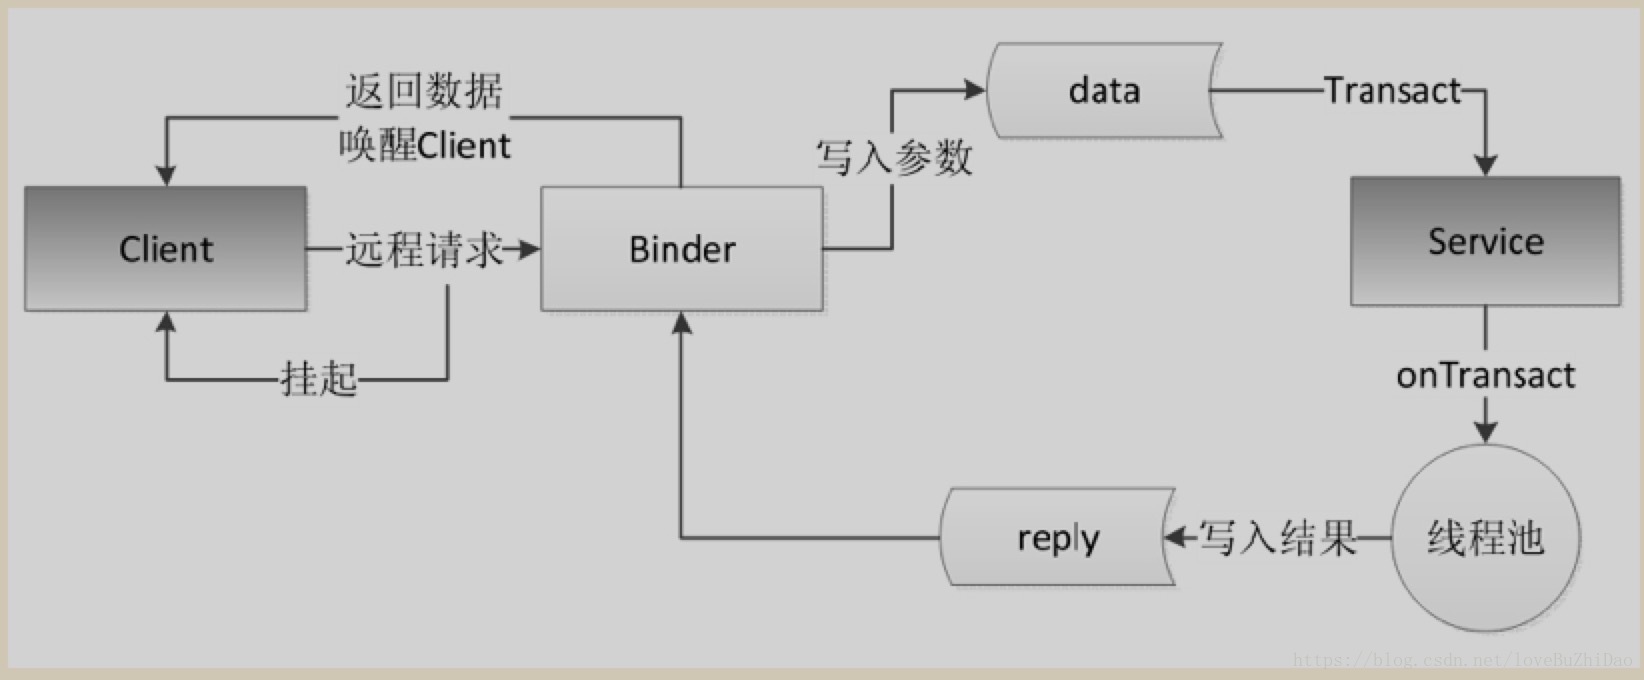
1、客户端调用远程服务的方法,被调用的方法运行在服务端的Binder线程池中,同时,客户端线程会被挂起,进入阻塞状态,如果被调用的服务端方法比较耗时,那么我们不能在客户端的主线程去调用服务端的方法,否则将导致客户端ANR。
2、查看ServiceConnection源码时,发现客户端的onServiceConnnected和onServiceDisconnected方法运行在主线程,即UI线程,所以也不能在这两个方法中调用服务端的耗时方法。
3、服务端的方法运行在服务端的Binder线程池中,所以在编写服务端代码时,不需要新建线程去执行服务端方法。
源码地址:AIDLTest

 浙公网安备 33010602011771号