Linux系统为Centos7以上版本安装Mysql详细操作步骤及注意事项
下载mysql包
我们可以直接去官网下载
mysql官网地址
https://dev.mysql.com/downloads/mysql/

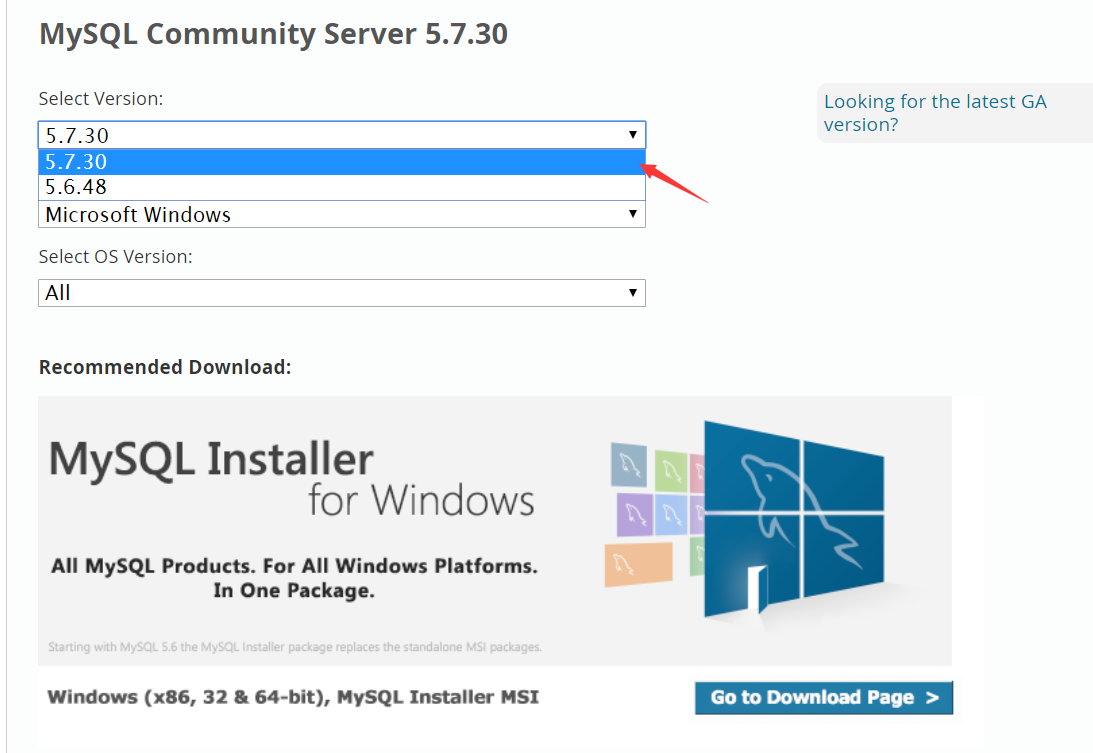
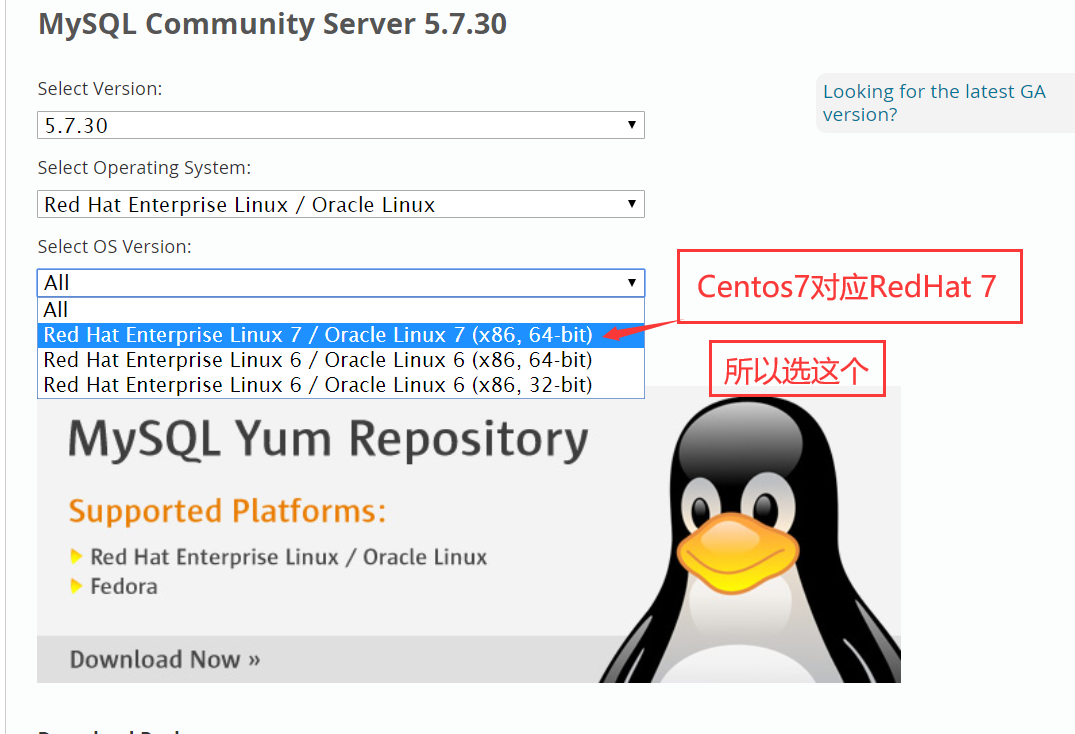
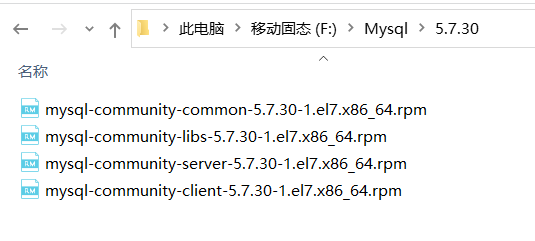
本次教程以5.7.30举例
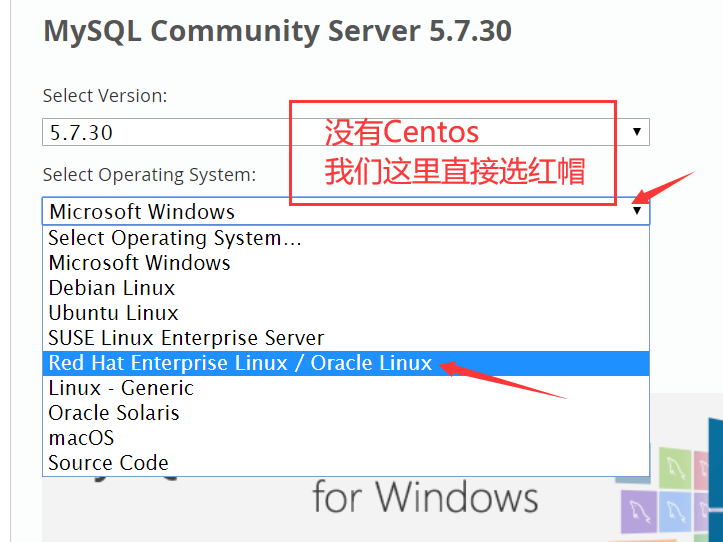

为什么要选redhat 大家可以自行百度 centos与Redhat的关系
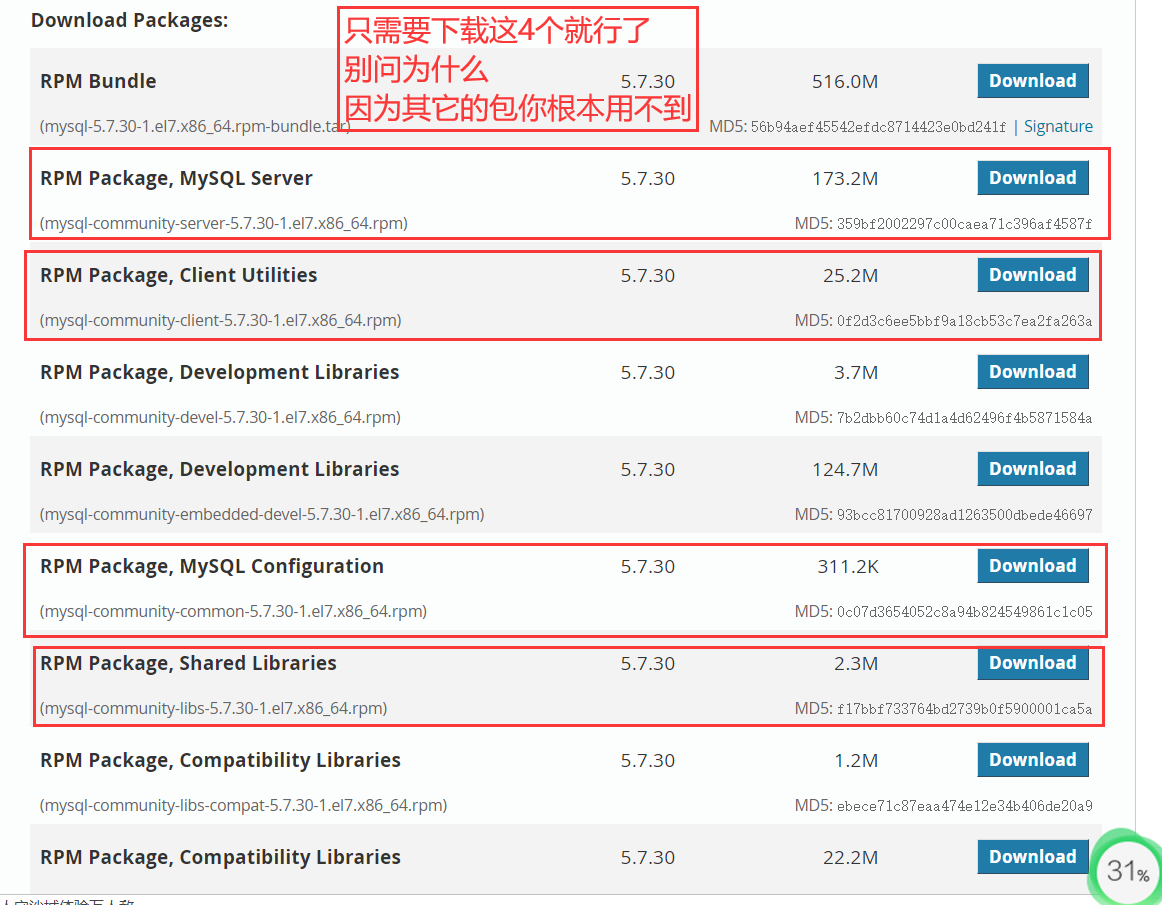
将这4个rpm包下载以后
当然这边也会提供百度网盘的下载地址
链接:https://pan.baidu.com/s/17H_VLSnmkwnOnfJ0NUoDyQ
提取码:6zna
接下来就是我们的安装步骤
查看系统版本号
[root@localhost ~]# cat /etc/redhat-release
CentOS Linux release 7.5.1804 (Core)

查看防火墙状态 systemctl status firewalld.service
暂时关闭防火墙systemctl stop firewalld.service
永久关闭防火墙systemctl disable firewalld.service
getenforce
enforcing为开启、disable为关闭:
一定要先关一下
setenforce 0
vi /etc/selinux/config
SELINUX=enforcing改为SELINUX=disabled
重启生效
8.0一定要初始化的时候加参数
首先在/etc/my.cnf添加
lower-case-table-names=1
数据库初始化
mysqld --initialize --user=mysql --lower-case-table-names=1
用xftp把安装包传上去 随便放哪都可以
我这放在了/opt/mysql/5.7.30目录下
接下来cd /opt/mysql/5.7.30
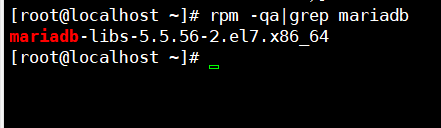
PS:centos7.6自带的类mysql数据库是mariadb,网上一些文章也有说如果有mariadb的程序安装了那会跟mysql冲突,要先删除。这里注意一下,不过按本文的方法不会有此问题
运行rpm -qa|grep mariadb,查询mariadb相关安装包,果然有
建议直接卸载
rpm -e --nodeps 加包名
rpm -e --nodeps mariadb-libs-5.5.56-2.el7.x86_64
再来验证一下 rpm -qa|grep mariadb

没了
接下来我们
直接安装刚刚传上去的rpm包
cd /opt/mysql/5.7.30
请按照顺序执行
rpm -ivh mysql-community-common-5.7.30-1.el7.x86_64.rpm
rpm -ivh mysql-community-libs-5.7.30-1.el7.x86_64.rpm
rpm -ivh mysql-community-client-5.7.30-1.el7.x86_64.rpm
rpm -ivh mysql-community-server-5.7.30-1.el7.x86_64.rpm
运行systemctl start mysqld.service,启动mysql
然后开始设置root用户密码
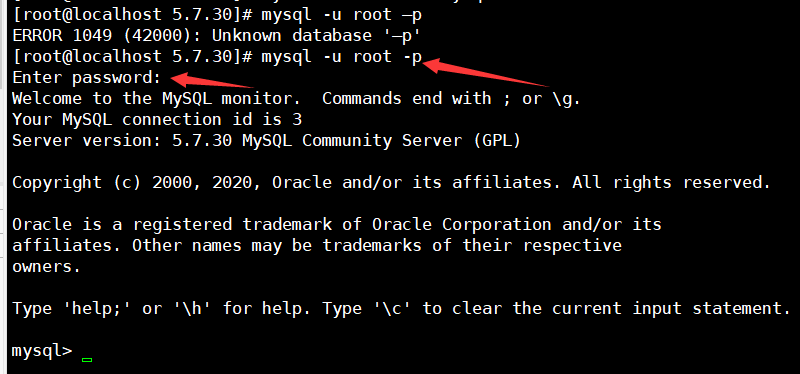
Mysql自动给root用户设置随机密码,运行grep "password" /var/log/mysqld.log可看到当前密码

运行mysql -u root -p,用root用户登录,提示输入密码可用上述的,可以成功登陆进入mysql命令行
然后是设置root密码,对于个人开发环境,如果要设比较简单的密码(生产环境服务器千万要设复杂密码!!!!!!!!!!),可以运行
set global validate_password_policy=0;
来修改密码强度限制(validate_password_policy默认值1,)

我的是已经修改过的,初始情况下第一个的值是ON,validate_password_length是8。可以通过如下命令修改:
mysql> set global validate_password_policy=0;
mysql> set global validate_password_length=1;
通过上面两个设置可以设置简单的数据库root密码了
设置之后就是我上面查出来的那几个值了,此时密码就可以设置的很简单,例如1234之类的。到此数据库的密码设置就完成了。
然后运行
set password for 'root'@'localhost' =password('rootroot');
修改密码,格式为:root代表用户名,rootroot代表密码
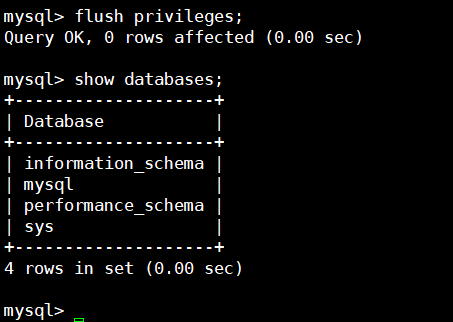
flush privileges;
运行flush privileges;使密码设置生效

到此安装成功
SHOW VARIABLES LIKE 'character%';
乱码问题
编辑my.cnf文件
vi /etc/my.cnf
[client]
default-character-set=utf8
[mysql]
default-character-set=utf8
[mysqld]
character-set-server=utf8
#在[client]段增加下面代码
default-character-set=utf8
#在[mysql]段增加下面的代码
character-set-server=utf8
#在[mysqld]段增加下面的代码
character-set-server=utf8
关于lnmp mysql STRICT_TRANS_TABLES,NO_ZERO_IN_DATE,NO_ZERO_DATE,ERROR_FOR_DIVISION_BY_ZERO...等等的报错信息
https://blog.csdn.net/qq_39207395/article/details/90478196
添加以下内容即可
[mysqld]
sql_mode='STRICT_TRANS_TABLES,NO_ZERO_IN_DATE,NO_ZERO_DATE,ERROR_FOR_DIVISION_BY_ZERO,NO_AUTO_CREATE_USER,NO_ENGINE_SUBSTITUTION'

验证
select @@sql_mode;

最大连接数问题
max_connections=1000
错误连接
max_connect_errors=1000
mysql中表名不区分大小写
在 [mysqld] 节点下,加入一行: lower_case_table_names=1
重启 MySQL 即可;
show variables like '%case%';
中文乱码问题
重启mysql
systemctl restart mysqld.service
mysql -uroot -p
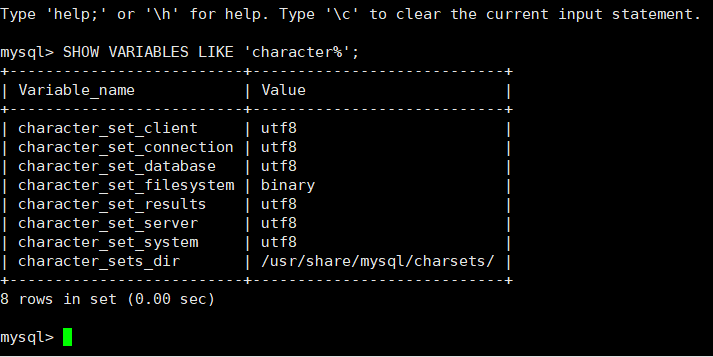
SHOW VARIABLES LIKE 'character%';
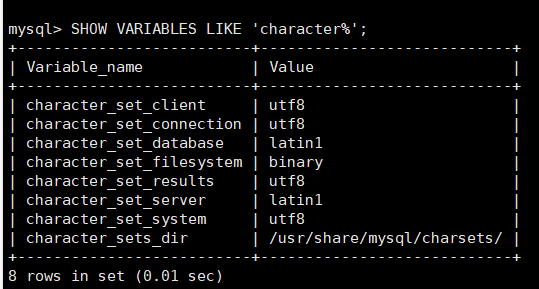
上面是之前的
下面是修改后的
1.启动命令
[root@xufeng Desktop]# service mysqld start
Redirecting to /bin/systemctl start mysqld.service
2.关闭命令
[root@xufeng ~]# service mysqld stop
Redirecting to /bin/systemctl stop mysqld.service
3.重启命令
[root@xufeng ~]# service mysqld restart
Redirecting to /bin/systemctl restart mysqld.service
4.查看服务状态
[root@xufeng ~]# service mysqld status
将mysql设置开机自启
systemctl enable mysqld
Host is not allowed to connect to this MySQL server解决方法
select host, user from user;
今天在Linux上面装完MySQL,却发现在本地登录可以,但是远程登录却报错Host is not allowed to connect to this MySQL server,找了半天试了网上的一些方法都没有解决,最终在一篇文章里找到了解决方法,特意记录一下。
先说说这个错误,其实就是我们的MySQL不允许远程登录,所以远程登录失败了,解决方法如下:
可以忽略 可以忽略 可以忽略
- 在装有MySQL的机器上登录MySQL mysql -u root -p密码
- 执行
use mysql; - 执行
update user set host = '%' where user = 'root';这一句执行完可能会报错,不用管它。 -
执行
FLUSH PRIVILEGES; - 这个改完以后会有问题,这里改完以后,还需要重新配置一下root@%的密码set password for 'root'@'%' =password('rootroot');,不然root@localhost登录会显示密码错误
直接采用下面的方式:
- 修改本地root用户登录密码。
alter user 'root'@'localhost' identified by "123456"; - 创建全域root用户(允许root从其他服务器访问)。
create user 'root'@'%' identified by '123456'; - 进行授权。
grant all privileges on *.* to 'root'@'%'; flush privileges; - 这里还是会有一个问题,
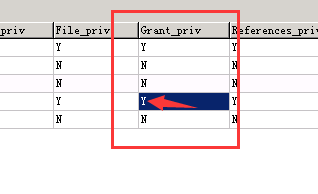
root@%的赋权还是为N   需要改成Y  并且需要重启数据库


使用SQL语句来更改

update mysql.user set Grant_priv='Y', Super_priv='Y' where user ='root' and host='%';

FLUSH PRIVILEGES;
如果不改:会出现以下的问题:
报1044-Access denied for user 'root'@'%' to database 'nacos' 错误
打开Mysql数据库中的user表 查看
或者sql语句查看
use mysql;
select * from user;
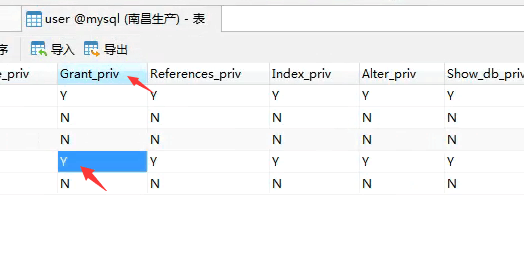
root@%中是否有grant权限
没有的话就把N改成Y
当然也可以通过sql语句来改
参考①
参考②
https://blog.csdn.net/lhl1124281072/article/details/80277163
mysql> grant all privileges on *.* to root@'%' identified by '密码';
mysql> flush privileges;
即可解决
最后还有Mysql时间问题

可以参考https://www.cnblogs.com/gengyufei/p/11730308.html
show variables like '%time_zone%';
set time_zone='+8:00';
验证:
select CURRENT_TIMESTAMP
select now();
上面这个不能重启,重启会失效
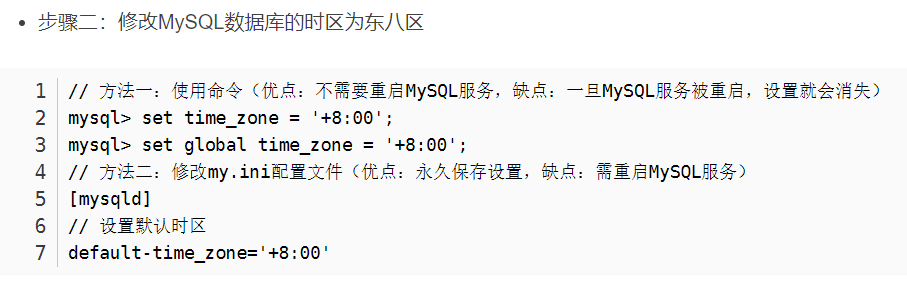
// 方法一:使用命令(优点:不需要重启MySQL服务,缺点:一旦MySQL服务被重启,设置就会消失)
mysql> set time_zone = '+8:00'; mysql> set global time_zone = '+8:00';
// 方法二:修改my.ini配置文件(优点:永久保存设置,缺点:需重启MySQL服务)
[mysqld]
// 设置默认时区
default-time_zone='+8:00'
之后还要做以下事情:
设置外网可访问
如果有防火墙,要开放端口,默认3306
Centos7下修改MySQL5.7数据库文件存放路径过程
1 测试环境搭建
1.1 安装操作系统Centos7
[root@localhost ~]# cat /etc/redhat-release
CentOS Linux release 7.7.1908 (Core)
2 修改Mysql数据存储路径到其他文件夹
2.1 查看当前Mysql数据存储路径,如下可知当前数据存放路径为/var/lib/mysql
#################### 查看/etc/my.cnf 配置文件内容 #######################
[root@localhost ~]# cat /etc/my.cnf
# For advice on how to change settings please see
# http://dev.mysql.com/doc/refman/5.7/en/server-configuration-defaults.html

[mysqld]
#
# Remove leading # and set to the amount of RAM for the most important data
# cache in MySQL. Start at 70% of total RAM for dedicated server, else 10%.
# innodb_buffer_pool_size = 128M
#
# Remove leading # to turn on a very important data integrity option: logging
# changes to the binary log between backups.
# log_bin
#
# Remove leading # to set options mainly useful for reporting servers.
# The server defaults are faster for transactions and fast SELECTs.
# Adjust sizes as needed, experiment to find the optimal values.
# join_buffer_size = 128M
# sort_buffer_size = 2M
# read_rnd_buffer_size = 2M
datadir=/var/lib/mysql
socket=/var/lib/mysql/mysql.sock

# Disabling symbolic-links is recommended to prevent assorted security risks
symbolic-links=0

log-error=/var/log/mysqld.log
pid-file=/var/run/mysqld/mysqld.pid
忽略大小写问题
- 新安装mysql5.7版本后,linux环境下默认是大小写敏感的。可以在客户端执行以下命令:
SHOW VARIABLES LIKE '%case%'
可以看到 lower_case_table_names 的值是 0, 我们要做的就是把它设置成 1. 具体步骤如下:
- 使用 vi /etc/mysql/my.cnf, 打开mysql 的配置文件, 在 mysqld 这个节点下, 加入:
lower_case_table_names=1
设置最大连接数
首先,首先我们来看下mysql的最大连接数:
show variables like '%max_connections%';
方法:
修改mysql配置文件my.cnf,在[mysqld]段中添加或修改max_connections值:
max_connections=1000
重启mysql服务即可。
service restart mysqld
systemctl mysqld restart
############### 查看/var/lib/mysql路径下文件列表 ####################
[root@localhost ~]# ls /var/lib/mysql
auto.cnf client-cert.pem ibdata1 ibtmp1 mysql.sock.lock public_key.pem sys
ca-key.pem client-key.pem ib_logfile0 mysql performance_schema server-cert.pem test
ca.pem ib_buffer_pool ib_logfile1 mysql.sock private_key.pem server-key.pem
[root@localhost ~]#
2.2 停止mysqld服务,创建新的mysql数据存放路径/home/data
################# 停止mysqld服务 #####################
[root@localhost ~]# service mysqld stop
Redirecting to /bin/systemctl stop mysqld.service
[root@localhost ~]#
########### 创建新的mysql数据存放路径 #################
[root@localhost ~]# mkdir -p /home/data/
[root@localhost ~]# ls /home/data/
[root@localhost ~]#
2.3 修改/etc/my.cnf,在[mysqld]选项组下配置新的文件路径
[root@localhost ~]# cat /etc/my.cnf
# For advice on how to change settings please see
# http://dev.mysql.com/doc/refman/5.7/en/server-configuration-defaults.html

[mysqld]
#
# Remove leading # and set to the amount of RAM for the most important data
# cache in MySQL. Start at 70% of total RAM for dedicated server, else 10%.
# innodb_buffer_pool_size = 128M
#
# Remove leading # to turn on a very important data integrity option: logging
# changes to the binary log between backups.
# log_bin
#
# Remove leading # to set options mainly useful for reporting servers.
# The server defaults are faster for transactions and fast SELECTs.
# Adjust sizes as needed, experiment to find the optimal values.
# join_buffer_size = 128M
# sort_buffer_size = 2M
# read_rnd_buffer_size = 2M
datadir=/home/data/mysql
socket=/home/data/mysql/mysql.sock

# Disabling symbolic-links is recommended to prevent assorted security risks
symbolic-links=0

log-error=/var/log/mysqld.log
pid-file=/var/run/mysqld/mysqld.pid
[root@localhost ~]#
如上所示,修改了datadir=/home/data/mysql, socket=/home/data/mysql/mysql.sock
2.4 移动/var/lib/mysql整个目录到新的文件夹/home/data/
[root@localhost ~]# mv /var/lib/mysql /home/data/
[root@localhost ~]# ls /home/data/mysql/
auto.cnf ca.pem client-key.pem ibdata1 ib_logfile1 performance_schema public_key.pem server-key.pem test
ca-key.pem client-cert.pem ib_buffer_pool ib_logfile0 mysql private_key.pem server-cert.pem sys
[root@localhost ~]#
注意:我这使用了mv来移动mysql文件夹,请保持一致
这个应该之前就要解决。一开始就要解决下面的问题
2.5 启动mysqld服务,解决因selinux开启导致的启动错误
[root@localhost ~]# service mysqld start
Redirecting to /bin/systemctl start mysqld.service
Job for mysqld.service failed because the control process exited with error code. See "systemctl status mysqld.service" and "journalctl -xe" for details.
可以看到系统报错,这是因为没有关闭selinux导致的,关闭selinux然后重新启动mysqld服务,成功
[root@localhost ~]# setenforce 0
[root@localhost ~]# getenforce
Permissive
[root@localhost ~]#
[root@localhost ~]# service mysqld start
Redirecting to /bin/systemctl start mysqld.service
[root@localhost ~]# service mysqld status
Redirecting to /bin/systemctl status mysqld.service
● mysqld.service - MySQL Server
Loaded: loaded (/usr/lib/systemd/system/mysqld.service; enabled; vendor preset: disabled)
Active: active (running) since Sat 2020-04-18 04:06:21 EDT; 3min 25s ago
Docs: man:mysqld(8)
http://dev.mysql.com/doc/refman/en/using-systemd.html
Process: 1964 ExecStart=/usr/sbin/mysqld --daemonize --pid-file=/var/run/mysqld/mysqld.pid $MYSQLD_OPTS (code=exited, status=0/SUCCESS)
Process: 1947 ExecStartPre=/usr/bin/mysqld_pre_systemd (code=exited, status=0/SUCCESS)
Main PID: 1967 (mysqld)
CGroup: /system.slice/mysqld.service
└─1967 /usr/sbin/mysqld --daemonize --pid-file=/var/run/mysqld/mysqld.pid
Apr 18 04:06:20 localhost.localdomain systemd[1]: Starting MySQL Server...
Apr 18 04:06:21 localhost.localdomain systemd[1]: Started MySQL Server.
[root@localhost ~]#
2.6 使用mysql -u root -p来登录mysql,发生因未配置[client]选项组中参数导致的错误
[root@localhost ~]# mysql -u root -p
Enter password:
ERROR 2002 (HY000): Can't connect to local MySQL server through socket '/var/lib/mysql/mysql.sock' (2)
[root@localhost ~]#
如上,发生了错误
2.7 修改/etc/my.cnf,修改[client]选项组下的配置信息
[root@localhost ~]# cat /etc/my.cnf
# For advice on how to change settings please see
# http://dev.mysql.com/doc/refman/5.7/en/server-configuration-defaults.html
[mysqld]
#
# Remove leading # and set to the amount of RAM for the most important data
# cache in MySQL. Start at 70% of total RAM for dedicated server, else 10%.
# innodb_buffer_pool_size = 128M
#
# Remove leading # to turn on a very important data integrity option: logging
# changes to the binary log between backups.
# log_bin
#
# Remove leading # to set options mainly useful for reporting servers.
# The server defaults are faster for transactions and fast SELECTs.
# Adjust sizes as needed, experiment to find the optimal values.
# join_buffer_size = 128M
# sort_buffer_size = 2M
# read_rnd_buffer_size = 2M
datadir=/home/data/mysql
socket=/home/data/mysql/mysql.sock
# Disabling symbolic-links is recommended to prevent assorted security risks
symbolic-links=0
log-error=/var/log/mysqld.log
pid-file=/var/run/mysqld/mysqld.pid
[client]
socket=/home/data/mysql/mysql.sock
[root@localhost ~]#
如上所示,添加了[client]选项组下面的socket配置信息
2.8 重启mysqld服务(service mysqld restart),使用mysql -u root -p登录mysql并测试成功
[root@localhost ~]#
[root@localhost ~]# mysql -u root -p
Enter password:
Welcome to the MySQL monitor. Commands end with ; or \g.
Your MySQL connection id is 2
Server version: 5.7.29 MySQL Community Server (GPL)
Copyright (c) 2000, 2020, Oracle and/or its affiliates. All rights reserved.
Oracle is a registered trademark of Oracle Corporation and/or its
affiliates. Other names may be trademarks of their respective
owners.
Type 'help;' or '\h' for help. Type '\c' to clear the current input statement.
mysql> use test;
Reading table information for completion of table and column names
You can turn off this feature to get a quicker startup with -A
Database changed
mysql> select * from student;
+-----+------+
| id | name |
+-----+------+
| 111 | AAA |
| 222 | BBB |
+-----+------+
2 rows in set (0.00 sec)
mysql>
2.9 重启操作系统,发现mysqld服务启动启动时发生错误
[root@localhost ~]# service mysqld status
Redirecting to /bin/systemctl status mysqld.service
● mysqld.service - MySQL Server
Loaded: loaded (/usr/lib/systemd/system/mysqld.service; enabled; vendor preset: disabled)
Active: failed (Result: start-limit) since Sat 2020-04-18 04:27:25 EDT; 8s ago
Docs: man:mysqld(8)
http://dev.mysql.com/doc/refman/en/using-systemd.html
Process: 1749 ExecStart=/usr/sbin/mysqld --daemonize --pid-file=/var/run/mysqld/mysqld.pid $MYSQLD_OPTS (code=exited, status=1/FAILURE)
Process: 1732 ExecStartPre=/usr/bin/mysqld_pre_systemd (code=exited, status=0/SUCCESS)
Apr 18 04:27:24 localhost.localdomain systemd[1]: Failed to start MySQL Server.
Apr 18 04:27:24 localhost.localdomain systemd[1]: Unit mysqld.service entered failed state.
Apr 18 04:27:24 localhost.localdomain systemd[1]: mysqld.service failed.
Apr 18 04:27:25 localhost.localdomain systemd[1]: mysqld.service holdoff time over, scheduling restart.
Apr 18 04:27:25 localhost.localdomain systemd[1]: Stopped MySQL Server.
Apr 18 04:27:25 localhost.localdomain systemd[1]: start request repeated too quickly for mysqld.service
Apr 18 04:27:25 localhost.localdomain systemd[1]: Failed to start MySQL Server.
Apr 18 04:27:25 localhost.localdomain systemd[1]: Unit mysqld.service entered failed state.
Apr 18 04:27:25 localhost.localdomain systemd[1]: mysqld.service failed.
上面启动失败是selinux在Linux重启后重新启用了造成的
2.10 修改selinux配置文件/etc/selinux/config,让selinux永久工作在permissive模式下
[root@localhost ~]# vi /etc/selinux/config
[root@localhost ~]# cat /etc/selinux/config
# This file controls the state of SELinux on the system.
# SELINUX= can take one of these three values:
# enforcing - SELinux security policy is enforced.
# permissive - SELinux prints warnings instead of enforcing.
# disabled - No SELinux policy is loaded.
# SELINUX=enforcing
SELINUX=permissive
# SELINUXTYPE= can take one of three two values:
# targeted - Targeted processes are protected,
# minimum - Modification of targeted policy. Only selected processes are protected.
# mls - Multi Level Security protection.
SELINUXTYPE=targeted
[root@localhost ~]#
2.11 再次重启操作系统,查看mysqld状态,并登录测试数据库,一切正常
keycer@LAPTOP-8JTG7IOM MINGW64 ~/Desktop
$ ssh root@192.168.43.4
root@192.168.43.4's password:
Last login: Sat Apr 18 04:27:29 2020 from laptop-8jtg7iom
[root@localhost ~]# service mysqld status
Redirecting to /bin/systemctl status mysqld.service
● mysqld.service - MySQL Server
Loaded: loaded (/usr/lib/systemd/system/mysqld.service; enabled; vendor preset: disabled)
Active: active (running) since Sat 2020-04-18 04:34:46 EDT; 27s ago
Docs: man:mysqld(8)
http://dev.mysql.com/doc/refman/en/using-systemd.html
Process: 1205 ExecStart=/usr/sbin/mysqld --daemonize --pid-file=/var/run/mysqld/mysqld.pid $MYSQLD_OPTS (code=exited, status=0/SUCCESS)
Process: 1162 ExecStartPre=/usr/bin/mysqld_pre_systemd (code=exited, status=0/SUCCESS)
Main PID: 1228 (mysqld)
CGroup: /system.slice/mysqld.service
└─1228 /usr/sbin/mysqld --daemonize --pid-file=/var/run/mysqld/mysqld.pid
Apr 18 04:34:45 localhost.localdomain systemd[1]: Starting MySQL Server...
Apr 18 04:34:46 localhost.localdomain systemd[1]: Started MySQL Server.
[root@localhost ~]# mysql -u root -p
Enter password:
Welcome to the MySQL monitor. Commands end with ; or \g.
Your MySQL connection id is 2
Server version: 5.7.29 MySQL Community Server (GPL)
Copyright (c) 2000, 2020, Oracle and/or its affiliates. All rights reserved.
Oracle is a registered trademark of Oracle Corporation and/or its
affiliates. Other names may be trademarks of their respective
owners.
Type 'help;' or '\h' for help. Type '\c' to clear the current input statement.
mysql> use test;
Reading table information for completion of table and column names
You can turn off this feature to get a quicker startup with -A
Database changed
mysql> select * from student;
+-----+------+
| id | name |
+-----+------+
| 111 | AAA |
| 222 | BBB |
+-----+------+
2 rows in set (0.00 sec)
mysql>
————————————————
版权声明:本文为CSDN博主「Keycer」的原创文章,遵循CC 4.0 BY-SA版权协议,转载请附上原文出处链接及本声明。
原文链接:https://blog.csdn.net/zgrjkflmkyc/article/details/105571586


set global validate_password_policy=0;
set global validate_password_length=1;

 浙公网安备 33010602011771号