使用 OpenSSL 创建私有 CA:2 中间证书
OpenSSL 创建私有 CA 三部曲:
使用 OpenSSL 创建私有 CA:1 根证书
使用 OpenSSL 创建私有 CA:2 中间证书
使用 OpenSSL 创建私有 CA:3 用户证书
本文将在前文《使用 OpenSSL 创建私有 CA:1 根证书》的基础上介绍如何为私有 CA 创建中间证书。
说明:本系列文章的演示环境为 Ubuntu 18.04,OpenSSL 的版本为 1.1.0g。
为什么要创建中间证书?
使用 CA 的根证书是可以直接签发用户证书的,那么为什么还还要创建中间证书呢?
大概有两个原因:
- 安全性
- 建立中间证书颁发机构(CA)
先说安全性,通过签发中间证书,再用中间证书签发用户证书的方式,可以最大程度的减少更证书的使用频率,甚至可以离线保存根证书。如果发现中间证书被破坏,还可以吊销该中间证书并颁发新的中间证书。
再来说说中间证书颁发机构(CA),一个中间证书颁发机构(CA)是一个实体,它具有根 CA 颁发的中间证书,并且可以代表根 CA 颁发用户证书,从而形成一条被信任的证书链。
这里有必要介绍下证书产业的基本玩法:首先根证书的所有者(大的证书厂商)会和 OS 厂商合作,让 OS 等环境默认信任自己的根证书。然后根证书的所有者会签发中间证书卖给小一些的证书厂商。这些小的证书厂商再用中间证书创建最终证书卖给普通消费者。
举个例子,像我们常用的 Windows 操作系统默认就信任了很多厂商的根证书,比如 VeriSign 的证书,并且这些证书还会随着 Windows 系统的更新而更新:
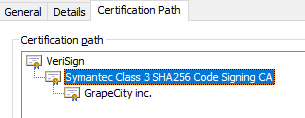
上图中,VeriSign 是根证书所有者,你安装 windows 操作系统时,VeriSign 的根证书就被安装到信任列表中了。Symantec Class 3 SHA256 Code Signing CA 则是 Symantec 公司从 VeriSign 公司购买的中间证书。GrapeCity inc. 则是 GrapeCity 公司从 Symantec 公司购买的最终证书用来对产品进行签名。当然,有时候根证书厂商比如 VeriSign 等也会直接向最终用户销售证书。
为了模拟中间证书颁发机构(CA),本文将使用前文中创建的根证书创建一个名称为 power 的中间证书。
准备中间 CA 的配置文件
创建文件配置文件 powerca/powerca.cnf,编辑其内容如下:
# OpenSSL root CA configuration file.
# v1
[ ca ]
# `man ca`
default_ca = CA_default
[ CA_default ]
# Directory and file locations.
dir = /home/nick/projects/myca/powerca
certs = $dir/certs
crl_dir = $dir/crl
new_certs_dir = $dir/newcerts
database = $dir/db/index
serial = $dir/db/serial
RANDFILE = $dir/private/random
# The root key and root certificate.
private_key = $dir/private/powerca.key.pem
certificate = $dir/certs/powerca.cert.pem
# For certificate revocation lists.
crlnumber = $dir/db/crlnumber
crl = $dir/crl/powerca.crl.pem
crl_extensions = crl_ext
default_crl_days = 30
# SHA-1 is deprecated, so use SHA-2 instead.
default_md = sha256
name_opt = ca_default
cert_opt = ca_default
default_days = 3750
copy_extensions = copy
preserve = no
policy = policy_loose
[ policy_loose ]
# Allow the intermediate CA to sign a more diverse range of certificates.
# See the POLICY FORMAT section of the `ca` man page.
countryName = optional
stateOrProvinceName = optional
localityName = optional
organizationName = optional
organizationalUnitName = optional
commonName = supplied
emailAddress = optional
[ req ]
# Options for the `req` tool (`man req`).
# Optionally, specify some defaults.
prompt = no
input_password = 123456
default_bits = 2048
distinguished_name = req_distinguished_name
string_mask = utf8only
# SHA-1 is deprecated, so use SHA-2 instead.
default_md = sha256
# Extension to add when the -x509 option is used.
# make sure use x509_extensions, do not use req_extensions.
x509_extensions = v3_ca
# use the req_extensions not work.
#req_extensions = v3_ca
[ req_distinguished_name ]
# See <https://en.wikipedia.org/wiki/Certificate_signing_request>.
countryName = CN
stateOrProvinceName = ShaanXi
localityName = Xian
organizationName = NickLi Ltd
organizationalUnitName = NickLi Ltd CA
commonName = NickLi Power CA
emailAddress = ljfpower@163.com
[ v3_ca ]
# Extensions for a typical CA (`man x509v3_config`).
subjectKeyIdentifier = hash
authorityKeyIdentifier = keyid:always,issuer
basicConstraints = critical, CA:true
keyUsage = critical, digitalSignature, cRLSign, keyCertSign
[ v3_intermediate_ca ]
# Extensions for a typical intermediate CA (`man x509v3_config`).
subjectKeyIdentifier = hash
authorityKeyIdentifier = keyid:always,issuer
basicConstraints = critical, CA:true, pathlen:0
keyUsage = critical, digitalSignature, cRLSign, keyCertSign
[ usr_cert ]
# Extensions for client certificates (`man x509v3_config`).
basicConstraints = CA:FALSE
nsCertType = client, email
nsComment = "OpenSSL Generated Client Certificate"
subjectKeyIdentifier = hash
authorityKeyIdentifier = keyid,issuer
keyUsage = critical, nonRepudiation, digitalSignature, keyEncipherment
extendedKeyUsage = clientAuth, emailProtection
[ server_cert ]
# Extensions for server certificates (`man x509v3_config`).
basicConstraints = CA:FALSE
nsCertType = server
nsComment = "OpenSSL Generated Server Certificate"
subjectKeyIdentifier = hash
authorityKeyIdentifier = keyid,issuer:always
keyUsage = critical, digitalSignature, keyEncipherment
extendedKeyUsage = serverAuth
[ crl_ext ]
# Extension for CRLs (`man x509v3_config`).
authorityKeyIdentifier=keyid:always
[ ocsp ]
# Extension for OCSP signing certificates (`man ocsp`).
basicConstraints = CA:FALSE
subjectKeyIdentifier = hash
authorityKeyIdentifier = keyid,issuer
keyUsage = critical, digitalSignature
extendedKeyUsage = critical, OCSPSigning
这个配置文件的内容和 rootca/rootca.cnf 有很多相同之处,下面是一些比较重要的不同之处:
[ CA_default ]
dir             = /home/nick/projects/myca/powerca
private_key     = $dir/private/powerca.key.pem
certificate     = $dir/certs/powerca.cert.pem
crl             = $dir/crl/powerca.crl.pem
policy          = policy_loose
[ req_distinguished_name ]
commonName = NickLi Power CA
CA_default 中的变化主要是告诉 OpenSSL 相关文件的路径,而中间证书的 commonName 必须不同于根证书。
准备目录和文件
与 rootca 目录相同,我们需要在 powerca 目录下创建如下的目录和文件:
powerca/certs/
powerca/db/
powerca/private/
powerca/crl/
powerca/csr/
powerca/newcerts/

powerca/db/index
powerca/db/serial
powerca/db/crlnumber
其中的 powerca/private 目录需同样要 700 的权限,我们使用下面的脚本来创建这些目录和文件:
#!/bin/bash

# create dir certs db private crl csr newcerts under powerca dir.
if [ ! -d powerca/certs ]; then
    mkdir -p powerca/certs
fi

if [ ! -d powerca/db ]; then
    mkdir -p powerca/db
    touch powerca/db/index
    openssl rand -hex 16 > powerca/db/serial
    echo 1001 > powerca/db/crlnumber
fi

if [ ! -d powerca/private ]; then
    mkdir -p powerca/private
    chmod 700 powerca/private
fi

if [ ! -d powerca/crl ]; then
    mkdir -p powerca/crl
fi

if [ ! -d powerca/newcerts ]; then
    mkdir -p powerca/newcerts
fi

if [ ! -d powerca/csr ]; then
    mkdir -p powerca/csr
fi
把上面的代码保存到 myca/powerhelper.sh 文件中,然后 cd 到 myca 目录下执行:
$ ./powerhelper.sh
此时当前目录为 myca,powerca 下的子目录和文件都已经创建成功。
创建中间证书的秘钥
进入 powerca 目录:
$ cd powerca
执行下面的命令重建私钥:
$ openssl genrsa -aes256 -out powerca/private/powerca.key.pem 4096

这里笔者设置的密码为:123456,记住这个密码,后面还会用到。然后为了确保安全,把秘钥的权限设置为 400:
$ chmod 400 private/powerca.key.pem
此时当前目录为 myca/powerca。
创建 Certificate Signing Requests(csr)
要创建中间证书,需要使用带有 v3_intermediate_ca 扩展名的根 CA 来签署中间 CSR,其中 v3_intermediate_ca 扩展的配置信息就在 powerca/powerca.cnf 中:
[ v3_intermediate_ca ]
# Extensions for a typical intermediate CA (`man x509v3_config`).
subjectKeyIdentifier = hash
authorityKeyIdentifier = keyid:always,issuer
basicConstraints = critical, CA:true, pathlen:0
keyUsage = critical, digitalSignature, cRLSign, keyCertSign
现在直接创建 csr 就行了:
$ openssl req -new \
    -config powerca.cnf \
    -sha256 \
    -key private/powerca.key.pem \
    -out csr/powerca.csr.pem
下面的命令可以检查生成的 csr:
$ openssl req -text -noout -in csr/powerca.csr.pem
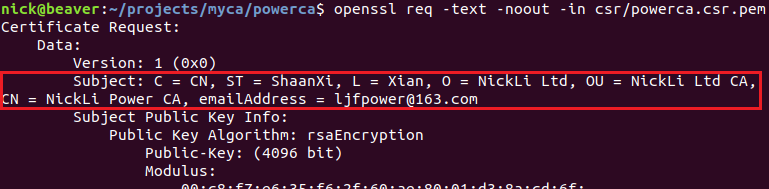
注意,csr 中包含了 CA 的基本信息,和公钥信息。
创建中间证书
下面是整个过程中最为关键的地方!通过 Root CA 的信息和用户的 csr 为用户生成证书。
创建中间证书需要用到 rootca/rootca.cnf 中的配置信息,所以先进入 myca 目录:
# 从 powerca 目录回到 myca 目录
$ cd ..
$ openssl ca -config rootca/rootca.cnf \
    -extensions v3_intermediate_ca \
    -days 3650 -notext -md sha256 \
    -in powerca/csr/powerca.csr.pem \
    -out powerca/certs/powerca.cert.pem
在交互式的提示中输入私钥的密码 123456,并同意其它的确认提示,就完成了根证书的生成操作:
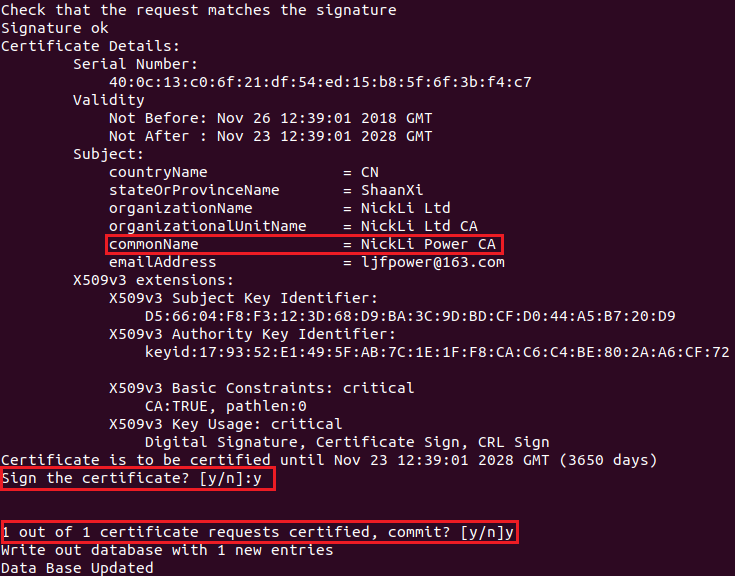
rootca/db/index 文件是 OpenSSL CA 工具存储证书的数据库,请不要手动修改这个文件(除非你清楚的知道自己在干什么)。此时它应该包含了根证书和中间证书的信息:

证书生成后我们把它的权限修改为 444:
$ chmod 444 powerca/certs/powerca.cert.pem
验证中间证书
通过下面的命令验证中间证书:
$ openssl x509 -noout -text -in powerca/certs/powerca.cert.pem
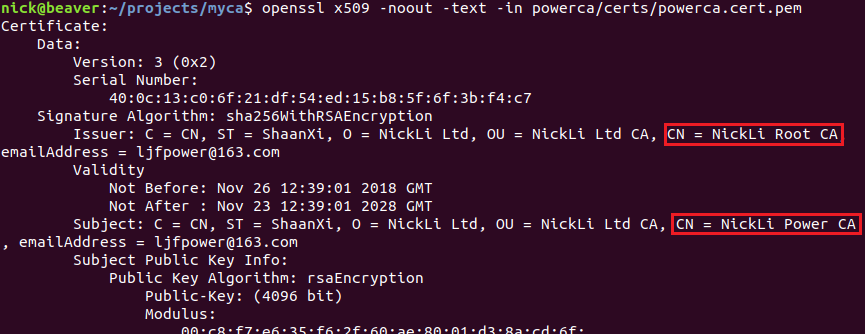
在中间证书中,Subject 的 Common Name 为 "NickLi Power CA",而 Issuer 的 Common Name 为 "NickLi Root CA"。
还可以通过下面的命令来检查中间证书的状态:
$ openssl verify -CAfile rootca/certs/rootca.cert.pem powerca/certs/powerca.cert.pem

创建证书链文件
当 web 浏览器等应用程序试图验证中间 CA 颁发的证书时,它还必须根据根证书验证中间证书。这就需要构建完整的证书信任链供应用程序验证。所谓的证书链,简单的说就是把根证书和中间证书按照顺序放置在同一个证书文件中。重点是:中间证书在上面,根证书在下面。比如为我们的中间证书创建证书链:
$ cat powerca/certs/powerca.cert.pem \
      rootca/certs/rootca.cert.pem > powerca/certs/powerca-chain.cert.pem
$ chmod 444 powerca/certs/powerca-chain.cert.pem
注意:在局域网环境中,我们一般会把生成的这个证书链安装到用户的机器上。
pem 格式的证书、证书链文件适用的场景比较多,但是在 windows 系统中一般使用 p12 格式,所以我们还需要创建一个 p12 格式的证书链:
$ openssl pkcs12 -export \
    -name "powerca chain" \
    -inkey powerca/private/powerca.key.pem \
    -in powerca/certs/powerca.cert.pem \
    -certfile powerca/certs/powerca-chain.cert.pem \
    -out powerca/certs/powerca-chain.cert.p12
这个过程中需要输入私钥 powerca/private/powerca.key.pem 的密码(这里是 123456),并且为新证书设置的密码。
总结
现在我们已经有了私有 CA 的根证书并且生成了中间证书和证书链,在接下来的《使用 OpenSSL 创建私有 CA:3 用户证书》一文中我们将详细的介绍如何使用中间证书创建用户证书,以及如何把证书部署到 web 站点和客户端。
参考:
OpenSSL Certificate Authority
《openssl-cookbook》

 浙公网安备 33010602011771号