

N46-第十七周作业
1、利用SAMBA实现指定目录共享
答:
服务端:
# 下载安装samba
dnf install -y samba
# 创建用户组及用户
groupadd -r admins
useradd -s /sbin/nologin -G admins wang
# 添加smb用户,并设置密码。
smbpasswd -a wang
New SMB password:123456
Retype new SMB password:123456
Added user wang.
# 添加共享目录,并设置权限
mkdir /testdir/smbshare -p
chgrp admins /testdir/smbshare
chmod 2775 /testdir/smbshare/
# 在smb.conf中添加共享目录和写入权限
vim /etc/samba/smb.conf
[share]
path = /testdir/smbshare
write list = @admins
# 启动smb服务
systemctl enable --now smb nmb
客户端:
# 安装smb客户端工具
dnf install -y cifs-utils
# 创建挂载目录
mkdir /mnt/wang
# 用mount命令挂载
mount -o username=wang //10.0.0.203/share /mnt/wang
Password for wang@//10.0.0.203/share: 123456
df -Th
Filesystem Type Size Used Avail Use% Mounted on
devtmpfs devtmpfs 208M 0 208M 0% /dev
tmpfs tmpfs 225M 0 225M 0% /dev/shm
tmpfs tmpfs 225M 9.0M 216M 4% /run
tmpfs tmpfs 225M 0 225M 0% /sys/fs/cgroup
/dev/mapper/vg0-lv0 xfs 100G 2.3G 98G 3% /
/dev/sda2 xfs 50G 390M 50G 1% /data
/dev/sda1 ext4 976M 146M 764M 17% /boot
tmpfs tmpfs 45M 0 45M 0% /run/user/0
//10.0.0.203/share cifs 100G 2.3G 98G 3% /mnt/wang
# 测试写入一个test.txt文件
echo "hello world" > /mnt/wang/test.txt
cat /mnt/wang/test.txt
2、实现不同samba用户访问相同的samba共享,实现不同的配置
答:
服务端:
# 下载安装samba
dnf install -y samba
# 创建3个samba用户,并指定密码为123456
useradd -s /sbin/nologin smb1
useradd -s /sbin/nologin smb2
useradd -s /sbin/nologin smb3
smbpasswd -a smb1
smbpasswd -a smb2
smbpasswd -a smb3
# 添加共享目录
mkdir -p /data/smb
mkdir -p /data/smb1
mkdir -p /data/smb2
touch /data/smb/smb.txt
touch /data/smb1/smb1.txt
touch /data/smb2/smb2.txt
# 在smb.conf中添加共享目录和相关权限
vim /etc/samba/smb.conf
[global]
config file = /etc/samba/conf.d/%U #在全局新添加一条配制
[share]
path = /data/smb
read only = no
guest ok = yes
write list = @wheel# 启动smb服务
mkdir /etc/samba/conf.d/ -p
vim /etc/samba/conf.d/smb1
[share]
path = /data/smb1
read only = no
create mask = 0644
cat /etc/samba/conf.d/smb2
[share]
path = /data/smb2
# 重启samba服务
systemctl restart smb nmb
客户端:
dnf install -y samba-client
[root@samba-client ~]# smbclient //10.0.0.203/share -U smb1%123456
Try "help" to get a list of possible commands.
smb: \> ls
. D 0 Tue Sep 22 11:40:01 2020
.. D 0 Tue Sep 22 11:39:42 2020
smb1.txt N 0 Tue Sep 22 11:40:01 2020
52403200 blocks of size 1024. 52004704 blocks available
smb: \> exit
[root@samba-client ~]# smbclient //10.0.0.203/share -U smb2%123456
Try "help" to get a list of possible commands.
smb: \> ls
. D 0 Tue Sep 22 11:40:06 2020
.. D 0 Tue Sep 22 11:39:42 2020
smb2.txt N 0 Tue Sep 22 11:40:06 2020
52403200 blocks of size 1024. 52004704 blocks available
smb: \> exit
[root@samba-client ~]# smbclient //10.0.0.203/share -U smb3%123456
Try "help" to get a list of possible commands.
smb: \> ls
. D 0 Tue Sep 22 11:40:21 2020
.. D 0 Tue Sep 22 11:39:42 2020
smb.txt N 0 Tue Sep 22 11:40:21 2020
52403200 blocks of size 1024. 52004704 blocks available
smb: \>
通过client端登录后,显示为不同用户目录里的不同文件,表明当登录同一个共享夹时,不同用户显示的为不同内容。
3、远程主机通过链接openvpn修复内网里httpd服务主机,假如现在httpd宕机了,我们需要链接进去让httpd启动
答:
搭建openvpn过程:
3、远程主机通过链接openvpn修复内网里httpd服务主机,假如现在httpd宕机了,我们需要链接进去让httpd启动
# 安装通过epel源,安装openvpn服务和easy-rsa
dnf install -y openvpn
dnf install -y easy-rsa
# 将openvpn示例配置文件及easy-rsa目录,复制到/etc/openvpn待用。
cp /usr/share/doc/openvpn/sample/sample-config-files/server.conf /etc/openvpn/
cp -r /usr/share/easy-rsa/ /etc/openvpn/easy-rsa-server
cp /usr/share/doc/easy-rsa/vars.example /etc/openvpn/easy-rsa-server/3/vars
# 修改easy-rsa中的vars文件,让生成的私有ca证书文件的有效日期为10年,普通服务端证书有效日期为10年
vim /etc/openvpn/easy-rsa-server/3/vars
set_var EASYRSA_CA_EXPIRE 3650
set_var EASYRSA_CERT_EXPIRE 3650
# 生成私有ca证书
cd /etc/openvpn/easy-rsa-server/3/
./easyrsa init-pki
./easyrsa build-ca nopass
# 生成服务端证书
./easyrsa gen-req app nopass
./easyrsa sign server app
# 生成diffman加密密钥
./easyrsa gen-dh
# 复制easy-rsa目录到/etc/openvpn,待生成客户端证书。
cp -r /usr/share/easy-rsa/ /etc/openvpn/easy-rsa-client
cp /usr/share/doc/easy-rsa/vars.example /etc/openvpn/easy-rsa-client/3/vars
# 初始化证书目录,并修改vars文件,让客户端证书有效日期为90天。
cd /etc/openvpn/easy-rsa-client/3/
./easyrsa init-pki
vim /etc/openvpn/easy-rsa-client/3/vars
set_var EASYRSA_CERT_EXPIRE 90
# 生成客户端证书
./easyrsa gen-req jiquanquan nopass
# 回到服务端证书目录,将客户端证书申请文件导入至服务端。
cd /etc/openvpn/easy-rsa-server/3
./easyrsa import-req /etc/openvpn/easy-rsa-client/3/pki/reqs/jiquanquan.req jiquanquan
# 由服务端ca颁发客户端证书
./easyrsa sign client jiquanquan
# 新建证书目录,复制相关服务端证书至此。
mkdir /etc/openvpn/certs
cp -a /etc/openvpn/easy-rsa-server/3/pki/ca.crt /etc/openvpn/certs/
cp -a /etc/openvpn/easy-rsa-server/3/pki/issued/app.crt /etc/openvpn/certs/
cp -a /etc/openvpn/easy-rsa-server/3/pki/private/app.key /etc/openvpn/certs/
cp -a /etc/openvpn/easy-rsa-server/3/pki/dh.pem /etc/openvpn/certs/
# 新建客户端证书目录,复制相关客户端证书至此。
mkdir -p /etc/openvpn/client/jiquanquan/
find /etc/openvpn/ \( -name "jiquanquan.key" -o -name "jiquanquan.crt" -o -name ca.crt \) -exec cp {} /etc/openvpn/client/jiquanquan \;
# 修改openvpn的server.conf
grep -Ev "^#|^$|^;" /etc/openvpn/server.conf
port 1194
proto tcp
dev tun
ca /etc/openvpn/certs/ca.crt
cert /etc/openvpn/certs/app.crt
key /etc/openvpn/certs/app.key # This file should be kept secret
dh /etc/openvpn/certs/dh.pem
server 10.8.0.0 255.255.255.0
push "route 172.30.0.0 255.255.255.0"
keepalive 10 120
cipher AES-256-CBC
max-clients 100
user openvpn
group openvpn
status /var/log/openvpn/openvpn-status.log
log-append /var/log/openvpn/openvpn.log
verb 3
mute 20
# 查看系统是否有openvpn用户,并新建openvpn的日志目录并授权。
getent passwd openvpn
mkdir /var/log/openvpn
chown openvpn.openvpn /var/log/openvpn/
# 打开系统的ip转发功能。
echo "net.ipv4.ip_forward = 1" >> /etc/sysctl.conf
sysctl -p
# 在iptables防火墙的nat表中,添加地址伪装条目。并放置到自启动文件中。
echo 'iptables -t nat -A POSTROUTING -s 10.8.0.0 -j MASQUERADE' >> /etc/rc.d/rc.local
chmod +x /etc/rc.d/rc.local
# 从Centos7的openvpn rpm包中提取自启动文件,放置到Centos8的相应目录,生成openvpn的自启动服务文件。
vim /usr/lib/systemd/system/openvpn@.service
[Unit]
Description=OpenVPN Robust And Highly Flexible Tunneling Application On %I
After=network.target
[Service]
Type=notify
PrivateTmp=true
ExecStart=/usr/sbin/openvpn --cd /etc/openvpn/ --config server.conf
[Install]
WantedBy=multi-user.target
# 刷新服务目录,并让openvpn服务自启动。
systemctl daemon-reload
systemctl enable --now openvpn@service
# 客户端配制文件:client.ovpn
client
dev tun
proto tcp
remote 10.0.0.204 1194
resolv-retry infinite
nobind
ca ca.crt
cert jiquanquan.crt
key jiquanquan.key
remote-cert-tls server
cipher AES-256-CBC
verb 3
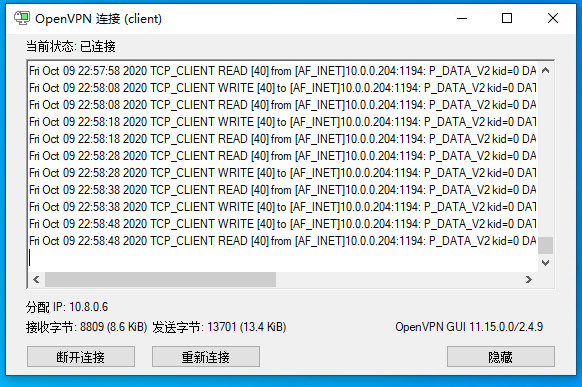
安装openvpn的客户端软件,连接正常:
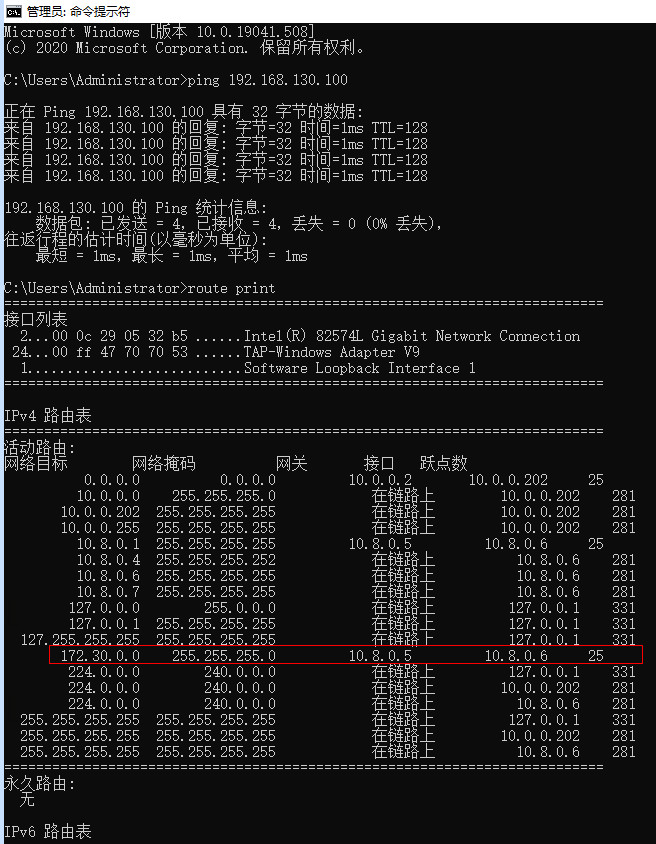
ping内网服务器地址,并从客户端查看路由表,可以看到有vpn推送过来的隧道地址及路由:
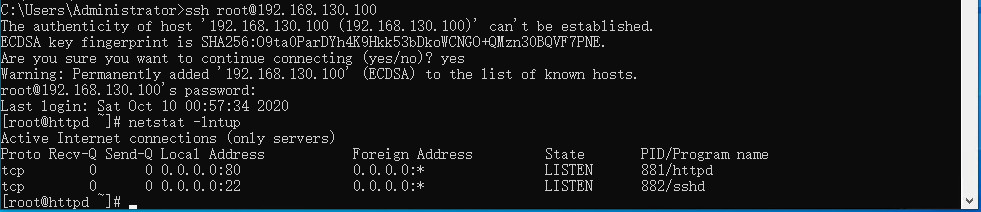
通过ssh登录到内网服务器上,重启并查看http服务是否正常。
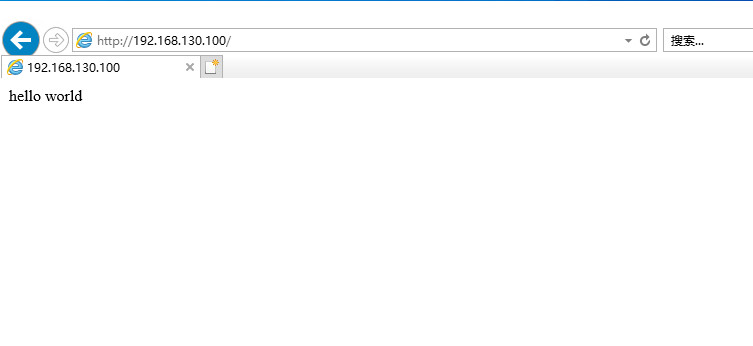
通过客户端浏览器,访问内网服务器,查看是否可以正常访问网页。

 浙公网安备 33010602011771号