springboot笔记
1 springboot简介
1.1 简介
SpringBoot是由Pivotal团队在2013年开始研发、2014年4月发布第一个版本的全新开源的轻量级框架。它基于Spring4.0设计,不仅继承了Spring框架原有的优秀特性,而且还通过简化配置来进一步简化了Spring应用的整个搭建和开发过程。另外SpringBoot通过集成大量的框架使得依赖包的版本冲突,以及引用的不稳定性等问题得到了很好的解决。
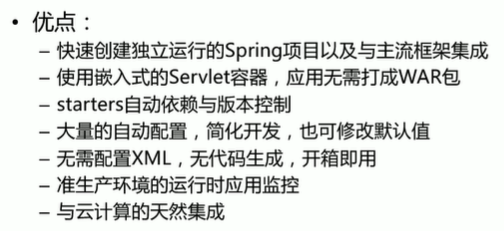
1.2 优点
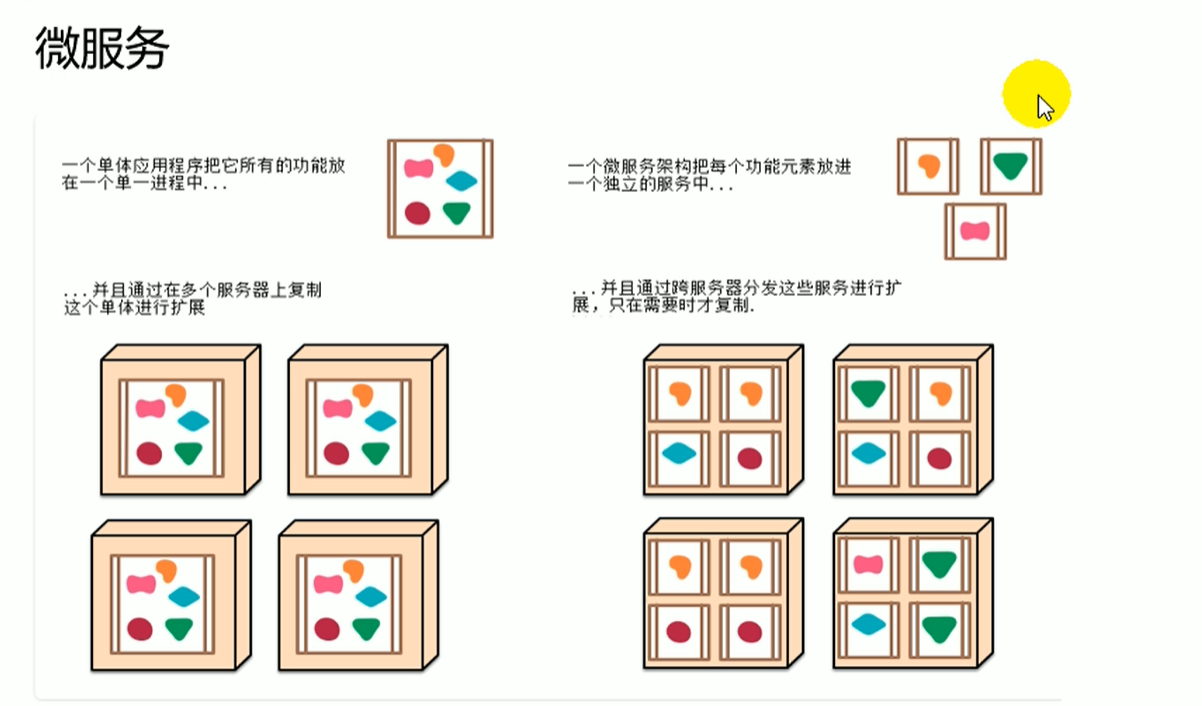
1.3 微服务
微服务源于 martin fowler的一篇博客

博客原文👉https://martinfowler.com/articles/microservices.html
博客译文👉https://blog.csdn.net/u013970991/article/details/53333921
1.4 在有微服务之前,我们是怎么做的?
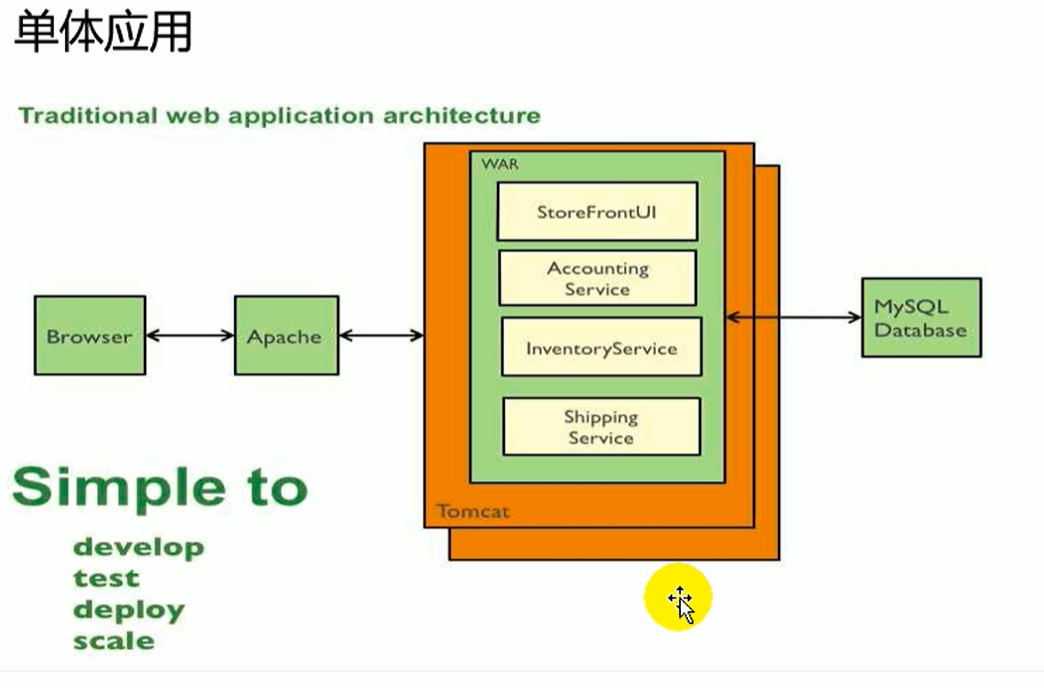
把一个应用打成war包放在tomcat里面,这样便于开发、测试、发布和负载均衡。但是一个应用有太多功能,太过复杂,修改维护起来不方便。
1.5 微服务和单体应用的对比
2 Hello world
2.1 环境搭建
C:\Users\>mvn -v
Apache Maven 3.5.2 (138edd61fd100ec658bfa2d307c43b76940a5d7d; 2017-10-18T15:58:13                                                                 +08:00)
Maven home: D:\javamaven\apache-maven-3.5.2\bin\..
Java version: 1.8.0_231, vendor: Oracle Corporation
Java home: C:\Program Files\Java\jdk1.8.0_231\jre
Default locale: zh_CN, platform encoding: GBK
OS name: "windows 10", version: "10.0", arch: "amd64", family: "windows"

C:\Users\>java -version
java version "1.8.0_231"
Java(TM) SE Runtime Environment (build 1.8.0_231-b11)
Java HotSpot(TM) 64-Bit Server VM (build 25.231-b11, mixed mode)

C:\Users\>
- jdk 1.8.0_231
- Maven 3.5.2
- idea IntelliJ IDEA 2019.2.4 x64
- springboot 2.3.0
可以直接从👉https://start.spring.io/来搭建基础环境,dependencies只选择spring web即可

注意:从官网搭建的基础环境会出现maven被墙的可能
解决办法
配置阿里源
配置好后在pom.xml配置如下👇,以使用阿里源
<repositories>
    <repository>
        <id>alimaven</id>
        <name>aliyun maven</name>
        <url>http://maven.aliyun.com/nexus/content/groups/public/</url>
        <releases>
            <enabled>true</enabled>
        </releases>
        <snapshots>
            <enabled>false</enabled>
        </snapshots>
    </repository>
</repositories>
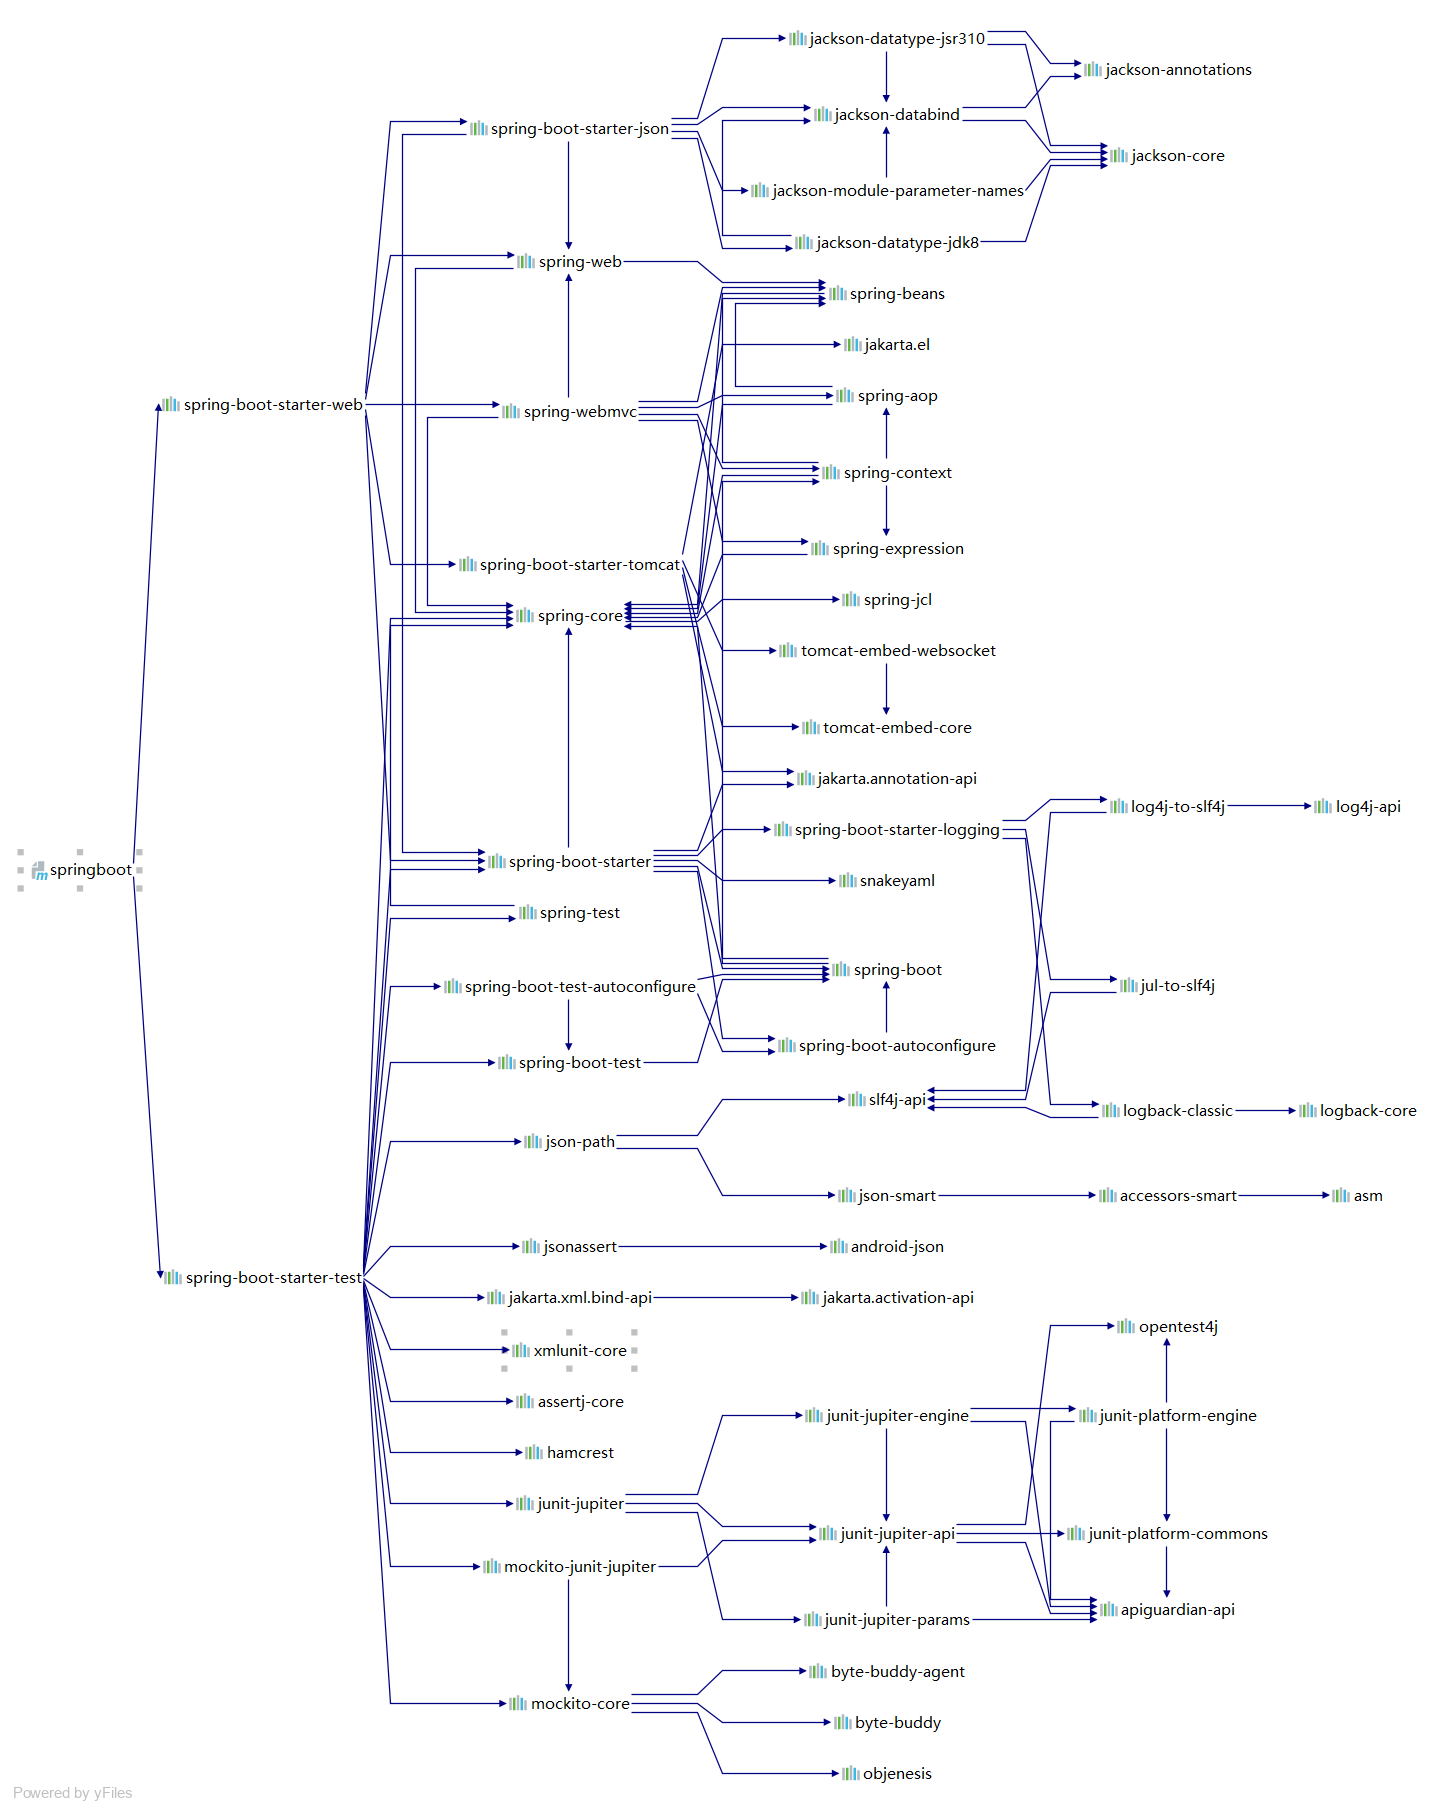
最终导入的包👇(卧槽!有点点小震惊,好多包啊😱)
2.2 springBoot官方帮助文件👇
Getting Started
Reference Documentation
For further reference, please consider the following sections:
- Official Apache Maven documentation
- Spring Boot Maven Plugin Reference Guide
- Create an OCI image
- Spring Web
Guides
The following guides illustrate how to use some features concretely:
- Building a RESTful Web Service
- Serving Web Content with Spring MVC
- Building REST services with Spring
2.3 搭建好的环境的文件结构
.
├── HELP.md
├── mvnw
├── mvnw.cmd
├── pom.xml
├── springboot-01.iml
├── springboot.iml
└── src
    ├── main
    │   ├── java
    │   │   └── org
    │   │       └── suyuesheng
    │   │           └── springboot
    │   │               └── Springboot01Application.java
    │   └── resources
    │       ├── application.properties
    │       ├── static
    │       └── templates
    └── test
        └── java
            └── org
                └── suyuesheng
                    └── springboot
                        └── Springboot01ApplicationTests.java
2.4 运行
运行Springboot01Application.java,访问localhost:8080
2.4.1 controller
在Springboot01Application.java的同级目录下,创建包controller,编写controller👇
package org.suyuesheng.springboot.controller;

import org.springframework.web.bind.annotation.RequestMapping;
import org.springframework.web.bind.annotation.RestController;

@RestController
public class TryController {

    @RequestMapping("/hello")
    public String one(){
        return "hello,你好";
    }
}
访问http://localhost:8080/hello👇
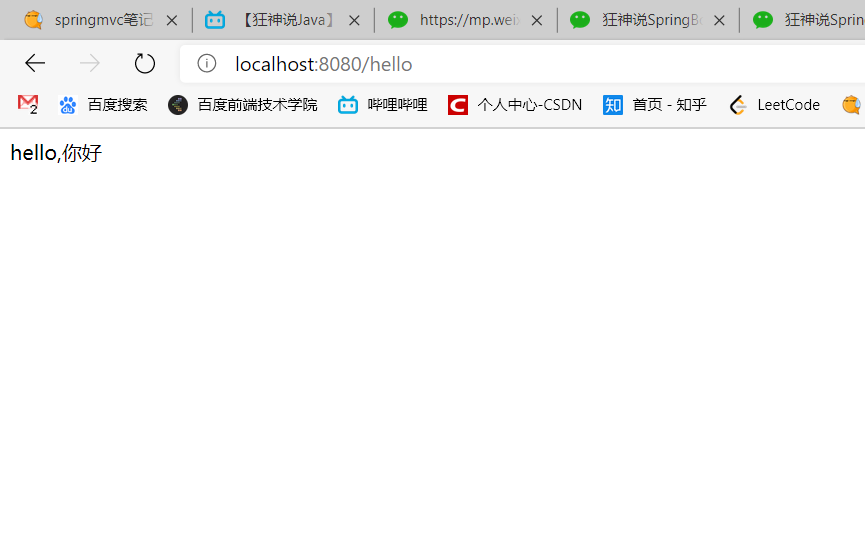
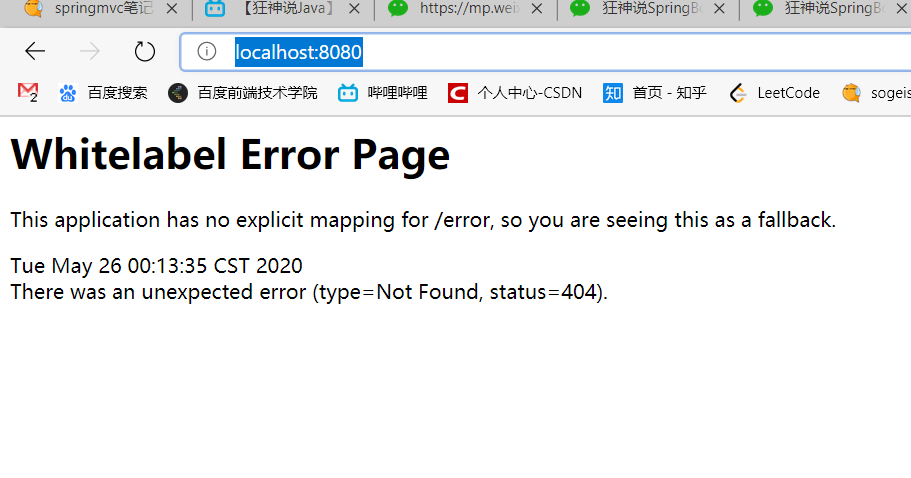
访问http://localhost:8080/👇
2.5 总结和彩蛋
springboot直接自动配置了tomcat,只需运行最后生成的jar包就可以达到配置tomcat的效果。
原因是pom.xml里面配置了spring-boot-starter-web,下面是官网对其的解释👇
Starter for building web, including RESTful, applications using Spring MVC. Uses Tomcat as the default embedded container
每次运行springboot时候,控制台会有spring的字符出现,这个是可以修改的,只需在resources下面写一个banner.txt,控制台中原本是spring的字样就变成了banner.txt配置的字样👇
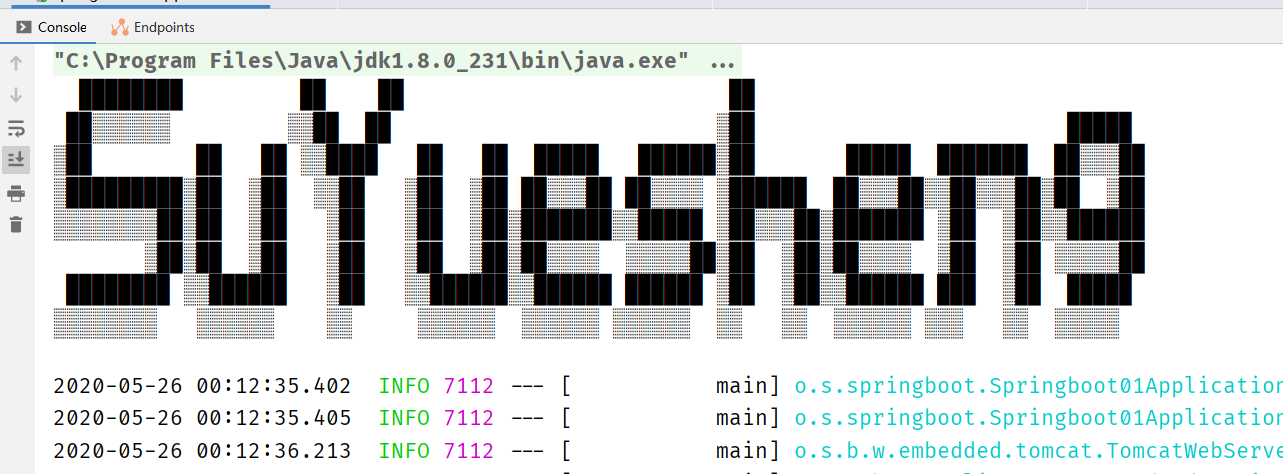
这种字符艺术字的效果可以到👉ASCII文字,SpringBoot自定义启动Banner在线生成工具编写
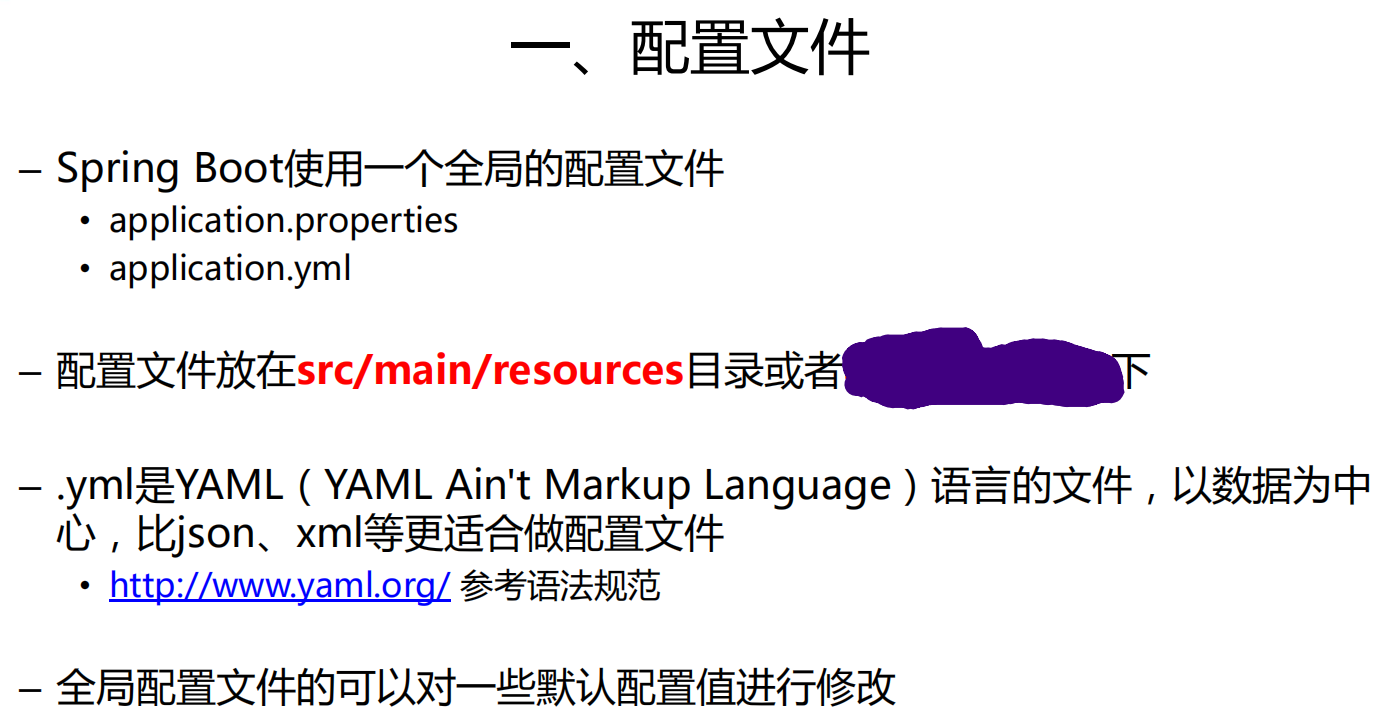
3 配置文件
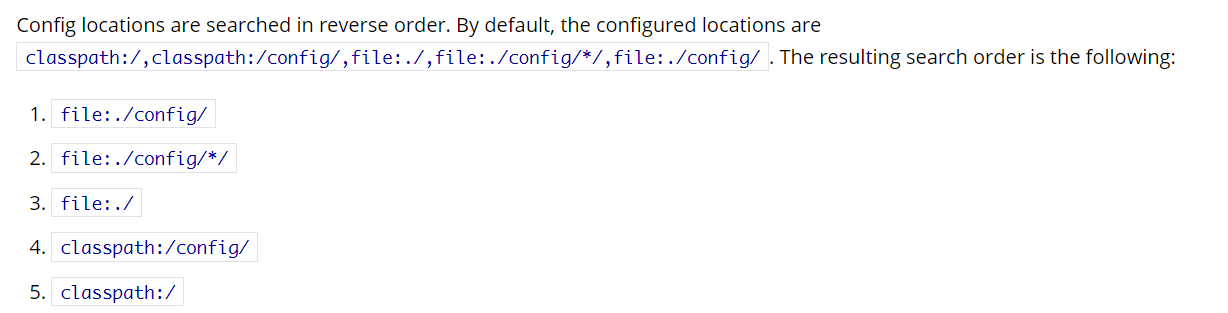
配置文件位置👇
可以发现优先级最低的就是默认的,优先级从上往下,从高到底,优先级最高是在项目的目录下的config目录下配置
3.1 yaml语法
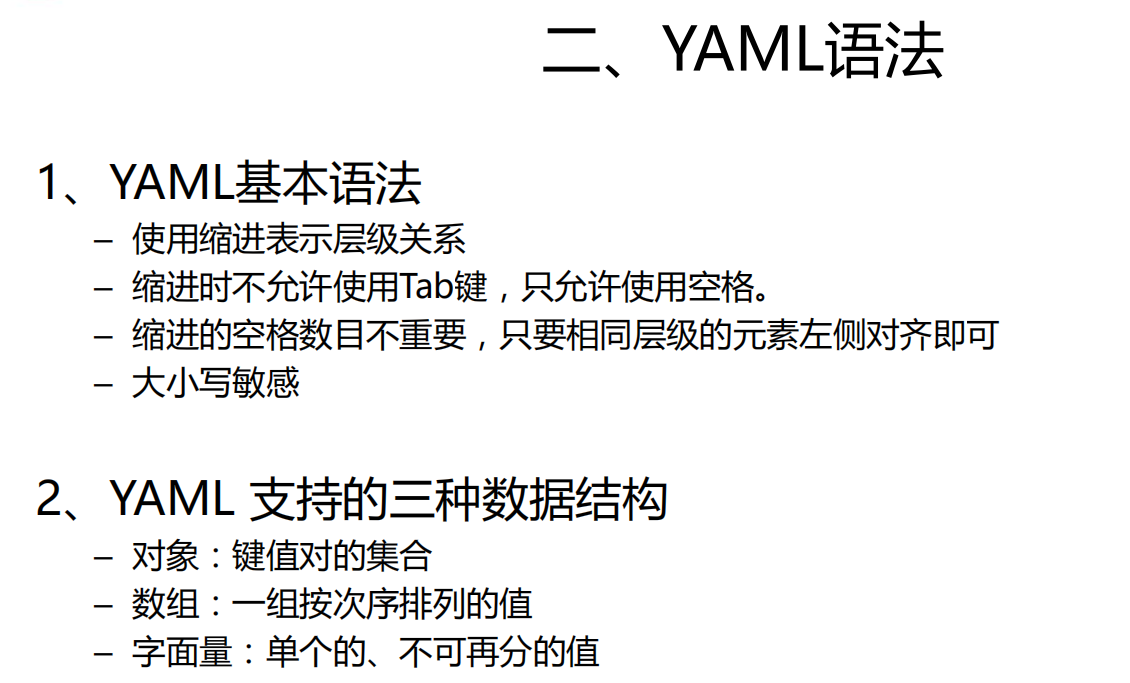

对象
user:
  name: 老刘
  birthday: 2020/04/08 12:33:00
or👇行内写法
friends: {lastName: zhangsan,age: 18}
数组
用- 值表示数组中的一个元素
pets:
 ‐ cat
 ‐ dog
 ‐ pig
or👇行内
pets: [cat,dog,pig]
在springboot中yaml文件的时间格式 date: yyyy/MM/dd HH:mm:ss
复合结构。以上写法的任意组合都是可以👇
user:
  name: 老刘
  birthday: 2020/04/08 12:33:00
  kids:
    - kid:
      name: laoliu
      age: 12
    - kid:
      name: llf
      age: 123
  age: 17
kid: {age: 12,name: 行内}
server:
  port: 80
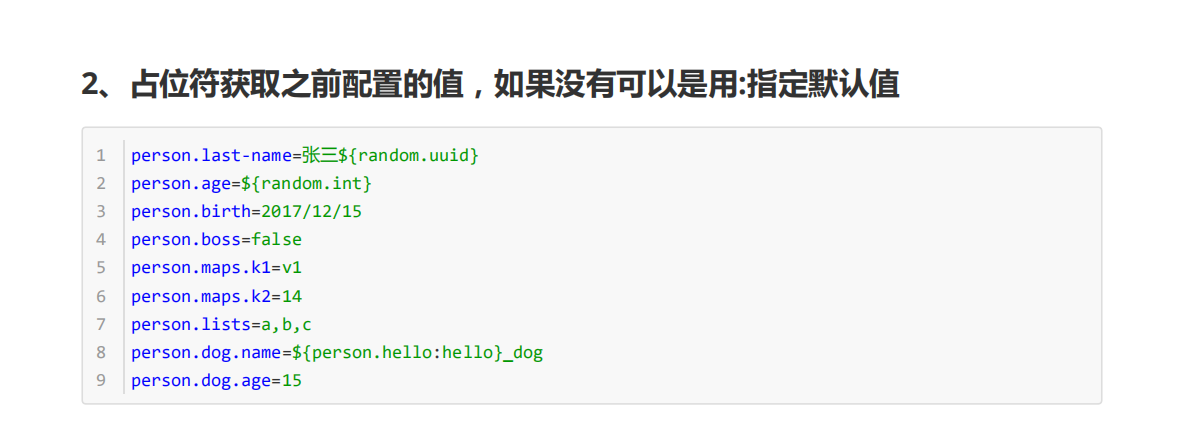
占位符
行内写法(如kid: {age: 12,name: 行内})不能使占位符
userr:
  name: 老刘
  birthday: 2020/04/08 12:33:00
  kids:
    - kid:
      name: 老李_${random.uuid} #老李_4b1db993-f841-4ff9-bc6b-dc120be0f8f3
      age: 12
    - kid:
      name: llf
      age: 123
  age: 17
kid:
  age: ${userr.kids[1].age}  #123
  name: ${userr.name}_${random.int(12,100)} #老刘_64
server:
  port: 80
3.2 yaml全局配置
比如说要配置端口为80
在application.yaml配置如下👇
server:
  port: 80
3.3 配置某实体类
/**
* 将配置文件中配置的每一个属性的值,映射到这个组件中
* @ConfigurationProperties:告诉SpringBoot将本类中的所有属性和配置文件中相关的配置进行绑定;
* prefix = "person":配置文件中哪个下面的所有属性进行一一映射
*
* 只有这个组件是容器中的组件,才能容器提供的@ConfigurationProperties功能;
*
*/
使用@ConfigurationProperties
package org.suyuesheng.springboot.pojo;

import lombok.AllArgsConstructor;
import lombok.Data;
import lombok.NoArgsConstructor;
import org.springframework.boot.context.properties.ConfigurationProperties;
import org.springframework.stereotype.Component;

import java.util.Date;
@Component
@ConfigurationProperties(prefix = "userr")
@Data
@AllArgsConstructor
@NoArgsConstructor
public class User {
    private String name;
    private int age;
    private Date birthday;
    private Kid[] kids;
}
3.4 JSR数据校验
JSR 303 - Bean Validation 介绍及最佳实践
导包
<dependency>
    <groupId>org.springframework.boot</groupId>
    <artifactId>spring-boot-starter-validation</artifactId>
</dependency>
表 1. Bean Validation 中内置的 constraint
| Constraint | 详细信息 |
|---|---|
@Null |
被注释的元素必须为 null |
@NotNull |
被注释的元素必须不为 null |
@AssertTrue |
被注释的元素必须为 true |
@AssertFalse |
被注释的元素必须为 false |
@Min(value) |
被注释的元素必须是一个数字,其值必须大于等于指定的最小值 |
@Max(value) |
被注释的元素必须是一个数字,其值必须小于等于指定的最大值 |
@DecimalMin(value) |
被注释的元素必须是一个数字,其值必须大于等于指定的最小值 |
@DecimalMax(value) |
被注释的元素必须是一个数字,其值必须小于等于指定的最大值 |
@Size(max, min) |
被注释的元素的大小必须在指定的范围内 |
@Digits (integer, fraction) |
被注释的元素必须是一个数字,其值必须在可接受的范围内 |
@Past |
被注释的元素必须是一个过去的日期 |
@Future |
被注释的元素必须是一个将来的日期 |
@Pattern(value) |
被注释的元素必须符合指定的正则表达式 |
表 2. Hibernate Validator 附加的 constraint
| Constraint | 详细信息 |
|---|---|
@Email |
被注释的元素必须是电子邮箱地址 |
@Length |
被注释的字符串的大小必须在指定的范围内 |
@NotEmpty |
被注释的字符串的必须非空 |
@Range |
被注释的元素必须在合适的范围内 |
package org.suyuesheng.springboot.pojo;

import lombok.AllArgsConstructor;
import lombok.Data;
import lombok.NoArgsConstructor;
import org.springframework.boot.context.properties.ConfigurationProperties;
import org.springframework.stereotype.Component;
import org.springframework.validation.annotation.Validated;

import javax.validation.constraints.Email;
import javax.validation.constraints.NotEmpty;
import javax.validation.constraints.NotNull;
import java.util.Date;
@Component
@ConfigurationProperties(prefix = "userr")
@Data
@AllArgsConstructor
@NoArgsConstructor
@Validated    //数据检测必须有这个注解
public class User {

    @NotNull(message = "hi!不可以为空啊")   //自定义错误提示信息
    private String name;
    private int age;
    private Date birthday;
    private Kid[] kids;
    @Email()  //必须是email的格式
    @NotNull()
    private String email;
}
3.5 多profile
3.5.1 多文件
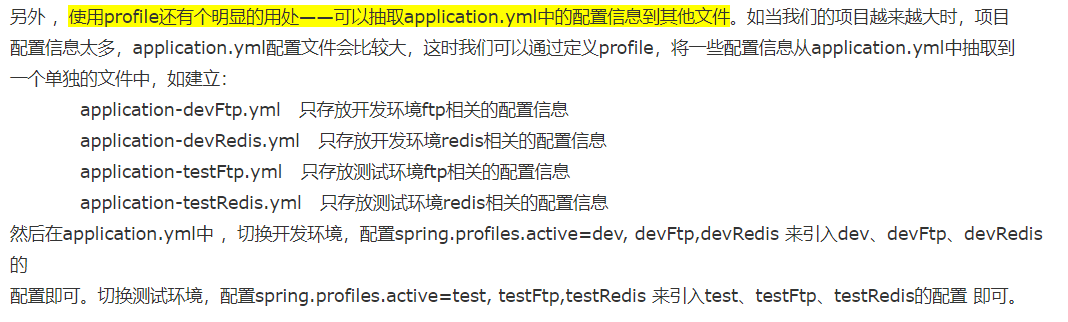
3.5.2 文档快
# 默认配置
spring:
  profiles:
    active: prod  #指定激活谁
userr:
  name: 老刘
  birthday: 2020/04/08 12:33:00
  kids:
    - kid:
      name: 老李_${random.uuid} #老李_4b1db993-f841-4ff9-bc6b-dc120be0f8f3
      age: 12
    - kid:
      name: llf
      age: 123
  age: 17
  email: wdefrg16@154.com
kid:
  age: ${userr.kids[1].age}  #123
  name: ${userr.name}_${random.int(12,100)} #老刘_64
---
# dev配置
server:
  port: 8080
spring:
  profiles: dev
---
# test配置
server:
  port: 8081
spring:
  profiles: test
---
# prod配置
server:
  port: 80
spring:
  profiles: prod
userr:
  email: 23245@efg
注意:多prifile遵循的是互补配置的原则,即spring.profiles.active中指定激活的配置为准,如果指定激活的配置没有配置就以默认配置为准,如果指定激活的配置和默认配置冲突,以激活的配置为准
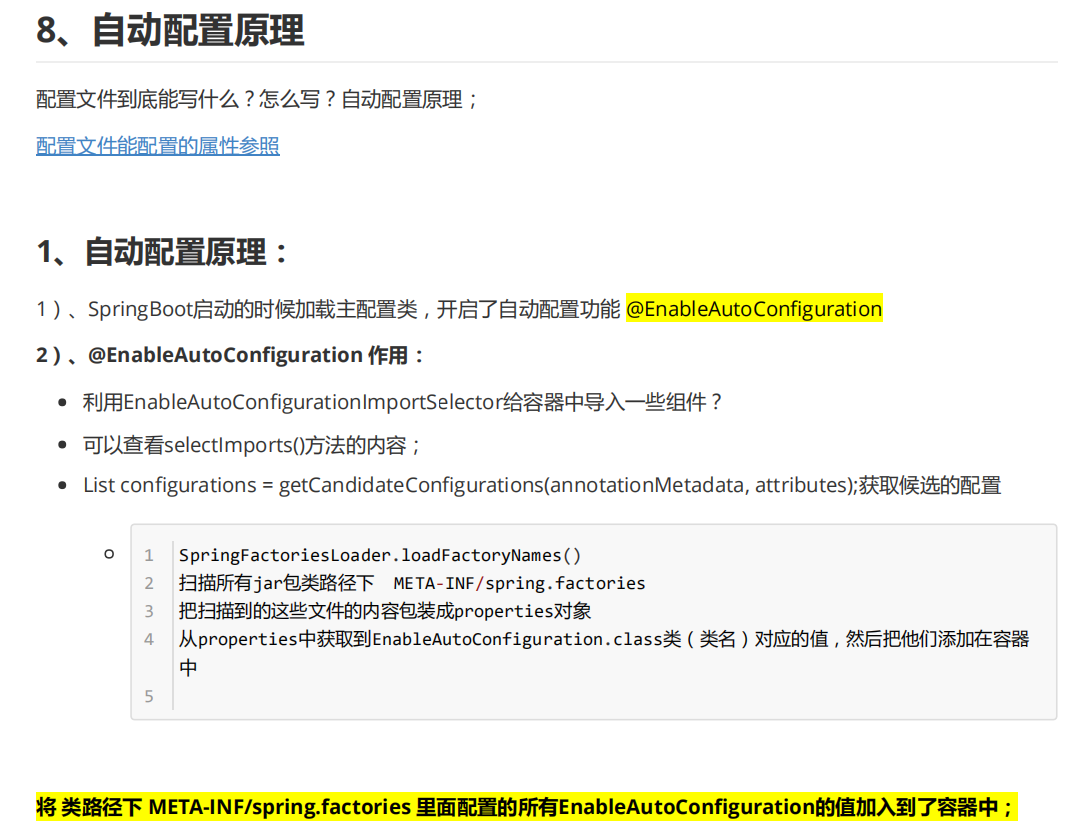
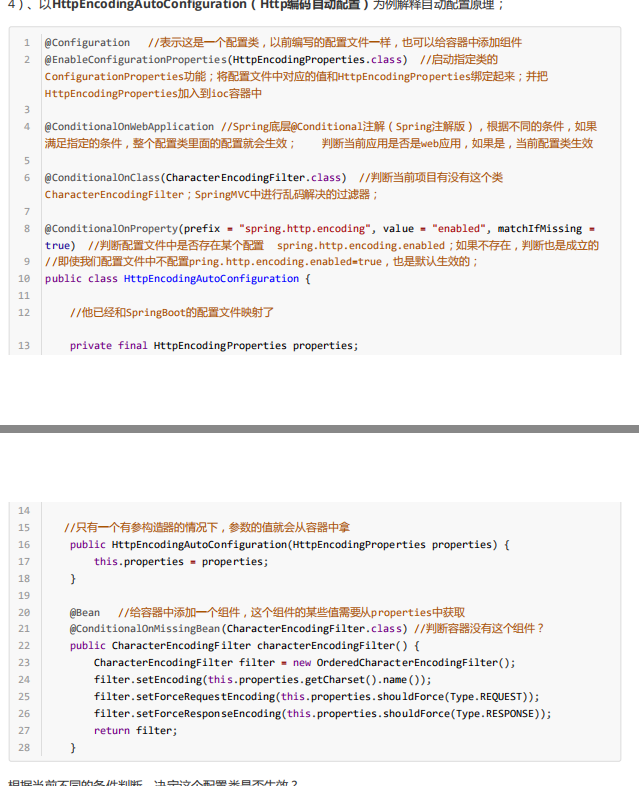
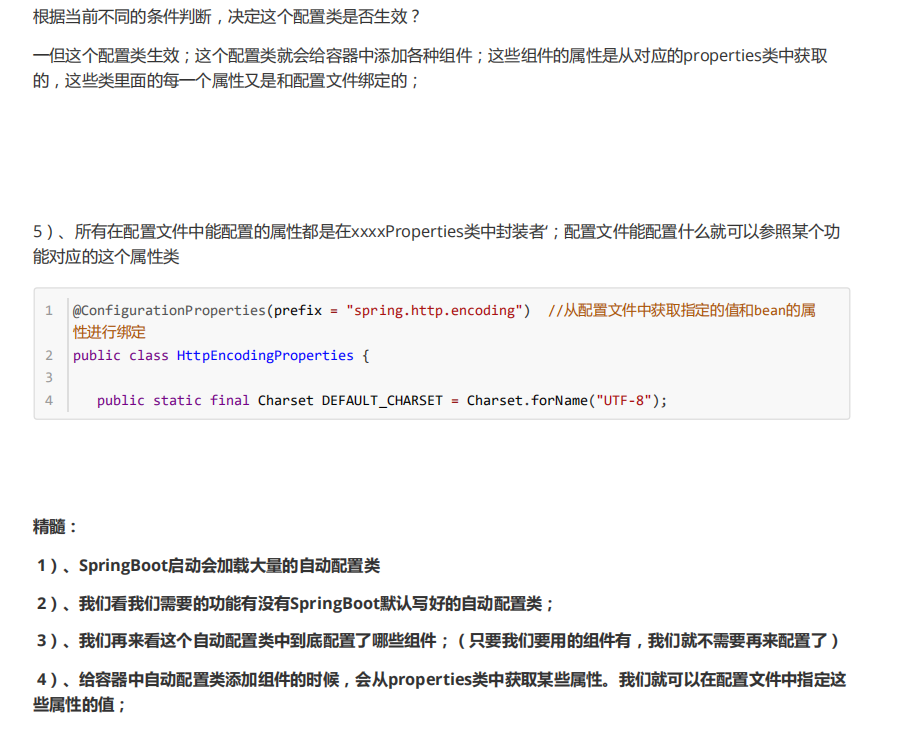
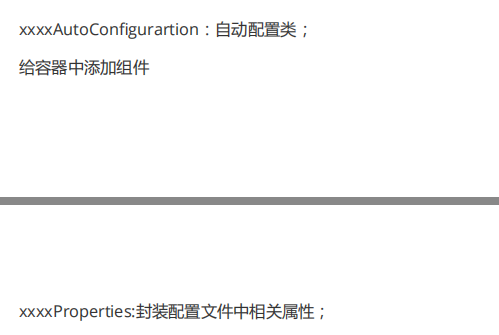
4 自动配置原理(精华)(重点)
跳过第四小节跳过

5 日志
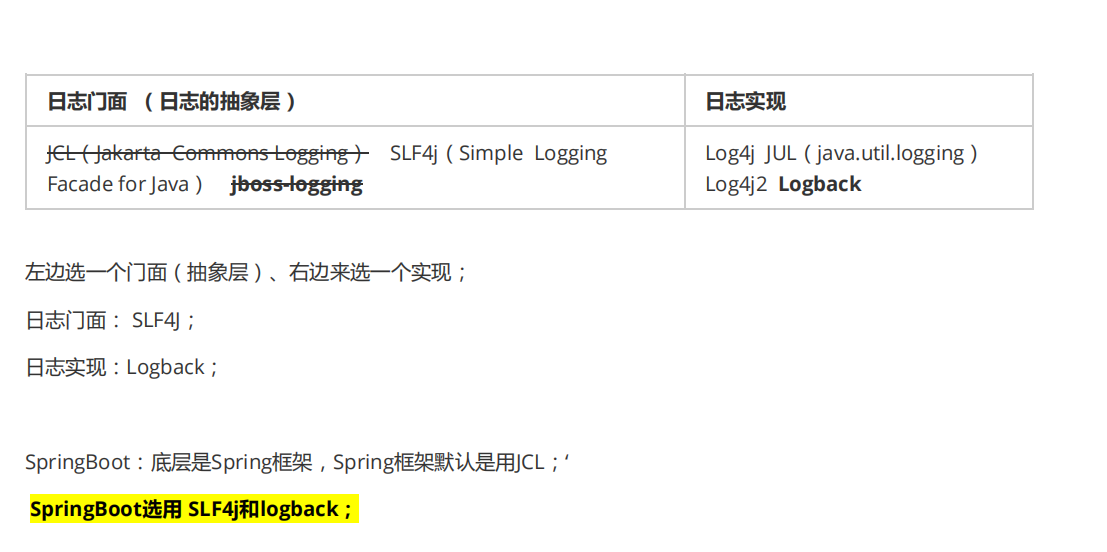
如何使用
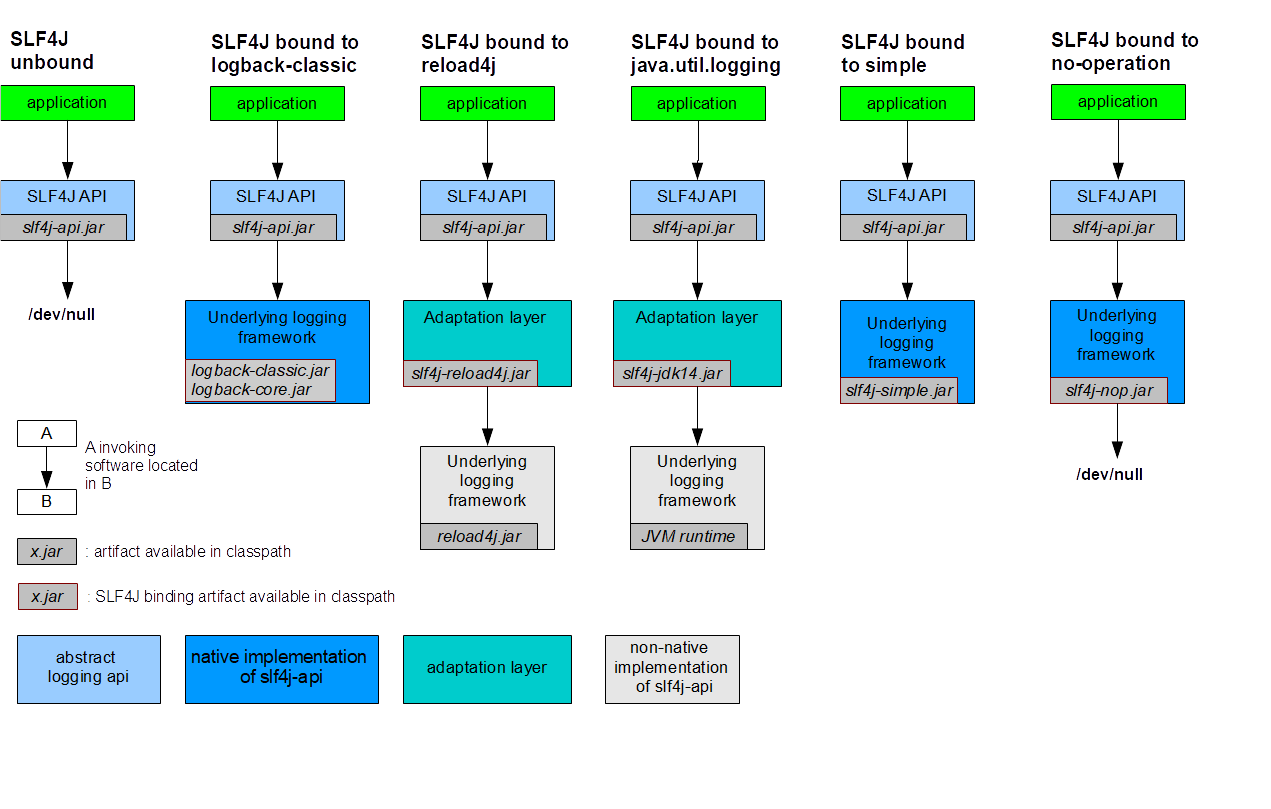
每一个日志的实现框架都有自己的配置文件。使用slf4j以后,配置文件还是做成日志实现框架自己本身的配置文件
统一日志记录
统一日志记录,即使是别的框架和我一起统一使用slf4j进行输出?
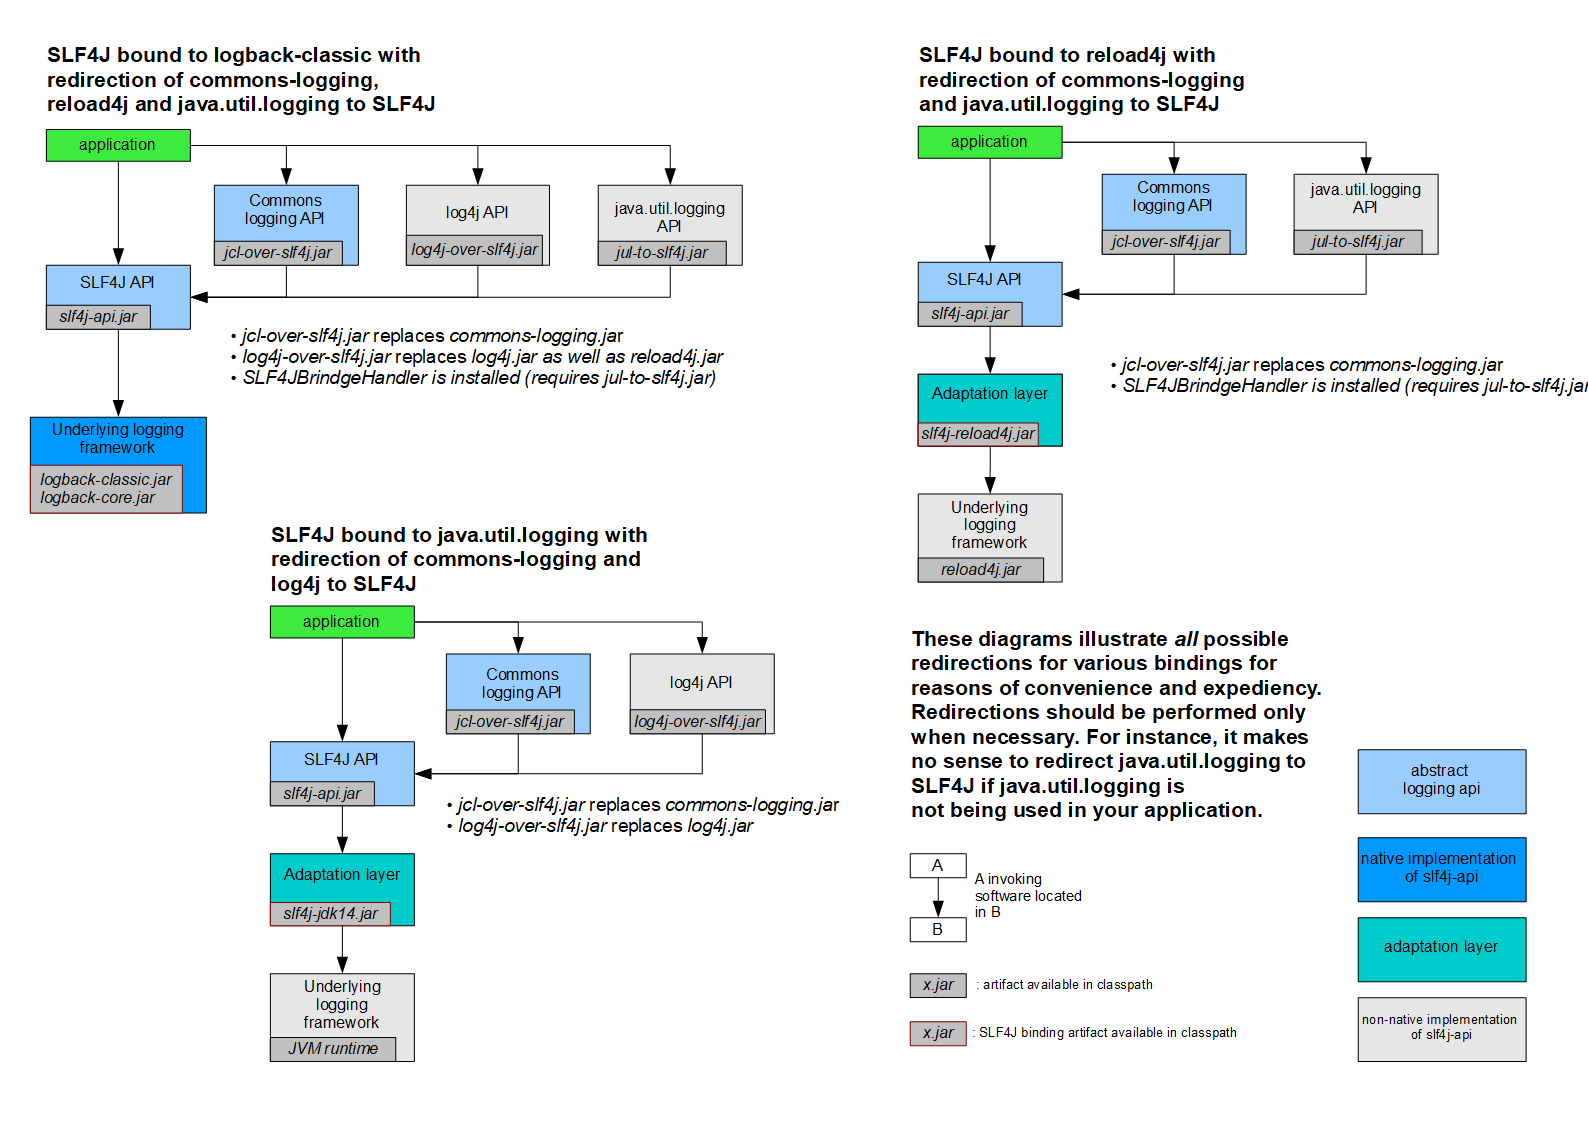
如何让系统中所有的日志都统一到slf4j;
-
将系统中其他日志框架先排除出去 -
用中间包来替换原有的日志框架; -
我们导入slf4j其他的实现

 浙公网安备 33010602011771号