Otter源码
查找对应的源码及相关的逻辑:
支持ddl同步
跳过ddl异常
报错1:
git clone git@github.com:alibaba/otter.git
cd otter;
mvn clean install -Dmaven.test.skip -Denv=release
https://github.com/alibaba/otter/wiki/Manager_Quickstart
[ERROR] Failed to execute goal on project shared.common: Could not resolve dependencies for project com.alibaba.otter:shared.common:jar:4.2.19-SNAPSHOT: Failed to collect dependencies at ch.qos.logback:logback-core:jar:1.1.3: Failed to read artifact descriptor for
ch.qos.logback:logback-core:jar:1.1.3: Could not transfer artifact ch.qos.logback:logback-core:pom:1.1.3 from/to central (http://repo1.maven.org/maven2): Failed to transfer file http://repo1.maven.org/maven2/ch/qos/logback/logback-core/1.1.3/logback-core-1.1.3.pom
with status code 501 -> [Help 1]
org.apache.maven.lifecycle.LifecycleExecutionException: Failed to execute goal on project shared.common: Could not resolve dependencies for project com.alibaba.otter:shared.common:jar:4.2.19-SNAPSHOT: Failed to collect dependencies at ch.qos.logback:logback-core:ja
r:1.1.3
    at org.apache.maven.lifecycle.internal.LifecycleDependencyResolver.getDependencies (LifecycleDependencyResolver.java:269)
    at org.apache.maven.lifecycle.internal.LifecycleDependencyResolver.resolveProjectDependencies (LifecycleDependencyResolver.java:147)
看报错原因,是拉pom文件时报错了,复现一下: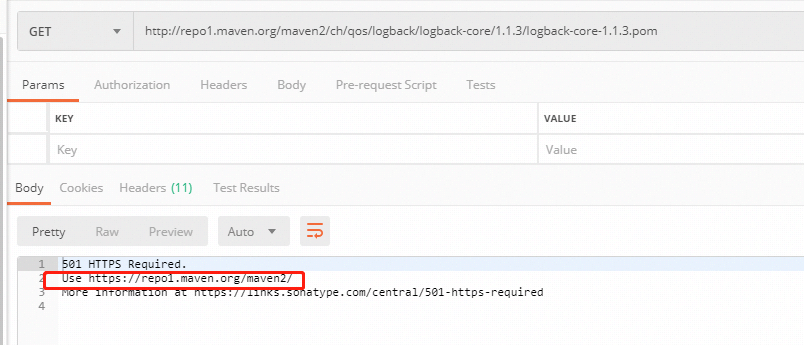
改成https就可以了:
那改的方法就简单了,将配置的http改为https就可以了:
执行 mvn clean install -Dmaven.test.skip=true -Denv=release 后,报了另外一个错:
[ERROR] Failed to execute goal on project shared.common: Could not resolve dependencies for project com.alibaba.otter:shared.common:jar:4.2.19-SNAPSHOT: Failed to collect dependencies at org.jtester:jtester:jar:1.1.8: Failed to read artifact descriptor for org.jtes
ter:jtester:jar:1.1.8: Could not transfer artifact org.jtester:jtester:pom:1.1.8 from/to jtester-maven (http://jtester.googlecode.com/svn/m2/): Connect to jtester.googlecode.com:80 [jtester.googlecode.com/74.125.204.82] failed: Connection timed out: connect -> [Hel
p 1]
[ERROR]
[ERROR] To see the full stack trace of the errors, re-run Maven with the -e switch.
[ERROR] Re-run Maven using the -X switch to enable full debug logging.
[ERROR]
[ERROR] For more information about the errors and possible solutions, please read the following articles:
[ERROR] [Help 1] http://cwiki.apache.org/confluence/display/MAVEN/DependencyResolutionException
[ERROR]
[ERROR] After correcting the problems, you can resume the build with the command
[ERROR]   mvn <goals> -rf :shared.common
可以看到在本机电脑就ping不通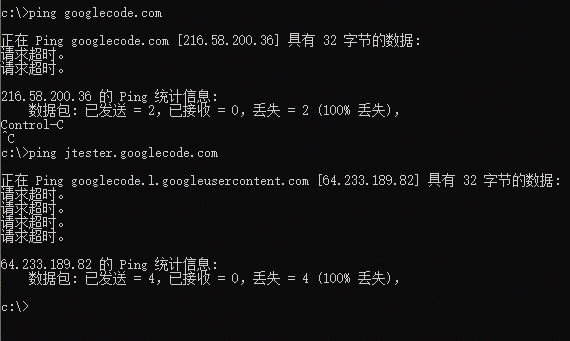
把这些已经删除掉: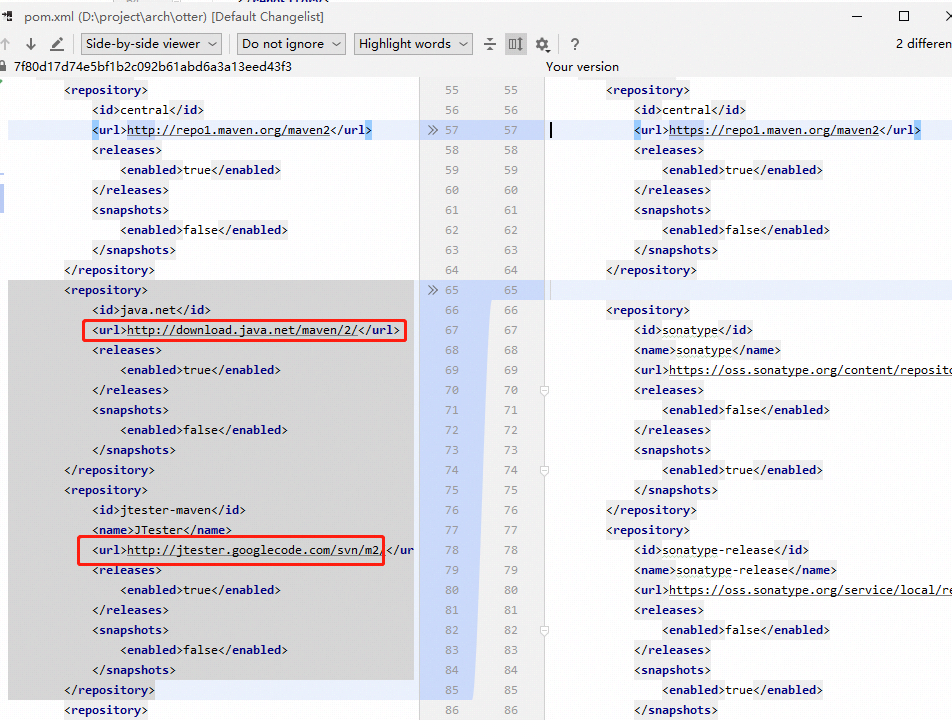
再执行 mvn clean compile install -Dmaven.test.skip=true -Denv=release
又报错了:
[INFO] ------------------------------------------------------------------------
[ERROR] Failed to execute goal on project shared.common: Could not resolve dependencies for project com.alibaba.otter:shared.common:jar:4.2.19-SNAPSHOT: Could not find artifact org.jtester:jtester:jar:1.1.8 in central (https://repo1.maven.org/maven2) -> [Help 1]
[ERROR]
[ERROR] To see the full stack trace of the errors, re-run Maven with the -e switch.
[ERROR] Re-run Maven using the -X switch to enable full debug logging.
[ERROR]
[ERROR] For more information about the errors and possible solutions, please read the following articles:
[ERROR] [Help 1] http://cwiki.apache.org/confluence/display/MAVEN/DependencyResolutionException
[ERROR]
[ERROR] After correcting the problems, you can resume the build with the command
[ERROR]   mvn <goals> -rf :shared.common
在mvnrepository.com上看的确没有: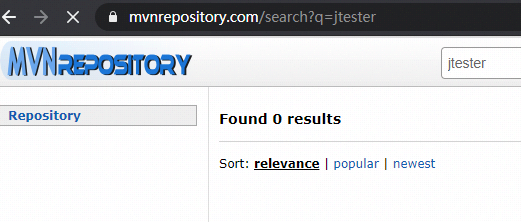
看项目中自带了:
引入到项目中: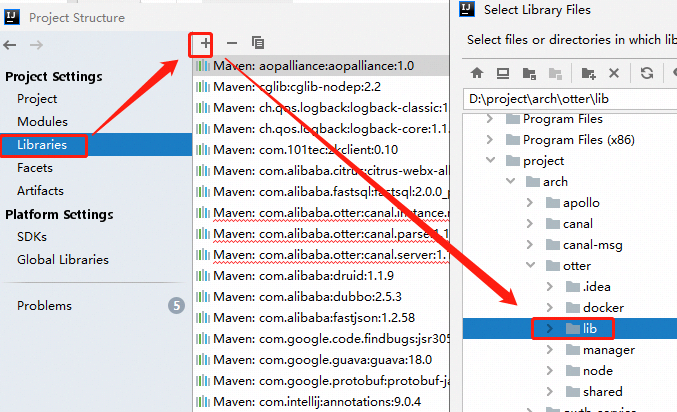
点 确定 后,选中所有的项目,点 确定
再执行 mvn clean compile install -Dmaven.test.skip=true -Denv=release
仍然报错,不过报错内容变了:
[INFO] BUILD FAILURE
[INFO] ------------------------------------------------------------------------
[INFO] Total time:  19.888 s
[INFO] Finished at: 2020-05-20T15:52:02+08:00
[INFO] ------------------------------------------------------------------------
[ERROR] Failed to execute goal on project shared.common: Could not resolve dependencies for project com.alibaba.otter:shared.common:jar:4.2.19-SNAPSHOT: Failure to find org.jtester:jtester:jar:1.1.8 in https://repo1.maven.org/maven2 was cached in the local reposito
ry, resolution will not be reattempted until the update interval of central has elapsed or updates are forced -> [Help 1]
[ERROR]
[ERROR] To see the full stack trace of the errors, re-run Maven with the -e switch.
[ERROR] Re-run Maven using the -X switch to enable full debug logging.
[ERROR]
[ERROR] For more information about the errors and possible solutions, please read the following articles:
[ERROR] [Help 1] http://cwiki.apache.org/confluence/display/MAVEN/DependencyResolutionException
[ERROR]
[ERROR] After correcting the problems, you can resume the build with the command
[ERROR]   mvn <goals> -rf :shared.common
这样还是不行。看来偷懒是不行了。
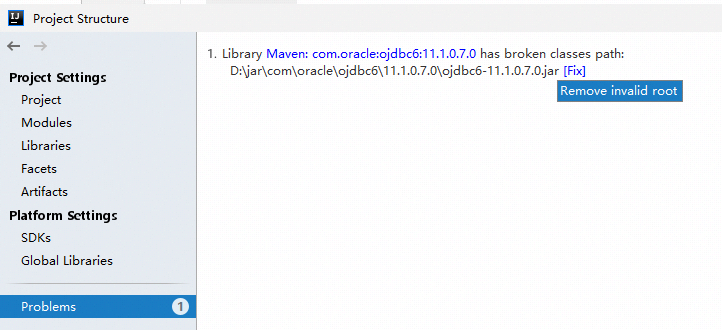
cd 存放下面两个 jar的目录
mvn install:install-file -Dfile=jtester-1.1.8.jar -DgroupId=org.jtester -DartifactId=jtester  -Dversion=1.1.8 -Dpackaging=jar
mvn install:install-file -Dfile=ojdbc6.jar -DgroupId=com.oracle -DartifactId=ojdbc6  -Dversion=11.1.0.7.0 -Dpackaging=jar
然后再到otter项目根目录下,执行 mvn clean compile package -Dmaven.skip.test=true -Denv=release 
IDEA使用Maven项目不能加入本地Jar包的解决方法
https://blog.csdn.net/lvshaorong/article/details/80334351
otter代码在IDEA远程DEBUG方法
众所周知,Otter的代码打包后,是通过Jetty启动的,Otter代码的启动脚本中自带了开启Jetty远程DEBUG的脚本,所以我们只需要在启动Otter Manager和Otter Node的时候,带上如下参数:
sh start.sh debug 8888
其中8888就是我们远程debug的端口号。
然后在IDEA中开启远程调试,具体的步骤为:
Debug->Remote->填入ip和端口号->apply
即可
然后在服务器启动,和在IDEA中启动,就可以DEBUG了。
最近要针对业务修改Otter的源码,本地又没法直接启动,所以只能通过远程调试来做了
https://www.cnblogs.com/f-zhao/p/8398704.html
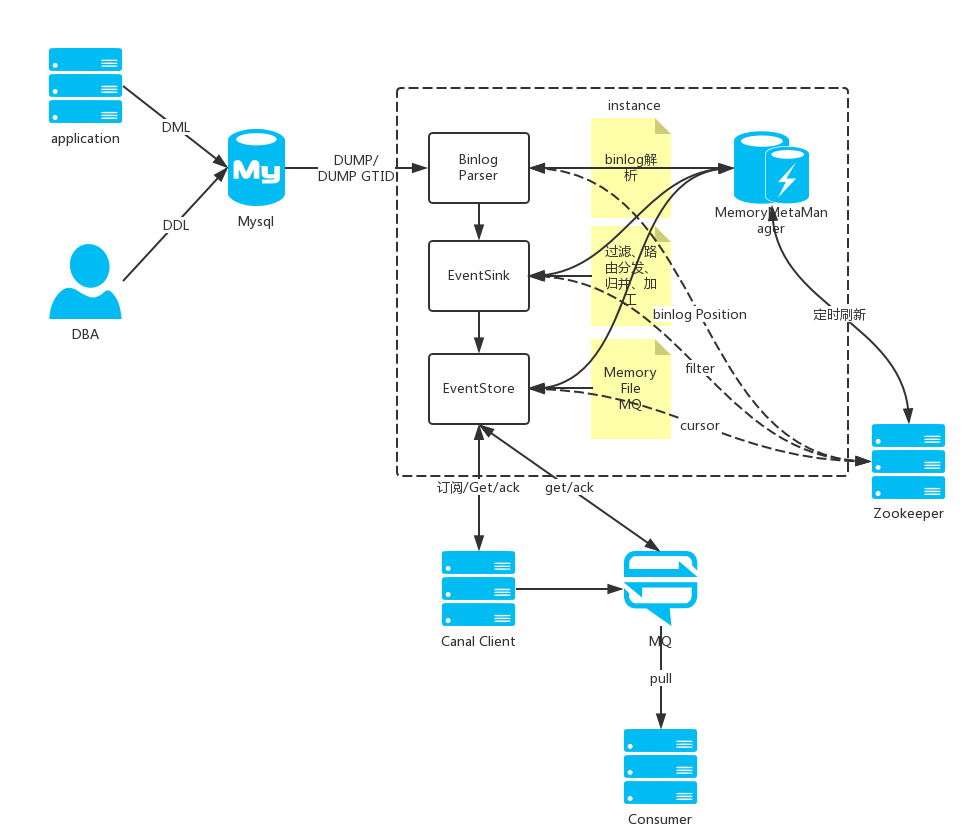
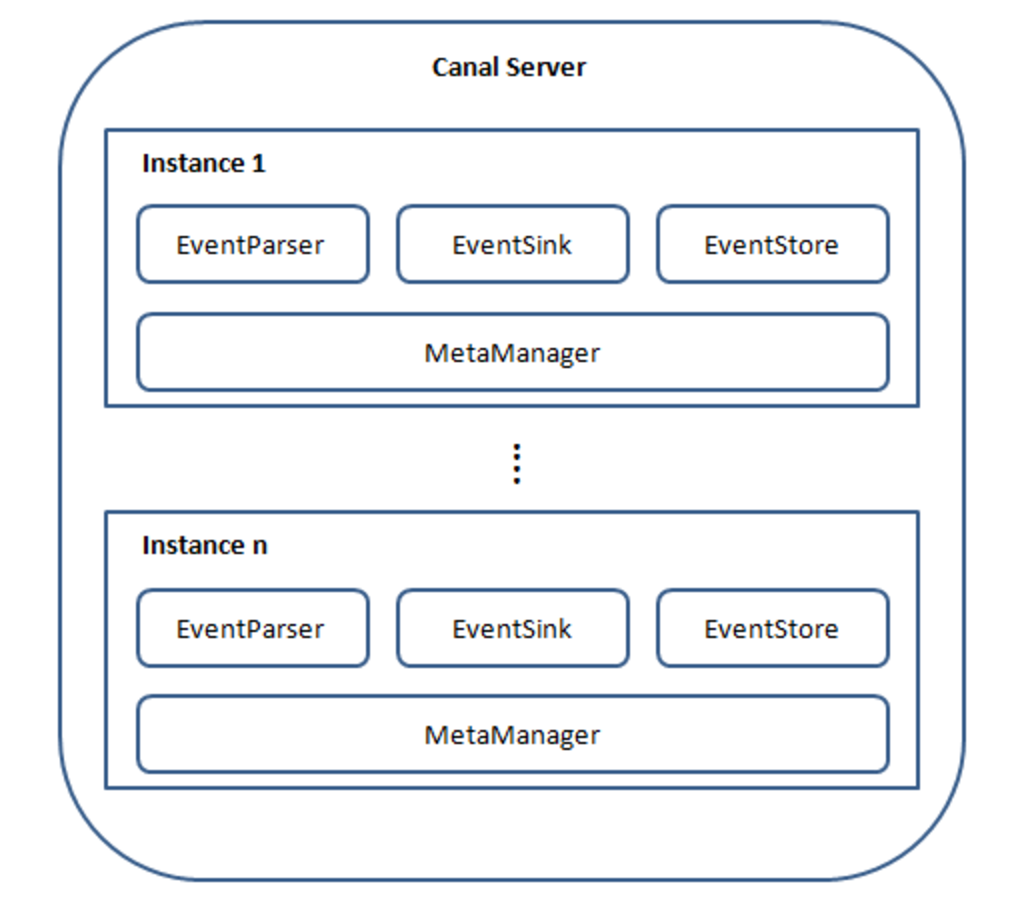
【Canal源码分析】整体架构
https://www.cnblogs.com/f-zhao/p/9112158.html
command : 'show master status' has an error! pls check. you need (at least one of) the SUPER,REPLICATION CLIENT privilege(s) for this operation
    /**
     * 查询当前的binlog位置
     */
    private EntryPosition findEndPosition(MysqlConnection mysqlConnection) {
        try {
            ResultSetPacket packet = mysqlConnection.query("show master status");
            List<String> fields = packet.getFieldValues();
            if (CollectionUtils.isEmpty(fields)) {
                throw new CanalParseException("command : 'show master status' has an error! pls check. you need (at least one of) the SUPER,REPLICATION CLIENT privilege(s) for this operation");
            }
            EntryPosition endPosition = new EntryPosition(fields.get(0), Long.valueOf(fields.get(1)));
            if (isGTIDMode() && fields.size() > 4) {
                endPosition.setGtid(fields.get(4));
            }
            return endPosition;
        } catch (IOException e) {
            throw new CanalParseException("command : 'show master status' has an error!", e);
        }
    }
com.alibaba.otter.canal.parse.inbound.mysql.MysqlEventParser#findEndPosition(com.alibaba.otter.canal.parse.inbound.mysql.MysqlConnection)


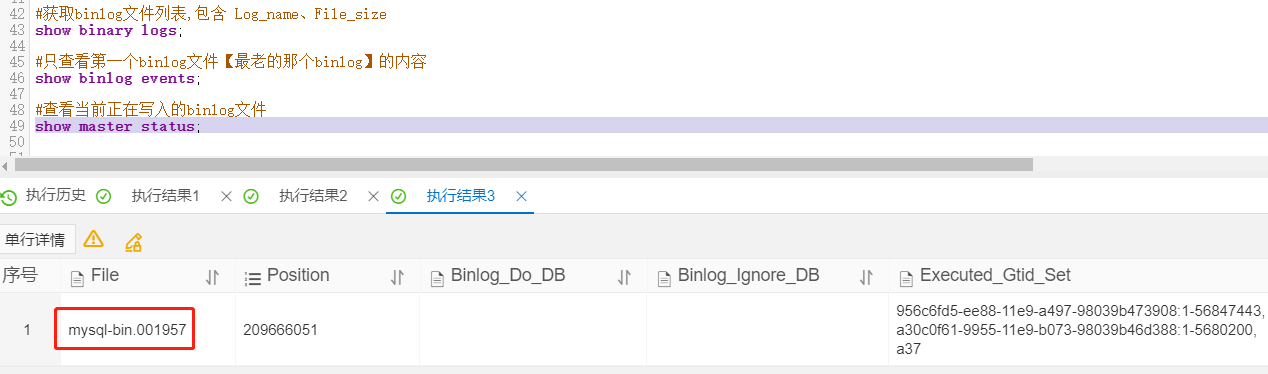
在MYSQL的主从复制中 ,通过命令show master status,可以查看master数据库当前正在使用的二进制日志及当前执行二进制日志位置
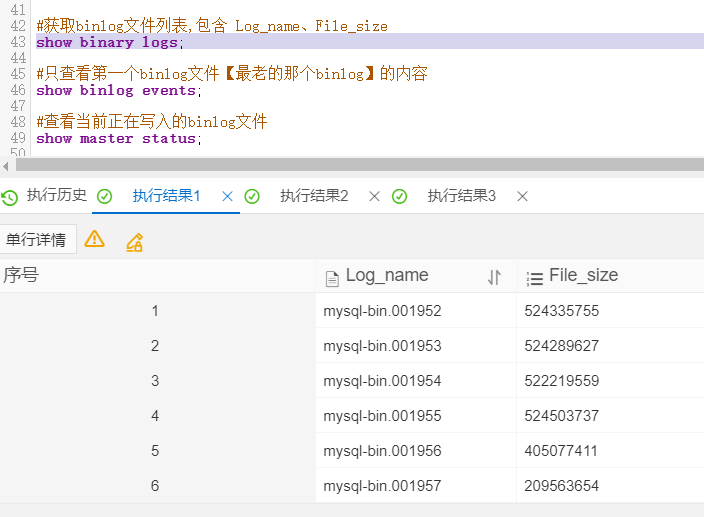
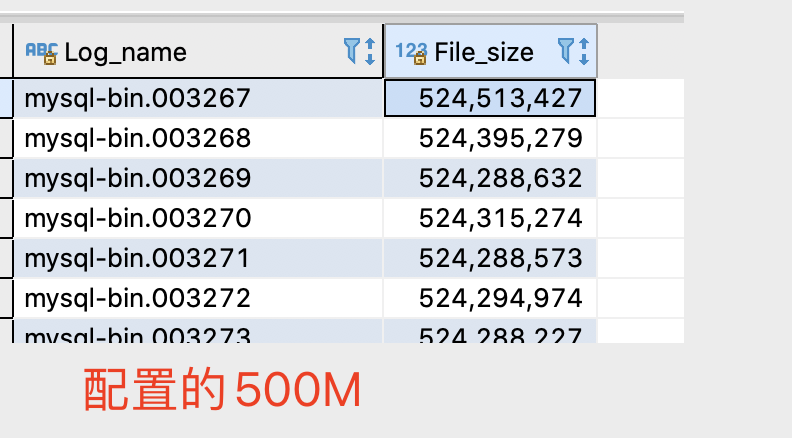
show master logs,查看所有二进制日志列表 ,和 show binary logs 同义。
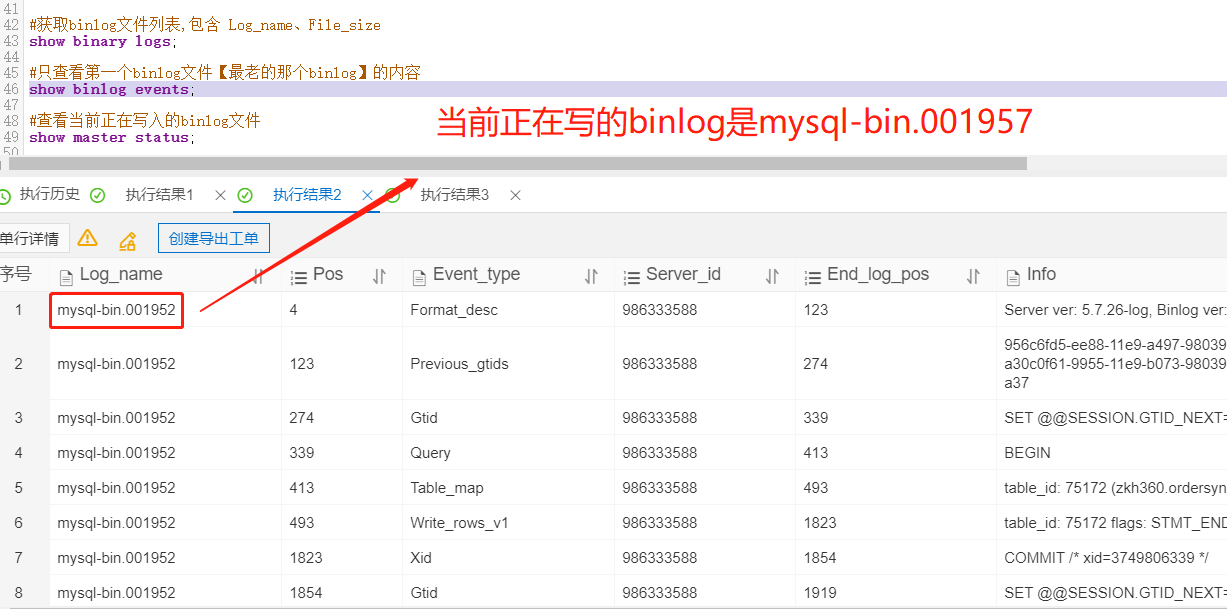
mysql> show binlog events;   #只查看第一个binlog文件【最老的那个binlog】的内容
mysql> show binlog events in 'mysql-bin.000002';#查看指定binlog文件的内容
mysql> show binary logs;  #获取binlog文件列表。即,查看当前服务器使用的biglog文件及大小【单位是Byte】
mysql> show master status; #查看当前正在写入的binlog文件
对比otter row_selected文件和当前正在写入的文件来判断是否有延迟
    /**
     * 查询当前的binlog位置
     */
    private EntryPosition findStartPosition(MysqlConnection mysqlConnection) {
        try {
            ResultSetPacket packet = mysqlConnection.query("show binlog events limit 1");
            List<String> fields = packet.getFieldValues();
            if (CollectionUtils.isEmpty(fields)) {
                throw new CanalParseException("command : 'show binlog events limit 1' has an error! pls check. you need (at least one of) the SUPER,REPLICATION CLIENT privilege(s) for this operation");
            }
            EntryPosition endPosition = new EntryPosition(fields.get(0), Long.valueOf(fields.get(1)));
            return endPosition;
        } catch (IOException e) {
            throw new CanalParseException("command : 'show binlog events limit 1' has an error!", e);
        }

    }
com.alibaba.otter.canal.parse.inbound.mysql.MysqlEventParser#findStartPosition(com.alibaba.otter.canal.parse.inbound.mysql.MysqlConnection)

mysql> show binlog events [IN 'log_name'] [FROM pos] [LIMIT [offset,] row_count];
选项解析:
IN 'log_name' 指定要查询的binlog文件名(不指定就是第一个binlog文件)
FROM pos 指定从哪个pos起始点开始查起(不指定就是从整个文件首个pos点开始算)
LIMIT [offset,] 偏移量(不指定就是0)
row_count 查询总条数(不指定就是所有行)
A.查询第一个(最早)的binlog日志:
mysql> show binlog events\G;
B.指定查询 mysql-bin.000021 这个文件:
mysql> show binlog events in 'mysql-bin.000021'\G;
C.指定查询 mysql-bin.000021 这个文件,从pos点:8224开始查起:
mysql> show binlog events in 'mysql-bin.000021' from 8224\G;
D.指定查询 mysql-bin.000021 这个文件,从pos点:8224开始查起,查询10条
mysql> show binlog events in 'mysql-bin.000021' from 8224 limit 10\G;
E.指定查询 mysql-bin.000021 这个文件,从pos点:8224开始查起,偏移2行,查询10条
mysql> show binlog events in 'mysql-bin.000021' from 8224 limit 2,10\G;
com.alibaba.otter.node.etl.select.selector.canal.CanalEmbedSelector#selector
   public Message<EventData> selector() throws InterruptedException {

        。。。

        if (dump && logger.isInfoEnabled()) {
            String startPosition = null;
            String endPosition = null;
            if (!CollectionUtils.isEmpty(entries)) {
                startPosition = buildPositionForDump(entries.get(0));
                endPosition = buildPositionForDump(entries.get(entries.size() - 1));
            }

            dumpMessages(result, startPosition, endPosition, entries.size());// 记录一下,方便追查问题
        }
        return result;
    }
com.alibaba.otter.node.etl.select.selector.canal.CanalEmbedSelector#dumpMessages
    /**
     * 记录一下message对象
     */
    private synchronized void dumpMessages(Message message, String startPosition, String endPosition, int total) {
        try {
            MDC.put(OtterConstants.splitPipelineSelectLogFileKey, String.valueOf(pipelineId));
            logger.info(SEP + "****************************************************" + SEP);
            logger.info(MessageDumper.dumpMessageInfo(message, startPosition, endPosition, total));
            logger.info("****************************************************" + SEP);
            if (dumpDetail) {// 判断一下是否需要打印详细信息
                dumpEventDatas(message.getDatas());
                logger.info("****************************************************" + SEP);
            }
        } finally {
            MDC.remove(OtterConstants.splitPipelineSelectLogFileKey);
        }
    }
com.alibaba.otter.node.etl.select.selector.canal.CanalEmbedSelector#buildPositionForDump
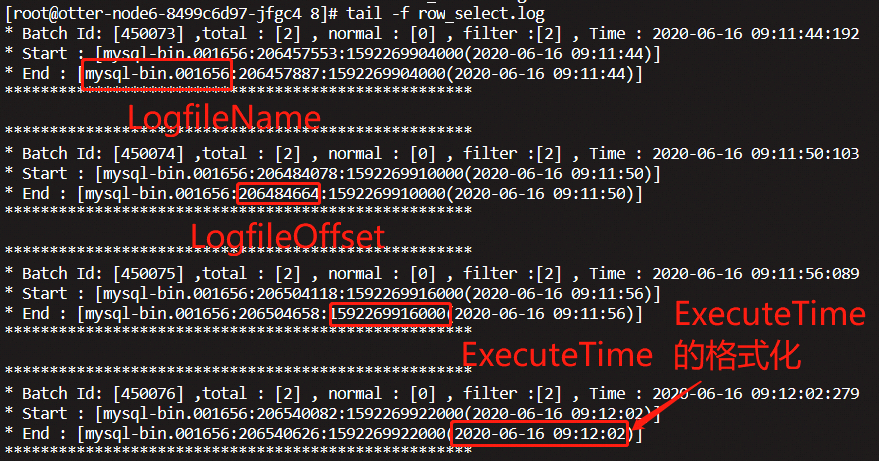
    private String buildPositionForDump(Entry entry) {
        long time = entry.getHeader().getExecuteTime();
        Date date = new Date(time);
        SimpleDateFormat format = new SimpleDateFormat(DATE_FORMAT);
        return entry.getHeader().getLogfileName() + ":" + entry.getHeader().getLogfileOffset() + ":"
               + entry.getHeader().getExecuteTime() + "(" + format.format(date) + ")";
    }
com.alibaba.otter.node.etl.select.selector.MessageDumper#dumpMessageInfo
   private static String       eventData_format       = null;
    private static int          event_default_capacity = 1024;                      // 预设值StringBuilder,减少扩容影响

    static {
        context_format = "* Batch Id: [{0}] ,total : [{1}] , normal : [{2}] , filter :[{3}] , Time : {4}" + SEP;
        context_format += "* Start : [{5}] " + SEP;
        context_format += "* End : [{6}] " + SEP;

        eventData_format = "-----------------" + SEP;
        eventData_format += "- TableId: {0} , Schema: {1} , Table: {2} " + SEP;
        eventData_format += "- Type: {3}  , ExecuteTime: {4} , Remedy: {5}" + SEP;
        eventData_format += "-----------------" + SEP;
        eventData_format += "---START" + SEP;
        eventData_format += "---Pks" + SEP;
        eventData_format += "{6}" + SEP;
        eventData_format += "---oldPks" + SEP;
        eventData_format += "{7}" + SEP;
        eventData_format += "---Columns" + SEP;
        eventData_format += "{8}" + SEP;
        eventData_format += "---END" + SEP;

    }

    public static String dumpMessageInfo(Message<EventData> message, String startPosition, String endPosition, int total) {
        Date now = new Date();
        SimpleDateFormat format = new SimpleDateFormat(TIMESTAMP_FORMAT);
        int normal = message.getDatas().size();
        return MessageFormat.format(context_format, String.valueOf(message.getId()), total, normal, total - normal,
                                    format.format(now), startPosition, endPosition);
    }

 浙公网安备 33010602011771号