Springboot(二)springboot之jsp支持
参考恒宇少年的博客:https://www.jianshu.com/p/90a84c814d0c
springboot内部对jsp的支持并不是特别理想,而springboot推荐的视图是Thymeleaf(在以后章节进行讲解),但是开发人员对jsp的应用得掌握,还是必不可少的。
本文目标:
整合springboot web项目支持jsp作为视图输出
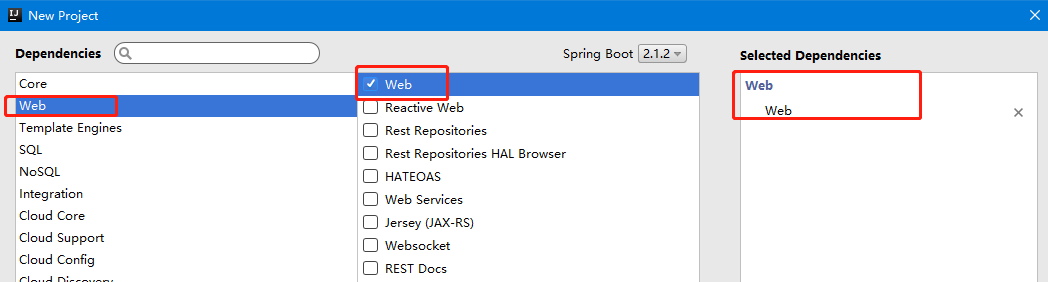
一、使用IntelliJ IDEA 工具来构建项目(建项目时候要选中war包)
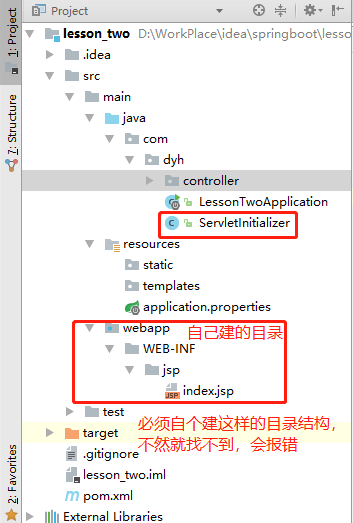
二、自动生成的ServletInitializer类介绍
打开该类我们不难发现它继承了SpringBootServletInitializer这个父类,而SpringBootServletInitializer这个类是springboot提供的web程序初始化的入口,当我们使用外部容器(后期文章讲解使用外部tomcat如何运行项目)运行项目时会自动加载并且装配。
实现SpringBootServletInitializer的子类需要重写一个configure方法,方法内自动根据LessontwoApplication.class的类型创建一个SpringApplicationBuilder交付给springboot框架来完成初始化运行配置。
实现SpringBootServletInitializer的子类需要重写一个configure方法,方法内自动根据LessontwoApplication.class的类型创建一个SpringApplicationBuilder交付给springboot框架来完成初始化运行配置。
三、配置springboot支持jsp
我们打开pom.xml(maven配置文件)可以看到我们之前构建项目时已经添加了web模块,而springboot给我们自动添加了spring-boot-starter-tomcat配置引入。springboot内部集成了tomcat组件,这里我们就不需要重复引入tomcat组件。


<?xml version="1.0" encoding="UTF-8"?>
<project xmlns="http://maven.apache.org/POM/4.0.0" xmlns:xsi="http://www.w3.org/2001/XMLSchema-instance"
    xsi:schemaLocation="http://maven.apache.org/POM/4.0.0 http://maven.apache.org/xsd/maven-4.0.0.xsd">
    <modelVersion>4.0.0</modelVersion>
    <parent>
        <groupId>org.springframework.boot</groupId>
        <artifactId>spring-boot-starter-parent</artifactId>
        <version>2.1.2.RELEASE</version>
        <relativePath/> <!-- lookup parent from repository -->
    </parent>
    <groupId>com.dyh</groupId>
    <artifactId>lesson_two</artifactId>
    <version>0.0.1-SNAPSHOT</version>
    <packaging>war</packaging>
    <name>lesson_two</name>
    <description>Demo project for Spring Boot</description>

    <properties>
        <java.version>1.8</java.version>
    </properties>

    <dependencies>
        <dependency>
            <groupId>org.springframework.boot</groupId>
            <artifactId>spring-boot-starter-web</artifactId>
        </dependency>

        <dependency>
            <groupId>org.springframework.boot</groupId>
            <artifactId>spring-boot-starter-tomcat</artifactId>
            <scope>provided</scope>
        </dependency>
        <dependency>
            <groupId>org.springframework.boot</groupId>
            <artifactId>spring-boot-starter-test</artifactId>
            <scope>test</scope>
        </dependency>

        <!--添加springboot对jsp支持-->
        <dependency>
            <groupId>org.apache.tomcat.embed</groupId>
            <artifactId>tomcat-embed-jasper</artifactId>
        </dependency>

        <!--servlet支持开启-->
        <dependency>
            <groupId>javax.servlet</groupId>
            <artifactId>javax.servlet-api</artifactId>
        </dependency>

        <!--使用jstl标签-->
        <dependency>
            <groupId>javax.servlet</groupId>
            <artifactId>jstl</artifactId>
        </dependency>

    </dependencies>

    <build>
        <plugins>
            <plugin>
                <groupId>org.springframework.boot</groupId>
                <artifactId>spring-boot-maven-plugin</artifactId>
            </plugin>
        </plugins>
    </build>

</project>
四、配置视图
我们必须按照jsp文件之前的文件目录风格,在/webapp/WEB-INF/jsp目录下。
1. 在main目录下创建webapp文件夹
2. 在webapp下创建jsp文件夹
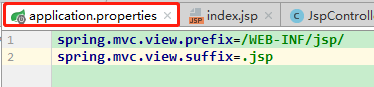
3. 修改application.properties文件让springmvc支持视图的跳转目录指向为/main/webapp/jsp

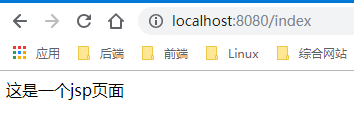
五、controller层代码书写,请求127.0.0.1:8080/index,返回到index.jsp页面
@Controller
public class JspController {
    @RequestMapping(value = "/index",method = RequestMethod.GET)
    public String getJsp(){
        return "index";
    }
}
六、创建Jsp页面,并测试
<%@ page contentType="text/html;charset=UTF-8" language="java" %>
<html>
<head>
    <title>Title</title>
</head>
<body>
    这是一个jsp页面
</body>
</html>

 浙公网安备 33010602011771号