Kotlin之小试Anko(Anko库的导入及使用)
第一部分
资料地址
anko是什么
Anko是JetBrains开发的一个强大的库,它主要的目的是用来替代以前XML的方式来使用代码生成UI布局的,它包含了很多的非常有帮助的函数和属性来避免让你写很多的模版代码。
环境配置 (结合kotlin使用)#
项目 build.gradle
 1 buildscript {
 2     ext.kotlin_version = '1.3.11'
 3     ext.anko_version = "0.10.8"
 4     repositories {
 5         google()
 6         jcenter()
 7
 8     }
 9     dependencies {
10         classpath 'com.android.tools.build:gradle:3.3.0'
11         classpath "org.jetbrains.kotlin:kotlin-gradle-plugin:$kotlin_version"
12         classpath "org.jetbrains.kotlin:kotlin-android-extensions: $kotlin_version"
13     }
14 }
app build.gradle
 1 dependencies {
 2     implementation fileTree(dir: 'libs', include: ['*.jar'])
 3     implementation"org.jetbrains.kotlin:kotlin-stdlib-jdk7:$kotlin_version"
 4     implementation 'com.android.support:appcompat-v7:28.0.0'
 5     implementation 'com.android.support.constraint:constraint-layout:1.1.3'
 6     testImplementation 'junit:junit:4.12'
 7     androidTestImplementation 'com.android.support.test:runner:1.0.2'
 8     androidTestImplementation 'com.android.support.test.espresso:espresso-core:3.0.2'
 9
10     // Anko Commons
11     implementation "org.jetbrains.anko:anko-commons:$anko_version"
12
13     // Anko Layouts
14     implementation "org.jetbrains.anko:anko-sdk25:$anko_version" // sdk15, sdk19, sdk21, sdk23 are also available
15     implementation "org.jetbrains.anko:anko-appcompat-v7:$anko_version"
16
17     // Coroutine listeners for Anko Layouts
18     implementation "org.jetbrains.anko:anko-sdk25-coroutines:$anko_version"
19     implementation "org.jetbrains.anko:anko-appcompat-v7-coroutines:$anko_version"
20
21     // Anko SQLite
22     implementation "org.jetbrains.anko:anko-sqlite:$anko_version"
23 }
示例
xml中的控件的属性的设置
xml
 1 <LinearLayout
 2         xmlns:android="http://schemas.android.com/apk/res/android"
 3         xmlns:tools="http://schemas.android.com/tools"
 4         xmlns:app="http://schemas.android.com/apk/res-auto"
 5         android:layout_width="match_parent"
 6         android:layout_height="match_parent"
 7         android:orientation="vertical"
 8         tools:context=".MainActivity">
 9
10     <TextView
11             android:id="@+id/tv_home"
12             android:layout_width="wrap_content"
13             android:layout_height="wrap_content"
14             android:text="Hello World!"
15     />
16
17 </LinearLayout>
activity
1 tv_home.text = "test_1"
怎么样,就是这么神奇
java中创建布局
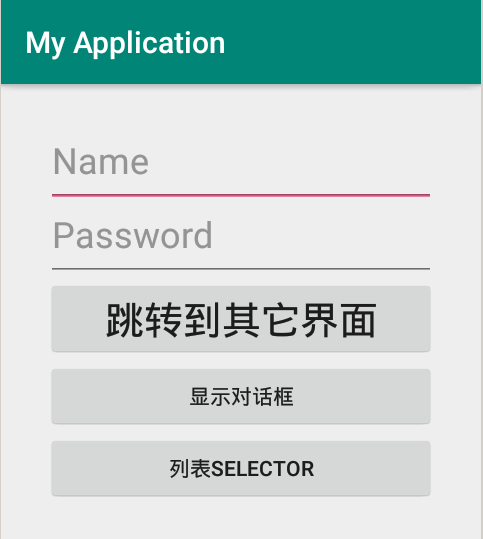
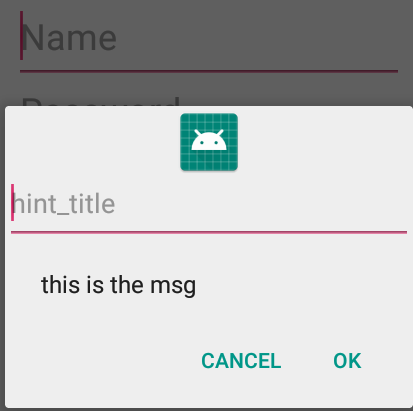
 1 private fun showCustomerLayout() {
 2     verticalLayout {
 3         padding = dip(30)
 4         editText {
 5             hint = "Name"
 6             textSize = 24f
 7         }.textChangedListener {
 8             onTextChanged { str, _, _, _ ->
 9                 println(str)
10             }
11         }
12         editText {
13             hint = "Password"
14             textSize = 24f
15         }.textChangedListener {
16             onTextChanged { str, _, _, _ ->
17                 println(str)
18             }
19         }
20         button("跳转到其它界面") {
21             textSize = 26f
22             id = BTN_ID
23             onClick {
24                 // 界面跳转并携带参数
25                 startActivity<IntentActivity>("name" to "小明", "age" to 12)
26             }
27         }
28
29         button("显示对话框") {
30             onClick {
31                 makeAndShowDialog()
32             }
33         }
34         button("列表selector") {
35             onClick {
36                 makeAndShowListSelector()
37             }
38         }
39     }
40 }
41
42 private fun makeAndShowListSelector() {
43     val countries = listOf("Russia", "USA", "England", "Australia")
44     selector("Where are you from", countries) { ds, i ->
45         toast("So you're living in ${countries[i]},right?")
46     }
47 }
48
49 private fun makeAndShowDialog() {
50     alert("this is the msg") {
51         customTitle {
52             verticalLayout {
53                 imageView(R.mipmap.ic_launcher)
54                 editText {
55                     hint = "hint_title"
56                 }
57             }
58         }
59
60         okButton {
61             toast("button-ok")
62             // 会自行关闭不需要我们手动调用
63         }
64         cancelButton {
65             toast("button-cancel")
66         }
67     }.show()
68 }
效果如下
对话框按钮点击效果
列表selector点击效果
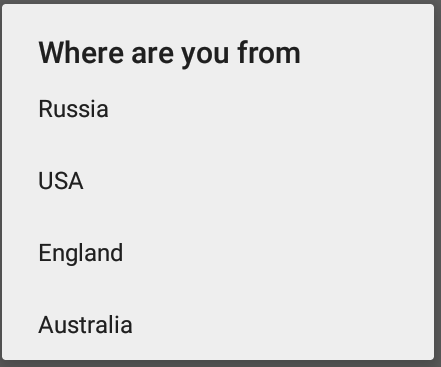
列表条目点击效果

目标界面效果
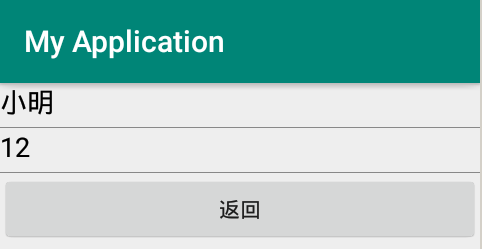
补充:(目标界面代码)
 1 private fun receiveAndShowResult() {
 2     // 数据的获取
 3     val name = intent.extras.getString("name")
 4     val age = intent.extras.getInt("age")
 5
 6     // 界面的定义及展示
 7     verticalLayout {
 8         textView(name) {
 9             textSize = 18f
10             textColor = Color.BLACK
11         }
12         // 布局参数设置
13         view {
14             backgroundColor = Color.GRAY
15         }.lparams(width = wrapContent, height = 1) {
16             topMargin = dip(5)
17         }
18         textView("$age") {
19             textSize = 18f
20             textColor = Color.BLACK
21         }
22         view {
23             backgroundColor = Color.GRAY
24         }.lparams(width = wrapContent, height = 1) {
25             topMargin = dip(5)
26         }
27         button("返回") {
28             onClick {
29                 finish()
30             }
31         }
32     }
33 }
高级使用部分
anko-sqlite配置
1 // Anko SQLite
2 implementation "org.jetbrains.anko:anko-sqlite:$anko_version"
anko-sqlite的使用
db创建
 1 class MyDb(ctx: Context) : ManagedSQLiteOpenHelper(ctx, "MyDb", null, 1) {
 2     companion object {
 3         private var instance: MyDb? = null
 4
 5         // 构建线程安全的单例
 6         @Synchronized
 7         fun getInstance(ctx: Context): MyDb {
 8             if (instance == null) {
 9                 instance = MyDb(ctx)
10             }
11             return instance!!
12         }
13     }
14
15     override fun onCreate(db: SQLiteDatabase?) {
16         // 创建表
17         db?.createTable(
18             "Customer", true,
19             "id" to INTEGER + PRIMARY_KEY + UNIQUE,
20             "t_name" to TEXT,
21             "t_photo" to BLOB
22         )
23     }
24
25     override fun onUpgrade(db: SQLiteDatabase?, oldVersion: Int, newVersion: Int) {
26         when (newVersion) {
27             2 -> {
28                 if (oldVersion < newVersion) {
29                     println("newVersion -- $newVersion")
30
31                     db?.execSQL("ALTER TABLE Person RENAME To tmp_person")
32                     db?.createTable(
33                         "Person", true,
34                         "id" to INTEGER + PRIMARY_KEY + UNIQUE,
35                         "name" to TEXT,
36                         "age" to INTEGER,
37                         "address" to TEXT,
38                         "sex" to INTEGER
39                     )
40                     db?.execSQL("INSERT INTO Person Select id,name,age,address FROM tmp_person")
41                     db?.dropTable("tmp_person")
42                 }
43             }
44         }
45     }
46 }
db扩展方法
1 val Context.database: MyDb
2     get() = MyDb.getInstance(applicationContext)
使用示例
创建表
 1 database.use {
 2     if (attempt {
 3             createTable(
 4                 "book", true,
 5                 "id" to INTEGER + PRIMARY_KEY + UNIQUE,
 6                 "name" to TEXT,
 7                 "author" to TEXT,
 8                 "price" to INTEGER,
 9                 "pubtime" to TEXT
10             )
11             toast("表创建成功")
12         }.isError) {
13         toast("表创建失败")
14     }
15 }
添加数据
 1 database.use {
 2     if (attempt {
 3             insert(
 4                 "book",
 5                 "name" to "奇迹",
 6                 "author" to "未知",
 7                 "price" to 32,
 8                 "pubtime" to "2012-12-11"
 9             )
10             insert(
11                 "book",
12                 "name" to "奇迹1",
13                 "author" to "未知",
14                 "price" to 32,
15                 "pubtime" to "2012-12-11"
16             )
17             insert(
18                 "book",
19                 "name" to "奇迹2",
20                 "author" to "未知",
21                 "price" to 33,
22                 "pubtime" to "2011-12-11"
23             )
24             insert(
25                 "book",
26                 "name" to "银瓶梅",
27                 "author" to "他二爷",
28                 "price" to 25,
29                 "pubtime" to "2010-1-1"
30             )
31             insert(
32                 "book",
33                 "name" to "平凡的世界",
34                 "author" to "路遥",
35                 "price" to 15,
36                 "pubtime" to "208-10-15"
37             )
38             toast("数据插入成功")
39         }.isError) {
40         toast("数据插入成功")
41     }
42 }
更新数据
if (attempt {
        database.use {
            if (attempt {
                    execSQL("update book set price = 85 where name = '平凡的世界'")
                    toast("更新数据成功")
                }.isError) {
                toast("更新数据失败")
            }
        }
    }.isError) {
    toast("错误,表不存在")
}
查找数据
1 单一查找
2 val whereArgs = select("book", "name", "price", "author")
3                             .whereArgs("(price = {price})", "price" to 33)
4 // 另一种方式用的是三元元组,这种是自定义式的数据解析器
5 // parseSingle 和 parseOpt数据都只适用于结果只有一条的时候,如果有多条,会报错
6 val list = whereArgs.parseSingle(classParser<Book>())
7 println(list)
Book(name=奇迹2, price=33, author=未知)
1 查找全部
2 val whereArgs = select("book", "name", "price", "author")
3 var parser = rowParser { name: String, price: Int, author: String ->
4 Triple(name, price, author)
5 }
6
7 val list = whereArgs.parseList(parser)
8 println(list)
[(奇迹, 32, 未知), (奇迹1, 32, 未知), (奇迹2, 33, 未知), (银瓶梅, 25, 他二爷), (平凡的世界, 85, 路遥)]
1 条件过滤查找
2 val whereArgs = select("book", "name", "price", "author")
3     .whereArgs("(price > {price})", "price" to 30)
4 var parser = rowParser { name: String, price: Int, author: String ->
5     Triple(name, price, author)
6 }
7
8 val list = whereArgs.parseList(parser)
9 println(list)
[(奇迹, 32, 未知), (奇迹1, 32, 未知), (奇迹2, 33, 未知), (平凡的世界, 85, 路遥)]
1 val whereArgs = select("book", "name", "price", "author")
2     .whereArgs("(price > {price})", "price" to 30)
3 // 另一种方式用的是三元元组,这种是自定义式的数据解析器
4 val list = whereArgs.parseList(classParser<Book>())
5 println(list)
[Book(name=奇迹, price=32, author=未知), Book(name=奇迹1, price=32, author=未知), Book(name=奇迹2, price=33, author=未知), Book(name=平凡的世界, price=85, author=路遥)]
删除表
1 database.use {
2     if (attempt {
3             dropTable("book")
4             toast("表删除成功")
5         }.isError) {
6         toast("表删除失败")
7     }
8 }
再次感谢大神的资料,大神的博客地址
第二部分
Anko的源码解析
目标示例代码
 1 verticalLayout {
 2     textView("注册") {
 3         textSize = dip(22).toFloat()
 4         textColor = Color.BLUE
 5         gravity = Gravity.CENTER_HORIZONTAL
 6     }
 7     editText {
 8         hint = "请输入姓名"
 9     }
10
11     // 水平线性布局
12     linearLayout {
13         textView("忘记密码")
14         textView("没有账户重新注册一个")
15     }
16
17     button("确定") {
18         onClick {
19             toast("注册用户")
20         }
21     }
22     loadRes()
23 }
其次给出代码工作流程
1 1. 创建控件
2 2. 调用init(),其实就是调用我们传递的lambda表达式
3 3. addView(),根据传入的上下文执行不同的操作,activity->setContentView,viewManager->addView()
verticalLayout函数
1 inline fun Activity.verticalLayout(theme: Int = 0): LinearLayout = verticalLayout(theme) {}
2 inline fun Activity.verticalLayout(theme: Int = 0, init: (@AnkoViewDslMarker _LinearLayout).() -> Unit): LinearLayout {
3     return ankoView(`$$Anko$Factories$CustomViews`.VERTICAL_LAYOUT_FACTORY, theme, init)
4 }
verticalLayout() 其实是个函数,参数也是个函数。这里就涉及到了“闭包”,简单来说就是:“verticalLayout”这个方法的参数(init)也是个函数,这个参数可以理解为在_LinearLayout类中扩展的匿名方法或者代码块。其中_LinearLayout是LinearLayout的子类,这个咱们后面讲的lparam时候再说。这个方法返回是一个LineaerLayout,咱们先来看看他的代码是怎么生成LinearLayout。
对象的生成
1 @PublishedApi
2 internal object `$$Anko$Factories$CustomViews` {
3     // 单例类的创建
4     val VERTICAL_LAYOUT_FACTORY = { ctx: Context ->
5         val view = _LinearLayout(ctx)
6         view.orientation = LinearLayout.VERTICAL
7         view
8     }
9 }
创建一个单例工厂类,里面有个函数属性:
val VERTICAL_LAYOUT_FACTORY:(Context)-> _LinearLayout
ankoView函数
1 inline fun <T : View> Activity.ankoView(factory: (ctx: Context) -> T, theme: Int, init: T.() -> Unit): T {
2     val ctx = AnkoInternals.wrapContextIfNeeded(this, theme)
3     val view = factory(ctx)
4     view.init() -->> 传入的lambda表达式
5     AnkoInternals.addView(this, view) // 先创建AnkoContextImpl对象,然后再调用AnkoContextImpl的addView
6     return view
7 }
AnkoInternals.addView函数
1 fun <T : View> addView(activity: Activity, view: T) {
2     // 先创建上下文
3     createAnkoContext(activity,
4                      {
5                         AnkoInternals.addView(this, view)
6                      }, true)
7 }
createAnkoContext函数
1 inline fun <T> T.createAnkoContext(
2         ctx: Context,
3         init: AnkoContext<T>.() -> Unit,
4         setContentView: Boolean = false
5 ): AnkoContext<T> {
6     val dsl = AnkoContextImpl(ctx, this, setContentView)
7     dsl.init() // 这里其实是调用了我们传入的labmda表达式,调用的是addView方法
8     return dsl
9 }
AnkoInternals.addView
1 fun <T : View> addView(manager: ViewManager, view: T) = when (manager) {
2     is ViewGroup -> manager.addView(view)  // 如果是ViewGroup直接调用addView
3     is AnkoContext<*> -> manager.addView(view, null) // 如果是AnkoContext直接调用AnkoContextImpl的addView
4     else -> throw AnkoException("$manager is the wrong parent")
5 }
AnkoContextImpl
 1 open class AnkoContextImpl<T>(
 2         override val ctx: Context,
 3         override val owner: T,
 4         private val setContentView: Boolean
 5 ) : AnkoContext<T> {
 6     private var myView: View? = null
 7
 8     override fun addView(view: View?, params: ViewGroup.LayoutParams?) {
 9         if (view == null) return
10
11         if (myView != null) {
12             alreadyHasView()
13         }
14
15         this.myView = view
16
17         if (setContentView) { // 上面传入的是true
18             doAddView(ctx, view)
19         }
20     }
21
22     private fun doAddView(context: Context, view: View) {
23         when (context) {
24             is Activity -> context.setContentView(view)  // 如果是activity,调用setContentView
25             is ContextWrapper -> doAddView(context.baseContext, view) // 调用addView
26             else -> throw IllegalStateException("Context is not an Activity, can't set content view")
27         }
28     }
29
30     open protected fun alreadyHasView(): Unit = throw IllegalStateException("View is already set: $myView")
31 }
lparams实现原理分析
示例代码
1 private fun @AnkoViewDslMarker _LinearLayout.test_include() {
2     include<View>(R.layout.layout_test01) {
3         backgroundColor = Color.LTGRAY
4     }.lparams(width = matchParent) {
5         margin = dip(12)
6     }
7 }
T.lparams
 1 inline fun <T: View> T.lparams(
 2         width: Int = android.view.ViewGroup.LayoutParams.WRAP_CONTENT,
 3         height: Int = android.view.ViewGroup.LayoutParams.WRAP_CONTENT,
 4         init: RelativeLayout.LayoutParams.() -> Unit
 5 ): T {
 6     val layoutParams = RelativeLayout.LayoutParams(width, height)
 7     layoutParams.init()
 8     this@lparams.layoutParams = layoutParams
 9     return this
10 }
Fragment之列表展示
Activity
1 class UIFragmentAct : AppCompatActivity() {
2
3     override fun onCreate(savedInstanceState: Bundle?) {
4         super.onCreate(savedInstanceState)
5         setContentView(R.layout.activity_uifragment)
6
7         supportFragmentManager.beginTransaction().replace(R.id.ll_root, MyFragment()).commit()
8     }
9 }
Fragment
 1 class MyFragment : Fragment() {
 2     var swipeLaout: SwipeRefreshLayout? = null
 3     var recView: RecyclerView? = null
 4     var dataList: ArrayList<String>? = null
 5     var ctx: Context? = null
 6
 7     override fun onAttach(context: Context?) {
 8         super.onAttach(context)
 9         ctx = context
10     }
11
12     override fun onCreateView(inflater: LayoutInflater, container: ViewGroup?, savedInstanceState: Bundle?): View? {
13         return createView()
14     }
15
16     private fun createView(): View {
17         return UI {
18             frameLayout {
19                 swipeLaout = swipeRefreshLayout {
20                     setColorSchemeResources(android.R.color.holo_blue_bright)
21                     setOnRefreshListener {
22                         getData()
23                         swipeLaout?.isRefreshing = false
24                     }
25
26                     recView = recyclerView {
27                         layoutManager = LinearLayoutManager(context)
28                         backgroundColor = Color.parseColor("#f3f3f3")
29                     }
30                 }.lparams(width = matchParent, height = matchParent)
31
32             }
33         }.view
34     }
35
36     override fun onActivityCreated(savedInstanceState: Bundle?) {
37         super.onActivityCreated(savedInstanceState)
38         getData()
39         recView?.adapter = ListItemAdapter(ctx!!, dataList)
40     }
41
42     private fun getData() {
43         dataList = ArrayList<String>()
44         dataList?.add("test01")
45         dataList?.add("test02")
46         dataList?.add("test03")
47         dataList?.add("test04")
48         dataList?.add("test05")
49         dataList?.add("test06")
50         dataList?.add("test07")
51         dataList?.add("test08")
52     }
53 }
Adapter
 1 class ListItemAdapter(var context: Context, var dataList: ArrayList<String>?) :
 2     RecyclerView.Adapter<ListItemAdapter.ViewHolder>() {
 3     var inflater: LayoutInflater = LayoutInflater.from(context)
 4
 5     override fun onCreateViewHolder(parent: ViewGroup, viewType: Int): ListItemAdapter.ViewHolder {
 6         // 老方式
 7 //        val itemView = inflater.inflate(R.layout.layout_test_list_item, parent, false)
 8         // 新方式创建ViewHolder
 9         return ViewHolder(createItemView(context))
10     }
11
12     private fun createItemView(context: Context): View {
13         return with(context) {
14             linearLayout {
15                 lparams(width = matchParent, height = dip(100)) {
16                     bottomMargin = dip(5)
17                 }
18                 cardView {
19                     linearLayout {
20                         gravity = Gravity.CENTER_VERTICAL
21                         imageView(R.mipmap.ic_launcher_round)
22                             .lparams(width = dip(65), height = dip(65)) {
23                                 leftMargin = dip(10)
24                             }
25
26                         textView {
27                             id = R.id.tv_title
28                             textSize = dip(18).toFloat()
29                             textColor = Color.BLUE
30                         }.lparams(width = matchParent, height = wrapContent) {
31                             leftMargin = dip(10)
32                             rightMargin = dip(10)
33                         }
34                     }
35
36                 }.lparams(width = matchParent, height = matchParent) {
37                     padding = dip(5)
38                 }
39             }
40         }
41     }
42
43     override fun getItemCount(): Int {
44         return dataList?.size ?: 0
45     }
46
47     override fun onBindViewHolder(holder: ListItemAdapter.ViewHolder, position: Int) {
48         if (dataList != null) {
49             val txt = dataList?.get(position)
50             holder.tvTitle.text = txt
51             holder.itemView.onClick {
52                 context.toast("点击了: $txt")
53             }
54         }
55     }
56
57     inner class ViewHolder(itemView: View) : RecyclerView.ViewHolder(itemView) {
58         var tvTitle: TextView = itemView.findViewById(R.id.tv_title)
59     }
60 }
界面效果

异步任务及界面刷新
1 async { // 在表达式中执行异步任务
2     println("ThreadId = ${Thread.currentThread().id}")
3     Thread.sleep(500)
4     uiThread { // 任务回调到ui线程
5         println("ThreadId = ${Thread.currentThread().id}")
6         tvResult?.text = "www.baidu.com"
7     }
8 }

 浙公网安备 33010602011771号