
DRBD
Distributed Replicated Block Device(分布式复制块设备)
教材书:linux企业集群
heartbeat-ldirectord
生成规则
健康状态检查
lvs
corosync + ldirectord
keepalived + ipvs
Server: rsync + inotify
Client: rsync, sersync
DAS: 直接附加存储,块级别存储设备;
NAS: 网络附加存储;
SAN: 直接将传输网络模拟成scsi总线;
scsi: Initiator, target
分布式复制块设备:DRBD
RAID 1: mirror镜像卷;
drbd内核功能
DRBD:
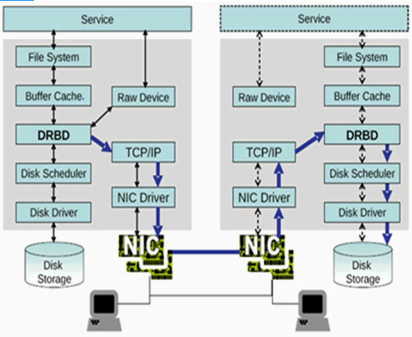
DRBD: 主从
primary: 可执行读、写操作
secondary: 文件系统不能挂载
A: primay
B: secondary
DRBD: dual primay, 双主
DLM: Distributed Lock Manager 分布式锁管理器
GFS2/OCFS2
DRBD仅允许两个节点;
磁盘雕塑器(Disk Scheduler):合并读请求,合并写请求,节约寻道;
Procotol:
A Async, 异步
B semi sync, 半同步
C sync, 同步
DRBD Source: DRBD资源
资源名称:可以是除了空白字符外的任意ACSII码字符;
DRBD设备:在双方节点上,此DRBD设备的设备文件,一般为/dev/drbdN,其主设备号147;
磁盘:在双方节点上,各自提供的存储设备;
网络配置:双方数据同步时所使用的网络属性;
Resources
the collective term that refers to all aspects of a particular replicated storage device
Include
Resource name(资源名称)
This can be any arbitrary,US-ASCII name not containing whitespace by which the resource is referred to(可以是任何字符,但是只能是纯ASCII码字符,不能包含空白字符)
DRBD device(DRBD设备)
This is the virutal blkck device managed by DRBD
It has a device major number of 147,and its minor numbers are numbered from 0 onwards, as is custamary
The associated block device is always named /dev/drbdn, where n is the device minor number
Disk configuration(磁盘配置)
This entails the local copy of the data, and meta data for DRBD's internal use
Network configuration(网络配置)
This entails all aspects of DRBD's commnication with the peer node
User space administration tools
drbdadm(比较接近用户管理工具)
The high-level administration tool of the DRBD program suite
It obtains all DRBD configuration parameters from the configuration file /etc/drbd.conf(/etc/drbd.d/)
drbdsetup(操作数据块)
The program that allows users to configure the DRBD module that has been loaded into the running kernel
It is the low-level tool within the DRBD program suite
drbdmeta(操作DRBD元数据)
The program which allows users to create,dump,restore,and modify DRBD's meta data structures
DRBD官网:http://www.linbit.com/
drbd: 2.6.33起,整合进内核
for I in {1..2}; do ssh node$I 'wget ftp://172.16.0.1/pub/Sources/drbd/a.rpm'; done
资源相关配置
mydrbd
/dev/drbd0
/dev/sda5
brbd的配置文件:
/etc/drbd.conf(主配置文件)
/etc/drbd.d/global_common.conf
/etc/drbd.d/resource.d/ (资源定义)
前提:
1)本配置共有两个测试节点,分别node1.magedu.com和node2.magedu.com,相的IP地址分别为172.16.100.11和172.16.100.12;
2)node1和node2两个节点上各提供了一个大小相同的分区作为drbd设备;我们这里为在两个节点上均为/dev/sda5,大小为512M;
3)系统为rhel5.8,x86平台;
1、准备工作
两个节点的主机名称和对应的IP地址解析服务可以正常工作,且每个节点的主机名称需要跟"uname -n“命令的结果保持一致;因此,需要保证两个节点上的/etc/hosts文件均为下面的内容:
172.16.100.11 node1.magedu.com node1
172.16.100.12 node2.magedu.com node2
为了使得重新启动系统后仍能保持如上的主机名称,还分别需要在各节点执行类似如下的命令:
Node1:
# sed -i 's@\(HOSTNAME=\).*@\1node1.magedu.com@g'
# hostname node1.magedu.com
Node2:
# sed -i 's@\(HOSTNAME=\).*@\1node2.magedu.com@g'
# hostname node2.magedu.com
2、安装软件包
drbd共有两部分组成:内核模块和用户空间的管理工具。其中drbd内核模块代码已经整合进Linux内核2.6.33以后的版本中,因此,如果您的内核版本高于此版本的话,你只需要安装管理工具即可;否则,您需要同时安装内核模块和管理工具两个软件包,并且此两者的版本号一定要保持对应。
目前在用的drbd版本主要有8.0、8.2和8.3三个版本,其对应的rpm包的名字分别为drbd, drbd82和drbd83,对应的内核模块的名字分别为kmod-drbd, kmod-drbd82和kmod-drbd83。各版本的功能和配置等略有差异;我们实验所用的平台为x86且系统为rhel5.8,因此需要同时安装内核模块和管理工具。我们这里选用最新的8.3的版本(drbd83-8.3.8-1.el5.centos.i386.rpm和kmod-drbd83-8.3.8-1.el5.centos.i686.rpm),下载地址为:http://mirrors.sohu.com/centos/5.8/extras/i386/RPMS/。
实际使用中,您需要根据自己的系统平台等下载符合您需要的软件包版本,这里不提供各版本的下载地址。
下载完成后直接安装即可:
# yum -y --nogpgcheck localinstall drbd83-8.3.8-1.el5.centos.i386.rpm kmod-drbd83-8.3.8-1.el5.centos.i686.rpm
3、配置drbd
drbd的主配置文件为/etc/drbd.conf;为了管理的便捷性,目前通常会将些配置文件分成多个部分,且都保存至/etc/drbd.d目录中,主配置文件中仅使用"include"指令将这些配置文件片断整合起来。通常,/etc/drbd.d目录中的配置文件为global_common.conf和所有以.res结尾的文件。其中global_common.conf中主要定义global段和common段,而每一个.res的文件用于定义一个资源。
在配置文件中,global段仅能出现一次,且如果所有的配置信息都保存至同一个配置文件中而不分开为多个文件的话,global段必须位于配置文件的最开始处。目前global段中可以定义的参数仅有minor-count, dialog-refresh, disable-ip-verification和usage-count。
common段则用于定义被每一个资源默认继承的参数,可以在资源定义中使用的参数都可以在common段中定义。实际应用中,common段并非必须,但建议将多个资源共享的参数定义为common段中的参数以降低配置文件的复杂度。
resource段则用于定义drbd资源,每个资源通常定义在一个单独的位于/etc/drbd.d目录中的以.res结尾的文件中。资源在定义时必须为其命名,名字可以由非空白的ASCII字符组成。每一个资源段的定义中至少要包含两个host子段,以定义此资源关联至的节点,其它参数均可以从common段或drbd的默认中进行继承而无须定义。
下面的操作在node1.magedu.com上完成。
1)复制样例配置文件为即将使用的配置文件:
# cp /usr/share/doc/drbd83-8.3.8/drbd.conf /etc
2)配置/etc/drbd.d/global-common.conf
global {
usage-count no;
# minor-count dialog-refresh disable-ip-verification
}
common {
protocol C;
handlers {
pri-on-incon-degr "/usr/lib/drbd/notify-pri-on-incon-degr.sh; /usr/lib/drbd/notify-emergency-reboot.sh; echo b > /proc/sysrq-trigger ; reboot -f";
pri-lost-after-sb "/usr/lib/drbd/notify-pri-lost-after-sb.sh; /usr/lib/drbd/notify-emergency-reboot.sh; echo b > /proc/sysrq-trigger ; reboot -f";
local-io-error "/usr/lib/drbd/notify-io-error.sh; /usr/lib/drbd/notify-emergency-shutdown.sh; echo o > /proc/sysrq-trigger ; halt -f";
# fence-peer "/usr/lib/drbd/crm-fence-peer.sh";
# split-brain "/usr/lib/drbd/notify-split-brain.sh root";
# out-of-sync "/usr/lib/drbd/notify-out-of-sync.sh root";
# before-resync-target "/usr/lib/drbd/snapshot-resync-target-lvm.sh -p 15 -- -c 16k";
# after-resync-target /usr/lib/drbd/unsnapshot-resync-target-lvm.sh;
}
startup {
#wfc-timeout 120;
#degr-wfc-timeout 120;
}
disk {
on-io-error detach;(磁盘I/O发生故障怎么办,就拆掉)
#fencing resource-only;
}
net {
cram-hmac-alg "sha1";(验证算法)
shared-secret "mydrbdlab";(共享密钥,最好随机数)
}
syncer {
rate 1000M;(同步速率)
}
}
3、定义一个资源/etc/drbd.d/web.res,内容如下:
resource web {(定义资源resource关键字,web资源名,两个节点相同的内容可以放在resource全局当中)
on node1.magedu.com {(节点名称,必须要能使用名称解析方式解析节点,第一个节点配置,对于每一个节点即要知道自己的配置还要知道对方的配置)
device /dev/drbd0;(设备文件名)
disk /dev/sda5;(磁盘分区)
address 172.16.100.11:7789;(监听地址端口)
meta-disk internal;(drbd元数据放在什么地方,internal设备内部)
}
on node2.magedu.com {(第二个节点配置)
device /dev/drbd0;
disk /dev/sda5;
address 172.16.100.12:7789;
meta-disk internal;
}
}
以上文件在两个节点上必须相同,因此,可以基于ssh将刚才配置的文件全部同步至另外一个节点。
# scp /etc/drbd.* node2:/etc
4、在两个节点上初始化已定义的资源并启动服务:
1)初始化资源,在Node1和Node2上分别执行:
# drbdadm create-md web
2)启动服务,在Node1和Node2上分别执行:
/etc/init.d/drbd start
3)查看启动状态:
# cat /proc/drbd
version: 8.3.8 (api:88/proto:86-94)
GIT-hash: d78846e52224fd00562f7c225bcc25b2d422321d build by mockbuild@builder10.centos.org, 2010-06-04 08:04:16
0: cs:Connected ro:Secondary/Secondary ds:Inconsistent/Inconsistent C r----
ns:0 nr:0 dw:0 dr:0 al:0 bm:0 lo:0 pe:0 ua:0 ap:0 ep:1 wo:b oos:505964
也可以使用drbd-overview命令来查看:
# drbd-overview
0:web Connected Secondary/Secondary Inconsistent/Inconsistent C r----
从上面的信息中可以看出此时两个节点均处于Secondary状态。于是,我们接下来需要将其中一个节点设置为Primary。在要设置为Primary的节点上执行如下命令:
# drbdsetup /dev/drbd0 primary –o
注: 也可以在要设置为Primary的节点上使用如下命令来设置主节点:
# drbdadm -- --overwrite-data-of-peer primary web
而后再次查看状态,可以发现数据同步过程已经开始:
# drbd-overview
0:web SyncSource Primary/Secondary UpToDate/Inconsistent C r----
[============>.......] sync'ed: 66.2% (172140/505964)K delay_probe: 35
等数据同步完成以后再次查看状态,可以发现节点已经牌实时状态,且节点已经有了主次:
# drbd-overview
0:web Connected Primary/Secondary UpToDate/UpToDate C r----
5、创建文件系统
文件系统的挂载只能在Primary节点进行,因此,也只有在设置了主节点后才能对drbd设备进行格式化:
# mke2fs -j -L DRBD /dev/drbd0
# mkdir /mnt/drbd
# mount /dev/drbd0 /mnt/drbd
6、切换Primary和Secondary节点
对主Primary/Secondary模型的drbd服务来讲,在某个时刻只能有一个节点为Primary,因此,要切换两个节点的角色,只能在先将原有的Primary节点设置为Secondary后,才能原来的Secondary节点设置为Primary:
Node1:
# cp -r /etc/drbd.* /mnt/drbd
# umount /mnt/drbd
# drbdadm secondary web
查看状态:
# drbd-overview
0:web Connected Secondary/Secondary UpToDate/UpToDate C r----
Node2:
# drbdadm primary web
# drbd-overview
0:web Connected Primary/Secondary UpToDate/UpToDate C r----
# mkdir /mnt/drbd
# mount /dev/drbd0 /mnt/drbd
使用下面的命令查看在此前在主节点上复制至此设备的文件是否存在:
# ls /mnt/drbd
drbd 8.4中第一次设置某节点成为主节点的命令
# drbdadm primary --force resource
配置资源双主模型的示例:
resource mydrbd {
net {
protocol C;
allow-two-primaries yes;
}
startup {
become-primary-on both;
}
disk {
fencing resource-and-stonith;
}
handlers {
# Make sure the other node is confirmed
# dead after this!
outdate-peer "/sbin/kill-other-node.sh";
}
on node1.magedu.com {
device /dev/drbd0;
disk /dev/vg0/mydrbd;
address 172.16.200.11:7789;
meta-disk internal;
}
on node2.magedu.com {
device /dev/drbd0;
disk /dev/vg0/mydrbd;
address 172.16.200.12:7789;
meta-disk internal;
}
}
环境:1、时间同步,2、SSH互信通信,3、主机名称
[root@node1 ~]# uname -r(查看内核版本)
2.6.18-308.el5
HA1:
[root@node1 ~]# date(查看系统时间)
Fri Apr 22 09:59:27 CST 2016
HA2:
[root@node2 ~]# date(查看系统时间)
2016年 04月 22日 星期五 09:59:28 CST
跳板机:
[root@nfs ~]# ssh node1 'date'(查看node1主机系统时间)
root@node1's password:
2016年 04月 22日 星期五 10:08:32 CST
[root@nfs ~]# ssh node2 'date'(查看node2主机系统时间)
root@node2's password:
2016年 04月 22日 星期五 10:09:05 CST
[root@nfs ~]# ssh-keygen -t rsa -P ''(生产一对密钥,-t指定加密算法类型rsa或dsa,-P指定密码)
Generating public/private rsa key pair.
Enter file in which to save the key (/root/.ssh/id_rsa):
Your identification has been saved in /root/.ssh/id_rsa.
Your public key has been saved in /root/.ssh/id_rsa.pub.
The key fingerprint is:
73:d0:4d:5d:be:06:88:12:f9:35:37:4a:57:22:9b:3c root@nfs.magedu.com
[root@nfs ~]# ssh-copy-id -i .ssh/id_rsa.pub root@node1(通过ssh-copy-id将.ssh/id_rsa.pub公钥复制到远程主机node1,以root用户登录,-i指定公钥文件)
15
root@node1's password:
Now try logging into the machine, with "ssh 'root@node1'", and check in:

  .ssh/authorized_keys

to make sure we haven't added extra keys that you weren't expecting.

[root@nfs ~]# ssh-copy-id -i .ssh/id_rsa.pub root@node2(通过ssh-copy-id将.ssh/id_rsa.pub公钥复制到远程主机node2,以root用户登录,-i指定公钥文件)
15
root@node2's password:
Now try logging into the machine, with "ssh 'root@node2'", and check in:

  .ssh/authorized_keys

to make sure we haven't added extra keys that you weren't expecting.
[root@nfs ~]# ssh node1 'date'(查看node1主机系统时间)
2016年 04月 22日 星期五 10:15:14 CST
[root@nfs ~]# ssh node2 'date'(查看node2主机系统时间)
2016年 04月 22日 星期五 10:15:19 CST
[root@nfs ~]# lftps(连接ftp服务器)
cd ok, cwd=/pub/Sources
lftp 172.16.0.1:/pub/Sources> cd drbd/
lftp 172.16.0.1:/pub/Sources/drbd> mget kmod-drbd83-8.3.15-3.el5.centos.i686.rpm drbd83-8.3.15-el5.centos.i386.rpm(下载多个文件kmod-drbd83-8.3.
15和drbd83-8.3.15)
388032 bytes transferred
Total 2 files transferred
lftp 172.16.0.1:/pub/Sources/drbd> bye(退出)
[root@nfs ~]# ls(查看当前目录文件及子目录)
anaconda-ks.cfg  drbd83-8.3.15-2.el5.centos.i386.rpm  install.log  install.log.syslog  kmod-drbd83-8.3.15-3.el5.centos.i686.rpm
[root@nfs ~]# for I in {1..2}; do scp *.rpm node$I:/root/; done(for循环,复制以rpm结尾的文件到node$I的/root目录,$I取值为1或者2)
drbd83-8.3.15-2.el5.centos.i386.rpm                                                                            100%  238KB 237.6KB/s   00:00
kmod-drbd83-8.3.15-3.el5.centos.i686.rpm                                                                       100%  141KB 141.4KB/s   00:00
drbd83-8.3.15-2.el5.centos.i386.rpm                                                                            100%  238KB 237.6KB/s   00:00
kmod-drbd83-8.3.15-3.el5.centos.i686.rpm                                                                       100%  141KB 141.4KB/s   00:00
[root@nfs ~]# for I in {1..2}; do ssh node$I 'yum -y --nogpgcheck localinstall *drbd*.rpm'; done(for循环,安装本地rpm软件*drbd*.rpm,-y所有询问回答
yes,--nogpgcheck不做gpg校验,$I取值1或2)
HA1:
[root@node1 ~]# rpm -ql drbd83(查看drbd83安装生成那些文件)
/etc/bash_completion.d/drbdadm
/etc/drbd.conf(配置文件)
/etc/drbd.d/global_common.conf
/etc/ha.d/resource.d/drbddisk(资源)
/etc/ha.d/resource.d/drbdupper
/etc/rc.d/init.d/drbd(服务脚本)
/etc/udev/rules.d/65-drbd.rules
/etc/xen/scripts/block-drbd
/sbin/drbdadm
/sbin/drbdmeta
/sbin/drbdsetup
/usr/lib/drbd/crm-fence-peer.sh
/usr/lib/drbd/crm-unfence-peer.sh
/usr/lib/drbd/notify-emergency-reboot.sh
/usr/lib/drbd/notify-emergency-shutdown.sh
/usr/lib/drbd/notify-io-error.sh
/usr/lib/drbd/notify-out-of-sync.sh
/usr/lib/drbd/notify-pri-lost-after-sb.sh
/usr/lib/drbd/notify-pri-lost.sh
/usr/lib/drbd/notify-pri-on-incon-degr.sh
/usr/lib/drbd/notify-split-brain.sh
/usr/lib/drbd/notify.sh
/usr/lib/drbd/outdate-peer.sh
/usr/lib/drbd/rhcs_fence
/usr/lib/drbd/snapshot-resync-target-lvm.sh
/usr/lib/drbd/stonith_admin-fence-peer.sh
/usr/lib/drbd/unsnapshot-resync-target-lvm.sh
/usr/lib/ocf/resource.d/linbit/drbd
/usr/sbin/drbd-overview(drbd简要信息)
/usr/share/cluster/drbd.metadata
/usr/share/cluster/drbd.sh
/usr/share/doc/drbd83-8.3.15
/usr/share/doc/drbd83-8.3.15/COPYING
/usr/share/doc/drbd83-8.3.15/ChangeLog
/usr/share/doc/drbd83-8.3.15/README
/usr/share/doc/drbd83-8.3.15/drbd.conf
/usr/share/doc/drbd83-8.3.15/file.list
/usr/share/man/man5/drbd.conf.5.gz
/usr/share/man/man8/drbd.8.gz
/usr/share/man/man8/drbdadm.8.gz
/usr/share/man/man8/drbddisk.8.gz
/usr/share/man/man8/drbdmeta.8.gz
/usr/share/man/man8/drbdsetup.8.gz
/var/lib/drbd
规划:假设两个主机上各自做一个磁盘分区,因为每一位都需要通过网络同步,要做两个分区磁盘有50G的话,同步一小时都同步不完,这里只提供1G左右,让两个1G的分区各自作为DRBD设备,然后演示是否在一个节点存储数据,另外一个节点都能得到一份;
HA1:
[root@node1 ~]# fdisk /dev/sda(管理磁盘,进入交互模式)

The number of cylinders for this disk is set to 6527.
There is nothing wrong with that, but this is larger than 1024,
and could in certain setups cause problems with:
1) software that runs at boot time (e.g., old versions of LILO)
2) booting and partitioning software from other OSs
   (e.g., DOS FDISK, OS/2 FDISK)

Command (m for help): p

Disk /dev/sda: 53.6 GB, 53687091200 bytes
255 heads, 63 sectors/track, 6527 cylinders
Units = cylinders of 16065 * 512 = 8225280 bytes

   Device Boot      Start         End      Blocks   Id  System
/dev/sda1   *           1          13      104391   83  Linux
/dev/sda2              14        2624    20972857+  83  Linux
/dev/sda3            2625        2755     1052257+  82  Linux swap / Solaris

Command (m for help): n(创建一个分区)
Command action
   e   extended
   p   primary partition (1-4)
e(扩展分区)
Selected partition 4(分区号)
First cylinder (2756-6527, default 2756):
Last cylinder or +size or +sizeM or +sizeK (2756-6527, default 6527):
Using default value 6527

Command (m for help): n(创建分区)
First cylinder (2756-6527, default 2756):
Using default value 2756
Last cylinder or +size or +sizeM or +sizeK (2756-6527, default 6527): +1G(创建1G分区)

Command (m for help): w(保存退出)
The partition table has been altered!

Calling ioctl() to re-read partition table.

WARNING: Re-reading the partition table failed with error 16: Device or resource busy.
The kernel still uses the old table.
The new table will be used at the next reboot.
Syncing disks.

[root@node1 ~]# partprobe /dev/sda(让内核重新加载sda分区表)
HA2:
[root@node2 ~]# fdisk /dev/sda

The number of cylinders for this disk is set to 6527.
There is nothing wrong with that, but this is larger than 1024,
and could in certain setups cause problems with:
1) software that runs at boot time (e.g., old versions of LILO)
2) booting and partitioning software from other OSs
   (e.g., DOS FDISK, OS/2 FDISK)

Command (m for help): n(创建分区)
Command action
   e   extended
   p   primary partition (1-4)
e(扩展分区)
Selected partition 4
First cylinder (2756-6527, default 2756):
Using default value 2756
Last cylinder or +size or +sizeM or +sizeK (2756-6527, default 6527):
Using default value 6527

Command (m for help): n(创建分区)
First cylinder (2756-6527, default 2756):
Using default value 2756
Last cylinder or +size or +sizeM or +sizeK (2756-6527, default 6527): +1G(创建1G分区)

Command (m for help): w(保存退出)
The partition table has been altered!

Calling ioctl() to re-read partition table.

WARNING: Re-reading the partition table failed with error 16: 设备或资源忙.
The kernel still uses the old table.
The new table will be used at the next reboot.
Syncing disks.

[root@node2 ~]# partprobe /dev/sda(让内核重新加载sda分区表)
[root@node2 ~]# cat /etc/drbd.conf(查看drbd.conf配置文件)
#
# please have a a look at the example configuration file in
# /usr/share/doc/drbd83/drbd.conf
#

提示:默认情况下什么内容都没有;
HA1:
[root@node1 ~]# ls /usr/share/doc/drbd83-8.3.15/(查看/usr/share/doc/drbd83-8.3.15目录文件及子目录)
ChangeLog  COPYING  drbd.conf  file.list  README
提示:drbd.conf是样例配置文件;
[root@node1 ~]# cat /usr/share/doc/drbd83-8.3.15/drbd.conf(查看drbd.conf文件内容)
# You can find an example in  /usr/share/doc/drbd.../drbd.conf.example

include "drbd.d/global_common.conf";
include "drbd.d/*.res";
[root@node1 ~]# cp /usr/share/doc/drbd83-8.3.15/drbd.conf /etc/drbd.conf(复制drbd.conf到/etc/drbd.conf,覆盖)
cp: overwrite `/etc/drbd.conf'? y
[root@node1 ~]# cd /etc/drbd.d/(切换到/etc/drbd.d目录)
[root@node1 drbd.d]# ls(查看当前目录文件及子目录)
global_common.conf
[root@node1 drbd.d]# cat global_common.conf(查看global_common.conf配置文件内容)
global {(全局配置)
	usage-count yes;(如果当前主机连接到互联网上去了,它会自动发信息给原作者告诉有人用了drbd,官方做信息统计)
	# minor-count dialog-refresh disable-ip-verification
}

common {(定义通用资源通用属性,默认属性)
	protocol C;(C同步)

	handlers {(处理器)
		# These are EXAMPLE handlers only.
		# They may have severe implications,
		# like hard resetting the node under certain circumstances.
		# Be careful when chosing your poison.

		# pri-on-incon-degr "/usr/lib/drbd/notify-pri-on-incon-degr.sh; /usr/lib/drbd/notify-emergency-reboot.sh; echo b > /proc/sysrq
-trigger ; reboot -f";
		# pri-lost-after-sb "/usr/lib/drbd/notify-pri-lost-after-sb.sh; /usr/lib/drbd/notify-emergency-reboot.sh; echo b > /proc/sysrq
-trigger ; reboot -f";
		# local-io-error "/usr/lib/drbd/notify-io-error.sh; /usr/lib/drbd/notify-emergency-shutdown.sh; echo o > /proc/sysrq-trigger ;
 halt -f";(本地I/O发生错误怎么处理)
		# fence-peer "/usr/lib/drbd/crm-fence-peer.sh";
		# split-brain "/usr/lib/drbd/notify-split-brain.sh root";(脑列怎么处理)
		# out-of-sync "/usr/lib/drbd/notify-out-of-sync.sh root";
		# before-resync-target "/usr/lib/drbd/snapshot-resync-target-lvm.sh -p 15 -- -c 16k";
		# after-resync-target /usr/lib/drbd/unsnapshot-resync-target-lvm.sh;
	}

	startup {(DRBD启动设备如何同步)
		# wfc-timeout(等待时间) degr-wfc-timeout outdated-wfc-timeout wait-after-sb
	}

	disk {
		# on-io-error fencing use-bmbv no-disk-barrier no-disk-flushes
		# no-disk-drain no-md-flushes max-bio-bvecs
	}

	net {(网络)
		# sndbuf-size(发送缓冲) rcvbuf-size(接收缓冲) timeout(超时时间) connect-int(连接初始化) ping-int(ping初始化) ping-timeout
(ping超时) max-buffers(最大缓冲)
		# max-epoch-size ko-count allow-two-primaries cram-hmac-alg shared-secret
		# after-sb-0pri after-sb-1pri after-sb-2pri data-integrity-alg no-tcp-cork
	}

	syncer {(定义速率)
		# rate after al-extents use-rle cpu-mask verify-alg csums-alg
	}
}

[root@node1 drbd.d]# vim global_common.conf(编辑global_common.conf配置文件)

global {
        usage-count yes;
        # minor-count dialog-refresh disable-ip-verification
}

common {
        protocol C;

        handlers {
                # These are EXAMPLE handlers only.
                # They may have severe implications,
                # like hard resetting the node under certain circumstances.
                # Be careful when chosing your poison.

                 pri-on-incon-degr "/usr/lib/drbd/notify-pri-on-incon-degr.sh; /usr/lib/drbd/notify-emergency-reboot.sh; echo b > /proc/sysrq
-trigger ; reboot -f";
                 pri-lost-after-sb "/usr/lib/drbd/notify-pri-lost-after-sb.sh; /usr/lib/drbd/notify-emergency-reboot.sh; echo b > /proc/sysrq
-trigger ; reboot -f";
                 local-io-error "/usr/lib/drbd/notify-io-error.sh; /usr/lib/drbd/notify-emergency-shutdown.sh; echo o > /proc/sysrq-trigger ;
 halt -f";
                # fence-peer "/usr/lib/drbd/crm-fence-peer.sh";
                # split-brain "/usr/lib/drbd/notify-split-brain.sh root";
                # out-of-sync "/usr/lib/drbd/notify-out-of-sync.sh root";
                # before-resync-target "/usr/lib/drbd/snapshot-resync-target-lvm.sh -p 15 -- -c 16k";
                # after-resync-target /usr/lib/drbd/unsnapshot-resync-target-lvm.sh;
        }

        startup {
                # wfc-timeout degr-wfc-timeout outdated-wfc-timeout wait-after-sb
        }

        disk {
                on-io-error detach;(i/o发生故障,拆除设备)
                # on-io-error fencing use-bmbv no-disk-barrier no-disk-flushes
                # no-disk-drain no-md-flushes max-bio-bvecs
        }

        net {
                # sndbuf-size rcvbuf-size timeout connect-int ping-int ping-timeout max-buffers
                # max-epoch-size ko-count allow-two-primaries cram-hmac-alg shared-secret
                # after-sb-0pri after-sb-1pri after-sb-2pri data-integrity-alg no-tcp-cork
                cram-hmac-alg "sha1";(认证算法)
                shared-secret "mydrbd7tj45";(密钥)
        }

        syncer {
                rate 200M;(速率)
                # rate after al-extents use-rle cpu-mask verify-alg csums-alg
        }
}

[root@node1 drbd.d]# man drbd.conf(查看drbd.conf的man帮助)
[root@node1 drbd.d]# ls(查看当前目录文件及子目录)
global_common.conf
[root@node1 drbd.d]# cat /etc/drbd.conf(查看drbd.conf配置文件内容)
# You can find an example in  /usr/share/doc/drbd.../drbd.conf.example

include "drbd.d/global_common.conf";
include "drbd.d/*.res";(以.res结尾的都是资源)
[root@node1 drbd.d]# vim mydrbd.res(编辑mydrbd.res文件)

resource mydrbd {
        device /dev/drbd0;
        disk /dev/sda5;
        meta-disk internal;
        on node1.magedu.com {
                address 172.16.100.6:7789;
        }
        on node2.magedu.com {
                address 172.16.100.7:7789;
        }
}

[root@node1 drbd.d]# cd(切换到用户家目录)
[root@node1 ~]# scp -r /etc/drbd.* node2:/etc/(复制/etc/drdb开头所有文件到node2主机的/etc目录,-r递归复制)
drbd.conf                                                                                      100%  133     0.1KB/s   00:00
mydrbd.res                                                                                     100%  188     0.2KB/s   00:00
global_common.conf                                                                             100% 1690     1.7KB/s   00:00
HA2:
[root@node2 ~]# cat /etc/drbd.conf(查看drbd.conf文件内容)
# You can find an example in  /usr/share/doc/drbd.../drbd.conf.example

include "drbd.d/global_common.conf";
include "drbd.d/*.res";
HA1:
[root@node1 ~]# drbdadm create-md mydrbd(初始化资源,mydrbd资源名称)

  --==  Thank you for participating in the global usage survey  ==--
The server's response is:

you are the 23214th user to install this version
Writing meta data...
initializing activity log
NOT initialized bitmap
New drbd meta data block successfully created.
HA2:
[root@node2 ~]# drbdadm create-md mydrbd(初始化资源,mydrbd资源名称)

  --==  Thank you for participating in the global usage survey  ==--
The server's response is:

Writing meta data...
initializing activity log
NOT initialized bitmap
New drbd meta data block successfully created.
HA1:
[root@node1 ~]# service drbd start(启动drbd服务)
Starting DRBD resources: [ d(mydrbd) s(mydrbd) n(mydrbd) ]..........
***************************************************************
 DRBD's startup script waits for the peer node(s) to appear.
 - In case this node was already a degraded cluster before the
   reboot the timeout is 0 seconds. [degr-wfc-timeout]
 - If the peer was available before the reboot the timeout will
   expire after 0 seconds. [wfc-timeout]
   (These values are for resource 'mydrbd'; 0 sec -> wait forever)
 To abort waiting enter 'yes' [  13]:
.
HA2:
[root@node2 ~]# service drbd start(启动drbd服务)
Starting DRBD resources: [ d(mydrbd) s(mydrbd) n(mydrbd) ].
HA1:
[root@node1 ~]# cat /proc/drbd(查看drbd同步过程)
version: 8.3.15 (api:88/proto:86-97)
GIT-hash: 0ce4d235fc02b5c53c1c52c53433d11a694eab8c build by mockbuild@builder17.centos.org, 2013-03-27 16:04:08
 0: cs:Connected ro:Secondary/Secondary ds:Inconsistent/Inconsistent C r-----
    ns:0 nr:0 dw:0 dr:0 al:0 bm:0 lo:0 pe:0 ua:0 ap:0 ep:1 wo:b oos:987896
提示:两个都处于secondary,Inconsistent非一致状态;
[root@node1 ~]# drbd-overview(查看drbd状态)
  0:mydrbd  Connected Secondary/Secondary Inconsistent/Inconsistent C r-----
[root@node1 ~]# drbdadm -- --overwrite-data-of-peer primary mydrbd(将当前节点设置为主的)
[root@node1 ~]# cat /proc/drbd(查看drbd同步过程)
version: 8.3.15 (api:88/proto:86-97)
GIT-hash: 0ce4d235fc02b5c53c1c52c53433d11a694eab8c build by mockbuild@builder17.centos.org, 2013-03-27 16:04:08
 0: cs:SyncSource ro:Primary/Secondary ds:UpToDate/Inconsistent C r---n-
    ns:891572 nr:0 dw:0 dr:899712 al:0 bm:54 lo:1 pe:23 ua:64 ap:0 ep:1 wo:b oos:99192
	[=================>..] sync'ed: 90.1% (99192/987896)K
	finish: 0:00:03 speed: 26,536 (26,928) K/sec
[root@node1 ~]# watch -n 1 'cat /proc/drbd'(循环执行cat /proc/drbd命令,-n指定显示时间)
[root@node1 ~]# drbd-overview(查看drbd状态)
  0:mydrbd  Connected Primary/Secondary UpToDate/UpToDate C r-----
提示:主/从状态,而且都已经更新了;
HA2:
[root@node2 ~]# service drbd start(查看drbd状态)
Starting DRBD resources: [ d(mydrbd) s(mydrbd) n(mydrbd) ].
[root@node2 ~]# drbd-overview
  0:mydrbd  Connected Secondary/Primary UpToDate/UpToDate C r-----
HA1:
[root@node1 ~]# mke2fs -j /dev/drbd0(格式化/dev/drbd0设备,-j格式化为带日志文件系统)
mke2fs 1.39 (29-May-2006)
Filesystem label=
OS type: Linux
Block size=4096 (log=2)
Fragment size=4096 (log=2)
123648 inodes, 246974 blocks
12348 blocks (5.00%) reserved for the super user
First data block=0
Maximum filesystem blocks=255852544
8 block groups
32768 blocks per group, 32768 fragments per group
15456 inodes per group
Superblock backups stored on blocks:
	32768, 98304, 163840, 229376

Writing inode tables: done
Creating journal (4096 blocks): done
Writing superblocks and filesystem accounting information: done

This filesystem will be automatically checked every 32 mounts or
180 days, whichever comes first.  Use tune2fs -c or -i to override.

提示:只能在主节点上格式化;
[root@node1 ~]# mkdir /mydata(创建目录/mydata)
[root@node1 ~]# mount /dev/drbd0 /mydata/(挂载drbd0到/mydata目录)
[root@node1 ~]# cd /mydata/(切换到/mydata目录)
[root@node1 mydata]# ls(查看当前目录文件及子目录)
lost+found
[root@node1 mydata]# cp /etc/inittab ./(复制inittab到当前目录)
[root@node1 mydata]# pwd(查看当前所处路径)
/mydata
[root@node1 mydata]# ls(查看当前目录文件及子目录)
inittab  lost+found
[root@node1 mydata]# cd(切换到用户家目录)
[root@node1 ~]# umount /mydata/(卸载/mydata目录挂载的文件系统)
[root@node1 ~]# drbdadm secondary mydrbd(将当前节点设置为从接单)
[root@node1 ~]# drbd-overview(查看drbd状态)
  0:mydrbd  Connected Secondary/Secondary UpToDate/UpToDate C r-----
HA2:
[root@node2 ~]# drbd-overview(查看drbd状态)
  0:mydrbd  Connected Secondary/Secondary UpToDate/UpToDate C r-----
[root@node2 ~]# drbdadm primary mydrbd(将当前节点设置为主的)
[root@node2 ~]# drbd-overview(查看drbd状态)
  0:mydrbd  Connected Primary/Secondary UpToDate/UpToDate C r-----
[root@node2 ~]# mkdir /mydata(创建/mydata目录)
[root@node2 ~]# mount /dev/drbd0 /mydata/(将drbd0挂载到/mydata目录)
[root@node2 ~]# cd /mydata/(切换到/mydata目录)
[root@node2 mydata]# ls(查看当前目录文件及子目录)
inittab  lost+found
[root@node2 mydata]# cat inittab(查看inittab文件内容)
#
# inittab       This file describes how the INIT process should set up
#               the system in a certain run-level.
#
# Author:       Miquel van Smoorenburg, <miquels@drinkel.nl.mugnet.org>
#               Modified for RHS Linux by Marc Ewing and Donnie Barnes
#

# Default runlevel. The runlevels used by RHS are:
#   0 - halt (Do NOT set initdefault to this)
#   1 - Single user mode
#   2 - Multiuser, without NFS (The same as 3, if you do not have networking)
#   3 - Full multiuser mode
#   4 - unused
#   5 - X11
#   6 - reboot (Do NOT set initdefault to this)
#
id:3:initdefault:

# System initialization.
si::sysinit:/etc/rc.d/rc.sysinit

l0:0:wait:/etc/rc.d/rc 0
l1:1:wait:/etc/rc.d/rc 1
l2:2:wait:/etc/rc.d/rc 2
l3:3:wait:/etc/rc.d/rc 3
l4:4:wait:/etc/rc.d/rc 4
l5:5:wait:/etc/rc.d/rc 5
l6:6:wait:/etc/rc.d/rc 6

# Trap CTRL-ALT-DELETE
ca::ctrlaltdel:/sbin/shutdown -t3 -r now

# When our UPS tells us power has failed, assume we have a few minutes
# of power left.  Schedule a shutdown for 2 minutes from now.
# This does, of course, assume you have powerd installed and your
# UPS connected and working correctly.
pf::powerfail:/sbin/shutdown -f -h +2 "Power Failure; System Shutting Down"

# If power was restored before the shutdown kicked in, cancel it.
pr:12345:powerokwait:/sbin/shutdown -c "Power Restored; Shutdown Cancelled"


# Run gettys in standard runlevels
1:2345:respawn:/sbin/mingetty tty1
2:2345:respawn:/sbin/mingetty tty2
3:2345:respawn:/sbin/mingetty tty3
4:2345:respawn:/sbin/mingetty tty4
5:2345:respawn:/sbin/mingetty tty5
6:2345:respawn:/sbin/mingetty tty6

# Run xdm in runlevel 5
x:5:respawn:/etc/X11/prefdm -nodaemon
drbd + corosync
clone-node-max:每个节点上最多运行多少资源
notify: 通知,当停止或者启动一个克隆资源的时候是不是通知其他的已经启动的克隆资源,默认true;
globally-unique:每一个克隆资源是不是必须具有全局唯一的,就是跟其他的克隆资源功能不一样,默认true;
mysqld + drbd + corosync
本文系统作者原创,任何转载必须经过作者同意,否则将保留追究一切责任的权利。
前提:
1)本配置共有两个测试节点,分别node1.a.org和node2.a.org,相的IP地址分别为192.168.0.5和192.168.0.6;
2)node1和node2两个节点已经配置好了基于openais/corosync的集群;且node1和node2也已经配置好了Primary/Secondary模型的drbd设备/dev/drbd0,且对应的资源名称为web;如果您此处的配置有所不同,请确保后面的命令中使用到时与您的配置修改此些信息与您所需要的配置保持一致;
3)系统为rhel5.4,x86平台;
1、查看当前集群的配置信息,确保已经配置全局属性参数为两节点集群所适用:
# crm configure show
node node1.a.org
node node2.a.org
property $id="cib-bootstrap-options" \
dc-version="1.0.11-1554a83db0d3c3e546cfd3aaff6af1184f79ee87" \
cluster-infrastructure="openais" \
expected-quorum-votes="2" \
stonith-enabled="false" \
last-lrm-refresh="1308059765" \
no-quorum-policy="ignore"
在如上输出的信息中,请确保有stonith-enabled和no-quorum-policy出现且其值与如上输出信息中相同。否则,可以分别使用如下命令进行配置:
# crm configure property stonith-enabled=false
# crm configure property no-quorum-policy=ignore
2、将已经配置好的drbd设备/dev/drbd0定义为集群服务;
1)按照集群服务的要求,首先确保两个节点上的drbd服务已经停止,且不会随系统启动而自动启动:
# drbd-overview
0:web Unconfigured . . . .
# chkconfig drbd off
2)配置drbd为集群资源:
提供drbd的RA目前由OCF归类为linbit,其路径为/usr/lib/ocf/resource.d/linbit/drbd。我们可以使用如下命令来查看此RA及RA的meta信息:
# crm ra classes
heartbeat
lsb
ocf / heartbeat linbit pacemaker
stonith
# crm ra list ocf linbit
drbd
# crm ra info ocf:linbit:drbd
This resource agent manages a DRBD resource
as a master/slave resource. DRBD is a shared-nothing replicated storage
device. (ocf:linbit:drbd)
Master/Slave OCF Resource Agent for DRBD
Parameters (* denotes required, [] the default):
drbd_resource* (string): drbd resource name
The name of the drbd resource from the drbd.conf file.
drbdconf (string, [/etc/drbd.conf]): Path to drbd.conf
Full path to the drbd.conf file.
Operations' defaults (advisory minimum):
start timeout=240
promote timeout=90
demote timeout=90
notify timeout=90
stop timeout=100
monitor_Slave interval=20 timeout=20 start-delay=1m
monitor_Master interval=10 timeout=20 start-delay=1m
drbd需要同时运行在两个节点上,但只能有一个节点(primary/secondary模型)是Master,而另一个节点为Slave;因此,它是一种比较特殊的集群资源,其资源类型为多态(Multi-state)clone类型,即主机节点有Master和Slave之分,且要求服务刚启动时两个节点都处于slave状态。
[root@node1 ~]# crm
crm(live)# configure
crm(live)configure# primitive webdrbd ocf:linbit:drbd params drbd_resource=web op monitor role=Master interval=50s timeout=30s op monitor role=Slave interval=60s timeout=30s(定义primitive资源,webdrbd名字,op指定操作,如果是主节点监控间隔为50秒,超时时间为30秒,如果角色是slave,监控间隔为60秒,超时时间为30秒,这个时间只能大于它建议的时间而不能小于)
crm(live)configure# master MS_Webdrbd webdrbd meta master-max="1" master-node-max="1" clone-max="2" clone-node-max="1" notify="true"(master定义主从类型资源,MS_Webdrbd名称,webdrbd是那个主资源的克隆,master-max最多允许出现几个主资源,master-node-max主资源最多允许几个节点,clone-max克隆数,主从都是克隆资源, clone-node-max克隆节点为几个,其实就是从节点几个,notify="true"是否发生故障向管理员发起通知)
crm(live)configure# show webdrbd
primitive webdrbd ocf:linbit:drbd \
params drbd_resource="web" \
op monitor interval="15s"
crm(live)configure# show MS_Webdrbd
ms MS_Webdrbd webdrbd \
meta master-max="1" master-node-max="1" clone-max="2" clone-node-max="1" notify="true"
crm(live)configure# verify
crm(live)configure# commit
查看当前集群运行状态:
# crm status
============
Last updated: Fri Jun 17 06:24:03 2011
Stack: openais
Current DC: node2.a.org - partition with quorum
Version: 1.0.11-1554a83db0d3c3e546cfd3aaff6af1184f79ee87
2 Nodes configured, 2 expected votes
1 Resources configured.
============
Online: [ node2.a.org node1.a.org ]
Master/Slave Set: MS_Webdrbd
Masters: [ node2.a.org ]
Slaves: [ node1.a.org ]
由上面的信息可以看出此时的drbd服务的Primary节点为node2.a.org,Secondary节点为node1.a.org。当然,也可以在node2上使用如下命令验正当前主机是否已经成为web资源的Primary节点:
# drbdadm role web
Primary/Secondary
3)为Primary节点上的web资源创建自动挂载的集群服务
MS_Webdrbd的Master节点即为drbd服务web资源的Primary节点,此节点的设备/dev/drbd0可以挂载使用,且在某集群服务的应用当中也需要能够实现自动挂载。假设我们这里的web资源是为Web服务器集群提供网页文件的共享文件系统,其需要挂载至/www(此目录需要在两个节点都已经建立完成)目录。
此外,此自动挂载的集群资源需要运行于drbd服务的Master节点上,并且只能在drbd服务将某节点设置为Primary以后方可启动。因此,还需要为这两个资源建立排列约束和顺序约束。
# crm
crm(live)# configure
crm(live)configure# primitive WebFS ocf:heartbeat:Filesystem params device="/dev/drbd0" directory="/www" fstype="ext3"
crm(live)configure# colocation WebFS_on_MS_webdrbd inf: WebFS MS_Webdrbd:Master
crm(live)configure# order WebFS_after_MS_Webdrbd inf: MS_Webdrbd:promote WebFS:start
crm(live)configure# verify
crm(live)configure# commit
查看集群中资源的运行状态:
crm status
============
Last updated: Fri Jun 17 06:26:03 2011
Stack: openais
Current DC: node2.a.org - partition with quorum
Version: 1.0.11-1554a83db0d3c3e546cfd3aaff6af1184f79ee87
2 Nodes configured, 2 expected votes
2 Resources configured.
============
Online: [ node2.a.org node1.a.org ]
Master/Slave Set: MS_Webdrbd
Masters: [ node2.a.org ]
Slaves: [ node1.a.org ]
WebFS (ocf::heartbeat:Filesystem): Started node2.a.org
由上面的信息可以发现,此时WebFS运行的节点和drbd服务的Primary节点均为node2.a.org;我们在node2上复制一些文件至/www目录(挂载点),而后在故障故障转移后查看node1的/www目录下是否存在这些文件。
# cp /etc/rc./rc.sysinit /www
下面我们模拟node2节点故障,看此些资源可否正确转移至node1。
以下命令在Node2上执行:
# crm node standby
# crm status
============
Last updated: Fri Jun 17 06:27:03 2011
Stack: openais
Current DC: node2.a.org - partition with quorum
Version: 1.0.11-1554a83db0d3c3e546cfd3aaff6af1184f79ee87
2 Nodes configured, 2 expected votes
2 Resources configured.
============
Node node2.a.org: standby
Online: [ node1.a.org ]
Master/Slave Set: MS_Webdrbd
Masters: [ node1.a.org ]
Stopped: [ webdrbd:0 ]
WebFS (ocf::heartbeat:Filesystem): Started node1.a.org
由上面的信息可以推断出,node2已经转入standby模式,其drbd服务已经停止,但故障转移已经完成,所有资源已经正常转移至node1。
在node1可以看到在node2作为primary节点时产生的保存至/www目录中的数据,在node1上均存在一份拷贝。
让node2重新上线:
# crm node online
[root@node2 ~]# crm status
============
Last updated: Fri Jun 17 06:30:05 2011
Stack: openais
Current DC: node2.a.org - partition with quorum
Version: 1.0.11-1554a83db0d3c3e546cfd3aaff6af1184f79ee87
2 Nodes configured, 2 expected votes
2 Resources configured.
============
Online: [ node2.a.org node1.a.org ]
Master/Slave Set: MS_Webdrbd
Masters: [ node1.a.org ]
Slaves: [ node2.a.org ]
WebFS (ocf::heartbeat:Filesystem): Started node1.a.org
mysql+drbd+corosync
node node1.magedu.com
node node2.magedu.com
primitive mysqldrbd ocf:linbit:drbd \
params drbd_resource="mysqlres" \
op monitor interval="30s" role="Master" timeout="30s" \
op monitor interval="40s" role="Slave" timeout="30s" \
op start interval="0" timeout="240" \
op stop interval="0" timeout="100"
primitive mysqlfs ocf:heartbeat:Filesystem \
params device="/dev/drbd0" directory="/data/mydata" fstype="ext3" \
op start interval="0" timeout="60s" \
op stop interval="0" timeout="60s"
primitive mysqlserver lsb:mysqld
primitive mysqlvip ocf:heartbeat:IPaddr \
params ip="172.16.100.1"
ms ms_mysqldrbd mysqldrbd \
meta master-max="1" master-node-max="1" clone-max="2" clone-node-max="1" notify="true"
colocation mysqlfs_with_ms_mysqldrbd inf: mysqlfs ms_mysqldrbd:Master
colocation mysqlserver_with_mysqlfs inf: mysqlfs mysqlserver
colocation mysqlvip_with_mysqlserver inf: mysqlvip mysqlserver
order mysqlfs_after_ms_mysqldrbd inf: ms_mysqldrbd:promote mysqlfs:start
order mysqlserver_after_mysqlfs inf: mysqlfs mysqlserver
property $id="cib-bootstrap-options" \
dc-version="1.1.5-1.1.el5-01e86afaaa6d4a8c4836f68df80ababd6ca3902f" \
cluster-infrastructure="openais" \
expected-quorum-votes="2" \
stonith-enabled="false" \
no-quorum-policy="ignore"
版本2:
crm(live)# configure
crm(live)configure# SHOW
node node1.magedu.com \
attributes standby="off"
node node2.magedu.com \
attributes standby="off"
primitive myip ocf:heartbeat:IPaddr \
params ip="172.16.100.1" nic="eth0" cidr_netmask="255.255.0.0"
primitive mysqld lsb:mysqld
primitive mysqldrbd ocf:heartbeat:drbd \
params drbd_resource="mydrbd" \
op start interval="0" timeout="240" \
op stop interval="0" timeout="100" \
op monitor interval="20" role="Master" timeout="30" \
op monitor interval="30" role="Slave" timeout="30"
primitive mystore ocf:heartbeat:Filesystem \
params device="/dev/drbd0" directory="/mydata" fstype="ext3" \
op start interval="0" timeout="60" \
op stop interval="0" timeout="60"
ms ms_mysqldrbd mysqldrbd \
meta master-max="1" master-node-max="1" clone-max="2" clone-node-max="1" notify="true"
colocation myip_with_ms_mysqldrbd inf: ms_mysqldrbd:Master myip
colocation mysqld_with_mystore inf: mysqld mystore
colocation mystore_with_ms_mysqldrbd inf: mystore ms_mysqldrbd:Master
order mysqld_after_mystore inf: mystore mysqld
order mystore_after_ms_mysqldrbd inf: ms_mysqldrbd:promote mystore:start
property $id="cib-bootstrap-options" \
dc-version="1.1.5-1.1.el5-01e86afaaa6d4a8c4836f68df80ababd6ca3902f" \
cluster-infrastructure="openais" \
expected-quorum-votes="2" \
stonith-enabled="false" \
no-quorum-policy="ignore" \
last-lrm-refresh="1368438416"
rsc_defaults $id="rsc-options" \
resource-stickiness="100"
使用双主模型:
一、设定资源启用双主模型
resource <resource> {
startup {
become-primary-on both;
...
}
net {
allow-two-primaries yes;
after-sb-0pri discard-zero-changes;
after-sb-1pri discard-secondary;
after-sb-2pri disconnect;
...
}
...
}
同时,包括双主drbd模型中的任何集群文件系统都需要fencing功能,且要求其不仅要在资源级别实现,也要在节点级别实现STONITH功能。
disk {
fencing resource-and-stonith;
}
handlers {
outdate-peer "/sbin/make-sure-the-other-node-is-confirmed-dead.sh"
}
二、使用GFS2文件系统
三、结合RHCS时的资源定义示例
<rm>
<resources />
<service autostart="1" name="mysql">
<drbd name="drbd-mysql" resource="mydrbd">
<fs device="/dev/drbd0"
mountpoint="/var/lib/mysql"
fstype="ext3"
name="mydrbd"
options="noatime"/>
</drbd>
<ip address="172.16.100.8" monitor_link="1"/>
<mysql config_file="/etc/my.cnf"
listen_address="172.16.100.8"
name="mysqld"/>
</service>
</rm>
多节点同时启动一个IP
node node1.magedu.com \
attributes standby="off"
node node2.magedu.com
node node3.magedu.com \
attributes standby="off"
primitive DLM ocf:pacemaker:controld \
params daemon="/usr/sbin/dlm_controld" \
op start interval="0" timeout="90" \
op stop interval="0" timeout="100"
primitive clusterip ocf:heartbeat:IPaddr2 \
params ip="172.16.200.7" cidr_netmask="32" clusterip_hash="sourceip"
clone WebIP clusterip \
meta globally-unique="true" clone-max="3" clone-node-max="3" target-role="Stopped"
clone dlm_clone DLM \
meta clone-max="3" clone-node-max="1" target-role="Started"
property $id="cib-bootstrap-options" \
dc-version="1.1.7-6.el6-148fccfd5985c5590cc601123c6c16e966b85d14" \
cluster-infrastructure="openais" \
expected-quorum-votes="3" \
stonith-enabled="false" \
last-lrm-refresh="1354024090"
HA2:
[root@node2 ~]# drbd-overview(查看drbd状态)
  0:mydrbd  Connected Primary/Secondary UpToDate/UpToDate C r----- /mydata ext3 950M 18M 885M 2%
提示:当前172.16.100.7为主节点;
[root@node2 ~]# umount /mydata/(卸载/mydata目录挂载的文件系统)
[root@node2 ~]# drbdadm secondary mydrbd(让当前节点成为备用节点)
[root@node2 ~]# drbd-overview(查看drbd状态)
  0:mydrbd  Connected Secondary/Secondary UpToDate/UpToDate C r-----
HA1:
[root@node1 ~]# service drbd stop(停止drbd服务)
Stopping all DRBD resources: .
HA2:
[root@node2 ~]# service drbd stop(停止drbd服务)
Stopping all DRBD resources: .
[root@node2 ~]# chkconfig --list drbd(查看drbd在相应系统级别开启启动情况)
drbd           	0:关闭	1:关闭	2:启用	3:启用	4:启用	5:启用	6:关闭
[root@node2 ~]# chkconfig drbd off(关闭drbd在相应系统级别开机自动启动)
HA1:
[root@node1 ~]# chkconfig drbd off(停止drbd在相应系统级别开机自动启动)
跳板机:
[root@nfs ~]# lftps(连接ftp服务器)
cd ok, cwd=/pub/Sources
lftp 172.16.0.1:/pub/Sources> cd corosync/(切换到corosync目录)
lftp 172.16.0.1:/pub/Sources> mget corosync-1.4.5-1.1.i386.rpm corosynclib-1.4.5-1.1.i386.rpm cluster-glue-* heartbeat-* pacemaker-*
resource-agents-1.0.4-1.1.el5.i386.rpm libesmtp-1.0.4-5.el5.i386.rpm(下载多个软件包)
3008416 bytes transferred
Total 11 files transferred
lftp 172.16.0.1:/pub/Sources/corosync> bye(退出)
[root@nfs ~]# ls(查看当前目录文件及子目录)
anaconda-ks.cfg                           corosynclib-1.2.7-1.1.el5.i386.rpm        install.log
pacemaker-1.1.5-1.1.el5.i386.rpm          cluster-glue-1.0.6-1.6.el5.i386.rpm       drbd83-8.3.15-2.el5.centos.i386.rpm
install.log.syslog                        pacemaker-cts-1.1.5-1.1.el5.i386.rpm      cluster-glue-libs-1.0.6-1.6.el5.i386.rpm
heartbeat-3.0.3-2.3.el5.i386.rpm          kmod-drbd83-8.3.15-3.el5.centos.i686.rpm  pacemaker-libs-1.1.5-1.1.el5.i386.rpm
corosync-1.2.7-1.1.el5.i386.rpm           heartbeat-libs-3.0.3-2.3.el5.i386.rpm     libesmtp-1.0.4-5.el5.i386.rpm
resource-agents-1.0.4-1.1.el5.i386.rpm
[root@nfs ~]# for I in {1..2}; do ssh node$I 'mkdir /root/corosync/'; scp *.rpm node$I:/root/corosync; ssh node$I 'yum -y --nogpgcheck
localinstall /root/corosync/*.rpm'; done(for循环,I取值为1到2,在node$I主机创建/root/corosync目录,并复制*.rpm到node$I:/root/corosync目录,并
且安装node$I主机本地/root/corosync目录所有rpm软件包)
HA1:
[root@node1 ~]# mkdri /var/log/cluster/(创建/var/log/cluster目录)
HA2:
[root@node2 ~]# mkdir /var/log/cluster/(创建/var/log/cluster目录)
HA1:
[root@node1 ~]# cd /etc/corosync/(切换到/etc/corosync目录)
[root@node1 corosync]# ls(查看当前目录文件及子目录)
corosync.conf.example  service.d  uidgid.d
[root@node1 corosync]# cp corosync.conf.example corosync.conf(复制corosync.conf.example为corosync.conf)
[root@node1 corosync]# vim corosync.conf(编辑corosync.conf配置文件)

        secauth: on

        threads: 2

        bindnetaddr: 172.16.100.0

        mcastaddr: 239.212.16.19

        mcastport: 5405

        to_syslog: no

        ttl: 1


service {
        ver: 0
        name: pacemaker
}

aisexec {
        user: root
        group: root
}

[root@node1 corosync]# corosync-keygen(生成密钥)
Corosync Cluster Engine Authentication key generator.
Gathering 1024 bits for key from /dev/random.
Press keys on your keyboard to generate entropy.
Writing corosync key to /etc/corosync/authkey.
[root@node1 corosync]# scp -p authkey corosync.conf node2:/etc/corosync/(复制authkey和corosync.conf到node2主机的/etc/corosync目录,-p保留文件属性)
authkey                                                                                                          100%  128     0.1KB/s   00:00
corosync.conf                                                                                                    100%  514
[root@node1 corosync]# service corosync start(启动corosync服务)
Starting Corosync Cluster Engine (corosync):               [  OK  ]
[root@node1 corosync]# ssh node2 'service corosync start'(启动node2主机的corosync服务)
Starting Corosync Cluster Engine (corosync): [  OK  ]
[root@node1 corosync]# cd(切换到用户家目录)
[root@node1 ~]# tail /var/log/cluster/corosync.log(查看corosync.log日志文件后10行)
Apr 22 13:32:08 node1.magedu.com crmd: [12464]: info: run_graph: ====================================================
Apr 22 13:32:08 node1.magedu.com crmd: [12464]: notice: run_graph: Transition 3 (Complete=0, Pending=0, Fired=0, Skipped=0, Incomplete=0, Sour
ce=/var/lib/pengine/pe-input-60.bz2): Complete
Apr 22 13:32:08 node1.magedu.com crmd: [12464]: info: te_graph_trigger: Transition 3 is now complete
Apr 22 13:32:08 node1.magedu.com crmd: [12464]: info: notify_crmd: Transition 3 status: done - <null>
Apr 22 13:32:08 node1.magedu.com crmd: [12464]: info: do_state_transition: State transition S_TRANSITION_ENGINE -> S_IDLE [ input=I_TE_SUCCESS
 cause=C_FSA_INTERNAL origin=notify_crmd ]
Apr 22 13:32:08 node1.magedu.com crmd: [12464]: info: do_state_transition: Starting PEngine Recheck Timer
Apr 22 13:32:08 node1.magedu.com attrd: [12462]: info: attrd_local_callback: Sending full refresh (origin=crmd)
Apr 22 13:32:08 node1.magedu.com attrd: [12462]: info: attrd_trigger_update: Sending flush op to all hosts for: probe_complete (true)
Apr 22 13:32:08 node1.magedu.com attrd: [12462]: info: attrd_trigger_update: Sending flush op to all hosts for: terminate (<null>)
Apr 22 13:32:08 node1.magedu.com attrd: [12462]: info: attrd_trigger_update: Sending flush op to all hosts for: shutdown (<null>)
[root@node1 ~]# crm status(查看集群状态)
============
Last updated: Fri Apr 22 13:35:58 2016
Stack: openais
Current DC: node1.magedu.com - partition with quorum
Version: 1.1.5-1.1.el5-01e86afaaa6d4a8c4836f68df80ababd6ca3902f
2 Nodes configured, 2 expected votes
0 Resources configured.
============

Online: [ node1.magedu.com node2.magedu.com ]
[root@node1 ~]# grep ERROR: /var/log/cluster/corosync.log(查看corosync.log文件ERROR:相关的段)
Apr 22 01:08:19 node1.magedu.com pengine: [32266]: ERROR: unpack_resources: Resource start-up disabled since no STONITH resources have been
defined
Apr 22 01:08:19 node1.magedu.com pengine: [32266]: ERROR: unpack_resources: Either configure some or disable STONITH with the stonith-enable
d option
Apr 22 01:08:19 node1.magedu.com pengine: [32266]: ERROR: unpack_resources: NOTE: Clusters with shared data need STONITH to ensure data inte
grity
[root@node1 ~]# grep -e "Corosync Cluster Engine" -e "configuration file" /var/log/cluster/corosync.log(查看corosync.log日志文件值包含字符串的段)
Apr 22 13:26:32 corosync [MAIN  ] Corosync Cluster Engine ('1.2.7'): started and ready to provide service.
Apr 22 13:26:32 corosync [MAIN  ] Successfully read main configuration file '/etc/corosync/corosync.conf'.
[root@node1 ~]# crm configure(进入crm的configure模式)
crm(live)configure# verify(检查配置文件)
Apr 22 01:08:19 node1.magedu.com pengine: [32266]: ERROR: unpack_resources: Resource start-up disabled since no STONITH resources have been
 defined
Apr 22 01:08:19 node1.magedu.com pengine: [32266]: ERROR: unpack_resources: Either configure some or disable STONITH with the stonith-enabled
 option
Apr 22 01:08:19 node1.magedu.com pengine: [32266]: ERROR: unpack_resources: NOTE: Clusters with shared data need STONITH to ensure data inte
grity
crm(live)configure# property(查看property所有的属性)
batch-limit=                  enable-acl=                   node-health-strategy=         shutdown-escalation=          stop-orphan-actions=
cluster-delay=                enable-startup-probes=        node-health-yellow=           start-failure-is-fatal=       stop-orphan-resources=
cluster-recheck-interval=     is-managed-default=           pe-error-series-max=          startup-fencing=              symmetric-cluster=
dc-deadtime=                  maintenance-mode=             pe-input-series-max=          stonith-action=
default-action-timeout=       no-quorum-policy=             pe-warn-series-max=           stonith-enabled=
default-resource-stickiness=  node-health-green=            placement-strategy=           stonith-timeout=
election-timeout=             node-health-red=              remove-after-stop=            stop-all-resources=
crm(live)configure# property stonith-enabled=false(关闭stonith设备检查)
crm(live)configure# verify(检查配置文件)
crm(live)configure# commit(提交)
crm(live)configure# property no-quorum-policy=ignore(当不具备法定票数忽略)
crm(live)configure# verify(检查配置文件语法)
crm(live)configure# commit(提交)
crm(live)configure# rsc_defaults(查看rsc_defaults属性)
allow-migrate=        failure-timeout=      is-managed=           multiple-active=      resource-stickiness=  target-role=
description=          interval-origin=      migration-threshold=  priority=             restart-type=
crm(live)configure# rsc_defaults resource-stickiness=100(修改默认资源粘性为100)
crm(live)configure# verify(检查配置)
crm(live)configure# commit(提交)
crm(live)configure# show(显示当前配置)
node node1.magedu.com
node node2.magedu.com
property $id="cib-bootstrap-options" \
	dc-version="1.1.5-1.1.el5-01e86afaaa6d4a8c4836f68df80ababd6ca3902f" \
	cluster-infrastructure="openais" \
	expected-quorum-votes="2" \
	stonith-enabled="false" \
	no-quorum-policy="ignore"
rsc_defaults $id="rsc-options" \
	resource-stickiness="100"
crm(live)configure# cd(切换到上级目录)
crm(live)# ra(进入ra模式)
crm(live)ra# providers drbd(查看drbd的提供者)
heartbeat linbit
crm(live)ra# classes(查看有那些类型资源)
heartbeat
lsb
ocf / heartbeat linbit pacemaker
stonith
crm(live)ra# meta ocf:heartbeat:drbd(查看ocf类型,heartbeat提供者,drbd资源的元数据)

Manages a DRBD resource (deprecated) (ocf:heartbeat:drbd)

Deprecation warning: This agent is deprecated and may be removed from
a future release. See the ocf:linbit:drbd resource agent for a
supported alternative. --
This resource agent manages a Distributed
Replicated Block Device (DRBD) object as a master/slave
resource. DRBD is a mechanism for replicating storage; please see the
documentation for setup details.

Parameters (* denotes required, [] the default):

drbd_resource* (string, [drbd0]): drbd resource name(drbd的资源是那个)
    The name of the drbd resource from the drbd.conf file.

drbdconf (string, [/etc/drbd.conf]): Path to drbd.conf(drbd的配置文件)
    Full path to the drbd.conf file.

clone_overrides_hostname (boolean, [no]): Override drbd hostname
    Whether or not to override the hostname with the clone number. This can
    be used to create floating peer configurations; drbd will be told to
    use node_<cloneno> as the hostname instead of the real uname,
    which can then be used in drbd.conf.

ignore_deprecation (boolean, [false]): Suppress deprecation warning
    If set to true, suppresses the deprecation warning for this agent.

Operations' defaults (advisory minimum):

    start         timeout=240
    promote       timeout=90
    demote        timeout=90
    notify        timeout=90
    stop          timeout=100
    monitor_Slave interval=20 timeout=20
    monitor_Master interval=10 timeout=20
(END)
crm(live)ra# meta ocf:linbit:drbd(查看ocf类型,linbit提供者,drbd资源的元数据)

Manages a DRBD device as a Master/Slave resource (ocf:linbit:drbd)

This resource agent manages a DRBD resource as a master/slave resource.
DRBD is a shared-nothing replicated storage device.
Note that you should configure resource level fencing in DRBD,
this cannot be done from this resource agent.
See the DRBD User's Guide for more information.
http://www.drbd.org/docs/applications/

Parameters (* denotes required, [] the default):

drbd_resource* (string): drbd resource name
    The name of the drbd resource from the drbd.conf file.

drbdconf (string, [/etc/drbd.conf]): Path to drbd.conf
    Full path to the drbd.conf file.

stop_outdates_secondary (boolean, [false]): outdate a secondary on stop
    Recommended setting: until pacemaker is fixed, leave at default (disabled).

    Note that this feature depends on the passed in information in
    OCF_RESKEY_CRM_meta_notify_master_uname to be correct, which unfortunately is
    not reliable for pacemaker versions up to at least 1.0.10 / 1.1.4.

    If a Secondary is stopped (unconfigured), it may be marked as outdated in the
    drbd meta data, if we know there is still a Primary running in the cluster.
    Note that this does not affect fencing policies set in drbd config,
    but is an additional safety feature of this resource agent only.
    You can enable this behaviour by setting the parameter to true.

    If this feature seems to not do what you expect, make sure you have defined
    fencing policies in the drbd configuration as well.

Operations' defaults (advisory minimum):(建议最小时间)

    start         timeout=240
    promote       timeout=90(把自己提升为某种模式,比如提升为主节点)
    demote        timeout=90(把当前要扮演的角色去了)
    notify        timeout=90(一旦发现主从节点切换了应该向管理员通知下,可能出故障了)
    stop          timeout=100
    monitor_Slave interval=20 timeout=20(监控从节点)
    monitor_Master interval=10 timeout=20(监控主节点)
(END)
crm(live)ra# cd(切换到上级目录)
crm(live)# configure(进入configure模式)
crm(live)configure# primitive mydrbd ocf:linbit:drbd params drbd_resource=mydrbd(创建主资源mydrbd,ocf类型,linbit提供者,drbd资源,params参数,
drbd_resource资源名称)
WARNING: mydrbd: default timeout 20s for start is smaller than the advised 240
WARNING: mydrbd: default timeout 20s for stop is smaller than the advised 100
提示:默认超时时间为20秒,太短了,而建议是240秒,默认停止时间为20秒,建议是100秒,如果不改这些时间默认会发起警告的;
crm(live)configure# cd(切换到上级目录)
There are changes pending. Do you want to commit them? n(不提交)
crm(live)# configure(进入configure模式)
crm(live)configure# show(查看集群配置)
node node1.magedu.com
node node2.magedu.com
property $id="cib-bootstrap-options" \
	dc-version="1.1.5-1.1.el5-01e86afaaa6d4a8c4836f68df80ababd6ca3902f" \
	cluster-infrastructure="openais" \
	expected-quorum-votes="2" \
	stonith-enabled="false" \
	no-quorum-policy="ignore"
rsc_defaults $id="rsc-options" \
	resource-stickiness="100"
crm(live)configure# primitive mydrbd ocf:linbit:drbd params drbd_resource=mydrbd op start timeout=240 op stop timeout=100 op monitor role=
Master interval=10s timeout=20s op monitor role=Slave interval=20s timeout=20(创建主资源mydrbd,ocf类型,linbit提供者,drbd资源,params参数,drdb
_resource资源,op操作,start启动超时时间240s,stop停止超时时间100秒,monitor监控,主节点间隔10s,超时时间20s,备用节点间隔20s,超时时间20s)
crm(live)configure# verify(检查配置)
提示:此前千万不要做提交,因为还要做主从类型;
crm(live)configure# help ms(查看ms命令帮助)

The `ms` command creates a master/slave resource type. It may contain a
single primitive resource or one group of resources.

Usage:
...............
        ms(主从资源) <name>(名称) <rsc>(把那个资源做成主从)
          [meta attr_list]
          [params attr_list]

        attr_list :: [$id=<id>] <attr>=<val> [<attr>=<val>...] | $id-ref=<id>
...............
Example:
...............
        ms disk1 drbd1 \
          meta notify=true(开启事件通知) globally-unique=false(是否全局唯一名称)
...............

.Note on `id-ref` usage
****************************
Instance or meta attributes (`params` and `meta`) may contain
a reference to another set of attributes. In that case, no other
attributes are allowed. Since attribute sets' ids, though they do
exist, are not shown in the `crm`, it is also possible to
reference an object instead of an attribute set. `crm` will
automatically replace such a reference with the right id:

...............
    crm(live)configure# primitive a2 www-2 meta $id-ref=a1
    crm(live)configure# show a2
    primitive a2 ocf:heartbeat:apache \
        meta $id-ref="a1-meta_attributes"
        [...]
...............
It is advisable to give meaningful names to attribute sets which
are going to be referenced.
****************************
(END)
crm(live)configure# ms ms_mydrbd mydrbd meta master-max=1 master-node-max=1 clone-max=2 clone-node-max=1(主从资源,名称ms_mydrbd,从mydrbd克隆,
meta元数据,master-max最多运行几个主的,master-node-max最多有几个主节点,clone-max最多几个克隆,clone-node-max一个节点最多克隆几个资源)
crm(live)configure# verify(检查配置)
crm(live)configure# commit(提交)
crm(live)configure# show(显示配置)
node node1.magedu.com
node node2.magedu.com
primitive mydrbd ocf:linbit:drbd \
        params drbd_resource="mydrbd" \
        op start interval="0" timeout="240" \
        op stop interval="0" timeout="100" \
        op monitor interval="10s" role="Master" timeout="20s" \
        op monitor interval="20s" role="Slave" timeout="20"
ms ms_mydrbd mydrbd \
        meta master-max="1" master-node-max="1" clone-max="2" clone-node-max="1"
property $id="cib-bootstrap-options" \
        dc-version="1.1.5-1.1.el5-01e86afaaa6d4a8c4836f68df80ababd6ca3902f" \
        cluster-infrastructure="openais" \
        expected-quorum-votes="2" \
        stonith-enabled="false" \
        no-quorum-policy="ignore"
rsc_defaults $id="rsc-options" \
        resource-stickiness="100"
(END)
crm(live)configure# cd(切换到上级目录)
crm(live)# status(查看节点状态)
============
Last updated: Fri Apr 22 14:56:41 2016
Stack: openais
Current DC: node1.magedu.com - partition with quorum
Version: 1.1.5-1.1.el5-01e86afaaa6d4a8c4836f68df80ababd6ca3902f
2 Nodes configured, 2 expected votes
1 Resources configured.
============

Online: [ node1.magedu.com node2.magedu.com ]

 Master/Slave Set: ms_mydrbd [mydrbd]
     mydrbd:0	(ocf::linbit:drbd):	Slave node1.magedu.com
     mydrbd:1	(ocf::linbit:drbd):	Slave node2.magedu.com

crm(live)# node(进入node模式)
crm(live)node# help(查看帮助)


Node management and status commands.


Available commands:

	status           show nodes' status
	show             show node
	standby          put node into standby
	online           set node online
	fence            fence node
	clearstate       Clear node state
	delete           delete node
	attribute        manage attributes
	utilization      manage utilization attributes
	status-attr      manage status attributes
	quit             exit the program
	help             show help
	end              go back one level
crm(live)node# online(设置节点上线)
crm(live)node# online node2.magedu.com(设置node2主机上线)
crm(live)node# status(显示节点状态)
<nodes>
  <node id="node1.magedu.com" type="normal" uname="node1.magedu.com">
    <instance_attributes id="nodes-node1.magedu.com">
      <nvpair id="nodes-node1.magedu.com-standby" name="standby" value="off"/>
    </instance_attributes>
  </node>
  <node id="node2.magedu.com" type="normal" uname="node2.magedu.com">
    <instance_attributes id="nodes-node2.magedu.com">
      <nvpair id="nodes-node2.magedu.com-standby" name="standby" value="off"/>
    </instance_attributes>
  </node>
</nodes>
crm(live)node# cd(切换到上级目录)
crm(live)# status(显示集群状态)
============
Last updated: Fri Apr 22 15:00:18 2016
Stack: openais
Current DC: node1.magedu.com - partition with quorum
Version: 1.1.5-1.1.el5-01e86afaaa6d4a8c4836f68df80ababd6ca3902f
2 Nodes configured, 2 expected votes
1 Resources configured.
============

Online: [ node1.magedu.com node2.magedu.com ]

 Master/Slave Set: ms_mydrbd [mydrbd]
     mydrbd:0	(ocf::linbit:drbd):	Slave node1.magedu.com
     mydrbd:1	(ocf::linbit:drbd):	Slave node2.magedu.com

crm(live)# exit(退出)
bye
[root@node1 ~]# crm status(查看集群状态)
============
Last updated: Fri Apr 22 15:02:08 2016
Stack: openais
Current DC: node1.magedu.com - partition with quorum
Version: 1.1.5-1.1.el5-01e86afaaa6d4a8c4836f68df80ababd6ca3902f
2 Nodes configured, 2 expected votes
1 Resources configured.
============

Online: [ node1.magedu.com node2.magedu.com ]

 Master/Slave Set: ms_mydrbd [mydrbd]
     mydrbd:0	(ocf::linbit:drbd):	Slave node1.magedu.com
     mydrbd:1	(ocf::linbit:drbd):	Slave node2.magedu.com

由于视频演示出现错误,节点离线状态,因此从新定义资源,使用crm configure edit删除原来定义资源:

[root@node1 ~]# crm(进入crm的shell)
crm(live)# configure(进入configure模式)
crm(live)configure# primitive mysqldrbd ocf:heartbeat:drbd params drbd_resource=mydrbd op start timeout=240 op stop timeout=100 op monitor
role=Master interval=20 timeout=30 op monitor role=Slave interval=30 timeout=30(定义主资源mysqldrbd,ocf类型,heartbeat提供者,drbd资源,params参
数,drbd_resource资源,op操作符,启动超时时间240,停止超时时间100,监控主节点时间间隔20秒,超时时间30秒,监控从节点时间间隔30秒,超时时间30秒)
crm(live)configure# ms ms_mysqldrbd mysqldrbd meta master-max=1 master-node-max=1 clone-max=2 clone-node-max=1 notify=true(ms主从资源名称mysq
ldrbd,克隆主资源mysqldrbd,meta元数据,master-max主资源1个,master-node-max主节点最多1个,克隆最多2个,每个节点最多克隆1个)
crm(live)configure# verify(检查配置)
crm(live)configure# commit(提交)
crm(live)configure# cd(切换到上级目录)
crm(live)# status(查看集群配置)
============
Last updated: Fri Apr 22 15:15:45 2016
Stack: openais
Current DC: node1.magedu.com - partition with quorum
Version: 1.1.5-1.1.el5-01e86afaaa6d4a8c4836f68df80ababd6ca3902f
2 Nodes configured, 2 expected votes
2 Resources configured.
============

Online: [ node1.magedu.com node2.magedu.com ]

 Master/Slave Set: ms_mydrbd [mydrbd]
     mydrbd:0	(ocf::linbit:drbd):	Slave node1.magedu.com
     Stopped: [ mydrbd:1 ]
 Master/Slave Set: ms_mysqldrbd [mysqldrbd]
     Masters: [ node1.magedu.com ]
     Slaves: [ node2.magedu.com ]

crm(live)# exit(退出)
bye
[root@node1 ~]# drbd-overview(查看集群状态)
  0:mydrbd  Connected Primary/Secondary UpToDate/UpToDate C r-----
HA2:
[root@node2 ~]# drbd-overview(查看集群状态)
  0:mydrbd  Connected Secondary/Primary UpToDate/UpToDate C r-----
HA1:
[root@node1 ~]# crm node standby(让当前节点称为备用节点)
[root@node1 ~]# crm status(查看集群状态)
============
Last updated: Fri Apr 22 15:19:54 2016
Stack: openais
Current DC: node1.magedu.com - partition with quorum
Version: 1.1.5-1.1.el5-01e86afaaa6d4a8c4836f68df80ababd6ca3902f
2 Nodes configured, 2 expected votes
2 Resources configured.
============

Node node1.magedu.com: standby
Online: [ node2.magedu.com ]

 Master/Slave Set: ms_mydrbd [mydrbd]
     mydrbd:0	(ocf::linbit:drbd):	Slave node1.magedu.com
     Stopped: [ mydrbd:1 ]
 Master/Slave Set: ms_mysqldrbd [mysqldrbd]
     Masters: [ node2.magedu.com ]
     Stopped: [ mysqldrbd:0 ]

[root@node1 ~]# crm node online(让当前节点上线)
[root@node1 ~]# crm status(查看集群状态)
============
Last updated: Fri Apr 22 15:50:22 2016
Stack: openais
Current DC: node1.magedu.com - partition with quorum
Version: 1.1.5-1.1.el5-01e86afaaa6d4a8c4836f68df80ababd6ca3902f
2 Nodes configured, 2 expected votes
2 Resources configured.
============

Online: [ node1.magedu.com node2.magedu.com ]

 Master/Slave Set: ms_mydrbd [mydrbd]
     mydrbd:0	(ocf::linbit:drbd):	Slave node1.magedu.com
     mydrbd:1	(ocf::linbit:drbd):	Slave node2.magedu.com
 Master/Slave Set: ms_mysqldrbd [mysqldrbd]
     Masters: [ node2.magedu.com ]
     Slaves: [ node1.magedu.com ]

[root@node1 ~]# drbd-overview(查看集群状态)
  0:mydrbd  Connected Secondary/Primary UpToDate/UpToDate C r-----

提示:要想使用drbd设备要挂载以后才能使用,现在它只完成角色切换了,能不能自动把drbd设备挂载到/mydata目录上,不能;
[root@node1 ~]# ls /mydata/(查看/mydata目录文件及子目录)
HA2:
[root@node2 ~]# ls /mydata/(查看mydata目录文件及子目录)
提示:把它定义为高可用的资源哪怕那它定义为主从,它最多只能保证主从角色的自动切换,它并不能保证能自动挂载这个文件系统,挂载以后才能使用,接下来还要定义资源Filesystem;
[root@node2 ~]# crm(进入crm的shell)
crm(live)# configure(进入configure模式)
crm(live)configure# primitive mystore ocf:heartbeat:Filesystem params device=/dev/drbd0 directory=/mydata fstype=ext3(定义基本资源mystore,资源
类型ocf,heartbeat提供商,Filesystem资源,params参数,设备为/dev/drbd0,挂载目录/mydata,文件系统类型ext3)
WARNING: mystore: default timeout 20s for start is smaller than the advised 60
WARNING: mystore: default timeout 20s for stop is smaller than the advised 60
警告:启动时间建议为60秒,停止为60秒,给的时间太少了;
crm(live)configure# edit(编辑CIB集群信息库)

node node1.magedu.com \
        attributes standby="off"
node node2.magedu.com \
        attributes standby="off"
primitive mysqldrbd ocf:heartbeat:drbd \
        params drbd_resource="mydrbd" \
        op start interval="0" timeout="240" \
        op stop interval="0" timeout="100" \
        op monitor interval="20" role="Master" timeout="30" \
        op monitor interval="30" role="Slave" timeout="30"
ms ms_mysqldrbd mysqldrbd \
        meta master-max="1" master-node-max="1" clone-max="2" clone-node-max="1" notify="true"
property $id="cib-bootstrap-options" \
        dc-version="1.1.5-1.1.el5-01e86afaaa6d4a8c4836f68df80ababd6ca3902f" \
        cluster-infrastructure="openais" \
        expected-quorum-votes="2" \
        stonith-enabled="false" \
        no-quorum-policy="ignore"
rsc_defaults $id="rsc-options" \
        resource-stickiness="100"
crm(live)configure# primitive mystore ocf:heartbeat:Filesystem params device=/dev/drbd0 directory=/mydata fstype=ext3 op start timeout=60 op
 stop timeout=60(定义基本资源mystore,资源类型ocf,heartbeat提供商,Filesystem资源,params参数,设备为/dev/drbd0,挂载目录/mydata,文件系统类型ext3,启动
超时时间60秒,停止超时时间60秒)
crm(live)configure# verify(检查配置)
提示:千万不能提交,Filesystem要保证跟主节点在一起;
crm(live)configure# colocation mystore_with_ms_mysqldrbd inf: mystore ms_mysqldrbd:Master(定义位置约束,名字mystore_with_ms,mystore和ms_mysqldr
bd:Master在一起)
crm(live)configure# order mystore_afer_ms_mysqldrbd mandatory: ms_mysqldrbd:promote mystore:start(定义顺序约束,先启动ms_mysqldrbd后启动mystore)
crm(live)configure# verify(检查配置)
crm(live)configure# commit(提交)
crm(live)configure# cd(切换到上级目录)
crm(live)# status(查看集群状态)
============
Last updated: Fri Apr 22 16:22:57 2016
Stack: openais
Current DC: node1.magedu.com - partition with quorum
Version: 1.1.5-1.1.el5-01e86afaaa6d4a8c4836f68df80ababd6ca3902f
2 Nodes configured, 2 expected votes
2 Resources configured.
============

Online: [ node1.magedu.com node2.magedu.com ]

 Master/Slave Set: ms_mysqldrbd [mysqldrbd]
     Masters: [ node2.magedu.com ]
     Slaves: [ node1.magedu.com ]
crm(live)# exit(退出)
bye
[root@node2 ~]# ls /mydata/(查看/mydata目录文件及子目录)
inittab  lost+found
[root@node2 ~]# crm node standby(让当前节点称为备用节点)
[root@node2 ~]# crm status
============
Last updated: Fri Apr 22 16:26:50 2016
Stack: openais
Current DC: node1.magedu.com - partition with quorum
Version: 1.1.5-1.1.el5-01e86afaaa6d4a8c4836f68df80ababd6ca3902f
2 Nodes configured, 2 expected votes
2 Resources configured.
============

Node node2.magedu.com: standby
Online: [ node1.magedu.com ]

 Master/Slave Set: ms_mysqldrbd [mysqldrbd]
     Masters: [ node1.magedu.com ]
     Stopped: [ mysqldrbd:1 ]
 mystore	(ocf::heartbeat:Filesystem):	Started node1.magedu.com
HA1:
[root@node1 ~]# ls /mydata/(查看mydata目录文件及子目录)
inittab  lost+found
HA2:
[root@node2 ~]# crm node online(让当前节点上线)
[root@node2 ~]# crm status(查看集群状态)
============
Last updated: Fri Apr 22 16:29:47 2016
Stack: openais
Current DC: node1.magedu.com - partition with quorum
Version: 1.1.5-1.1.el5-01e86afaaa6d4a8c4836f68df80ababd6ca3902f
2 Nodes configured, 2 expected votes
2 Resources configured.
============

Online: [ node1.magedu.com node2.magedu.com ]

 Master/Slave Set: ms_mysqldrbd [mysqldrbd]
     Masters: [ node1.magedu.com ]
     Slaves: [ node2.magedu.com ]
 mystore	(ocf::heartbeat:Filesystem):	Started node1.magedu.com
HA1:
[root@node1 ~]# groupadd -g 306 mysql(创建组mysql,-g指定GID)
[root@node1 ~]# useradd -g 306 -u 306 -M -s /sbin/nologin mysql
[root@node1 ~]# id mysql(查看mysql用户信息)
uid=306(mysql) gid=306(mysql) groups=306(mysql) context=root:system_r:unconfined_t:SystemLow-SystemHigh
[root@node1 ~]# tar xf mysql-5.5.28-linux2.6-i686.tar.gz -C /usr/local/(解压mysql-5.5.28,-C指定保存目录)
[root@node1 ~]# cd /usr/local/
[root@node1 local]# ls(查看当前目录文件及子目录)
bin  etc  games  include  lib  libexec  mysql  mysql-5.5.28-linux2.6-i686  sbin  share  src
[root@node1 local]# ll(查看当前目录详细信息)
total 84
drwxr-xr-x  2 root root 4096 Oct  1  2009 bin
drwxr-xr-x  2 root root 4096 Oct  1  2009 etc
drwxr-xr-x  2 root root 4096 Oct  1  2009 games
drwxr-xr-x  2 root root 4096 Oct  1  2009 include
drwxr-xr-x  2 root root 4096 Oct  1  2009 lib
drwxr-xr-x  2 root root 4096 Oct  1  2009 libexec
lrwxrwxrwx  1 root root   27 Apr 22 16:37 mysql -> mysql-5.5.28-linux2.6-i686/
drwxr-xr-x 13 root root 4096 Apr 22 16:36 mysql-5.5.28-linux2.6-i686
drwxr-xr-x  2 root root 4096 Oct  1  2009 sbin
drwxr-xr-x  4 root root 4096 Nov 22  2014 share
drwxr-xr-x  2 root root 4096 Oct  1  2009 src
[root@node1 local]# mkdir /mydata/data(创建/mydata/data目录)
[root@node1 local]# chown -R mysql.mysql /mydata/dada/(更改/mydata/data目录属主数组为mysql)
[root@node1 local]# ll /mydata/(查看/mydata目录文件及子目录详细信息)
total 32
drwxr-xr-x 2 mysql mysql  4096 Apr 22 16:38 dada
-rw-r--r-- 1 root  root   1666 Apr 22 11:45 inittab
drwx------ 2 root  root  16384 Apr 22 11:43 lost+found
[root@node1 local]# ln -sv mysql-5.5.28-linux2.6-i686/ mysql(为mysql-5.5.28创建软连接mysql,-s软连接,-v显示创建过程)
create symbolic link `mysql/mysql-5.5.28-linux2.6-i686' to `mysql-5.5.28-linux2.6-i686/'
[root@node1 mysql]# chown -R mysql.mysql ./*(修改当前目录所文件的属主数组为mysql)
[root@node1 mysql]# ll
total 132
drwxr-xr-x  2 mysql mysql  4096 Apr 22 16:36 bin
-rw-r--r--  1 mysql mysql 17987 Aug 29  2012 COPYING
drwxr-xr-x  4 mysql mysql  4096 Apr 22 16:41 data
drwxr-xr-x  2 mysql mysql  4096 Apr 22 16:36 docs
drwxr-xr-x  3 mysql mysql  4096 Apr 22 16:36 include
-rw-r--r--  1 mysql mysql  7604 Aug 29  2012 INSTALL-BINARY
drwxr-xr-x  3 mysql mysql  4096 Apr 22 16:36 lib
drwxr-xr-x  4 mysql mysql  4096 Apr 22 16:36 man
drwxr-xr-x 10 mysql mysql  4096 Apr 22 16:36 mysql-test
-rw-r--r--  1 mysql mysql  2552 Aug 29  2012 README
drwxr-xr-x  2 mysql mysql  4096 Apr 22 16:36 scripts
drwxr-xr-x 27 mysql mysql  4096 Apr 22 16:36 share
drwxr-xr-x  4 mysql mysql  4096 Apr 22 16:36 sql-bench
drwxr-xr-x  2 mysql mysql  4096 Apr 22 16:36 support-files
[root@node1 mysql]# scripts/mysql_install_db --user=mysql --datadir=/mydata/data/(初始化mysql,--user指定运行mysql用户,--datadir指定数据文件目录)
Installing MySQL system tables...
OK
Filling help tables...
OK

To start mysqld at boot time you have to copy
support-files/mysql.server to the right place for your system

PLEASE REMEMBER TO SET A PASSWORD FOR THE MySQL root USER !
To do so, start the server, then issue the following commands:

./bin/mysqladmin -u root password 'new-password'
./bin/mysqladmin -u root -h node1.magedu.com password 'new-password'

Alternatively you can run:
./bin/mysql_secure_installation

which will also give you the option of removing the test
databases and anonymous user created by default.  This is
strongly recommended for production servers.

See the manual for more instructions.

You can start the MySQL daemon with:
cd . ; ./bin/mysqld_safe &

You can test the MySQL daemon with mysql-test-run.pl
cd ./mysql-test ; perl mysql-test-run.pl

Please report any problems with the ./bin/mysqlbug script!
[root@node1 mysql]# cd support-files/(切换到support-files目录)
[root@node1 support-files]# cp my-large.cnf /etc/my.cnf(复制mysql配置文件)
[root@node1 support-files]# cp mysql.server /etc/init.d/mysqld(复制启动脚本)
[root@node2 mysql]# chown -R root ./*(修改当前目录所有文件属主为root)
[root@node1 mysql]# vim /etc/my.cnf(编辑my.cnf配置文件)

datadir = /mydata/data

[root@node1 mysql]# service mysqld start(启动Mysqld服务)
Starting MySQL..                                           [  OK  ]
[root@node1 mysql]# /usr/local/mysql/bin/mysql(连接mysql数据库)
Welcome to the MySQL monitor.  Commands end with ; or \g.
Your MySQL connection id is 1
Server version: 5.5.28-log MySQL Community Server (GPL)

Copyright (c) 2000, 2012, Oracle and/or its affiliates. All rights reserved.

Oracle is a registered trademark of Oracle Corporation and/or its
affiliates. Other names may be trademarks of their respective
owners.

Type 'help;' or '\h' for help. Type '\c' to clear the current input statement.

mysql> SHOW DATABASES;(显示数据库)
+--------------------+
| Database           |
+--------------------+
| information_schema |
| mysql              |
| performance_schema |
| test               |
+--------------------+
4 rows in set (0.02 sec)

mysql> CREATE DATABASE mydb;(创建新数据库mydb)
Query OK, 1 row affected (0.00 sec)

mysql> \q(退出)
Bye

[root@node1 mysql]# service mysqld stop(停止mysqld服务)
Shutting down MySQL.                                       [  OK  ]
[root@node1 mysql]# chkconfig mysqld off(关闭mysqld在相应系统级别开机自动启动)
[root@node1 mysql]# crm node standby(更改当前节点为被节点)
[root@node1 mysql]# crm status(查看节点状态)
============
Last updated: Fri Apr 22 17:29:14 2016
Stack: openais
Current DC: node1.magedu.com - partition with quorum
Version: 1.1.5-1.1.el5-01e86afaaa6d4a8c4836f68df80ababd6ca3902f
2 Nodes configured, 2 expected votes
2 Resources configured.
============

Node node1.magedu.com: standby
Online: [ node2.magedu.com ]

 Master/Slave Set: ms_mysqldrbd [mysqldrbd]
     Masters: [ node2.magedu.com ]
     Stopped: [ mysqldrbd:0 ]
 mystore	(ocf::heartbeat:Filesystem):	Started node2.magedu.com
[root@node1 mysql]# crm node online(让当前节点上线)
提示:确保节点2成为主节点;
[root@node1 mysql]# crm status(查看节点状态)
============
Last updated: Fri Apr 22 17:35:51 2016
Stack: openais
Current DC: node1.magedu.com - partition with quorum
Version: 1.1.5-1.1.el5-01e86afaaa6d4a8c4836f68df80ababd6ca3902f
2 Nodes configured, 2 expected votes
2 Resources configured.
============

Online: [ node1.magedu.com node2.magedu.com ]

 Master/Slave Set: ms_mysqldrbd [mysqldrbd]
     Masters: [ node2.magedu.com ]
     Slaves: [ node1.magedu.com ]
 mystore	(ocf::heartbeat:Filesystem):	Started node2.magedu.com
HA2:
[root@node2 ~]# groupadd -g 306 mysql(创建mysql组,-g指定组id)
[root@node2 ~]# useradd -g 306 -u 306 -M -s /sbin/nologin mysql(创建mysql用户,-g指定加入基本组,-u制定uid,-M不创建家目录,-s指定默认shell,)
[root@node2 ~]# id mysql(查看mysql用户信息)
uid=306(mysql) gid=306(mysql) groups=306(mysql) context=root:system_r:unconfined_t:SystemLow-SystemHigh
提示:确保两个节点的mysql用户的组id和用户id要一样;
[root@node2 ~]# tar xf mysql-5.5.28-linux2.6-i686.tar.gz -C /usr/local/(解压mysql-5.5.28,x解压,f后面跟文件,-C更改解压目录)
[root@node2 ~]# cd /usr/local/(切换到/usr/local目录)
[root@node2 local]# ln -sv mysql-5.5.28-linux2.6-i686/ mysql(为mysql-5.5.28创建软连接叫mysql,-s软连接,-v显示创建过程)
创建指向“mysql-5.5.28-linux2.6-i686/”的符号链接“mysql”
[root@node2 local]# cd mysql(切换到mysql目录)
[root@node2 mysql]# ll(查看当前目录文件详细信息)
总计 132
drwxr-xr-x  2 root root   4096 04-22 17:42 bin
-rw-r--r--  1 7161 wheel 17987 2012-08-29 COPYING
drwxr-xr-x  4 root root   4096 04-22 17:42 data
drwxr-xr-x  2 root root   4096 04-22 17:42 docs
drwxr-xr-x  3 root root   4096 04-22 17:42 include
-rw-r--r--  1 7161 wheel  7604 2012-08-29 INSTALL-BINARY
drwxr-xr-x  3 root root   4096 04-22 17:42 lib
drwxr-xr-x  4 root root   4096 04-22 17:42 man
drwxr-xr-x 10 root root   4096 04-22 17:42 mysql-test
-rw-r--r--  1 7161 wheel  2552 2012-08-29 README
drwxr-xr-x  2 root root   4096 04-22 17:42 scripts
drwxr-xr-x 27 root root   4096 04-22 17:42 share
drwxr-xr-x  4 root root   4096 04-22 17:42 sql-bench
drwxr-xr-x  2 root root   4096 04-22 17:42 support-files
[root@node2 mysql]# chown -R mysql:mysql ./*(更改当前目录文件的属主为mysql,属组为mysql,-R递归更改)
[root@node2 mysql]# ll(查看当前目录文件及子目录详细信息)
总计 132
drwxr-xr-x  2 mysql mysql  4096 04-22 17:42 bin
-rw-r--r--  1 mysql mysql 17987 2012-08-29 COPYING
drwxr-xr-x  4 mysql mysql  4096 04-22 17:42 data
drwxr-xr-x  2 mysql mysql  4096 04-22 17:42 docs
drwxr-xr-x  3 mysql mysql  4096 04-22 17:42 include
-rw-r--r--  1 mysql mysql  7604 2012-08-29 INSTALL-BINARY
drwxr-xr-x  3 mysql mysql  4096 04-22 17:42 lib
drwxr-xr-x  4 mysql mysql  4096 04-22 17:42 man
drwxr-xr-x 10 mysql mysql  4096 04-22 17:42 mysql-test
-rw-r--r--  1 mysql mysql  2552 2012-08-29 README
drwxr-xr-x  2 mysql mysql  4096 04-22 17:42 scripts
drwxr-xr-x 27 mysql mysql  4096 04-22 17:42 share
drwxr-xr-x  4 mysql mysql  4096 04-22 17:42 sql-bench
drwxr-xr-x  2 mysql mysql  4096 04-22 17:42 support-files
[root@node2 mysql]# cd support-files/(切换到support-files目录)
[root@node2 support-files]# cp my-large.cnf /etc/my.cnf(复制mysql配置文件)
[root@node2 support-files]# cp mysql.server /etc/init.d/mysqld(复制mysqld服务脚步)
[root@node2 support-files]# cd(切换到用户家目录)
[root@node2 mysql]# scripts/mysql_install_db --user=mysql --datadir=/mydata/data/
Installing MySQL system tables...
OK
Filling help tables...
OK

To start mysqld at boot time you have to copy
support-files/mysql.server to the right place for your system

PLEASE REMEMBER TO SET A PASSWORD FOR THE MySQL root USER !
To do so, start the server, then issue the following commands:

./bin/mysqladmin -u root password 'new-password'
./bin/mysqladmin -u root -h node2.magedu.com password 'new-password'

Alternatively you can run:
./bin/mysql_secure_installation

which will also give you the option of removing the test
databases and anonymous user created by default.  This is
strongly recommended for production servers.

See the manual for more instructions.

You can start the MySQL daemon with:
cd . ; ./bin/mysqld_safe &

You can test the MySQL daemon with mysql-test-run.pl
cd ./mysql-test ; perl mysql-test-run.pl

Please report any problems with the ./bin/mysqlbug script!
[root@node2 ~]# vim /etc/my.cnf(编辑mysql配置文件)

datadir =  /mydata/data

[root@node2 ~]# service mysqld start(启动mysqld服务)
Starting MySQL...                                          [确定]
[root@node2 ~]# /usr/local/mysql/bin/mysql(连接mysql数据库)
Welcome to the MySQL monitor.  Commands end with ; or \g.
Your MySQL connection id is 1
Server version: 5.5.28-log MySQL Community Server (GPL)

Copyright (c) 2000, 2012, Oracle and/or its affiliates. All rights reserved.

Oracle is a registered trademark of Oracle Corporation and/or its
affiliates. Other names may be trademarks of their respective
owners.

Type 'help;' or '\h' for help. Type '\c' to clear the current input statement.

mysql> SHOW DATABASES;(连接mysql数据库)
+--------------------+
| Database           |
+--------------------+
| information_schema |
| mydb               |
| mysql              |
| performance_schema |
| test               |
+--------------------+
5 rows in set (0.00 sec)

mysql> \q(退出)
Bye

[root@node2 corosync]# service mysqld stop(停止mysqld服务)
Shutting down MySQL.                                       [确定]
[root@node2 corosync]# chkconfig mysqld off(关闭mysqld在相应系统级别开机自动启动)
[root@node2 corosync]# crm status(查看集群状态)
============
Last updated: Fri Apr 22 20:28:10 2016
Stack: openais
Current DC: node1.magedu.com - partition with quorum
Version: 1.1.5-1.1.el5-01e86afaaa6d4a8c4836f68df80ababd6ca3902f
2 Nodes configured, 2 expected votes
2 Resources configured.
============

Online: [ node1.magedu.com node2.magedu.com ]

 Master/Slave Set: ms_mysqldrbd [mysqldrbd]
     Masters: [ node2.magedu.com ]
     Slaves: [ node1.magedu.com ]
 mystore	(ocf::heartbeat:Filesystem):	Started node2.magedu.com
[root@node2 corosync]# crm(进入crm的shell)
crm(live)# configure(进入configure模式)
crm(live)configure# primitive mysqld lsb:mysqld(定义基本资源mysqld,lsb类型,mysqld资源的元数据)
crm(live)configure# verify(检查配置)
crm(live)configure# colocation mysqld_with_mystore inf: mysqld mystore(定义位置约束,mysqld要和mystore在一起,inf:必须在一起)
crm(live)configure# show(查看集群信息库对象)
node node1.magedu.com \
        attributes standby="off"
node node2.magedu.com \
        attributes standby="off"
primitive mysqld lsb:mysqld
primitive mysqldrbd ocf:heartbeat:drbd \
        params drbd_resource="mydrbd" \
        op start interval="0" timeout="240" \
        op stop interval="0" timeout="100" \
        op monitor interval="20" role="Master" timeout="30" \
        op monitor interval="30" role="Slave" timeout="30"
primitive mystore ocf:heartbeat:Filesystem \
        params device="/dev/drbd0" directory="/mydata" fstype="ext3" \
        op start interval="0" timeout="60" \
        op stop interval="0" timeout="60"
ms ms_mysqldrbd mysqldrbd \
        meta master-max="1" master-node-max="1" clone-max="2" clone-node-max="1" notify="true"
colocation mysqld_with_mystore inf: mysqld mystore
colocation mystore_with_ms_mysqldrbd inf: mystore ms_mysqldrbd:Master
order mystore_afer_ms_mysqldrbd inf: ms_mysqldrbd:promote mystore:start
property $id="cib-bootstrap-options" \
        dc-version="1.1.5-1.1.el5-01e86afaaa6d4a8c4836f68df80ababd6ca3902f" \
        cluster-infrastructure="openais" \
        expected-quorum-votes="2" \
        stonith-enabled="false" \
        no-quorum-policy="ignore"
rsc_defaults $id="rsc-options" \
        resource-stickiness="100"
(END)
crm(live)configure# show xml(查看xml格式的集群信息库对象)
<?xml version="1.0" ?>
<cib admin_epoch="0" cib-last-written="Fri Apr 22 19:12:17 2016" crm_feature_set="3.0.5" dc-uuid="node1.magedu.com" epoch="111" have-quo
rum="1" num_updates="7" validate-with="pacemaker-1.2">
  <configuration>
    <crm_config>
      <cluster_property_set id="cib-bootstrap-options">
        <nvpair id="cib-bootstrap-options-dc-version" name="dc-version" value="1.1.5-1.1.el5-01e86afaaa6d4a8c4836f68df80ababd6ca3902f"/>
        <nvpair id="cib-bootstrap-options-cluster-infrastructure" name="cluster-infrastructure" value="openais"/>
        <nvpair id="cib-bootstrap-options-expected-quorum-votes" name="expected-quorum-votes" value="2"/>
        <nvpair id="cib-bootstrap-options-stonith-enabled" name="stonith-enabled" value="false"/>
        <nvpair id="cib-bootstrap-options-no-quorum-policy" name="no-quorum-policy" value="ignore"/>
      </cluster_property_set>
    </crm_config>
    <nodes>
      <node id="node2.magedu.com" type="normal" uname="node2.magedu.com">
        <instance_attributes id="nodes-node2.magedu.com">
          <nvpair id="nodes-node2.magedu.com-standby" name="standby" value="off"/>
        </instance_attributes>
      </node>
      <node id="node1.magedu.com" type="normal" uname="node1.magedu.com">
        <instance_attributes id="nodes-node1.magedu.com">
          <nvpair id="nodes-node1.magedu.com-standby" name="standby" value="off"/>
        </instance_attributes>
      </node>
    </nodes>
    <resources>
      <primitive class="ocf" id="mystore" provider="heartbeat" type="Filesystem">
        <instance_attributes id="mystore-instance_attributes">
          <nvpair id="mystore-instance_attributes-device" name="device" value="/dev/drbd0"/>
          <nvpair id="mystore-instance_attributes-directory" name="directory" value="/mydata"/>
          <nvpair id="mystore-instance_attributes-fstype" name="fstype" value="ext3"/>
        </instance_attributes>
        <operations>
          <op id="mystore-start-0" interval="0" name="start" timeout="60"/>
          <op id="mystore-stop-0" interval="0" name="stop" timeout="60"/>
        </operations>
      </primitive>
      <master id="ms_mysqldrbd">
        <meta_attributes id="ms_mysqldrbd-meta_attributes">
          <nvpair id="ms_mysqldrbd-meta_attributes-master-max" name="master-max" value="1"/>
          <nvpair id="ms_mysqldrbd-meta_attributes-master-node-max" name="master-node-max" value="1"/>
          <nvpair id="ms_mysqldrbd-meta_attributes-clone-max" name="clone-max" value="2"/>
          <nvpair id="ms_mysqldrbd-meta_attributes-clone-node-max" name="clone-node-max" value="1"/>
          <nvpair id="ms_mysqldrbd-meta_attributes-notify" name="notify" value="true"/>
        </meta_attributes>
        <primitive class="ocf" id="mysqldrbd" provider="heartbeat" type="drbd">
          <instance_attributes id="mysqldrbd-instance_attributes">
            <nvpair id="mysqldrbd-instance_attributes-drbd_resource" name="drbd_resource" value="mydrbd"/>
          </instance_attributes>
          <operations>
            <op id="mysqldrbd-start-0" interval="0" name="start" timeout="240"/>
            <op id="mysqldrbd-stop-0" interval="0" name="stop" timeout="100"/>
            <op id="mysqldrbd-monitor-20" interval="20" name="monitor" role="Master" timeout="30"/>
            <op id="mysqldrbd-monitor-30" interval="30" name="monitor" role="Slave" timeout="30"/>
          </operations>
        </primitive>
      </master>
      <primitive class="lsb" id="mysqld" type="mysqld"/>
    </resources>
    <constraints>
      <rsc_colocation id="mystore_with_ms_mysqldrbd" rsc="mystore" score="INFINITY" with-rsc="ms_mysqldrbd" with-rsc-role="Master"/>
      <rsc_order first="ms_mysqldrbd" first-action="promote" id="mystore_afer_ms_mysqldrbd" score="INFINITY" then="mystore" then-action=
"start"/>
      <rsc_colocation id="mysqld_with_mystore" rsc="mysqld" score="INFINITY" with-rsc="mystore"/>
    </constraints>
    <rsc_defaults>
      <meta_attributes id="rsc-options">
        <nvpair id="rsc-options-resource-stickiness" name="resource-stickiness" value="100"/>
      </meta_attributes>
    </rsc_defaults>
  </configuration>
</cib>
(END)
crm(live)configure# order mysqld_after_mystore mandatory: mystore mysqld(定义顺序约束,先启动mystore再启动mysqld,mandatory:强制)
crm(live)configure# verify(检查配置)
crm(live)configure# show xml(查看xml格式集群信息库对象)
<?xml version="1.0" ?>
<cib admin_epoch="0" cib-last-written="Fri Apr 22 19:12:17 2016" crm_feature_set="3.0.5" dc-uuid="node1.magedu.com" epoch="111" have-quorum
="1" num_updates="7" validate-with="pacemaker-1.2">
  <configuration>
    <crm_config>
      <cluster_property_set id="cib-bootstrap-options">
        <nvpair id="cib-bootstrap-options-dc-version" name="dc-version" value="1.1.5-1.1.el5-01e86afaaa6d4a8c4836f68df80ababd6ca3902f"/>
        <nvpair id="cib-bootstrap-options-cluster-infrastructure" name="cluster-infrastructure" value="openais"/>
        <nvpair id="cib-bootstrap-options-expected-quorum-votes" name="expected-quorum-votes" value="2"/>
        <nvpair id="cib-bootstrap-options-stonith-enabled" name="stonith-enabled" value="false"/>
        <nvpair id="cib-bootstrap-options-no-quorum-policy" name="no-quorum-policy" value="ignore"/>
      </cluster_property_set>
    </crm_config>
    <nodes>
      <node id="node2.magedu.com" type="normal" uname="node2.magedu.com">
        <instance_attributes id="nodes-node2.magedu.com">
          <nvpair id="nodes-node2.magedu.com-standby" name="standby" value="off"/>
        </instance_attributes>
      </node>
      <node id="node1.magedu.com" type="normal" uname="node1.magedu.com">
        <instance_attributes id="nodes-node1.magedu.com">
          <nvpair id="nodes-node1.magedu.com-standby" name="standby" value="off"/>
        </instance_attributes>
      </node>
    </nodes>
    <resources>
      <primitive class="ocf" id="mystore" provider="heartbeat" type="Filesystem">
        <instance_attributes id="mystore-instance_attributes">
          <nvpair id="mystore-instance_attributes-device" name="device" value="/dev/drbd0"/>
          <nvpair id="mystore-instance_attributes-directory" name="directory" value="/mydata"/>
          <nvpair id="mystore-instance_attributes-fstype" name="fstype" value="ext3"/>
        </instance_attributes>
        <operations>
          <op id="mystore-start-0" interval="0" name="start" timeout="60"/>
          <op id="mystore-stop-0" interval="0" name="stop" timeout="60"/>
        </operations>
      </primitive>
      <master id="ms_mysqldrbd">
        <meta_attributes id="ms_mysqldrbd-meta_attributes">
          <nvpair id="ms_mysqldrbd-meta_attributes-master-max" name="master-max" value="1"/>
          <nvpair id="ms_mysqldrbd-meta_attributes-master-node-max" name="master-node-max" value="1"/>
          <nvpair id="ms_mysqldrbd-meta_attributes-clone-max" name="clone-max" value="2"/>
          <nvpair id="ms_mysqldrbd-meta_attributes-clone-node-max" name="clone-node-max" value="1"/>
          <nvpair id="ms_mysqldrbd-meta_attributes-notify" name="notify" value="true"/>
        </meta_attributes>
        <primitive class="ocf" id="mysqldrbd" provider="heartbeat" type="drbd">
          <instance_attributes id="mysqldrbd-instance_attributes">
            <nvpair id="mysqldrbd-instance_attributes-drbd_resource" name="drbd_resource" value="mydrbd"/>
          </instance_attributes>
          <operations>
            <op id="mysqldrbd-start-0" interval="0" name="start" timeout="240"/>
            <op id="mysqldrbd-stop-0" interval="0" name="stop" timeout="100"/>
            <op id="mysqldrbd-monitor-20" interval="20" name="monitor" role="Master" timeout="30"/>
            <op id="mysqldrbd-monitor-30" interval="30" name="monitor" role="Slave" timeout="30"/>
          </operations>
        </primitive>
      </master>
      <primitive class="lsb" id="mysqld" type="mysqld"/>
    </resources>
    <constraints>
      <rsc_colocation id="mystore_with_ms_mysqldrbd" rsc="mystore" score="INFINITY" with-rsc="ms_mysqldrbd" with-rsc-role="Master"/>
      <rsc_order first="mystore" id="mysqld_after_mystore" score="INFINITY" then="mysqld"/>
      <rsc_order first="ms_mysqldrbd" first-action="promote" id="mystore_afer_ms_mysqldrbd" score="INFINITY" then="mystore" then-action=
"start"/>
      <rsc_colocation id="mysqld_with_mystore" rsc="mysqld" score="INFINITY" with-rsc="mystore"/>
    </constraints>
    <rsc_defaults>
      <meta_attributes id="rsc-options">
        <nvpair id="rsc-options-resource-stickiness" name="resource-stickiness" value="100"/>
      </meta_attributes>
    </rsc_defaults>
  </configuration>
</cib>
(END)
crm(live)configure# commit(提交)
crm(live)configure# cd(切换到上级目录)
crm(live)# status(查看集群状态)
============
Last updated: Fri Apr 22 20:41:34 2016
Stack: openais
Current DC: node1.magedu.com - partition with quorum
Version: 1.1.5-1.1.el5-01e86afaaa6d4a8c4836f68df80ababd6ca3902f
2 Nodes configured, 2 expected votes
3 Resources configured.
============

Online: [ node1.magedu.com node2.magedu.com ]

 Master/Slave Set: ms_mysqldrbd [mysqldrbd]
     Masters: [ node2.magedu.com ]
     Slaves: [ node1.magedu.com ]
 mystore	(ocf::heartbeat:Filesystem):	Started node2.magedu.com
 mysqld	(lsb:mysqld):	Started node2.magedu.com
[root@node2 ~]# /usr/local/mysql/bin/mysql(连接mysql数据库)
Welcome to the MySQL monitor.  Commands end with ; or \g.
Your MySQL connection id is 1
Server version: 5.5.28-log MySQL Community Server (GPL)

Copyright (c) 2000, 2012, Oracle and/or its affiliates. All rights reserved.

Oracle is a registered trademark of Oracle Corporation and/or its
affiliates. Other names may be trademarks of their respective
owners.

Type 'help;' or '\h' for help. Type '\c' to clear the current input statement.

mysql> DROP DATABASE mydb;(删除数据库mydb)
Query OK, 0 rows affected (0.06 sec)

mysql> CREATE DATABASE hellodb;(创建数据库hellodb)
Query OK, 1 row affected (0.00 sec)

mysql> SHOW DATABASES;(显示数据库)
+--------------------+
| Database           |
+--------------------+
| information_schema |
| hellodb            |
| mysql              |
| performance_schema |
| test               |
+--------------------+
5 rows in set (0.00 sec)

mysql> \q(退出)
Bye
[root@node2 ~]# crm node standby(让当前节点成为从节点)
[root@node2 ~]# crm status(查看集群状态)
============
Last updated: Fri Apr 22 20:46:01 2016
Stack: openais
Current DC: node1.magedu.com - partition with quorum
Version: 1.1.5-1.1.el5-01e86afaaa6d4a8c4836f68df80ababd6ca3902f
2 Nodes configured, 2 expected votes
3 Resources configured.
============

Node node2.magedu.com: standby
Online: [ node1.magedu.com ]

 Master/Slave Set: ms_mysqldrbd [mysqldrbd]
     Masters: [ node1.magedu.com ]
     Stopped: [ mysqldrbd:1 ]
 mystore	(ocf::heartbeat:Filesystem):	Started node1.magedu.com
 mysqld	(lsb:mysqld):	Started node1.magedu.com
[root@node2 ~]# crm node online(上当前节点上线)
HA1:
[root@node1 ~]# /usr/local/mysql/bin/mysql(连接mysql数据库)
Welcome to the MySQL monitor.  Commands end with ; or \g.
Your MySQL connection id is 1
Server version: 5.5.28-log MySQL Community Server (GPL)

Copyright (c) 2000, 2012, Oracle and/or its affiliates. All rights reserved.

Oracle is a registered trademark of Oracle Corporation and/or its
affiliates. Other names may be trademarks of their respective
owners.

Type 'help;' or '\h' for help. Type '\c' to clear the current input statement.

mysql> SHOW DATABASES;(显示数据库)
+--------------------+
| Database           |
+--------------------+
| information_schema |
| hellodb            |
| mysql              |
| performance_schema |
| test               |
+--------------------+
5 rows in set (0.02 sec)

mysql> \q(退出)
Bye

[root@node1 ~]# crm(进入crm的shell)
crm(live)# configure(进入configure模式)
crm(live)configure# primitive myip ocf:heartbeat:IPaddr params ip=172.16.100.1 nic=eth0 cidr_netmask=255.255.0.0(创建基本资源myip,ocf类型,hea
rtbeat提供者,IPaddr资源元数据,params参数)
crm(live)configure# verify(检查配置)
crm(live)configure# colocation myip_with_ms_mysqldrbd inf: ms_mysqldrbd:Master myip(定义位置约束,myip要和主资源mysqldrbd在一起)
crm(live)configure# verify(检查配置)
crm(live)configure# show xml(显示xml格式的集群信息哭对象)
<?xml version="1.0" ?>
<cib admin_epoch="0" cib-last-written="Fri Apr 22 19:12:17 2016" crm_feature_set="3.0.5" dc-uuid="node1.magedu.com" epoch="114" have-quorum
="1" num_updates="7" validate-with="pacemaker-1.2">
  <configuration>
    <crm_config>
      <cluster_property_set id="cib-bootstrap-options">
        <nvpair id="cib-bootstrap-options-dc-version" name="dc-version" value="1.1.5-1.1.el5-01e86afaaa6d4a8c4836f68df80ababd6ca3902f"/>
        <nvpair id="cib-bootstrap-options-cluster-infrastructure" name="cluster-infrastructure" value="openais"/>
        <nvpair id="cib-bootstrap-options-expected-quorum-votes" name="expected-quorum-votes" value="2"/>
        <nvpair id="cib-bootstrap-options-stonith-enabled" name="stonith-enabled" value="false"/>
        <nvpair id="cib-bootstrap-options-no-quorum-policy" name="no-quorum-policy" value="ignore"/>
      </cluster_property_set>
    </crm_config>
    <nodes>
      <node id="node2.magedu.com" type="normal" uname="node2.magedu.com">
        <instance_attributes id="nodes-node2.magedu.com">
          <nvpair id="nodes-node2.magedu.com-standby" name="standby" value="off"/>
        </instance_attributes>
      </node>
      <node id="node1.magedu.com" type="normal" uname="node1.magedu.com">
        <instance_attributes id="nodes-node1.magedu.com">
          <nvpair id="nodes-node1.magedu.com-standby" name="standby" value="off"/>
        </instance_attributes>
      </node>
    </nodes>
    <resources>
      <primitive class="ocf" id="mystore" provider="heartbeat" type="Filesystem">
        <instance_attributes id="mystore-instance_attributes">
          <nvpair id="mystore-instance_attributes-device" name="device" value="/dev/drbd0"/>
          <nvpair id="mystore-instance_attributes-directory" name="directory" value="/mydata"/>
          <nvpair id="mystore-instance_attributes-fstype" name="fstype" value="ext3"/>
        </instance_attributes>
        <operations>
          <op id="mystore-start-0" interval="0" name="start" timeout="60"/>
          <op id="mystore-stop-0" interval="0" name="stop" timeout="60"/>
        </operations>
      </primitive>
      <master id="ms_mysqldrbd">
        <meta_attributes id="ms_mysqldrbd-meta_attributes">
          <nvpair id="ms_mysqldrbd-meta_attributes-master-max" name="master-max" value="1"/>
          <nvpair id="ms_mysqldrbd-meta_attributes-master-node-max" name="master-node-max" value="1"/>
          <nvpair id="ms_mysqldrbd-meta_attributes-clone-max" name="clone-max" value="2"/>
          <nvpair id="ms_mysqldrbd-meta_attributes-clone-node-max" name="clone-node-max" value="1"/>
          <nvpair id="ms_mysqldrbd-meta_attributes-notify" name="notify" value="true"/>
        </meta_attributes>
        <primitive class="ocf" id="mysqldrbd" provider="heartbeat" type="drbd">
          <instance_attributes id="mysqldrbd-instance_attributes">
            <nvpair id="mysqldrbd-instance_attributes-drbd_resource" name="drbd_resource" value="mydrbd"/>
          </instance_attributes>
          <operations>
            <op id="mysqldrbd-start-0" interval="0" name="start" timeout="240"/>
            <op id="mysqldrbd-stop-0" interval="0" name="stop" timeout="100"/>
            <op id="mysqldrbd-monitor-20" interval="20" name="monitor" role="Master" timeout="30"/>
            <op id="mysqldrbd-monitor-30" interval="30" name="monitor" role="Slave" timeout="30"/>
          </operations>
        </primitive>
      </master>
      <primitive class="lsb" id="mysqld" type="mysqld"/>
      <primitive class="ocf" id="myip" provider="heartbeat" type="IPaddr">
        <instance_attributes id="myip-instance_attributes">
          <nvpair id="myip-instance_attributes-ip" name="ip" value="172.16.100.1"/>
          <nvpair id="myip-instance_attributes-nic" name="nic" value="eth0"/>
          <nvpair id="myip-instance_attributes-cidr_netmask" name="cidr_netmask" value="255.255.0.0"/>
        </instance_attributes>
      </primitive>
    </resources>
    <constraints>
      <rsc_order first="mystore" id="mysqld_after_mystore" score="INFINITY" then="mysqld"/>
      <rsc_colocation id="myip_with_ms_mysqldrbd" rsc="ms_mysqldrbd" rsc-role="Master" score="INFINITY" with-rsc="myip"/>
      <rsc_colocation id="mystore_with_ms_mysqldrbd" rsc="mystore" score="INFINITY" with-rsc="ms_mysqldrbd" with-rsc-role="Master"/>
      <rsc_order first="ms_mysqldrbd" first-action="promote" id="mystore_afer_ms_mysqldrbd" score="INFINITY" then="mystore" then-action=
"start"/>
      <rsc_colocation id="mysqld_with_mystore" rsc="mysqld" score="INFINITY" with-rsc="mystore"/>
    </constraints>
    <rsc_defaults>
      <meta_attributes id="rsc-options">
        <nvpair id="rsc-options-resource-stickiness" name="resource-stickiness" value="100"/>
      </meta_attributes>
    </rsc_defaults>
  </configuration>
</cib>
(END)
crm(live)configure# commit(提交)
crm(live)configure# cd(切换到上级目录)
crm(live)# status(查看集群状态)
============
Last updated: Fri Apr 22 20:53:46 2016
Stack: openais
Current DC: node1.magedu.com - partition with quorum
Version: 1.1.5-1.1.el5-01e86afaaa6d4a8c4836f68df80ababd6ca3902f
2 Nodes configured, 2 expected votes
4 Resources configured.
============

Online: [ node1.magedu.com node2.magedu.com ]

 Master/Slave Set: ms_mysqldrbd [mysqldrbd]
     Masters: [ node1.magedu.com ]
     Slaves: [ node2.magedu.com ]
 mystore	(ocf::heartbeat:Filesystem):	Started node1.magedu.com
 mysqld	(lsb:mysqld):	Started node1.magedu.com
 myip	(ocf::heartbeat:IPaddr):	Started node1.magedu.com
crm(live)# exit(退出)
bye
跳板机:
[root@nfs ~]# yum -y install mysql(通过yum源安装mysql)
HA1:
[root@node1 ~]# /usr/local/mysql/bin/mysql
Welcome to the MySQL monitor.  Commands end with ; or \g.
Your MySQL connection id is 2
Server version: 5.5.28-log MySQL Community Server (GPL)

Copyright (c) 2000, 2012, Oracle and/or its affiliates. All rights reserved.

Oracle is a registered trademark of Oracle Corporation and/or its
affiliates. Other names may be trademarks of their respective
owners.

Type 'help;' or '\h' for help. Type '\c' to clear the current input statement.

mysql> GRANT ALL ON *.* TO root@'%' IDENTIFIED BY 'magedu';(授权root用户所有主机对所有库所有表所有权限,并设置密码为magedu)
Query OK, 0 rows affected (0.00 sec)

mysql> FLUSH PRIVILEGES;(刷新授权表)
Query OK, 0 rows affected (0.00 sec)

mysql> \q(退出)
Bye
跳板机:
[root@nfs ~]# mysql -uroot -h172.16.100.1 -p(连接mysql数据库,-u指定用户,-h指定主机,-p指定密码)
Enter password:
Welcome to the MySQL monitor.  Commands end with ; or \g.
Your MySQL connection id is 3
Server version: 5.5.28-log MySQL Community Server (GPL)

Type 'help;' or '\h' for help. Type '\c' to clear the buffer.

mysql> SHOW DATABASES;(显示数据库)
+--------------------+
| Database           |
+--------------------+
| information_schema |
| hellodb            |
| mysql              |
| performance_schema |
| test               |
+--------------------+
5 rows in set (0.00 sec)

mysql> \q(退出)
Bye
HA1:
[root@node1 ~]# crm node standby(让当前节点成为备节点)
[root@node1 ~]# crm status(查看集群状态)
============
Last updated: Fri Apr 22 21:05:29 2016
Stack: openais
Current DC: node1.magedu.com - partition with quorum
Version: 1.1.5-1.1.el5-01e86afaaa6d4a8c4836f68df80ababd6ca3902f
2 Nodes configured, 2 expected votes
4 Resources configured.
============

Node node1.magedu.com: standby
Online: [ node2.magedu.com ]

 Master/Slave Set: ms_mysqldrbd [mysqldrbd]
     Masters: [ node2.magedu.com ]
     Stopped: [ mysqldrbd:0 ]
 mystore	(ocf::heartbeat:Filesystem):	Started node2.magedu.com
 mysqld	(lsb:mysqld):	Started node2.magedu.com
 myip	(ocf::heartbeat:IPaddr):	Started node2.magedu.com
[root@node1 ~]# crm node online(让当前节点上线)
跳板机:
[root@nfs ~]# mysql -uroot -h172.16.100.1 -p(连接mysql数据库,-u指定用户,-h指定主机,-p指定密码)
Enter password:
Welcome to the MySQL monitor.  Commands end with ; or \g.
Your MySQL connection id is 1
Server version: 5.5.28-log MySQL Community Server (GPL)

Type 'help;' or '\h' for help. Type '\c' to clear the buffer.

mysql> SHOW DATABASES;(显示数据库)
+--------------------+
| Database           |
+--------------------+
| information_schema |
| hellodb            |
| mysql              |
| performance_schema |
| test               |
+--------------------+
5 rows in set (0.05 sec)

mysql> \q(退出)
Bye
HA1:
[root@node1 ~]# crm status(查看集群状态)
============
Last updated: Fri Apr 22 21:08:34 2016
Stack: openais
Current DC: node1.magedu.com - partition with quorum
Version: 1.1.5-1.1.el5-01e86afaaa6d4a8c4836f68df80ababd6ca3902f
2 Nodes configured, 2 expected votes
4 Resources configured.
============

Online: [ node1.magedu.com node2.magedu.com ]

 Master/Slave Set: ms_mysqldrbd [mysqldrbd]
     Masters: [ node2.magedu.com ]
     Slaves: [ node1.magedu.com ]
 mystore	(ocf::heartbeat:Filesystem):	Started node2.magedu.com
 mysqld	(lsb:mysqld):	Started node2.magedu.com
 myip	(ocf::heartbeat:IPaddr):	Started node2.magedu.com

[root@node1 ~]# crm(进入crm的shell)
crm(live)# configure(进入configure模式)
crm(live)configure# show(显示集群信息库对象)
node node1.magedu.com \
        attributes standby="off"
node node2.magedu.com \
        attributes standby="off"
primitive myip ocf:heartbeat:IPaddr \
        params ip="172.16.100.1" nic="eth0" cidr_netmask="255.255.0.0"
primitive mysqld lsb:mysqld
primitive mysqldrbd ocf:heartbeat:drbd \
        params drbd_resource="mydrbd" \
        op start interval="0" timeout="240" \
        op stop interval="0" timeout="100" \
        op monitor interval="20" role="Master" timeout="30" \
        op monitor interval="30" role="Slave" timeout="30"
primitive mystore ocf:heartbeat:Filesystem \
        params device="/dev/drbd0" directory="/mydata" fstype="ext3" \
        op start interval="0" timeout="60" \
        op stop interval="0" timeout="60"
ms ms_mysqldrbd mysqldrbd \
        meta master-max="1" master-node-max="1" clone-max="2" clone-node-max="1" notify="true"
colocation myip_with_ms_mysqldrbd inf: ms_mysqldrbd:Master myip
colocation mysqld_with_mystore inf: mysqld mystore
colocation mystore_with_ms_mysqldrbd inf: mystore ms_mysqldrbd:Master
order mysqld_after_mystore inf: mystore mysqld
order mystore_afer_ms_mysqldrbd inf: ms_mysqldrbd:promote mystore:start
property $id="cib-bootstrap-options" \
        dc-version="1.1.5-1.1.el5-01e86afaaa6d4a8c4836f68df80ababd6ca3902f" \
        cluster-infrastructure="openais" \
        expected-quorum-votes="2" \
        stonith-enabled="false" \
        no-quorum-policy="ignore"
rsc_defaults $id="rsc-options" \
        resource-stickiness="100"
(END)
RHCS
Red Hat Cluster Suite(红帽集群套件)
LVS 负载均衡
HA 高可用组建
GFS 集群文件系统
cLVM 集群逻辑卷
高可用集群工作特性:
一般说来一个高可用集群,这些集群节点之间必须要随时明确知道当前集群内一共有多少个节点,每一个节点它的通信状况如何,成员关系当前是否具备法定票数,这一切都要依赖集群基础架构层,也称为叫做信息层来实现,在这个基础上各节点之间传递心跳信息完成成员关系配置检查法定票数等等,基础架构层并不能真正的为那些非具有高可用能力的服务提供高可用功能,所以还需要一个crm(资源管理器),资源管理器可以实现资源的配置,资源属性,包括资源的管理,这些资源管理包括资源配置,资源删除,资源添加,资源属性清理,资源迁移等等众多功能,更重要的是它还能够完成基于资源代理的方式在相应的节点上启动停止或者重新配置资源,资源代理(RA),crm(资源管理器)本身它也是一个应用程序。
RA(资源代理):
lsb(/etc/init.d/)
ocf(开放集群框架,provders提供商)
legacy HB v1
stonith
集群基础架构层:
heartbeat
corosync
cman(Cluster Manager)
keepalived
CRM(资源管理器)
hb v1:hresources
hb v2:crm
hb v3:pacemaker
rhcs:rgmanager
RHCS
cman
rgmanager
ra
internal(内部)
script:lsb
/etc/rc.d/init.d/*
法定票数(投票系统,quorum)
openais配置文件:/etc/openais/openais.conf
corosync配置文件:/etc/corosync/corosyc.conf
rhcs配置文件:/etc/cluster/cluster.con
RHCS
corosync(cman)
pacemaker(ramanager)
corosync
1.4.5
2.3.0 (needle)
votequorum
gfs: Global File System
gfs2
dlm: Distributed Lock Manager
ocfs2: Oracle Cluster File System
gfs: google file system 分布式文件系统
LVM: Logical Volume Manager 逻辑卷管理器
cLVM:Cluster LVM 集群逻辑卷
借助于HA的功能,将某节点对LVM操作通知给其它节点
CMAN & DLM(RHEL4)

RHCS:
CCS: Cluster Configuration System
ccsd进程,负责集群配置文件管理,在任何一个节点更改配置文件会同步其它节点;
CMAN: /etc/cluster/cluster.conf
RHCS in RHEL5

RHCS in RHEL6

LVS piranha: GUI
RHCS: Failover Domain
服务故障转移域:Service,当一个节点发生故障,那么运行在这个节点上的服务要转移到其他节点,转到其他节点的那个节点上去;
HA Server: VIP, httpd, Filesystem
pxe
cobbler官网:http://cobbler.github.io/ 大规模安装系统软件;
软件、系统安装
命令:for, ssh
配置文件管理、软件分发:puppet
RHCS: luci/ricci
rhel6.4 pcs
Command Line Administration Tools
ccs_tool 管理ccs,管理集群配置
camn_tool 管理cman
fence_tool 执行fence功能
cluster status 显示集群状态
clustvsadm 集群服务器管理器
rhle5.8: system-config-cluster
sync + infotify
haproxy
nginx
[root@nfs ~]# cd /etc/lvm/(切换到/etc/lvm目录)
[root@nfs lvm]# ls(查看当前目录文件及子目录)
archive  backup  cache  lvm.conf
提示:lvm是有配置文件的叫做lvm.conf;
[root@nfs lvm]# cat lvm.conf(查看lvm.conf配置文件内容)
[root@nfs lvm]# less lvm.conf(分页显示lvm.conf文件)

    locking_type = 1(锁类型,1表示基于文件进行锁定,在本机使用,2使用外部的共享库中所提供的锁库,3使用内建的集群锁)
fabric
RHCS:
cman: openais
rgmanger 资源管理器
gfs2 内核模块
gfs2-utils
lvm-cluster
system-config-cluster
HA:
node1 node1.magedu.com 172.16.100.6
node1 node2.magedu.com 172.16.100.7
node1 node3.magedu.com 172.16.100.8
跳板机:
steppingstone.magedu.com 172.16.100.100
前提:
1、时间同步
2、名称解析,且每个主机主机名与'uname -n'保持一致;
3、配置好每个节点的yum;
RHCS:
cman, rgmanager, system-config-cluster
RHCS服务启动前提:
1、每个集群都有唯一集群名称,用于区别于其它集群
2、至少有一个fence设备;
3、至少有应该有三个节点,两个节点的场景中要使用qdisk;
两个资源:
VIP
httpd
-M: 实时迁移虚拟机;
HA1:
[root@localhost ~]# ifconfig eth0(查看eth0网卡接口信息)
eth0      Link encap:Ethernet  HWaddr 00:0C:29:CC:FA:AE
          inet addr:172.16.100.6  Bcast:172.16.100.255  Mask:255.255.255.0
          inet6 addr: fe80::20c:29ff:fecc:faae/64 Scope:Link
          UP BROADCAST RUNNING MULTICAST  MTU:1500  Metric:1
          RX packets:1514 errors:0 dropped:0 overruns:0 frame:0
          TX packets:815 errors:0 dropped:0 overruns:0 carrier:0
          collisions:0 txqueuelen:1000
          RX bytes:144866 (141.4 KiB)  TX bytes:91956 (89.8 KiB)
          Interrupt:67 Base address:0x2000
[root@localhost ~]# ntpdate 172.16.100.100(向ntp服务器同步时间)
13 May 17:48:06 ntpdate[4892]: step time server 172.16.100.100 offset 46537780.526090 sec
[root@localhost ~]# hostname node1.magedu.com(修改主机名称)
[root@localhost ~]# hostname(查看主机名称)
node1.magedu.com
[root@localhost ~]# vim /etc/sysconfig/network(编辑主机名称配置文件)

NETWORKING=yes
NETWORKING_IPV6=yes
HOSTNAME=node1.magedu.com

[root@localhost ~]# uname -n(查看主机名称)
node1.magedu.com
[root@node1 ~]# vim /etc/hosts(编辑本机解析文件)

# Do not remove the following line, or various programs
# that require network functionality will fail.
127.0.0.1               localhost.localdomain localhost
::1             localhost6.localdomain6 localhost6
172.16.100.6    node1.magedu.com node1
172.16.100.7    node2.magedu.com node2
172.16.100.8    node3.magedu.com node3
172.16.100.100  steppingstone.magedu.com steppingstone
[root@node1 ~]# mount /dev/cdrom /media/(将/dev/cdrom挂载到/media目录)
mount: block device /dev/cdrom is write-protected, mounting read-only

[root@node1 ~]# vim /etc/yum.repos.d/smoke.repo(编辑yum源配置文件)

[Server]
name=Server
baseurl=file:///media/Server
enabled=1
gpgcheck=0
[VT]
name=VT
baseurl=file:///media/VT
enabled=1
gpgcheck=0
[Cluster]
name=Cluster
baseurl=file:///media/Cluster
enabled=1
gpgcheck=0
[ClusterStorage]
name=ClusterStorage
baseurl=file:///media/ClusterStorage
enabled=1
gpgcheck=0
HA2:
[root@localhost ~]# ifconfig eth0(查看eth0接口信息)
eth0      Link encap:Ethernet  HWaddr 00:0C:29:B8:44:39
          inet addr:172.16.100.7  Bcast:172.16.100.255  Mask:255.255.255.0
          inet6 addr: fe80::20c:29ff:feb8:4439/64 Scope:Link
          UP BROADCAST RUNNING MULTICAST  MTU:1500  Metric:1
          RX packets:741 errors:0 dropped:0 overruns:0 frame:0
          TX packets:226 errors:0 dropped:0 overruns:0 carrier:0
          collisions:0 txqueuelen:1000
          RX bytes:72845 (71.1 KiB)  TX bytes:28820 (28.1 KiB)
          Interrupt:67 Base address:0x2000
[root@localhost ~]# ntpdate 172.16.100.100(向Ntp服务器同步时间)
13 May 17:48:34 ntpdate[4444]: step time server 172.16.100.100 offset -28798.470076 sec
[root@localhost ~]# hostname node2.magedu.com(修改主机名)
[root@localhost ~]# hostname(查看主机名)
node2.magedu.com
[root@localhost ~]# vim /etc/sysconfig/network(修改主机名配置文件)

NETWORKING=yes
NETWORKING_IPV6=yes
HOSTNAME=node2.magedu.com

[root@localhost ~]# uname -n(查看主机名)
node2.magedu.com
[root@node2 ~]# vim /etc/hosts(编辑本机解析配置文件)

# Do not remove the following line, or various programs
# that require network functionality will fail.
127.0.0.1               localhost.localdomain localhost
::1             localhost6.localdomain6 localhost6
172.16.100.6    node1.magedu.com node1
172.16.100.7    node2.magedu.com node2
172.16.100.8    node3.magedu.com node3
172.16.100.100  steppingstone.magedu.com steppingstone

[root@node2 ~]# mount /dev/cdrom /media/(将/dev/cdrom挂载到/media目录)
mount: block device /dev/cdrom is write-protected, mounting read-only
[root@node2 ~]# vim /etc/yum.repos.d/smoke.repo(编辑yum源配置文件)

[Server]
name=Server
baseurl=file:///media/Server
enabled=1
gpgcheck=0
[VT]
name=VT
baseurl=file:///media/VT
enabled=1
gpgcheck=0
[Cluster]
name=Cluster
baseurl=file:///media/Cluster
enabled=1
gpgcheck=0
[ClusterStorage]
name=ClusterStorage
baseurl=file:///media/ClusterStorage
enabled=1
gpgcheck=0
HA3:
[root@localhost ~]# ifconfig eth0(查看eth0网卡信息)
eth0      Link encap:Ethernet  HWaddr 00:0C:29:D9:86:95
          inet addr:172.16.100.8  Bcast:172.16.100.255  Mask:255.255.255.0
          inet6 addr: fe80::20c:29ff:fed9:8695/64 Scope:Link
          UP BROADCAST RUNNING MULTICAST  MTU:1500  Metric:1
          RX packets:1305 errors:0 dropped:0 overruns:0 frame:0
          TX packets:147 errors:0 dropped:0 overruns:0 carrier:0
          collisions:0 txqueuelen:1000
          RX bytes:121901 (119.0 KiB)  TX bytes:22597 (22.0 KiB)
          Interrupt:67 Base address:0x2000
[root@localhost ~]#  ntpdate 172.16.100.100(向ntp服务器同步时间)
13 May 17:49:01 ntpdate[21223]: step time server 172.16.100.100 offset 5391827.799032 sec
[root@localhost ~]# hostname node3.magedu.com(修改主机名称)
[root@localhost ~]# hostname(查看主机名称)
node3.magedu.com
[root@localhost ~]# vim /etc/sysconfig/network(编辑主机名配置文件)

NETWORKING=yes
NETWORKING_IPV6=yes
HOSTNAME=node3.magedu.com

[root@localhost ~]# uname -n(查看主机名称)
node3.magedu.com
[root@node3 ~]# vim /etc/hosts(编辑本机解析配置文件)

# Do not remove the following line, or various programs
# that require network functionality will fail.
127.0.0.1               localhost.localdomain localhost
::1             localhost6.localdomain6 localhost6
172.16.100.6    node1.magedu.com node1
172.16.100.7    node2.magedu.com node2
172.16.100.8    node3.magedu.com node3
172.16.100.100  steppingstone.magedu.com steppingstone

[root@node3 ~]# mount /dev/cdrom /media(将/dev/cdrom挂载到/media目录)
mount: block device /dev/cdrom is write-protected, mounting read-only
[root@node3 ~]# vim /etc/yum.repos.d/smoke.repo(编辑yum源配置文件)

[Server]
name=Server
baseurl=file:///media/Server
enabled=1
gpgcheck=0
[VT]
name=VT
baseurl=file:///media/VT
enabled=1
gpgcheck=0
[Cluster]
name=Cluster
baseurl=file:///media/Cluster
enabled=1
gpgcheck=0
[ClusterStorage]
name=ClusterStorage
baseurl=file:///media/ClusterStorage
enabled=1
gpgcheck=0
跳板机:
[root@localhost ~]# ifconfig eth0(查看eth0网卡信息)
eth0      Link encap:Ethernet  HWaddr 00:0C:29:F4:69:6B
          inet addr:172.16.100.100  Bcast:172.16.100.255  Mask:255.255.255.0
          inet6 addr: fe80::20c:29ff:fef4:696b/64 Scope:Link
          UP BROADCAST RUNNING MULTICAST  MTU:1500  Metric:1
          RX packets:3325 errors:0 dropped:0 overruns:0 frame:0
          TX packets:2598 errors:0 dropped:0 overruns:0 carrier:0
          collisions:0 txqueuelen:1000
          RX bytes:290142 (283.3 KiB)  TX bytes:313024 (305.6 KiB)
          Interrupt:67 Base address:0x2000
[root@localhost ~]# hostname steppingstone.magedu.com(修改主机名称)
[root@localhost ~]# hostname(查看主机名称)
steppingstone.magedu.com
[root@localhost ~]# vim /etc/sysconfig/network(编辑主机名配置文件)

NETWORKING=yes
NETWORKING_IPV6=yes
HOSTNAME=steppingstone.magedu.com

[root@localhost ~]# uname  -n(查看主机名)
steppingstone.magedu.com
[root@steppingstone ~]# ssh-keygen -t rsa -f ~/.ssh/id_rsa -P ''(生存一对密钥,-t指定加密算法类型rsa或dsa,-f指定私钥文件保存位置,-P指定私钥密码)
Generating public/private rsa key pair.
/root/.ssh/id_rsa already exists.
Overwrite (y/n)? y
Your identification has been saved in /root/.ssh/id_rsa.
Your public key has been saved in /root/.ssh/id_rsa.pub.
The key fingerprint is:
8d:7b:29:a0:ab:70:50:26:ea:4c:f1:6c:db:73:f8:2f root@steppingstone.magedu.com
[root@steppingstone ~]# ssh-copy-id -i .ssh/id_rsa.pub root@172.16.100.6(通过ssh-copy-id将.ssh/id_rsa.pub公钥文件复制到远程主机172.16.100.6,以
root用户登录,-i指定公钥文件)
15
The authenticity of host '172.16.100.6 (172.16.100.6)' can't be established.
RSA key fingerprint is ea:32:fd:b5:e6:d2:75:e2:c2:c2:8c:63:d4:82:4c:48.
Are you sure you want to continue connecting (yes/no)? yes
Warning: Permanently added '172.16.100.6' (RSA) to the list of known hosts.
root@172.16.100.6's password:
Now try logging into the machine, with "ssh 'root@172.16.100.6'", and check in:

  .ssh/authorized_keys

to make sure we haven't added extra keys that you weren't expecting.


[root@steppingstone ~]# ssh-copy-id -i .ssh/id_rsa.pub root@172.16.100.7(通过ssh-copy-id将.ssh/id_rsa.pub公钥文件复制到远程主机172.16.100.7,以
root用户登录,-i指定公钥文件)
15
The authenticity of host '172.16.100.7 (172.16.100.7)' can't be established.
RSA key fingerprint is 89:76:bc:a3:db:68:83:e1:20:ce:d4:69:eb:73:0d:f1.
Are you sure you want to continue connecting (yes/no)? yes
Warning: Permanently added '172.16.100.7' (RSA) to the list of known hosts.
root@172.16.100.7's password:
Now try logging into the machine, with "ssh 'root@172.16.100.7'", and check in:

  .ssh/authorized_keys

to make sure we haven't added extra keys that you weren't expecting.

[root@steppingstone ~]# ssh-copy-id -i .ssh/id_rsa.pub root@172.16.100.8(通过ssh-copy-id将.ssh/id_rsa.pub公钥文件复制到远程主机172.16.100.8,以
root用户登录,-i指定公钥文件)
15
The authenticity of host '172.16.100.8 (172.16.100.8)' can't be established.
RSA key fingerprint is d4:9e:40:d8:96:90:df:12:8e:5e:42:c6:80:90:34:0c.
Are you sure you want to continue connecting (yes/no)? yes
Warning: Permanently added '172.16.100.8' (RSA) to the list of known hosts.
root@172.16.100.8's password:
Now try logging into the machine, with "ssh 'root@172.16.100.8'", and check in:

  .ssh/authorized_keys

to make sure we haven't added extra keys that you weren't expecting.

[root@steppingstone ~]# vim /etc/hosts(编辑本机解析配置文件)

# Do not remove the following line, or various programs
# that require network functionality will fail.
127.0.0.1               localhost.localdomain localhost
::1             localhost6.localdomain6 localhost6
172.16.100.6    node1.magedu.com node1
172.16.100.7    node2.magedu.com node2
172.16.100.8    node3.magedu.com node3
172.16.100.100  steppingstone.magedu.com steppingstone
[root@steppingstone ~]# alias ha='for I in {1..3}; do'(创建别名ha等于'for I in {1..3}; do')
[root@steppingstone ~]# ha ssh node$I 'yum -y install cman rgmanager system-config-cluster'; done(for循环,ssh到node$I主机,$I等于1、2、3,循环
通过yum源安装cman rgmanager system-config-cluster软件)
提示:使用for循环安装有个缺陷,简单的写命令,三个节点不会并行,事实上这三个命令应该在各节点同时执行速度会更快,因为是基于bash方式,它必须一个命令执行完以后执行另外一
个,一次循环结束执行下一轮,fabric有这样的能力;
HA1:
[root@node1 ~]# rpm -ql cman | less(查看cman安装生成那些文件)
/etc/cluster(配置文件目录,但里面没有任何文件)
/etc/rc.d/init.d/cman
/etc/rc.d/init.d/qdiskd(仲裁磁盘)
/etc/rc.d/init.d/scsi_reserve
/etc/udev/rules.d/51-dlm.rules
/sbin/ccs_test
/sbin/ccs_tool(管理ccs工具)
/sbin/ccsd
/sbin/dlm_controld(分布式锁控制进程)
/sbin/dlm_tool(管理分布式锁工具)
/sbin/fence_ack_manual
/sbin/fence_apc
/sbin/fence_apc_snmp
/sbin/fence_bladecenter
/sbin/fence_brocade
/sbin/fence_bullpap
/sbin/fence_cisco_mds
/sbin/fence_cisco_ucs
/sbin/fence_drac
/sbin/fence_drac5
/sbin/fence_egenera
/sbin/fence_ifmib
/sbin/fence_ilo
/sbin/fence_ilo_mp
/sbin/fence_ipmilan
/sbin/fence_lpar
/sbin/fence_manual
/sbin/fence_mcdata
/sbin/fence_node
/sbin/fence_rhevm
/sbin/fence_rps10
/sbin/fence_rsa
/sbin/fence_rsb
/sbin/fence_sanbox2
/sbin/fence_scsi
/sbin/fence_scsi_test
/sbin/fence_tool
/sbin/fence_virsh
/sbin/fence_vixel
/sbin/fence_vmware
/sbin/fence_vmware_helper
/sbin/fence_vmware_soap
/sbin/fence_wti
/sbin/fence_xvm
/sbin/fence_xvmd
/sbin/fenced
/sbin/gfs_controld
/sbin/group_tool
/sbin/groupd
/usr/lib/fence
/usr/lib/fence/fencing.py
/usr/lib/fence/fencing.pyc
/usr/lib/fence/fencing.pyo
/usr/lib/fence/fencing_snmp.py
/usr/lib/fence/fencing_snmp.pyc
/usr/lib/fence/fencing_snmp.pyo
/usr/lib/fence/telnet_ssl
/usr/lib/libcman.so
/usr/lib/libcman.so.2
/usr/lib/libcman.so.2.0.115
/usr/lib/libdlm.so
/usr/lib/libdlm.so.2
/usr/lib/libdlm.so.2.0.115
/usr/lib/libdlm_lt.so
/usr/lib/libdlm_lt.so.2
/usr/lib/libdlm_lt.so.2.0.115
/usr/libexec/lcrso
/usr/libexec/lcrso/service_cman.lcrso
/usr/sbin/cman_tool
/usr/sbin/mkqdisk
/usr/sbin/qdiskd
/usr/share/man/man3/dlm_cleanup.3.gz
/usr/share/man/man3/dlm_close_lockspace.3.gz
/usr/share/man/man3/dlm_create_lockspace.3.gz
/usr/share/man/man3/dlm_dispatch.3.gz
/usr/share/man/man3/dlm_get_fd.3.gz
/usr/share/man/man3/dlm_lock.3.gz
/usr/share/man/man3/dlm_lock_wait.3.gz
/usr/share/man/man3/dlm_ls_lock.3.gz
/usr/share/man/man3/dlm_ls_lock_wait.3.gz
/usr/share/man/man3/dlm_ls_lockx.3.gz
/usr/share/man/man3/dlm_ls_pthread_init.3.gz
/usr/share/man/man3/dlm_ls_unlock.3.gz
/usr/share/man/man3/dlm_ls_unlock_wait.3.gz
/usr/share/man/man3/dlm_new_lockspace.3.gz
/usr/share/man/man3/dlm_open_lockspace.3.gz
/usr/share/man/man3/dlm_pthread_init.3.gz
/usr/share/man/man3/dlm_release_lockspace.3.gz
/usr/share/man/man3/dlm_unlock.3.gz
/usr/share/man/man3/dlm_unlock_wait.3.gz
/usr/share/man/man3/libdlm.3.gz
/usr/share/man/man5/cluster.conf.5.gz
/usr/share/man/man5/cman.5.gz
/usr/share/man/man5/qdisk.5.gz
/usr/share/man/man7/ccs.7.gz
/usr/share/man/man8/ccs_test.8.gz
/usr/share/man/man8/ccs_tool.8.gz
/usr/share/man/man8/ccsd.8.gz
/usr/share/man/man8/cman_tool.8.gz
/usr/share/man/man8/dlm_controld.8.gz
/usr/share/man/man8/dlm_tool.8.gz
/usr/share/man/man8/fence.8.gz
/usr/share/man/man8/fence_ack_manual.8.gz
/usr/share/man/man8/fence_apc.8.gz
/usr/share/man/man8/fence_apc_snmp.8.gz
/usr/share/man/man8/fence_bladecenter.8.gz
/usr/share/man/man8/fence_brocade.8.gz
/usr/share/man/man8/fence_bullpap.8.gz
/usr/share/man/man8/fence_cisco_mds.8.gz
/usr/share/man/man8/fence_cisco_ucs.8.gz
/usr/share/man/man8/fence_drac.8.gz
/usr/share/man/man8/fence_drac5.8.gz
/usr/share/man/man8/fence_egenera.8.gz
/usr/share/man/man8/fence_ifmib.8.gz
/usr/share/man/man8/fence_ilo.8.gz
/usr/share/man/man8/fence_ilo_mp.8.gz
/usr/share/man/man8/fence_ipmilan.8.gz
/usr/share/man/man8/fence_lpar.8.gz
/usr/share/man/man8/fence_manual.8.gz
/usr/share/man/man8/fence_mcdata.8.gz
/usr/share/man/man8/fence_node.8.gz
/usr/share/man/man8/fence_rhevm.8.gz
/usr/share/man/man8/fence_rib.8.gz
/usr/share/man/man8/fence_rps10.8.gz
/usr/share/man/man8/fence_rsa.8.gz
/usr/share/man/man8/fence_rsb.8.gz
/usr/share/man/man8/fence_sanbox2.8.gz
/usr/share/man/man8/fence_scsi.8.gz
/usr/share/man/man8/fence_scsi_test.8.gz
/usr/share/man/man8/fence_tool.8.gz
/usr/share/man/man8/fence_virsh.8.gz
/usr/share/man/man8/fence_vixel.8.gz
/usr/share/man/man8/fence_vmware.8.gz
/usr/share/man/man8/fence_vmware_soap.8.gz
/usr/share/man/man8/fence_wti.8.gz
/usr/share/man/man8/fence_xvm.8.gz
/usr/share/man/man8/fence_xvmd.8.gz
/usr/share/man/man8/fenced.8.gz
/usr/share/man/man8/gfs_controld.8.gz
/usr/share/man/man8/group_tool.8.gz
/usr/share/man/man8/groupd.8.gz
/usr/share/man/man8/mkqdisk.8.gz
/usr/share/man/man8/qdiskd.8.gz
/usr/share/snmp/mibs/powernet369.mib
/var/run/cluster
(END)
[root@node1 ~]# man cman_tool(查看cman_tool命令的man帮助)

       cman_tool - Cluster Management Tool(管理集群工具)

       cman_tool join(加入节点到集群) | leave(将节点移除集群) | kill | expected(期望票数) | votes | version(配置版本) | wait | status(查看集群
状态) | nodes | services | debug [options]

[root@node1 ~]# man ccs_tool(查看ccs_tool的man帮助)

       ccs_tool - The tool used to make online updates of CCS config files.(用来在线更新集群配置文件,而且能够立即生效工具)

[root@node1 ~]# rpm -ql cman | less(查看cman安装生成那些文件)
/etc/cluster(配置文件目录,但里面没有任何文件)
/etc/rc.d/init.d/cman
/etc/rc.d/init.d/qdiskd(仲裁磁盘)
/etc/rc.d/init.d/scsi_reserve
/etc/udev/rules.d/51-dlm.rules
/sbin/ccs_test
/sbin/ccs_tool(管理ccs工具)
/sbin/ccsd
/sbin/dlm_controld(分布式锁控制进程)
/sbin/dlm_tool(管理分布式锁工具)
/sbin/fence_ack_manual
/sbin/fence_apc
/sbin/fence_apc_snmp
/sbin/fence_bladecenter
/sbin/fence_brocade
/sbin/fence_bullpap
/sbin/fence_cisco_mds
/sbin/fence_cisco_ucs
/sbin/fence_drac
/sbin/fence_drac5
/sbin/fence_egenera
/sbin/fence_ifmib
/sbin/fence_ilo
/sbin/fence_ilo_mp
/sbin/fence_ipmilan
/sbin/fence_lpar
/sbin/fence_manual(模拟手动fence)
/sbin/fence_mcdata
/sbin/fence_node
/sbin/fence_rhevm
/sbin/fence_rps10
/sbin/fence_rsa
/sbin/fence_rsb
/sbin/fence_sanbox2
/sbin/fence_scsi
/sbin/fence_scsi_test
/sbin/fence_tool
/sbin/fence_virsh
/sbin/fence_vixel
/sbin/fence_vmware
/sbin/fence_vmware_helper
/sbin/fence_vmware_soap
/sbin/fence_wti
/sbin/fence_xvm
/sbin/fence_xvmd
/sbin/fenced
/sbin/gfs_controld
/sbin/group_tool
/sbin/groupd
/usr/lib/fence
/usr/lib/fence/fencing.py
/usr/lib/fence/fencing.pyc
/usr/lib/fence/fencing.pyo
/usr/lib/fence/fencing_snmp.py
/usr/lib/fence/fencing_snmp.pyc
/usr/lib/fence/fencing_snmp.pyo
/usr/lib/fence/telnet_ssl
/usr/lib/libcman.so
/usr/lib/libcman.so.2
/usr/lib/libcman.so.2.0.115
/usr/lib/libdlm.so
/usr/lib/libdlm.so.2
/usr/lib/libdlm.so.2.0.115
/usr/lib/libdlm_lt.so
/usr/lib/libdlm_lt.so.2
/usr/lib/libdlm_lt.so.2.0.115
/usr/libexec/lcrso
/usr/libexec/lcrso/service_cman.lcrso
/usr/sbin/cman_tool
/usr/sbin/mkqdisk
/usr/sbin/qdiskd
/usr/share/man/man3/dlm_cleanup.3.gz
/usr/share/man/man3/dlm_close_lockspace.3.gz
/usr/share/man/man3/dlm_create_lockspace.3.gz
/usr/share/man/man3/dlm_dispatch.3.gz
/usr/share/man/man3/dlm_get_fd.3.gz
/usr/share/man/man3/dlm_lock.3.gz
/usr/share/man/man3/dlm_lock_wait.3.gz
/usr/share/man/man3/dlm_ls_lock.3.gz
/usr/share/man/man3/dlm_ls_lock_wait.3.gz
/usr/share/man/man3/dlm_ls_lockx.3.gz
/usr/share/man/man3/dlm_ls_pthread_init.3.gz
/usr/share/man/man3/dlm_ls_unlock.3.gz
/usr/share/man/man3/dlm_ls_unlock_wait.3.gz
/usr/share/man/man3/dlm_new_lockspace.3.gz
/usr/share/man/man3/dlm_open_lockspace.3.gz
/usr/share/man/man3/dlm_pthread_init.3.gz
/usr/share/man/man3/dlm_release_lockspace.3.gz
/usr/share/man/man3/dlm_unlock.3.gz
/usr/share/man/man3/dlm_unlock_wait.3.gz
/usr/share/man/man3/libdlm.3.gz
/usr/share/man/man5/cluster.conf.5.gz
/usr/share/man/man5/cman.5.gz
/usr/share/man/man5/qdisk.5.gz
/usr/share/man/man7/ccs.7.gz
/usr/share/man/man8/ccs_test.8.gz
/usr/share/man/man8/ccs_tool.8.gz
/usr/share/man/man8/ccsd.8.gz
/usr/share/man/man8/cman_tool.8.gz
/usr/share/man/man8/dlm_controld.8.gz
/usr/share/man/man8/dlm_tool.8.gz
/usr/share/man/man8/fence.8.gz
/usr/share/man/man8/fence_ack_manual.8.gz
/usr/share/man/man8/fence_apc.8.gz
/usr/share/man/man8/fence_apc_snmp.8.gz
/usr/share/man/man8/fence_bladecenter.8.gz
/usr/share/man/man8/fence_brocade.8.gz
/usr/share/man/man8/fence_bullpap.8.gz
/usr/share/man/man8/fence_cisco_mds.8.gz
/usr/share/man/man8/fence_cisco_ucs.8.gz
/usr/share/man/man8/fence_drac.8.gz
/usr/share/man/man8/fence_drac5.8.gz
/usr/share/man/man8/fence_egenera.8.gz
/usr/share/man/man8/fence_ifmib.8.gz
/usr/share/man/man8/fence_ilo.8.gz
/usr/share/man/man8/fence_ilo_mp.8.gz
/usr/share/man/man8/fence_ipmilan.8.gz
/usr/share/man/man8/fence_lpar.8.gz
/usr/share/man/man8/fence_manual.8.gz
/usr/share/man/man8/fence_mcdata.8.gz
/usr/share/man/man8/fence_node.8.gz
/usr/share/man/man8/fence_rhevm.8.gz
/usr/share/man/man8/fence_rib.8.gz
/usr/share/man/man8/fence_rps10.8.gz
/usr/share/man/man8/fence_rsa.8.gz
/usr/share/man/man8/fence_rsb.8.gz
/usr/share/man/man8/fence_sanbox2.8.gz
/usr/share/man/man8/fence_scsi.8.gz
/usr/share/man/man8/fence_scsi_test.8.gz
/usr/share/man/man8/fence_tool.8.gz
/usr/share/man/man8/fence_virsh.8.gz(virsh能够管理zen、kvm,让运行在zen、kvm虚拟机关机重启等等)
/usr/share/man/man8/fence_vixel.8.gz
/usr/share/man/man8/fence_vmware.8.gz(用来fence vmware虚拟机)
/usr/share/man/man8/fence_vmware_soap.8.gz
/usr/share/man/man8/fence_wti.8.gz
/usr/share/man/man8/fence_xvm.8.gz
/usr/share/man/man8/fence_xvmd.8.gz
/usr/share/man/man8/fenced.8.gz
/usr/share/man/man8/gfs_controld.8.gz
/usr/share/man/man8/group_tool.8.gz
/usr/share/man/man8/groupd.8.gz
/usr/share/man/man8/mkqdisk.8.gz
/usr/share/man/man8/qdiskd.8.gz
/usr/share/snmp/mibs/powernet369.mib
/var/run/cluster
(END)
[root@node1 ~]# fence_manual -h(查看fence_manual的帮助)
Usage:

fence_manual [options]

Options:
  -h               usage
  -q               quiet
  -n <nodename>    node to fence(指明fence掉)
  -V               version
[root@node1 ~]# fence_manual -n node3.magedu.com(模拟fence掉node3节点)
[root@node1 ~]# fence_vmware -h(查看fence_vmware命令帮助)
Usage:
	fence_vmware [options]
Options:
   -o, --action=<action>          Action: status, reboot (default), off or on
   -a, --ip=<ip>                  IP address or hostname of fencing device
   -l, --username=<name>          Login name(登录帐号)
   -p, --password=<password>      Login password or passphrase(密码)
   -S, --password-script=<script> Script to run to retrieve password
   -n, --plug=<id>                Physical plug number on device or
                                        name of virtual machine
   -e, --exec=<command>           Command to execute
   -d, --vmware_type=<type>       Type of VMware to connect
   -x, --ssh                      Use ssh connection
   -k, --identity-file=<filename> Identity file (private key) for ssh
   -s, --vmware_datacenter=<dc>   VMWare datacenter filter
   -v, --verbose                  Verbose mode
   -D, --debug-file=<debugfile>   Debugging to output file
   -V, --version                  Output version information and exit
   -h, --help                     Display this help and exit
   -C, --separator=<char>         Separator for CSV created by 'list' operation
   --power-timeout <seconds>      Test X seconds for status change after ON/OFF
   --shell-timeout <seconds>      Wait X seconds for cmd prompt after issuing command
   --login-timeout <seconds>      Wait X seconds for cmd prompt after login
   --power-wait <seconds>         Wait X seconds after issuing ON/OFF
   --delay <seconds>              Wait X seconds before fencing is started
   --retry-on <attempts>          Count of attempts to retry power on
[root@node1 ~]# system-config-cluster &(后台运行system-config-cluster集群配置图形界面)
现在没有配置文件,是不是手动指定一个配置文件,这个程序都是在本机操作的所以不需要登录,当点击保存,它会借助CCS将配置同步到其他各节点上去,它不需要非的联系DC的,在cman当中是没有DC的概念的,点击Create New Configuration创建配置文件;

Choose a name for the cluster:集群名称tcluster,集群节点之间通过多播方式传递心跳信息,点击Custom Configure Multicast指定多播地址,如果不指定它会生成一个随机可用多播地址,Use a Quorum Disk是否使用仲裁磁盘,Interval:内部多长时间尝试写一次,点击OK;

Cluster Nodes集群有多少节点,Fence Devices有几个fence设备,Failover Domains故障转移域是数什么,Resources资源,Services服务,现在想将我们的集群节点加入进来点击Add a Cluster Node就可以了;

Cluster Node Name:节点名称为node1.magedu.com,当前主机一定要能解析那个节点,Quorum Votes:票数,默认都1票,点击OK;

继续点击Add a Cluster Node添加节点,Cluster Node Name:节点名称node2.magedu.com,Quorum Votes:票数,1票,点击OK;

继续点击Add a Cluster Node添加节点,Cluster Node Name:节点名称node3.magedu.com,Quorum Votes:票数,1票,点击OK;

还至少应该有一个Fence Devices,选择Fence Devices,点击Add a Fence Device添加fence设备;

Add a New Fence Device,选择Manual Fencing(使用肉键fencing),Name:名称meatware,点击OK;

点击File--Save 保存配置,指定保存位置/etc/cluster,点击OK,保存后关闭system-config-cluster;

[root@node1 ~]# cd /etc/cluster/(切换到/etc/cluster目录)
[root@node1 cluster]# cat cluster.conf(查看cluster.conf文件内容)
<?xml version="1.0" ?>
<cluster config_version="2" name="tcluster">
	<fence_daemon post_fail_delay="0" post_join_delay="3"/>
	<clusternodes>
		<clusternode name="node1.magedu.com" nodeid="1" votes="1">
			<fence/>
		</clusternode>
		<clusternode name="node2.magedu.com" nodeid="2" votes="1">
			<fence/>
		</clusternode>
		<clusternode name="node3.magedu.com" nodeid="3" votes="1">
			<fence/>
		</clusternode>
	</clusternodes>
	<cman/>
	<fencedevices>
		<fencedevice agent="fence_manual" name="meatware"/>
	</fencedevices>
	<rm>
		<failoverdomains/>
		<resources/>
	</rm>
</cluster>
HA2:
[root@node2 ~]# cd /etc/cluster/(切换到/etc/cluster目录)
[root@node2 cluster]# ls(查看当前目录文件及子目录)
提示:node2节点/etc/cluster目录没有cluster.conf配置文件,因为集群服务还没有启动;
HA1:
[root@node1 cluster]# service cman start(启动cman服务)
Starting cluster:
   Loading modules... done
   Mounting configfs... done
   Starting ccsd... done
   Starting cman... done
   Starting daemons... done
   Starting fencing...
                                                           [  OK  ]
提示:在node1节点启动cman服务,卡到启动fencing,它要等待把这个配置文件传输到其他两个节点上去,所以cman启动过程当中它会自动的就启动ccs服务,所以另外两个节点把cman也
都启动起来,它首先ccs服务会启动的,ccs把配置文件都传递给另外两个节点,而后这个启动才算真正完成了;

HA2:
[root@node2 cluster]# service cman start(启动cman服务)
Starting cluster:
   Loading modules... done
   Mounting configfs... done
   Starting ccsd... done
   Starting cman... done
   Starting daemons... done
   Starting fencing...
                                                           [确定]
HA3:
[root@node3 ~]# service cman start(启动cman服务)
Starting cluster:
   Loading modules... done
   Mounting configfs... done
   Starting ccsd... done
   Starting cman...
   Starting daemons... done
   Starting fencing... done
                                                           [  OK  ]
提示:这里并没有使用for循环的方式去执行,因为第一个主机执行结束之后第二个主机才能启动,第一个主机等待另外两个主机启动才能启动;
HA2:
[root@node2 cluster]# ls(查看当前目录文件及子目录)
cluster.conf
提示:cluster.conf复制过来了,这就是ccsd给我们带来的效果;
HA3:
[root@node3 ~]# cd /etc/cluster/(切换到/etc/cluster目录)
[root@node3 cluster]# ls(查看当前目录文件及子目录)
cluster.conf
[root@node3 cluster]# cat cluster.conf(查看cluster.conf配置文件)
<?xml version="1.0"?>
<cluster config_version="2" name="tcluster">
	<fence_daemon post_fail_delay="0" post_join_delay="3"/>
	<clusternodes>
		<clusternode name="node1.magedu.com" nodeid="1" votes="1">
			<fence/>
		</clusternode>
		<clusternode name="node2.magedu.com" nodeid="2" votes="1">
			<fence/>
		</clusternode>
		<clusternode name="node3.magedu.com" nodeid="3" votes="1">
			<fence/>
		</clusternode>
	</clusternodes>
	<cman/>
	<fencedevices>
		<fencedevice agent="fence_manual" name="meatware"/>
	</fencedevices>
	<rm>
		<failoverdomains/>
		<resources/>
	</rm>
</cluster>
提示:配置文件在所有节点都是一模一样的,所以cman启动起来了;

除了cman之外它们还依赖一个资源管理器rgmanager;
跳板机:
[root@steppingstone ~]# ha ssh node$I 'service rgmanager start'; done(for循环,在node$I节点上启动rgmanager服务,$I等于1、2、3循环3次)
启动 Cluster Service Manager:[确定]
启动 Cluster Service Manager:[确定]
启动 Cluster Service Manager:[确定]
HA1:
[root@node1 cluster]# cd(切换到用户家目录)
[root@node1 ~]# netstat -tnlp | grep -E "(cman|rgmanager)"(显示系统服务,-t代表tcp,-n以数字显示,-l监听端口,-p显示协议名称,将结果送给管道只显示包含cman
或rgmanager的段,-E扩展egrep)
[root@node1 ~]# netstat -tnlp(查看系统服务,-t代表tcp,-n以数字显示,-l监听端口,p显示服务名称)
Active Internet connections (only servers)
Proto Recv-Q Send-Q Local Address               Foreign Address             State       PID/Program name
tcp        0      0 127.0.0.1:2208              0.0.0.0:*                   LISTEN      3494/./hpiod
tcp        0      0 172.16.100.6:21064          0.0.0.0:*                   LISTEN      -
tcp        0      0 0.0.0.0:111                 0.0.0.0:*                   LISTEN      3175/portmap
tcp        0      0 0.0.0.0:852                 0.0.0.0:*                   LISTEN      3214/rpc.statd
tcp        0      0 0.0.0.0:22                  0.0.0.0:*                   LISTEN      3515/sshd
tcp        0      0 127.0.0.1:631               0.0.0.0:*                   LISTEN      3527/cupsd
tcp        0      0 0.0.0.0:50008               0.0.0.0:*                   LISTEN      14521/ccsd
tcp        0      0 127.0.0.1:25                0.0.0.0:*                   LISTEN      3564/sendmail
tcp        0      0 127.0.0.1:6010              0.0.0.0:*                   LISTEN      4917/sshd
tcp        0      0 127.0.0.1:2207              0.0.0.0:*                   LISTEN      3499/python
tcp        0      0 ::1:50006                   :::*                        LISTEN      14521/ccsd
tcp        0      0 :::22                       :::*                        LISTEN      3515/sshd
tcp        0      0 ::1:6010                    :::*                        LISTEN      4917/sshd
提示:这里叫ccsd而不叫cman;
[root@node1 ~]# netstat -tunlp(显示系统服务,-t代表tcp,-u代表udp,-n以数字显示,-l监听端口,-p显示服务名称)
Active Internet connections (only servers)
Proto Recv-Q Send-Q Local Address               Foreign Address             State       PID/Program name
tcp        0      0 127.0.0.1:2208              0.0.0.0:*                   LISTEN      3494/./hpiod
tcp        0      0 172.16.100.6:21064          0.0.0.0:*                   LISTEN      -
tcp        0      0 0.0.0.0:111                 0.0.0.0:*                   LISTEN      3175/portmap
tcp        0      0 0.0.0.0:852                 0.0.0.0:*                   LISTEN      3214/rpc.statd
tcp        0      0 0.0.0.0:22                  0.0.0.0:*                   LISTEN      3515/sshd
tcp        0      0 127.0.0.1:631               0.0.0.0:*                   LISTEN      3527/cupsd
tcp        0      0 0.0.0.0:50008               0.0.0.0:*                   LISTEN      14521/ccsd
tcp        0      0 127.0.0.1:25                0.0.0.0:*                   LISTEN      3564/sendmail
tcp        0      0 127.0.0.1:6010              0.0.0.0:*                   LISTEN      4917/sshd
tcp        0      0 127.0.0.1:2207              0.0.0.0:*                   LISTEN      3499/python
tcp        0      0 ::1:50006                   :::*                        LISTEN      14521/ccsd
tcp        0      0 :::22                       :::*                        LISTEN      3515/sshd
tcp        0      0 ::1:6010                    :::*                        LISTEN      4917/sshd
udp        0      0 0.0.0.0:43547               0.0.0.0:*                               3701/avahi-daemon
udp        0      0 172.16.100.6:5405           0.0.0.0:*                               14527/aisexec
udp        0      0 172.16.100.6:5149           0.0.0.0:*                               14527/aisexec
udp        0      0 239.192.110.162:5405        0.0.0.0:*                               14527/aisexec
udp        0      0 0.0.0.0:846                 0.0.0.0:*                               3214/rpc.statd
udp        0      0 0.0.0.0:849                 0.0.0.0:*                               3214/rpc.statd
udp        0      0 0.0.0.0:5353                0.0.0.0:*                               3701/avahi-daemon
udp        0      0 0.0.0.0:111                 0.0.0.0:*                               3175/portmap
udp        0      0 0.0.0.0:631                 0.0.0.0:*                               3527/cupsd
udp        0      0 :::40122                    :::*                                    3701/avahi-daemon
udp        0      0 :::50007                    :::*                                    14521/ccsd
udp        0      0 :::5353                     :::*                                    3701/avahi-daemon
提示:aisexec 239.192.110.162:5405多播地址,ccsd还有udp的;
跳板机:
[root@steppingstone ~]# ha ssh node$I 'yum -y install httpd'; done(for循环,ssh远程到$I主机,通过yum源安装httpd软件到node$I主机,$I标识1、2、3执行3次
循环)
[root@steppingstone ~]# ha ssh node$I 'echo node$I > /var/www/html/index.html'; done(for循环,ssh远程到node$I主机显示node$I到/var/www/index.html
文件,$I取值为1、2、3,循环3次)
HA1:
[root@node1 ~]# cd /var/www/html/(切换到/var/www/html目录)
[root@node1 html]# ls(查看当前目录文件及子目录)
index.html
[root@node1 html]# vim index.html(编辑index.html文件)

node

提示:没有$I取值;
跳板机:
[root@steppingstone ~]# ha ssh node$I 'echo node$I > /var/www/html/index.html'; done(for循环,ssh远程到node$I主机显示node$I到/var/www/index.html
文件,$I取值为1、2、3,循环3次)
提示:这个命令$I有个坏处这个命令不是在当前shell中执行的,它在远程主机执行的,远程主机没有$I;
HA1:
[root@node1 html]# vim index.html(编辑index.html文件)

node1
HA2:
[root@node2 cluster]# vim /var/www/html/index.html(编辑index.html文件)

node2
HA3:
[root@node3 cluster]# vim /var/www/html/index.html(编辑index.html文件)

node3
HA1:
[root@node1 html]# service httpd start(启动httpd服务)
Starting httpd:                                            [  OK  ]
测试:通过window的ie浏览器访问httpd://172.16.100.6,可以访问;

[root@node1 html]# service httpd stop(停止httpd服务)
Stopping httpd:                                            [  OK  ]
[root@node1 html]# chkconfig httpd off(关闭httpd服务在相应系统级别开机自动启动)
HA2:
[root@node2 cluster]# chkconfig httpd off(关闭httpd服务)
HA3:
[root@node3 cluster]# chkconfig httpd off(关闭httpd服务)
[root@node3 cluster]# cman_tool status(查看当前集群状态)
Version: 6.2.0
Config Version: 2(配置文件版本)
Cluster Name: tcluster(集群名称)
Cluster Id: 28212
Cluster Member: Yes
Cluster Generation: 128
Membership state: Cluster-Member
Nodes: 3(几个节点)
Expected votes: 3(期望几票)
Total votes: 3(一共几票)
Node votes: 1(每个节点几票)
Quorum: 2(满足quorum至少有2票)
Active subsystems: 8
Flags: Dirty
Ports Bound: 0 177
Node name: node3.magedu.com(当前节点名)
Node ID: 3
Multicast addresses: 239.192.110.162(多播地址)
Node addresses: 172.16.100.8
[root@node3 cluster]# clustat(查看集群状态)
Cluster Status for tcluster @ Fri May 13 22:03:26 2016
Member Status: Quorate

 Member Name                                                     ID   Status
 ------ ----                                                     ---- ------
 node1.magedu.com                                                    1 Online
 node2.magedu.com                                                    2 Online
 node3.magedu.com                                                    3 Online, Local
[root@node3 cluster]# clusvcadm -h(查看clusvcadm的帮助)
Resource Group Control Commands:
       clusvcadm -v                     Display version and exit
       clusvcadm -d <group>             Disable <group>(禁用组)
       clusvcadm -e <group>             Enable <group>(启用组)
       clusvcadm -e <group> -F          Enable <group> according to failover
                                        domain rules
       clusvcadm -e <group> -m <member> Enable <group> on <member>(在那个成员启用组)
       clusvcadm -r <group> -m <member> Relocate <group> [to <member>](在那个成员迁移组)
       clusvcadm -M <group> -m <member> Migrate <group> to <member>
                                          (e.g. for live migration of VMs)
       clusvcadm -q                     Quiet operation
       clusvcadm -R <group>             Restart a group in place.
       clusvcadm -s <group>             Stop <group>

Resource Group Locking (for cluster Shutdown / Debugging):
       clusvcadm -l                     Lock local resource group manager.
                                        This prevents resource groups from
                                        starting on the local node.
       clusvcadm -S                     Show lock state
       clusvcadm -u                     Unlock local resource group manager.
                                        This allows resource groups to start
                                        on the local node.
       clusvcadm -Z <group>             Freeze group in place
       clusvcadm -U <group>             Unfreeze/thaw group
       clusvcadm -c <group>             Convalesce (repair, fix) resource group.
                                        Attempts to start failed, non-critical
                                        resources within a resource group.
提示:对于cman没有命令来配置资源,只有直接手动编辑配置文件/etc/cluster/cluster.conf,而且要编辑为xml格式的;
HA1:
[root@node1 html]# !sys(后台执行system-config-cluster集群配置图形界面)
system-config-cluster &
[1] 15558
点击Resources资源,点击Create a Resource创建一个资源;

Select a Resource Type:选择资源类型,有Sybase、SAP Database、Apache Server、File System、IP Address、MySQL Server、NFS Client、NFS Export、NFS Mount、Open LDAP server,选择Apache Server,Name:名称,Server Root:目录,Config File:配置文件,httpd Options:选项,我们此前都是使用服务脚本直接启动,所以选择Script,所有位于lsb的资源代理类型都被称为Script,Name:资源名称,FIIE(with path):可执行脚步路径,定义第一个资源IP地址,Select a Resource Type:选择资源类型为IP Address,地址为172.16.100.1,掩码长度24位,点击OK;

点击Resources,添加第二个资源,点击Create a Resource,Select a Resource Type:选择Script,Name:名称叫webserver,FIIe(with path):路径/etc/rc.d/init.d/httpd,点击OK;

两个资源,资源是没法启动的,这根corosysnc不一样,资源只能定义成服务,能启动的只能是服务,选择Service,创建服务,点击Create a Service,Name:名称webservice,点击OK;

Fallover Domain:故障转移域,出现故障应该在那个域进行转移,Autostart This Service集群启动自动启动服务,出现故障Restart(重启)、Relocate(重新找个节点运行,一定是转移到故障转移域优先级比较高的节点)、Disable(禁用),最好使用Restart,Create a new resource for this service创建新资源到这个服务,Add a Shared Resource to theis service添加共享资源到这个服务,点击Add a Shared Resource to theis service添加共享资源到这个服务,将IP Address和Script添加进服务,点击Close;

配置完以后,点击Send to Cluster(自动同步到所有节点),点击Yes;

HA1:
[root@node1 html]# cman_tool status(查看集群状态)
Version: 6.2.0
Config Version: 3
Cluster Name: tcluster
Cluster Id: 28212
Cluster Member: Yes
Cluster Generation: 128
Membership state: Cluster-Member
Nodes: 3
Expected votes: 3
Total votes: 3
Node votes: 1
Quorum: 2
Active subsystems: 8
Flags: Dirty
Ports Bound: 0 177
Node name: node1.magedu.com
Node ID: 1
Multicast addresses: 239.192.110.162
Node addresses: 172.16.100.6
[root@node1 html]# ccs_tool -h(查看cc_tool的帮助)
Usage::
  ccs_tool [options] <command>

Options:
  -h                  Print this usage and exit.
  -V                  Print version information and exit.

Commands:
  help                Print this usage and exit.
  update <xml file>   Tells ccsd to upgrade to new config file.
  upgrade <location>  Upgrade old CCS format to new xml format.
  addnode <node>      Add a node
  delnode <node>      Delete a node
  lsnode              List nodes
  lsfence             List fence devices
  addfence <fencedev> Add a new fence device
  delfence <fencedev> Delete a fence device
  create              Create a skeleton config file
  addnodeids          Assign node ID numbers to all nodes
[root@node1 html]# clustat(查看集群状态)
Cluster Status for tcluster @ Fri May 13 22:35:25 2016
Member Status: Quorate

 Member Name                                                     ID   Status
 ------ ----                                                     ---- ------
 node1.magedu.com                                                    1 Online, Local, rgmanager
 node2.magedu.com                                                    2 Online, rgmanager
 node3.magedu.com                                                    3 Online, rgmanager

 Service Name                                              Owner (Last)                                              State
 ------- ----                                              ----- ------                                              -----
 service:webservice                                        node1.magedu.com                                          started
提示:服务名称叫webservice,状态started,在第一个节点上;
[root@node1 html]# netstat -tnlp(查看系统服务,-t代表tcp,-n以数字显示,-l监听端口,-p显示服务名称)
Active Internet connections (only servers)
Proto Recv-Q Send-Q Local Address               Foreign Address             State       PID/Program name
tcp        0      0 127.0.0.1:2208              0.0.0.0:*                   LISTEN      3494/./hpiod
tcp        0      0 172.16.100.6:21064          0.0.0.0:*                   LISTEN      -
tcp        0      0 0.0.0.0:111                 0.0.0.0:*                   LISTEN      3175/portmap
tcp        0      0 0.0.0.0:852                 0.0.0.0:*                   LISTEN      3214/rpc.statd
tcp        0      0 0.0.0.0:22                  0.0.0.0:*                   LISTEN      3515/sshd
tcp        0      0 127.0.0.1:631               0.0.0.0:*                   LISTEN      3527/cupsd
tcp        0      0 0.0.0.0:50008               0.0.0.0:*                   LISTEN      14521/ccsd
tcp        0      0 127.0.0.1:25                0.0.0.0:*                   LISTEN      3564/sendmail
tcp        0      0 127.0.0.1:6010              0.0.0.0:*                   LISTEN      4917/sshd
tcp        0      0 127.0.0.1:2207              0.0.0.0:*                   LISTEN      3499/python
tcp        0      0 :::80                       :::*                        LISTEN      17377/httpd
tcp        0      0 ::1:50006                   :::*                        LISTEN      14521/ccsd
tcp        0      0 :::22                       :::*                        LISTEN      3515/sshd
tcp        0      0 ::1:6010                    :::*                        LISTEN      4917/sshd
[root@node1 html]# ifconfig(查看网卡接口信息)
eth0      Link encap:Ethernet  HWaddr 00:0C:29:CC:FA:AE
          inet addr:172.16.100.6  Bcast:172.16.100.255  Mask:255.255.255.0
          inet6 addr: fe80::20c:29ff:fecc:faae/64 Scope:Link
          UP BROADCAST RUNNING MULTICAST  MTU:1500  Metric:1
          RX packets:53391 errors:0 dropped:0 overruns:0 frame:0
          TX packets:71386 errors:0 dropped:0 overruns:0 carrier:0
          collisions:0 txqueuelen:1000
          RX bytes:7548344 (7.1 MiB)  TX bytes:35178360 (33.5 MiB)
          Interrupt:67 Base address:0x2000

lo        Link encap:Local Loopback
          inet addr:127.0.0.1  Mask:255.0.0.0
          inet6 addr: ::1/128 Scope:Host
          UP LOOPBACK RUNNING  MTU:16436  Metric:1
          RX packets:15095 errors:0 dropped:0 overruns:0 frame:0
          TX packets:15095 errors:0 dropped:0 overruns:0 carrier:0
          collisions:0 txqueuelen:0
          RX bytes:26082661 (24.8 MiB)  TX bytes:26082661 (24.8 MiB)
提示:没有172.16.100.1的VIP地址;
[root@node1 html]# ip addr show(显示ip地址)
1: lo: <LOOPBACK,UP,LOWER_UP> mtu 16436 qdisc noqueue
    link/loopback 00:00:00:00:00:00 brd 00:00:00:00:00:00
    inet 127.0.0.1/8 scope host lo
    inet6 ::1/128 scope host
       valid_lft forever preferred_lft forever
2: eth0: <BROADCAST,MULTICAST,UP,LOWER_UP> mtu 1500 qdisc pfifo_fast qlen 1000
    link/ether 00:0c:29:cc:fa:ae brd ff:ff:ff:ff:ff:ff
    inet 172.16.100.6/24 brd 172.16.100.255 scope global eth0
    inet 172.16.100.1/24 scope global secondary eth0
    inet6 fe80::20c:29ff:fecc:faae/64 scope link
       valid_lft forever preferred_lft forever
3: eth1: <BROADCAST,MULTICAST> mtu 1500 qdisc pfifo_fast qlen 1000
    link/ether 00:0c:29:cc:fa:b8 brd ff:ff:ff:ff:ff:ff
4: sit0: <NOARP> mtu 1480 qdisc noop
    link/sit 0.0.0.0 brd 0.0.0.0
提示:它使用ip addr添加的,有VIP地址172.16.100.1;
测试:通过Windows的ie浏览器访问172.16.100.1,正常访问;

[root@node1 html]# cman_tool -h(查看cman_tool的帮助)
Usage:

cman_tool <join|leave|kill|expected|votes|version|wait|status|nodes|services|debug> [options]

Options:
  -h               Print this help, then exit
  -V               Print program version information, then exit
  -d               Enable debug output

join
  Cluster & node information is taken from CCS. These switches are provided to
  to allow CCS values to be overridden. Use them with extreme care.

  -m <addr>        Multicast address to use
  -v <votes>       Number of votes this node has
  -e <votes>       Number of expected votes for the cluster
  -p <port>        UDP port number for cman communications
  -n <nodename>    The name of this node (defaults to hostname)
  -c <clustername> The name of the cluster to join
  -N <id>          Node id
  -w               Wait until node has joined a cluster
  -q               Wait until the cluster is quorate
  -t               Maximum time (in seconds) to wait
  -k <file>        Private key file for AIS communications

wait               Wait until the node is a member of a cluster
  -q               Wait until the cluster is quorate
  -t               Maximum time (in seconds) to wait

leave
  -w               If cluster is in transition, wait and keep trying
  -t               Maximum time (in seconds) to wait
  remove           Tell other nodes to ajust quorum downwards if necessary
  force            Leave even if cluster subsystems are active

kill
  -n <nodename>    The name of the node to kill (can specify multiple times)

expected
  -e <votes>       New number of expected votes for the cluster

votes
  -v <votes>       New number of votes for this node

status             Show local record of cluster status

nodes              Show local record of cluster nodes
  -f                 Also show when node was last fenced
  -a                 Also show node address(es)
  -n <nodename>      Only show information for specific node
  -F <format>        Specify output format (see man page)

services           Show local record of cluster services

version
  -r <config>      A new config version to set on all members
[root@node1 html]# cman_tool services(查看集群服务)
type             level name       id       state
fence            0     default    00010002 none
[1 2 3]
dlm              1     rgmanager  00010001 none
[1 2 3]
[root@node1 html]# cman_tool services -h(查看cman_tool services的帮助)
Usage:

cman_tool <join|leave|kill|expected|votes|version|wait|status|nodes|services|debug> [options]

Options:
  -h               Print this help, then exit
  -V               Print program version information, then exit
  -d               Enable debug output

services           Show local record of cluster services
[root@node1 html]# man cman_tool(查看cman_tool的man帮助)

       services(查看本地试图的子系统使用cman,谁利用cman传递了心跳信息)
              Displays the local view of subsystems using cman (deprecated, group_tool should be used instead).

[root@node1 html]# clusvcadm -h(查看clusvcadm命令帮助)
Resource Group Control Commands:
       clusvcadm -v                     Display version and exit
       clusvcadm -d <group>             Disable <group>(禁用组资源)
       clusvcadm -e <group>             Enable <group>(启动组资源)
       clusvcadm -e <group> -F          Enable <group> according to failover
                                        domain rules
       clusvcadm -e <group> -m <member> Enable <group> on <member>
       clusvcadm -r <group> -m <member> Relocate <group> [to <member>](重新定位组资源)
       clusvcadm -M <group> -m <member> Migrate <group> to <member>
                                          (e.g. for live migration of VMs)(迁移资源组到另一个主机)
       clusvcadm -q                     Quiet operation
       clusvcadm -R <group>             Restart a group in place.(Restart一个组)
       clusvcadm -s <group>             Stop <group>(停止资源组)

Resource Group Locking (for cluster Shutdown / Debugging):
       clusvcadm -l                     Lock local resource group manager.
                                        This prevents resource groups from
                                        starting on the local node.(锁定资源组)
       clusvcadm -S                     Show lock state
       clusvcadm -u                     Unlock local resource group manager.
                                        This allows resource groups to start
                                        on the local node.
       clusvcadm -Z <group>             Freeze group in place(冻结组资源)
       clusvcadm -U <group>             Unfreeze/thaw group(解冻组资源)
       clusvcadm -c <group>             Convalesce (repair, fix) resource group.
                                        Attempts to start failed, non-critical
                                        resources within a resource group.
[root@node1 html]# clusvcadm -l(锁定资源组)
Resource groups locked(资源组锁定)
[root@node1 html]# clusvcadm -u(解锁资源组)
Resource groups unlocked
[root@node1 html]# clusvcadm -r webservice -m node2.magedu.com(重新定位webservice资源到node2节点)
Trying to relocate service:webservice to node2.magedu.com...Success
service:webservice is now running on node2.magedu.com
测试:通过Windows的ie浏览器访问172.16.100.1,正常访问;

[root@node1 html]# clusvcadm -r webservice(重新定位webservice资源到随机节点)
Trying to relocate service:webservice...Success
service:webservice is now running on node3.magedu.com
[root@node1 html]# cman_tool nodes(显示当前集群所有节点)
Node  Sts   Inc   Joined               Name
   1   M      4   2016-05-13 20:53:57  node1.magedu.com
   2   M      8   2016-05-13 20:56:41  node2.magedu.com
   3   M    128   2016-05-13 21:03:03  node3.magedu.com
[root@node1 html]# clustat(查看集群状态)
Cluster Status for tcluster @ Fri May 13 23:45:00 2016
Member Status: Quorate

 Member Name                                                   ID   Status
 ------ ----                                                   ---- ------
 node1.magedu.com                                                  1 Online, Local, rgmanager
 node2.magedu.com                                                  2 Online, rgmanager
 node3.magedu.com                                                  3 Online, rgmanager

 Service Name                                         Owner (Last)                                         State
 ------- ----                                         ----- ------                                         -----
 service:webservice                                   node3.magedu.com                                     started
[root@node1 html]# ccs_tool -h(查看ccs_tool帮助)
Usage::
  ccs_tool [options] <command>

Options:
  -h                  Print this usage and exit.
  -V                  Print version information and exit.

Commands:
  help                Print this usage and exit.
  update <xml file>   Tells ccsd to upgrade to new config file.
  upgrade <location>  Upgrade old CCS format to new xml format.
  addnode <node>      Add a node(添加节点)
  delnode <node>      Delete a node(删除节点)
  lsnode              List nodes
  lsfence             List fence devices
  addfence <fencedev> Add a new fence device(添加fencedev设备)
  delfence <fencedev> Delete a fence device(删除fencedev设备)
  create              Create a skeleton config file(创建集群)
  addnodeids          Assign node ID numbers to all nodes
如何实现让高可用集群在RHCS当中也能使用共享存储,使用Filesystem,假如无论我们的web服务无论运行在node1、node2、node3那一个节点上它提供的网页页面都是一模一样的,这就要用到共享存储了,我们共享存储要么有DAS,要么是SAN设备,这是块级别的,而要在文件级别只能使用NAS,所以这里仍然以NFS为例来演示怎么能够在RHCS当中也使用文件系统服务的;
跳板机:
[root@steppingstone ~]# mkdir -pv /web/htdocs(创建/web/htdocs目录,-p递归创建,-v显示创建过程)
mkdir: 已创建目录 “/web”
mkdir: 已创建目录 “/web/htdocs”
[root@steppingstone ~]# vim /etc/exports(编辑nfs配置文件)

/web/htdocs     172.16.0.0/16(ro)

[root@steppingstone ~]# service nfs start(启动nfs服务器)
启动 NFS 服务:                                            [确定]
关掉 NFS 配额:                                            [确定]
启动 NFS 守护进程:                                        [确定]
启动 NFS mountd:                                          [确定]
[root@steppingstone ~]# chkconfig nfs on(让nfs开机自动启动)
[root@steppingstone ~]# showmount -e 172.16.100.100(查看172.16.100.100NFS服务器到处的文件系统)
Export list for 172.16.100.100:
/web/htdocs 172.16.0.0/16
提示:不能让集群节点自动挂载NFS文件系统,要让集群服务切换到谁谁就挂载,而且挂载应该跟webservice在一起;
[root@steppingstone ~]# cd /web/htdocs/(切换到/web/htdocs目录)
[root@steppingstone htdocs]# vim index.html(编辑index.html文件)

nfs server
点击Services--Service webservice--Edit Service Properties(编辑服务属性),点击Create a new resource for this service(创建一个新的资源服务),Select a Resource Type:(选择资源类型)为NFS Mount,Name:(名称)为webstore,MOunt Point:(挂载点)/var/www/html,HOst:(NFS服务器地址)为172.16.100.100,Export Path:(共享文件系统目录)为/web/htdocs,敲OK;

提示:在敲OK之前,要确保web服务在各节点上selinux是强制的,所以挂载过来的内容是没办法被直接访问的,因为没有权限,selinux会把它阻止掉的;
HA1:
[root@node1 ~]# getenforce
Enforcing
跳板机:
[root@steppingstone htdocs]# ha ssh node$I 'setenforce 0';done(for循环,ssh远程执行node$I主机关闭selinux,$I取值为1、2、3,循环3次)
HA1:
[root@node1 ~]# getenforce(查看selinux状态)
Permissive
点击Close;
HA1:
[root@node1 ~]# clustat(查看集群状态)
Cluster Status for tcluster @ Sat May 14 01:08:09 2016
Member Status: Quorate

 Member Name                                                ID   Status
 ------ ----                                                ---- ------
 node1.magedu.com                                               1 Online, Local, rgmanager
 node2.magedu.com                                               2 Online, rgmanager
 node3.magedu.com                                               3 Online, rgmanager

 Service Name                                      Owner (Last)                                      State
 ------- ----                                      ----- ------                                      -----
 service:webservice                                node3.magedu.com                                  started
[root@node1 ~]# clusvcadm -r webservice -m node1.magedu.com(前进webservice集群服务到node1.magedu.com主机)
Trying to relocate service:webservice to node1.magedu.com...Success
service:webservice is now running on node1.magedu.com
[root@node1 ~]# mount(查看当前系统挂载所有文件系统)
/dev/sda2 on / type ext3 (rw)
proc on /proc type proc (rw)
sysfs on /sys type sysfs (rw)
devpts on /dev/pts type devpts (rw,gid=5,mode=620)
/dev/sda1 on /boot type ext3 (rw)
tmpfs on /dev/shm type tmpfs (rw)
none on /proc/sys/fs/binfmt_misc type binfmt_misc (rw)
sunrpc on /var/lib/nfs/rpc_pipefs type rpc_pipefs (rw)
/dev/sr0 on /media type iso9660 (ro)
none on /sys/kernel/config type configfs (rw)
测试:通过windows的ie浏览器访问172.16.100.1,访问的是node1主机的页面,没有挂载上来;

点击Send to Cluster,点击Yes;

[root@node1 ~]# mount(查看当前系统挂载的文件系统)
/dev/sda2 on / type ext3 (rw)
proc on /proc type proc (rw)
sysfs on /sys type sysfs (rw)
devpts on /dev/pts type devpts (rw,gid=5,mode=620)
/dev/sda1 on /boot type ext3 (rw)
tmpfs on /dev/shm type tmpfs (rw)
none on /proc/sys/fs/binfmt_misc type binfmt_misc (rw)
sunrpc on /var/lib/nfs/rpc_pipefs type rpc_pipefs (rw)
/dev/sr0 on /media type iso9660 (ro)
none on /sys/kernel/config type configfs (rw)
172.16.100.100:/web/htdocs on /var/www/html type nfs (rw,sync,soft,noac,addr=172.16.100.100)
[root@node1 ~]# clusvcadm -r webservice -m node2.magedu.com(迁移webservice集群服务到node2主机)
Trying to relocate service:webservice to node2.magedu.com...Success
service:webservice is now running on node2.magedu.com
[root@node1 ~]# clustat(查看集群状态)
Cluster Status for tcluster @ Sat May 14 01:14:54 2016
Member Status: Quorate

 Member Name                                                     ID   Status
 ------ ----                                                     ---- ------
 node1.magedu.com                                                    1 Online, Local, rgmanager
 node2.magedu.com                                                    2 Online, rgmanager
 node3.magedu.com                                                    3 Online, rgmanager

 Service Name                                            Owner (Last)                                            State
 ------- ----                                            ----- ------                                            -----
 service:webservice                                      node2.magedu.com                                        started
[root@node1 ~]# clusvcadm -h(查看clusvcadm的帮助)
Resource Group Control Commands:
       clusvcadm -v                     Display version and exit
       clusvcadm -d <group>             Disable <group>
       clusvcadm -e <group>             Enable <group>
       clusvcadm -e <group> -F          Enable <group> according to failover
                                        domain rules
       clusvcadm -e <group> -m <member> Enable <group> on <member>
       clusvcadm -r <group> -m <member> Relocate <group> [to <member>]
       clusvcadm -M <group> -m <member> Migrate <group> to <member>
                                          (e.g. for live migration of VMs)
       clusvcadm -q                     Quiet operation
       clusvcadm -R <group>             Restart a group in place.(重启组)
       clusvcadm -s <group>             Stop <group>

Resource Group Locking (for cluster Shutdown / Debugging):
       clusvcadm -l                     Lock local resource group manager.
                                        This prevents resource groups from
                                        starting on the local node.
       clusvcadm -S                     Show lock state
       clusvcadm -u                     Unlock local resource group manager.
                                        This allows resource groups to start
                                        on the local node.
       clusvcadm -Z <group>             Freeze group in place
       clusvcadm -U <group>             Unfreeze/thaw group
       clusvcadm -c <group>             Convalesce (repair, fix) resource group.
                                        Attempts to start failed, non-critical
                                        resources within a resource group.
[root@node1 ~]# clusvcadm -R webservice(重启webservice集群组资源)
Local machine trying to restart service:webservice...Success
[root@node1 ~]# clustat(查看集群状态)
Cluster Status for tcluster @ Sat May 14 01:19:25 2016
Member Status: Quorate

 Member Name                                                     ID   Status
 ------ ----                                                     ---- ------
 node1.magedu.com                                                    1 Online, Local, rgmanager
 node2.magedu.com                                                    2 Online, rgmanager
 node3.magedu.com                                                    3 Online, rgmanager

 Service Name                                            Owner (Last)                                            State
 ------- ----                                            ----- ------                                            -----
 service:webservice                                      node2.magedu.com                                        started
测试:通过Windows的ie浏览器访问http://172.16.100.1,正常访问nfs服务器主页;

[root@node1 ~]# clusvcadm -r webservice -m node1.magedu.com(迁移集群服务webservice到node1主机)
Trying to relocate service:webservice to node1.magedu.com...Success
service:webservice is now running on node1.magedu.com
测试:通过Windows的ie浏览器访问http://172.16.100.1,正常访问nfs服务器主页;

[root@node1 ~]# mount(查看系统挂载的文件系统)
/dev/sda2 on / type ext3 (rw)
proc on /proc type proc (rw)
sysfs on /sys type sysfs (rw)
devpts on /dev/pts type devpts (rw,gid=5,mode=620)
/dev/sda1 on /boot type ext3 (rw)
tmpfs on /dev/shm type tmpfs (rw)
none on /proc/sys/fs/binfmt_misc type binfmt_misc (rw)
sunrpc on /var/lib/nfs/rpc_pipefs type rpc_pipefs (rw)
/dev/sr0 on /media type iso9660 (ro)
none on /sys/kernel/config type configfs (rw)
172.16.100.100:/web/htdocs on /var/www/html type nfs (rw,sync,soft,noac,addr=172.16.100.100)
[root@node1 ~]# clusvcadm -s webservice(停止webservice集群服务)
Local machine stopping service:webservice...Success
点击Services--Service webservice--Delete Service(删除服务),点击Yes;

点击Resources(资源),删除IP Address: 172.16.100.1/16,点击Delete Resource(删除资源),点击Yes;

继续点击Resources(资源),删除Script: webserver资源,点击Delete Resource(删除资源),点击Yes;

点击Send to Cluster(发送到集群配置),点击Yes;

跳板机:
[root@steppingstone htdocs]# cd(切换到用户家目录)
[root@steppingstone ~]# ha ssh node$I 'service rgmanager stop'; done(for循环ssh远程停止node$I主机的rgmanager服务,$I取值为1、2、3,循环3次)
Shutting down Cluster Service Manager...
服务已停止。
Cluster Service Manager is stopped.
Shutting down Cluster Service Manager...
服务已停止。
Cluster Service Manager is stopped.
Shutting down Cluster Service Manager...
服务已停止。
Cluster Service Manager is stopped.
[root@steppingstone ~]# ha ssh node$I 'service cman stop'; done(for循环ssh远程停止node$I主机的cman服务,$I取值为1、2、3,循环3次)
Stopping cluster:
   Stopping fencing... done
   Stopping cman... done
   Stopping ccsd... done
   Unmounting configfs... done
[确定]
Stopping cluster:
   Stopping fencing... done
   Stopping cman... done
   Stopping ccsd... done
   Unmounting configfs... done
[确定]
Stopping cluster:
   Stopping fencing... done
   Stopping cman... done
   Stopping ccsd... done
   Unmounting configfs... done
[确定]
[root@steppingstone ~]# ha ssh node$I 'rm -rf /etc/cluster/cluster.conf'; done(for循环ssh远程删除node$I主机的cluster.conf配置文件,$I取值为1、2、
3,循环3次)
HA1:
[root@node1 ~]# ls /etc/cluster/(查看/etc/cluster目录文件及子目录)
cluster.conf.bak.1  cluster.conf.bak.2  cluster.conf.bak.3
提示:这里有很多的cluster.conf.bak文件,我们每次在别的地方修改以后它会把此前的配置文件备份保存一份的;
跳板机:
[root@steppingstone ~]# ha ssh node$I 'rm -rf /etc/cluster/*'; done(for循环ssh远程删除node$I主机上/etc/cluster目录所有文件,$I取值为1、2、3,循环3次)
HA1:
[root@node1 ~]# ls /etc/cluster/(查看/etc/cluster目录文件及子目录)

在节点上完全使用命令方式,来配置RHCS工作起来,使用命令无法配置资源和服务,只是让集群能够启动起来,要想让集群能够启动起来要配置集群名称、节点、fence设备;
配置集群名称:
[root@node1 ~]# ccs_tool -h(查看ccs_tool的帮助)
Usage::
  ccs_tool [options] <command>

Options:
  -h                  Print this usage and exit.
  -V                  Print version information and exit.

Commands:
  help                Print this usage and exit.
  update <xml file>   Tells ccsd to upgrade to new config file.
  upgrade <location>  Upgrade old CCS format to new xml format.
  addnode <node>      Add a node(添加节点)
  delnode <node>      Delete a node(删除节点)
  lsnode              List nodes(显示节点)
  lsfence             List fence devices(显示fence设备)
  addfence <fencedev> Add a new fence device(添加fence设备)
  delfence <fencedev> Delete a fence device(删除fence设备)
  create              Create a skeleton config file(创建集群配置文件)
  addnodeids          Assign node ID numbers to all nodes
[root@node1 ~]# ccs_tool create tcluster(创建集群配置文件)
[root@node1 ~]# cd /etc/cluster/(切换到/etc/cluster目录)
[root@node1 cluster]# ls(查看当前目录文件及子目录)
cluster.conf
[root@node1 cluster]# cat cluster.conf(查看cluster.conf文件内容)
<?xml version="1.0"?>
<cluster name="tcluster" config_version="1">(集群名称tcluster)
  <clusternodes/>
  <fencedevices/>
  <rm>
    <failoverdomains/>
    <resources/>
  </rm>
[root@node1 cluster]# ccs_tool lsfence(显示fence设备)
Name             Agent
[root@node1 cluster]# ccs_tool addfence -h(查看创建fence设备命令帮助)
Usage: ccs_tool addfence [options] <name>(fence设备名称) <agent>(代理) [param=value](参数)
 -c --configfile    Name of configuration file (/etc/cluster/cluster.conf)
 -o --outputfile    Name of output file (defaults to same as --configfile)
 -C --no_ccs        Don't tell CCSD about this change
                    default: run "ccs_tool update" if file is updated in place)
 -F --force_ccs     Force "ccs_tool upgrade" even if input & output files differ
 -h --help          Display this help text
[root@node1 cluster]# ccs_tool addfence meatware fence_munual(创建fence设备meatware,fence_munual手动fence)
running ccs_tool update...
[root@node1 cluster]# ccs_tool delfence meatware(删除fence设备meatware)
running ccs_tool update...
Unable to connect to the CCS daemon: Connection refused
[root@node1 cluster]# ccs_tool addfence meatware fence_manual(创建fence设备meatware,fence_manual手动fence)
running ccs_tool update...
[root@node1 cluster]# cat cluster.conf(查看cluster.conf文件内容)
<?xml version="1.0"?>
<cluster name="tcluster" config_version="4">
  <clusternodes/>
  <fencedevices><fencedevice name="meatware" agent="fence_manual"/></fencedevices>
  <rm>
    <failoverdomains/>
    <resources/>
  </rm>
</cluster>
[root@node1 cluster]# ccs_tool lsfence(查看fence设备)
Name             Agent
meatware         fence_manual
[root@node1 cluster]# ccs_tool addnode -h(查看添加节点命令帮助)
Usage: ccs_tool addnode [options] <nodename> [<fencearg>=<value>]...
 -n --nodeid        Nodeid (required)
 -v --votes         Number of votes for this node (default 1)(指定当前节点所具有的票数)
 -a --altname       Alternative name/interface for multihomed hosts
 -f --fence_type    Type of fencing to use
 -c --configfile    Name of configuration file (/etc/cluster/cluster.conf)
 -o --outputfile    Name of output file (defaults to same as --configfile)
 -C --no_ccs        Don't tell CCSD about this change
                    default: run "ccs_tool update" if file is updated in place)
 -F --force_ccs     Force "ccs_tool upgrade" even if input & output files differ
 -h --help          Display this help text

Examples:

Add a new node to default configuration file:
  ccs_tool addnode -n 1(node id,在当前集群中唯一node编号) -f manual(使用那个fence设备) ipaddr=newnode(节点名称)

Add a new node and dump config file to stdout rather than save it
  ccs_tool addnode -n 2 -f apc -o- newnode.temp.net port=1
[root@node1 cluster]# ccs_tool addnode -v 1 -n 1 -f meatware node1.magedu.com(添加节点node1.magedu.com,-v指定具有的票数,-n当前节点编号,-f使用那个fence设备)
running ccs_tool update...
Segmentation fault(有段错误,不用关心)
[root@node1 cluster]# ccs_tool addnode -v 1 -n 2 -f meatware node2.magedu.com(添加节点node2.magedu.com,-v指定具有票数,-n当前节点编号,-f使用那个fence设备)
running ccs_tool update...
Segmentation fault
[root@node1 cluster]# ccs_tool addnode -v 1 -n 3 -f meatware node3.magedu.com(添加节点node3.magedu.com,-v指定具有票数,-n当前节点编号,-f使用那个fence设备)
running ccs_tool update...
Segmentation fault
[root@node1 cluster]# ccs_tool lsnode(查看节点)

Cluster name: tcluster, config_version: 7

Nodename                        Votes Nodeid Fencetype
node1.magedu.com                   1    1    meatware
node2.magedu.com                   1    2    meatware
node3.magedu.com                   1    3    meatware
[root@node1 cluster]# service cman start(启动cman服务)
Starting cluster:
   Loading modules... done
   Mounting configfs... done
   Starting ccsd... done
   Starting cman... done
   Starting daemons... done
   Starting fencing... done
                                                           [  OK  ]
HA2:
[root@node2 ~]# service cman start(启动cman服务)
Starting cluster:
   Loading modules... done
   Mounting configfs... done
   Starting ccsd... done
   Starting cman... done
   Starting daemons... done
   Starting fencing... done
                                                           [确定]
HA3:
[root@node3 ~]# service cman start(启动cman服务)
Starting cluster:
   Loading modules... done
   Mounting configfs... done
   Starting ccsd... done
   Starting cman... done
   Starting daemons... done
   Starting fencing... done
                                                           [  OK  ]

 浙公网安备 33010602011771号