

第二十二篇 - Vue3中el-table篇
今天主要是来介绍vue3中的el-table控件使用。
一、检测开发环境是否OK
1. 在cmd窗口创建一个vue3项目【vue create demo1】
2. cmd窗口运行项目【npm run serve】
3. 浏览器访问项目【http://localhost:8080/】
4. 访问成功界面

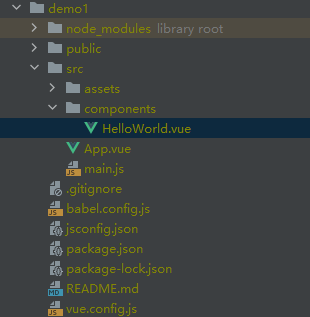
5. 项目目录
二、改写HelloWorld.vue页面新建el-table
1. 想要使用el-table,需要导入element-plus库,因此在package.json文件中添加element-plus版本信息
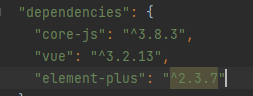
可以看到那个地方是灰色,将鼠标悬浮到^2.3.7上面会有提示run npm install,点击安装就行。
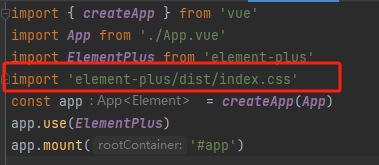
2. 将element-plus在main.js中加入app
import { createApp } from 'vue'
import App from './App.vue'
import ElementPlus from 'element-plus'
const app = createApp(App)
app.use(ElementPlus)
app.mount('#app')
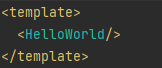
3. 将App.vue到HelloWorld.vue的链接改下
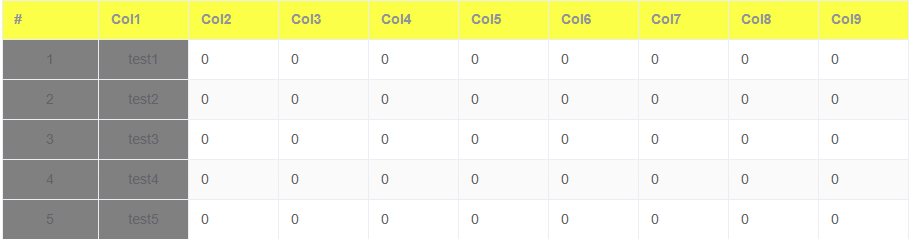
4. HelloWorld.vue中新建el-table


<template>
  <el-card>
    <el-table
        :data="tablelist"
        :header-cell-style="{background:'yellow'}"
        style="width: 50%;"
        height="800px"
    >
      <el-table-column label="#"  type="index" min-width="10%"/>
      <el-table-column label="Col1" prop="col1" min-width="10%" />
      <el-table-column label="Col2" prop="col2" min-width="10%" />
      <el-table-column label="Col3" prop="col3" min-width="10%" />
      <el-table-column label="Col4" prop="col4" min-width="10%" />
      <el-table-column label="Col5" prop="col5" min-width="10%" />
      <el-table-column label="Col6" prop="col6" min-width="10%" />
      <el-table-column label="Col7" prop="col7" min-width="10%" />
      <el-table-column label="Col8" prop="col8" min-width="10%" />
      <el-table-column label="Col9" prop="col9" min-width="10%" />
    </el-table>
  </el-card>
</template>

<script>
export default {
  name: 'HelloWorld',
  data(){
    return {
      tablelist: [
          {
            col1: 0,
            col2: 0,
            col3: 0,
            col4: 0,
            col5: 0,
            col6: 0,
            col7: 0,
            col8: 0,
            col9: 0,
          },
        {
          col1: 0,
          col2: 0,
          col3: 0,
          col4: 0,
          col5: 0,
          col6: 0,
          col7: 0,
          col8: 0,
          col9: 0,
        },
        {
          col1: 0,
          col2: 0,
          col3: 0,
          col4: 0,
          col5: 0,
          col6: 0,
          col7: 0,
          col8: 0,
          col9: 0,
        },
        {
          col1: 0,
          col2: 0,
          col3: 0,
          col4: 0,
          col5: 0,
          col6: 0,
          col7: 0,
          col8: 0,
          col9: 0,
        },
        {
          col1: 0,
          col2: 0,
          col3: 0,
          col4: 0,
          col5: 0,
          col6: 0,
          col7: 0,
          col8: 0,
          col9: 0,
        },
      ]
    }
  }
}
</script>

<style>

</style>
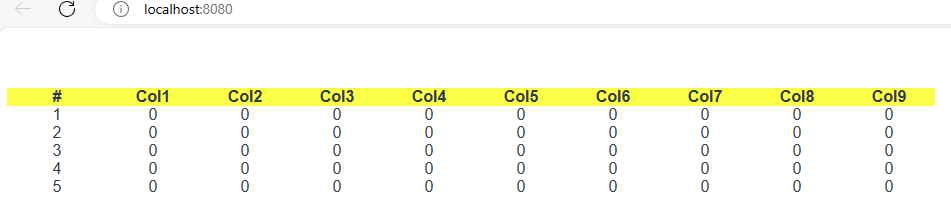
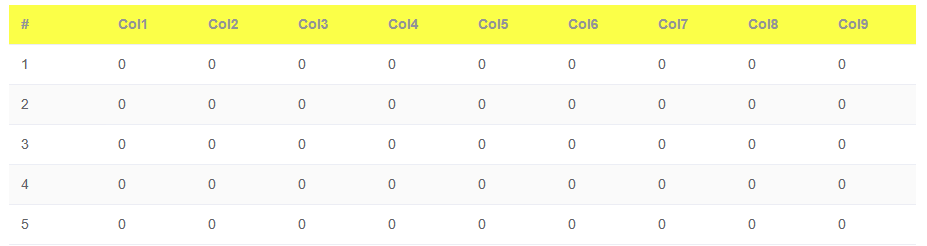
5. 看下运行后效果图
6. 代码参数解析
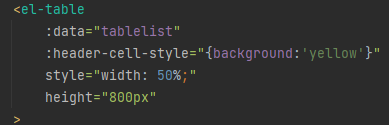
a. 首先第一个参数【:data】对应的是tablelist变量,意思是将tablelist变量与表绑定,给表赋值的。
tablelist是一个列表[{第一行},{第二行},{第三行}],第几个{}代表第几行。{col1: 0, col2:1}意思是prop为col1的那一列的值是0,prop为col2列的值为1。所以[{col1: 0, col2: 1},{col1:2}]代表第0行的col1列的值为0,col2列的值为1,第1行的col1列的值为2。(注意字典中的key值要和prop的值对应)
b. 第二个参数【:headder-cell-style】是表头的样式,{background:'yellow'}是将表头背景色设置为黄色
c. 第三个参数【style】是表的样式,width:50%是将当前表的宽度设置为页面的一半
d. 第四个参数【height】是表格的高度,设置为800px
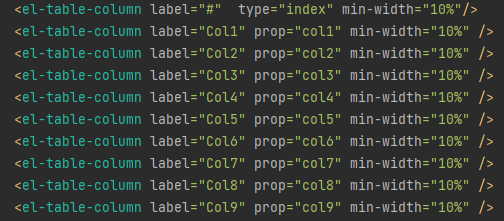
一个el-table-column代表一列,label表示表头要显示的值,prop是列表绑定的变量,和列表的key对应,min-width设置的是每一列的比例,图中是每一列各占10%。
三、el-table的样式设置
首先在main.js中引入样式,接下来table的样式设置依赖于它
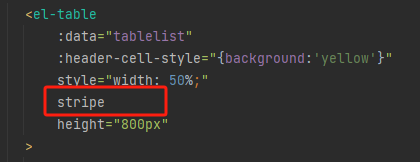
1. 间隔行变色
参考链接:https://blog.csdn.net/weixin_43551840/article/details/89100478
给el-table添加属性stripe,斑马纹,即间隔行变色
样式如下:
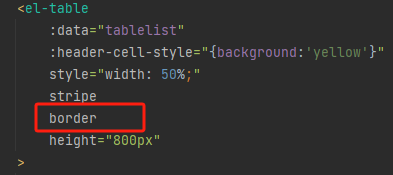
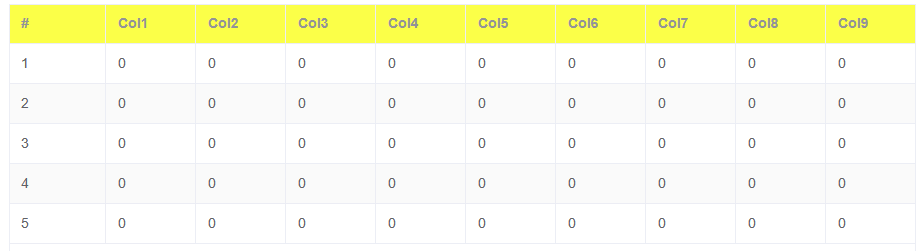
2. 显示网格线
给el-table添加属性border
样式如下
3. 每一行添加索引
上面代码中有,索引列,label里面的内容可以自行填写,type设置为index就行

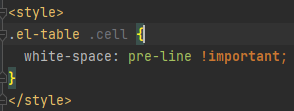
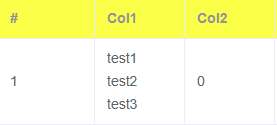
4. 表格识别换行符\n"
比如当[0,1]位置文字是“test1\n\test2\ntest3\n”
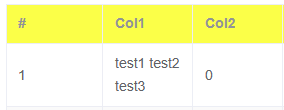
可以看到换行符并未生效。此时在style下添加
.el-table .cell {
white-space: pre-line !important;
}
就可使换行符生效
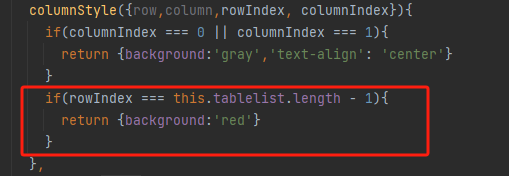
5. 单元格样式设置
给el-table添加单元格样式

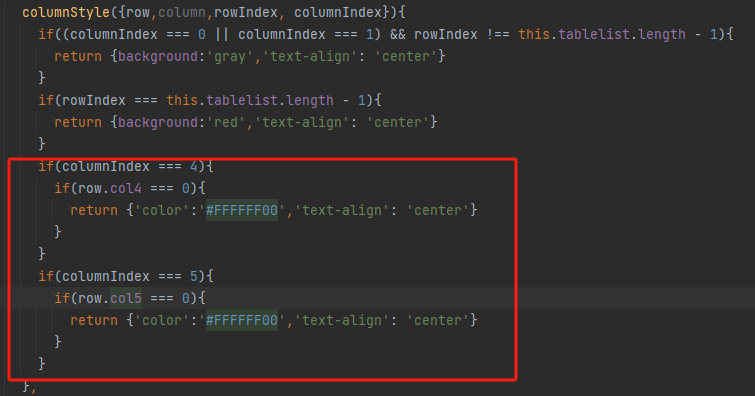
a. 然后在methods里面写columnStyle函数,设置第一列和第二列单元格背景色为灰色,文字居中
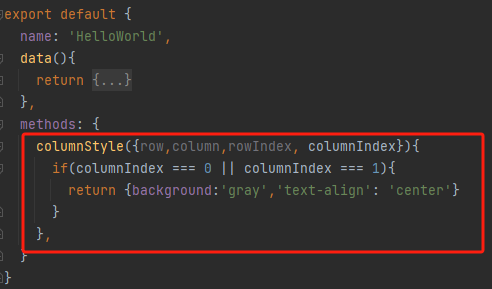
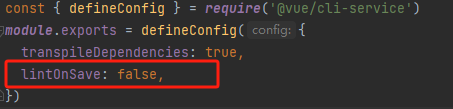
可以看到{row,column,rowIndex}都是灰色的,如果没有关掉Eslint校验,那么运行时就会报错,说变量未使用,此时可以在vue.config.js中关闭Eslint校验
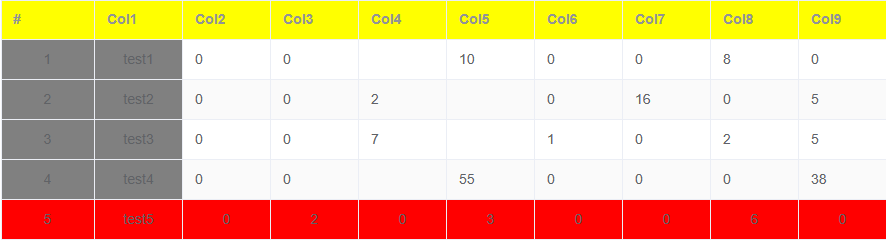
b. 设置最后一行背景色为红色
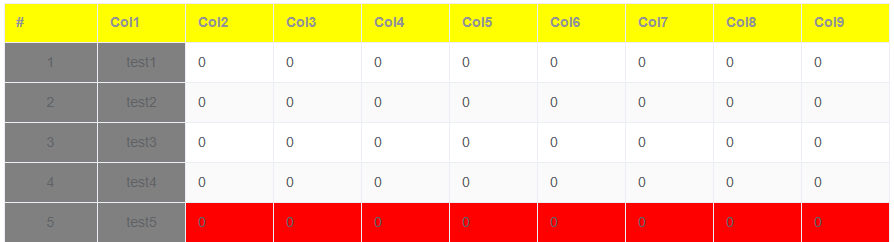
可以看到最后一行变红了,不过前两列没变红,所以在上面那一个if条件可以把最后一行过滤哦。【if((columnIndex === 0 || columnIndex === 1) && rowIndex !== this.tablelist.length - 1)】
c. 设置数值为0的地方颜色为透明,不显示
先改变列表的值
tablelist: [
          {
            col1: "test1",
            col2: 0,
            col3: 0,
            col4: 0,
            col5: 10,
            col6: 0,
            col7: 0,
            col8: 8,
            col9: 0,
          },
        {
          col1: "test2",
          col2: 0,
          col3: 0,
          col4: 2,
          col5: 0,
          col6: 0,
          col7: 16,
          col8: 0,
          col9: 5,
        },
        {
          col1: "test3",
          col2: 0,
          col3: 0,
          col4: 7,
          col5: 0,
          col6: 1,
          col7: 0,
          col8: 2,
          col9: 5,
        },
        {
          col1: "test4",
          col2: 0,
          col3: 0,
          col4: 0,
          col5: 55,
          col6: 0,
          col7: 0,
          col8: 0,
          col9: 38,
        },
        {
          col1: "test5",
          col2: 0,
          col3: 2,
          col4: 0,
          col5: 3,
          col6: 0,
          col7: 0,
          col8: 6,
          col9: 0,
        },
      ]
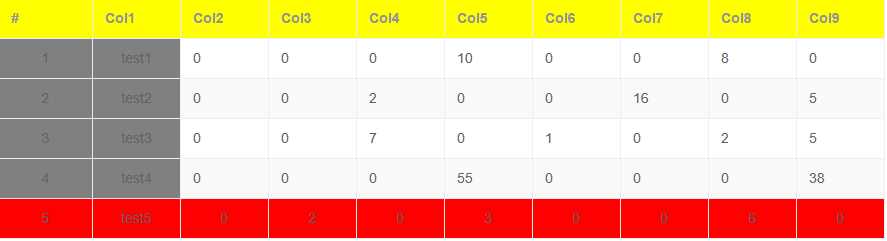
设置Col4, Col5列数值为0的地方不显示
依次类推就行。
6. 合并单元格
首先将列表的值更改一下
tablelist: [
          {
            col1: "test1",
            col2: "label1",
            col3: 0,
            col4: 0,
            col5: 10,
            col6: 0,
            col7: 0,
            col8: 8,
            col9: 0,
          },
        {
          col1: "test1",
          col2: "label1",
          col3: 0,
          col4: 2,
          col5: 0,
          col6: 0,
          col7: 16,
          col8: 0,
          col9: 5,
        },
        {
          col1: "test1",
          col2: "label2",
          col3: 0,
          col4: 7,
          col5: 0,
          col6: 1,
          col7: 0,
          col8: 2,
          col9: 5,
        },
        {
          col1: "test2",
          col2: "label3",
          col3: 0,
          col4: 0,
          col5: 55,
          col6: 0,
          col7: 0,
          col8: 0,
          col9: 38,
        },
        {
          col1: "test2",
          col2: "label4",
          col3: 2,
          col4: 0,
          col5: 3,
          col6: 0,
          col7: 0,
          col8: 6,
          col9: 0,
        },
        {
          col1: "test3",
          col2: "label5",
          col3: 2,
          col4: 0,
          col5: 3,
          col6: 0,
          col7: 0,
          col8: 6,
          col9: 0,
        },
        {
          col1: "test4",
          col2: "label6",
          col3: 2,
          col4: 0,
          col5: 3,
          col6: 0,
          col7: 0,
          col8: 6,
          col9: 0,
        },
      ],
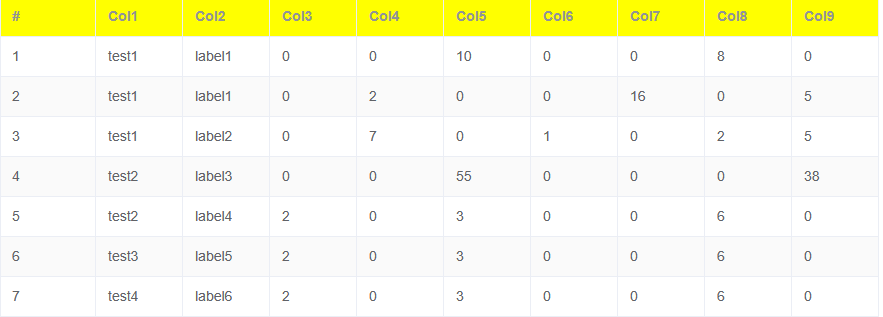
先来看看如何将Col1列合并
首先在data中定义一个新列表
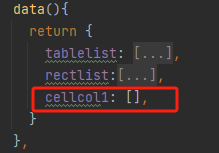
然后在mounted中添加新的函数
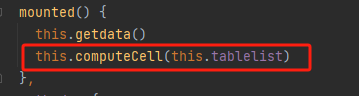
其次编写computeCell函数得到第一列的cellcol1列表
    computeCell(tableBody) {
      for (let i = 0; i < tableBody.length; i++) {
        if (i === 0) {
          // 先设置第一项
          this.cellcol1.push(1); // 初为1,若下一项和此项相同,就在cellList数组中追加0
          this.count = 0; // 初始计数为0
        }
        else {
          // 判断当前项与上项的category是否相同,因为这是合并这一列的单元格
          if (tableBody[i].col1 === tableBody[i - 1].col1) {
            // 如果相等
            this.cellcol1[this.count] += 1; // 增加计数
            this.cellcol1.push(0);  //相等就在cellList数组中追加0
          }
          else {
            this.cellcol1.push(1); // 不等就在cellList数组中追加1
            this.count = i;
          }
        }
      }
    }
打印出来的cellcol1值为
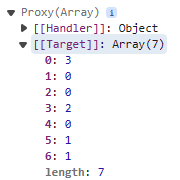
可以看出(0,1,2)合并,(3,4)合并
接下来在el-table中绑定实现合并的函数
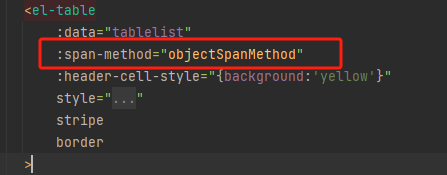
编写objectSpanMethod函数
    objectSpanMethod({row,column,rowIndex,columnIndex}) {
      if (columnIndex === 1) {
        const rowCell = this.cellcol1[rowIndex];
        if (rowCell > 0) {
          const colCell = 1;
          return {
            rowspan: rowCell,
            colspan: colCell,
          };
        } else {
          return {
            rowspan: 0,
            colspan: 0,
          };
        }
      }
    }
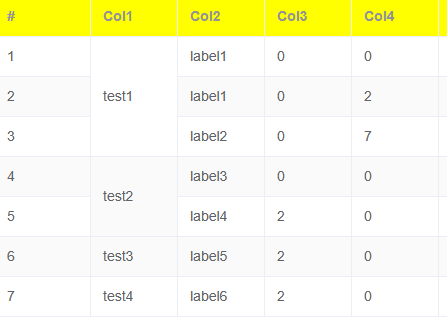
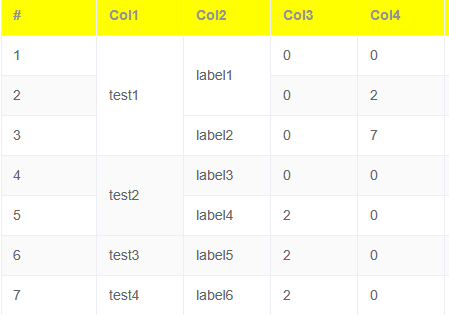
可以看到第一列合并了。
接下来将Col2列合并
在data添加一个cellcol2列表
修改computeCell函数
    computeCell(tableBody) {
      for (let i = 0; i < tableBody.length; i++) {
        if (i === 0) {
          // 先设置第一项
          this.cellcol1.push(1); // 初为1,若下一项和此项相同,就在cellList数组中追加0
          this.count = 0; // 初始计数为0
          this.cellcol2.push(1);
          this.count1 = 0;
        }
        else {
          // 判断当前项与上项的category是否相同,因为这是合并这一列的单元格
          if (tableBody[i].col1 === tableBody[i - 1].col1) {
            // 如果相等
            this.cellcol1[this.count] += 1; // 增加计数
            this.cellcol1.push(0);  //相等就在cellList数组中追加0
            if(tableBody[i].col2 === tableBody[i - 1].col2){
              this.cellcol2[this.count1] += 1;
              this.cellcol2.push(0)
            }
            else{
              this.cellcol2.push(1);
              this.count1 = i;
            }
          }
          else {
            this.cellcol1.push(1); // 不等就在cellList数组中追加1
            this.count = i;
            this.cellcol2.push(1);
            this.count1 = i;
          }
        }
      }
    }
修改objectSpanMethod函数
    objectSpanMethod({row,column,rowIndex,columnIndex}) {
      if (columnIndex === 1) {
        const rowCell = this.cellcol1[rowIndex];
        if (rowCell > 0) {
          const colCell = 1;
          return {
            rowspan: rowCell,
            colspan: colCell,
          };
        } else {
          return {
            rowspan: 0,
            colspan: 0,
          };
        }
      }

      if (columnIndex === 2) {
        const rowCell = this.cellcol2[rowIndex];
        if (rowCell > 0) {
          const colCell = 1;
          return {
            rowspan: rowCell,
            colspan: colCell,
          };
        } else {
          return {
            rowspan: 0,
            colspan: 0,
          };
        }
      }
    }

 浙公网安备 33010602011771号