python快速入门
python快速入门
一、python3安装
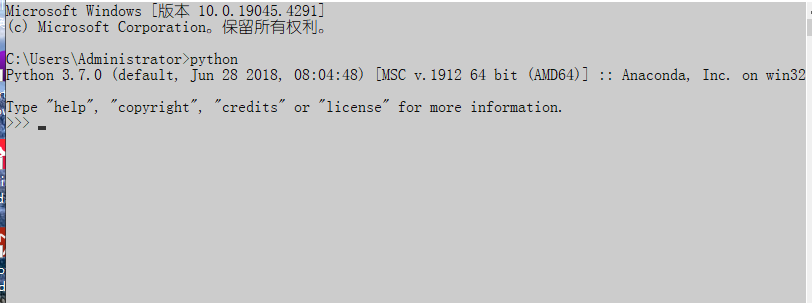
测试python解释器是否安装成功!
https://www.jetbrains.com.cn/pycharm/安装pychar工具,学生可以使用社区版,旗舰版需要激活码可以访问 http://idea.hicxy.com/?t=bjh ,获取激活码进行旗舰版激活。

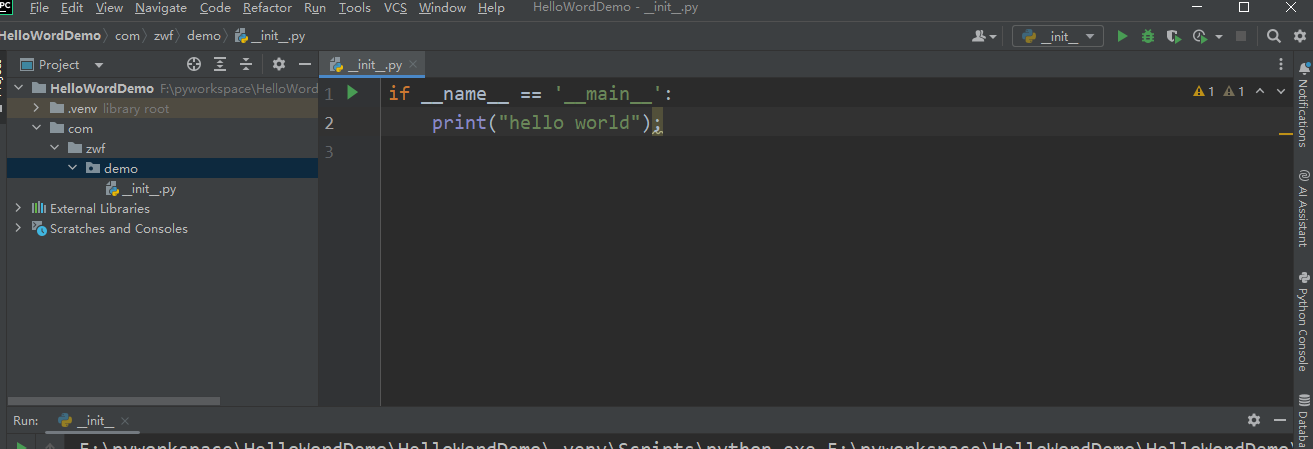
二、使用python建立py工程
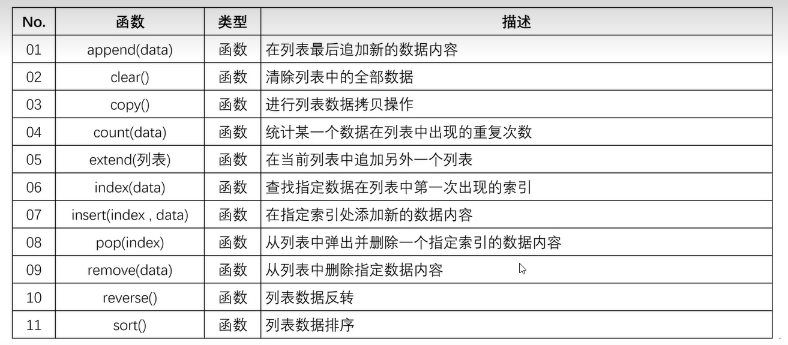
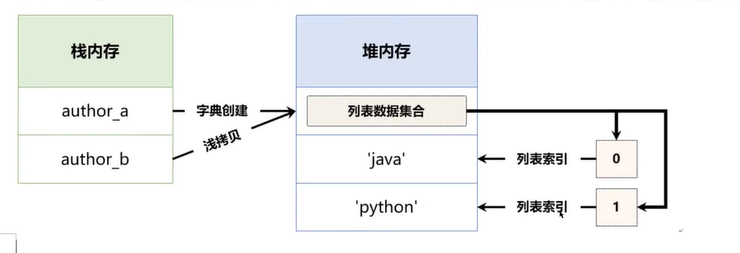
三、集合
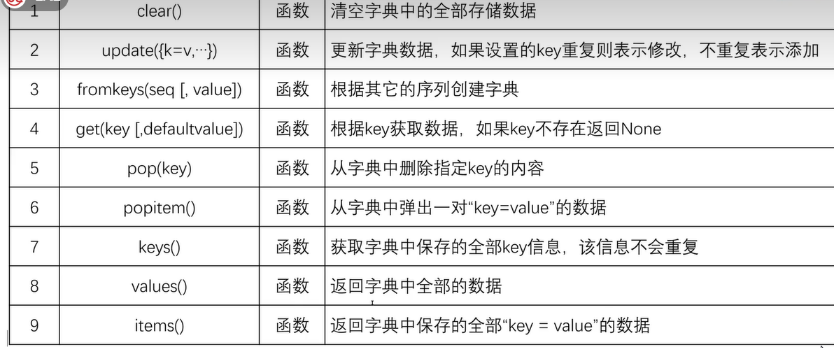
四、字典
五、序列统计函数

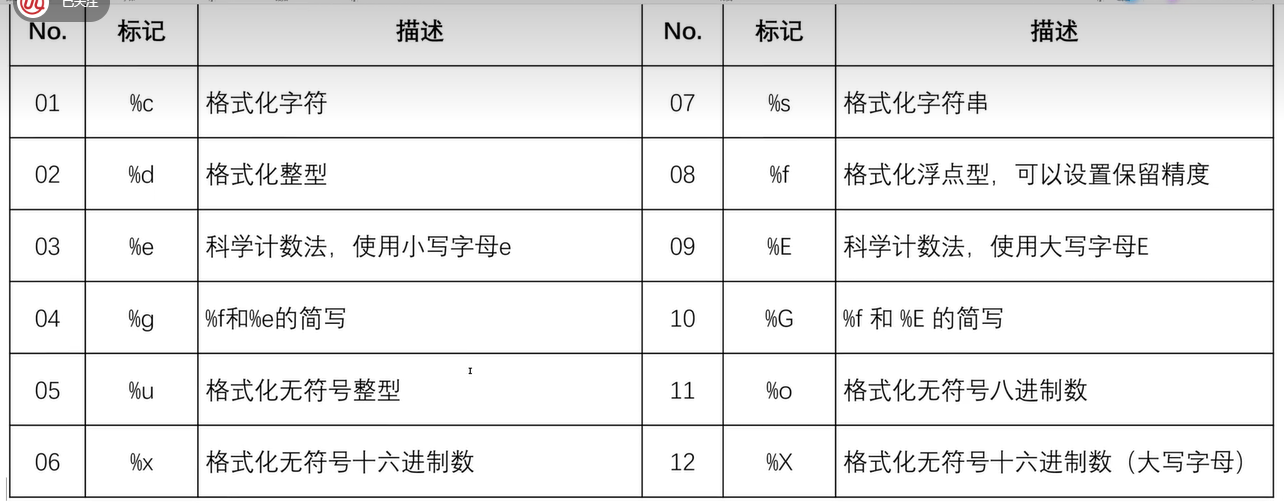
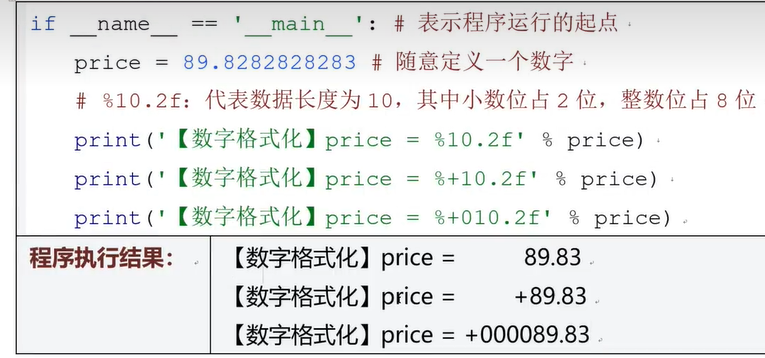
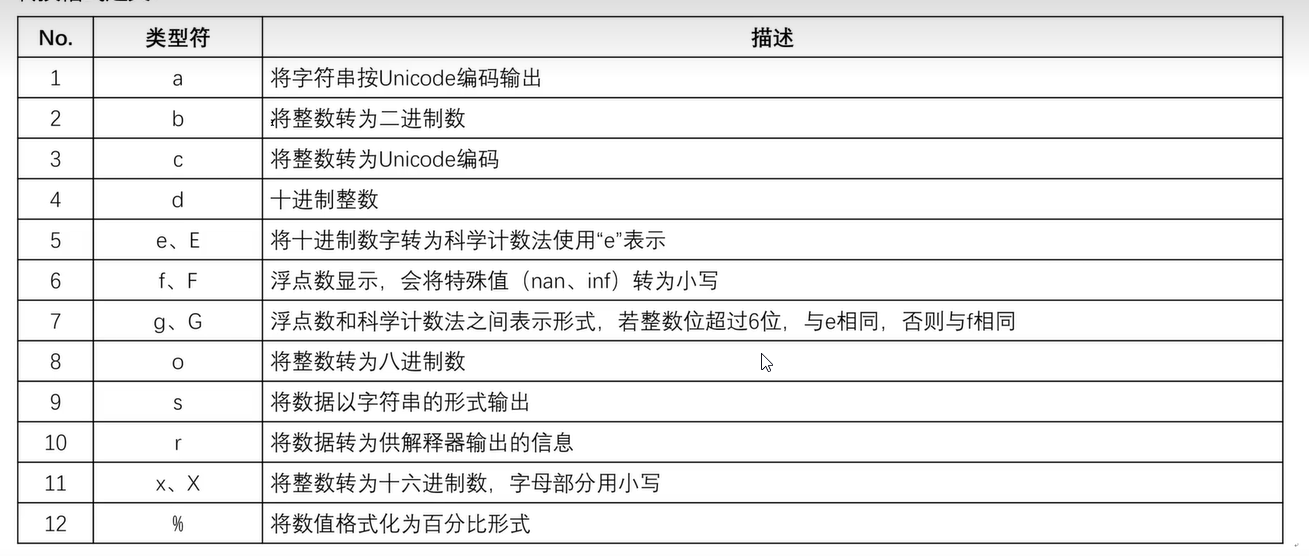
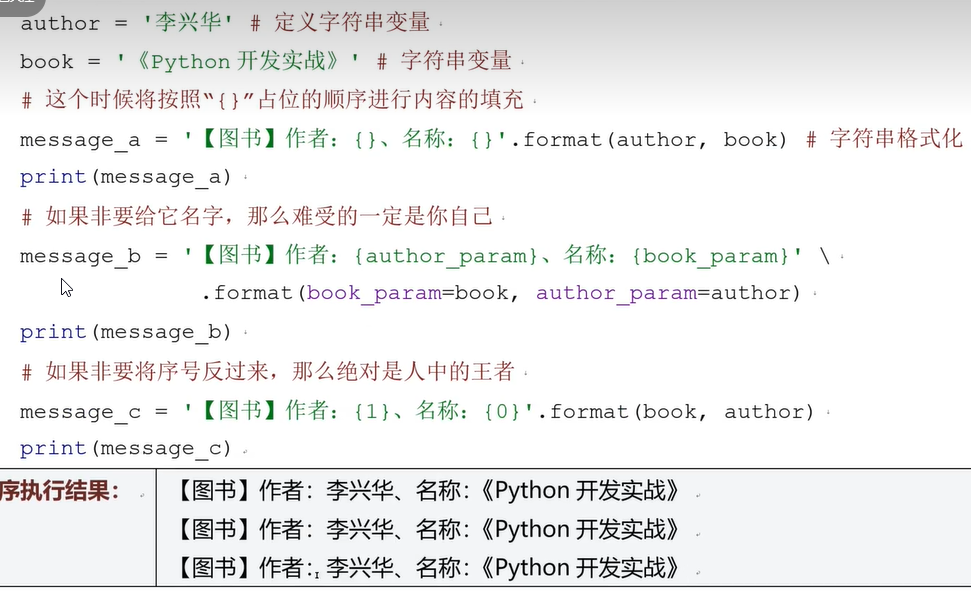
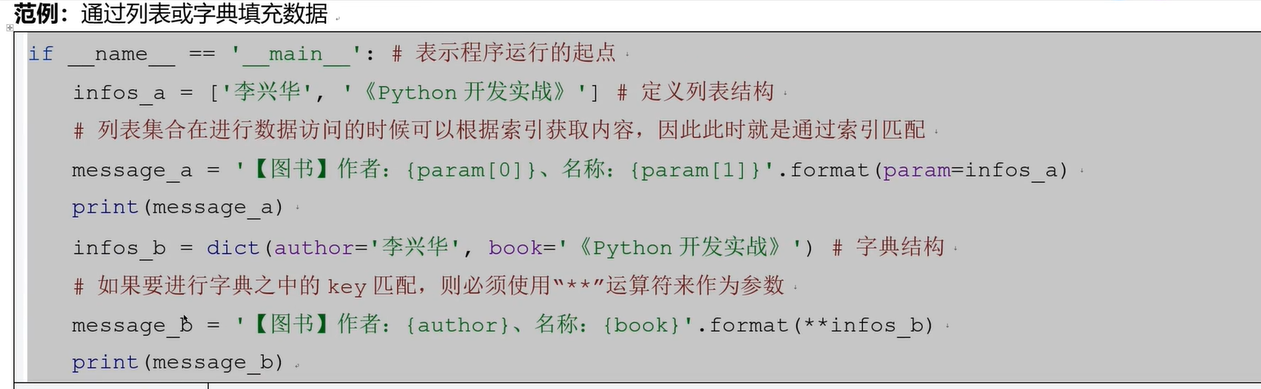
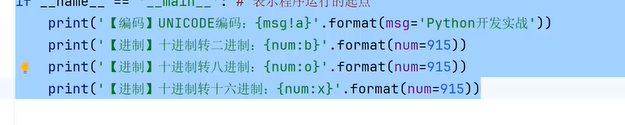
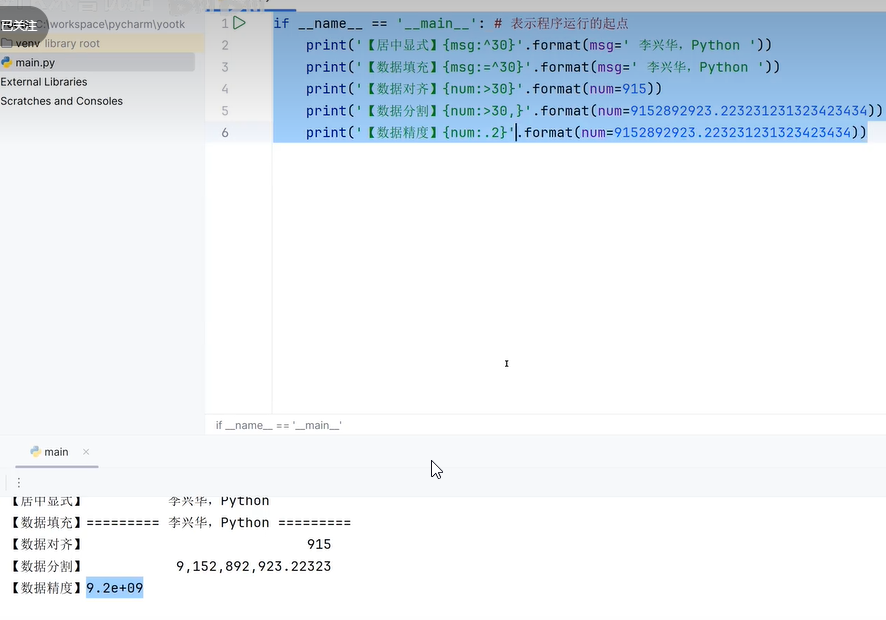
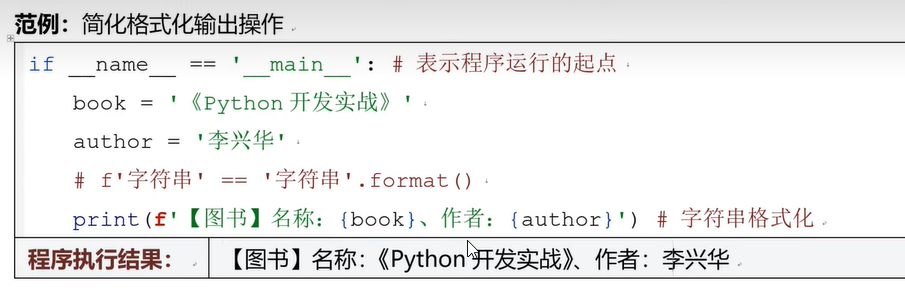
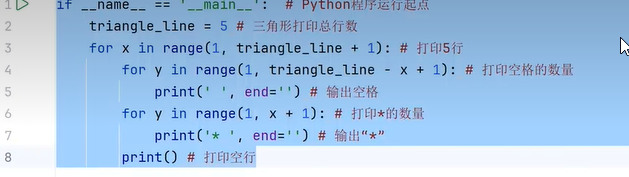
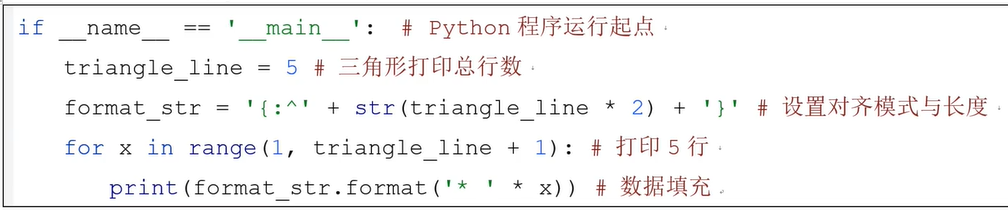
六、数据格式化输出
七、字符串转义
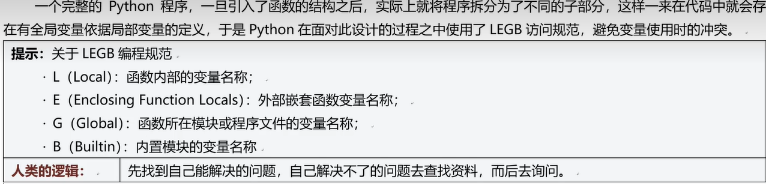
八、变量的作用域
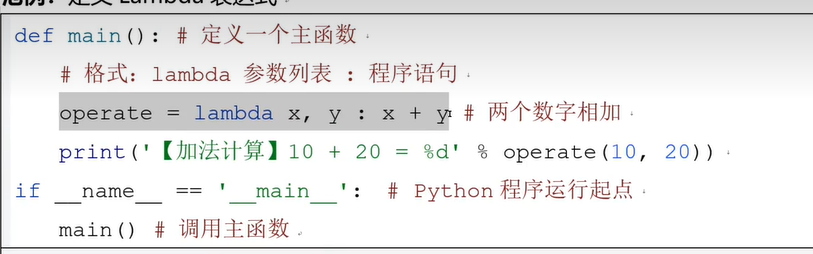
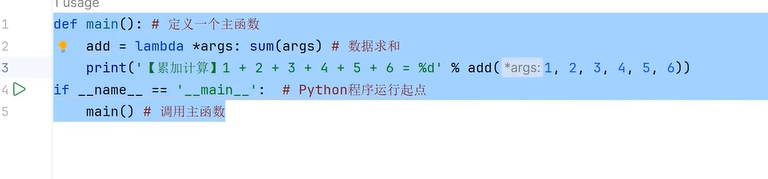
九、Lambda表达式


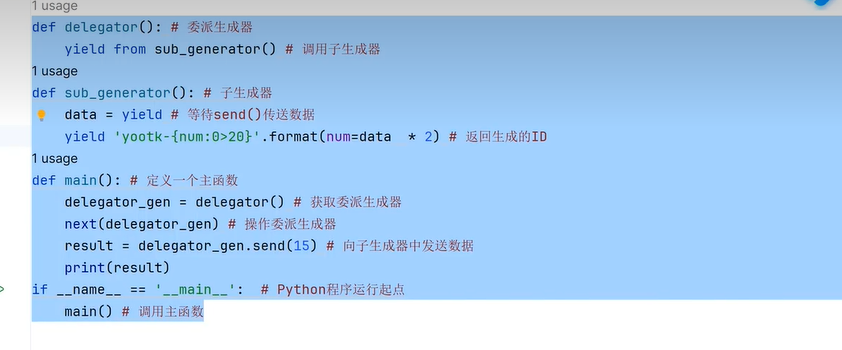
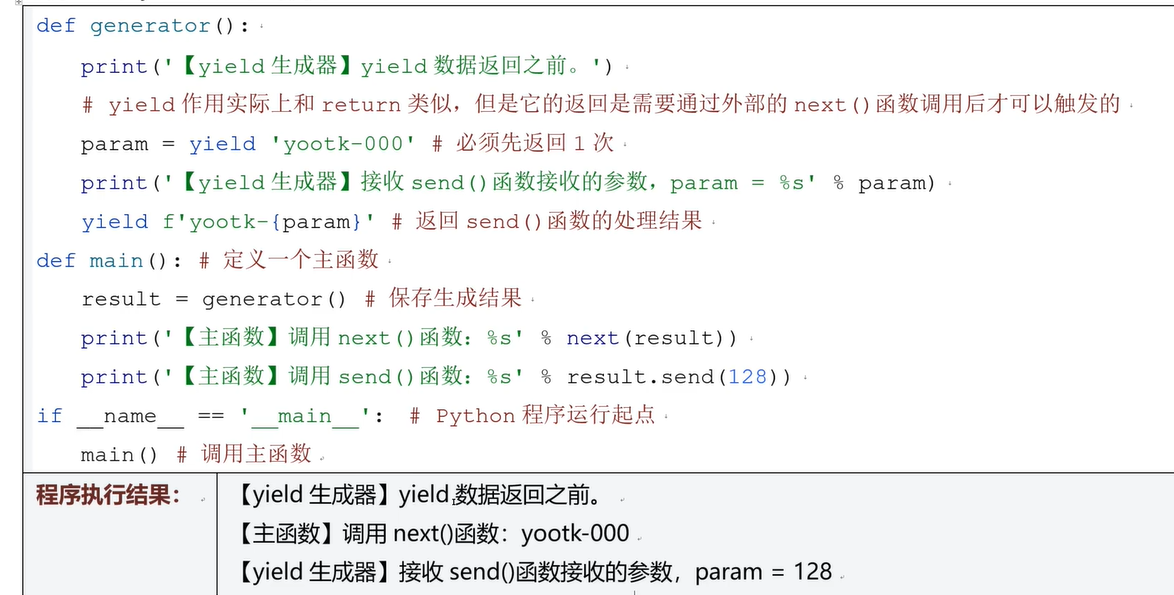
十、yield懒加载机制
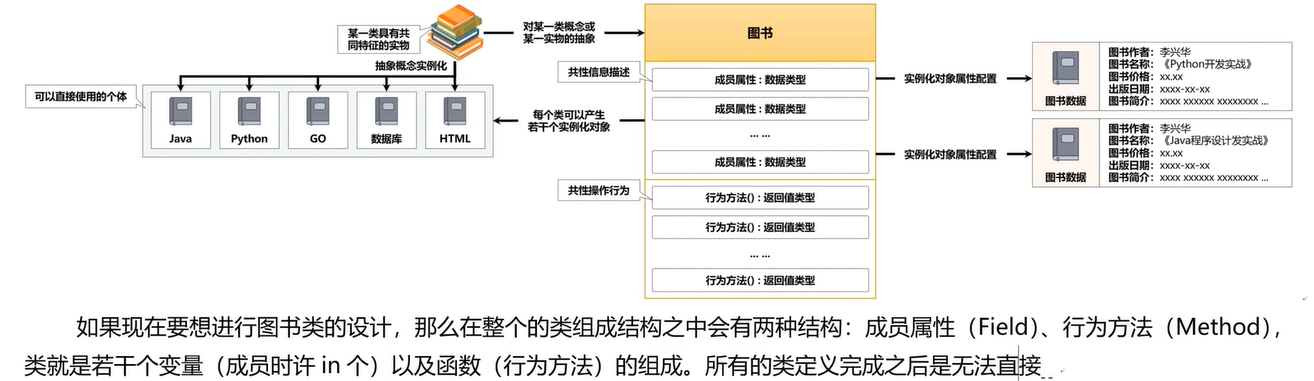
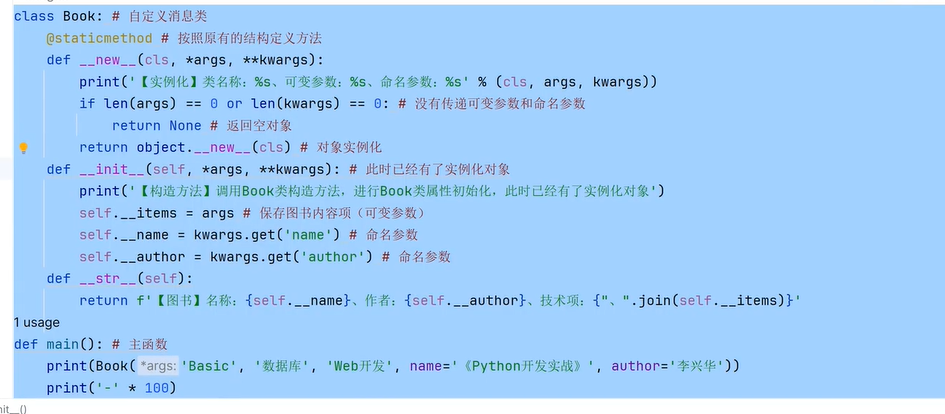
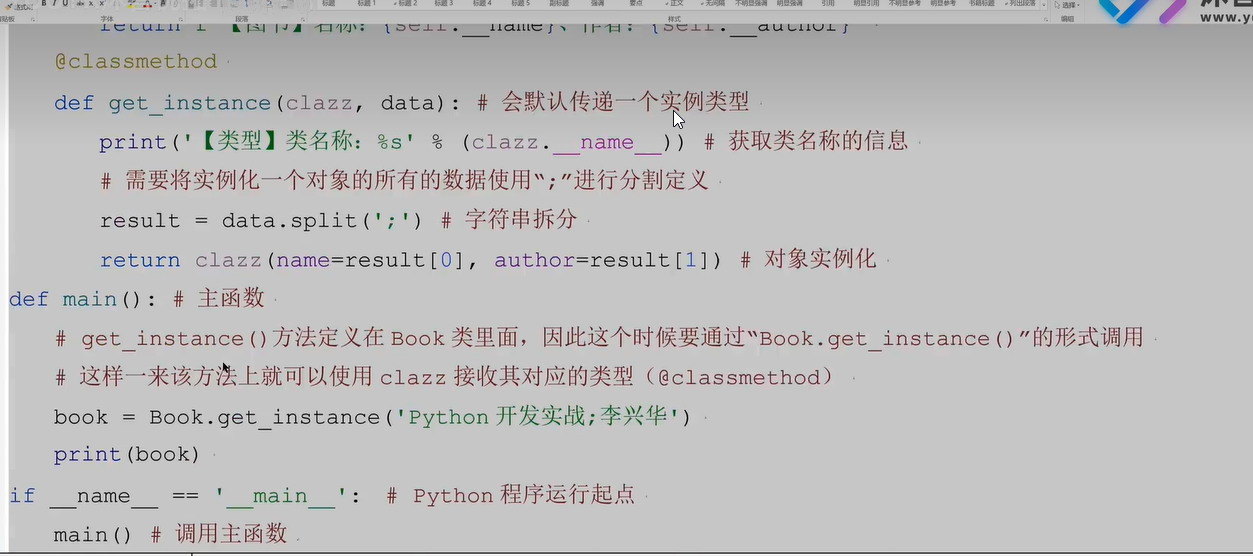
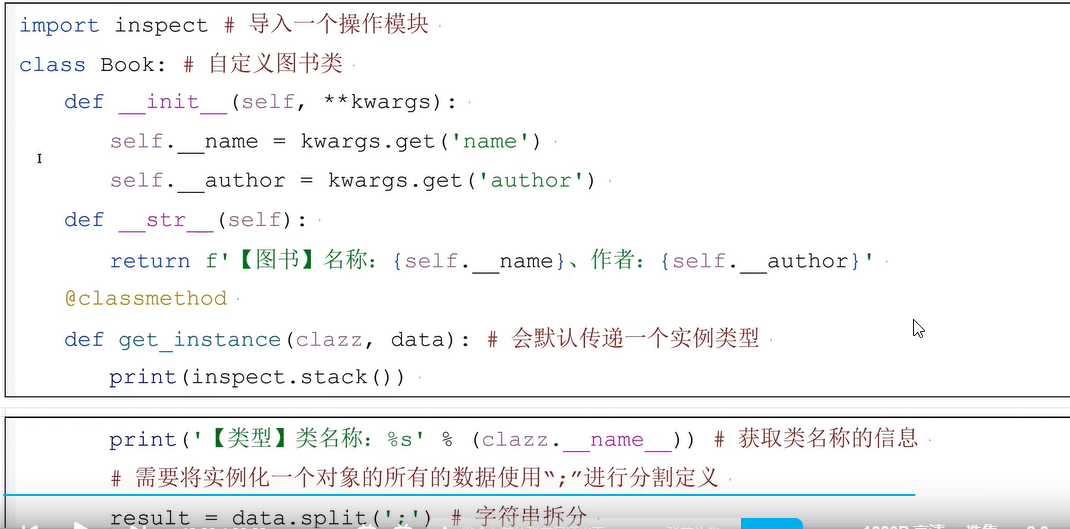
十一、面向对象
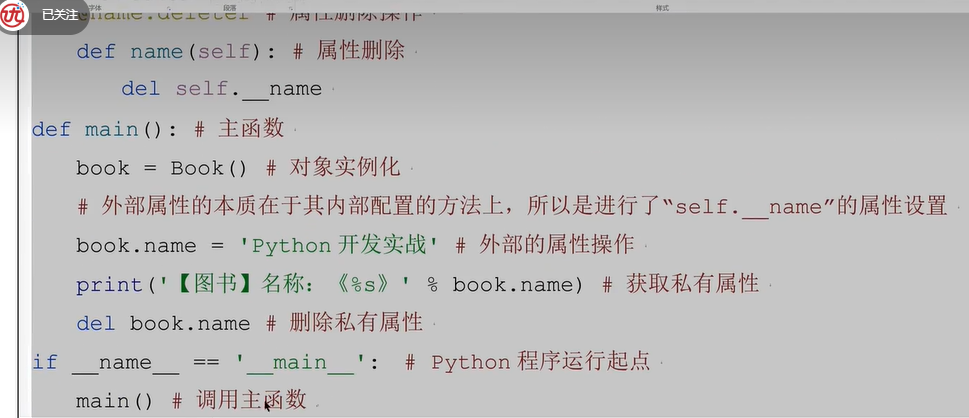
十二、内部类
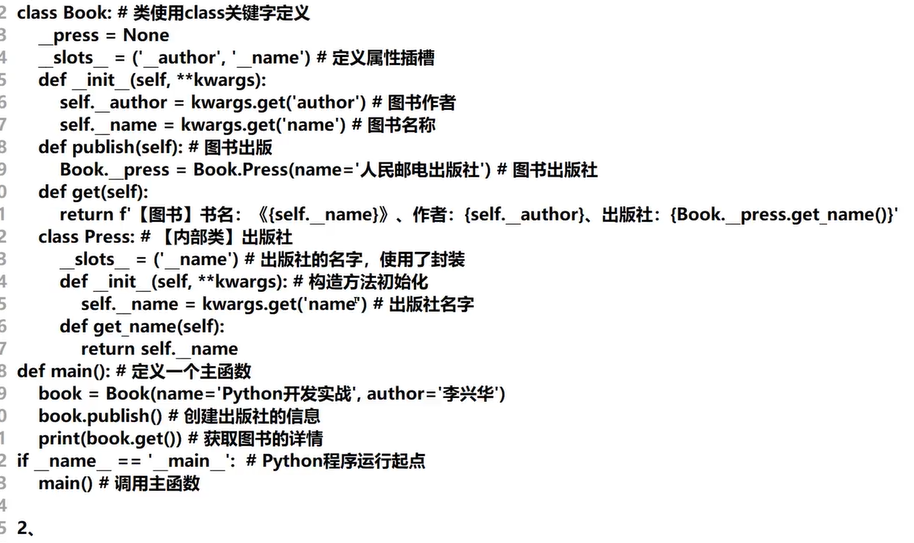
十三、继承子类
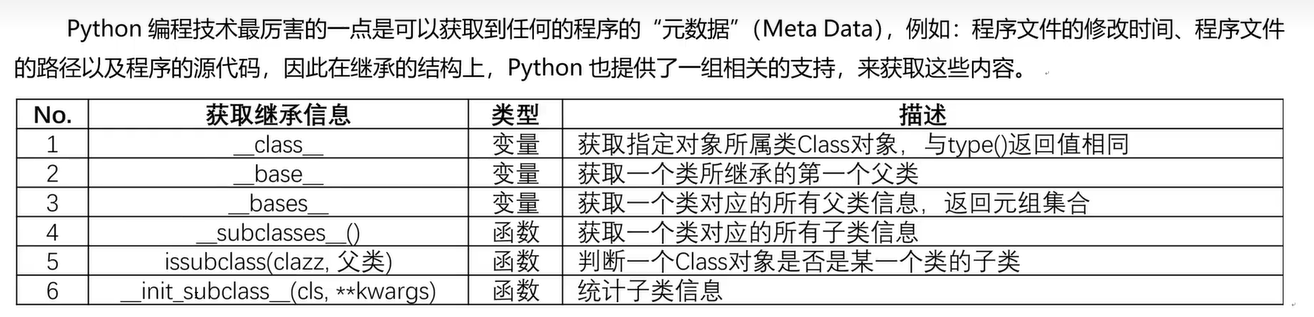
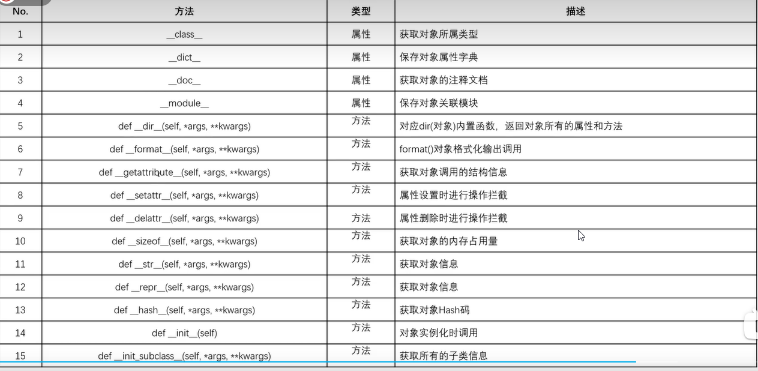
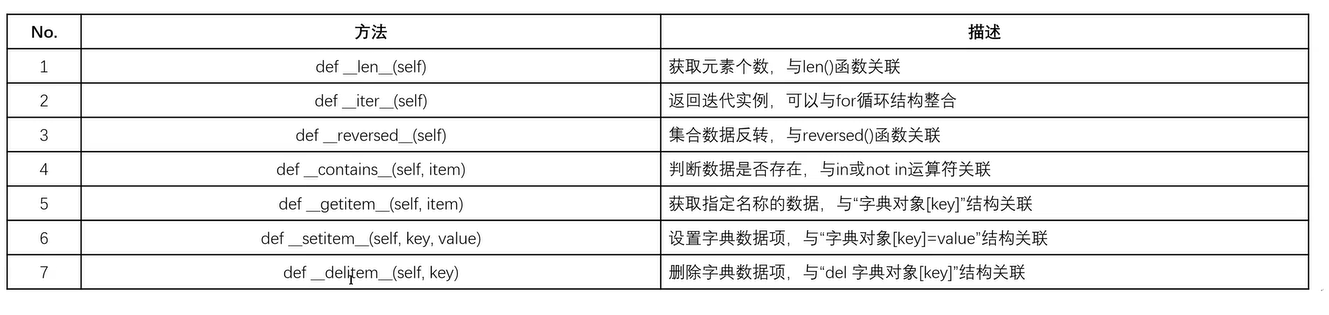
十四、object类常用方法
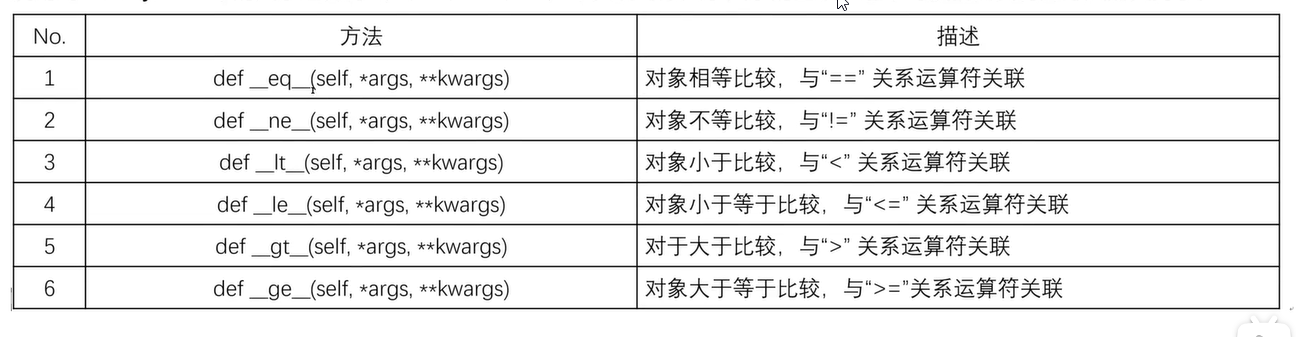
十五、对象比较
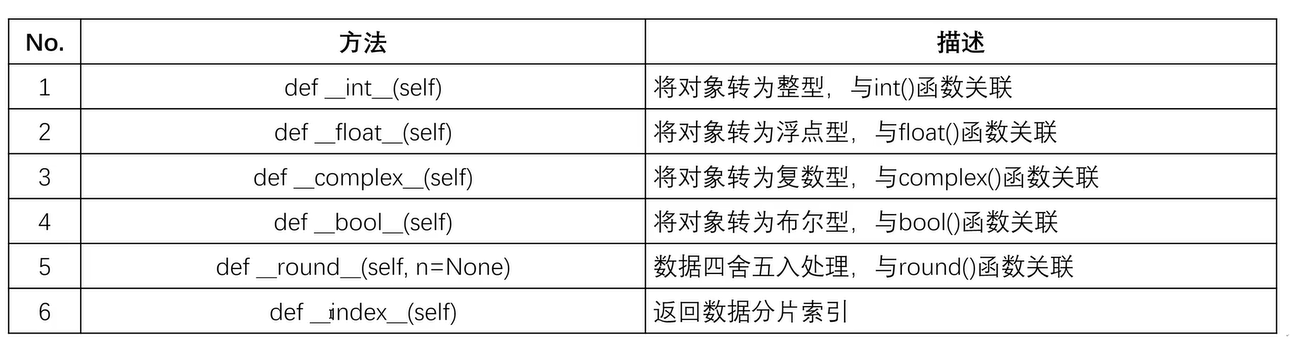
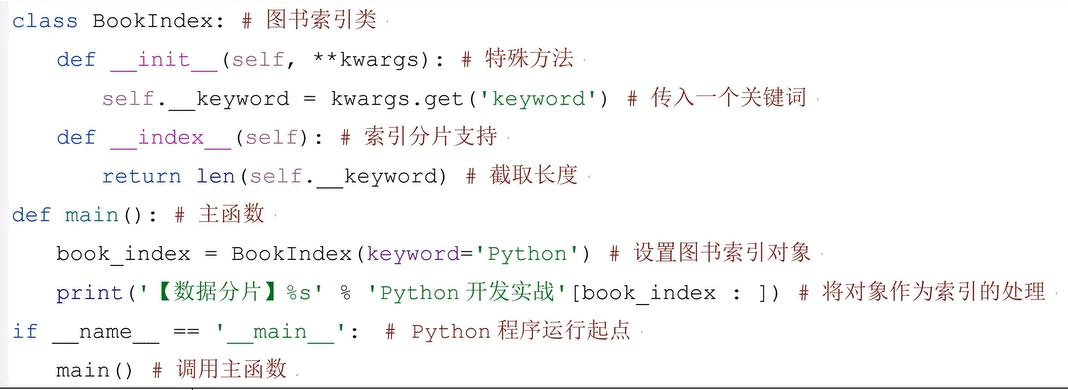
十六、数据类型转换
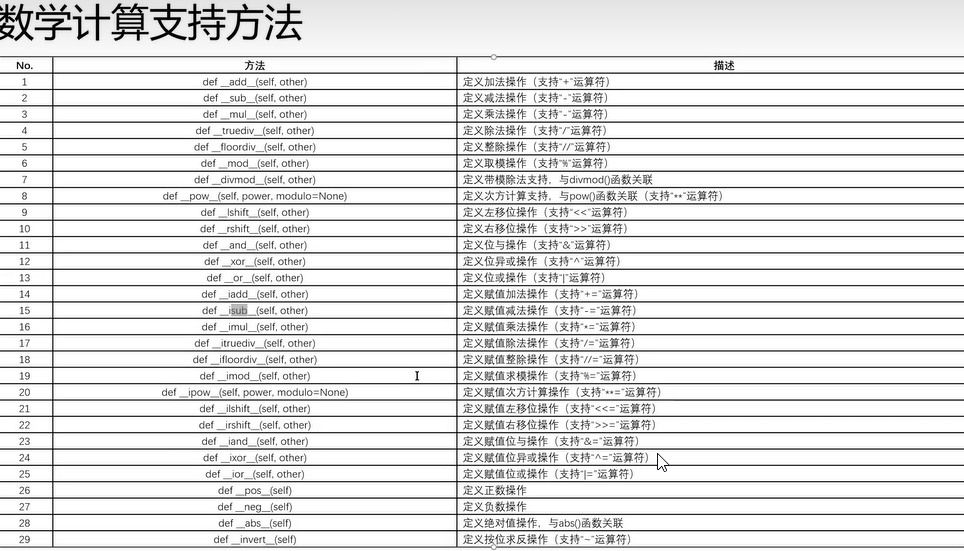
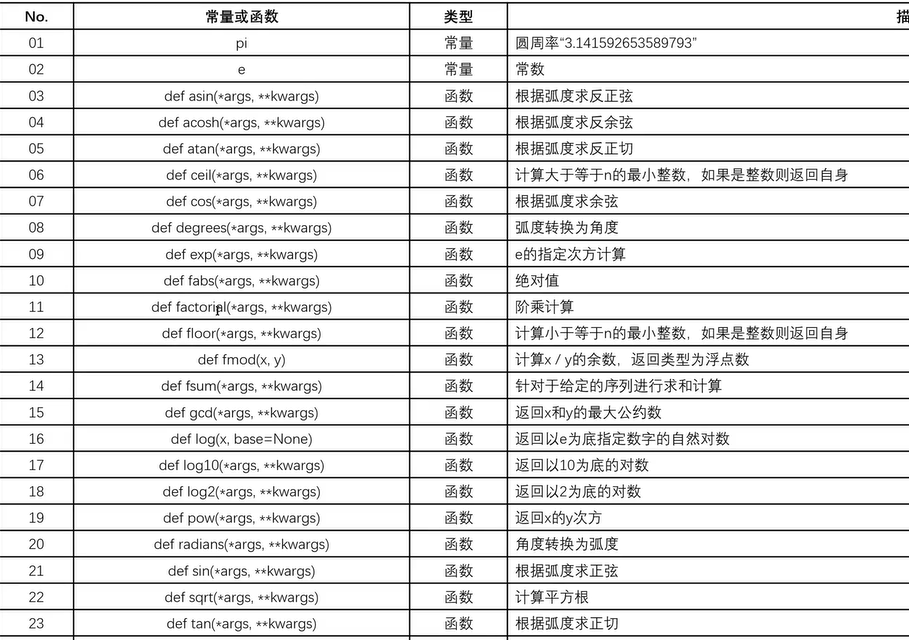
十七、Math类
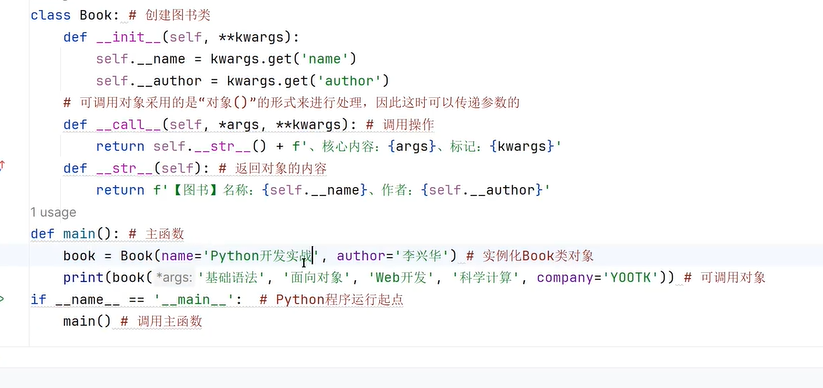
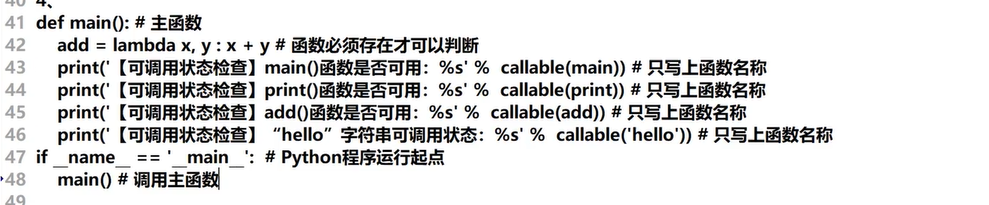
十八、可调用对象(Call()方法)

十九、链表
二十、装饰器
# 代理函数模式
def log(level = 'INFO'):
    def decorator(func):
        def wrapper(*args, **kwargs):
            # func.__name__获取被代理函数名   args:一个元组 第一个值是对象  第二个值是参数
            # kwargs: 命名参数
            print(f'[{func.__name__}]-{level};{args};{kwargs}')
            return func(*args, **kwargs)
        return wrapper  # 返回内部函数
    return decorator  # 返回外部函数


class Message:  # 网络消息
    # 方法覆写
    @log(level='DEBUG')
    def connect(self):
        # 核心代码
        print('建立网络连接....')
        return True

    # 引用装饰器
    @log()
        #方法覆写
    def echo(self, msg,**kwargs):
        name = kwargs.get('name')
        return '[ECHO]' + msg +f',{name}'


def main():
    message = Message()
    if message.connect():
        print(message.echo('Hello I am UDP,TCP', name='xiaoZeng'))


if __name__ == '__main__':
    main()
- 代理类
# 代理类
class Log:
    # 设置参数
    def __init__(self, level='INFO'):
        self.__level = level

    # 设置代理内容
    def __call__(self, func):
        def wrapper(*args, **kwargs):
            print(f'[被代理的方法名:{func.__name__}]:参数:{args},命名参数:{kwargs}')
            return func(*args, **kwargs)
        return wrapper


class Message:
    @Log(level='DEBUG')
    def connect(self):
        print('网络连接成功!!')
        return True

    @Log()
    def echo(self, msg, **kwargs):
        return f'[网络发送消息]:{msg},发送方:{kwargs.get('person')}'


def main():
    message = Message()
    if message.connect():
        print(message.echo('你好,我是代理类!', person='小曾'))


if __name__ == '__main__':
    main()

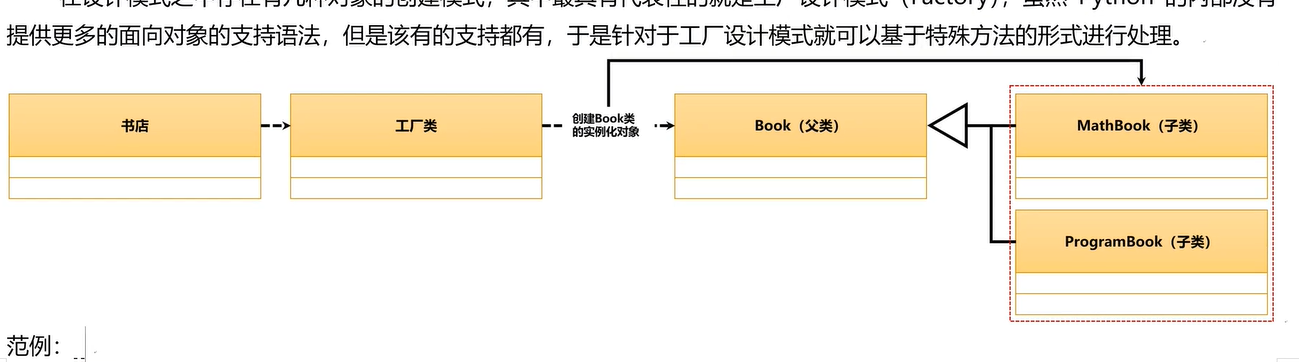
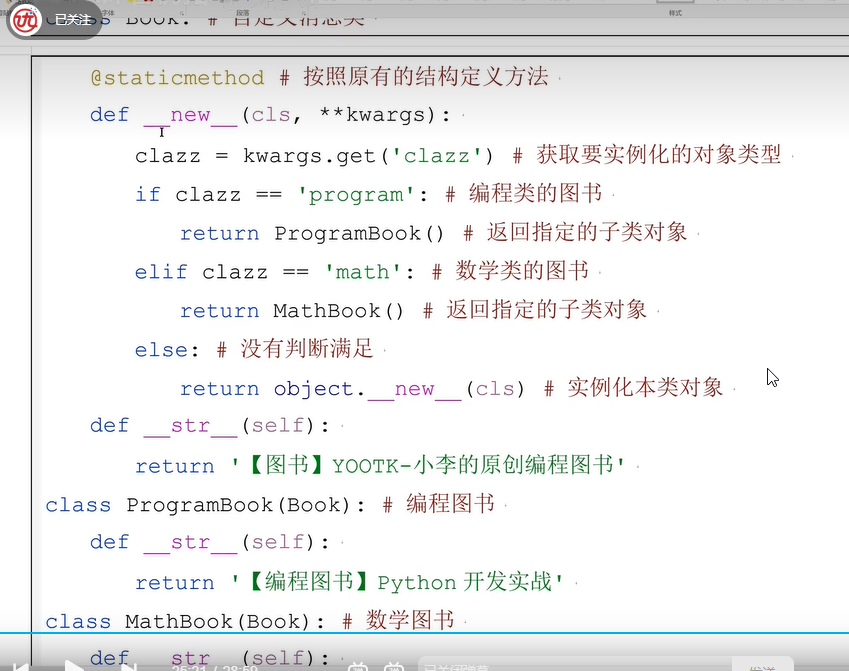
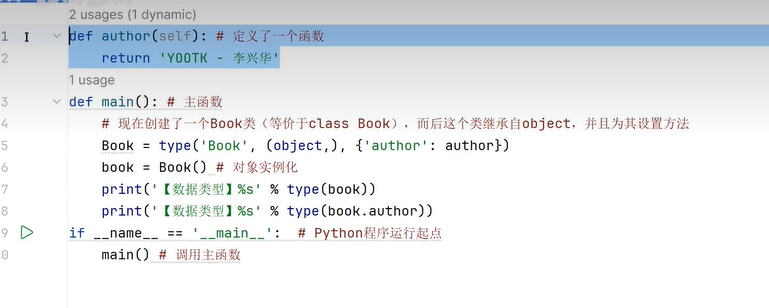
二十一、工厂模式
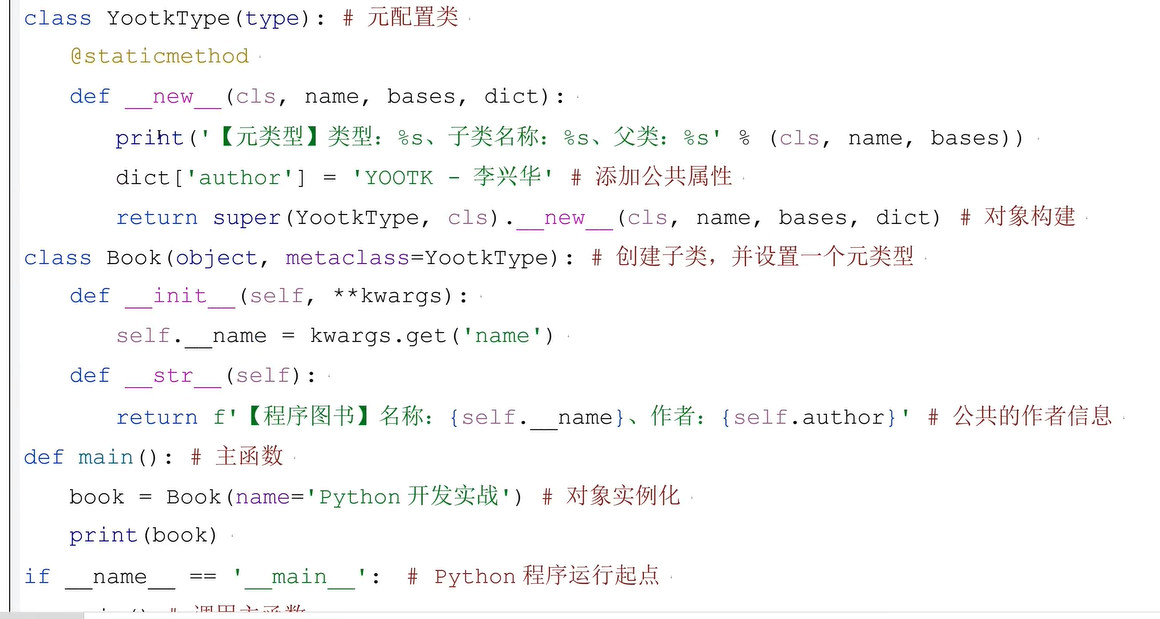
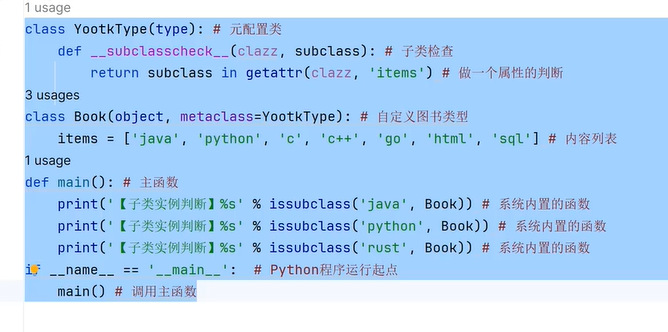
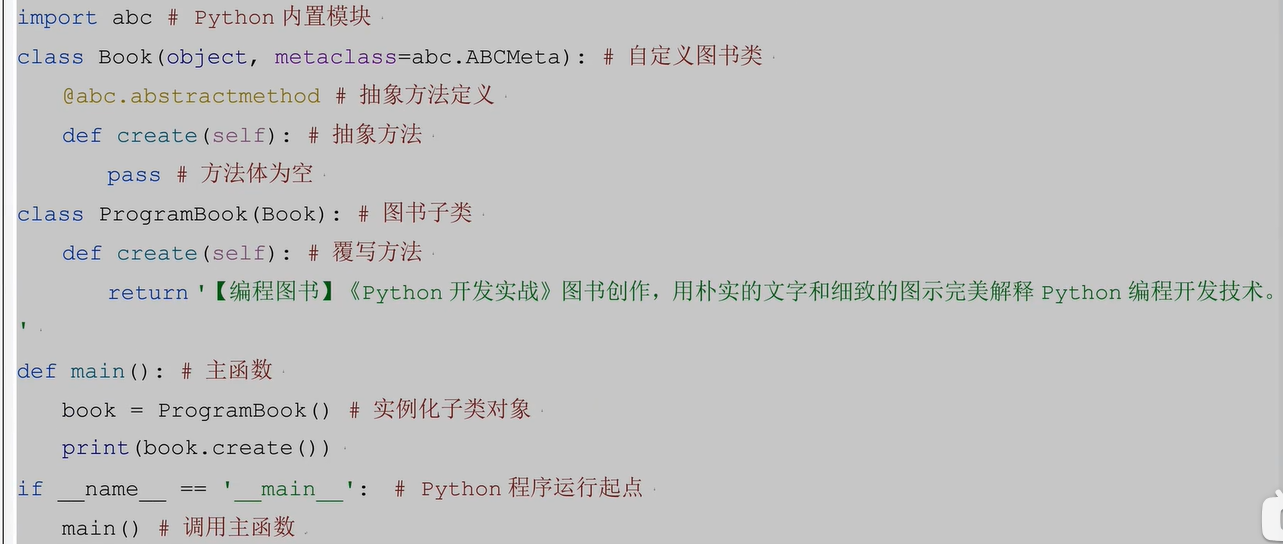
二十三、metaclass
二十四、异常处理

二十五、模块化开发


二十六、Math类
二十七、随机数
- 随机数案例
import random
# 编写一个中奖系统
def main():
    # 存放中奖号码集合
    sltos=[]

    while len(sltos)!=7:
        temp_number = random.randint(1,37)  # 随机生产1~36随机数包括1,36
        sltos.append(temp_number)

    # 排序
    sltos.sort()

    # 打印中奖号码
    print(f'打印中奖号码:{sltos}')


if __name__ == '__main__':
    main()
- 偏函数
import functools
def write_book(*args,**kwargs):
    return f'[图书创作]名称:{kwargs.get('name')}、作者:{kwargs.get('author')},特点:{args}'

def main():
    # 偏函数的目的是封装相同的方法  提高系统的扩展性
    wrapper=functools.partial(write_book,'图书','系统','案例',author='李兴华')
    print(wrapper('零基础',name='python开发实战'))
    print(wrapper('零基础', name='java开发实战'))


if __name__ == '__main__':
    main()
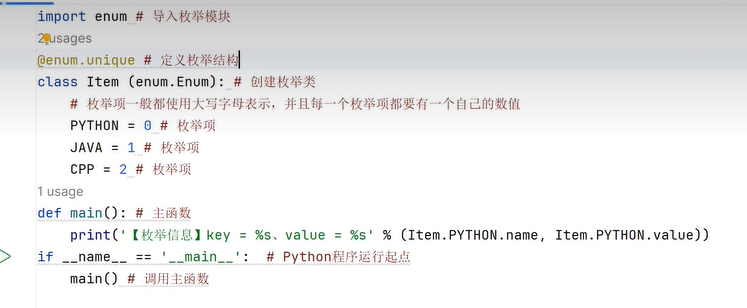
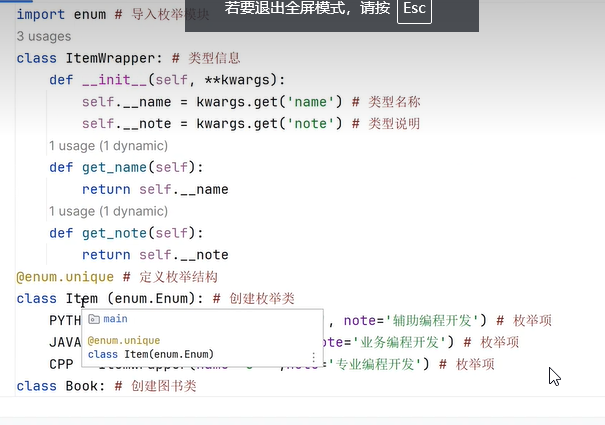
二十八、枚举类型
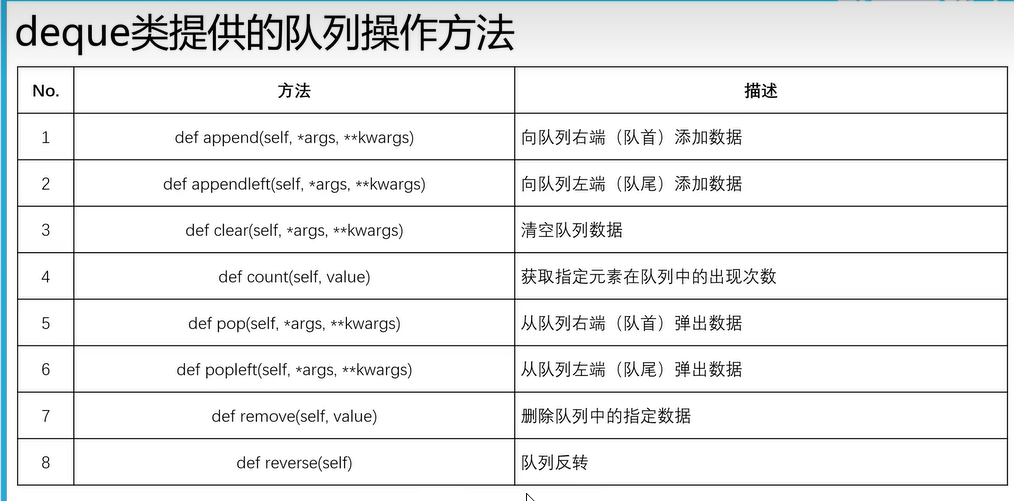
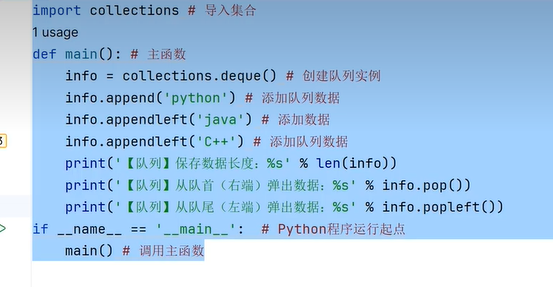
二十九、双端队列
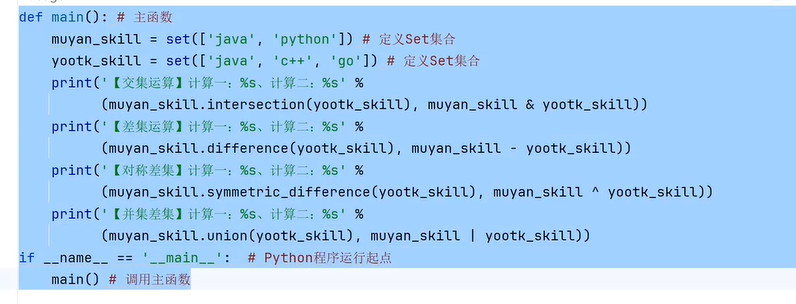
三十、Set集合运算
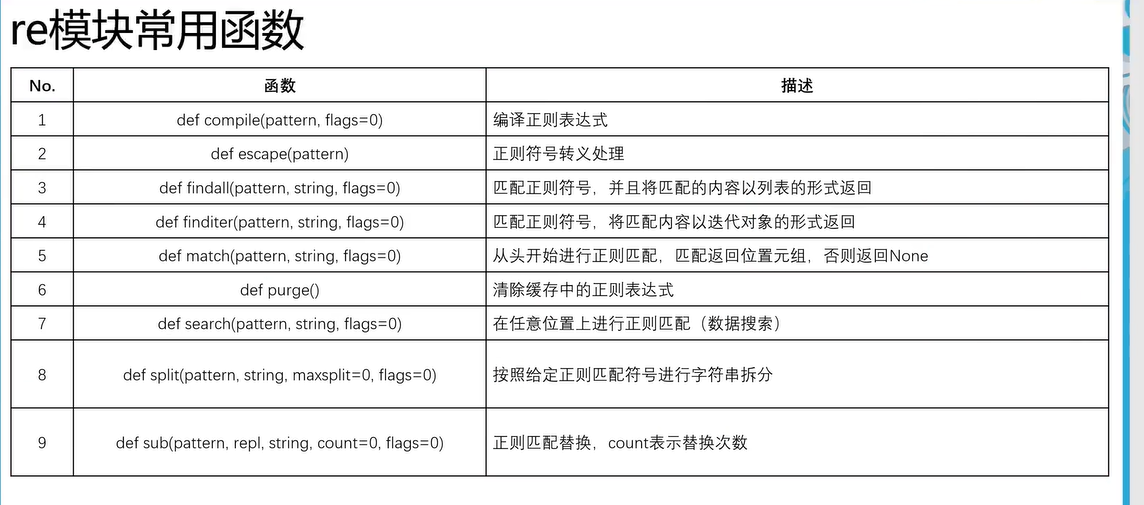
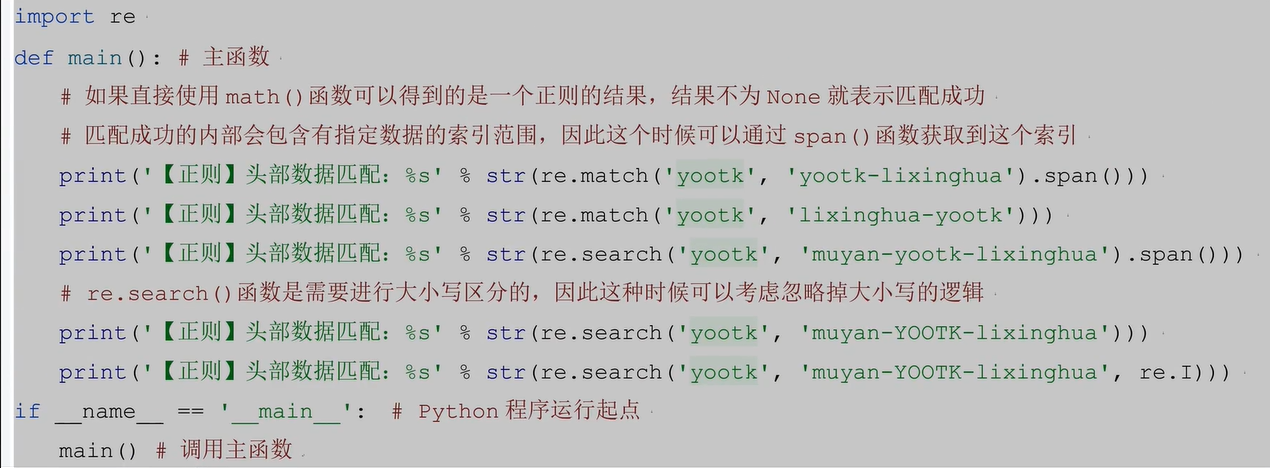
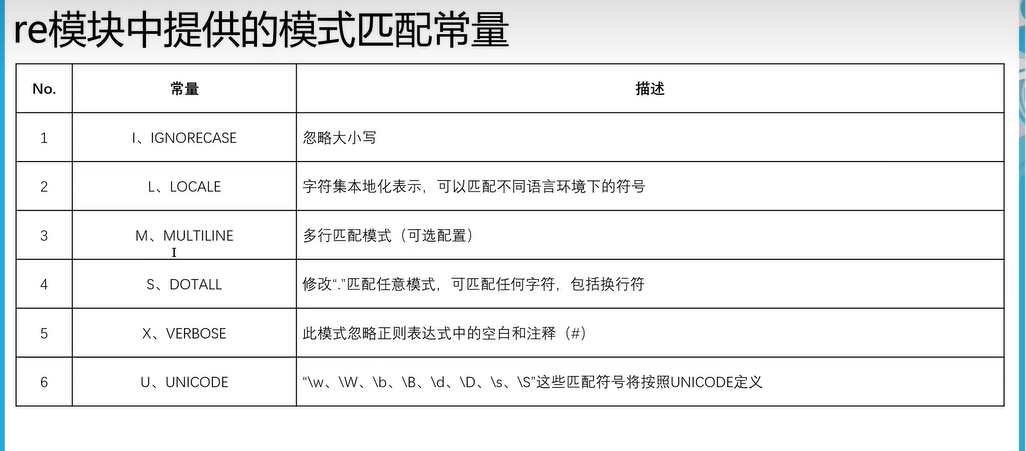
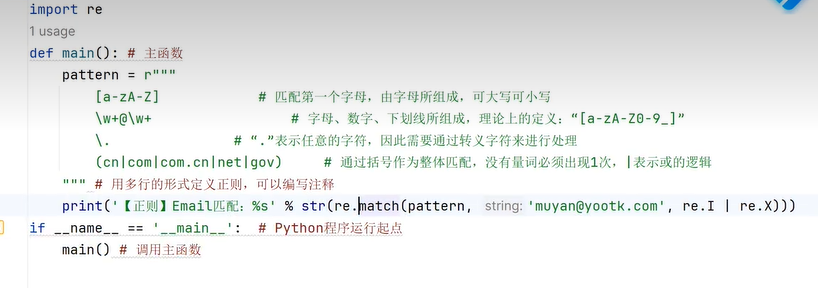
三十一、正则匹配
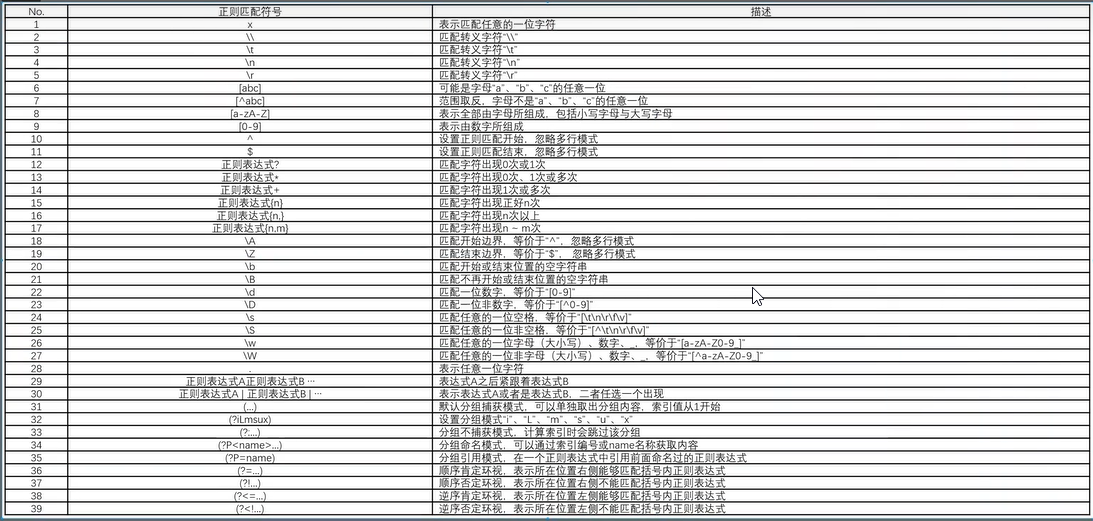


^\w+@\w+\.(cn|com|com\.cn|net|gov){1}$
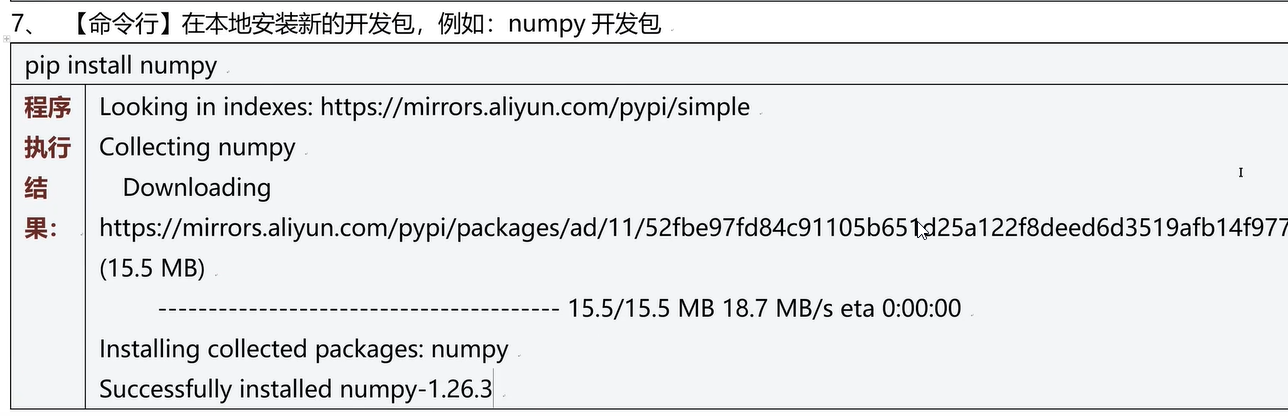
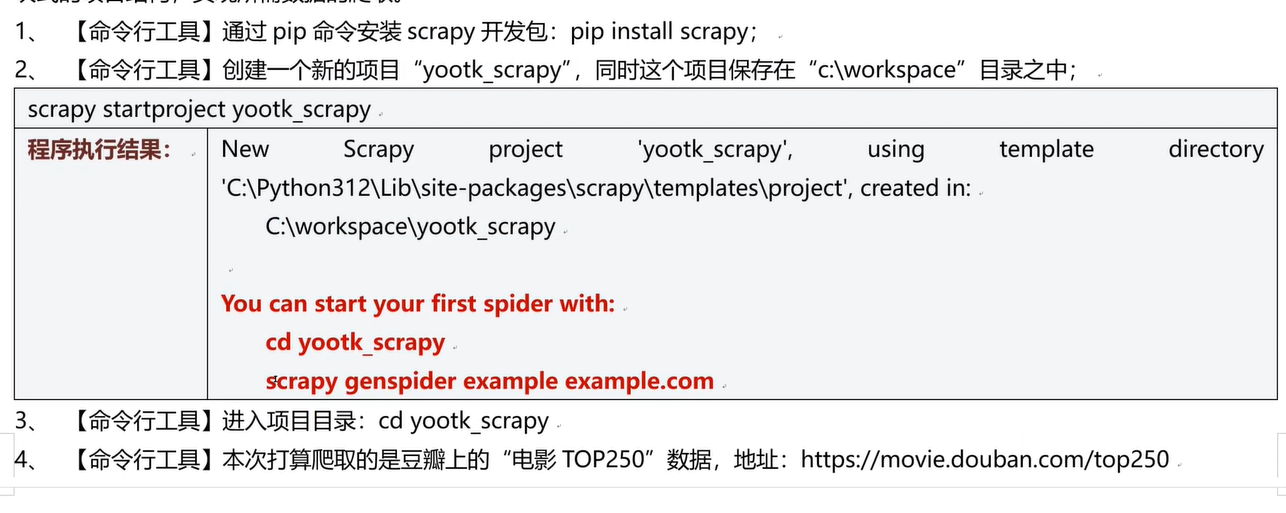
三十二、Pip工具


三十三、虚拟环境
- 手动创建python项目虚拟环境
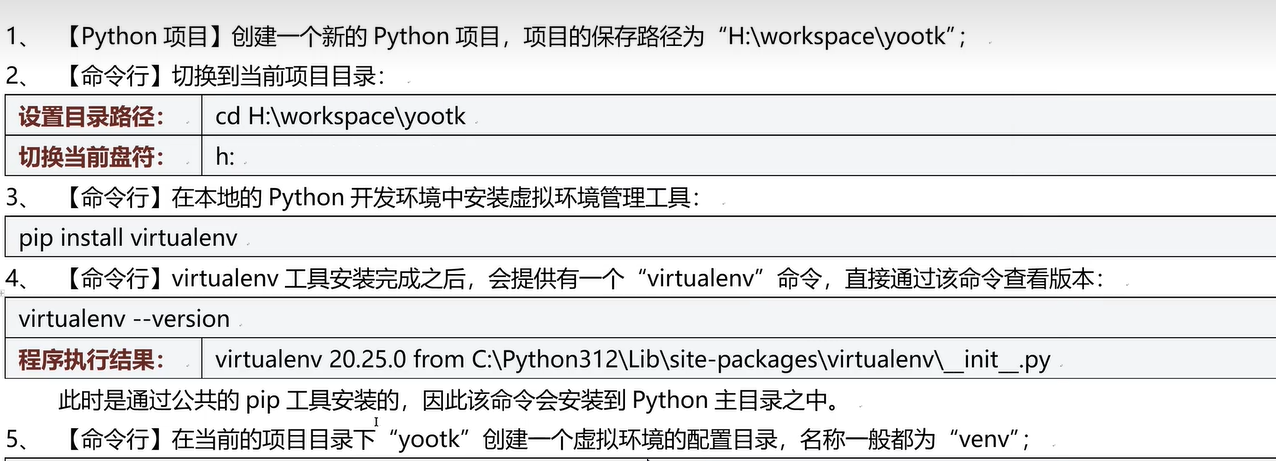

- pycharm每次创建一个项目就会自动创建一个虚拟环境
三十四、python打包
pip install setuptools #先按照打包模块,然后改下配置类
- 在项目根目录下创建setup.py配置类如下:
import setuptools
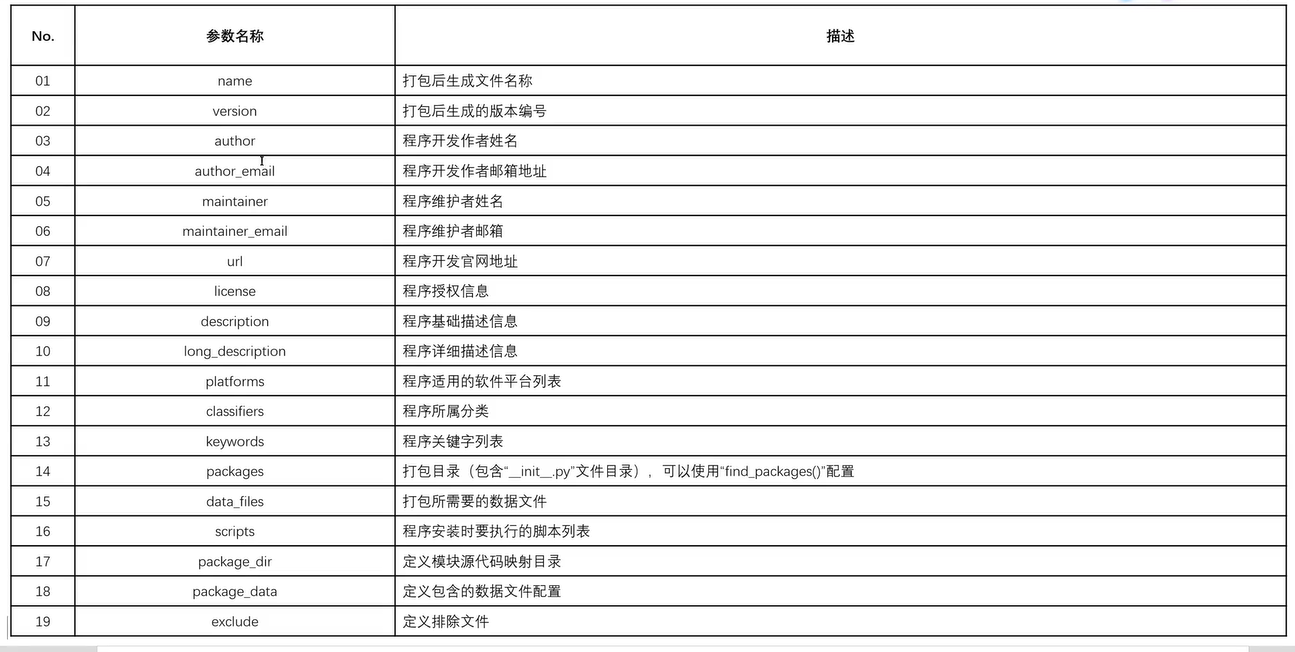
setuptools.setup(
name='python_study_XiaoZeng_demo', # 打包文件名称
version='0.0.1', # 打包模块版本号
author= '小曾',
url = 'http://www.baidu.com',
description='这是一个学习Demo代码集',
packages=setuptools.find_packages('src'),
package_dir={'':'src'}, # 打包目录
package_data={'':['*.txt','*.info','*.properties'], '':['data/*.*']}, #配置文件包含的后缀文件
exclude=['*.test','*.test.*','test.*','test'], # 排除所有的配置文件
classifiers=['Environment :: Web Environment',
'Intended Audience :: Developers',
'License :: OSI Approved :: BSD License',
'Operating System :: OS Independent',
'Programming Language :: Python',
'Programming Language :: Python :: 2',
'Programming Language :: Python :: 3'])
- 在CMD/WindowPowerShell页面中运行如下命令进行
python setup.py bdist_wheel #python打包命令
-
把生成的程序包让别人执行如下命令,进行安装
![image-20240629172151011]()
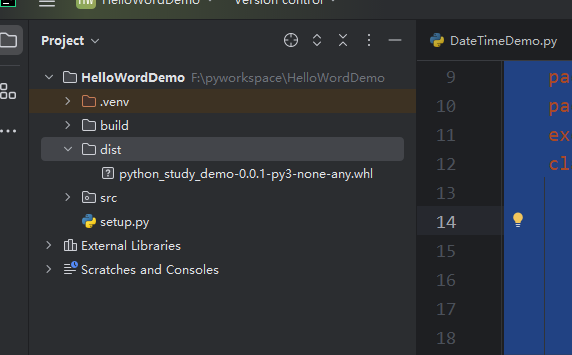
pip install F:\pyworkspace\HelloWordDemo\dist\python_study_demo-0.0.1-py3-none-any.whl
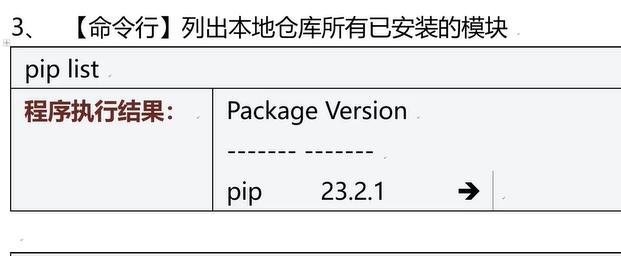
- 查看本地模块
pip list
- 在自己的项目中安装自己打包程序
python setup.py install  # 第一种方式
# 第二种方式
pip install F:\pyworkspace\HelloWordDemo\dist\python_study_demo-0.0.1-py3-none-any.whl
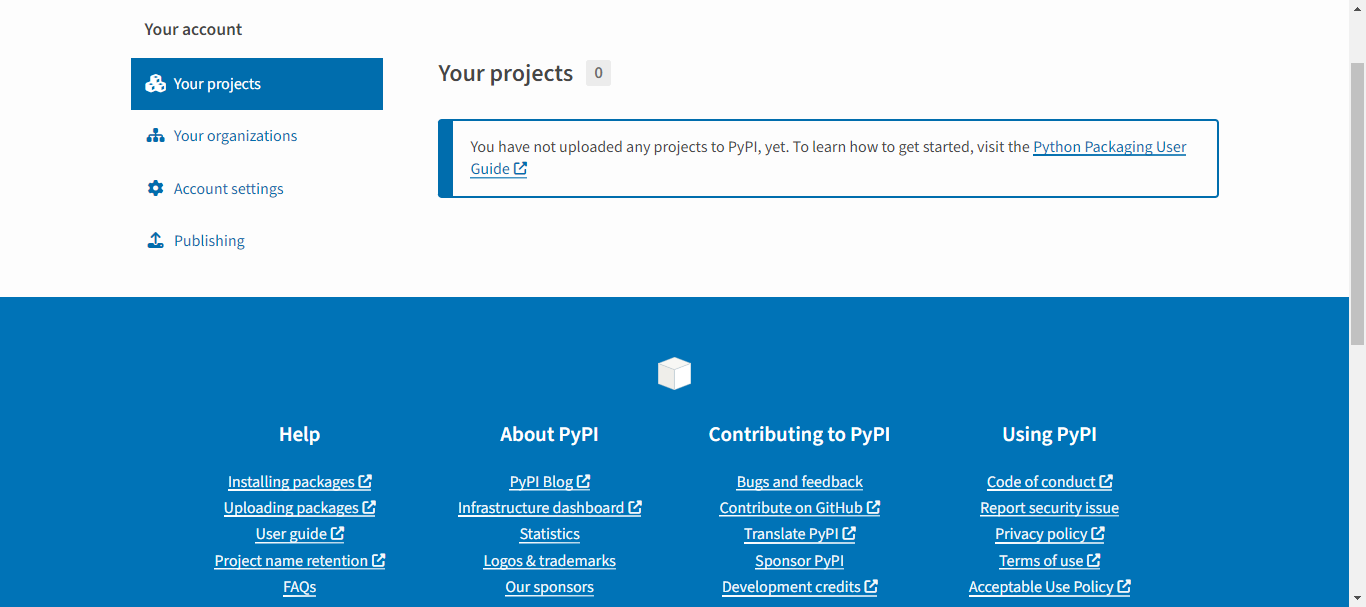
三十五、项目发布
- 在上传安装包前,先注册pipy远程仓库账号
https://pypi.org/manage/projects/
- 新建token用于上传验证
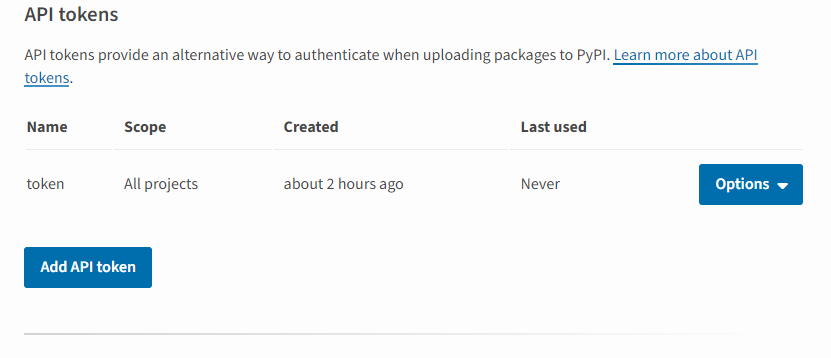
- 在操作系统的用户目录下创建
.pipyrc文件,可以不用每次输密码上传,类似于git验证

.pipyrc格式如下
[pypi]
  username = __token__
  password = pypi-AgEIcHlwaS5v....
- 在项目虚拟环境下安装twine
pip install twine
- 使用twine上传文件dist目录下安装到pipy远程仓库中,供全球开发者使用。
twine upload dist/*
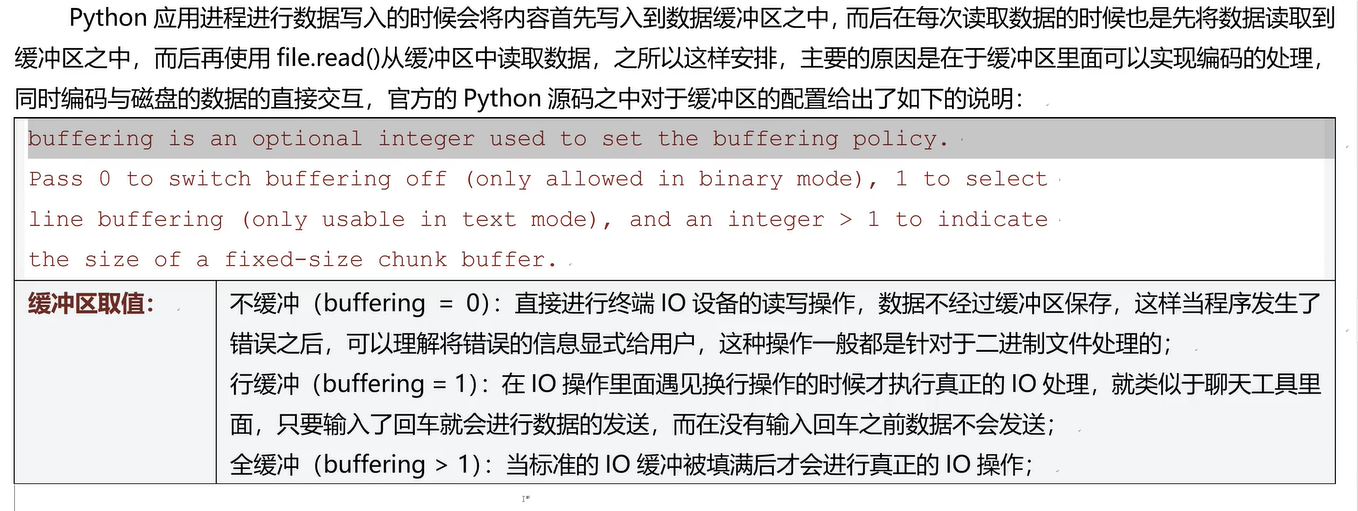
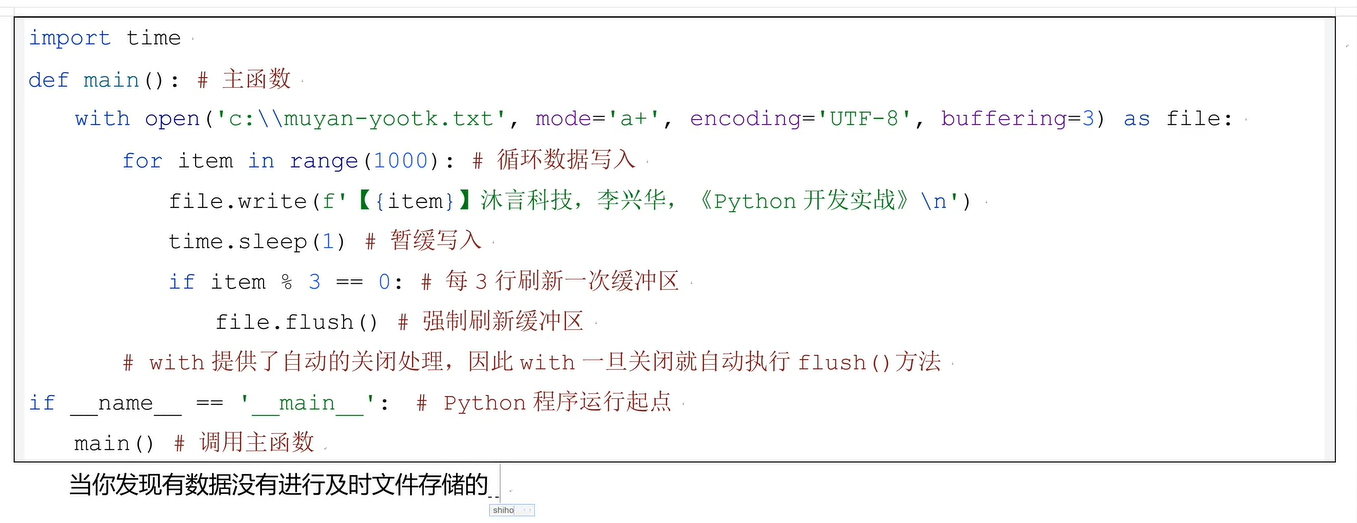
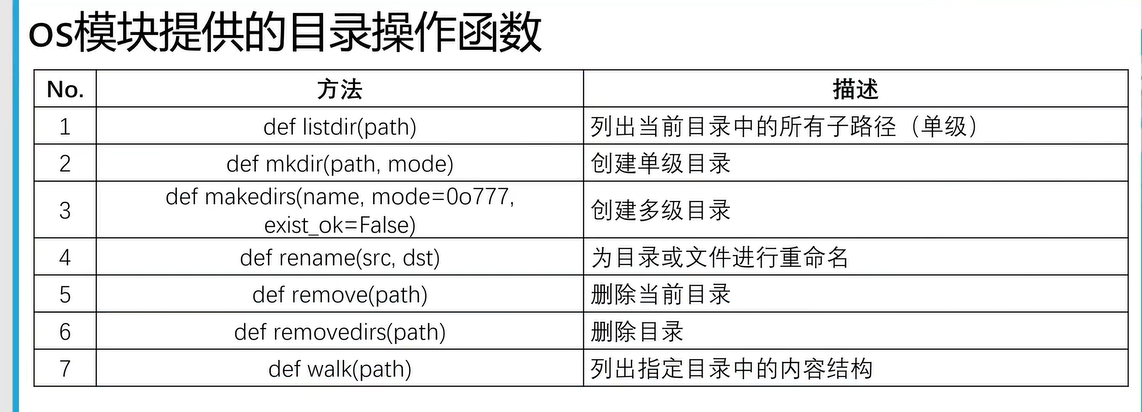
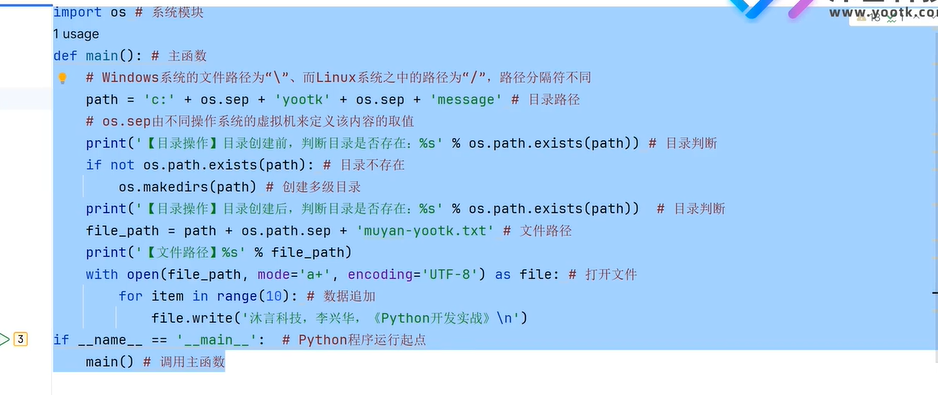
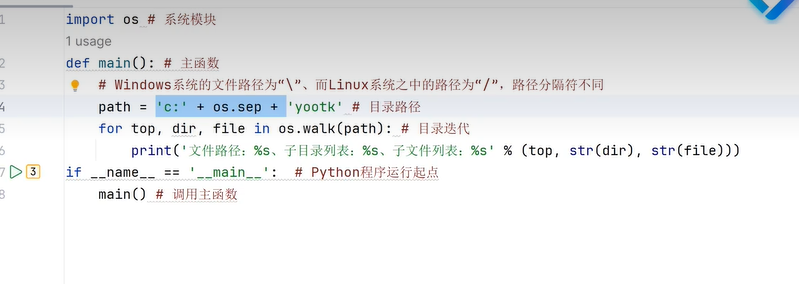
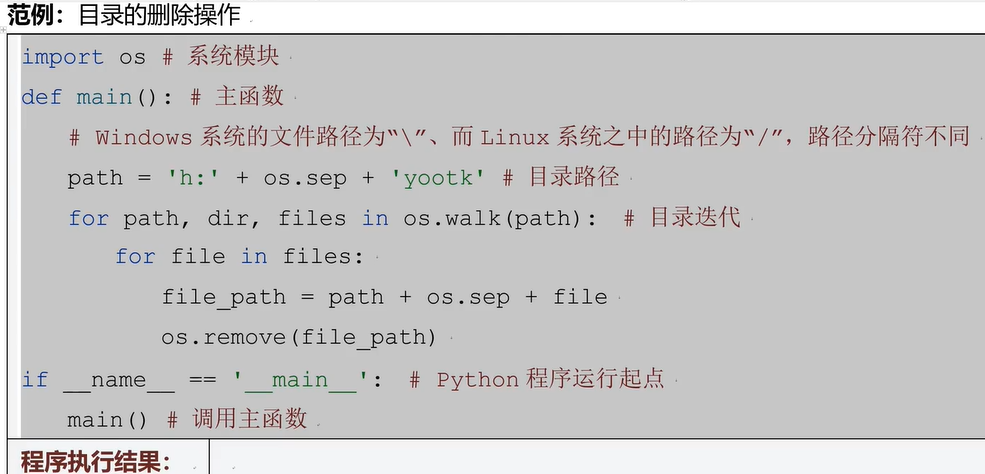
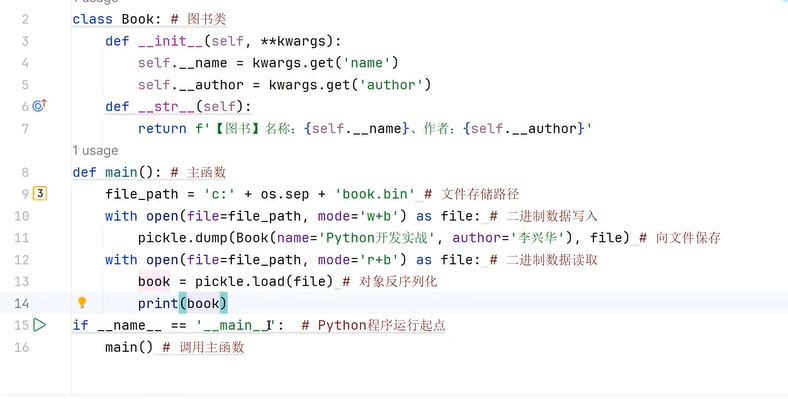
三十六、文件读写

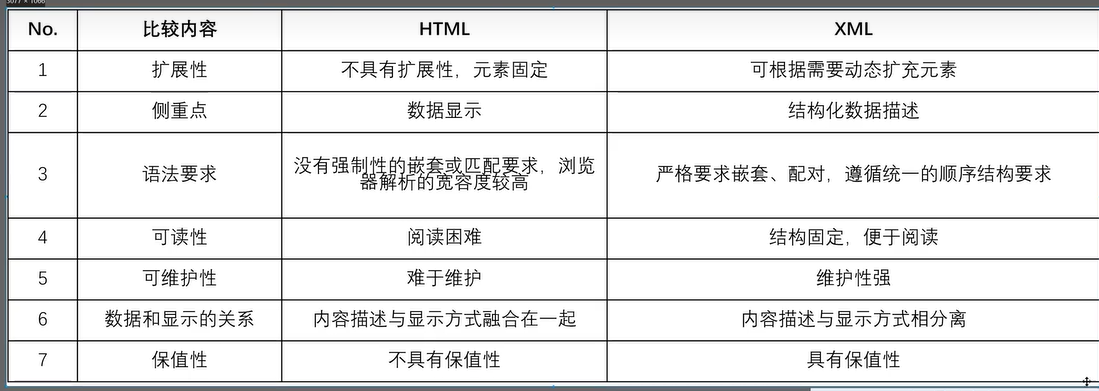
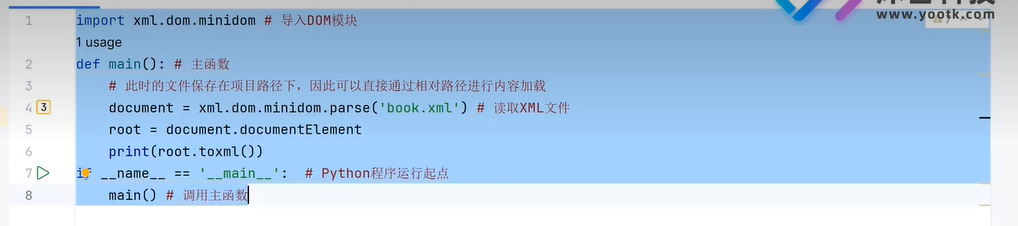
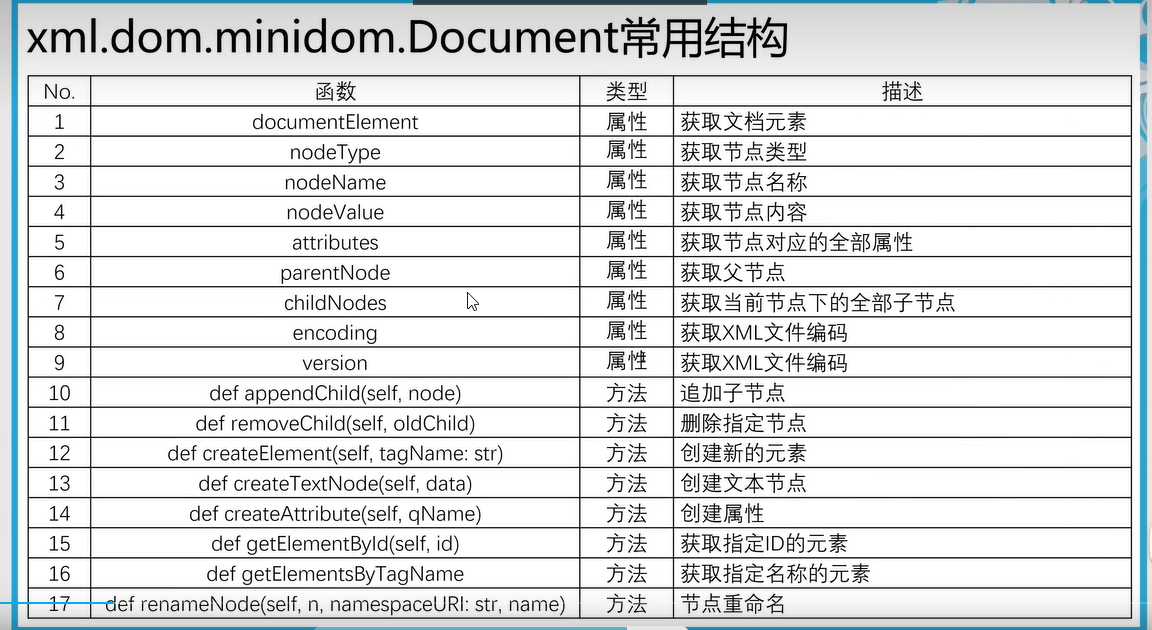
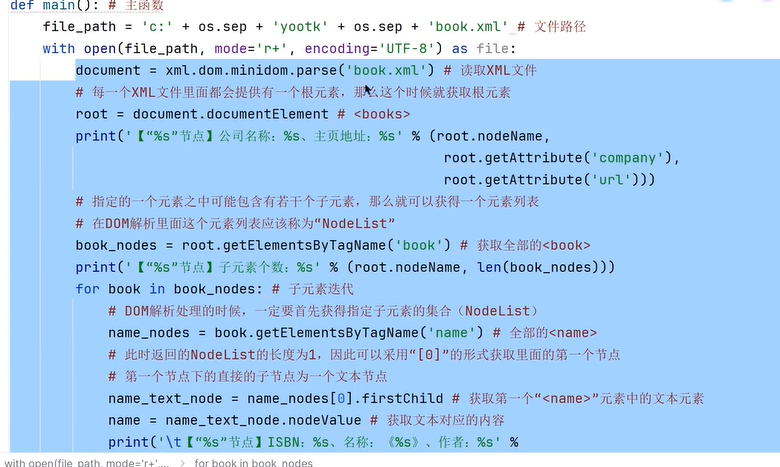
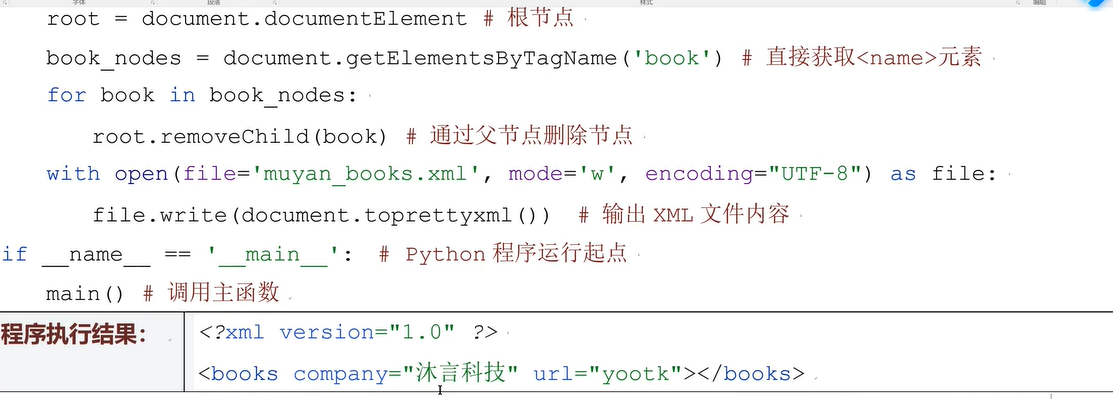
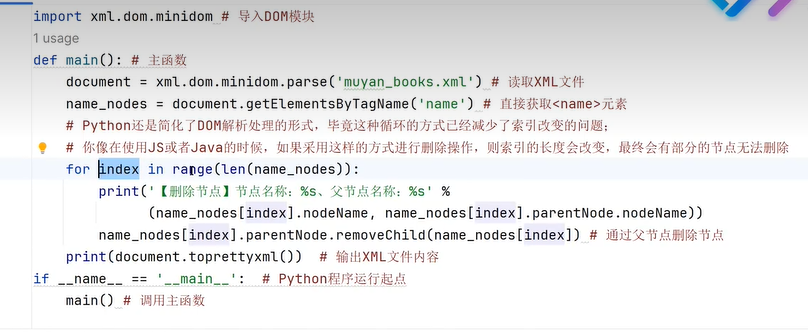
三十七、文本格式(Dom解析)
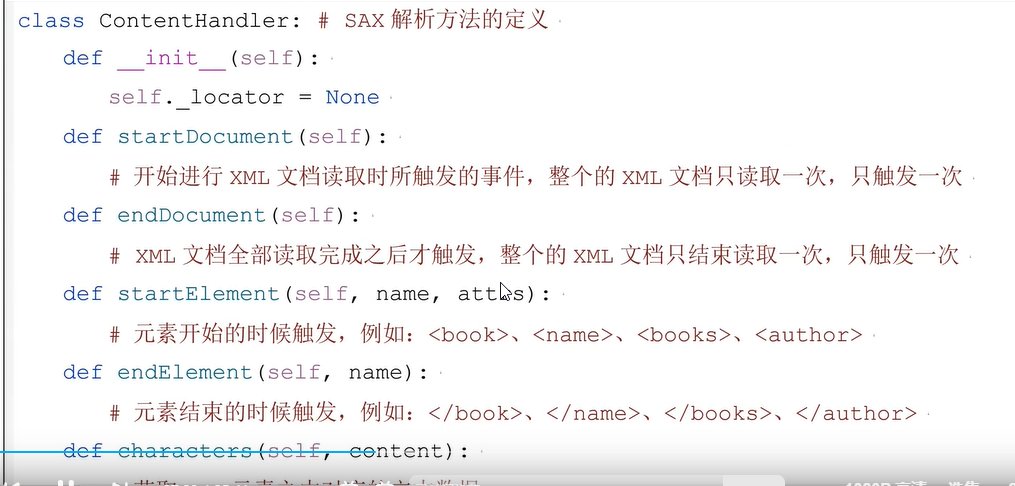
三十七、SAX文件解析
适合大数据量文件开发
import xml.sax
# SAX工具解析xml文件

class Book:
    def __init__(self):
        pass
    def __str__(self):
        return f'[图书信息]书名:{self.name},作者:{self.author},isbn:{self.isbn}'
class ContentHandle(xml.sax.ContentHandler):
    def startDocument(self):   #开始读取xml文档,只执行一次。
        # 声明属性
        self.__currentBook=None  # 当前对象
        self.__currentTarge=None # 当前标签
        # 读取每个book对象存储在集合中
        self.books =[]

    def endDocument(self):
        print('xml文件读取结束!')


    def characters(self, content):  # 获取xml元素中对应的文本数据
        # 判断是否有内容
        if len(content.strip())>0:
            if self.__currentTarge=='author':
                self.__currentBook.author=content
            elif self.__currentTarge=='isbn':
                self.__currentBook.isbn=content
            elif self.__currentTarge=='name':
                self.__currentBook.name=content

    def startElement(self, name, attrs): # 获取<name>开始标签
        # 获取当前标签名称
        self.__currentTarge=name
        # 如果是子标签对象的话就实例化对象
        if self.__currentTarge == 'book':
            self.__currentBook=Book()
            # 把熟悉添加到对象中
            self.__currentBook.isbn=attrs.getValue('isbn')


    def endElement(self, name): # 获取</name>结束标签
        if name=='book':
           self.books.append(self.__currentBook)


def main():
    # 获取sax解析器对象
    sax=xml.sax.make_parser()
    # 关闭命名空间检查
    sax.setFeature(xml.sax.handler.feature_namespaces, 0)
    # 实例化解析
    chd = ContentHandle()
    sax.setContentHandler(chd) #SAX解析配置
    sax.parse('F:\\pyworkspace\\HelloWordDemo\\book.xml')
    for book in chd.books:
     print('xml文件集合:', book,end='\t\t')
if __name__ == '__main__':
    main()
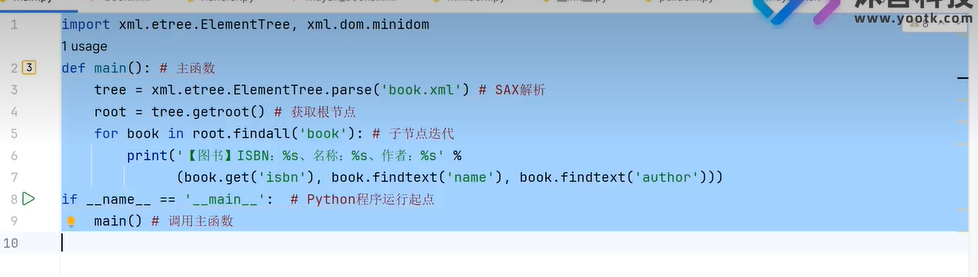
三十八、ElementTree(创建Dom树)
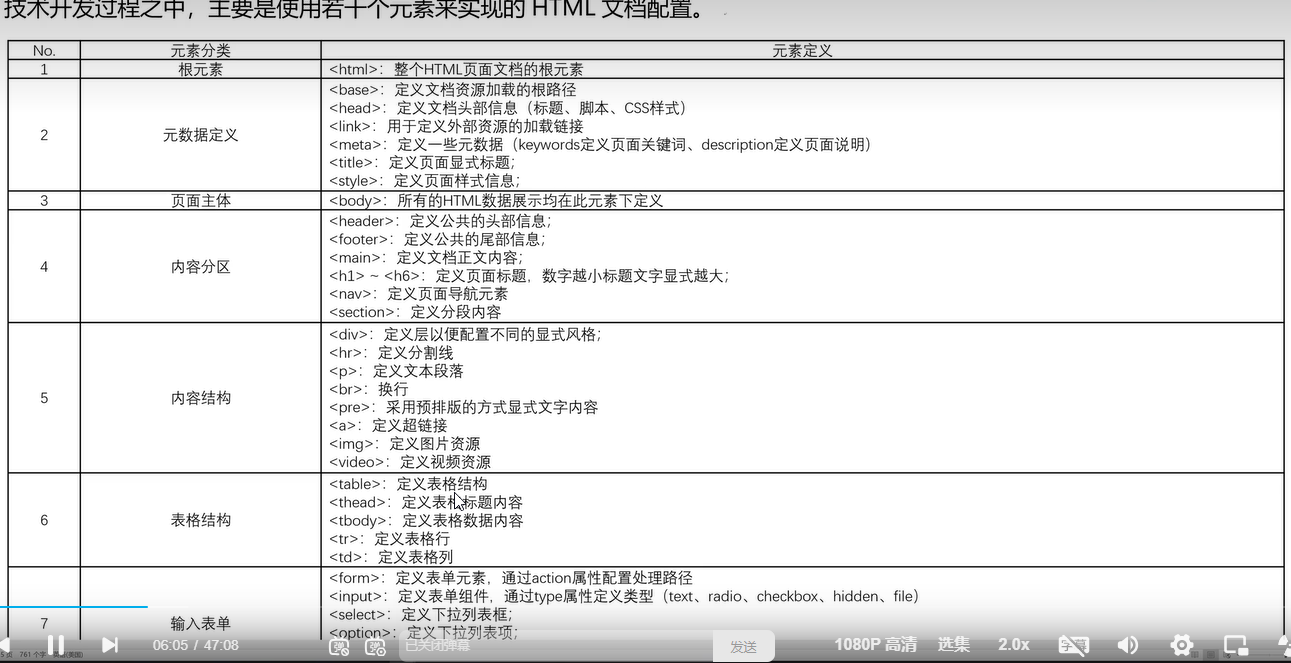
三十九、HTML
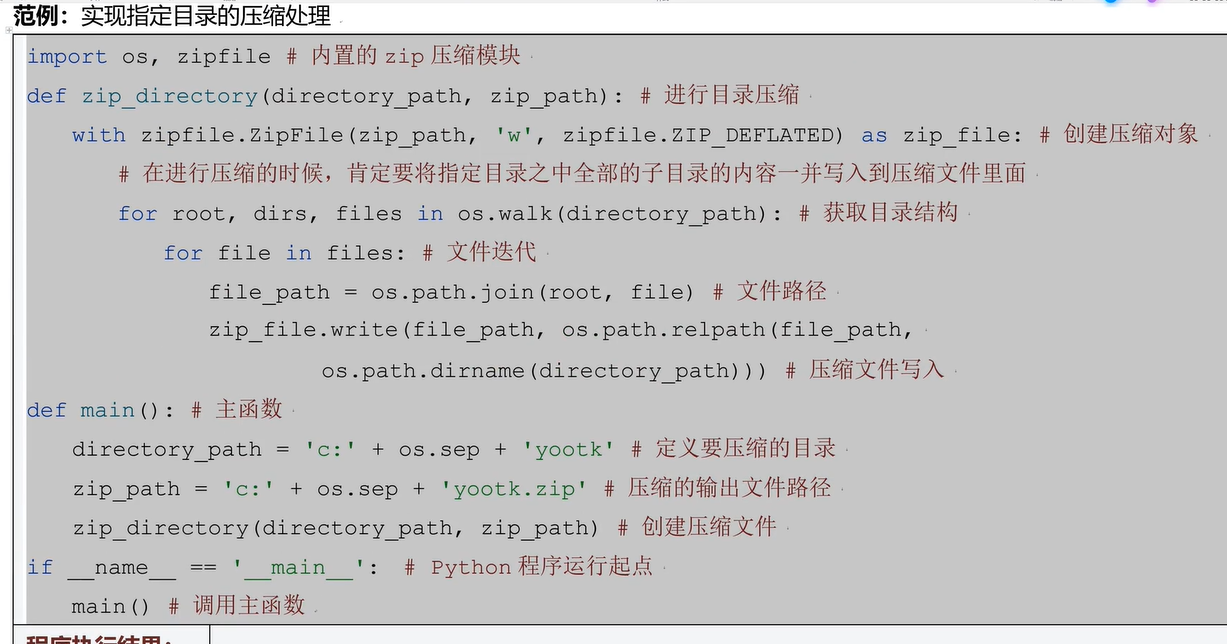
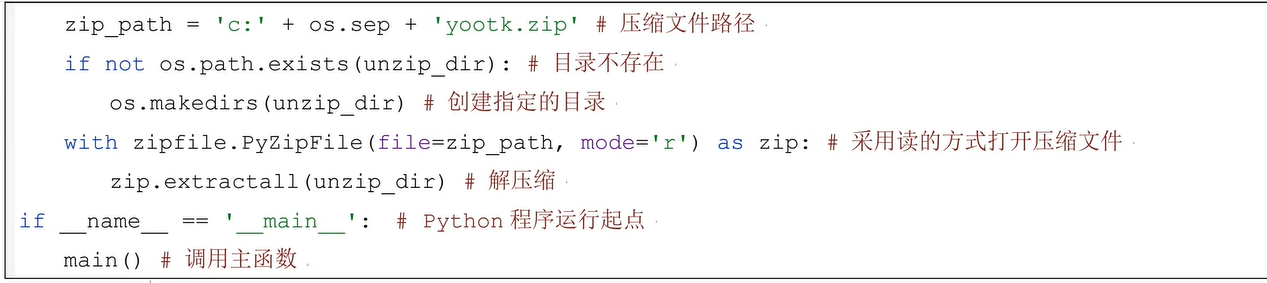
四十、ZIP压缩文件创建
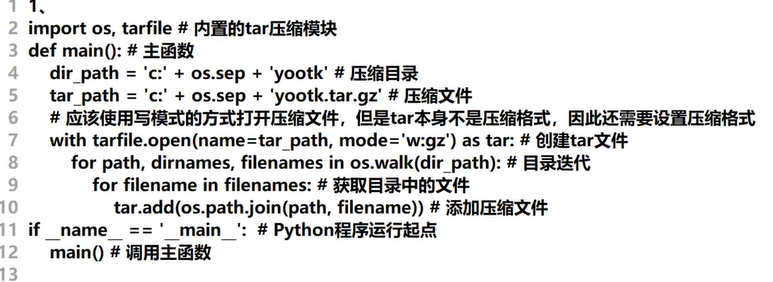
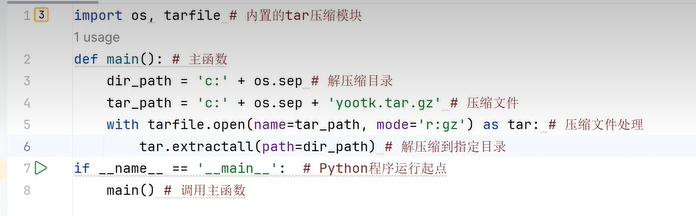
四十一、tar.gz压缩文件文件创建
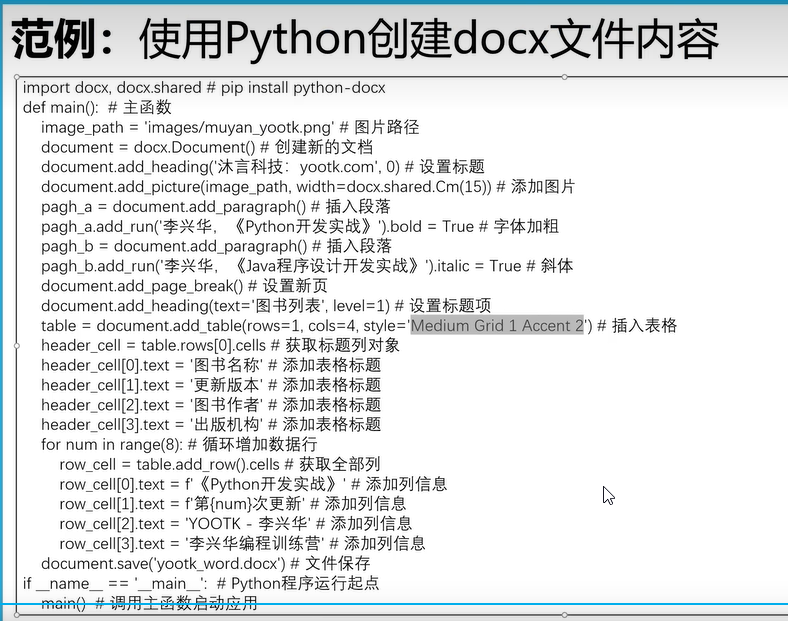
四十二、python操作word
- 安装python依赖包(在虚拟环境下)
pip install python-docx
四十三、python操作excel文件
- 安装依赖库
pip install openpyxl
# 导入依赖  pip install openpyxl
import openpyxl,openpyxl.styles

def main():
    wb = openpyxl.Workbook()
    #获取第一个工作簿
    sheet1=wb.active
    # 在第一行第二列输入值
    sheet1.cell(1,2,'沐言优拓')
    sheet1.cell(row=1,column=3,value='李兴华')
    # 追加一行数据
    sheet1.append(['java','python','go','c++','c','ruby'])
    # 设置单元格数据
    sheet1['A1']='测试单元格插入数据!'
    # 给单元格设置字体
    sheet1.cell(row=3,column=1,value='样式内容').font =(
        # 字体类型  字体大小  是否加粗  字体颜色  是否倾斜
        openpyxl.styles.Font(name='微软雅黑',size=12,bold=True,color='00FF00',italic=True))
    # 设置文本左对齐
    sheet1.cell(3,2,'文本左对齐').alignment=openpyxl.styles.Alignment(horizontal='left')
    #底色填充
    sheet1.cell(3,3,'底色填充').fill=openpyxl.styles.PatternFill(fill_type='solid',start_color='ffeb9c')
   # 单元格边框
    sheet1.cell(3,4,'单元格边框').border=openpyxl.styles.Border(left=openpyxl.styles.Side(border_style='double',color='FF0000'),right=openpyxl.styles.Side(border_style='double',color='00FF00'))
    # 受保护的单元格
    sheet1.cell(4,4,'受保护单元格').protection=openpyxl.styles.Protection()
    # 数值文本格式化
    sheet1.cell(4,5,0.9).number_format=openpyxl.styles.numbers.FORMAT_PERCENTAGE
    wb.save('test2.xlsx')

if __name__ == '__main__':
    main()
# 函数处理
import openpyxl,openpyxl.styles

def main():
    workbook=openpyxl.Workbook()
    sheet1=workbook.active
    sheet1.title='图书销售情况'
    sheet1.append(('图书名称','图书作者','出版机构','图书印刷量','图书销售量','图书破损量','图书库存量'))
    book_name=['Mysql开发实战','Redis开发实战','ElasticSearch开发实战','PostgreSQL开发实战','MongDB开发实战']
    prints=[5000,8000,7000,5000,3000]  # 印刷量
    sales=[4500,7200,5300,3500,1800] # 销售量
    breaks=[213,239,131,231,89]

    for index in range(len(book_name)):
        sheet1.cell(row=index+2,column=1,value=book_name[index])
        sheet1.cell(row=index + 2, column=2, value='李兴华')
        sheet1.cell(row=index + 2, column=3, value='沐言优拓')
        sheet1.cell(row=index+2,column=4,value=prints[index])
        sheet1.cell(row=index+2, column=5,value=sales[index])
        sheet1.cell(row=index+2, column=6,value=breaks[index])
        sheet1.cell(row=index+2, column=7,value=prints[index]-sales[index]-breaks[index])

    # 为表头添加数据筛选功能
    sheet1.auto_filter.ref='A1:G1'
    sheet1['D7']='=SUM(D2:D6)'
    sheet1['E7']='=SUM(E2:E6)'

    workbook.save('test3.xlsx')
if __name__ == '__main__':
  main()
# 生成Excel柱状图
import openpyxl,openpyxl.styles,openpyxl.chart

def main():
    wb = openpyxl.Workbook()
    sheet = wb.active
    vals=[('季度','python','c','c++','java','golang','ruby')
          ,(1,1232,4536,1254,7865,3456,4567)
        ,(2,4567,2356,7986,2567,9876,5687)
        ,(3,3456,8790,2365,1789,9867,1456)
        ,(4,1456,7896,1456,4578,2567,8967)]

    for row in vals:
        sheet.append(row)


    # 柱状图
    # bar = openpyxl.chart.BarChart()
    # 折线图
    bar=openpyxl.chart.LineChart()
    bar.title='编程语言使用统计'
    bar.x_axis.title='季度'
    bar.y_axis.title='使用量'
    chart_data=openpyxl.chart.Reference(sheet,min_col=2,max_col=7,min_row=1,max_row=5)
    chart_catelog=openpyxl.chart.Reference(sheet,min_col=1,min_row=2,max_row=5)
    # 设置统计数据
    bar.set_categories(chart_catelog)
    bar.add_data(chart_data,titles_from_data=True)
    # 柱状图展示的位置
    sheet.add_chart(bar,'H9')


    wb.save('test4.xlsx')


if __name__ == '__main__':
   main()
# 生成Excel柱状图
import openpyxl,openpyxl.styles,openpyxl.chart

def main():
    wb = openpyxl.Workbook()
    sheet = wb.active
    vals=[('季度','python','c','c++','java','golang','ruby')
          ,(1,1232,4536,1254,7865,3456,4567)
        ,(2,4567,2356,7986,2567,9876,5687)
        ,(3,3456,8790,2365,1789,9867,1456)
        ,(4,1456,7896,1456,4578,2567,8967)]

    for row in vals:
        sheet.append(row)


    # 面积图
    bar=openpyxl.chart.AreaChart()
    bar.title='编程语言使用统计'
    bar.x_axis.title='季度'
    bar.y_axis.title='使用量'
    chart_data=openpyxl.chart.Reference(sheet,range_string='sheet!B1:G5')
    chart_catelog=openpyxl.chart.Reference(sheet,range_string='sheet!A2:A5')
    # 设置统计数据
    bar.set_categories(chart_catelog)
    bar.add_data(chart_data,titles_from_data=True)
    # 柱状图展示的位置
    sheet.add_chart(bar,'H9')


    wb.save('test5.xlsx')


if __name__ == '__main__':
   main()
import openpyxl
def main():
    # 加载Excel中的数据
    content=openpyxl.load_workbook('test.xlsx')
    # 获取sheet列表
    print('sheet名字列表',content.sheetnames)
    # 获取名称获取表格信息
    sheet1=content['图书销售总量']
    for item in range(2025,2027):
        # 复制单元表 并改名
        sheet1_copy=content.copy_worksheet(sheet1)
        sheet1_copy.title = 'Sheet1'
        sheet1_copy.sheet_properties_tabcolor='ba7f57'
    # 删除工作簿
    content.remove(sheet1_copy)
    content.save('test1.xlsx')


if __name__ == '__main__':
    main()
# 处理excel
import openpyxl
def main():
    # 创建多个sheet
    program=['python','java','sql','go']
    # 获取wordbook对象
    workbook=openpyxl.Workbook()
    #创建默认的sheet
    sheet1=workbook.active
    sheet1.title='图书销售总量'
    for item in program:
        workbook.create_sheet(f'{item}图书销售')

    workbook.save('test.xlsx')

if __name__ == '__main__':
    main()
四十四、CSV格式使用
import csv


def main():
    with open('test.csv', 'r+', newline='',encoding='UTF-8') as csvfile:
        csv_file=csv.reader(csvfile)
        # 获取标题
        csv_header=next(csv_file)
        print(csv_header)  # 以列表显示
        # 读取每行数据
        for row in csv_file:
            print(row)  # 以列表显示

if __name__ == '__main__':
    main()
import csv


def main():
    # 以空格换行
    with open('test.csv', 'r+', newline='',encoding='UTF-8') as csvfile:
        # 以字典读取
        csv_file=csv.DictReader(csvfile)
        print(next(csv_file))  # 迭代输出字典
        # 读取每行数据
        for row in csv_file:
            print(row.get('图书名称'),row.get('图书作者'))  # 以列表显示

if __name__ == '__main__':
    main()
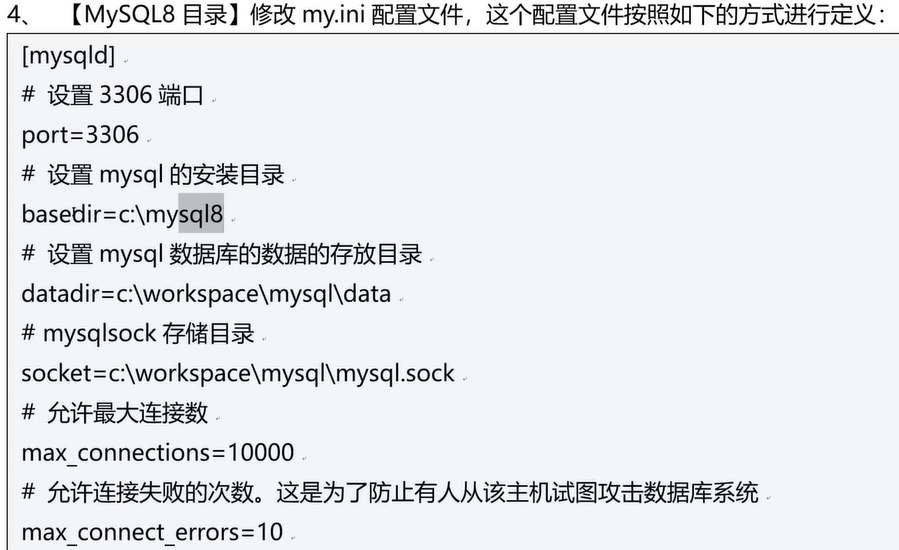
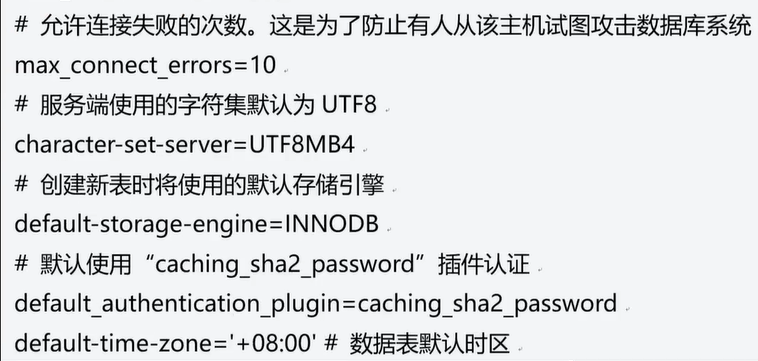
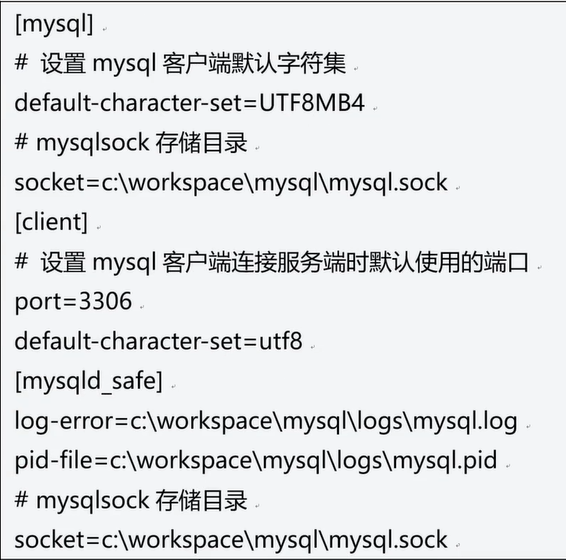
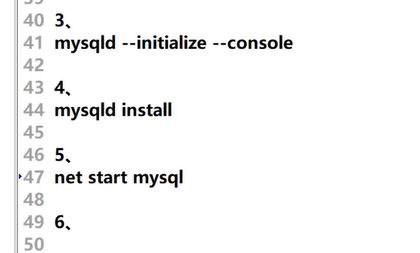
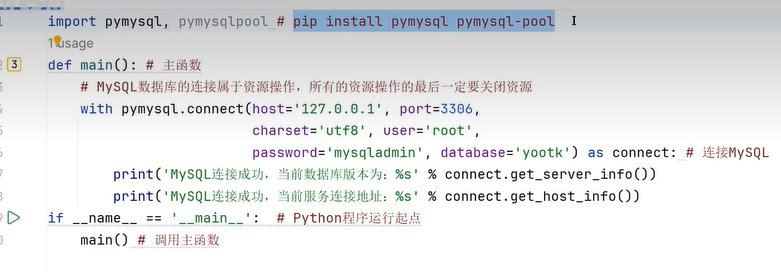
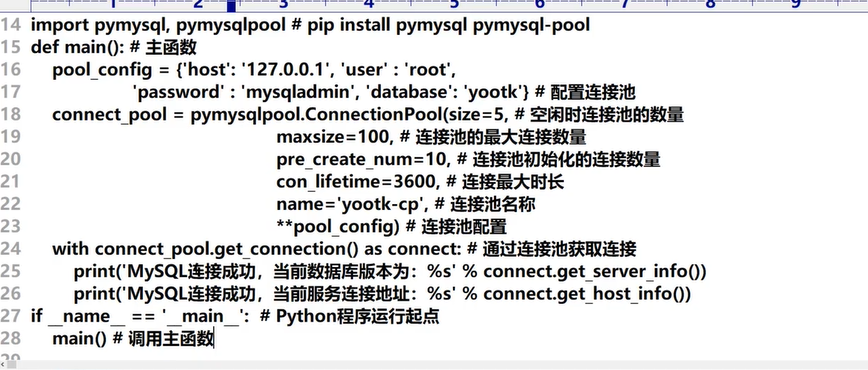
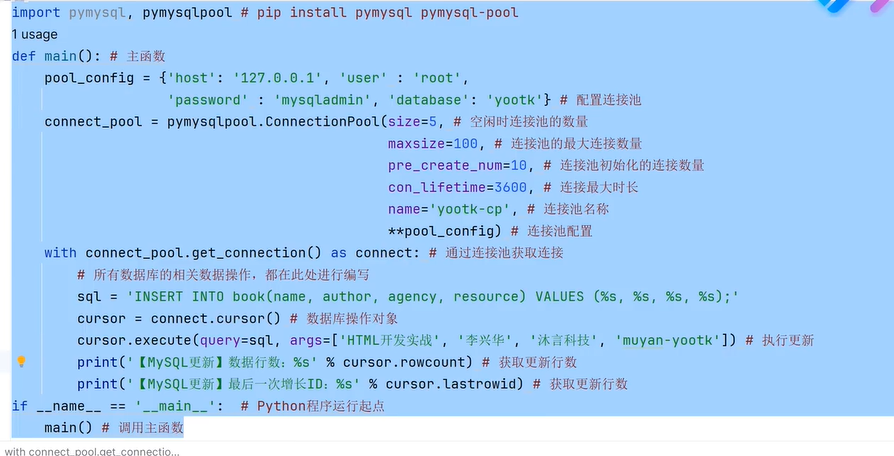
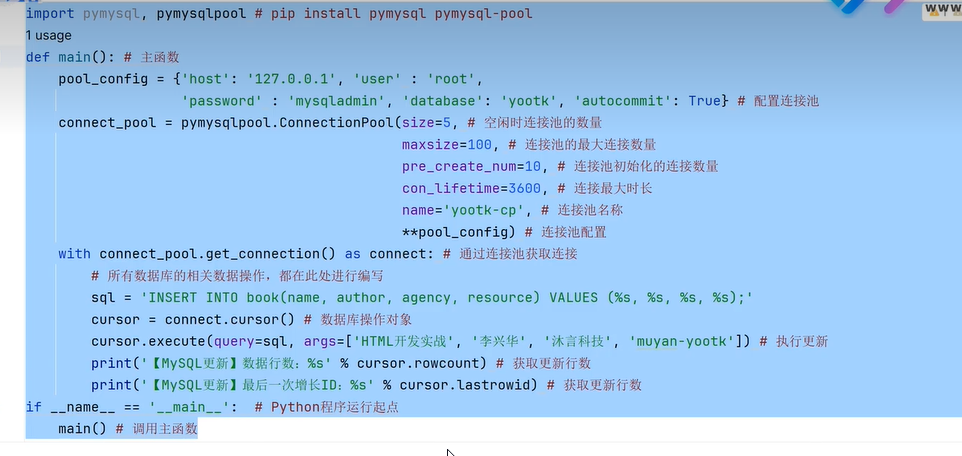
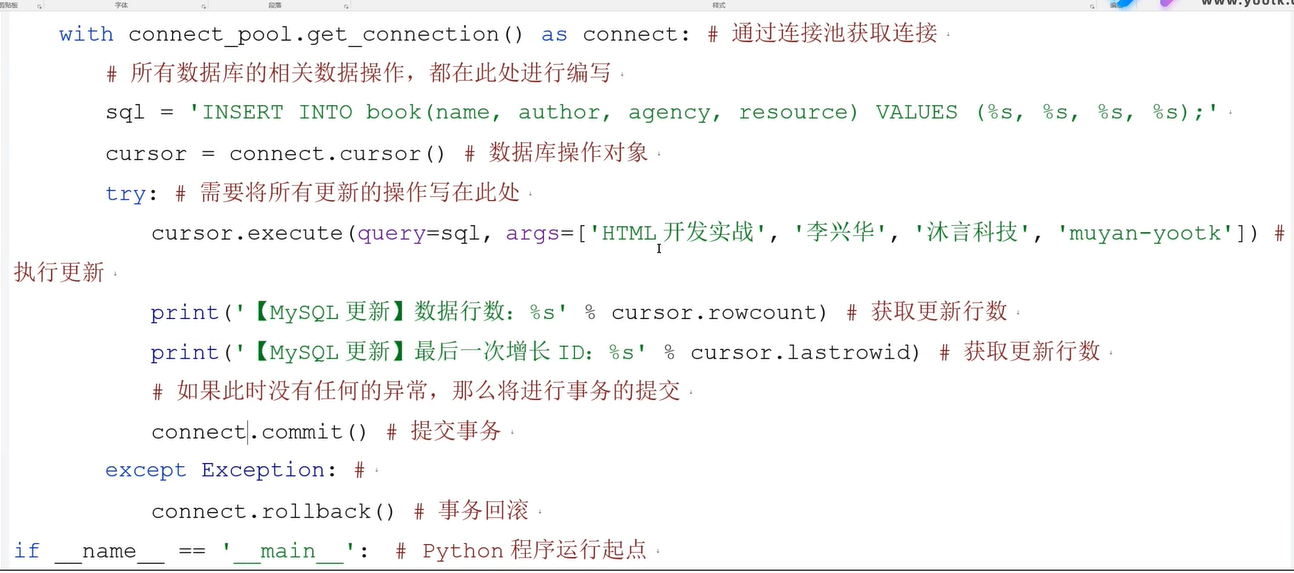
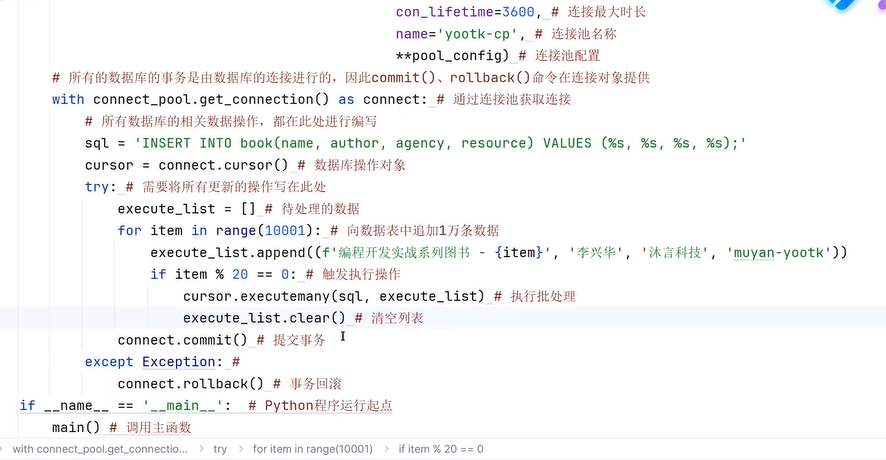
四十五、连接MySQL


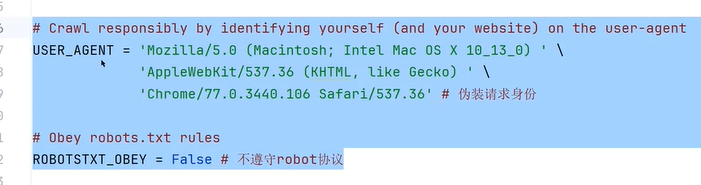
四十六、scrapy框架爬虫


本文来自博客园,作者:戴莫先生Study平台,转载请注明原文链接:https://www.cnblogs.com/smallzengstudy/p/18924851

 浙公网安备 33010602011771号