33. Java进阶之Scanner类学习(基本概念,常见用法)
文章目录
1.Scanner基础学习
1.1 Scanner类是个什么类?
其实这个类并不是一个输入类,只是我们初学的人把它的一种用法作为输入方法而已,从字面意思上来理解,它应该是个扫描类。
Java 8 API这样解释Scanner类:
一个简单的文本扫描器,可以使用正则表达式解析原始类型和字符串。
1.2 构造方法学习
https://www.matools.com/api/java8
我们常用的Scanner in=new Scanner(System.in);调用的就是Scanner(InputStream source)构造方法。
通过对Scanner构造方法的学习,我们可以知道Scanner对象能对那些形式的信息进行扫描, Scanner中定义了很多类型的构造器,我们了解其中具有代表性的。
//这里表示能对Reader,Buffer的信息进行处理
public Scanner(Readable source)
//扫描器将可以的对指定输入流中的信息进行处理
public Scanner(InputStream source)
//扫描器将可以的对指定输入流中的信息以指定字符集进行处理
public Scanner(InputStream source, String charsetName)
//扫描器能对File对象描述的文件中的信息以指定字符集进行处理
public Scanner(File source, String charsetName)
//扫描器也能对指定路径描述的文件信息进行处理
public Scanner(Path source)
//扫描器也能对指定字符串进行处理
public Scanner(String source)
//扫描器能对指定可读通道的信息进行处理
public Scanner(ReadableByteChannel source)
1.3 其他重要方法学习
| 方法 | 描述 |
|---|---|
| String next() | 查找并返回此扫描仪的下一个完成匹配项。 |
| void close() | 关闭此扫描器。 |
| boolean hasNext() | 如果此扫描器在其输入中有下一个匹配项,则返回true。默认情况下匹配空格 |
| boolean hasNext(String pattern) | 如果下一个匹配项遵守指定字符串构造的模式,则返回true。 |
| int nextInt() | 扫描源的下一个int类型的数据 |
| int radix() | 返回此扫描器的默认基数。 |
| String toString() | 返回此 Scanner的字符串表示 。 |
| Scanner useRadix(int radix) | 将此扫描器的默认基数设置为指定的基数。 |
其他API方法大家可以查看API文档进行详细的学习。
2.Scanner的用法
2.1.常见用法
2.1.1 输入流扫描
Scanner sc = new Scanner(System.in);
int i = sc.nextInt();
通过这种方式来实现数据的手动输入。
/**
* Scanner输入流构造器学习
*/
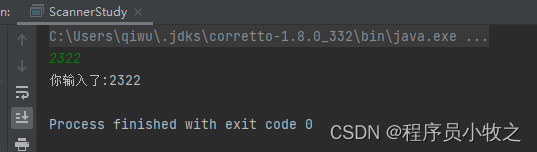
public static void scannerInputStream(){
Scanner sc = new Scanner(System.in);
int i = sc.nextInt();
System.out.println("你输入了:"+ i);
}
通过查看构造方法我们知道它还可以用于文件扫描,路径扫描,字符串扫描,通道扫描。
2.1.2 .文件扫描
用法如下:
File test=new File("D:\\test.txt");//这里的路径就是文件的路径,可以用相对路径也可以用绝对路径
 Scanner in = new Scanner(test);//这样in中存储的的就是test.txt文本的数据了
 //我们可以调用下面方法来对它进行操作
  while (in.hasNext()){
      String word = in.next();
      System.out.println(word);
 }
示例:
/**
 * 对File文件扫描
 * @throws FileNotFoundException
 */
public static void scannerFile() throws FileNotFoundException {
    //这里的路径就是文件的路径,可以用相对路径也可以用绝对路径
    File test = new File("麻子.txt");
    //这样in中存储的的就是麻子.txt文本的数据了
    Scanner in = new Scanner(test);
    //我们可以调用下面方法来对它进行操作
    while (in.hasNext()){
        String word = in.next();
        System.out.print(word);
    }
}

2.1.3 路径扫描,Path的路径设置相对文件扫描的设置显得麻烦许多
假设我们想要一个BufferedReader从文件test.txt中读取文件,该文件位于相对于当前工作目录的目录logs中,我们可以:
Path path = FileSystems.getDefault().getPath("logs","test.txt");
BufferedReader reader=Files.newBufferedReader(path);
从上面我们看出,它要求把路径分开输入,比较麻烦,所以还是用上面的方式简单点。
示例:
public static void scannerPath() throws IOException {
    Path path = FileSystems.getDefault().getPath("麻子.txt");
    Scanner in = new Scanner(path);
    //我们可以调用下面方法来对它进行操作
    while (in.hasNext()){
        String word = in.next();
        System.out.print(word);
    }
    //BufferedReader reader = Files.newBufferedReader(path);
}

2.1.4 字符串扫描
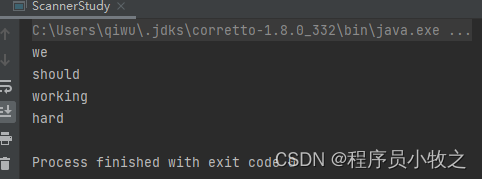
public static void scannerString(){
    Scanner in = new Scanner("we should working hard");
    //我们可以调用下面方法来对它进行操作
    while (in.hasNext()){
        String word = in.next();
        System.out.println(word);
    }
}
2.1.5 通道扫描
public static void scannerChannel() throws FileNotFoundException {
    File file = new File("麻子.txt");
    FileInputStream fileInputStream = new FileInputStream(file);
    Scanner in = new Scanner(fileInputStream.getChannel());
    while (in.hasNext()){
        String word = in.next();
        System.out.print(word);
    }
}

3.代码地址
Java基础学习/src/main/java/Progress/exa33 · 严家豆/Study - 码云 - 开源中国 (gitee.com)

 浙公网安备 33010602011771号