Android Notification
Android Notification
饮水思源
本文的主要内容是从下列的连接中总结而来。
http://www.cnblogs.com/travellife/p/Android-Notification-xiang-jie.html
http://adchs.github.io/patterns/notifications.html
https://developer.android.google.cn/guide/topics/ui/notifiers/notifications.html
http://www.runoob.com/w3cnote/android-tutorial-notification.html
DESC
通知是您可以在应用的常规UI外部向用户显示的消息。当您告知系统发出通知时,它将先以图标的形式显示在通知区域中。用户可以打开抽屉式通知栏查看通知的详细信息。通知区域和抽屉式通知栏均是由系统控制的区域,用户可以随时查看。
涉及到的知识点

通知的细节
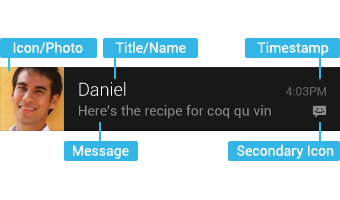
一个通知的钢需
- Icon 小图标 通过 setSmallIcon 方法设置
- Title 标题 setContentTItle 方法设置
- Msg 信息 setContentText() 设置
以上三个是一个通知所必须的,而其他的属性都是可选的
发送通知
常用的方法
-
SetContentTitle() 设置标题
-
SetContentText() 设置内容
-
SetSubText() 设置内容下发的小文字
-
SetTicker() 设置收到通知时在顶部显示的文字信息
-
SetWhen() 设置通知时间 通常值为 System.CurrectTimeMillis()
-
SetSmallIcon() 设置小图标
-
SetLargerIcon() 设置大图标
-
SetAutoCancel() 设置点击 Notification面板点击后 是否取消通知的显示 默认值是不取消
-
SetDefaults() 向通知添加闪灯声音,闪灯,震动等效果 最简单的时使用 默认的(defaults)属性 可以组合多种属性
-
- Light 默认灯光
- Sound 默认声音
- Vibrate 默认震动
- All 全部
-
SetVibrate 设置震动的方式
-
SetSound 设置通知时候的铃声 可以是系统的也可以是文件
-
SetOngoing() 如果设置为true 表示为一个正在进行或者正在等待处理的通知。通常用来表示一个后台任务,如(播放音乐等),也可能是因为某种原因在等待比如:文件下载,请求联网等
-
SetProgress(int,int,bool) 设置带进度条的通知 参数为 最大值,当前值,进度条是否不确定
-
- 如果是不确定进度条 调用 SetProgress(0,0,ture) 两种格式的进度条取消的时候调用SetProgress(0,0,false)
-
SetContentIntent(PendingIntent intent); PendingIntent 和Intent 有所不同 主要用于 远程服务通信,闹铃,通知,启动器,短信中 ,启动Activity中 一般情况下用的比较少
发送一个最简单的通知

public void click(View view) {
    //创建一个notification
    Notification.Builder nBuilder = new Notification.Builder(this).
            setSmallIcon(R.drawable.notification).
            setContentTitle("The is a notification!").
            setContentText("The is notification!The is notification!The is notification!The is notification!");
    //获取通知管理者
    NotificationManager nManager = (NotificationManager) this.getSystemService(Context.NOTIFICATION_SERVICE);
    /*
    * 发送通知
    * id: 用于更新通知
    * notification: 要发送的广播
    * */
    nManager.notify(1, nBuilder.build());
}
设置通知的显示位置
浮动通知
浮动通知,时 Android 5.0 新出的显示方式,以顶部弹框的形式显示出我们的通知。
/*
* 设置显示浮动通知
* 参数:
* PendingIntent
* highPriority 是否是高优先级的
* */
nBuilder.setFullScreenIntent(pi, false);
锁屏通知
Android 5.0 开始,通知可以显示在锁屏上了,我们可以通过
setVisibility方法来设置锁频通知所显示的内容参数:
- VISIBILITY_PRIVATE : 显示基本信息,如通知的图标,但隐藏通知的全部内容
- VISIBILITY_PUBLIC : 显示通知的全部内容
- VISIBILITY_SECRET : 不显示任何内容,包括图标
/*
* 参数:
* visibility 设置锁屏通知显示的内容
* */
nBuilder.setVisibility(Notification.VISIBILITY_PUBLIC);
通知的优先级
-
SetPriority() 设置通知的优先级
-
- MAX 重要而紧急的消息,继续被用户处理
- High 高优先级 用途通讯 如短信,或者消息
- Default 默认
- Low 可以通知用户但是不紧急
- Min 后台消息
设置通知的提醒方式
//使用系统默认的通知方式
//不知为何在我的模拟器上没有任何的显示
//设置呼吸灯
builder.setDefaults(Notification.DEFAULT_LIGHTS);
//设置震动
builder.setDefaults(Notification.DEFAULT_VIBRATE);
//设置声音
builder.setDefaults(Notification.DEFAULT_SOUND);
使通知具有导航功能

我们发送的通知,理所应当该有一个动作,点击通知后跳转到某个界面(QQ 点击消息通知后跳转到聊天界面), 而不仅仅只是用来显示消息来的.
最主要的知识是PendingIntent
从字面上来解释就是: 延迟的意图
可以看做是对Intent的一种封装,因为PendingIntent中包含Intent和所需的Context环境,所以,创建PendingIntent的对象被销毁后,也不会影响到PendingIntent的执行。
获取PendingIntent的方式
//获取一个用于启动 Activity 的 PendingIntent 对象
public static PendingIntent getActivity(Context context, int requestCode, Intent intent, int flags);

//获取一个用于启动 Service 的 PendingIntent 对象
public static PendingIntent getService(Context context, int requestCode, Intent intent, int flags);

//获取一个用于向 BroadcastReceiver 广播的 PendingIntent 对象
public static PendingIntent getBroadcast(Context context, int requestCode, Intent intent, int flags)
flag 参数
FLAG_CANCEL_CURRENT:如果当前系统中已经存在一个相同的 PendingIntent 对象,那么就将先将已有的 PendingIntent 取消,然后重新生成一个 PendingIntent 对象。
FLAG_NO_CREATE:如果当前系统中不存在相同的 PendingIntent 对象,系统将不会创建该 PendingIntent 对象而是直接返回 null 。
FLAG_ONE_SHOT:该 PendingIntent 只作用一次。
FLAG_UPDATE_CURRENT:如果系统中已存在该 PendingIntent 对象,那么系统将保留该 PendingIntent 对象,但是会使用新的 Intent 来更新之前 PendingIntent 中的 Intent 对象数据,例如更新 Intent 中的 Extras 。
public void click(View view) {
    //创建一个notification
    Notification.Builder nBuilder = new Notification.Builder(this).
            setSmallIcon(R.drawable.notification).
            setContentTitle("The is a notification!").
            setContentText("The is notification!The is notification!The is notification!The is notification!");
    //设置导航功能
    Intent intent = new Intent(this, this.getClass());
    REQUEST_CODE = 1;
    PendingIntent pi = PendingIntent.getActivities(this, REQUEST_CODE, new Intent[]{intent}, PendingIntent.FLAG_ONE_SHOT);
    nBuilder.setContentIntent(pi);

    //获取通知管理者
    NotificationManager nManager = (NotificationManager) this.getSystemService(Context.NOTIFICATION_SERVICE);
    /*
    * 发送通知
    * id: 用于更新通知
    * notification: 要发送的广播
    * */
    nManager.notify(1, nBuilder.build());
}
保留Activity返回栈
有时候,我们发送了一个通知,我们通过这个通知,跳转到时候Activity中,但是,我们又想,让我们的用户继续停留在我们的应用中。
对比
普通的方式进行导航

保留activity栈的方式

配置xml文件
<activity android:name=".MainActivity">
<intent-filter>
<action android:name="android.intent.action.MAIN" />
<category android:name="android.intent.category.LAUNCHER" />
</intent-filter>
</activity>
<!--Android 4.1 及以上的写法 -->
<activity
android:name=".SecondActivity"
android:parentActivityName=".MainActivity">
<!--<!–为了兼容 4.0.3版本–>-->
<!--<meta-data-->
<!--android:name="android.support.PARENT_ACTIVITY"-->
<!--android:value=".MainActivity" />-->
</activity>
程序实现
public void click(View view) {
    //创建一个notification
    nBuilder = new Notification.Builder(this).
            setSmallIcon(R.drawable.notification).
            setContentTitle("The is a notification!").
            setContentText("The is notification!The is notification!The is notification!The is notification!");
    //获取通知管理者
    NotificationManager nManager = (NotificationManager) this.getSystemService(Context.NOTIFICATION_SERVICE);
    Intent intent = new Intent(this, SecondActivity.class);
    //实例化堆栈创建者
    TaskStackBuilder stackBuilder = TaskStackBuilder.create(this);
    //添加返回栈
    stackBuilder.addParentStack(SecondActivity.class);
    //将我们的意图添加到返回栈的顶部
    stackBuilder.addNextIntent(intent);
    //获取PendingIntent的对象
    PendingIntent pi = stackBuilder.getPendingIntent(this.REQUEST_CODE, PendingIntent.FLAG_UPDATE_CURRENT);

    nBuilder.setContentIntent(pi);
    nManager.notify(this.UPDATE_ID, nBuilder.build());
}
更新通知

更新通知时,我们就需要,上放我们调用
nManager.notify(id,notification)方法时传递的ID了,如果该通知存在就更新该通知,如果不存在就创建新的通知。
public class MainActivity extends AppCompatActivity {

    private int REQUEST_CODE = 1;
    private final int UPDATE_ID = 1;
    private Notification.Builder nBuilder;

    @Override
    protected void onCreate(Bundle savedInstanceState) {
        super.onCreate(savedInstanceState);
        setContentView(R.layout.activity_main);
    }

    public void click(View view) {
        //创建一个notification
        nBuilder = new Notification.Builder(this).
                setSmallIcon(R.drawable.notification).
                setContentTitle("The is a notification!").
                setContentText("The is notification!The is notification!The is notification!The is notification!");
        //获取通知管理者
        NotificationManager nManager = (NotificationManager) this.getSystemService(Context.NOTIFICATION_SERVICE);

        /*
        * 发送通知
        * id: 用于更新通知
        * notification: 要发送的广播
        * */
        nManager.notify(this.UPDATE_ID, nBuilder.build());
    }

    //更新通知
    public void clickUpdate(View view) {
        nBuilder.setContentTitle("更新后的标题");
        NotificationManager nManager = (NotificationManager) this.getSystemService(Context.NOTIFICATION_SERVICE);
        nManager.notify(this.UPDATE_ID, nBuilder.build());
    }

}
删除通知
- 点击通知栏的清除按钮,会清除所有可清除的通知
- 设置了 setAutoCancel() 或 FLAG_AUTO_CANCEL 的通知,点击该通知时会清除它
- 通过 NotificationManager 调用 cancel(int id) 方法清除指定 ID 的通知
- 通过 NotificationManager 调用 cancel(String tag, int id) 方法清除指定 TAG 和 ID 的通知
- 通过 NotificationManager 调用 cancelAll() 方法清除所有该应用之前发送的通知
进度条通知

//参数: 最大值,当前值,是否是模糊的
nBuilder.setProgress(100, 50, true);
自定义通知
我们要使用自定义通知来实现下图这样的一个通知。

布局文件
<RelativeLayout xmlns:android="http://schemas.android.com/apk/res/android"
    xmlns:tools="http://schemas.android.com/tools"
    android:layout_width="match_parent"
    android:layout_height="match_parent"
    android:background="#FF151515"
    tools:context=".MainActivity">

    <TextView
        android:id="@+id/tv_Title"
        android:layout_width="match_parent"
        android:layout_height="wrap_content"
        android:layout_marginLeft="6dp"
        android:text="您的彩票中奖了"
        android:textColor="@color/notificationTextColor"
        android:textSize="18dp" />

    <TextView
        android:id="@+id/tv_Content"
        android:layout_width="wrap_content"
        android:layout_height="wrap_content"
        android:layout_below="@id/tv_Title"
        android:layout_marginLeft="6dp"
        android:text="您的彩票xxxx中了500W,请赶快领取!"
        android:textColor="@color/notificationTextColor"
        android:textSize="13dp" />

    <Button
        android:id="@+id/btn_View"
        android:layout_width="wrap_content"
        android:layout_height="wrap_content"
        android:layout_alignParentRight="true"
        android:text="领取"
        />
</RelativeLayout>
代码实现
//显示自定义通知栏
public void clickCustom(View view) {
    /*
    * 远程视图
    * 从我们预先定义好的布局文件中,加载我们的自定义notification的布局
    * */
    RemoteViews views = new RemoteViews(this.getPackageName(), R.layout.layout_custom_notification_money);

    //设置自定义布局的内容
    views.setTextViewText(R.id.tv_Title, "您的彩票中奖了500w");
    views.setTextViewText(R.id.tv_Content, "领奖暗号是:天王盖地虎!");
    //虽然我们的 btn_View 是按钮,但是他是继承是我们的TextView所以设置Button的text时,也是按照textview的方式来设置
    views.setTextViewText(R.id.btn_View, "暴富");

    //为按钮设置点击事件
    Intent intent = new Intent(this, MoneyActivity.class);
    PendingIntent pendingIntent = PendingIntent.getActivities(this, 1, new Intent[]{intent}, PendingIntent.FLAG_UPDATE_CURRENT);
    views.setOnClickPendingIntent(R.id.btn_View, pendingIntent);

    Notification.Builder builder = new Notification.Builder(this);
    builder.setContent(views);

    //这行代码一定要保留,我们要用它来显示我们通知的icon,如果不设置就会报错的。
    builder.setSmallIcon(R.drawable.notification);

    NotificationManager manager = (NotificationManager) this.getSystemService(Context.NOTIFICATION_SERVICE);
    manager.notify(1, builder.build());
}

 浙公网安备 33010602011771号