
MyBatis源码解析
MyBatis源码解析
如何编译源码

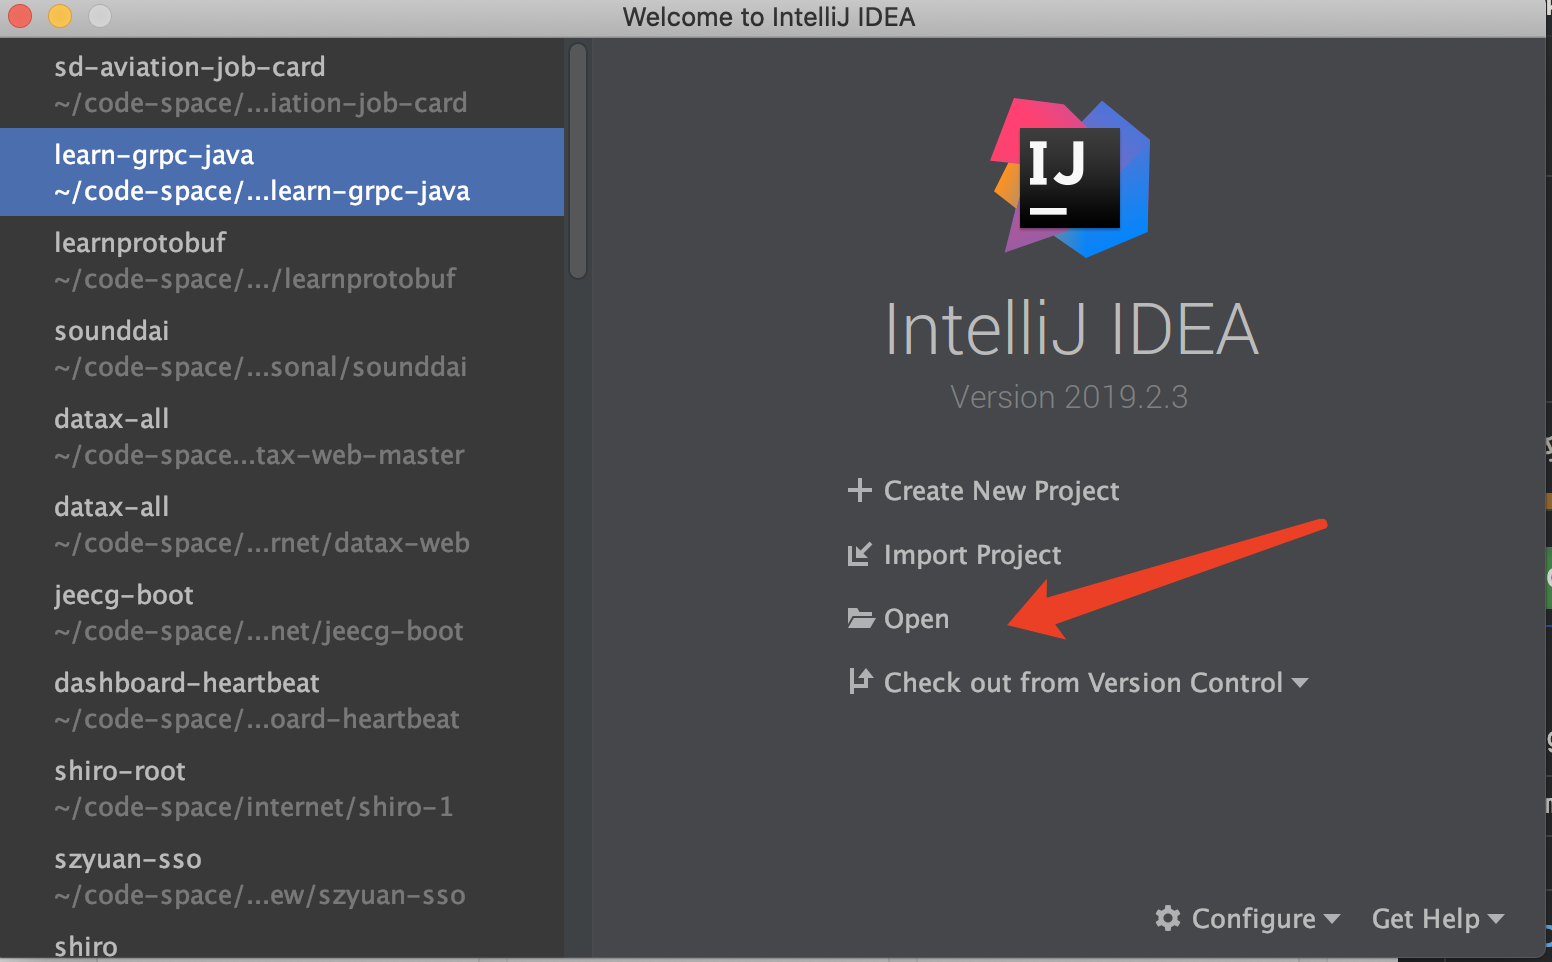
1、idea中打开项目(推荐在导入idea之前,在命令行先将项目编译通过,命令mvn clean compile)
2、等待解析依赖
备注:解析依赖的过程中有可能某些jar包的版本找不到,可自行在https://mvnrepository.com/ 找寻替代版本
运行流程
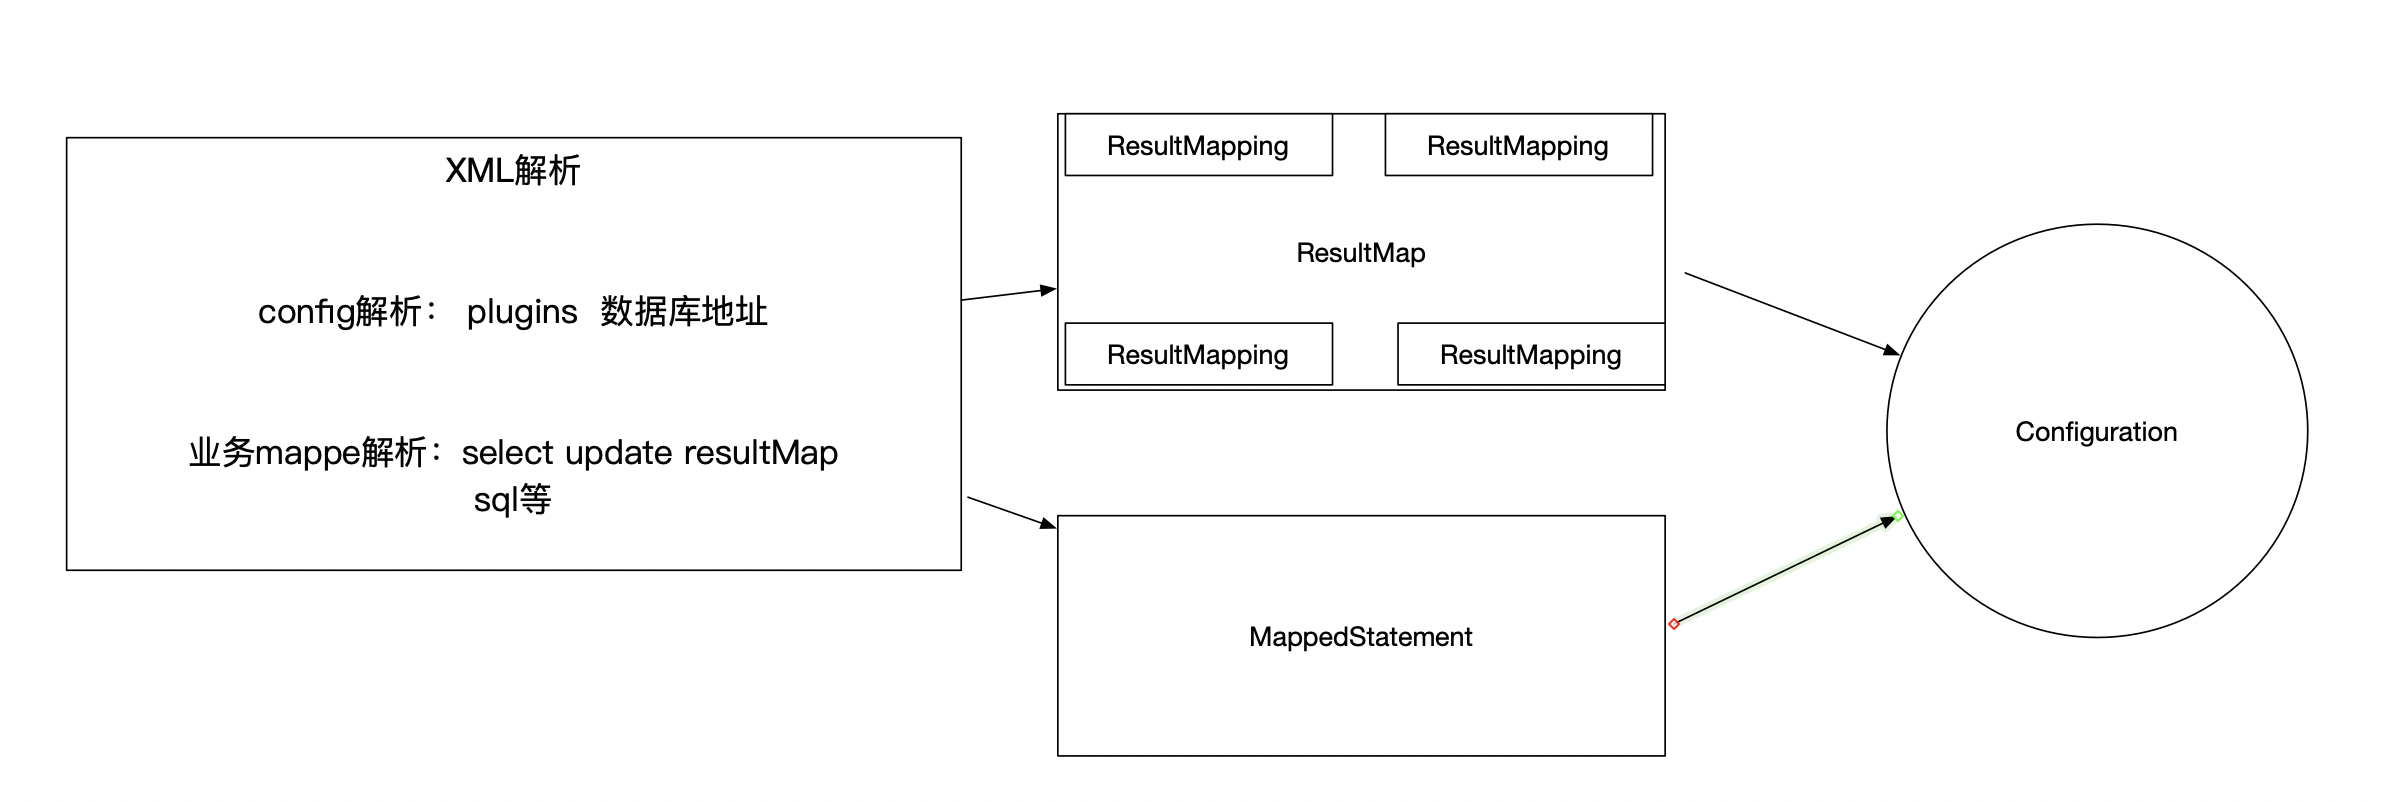

XML解析
mybatis3支持注解方式声明SQL语句,但是最终经过mybatis内部解析,作用和使用XML定义是一样的。
只要你理解了XML的整个解析流程,其实就已经吃透了mybatis。
在阅读源码的过程中,mybatis的中文官网必须时刻去翻阅。特别是如下几章内容:
XML配置讲解的是mybatis-config.xml (配置数据库地址、插件、类型别名)
XML映射器讲解的是我们自定义业务SQL语句的***Mapper.xml
如何开始阅读源码呢?当然不可能一个一个包一个一个类去翻阅,这样是没有意义的。我们必须找到一个入口,也就是写一个最简单的例子跑完整个流程。然后使用idea跟踪这个流程的每一步。
可以参照入门搭建一个最小的示例。
入口示例
我参照入门构造了一个示例,目录结构如下:
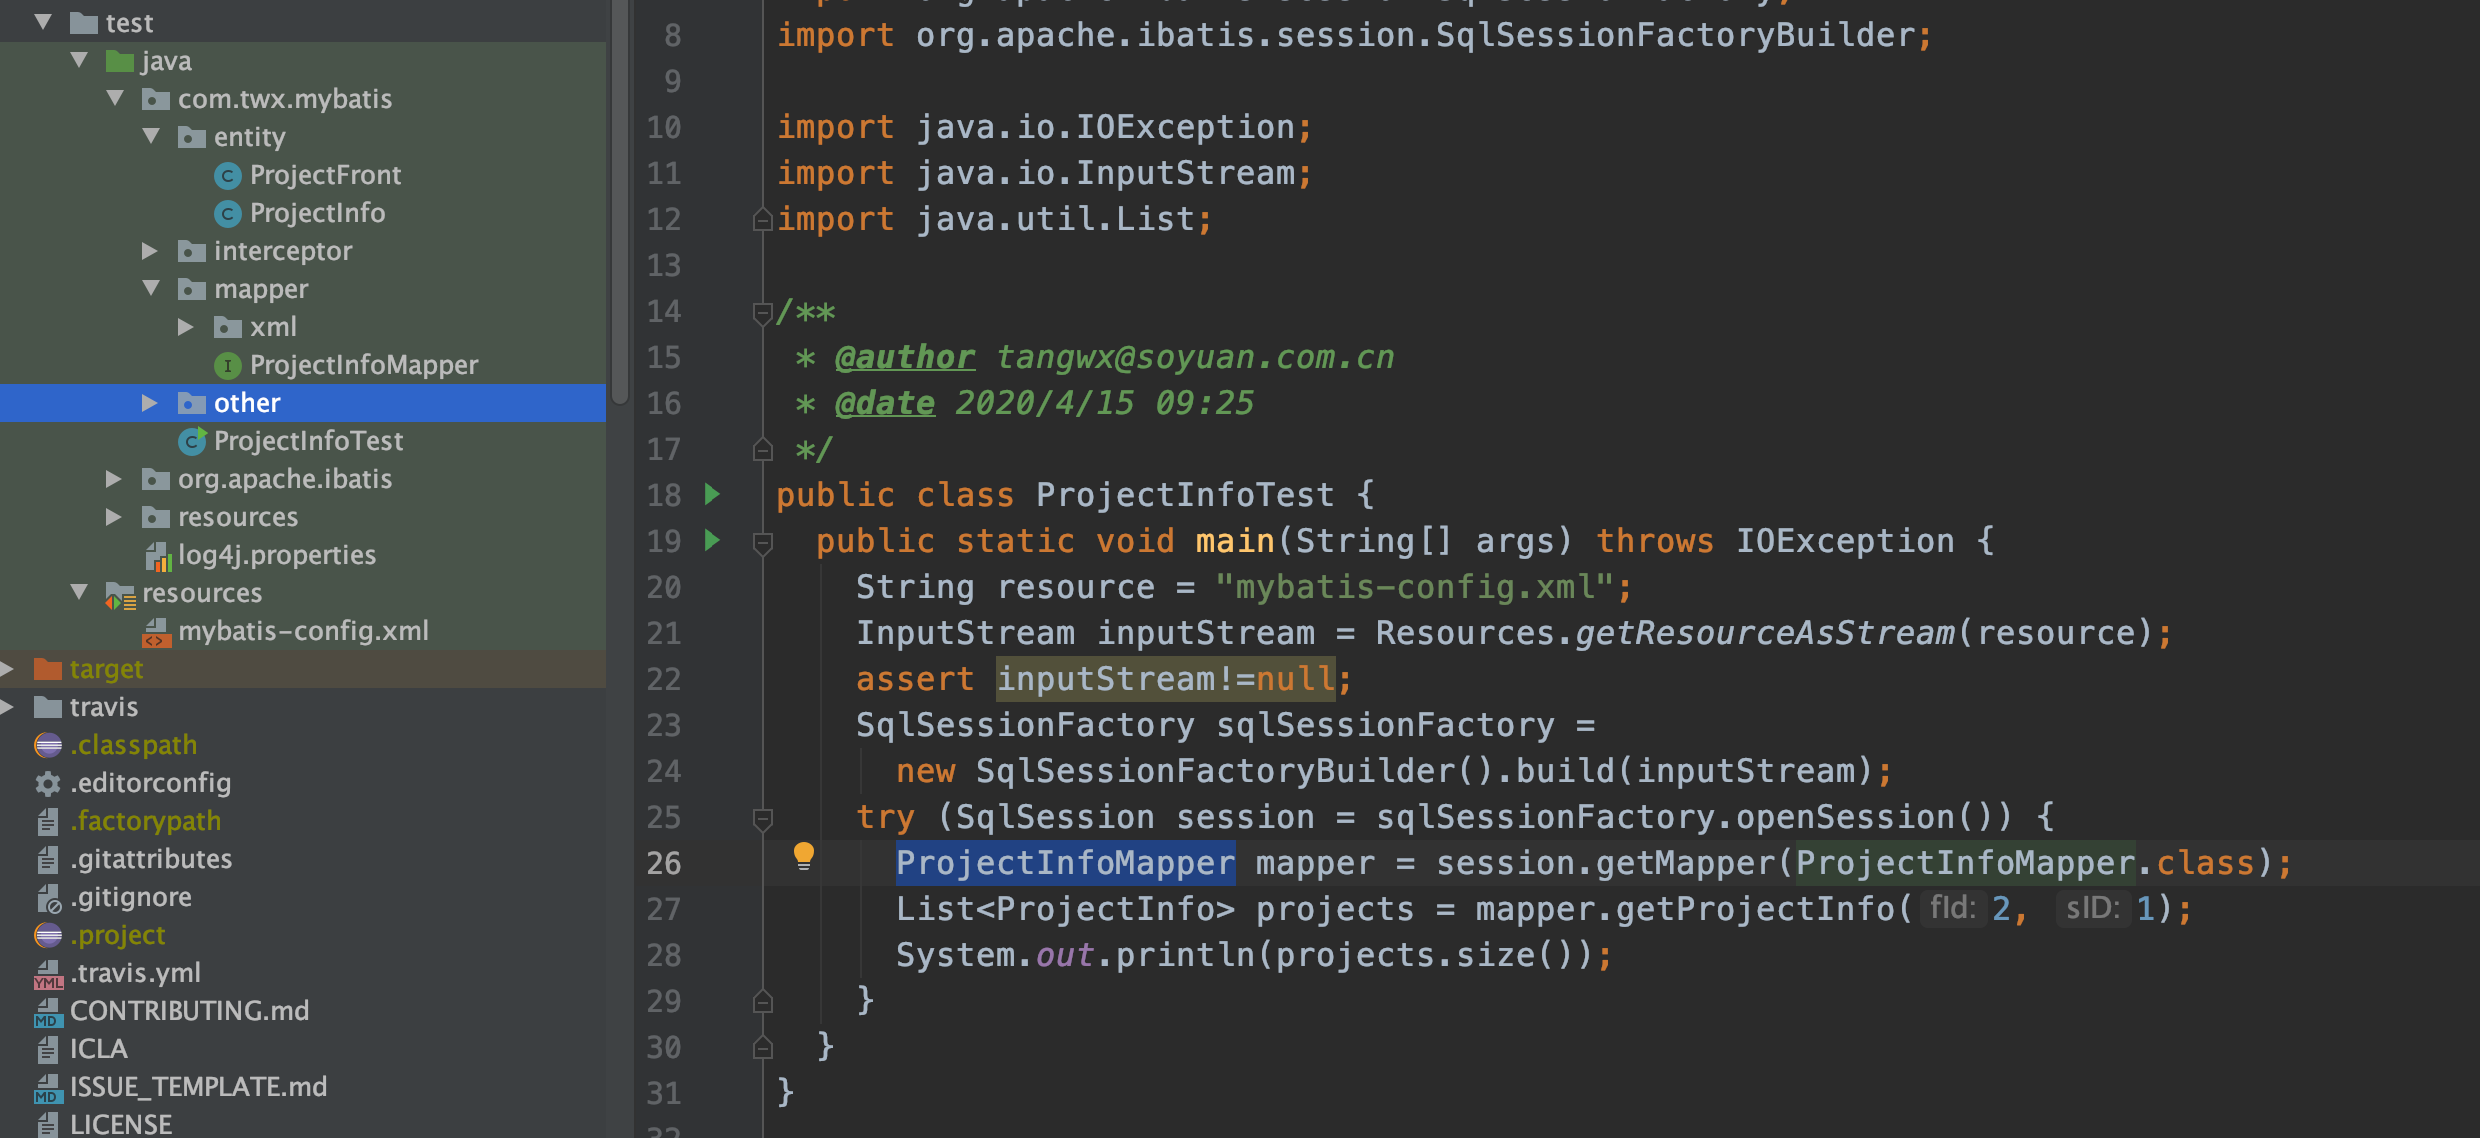
在mybatis-config.xml中,配置了数据库地址、以及业务mapper xml文件 (projectInfo.xml)
Mybatis-config.xml
<?xml version="1.0" encoding="UTF-8" ?>
<!DOCTYPE configuration
  PUBLIC "-//mybatis.org//DTD Config 3.0//EN"
  "http://mybatis.org/dtd/mybatis-3-config.dtd">
<configuration>
  <plugins>
    <plugin interceptor="com.twx.mybatis.interceptor.InterceptorDemo1" />
  </plugins>

  <environments default="development">
    <environment id="development">
      <transactionManager type="JDBC"/>
      <dataSource type="POOLED">
        <property name="driver" value="com.mysql.cj.jdbc.Driver"/>
        <property name="url" value="jdbc:mysql://localhost:3306/dashboard_heart_beat"/>
        <property name="username" value="twx"/>
        <property name="password" value="soyuan123"/>
      </dataSource>
    </environment>
  </environments>

  <mappers>
    <mapper resource="com/twx/mybatis/mapper/xml/projectInfo.xml"/>
  </mappers>
</configuration>
projectInfo.xml
<?xml version="1.0" encoding="UTF-8"?>
<!DOCTYPE mapper PUBLIC "-//mybatis.org//DTD Mapper 3.0//EN" "http://mybatis.org/dtd/mybatis-3-mapper.dtd">
<mapper namespace="com.twx.mybatis.mapper.ProjectInfoMapper">


    <resultMap id="projectInfoMap" type="com.twx.mybatis.entity.ProjectInfo">
        <id column="id" property="id" jdbcType="INTEGER"></id>
        <result column="project_name" property="projectName" jdbcType="VARCHAR"></result>
        <result column="url" property="url" jdbcType="VARCHAR"></result>
        <result column="description" property="description" jdbcType="VARCHAR"></result>
        <result column="tags" property="tags" jdbcType="VARCHAR"></result>
        <result column="username" property="username" jdbcType="VARCHAR" />
        <result column="password" property="password" jdbcType="VARCHAR" />
        <result column="thumbnail_url" property="thumbnailUrl" jdbcType="VARCHAR" />
        <result column="second_category_id" property="secondCategoryId" jdbcType="INTEGER" />
        <result column="project_sort" property="projectSort" jdbcType="INTEGER" />
        <result column="maintainer" property="maintainer" jdbcType="VARCHAR" />
        <result column="status" property="status" jdbcType="BOOLEAN" />
        <result column="back_service" property="backService" jdbcType="BOOLEAN" />
        <result column="edit" property="edit" jdbcType="BOOLEAN" />
        <result column="create_time" property="createTime" jdbcType="DATE" />
        <result column="update_time" property="updateTime" jdbcType="DATE" />
    </resultMap>

    <sql id="info_columns">
        p.id, p.project_name,p.url,p.description,p.tags,
        p.username,p.`password`,p.thumbnail_url,p.second_category_id,
        p.project_sort,p.maintainer,p.`status`,p.back_service,p.create_time
    </sql>

    <select id="getProjectInfo" resultMap="projectInfoMap">
        select
        <include refid="info_columns"></include>
        from project_info p
        LEFT JOIN second_category sc on sc.id = p.second_category_id
        INNER JOIN primary_category pc on pc.id = sc.p_id
        where p.logic_delete = 0
        <if test="fId != null">
            and pc.id = #{fId}
            <if test="sId !=null">
                and sc.id = #{sId}
            </if>
        </if>
        ORDER BY pc.sort,sc.sort,p.project_sort
    </select>

    <!--    大屏前端使用  -->
    <resultMap id="projectFrontMap" type="com.twx.mybatis.entity.ProjectFront">
        <result column="project_name" property="projectName" jdbcType="VARCHAR"></result>
        <result column="url" property="url" jdbcType="VARCHAR"></result>
        <result column="description" property="description" jdbcType="VARCHAR"></result>
        <result column="username" property="username" jdbcType="VARCHAR" />
        <result column="password" property="password" jdbcType="VARCHAR" />
        <result column="thumbnail_url" property="thumbnailUrl" jdbcType="VARCHAR" />
        <result column="category" property="category" jdbcType="VARCHAR" />
        <result column="category_sort" property="categorySort" jdbcType="INTEGER" />
        <result column="second_category" property="secondCategory" jdbcType="VARCHAR" />
        <result column="second_category_sort" property="secondCategorySort" jdbcType="INTEGER" />
        <result column="project_sort" property="projectSort" jdbcType="INTEGER" />
        <result column="maintainer" property="maintainer" jdbcType="VARCHAR" />
        <result column="create_time" property="createTime" jdbcType="DATE" />
    </resultMap>

    <sql id="front_columns">
        p.project_name,p.url,p.description,p.tags,
        p.username,p.`password`,p.thumbnail_url,
        pc.name as category,pc.sort as category_sort,
        sc.name as second_category,sc.sort as second_category_sort,
        p.project_sort,p.maintainer,p.create_time
    </sql>

    <select id="getProjectFront" resultMap="projectFrontMap">
        select
        <include refid="front_columns"></include>
        from project_info p
        LEFT JOIN second_category sc on sc.id = p.second_category_id
        INNER JOIN primary_category pc on pc.id = sc.p_id
        WHERE p.back_service=0
        ORDER BY pc.sort,sc.sort,p.project_sort
    </select>
</mapper>
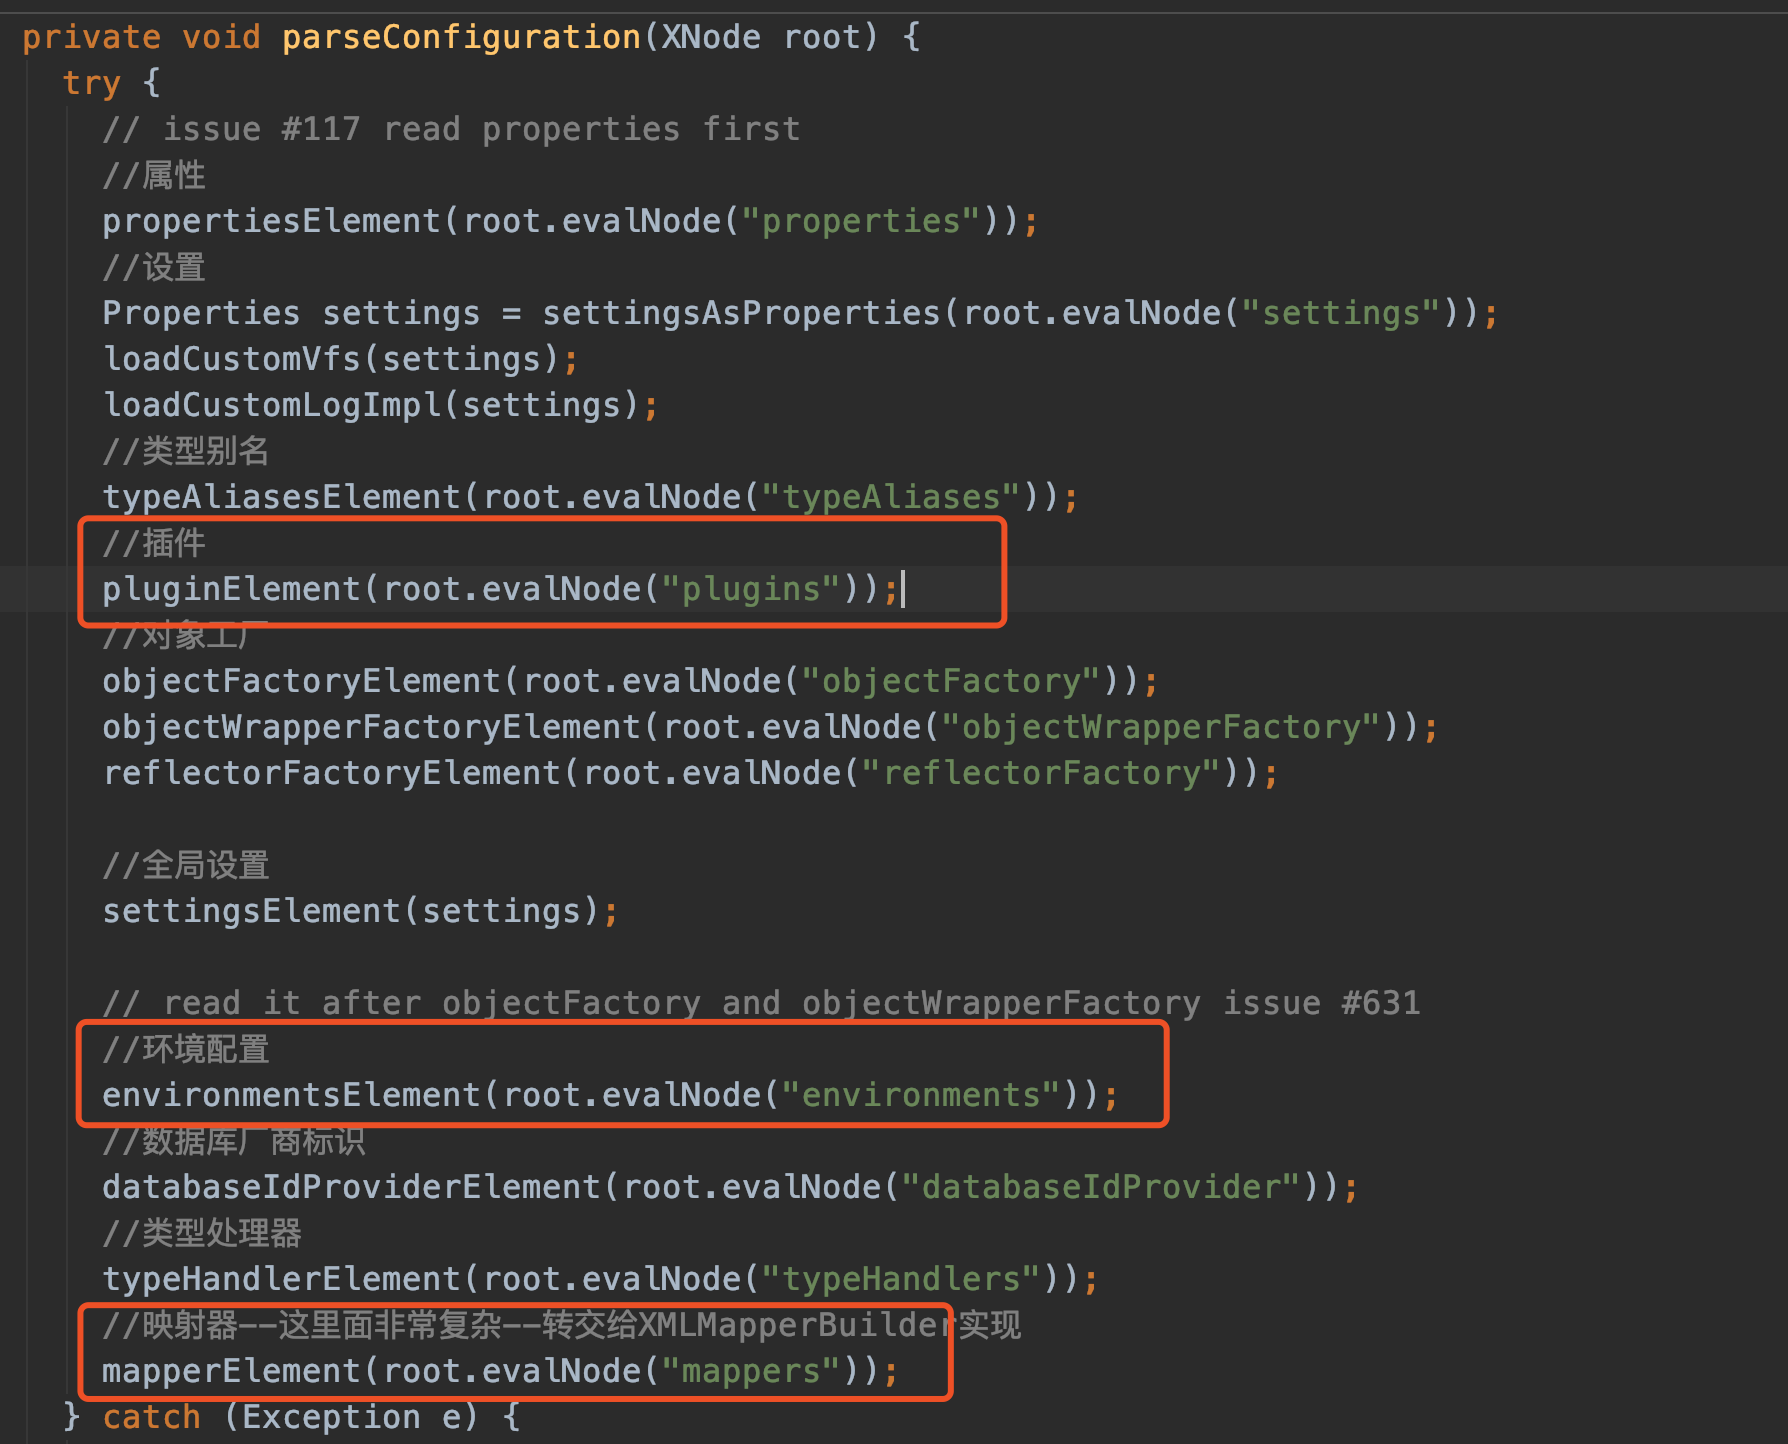
mybatis解析xml文件的入口是 mybatis-config.xml。
依次解析properties->settings->typeAliases->plugins->objectFactory->objectWrapperFactory->reflectorFactory->environments->databaseIdProvider->typeHandlers->mappers
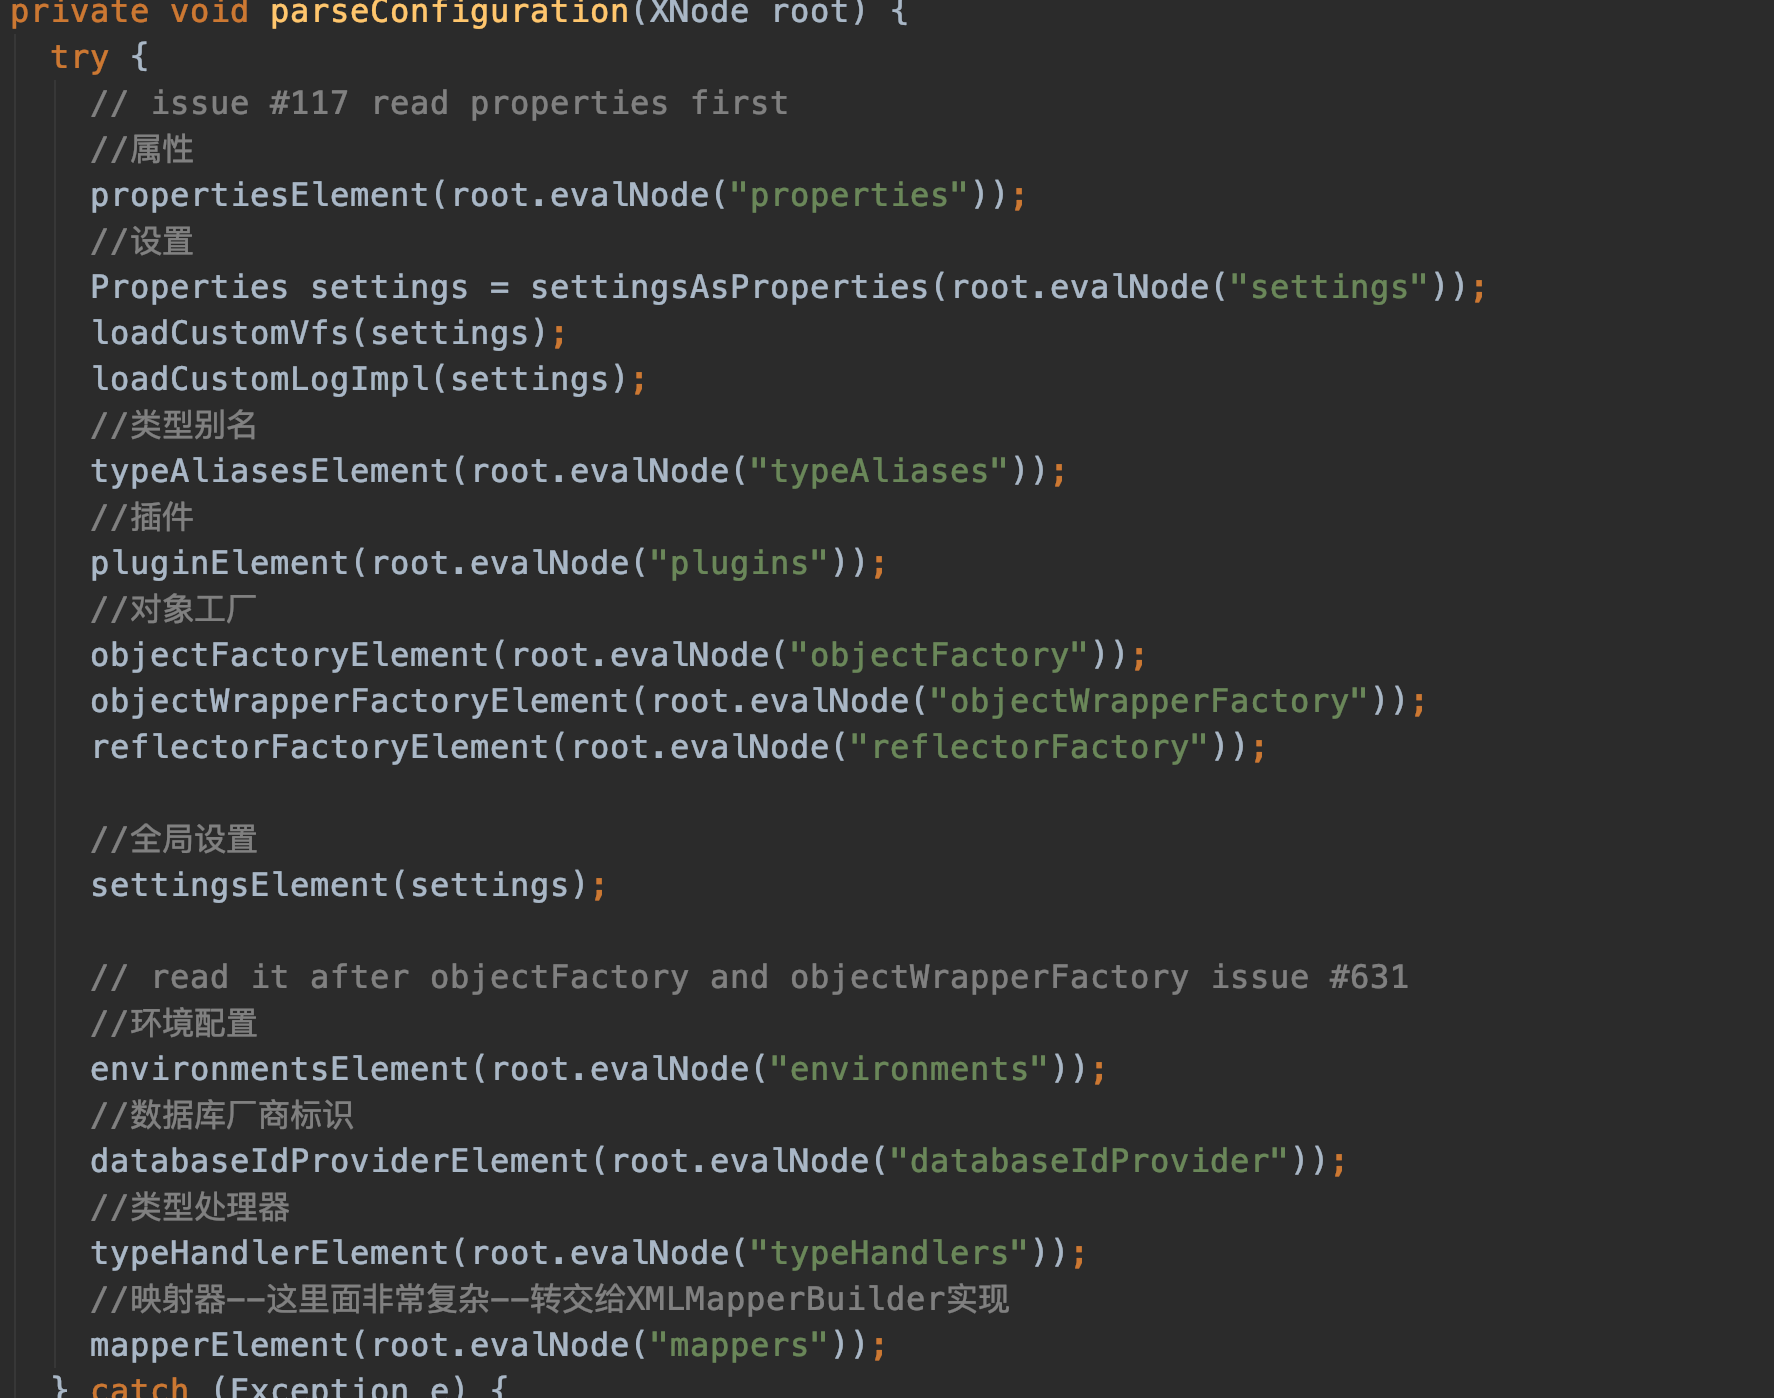
最后的mapperElement(root.evalNode("mappers")); 解析的就是我们的业务mapper:
<mappers>
  <mapper resource="com/twx/mybatis/mapper/xml/projectInfo.xml"/>
</mappers>
我们先来看mybatis-config.xml的解析
mybatis-config.xml
String resource = "mybatis-config.xml";
InputStream inputStream = Resources.getResourceAsStream(resource);
assert inputStream!=null;
SqlSessionFactory sqlSessionFactory = new SqlSessionFactoryBuilder().build(inputStream);
我们的入口程序中指定了mybatis-config.xml的路径,传递给了SqlSessionFactoryBuilder的build方法。
XMLConfigBuilder1
我们进入看看:
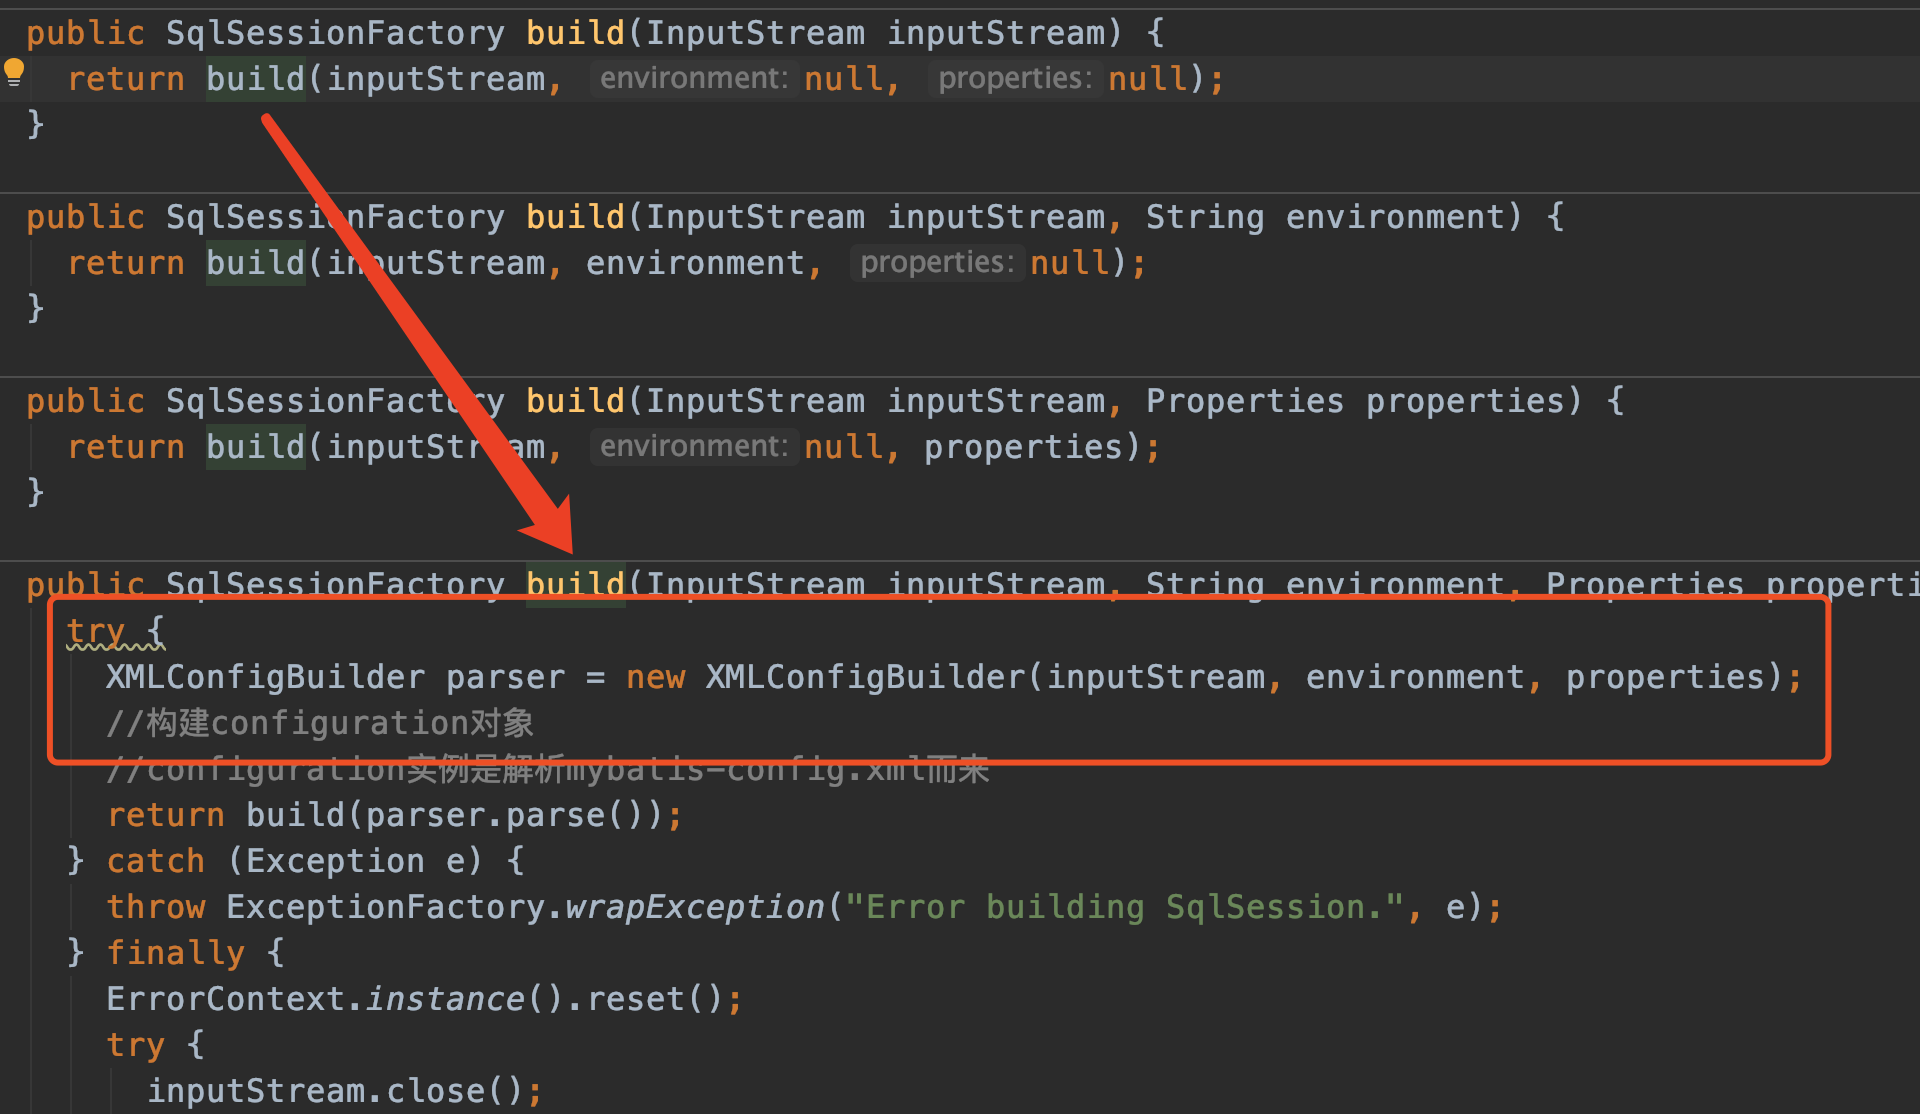
注意XMLConfigBuilder对象,它负责解析mybatis-config.xml中除了mappers标签以外的元素。
我们进入XMLConfigBuilder的构造方法中看看,同时也要注意一下XMLConfigBuilder继承了一个BaseBuilder类:
public class XMLConfigBuilder extends BaseBuilder {

  public XMLConfigBuilder(InputStream inputStream, String environment, Properties props) {
    //XMLMapperEntityResolver实现了org.xml.EntityResolver接口
    this(new XPathParser(inputStream, true, props, new XMLMapperEntityResolver()), environment, props);
  }
}
注意:构造方法中新建了一个new XPathParser对象,我们不深入这个类,它的作用是可以根据标签方便的获取xml内容。例如parser.evalNode("/configuration")就能获取到configuration中的内容。
<?xml version="1.0" encoding="UTF-8" ?>
<!DOCTYPE configuration
  PUBLIC "-//mybatis.org//DTD Config 3.0//EN"
  "http://mybatis.org/dtd/mybatis-3-config.dtd">
<configuration>
  <plugins>
    <plugin interceptor="com.twx.mybatis.interceptor.InterceptorDemo1" />
  </plugins>
  <environments default="development">
  </environments>
  <mappers>
    <mapper resource="com/twx/mybatis/mapper/xml/projectInfo.xml"/>
  </mappers>
</configuration>
刚刚看了XMLConfigBuilder的构造方法,我们继续:
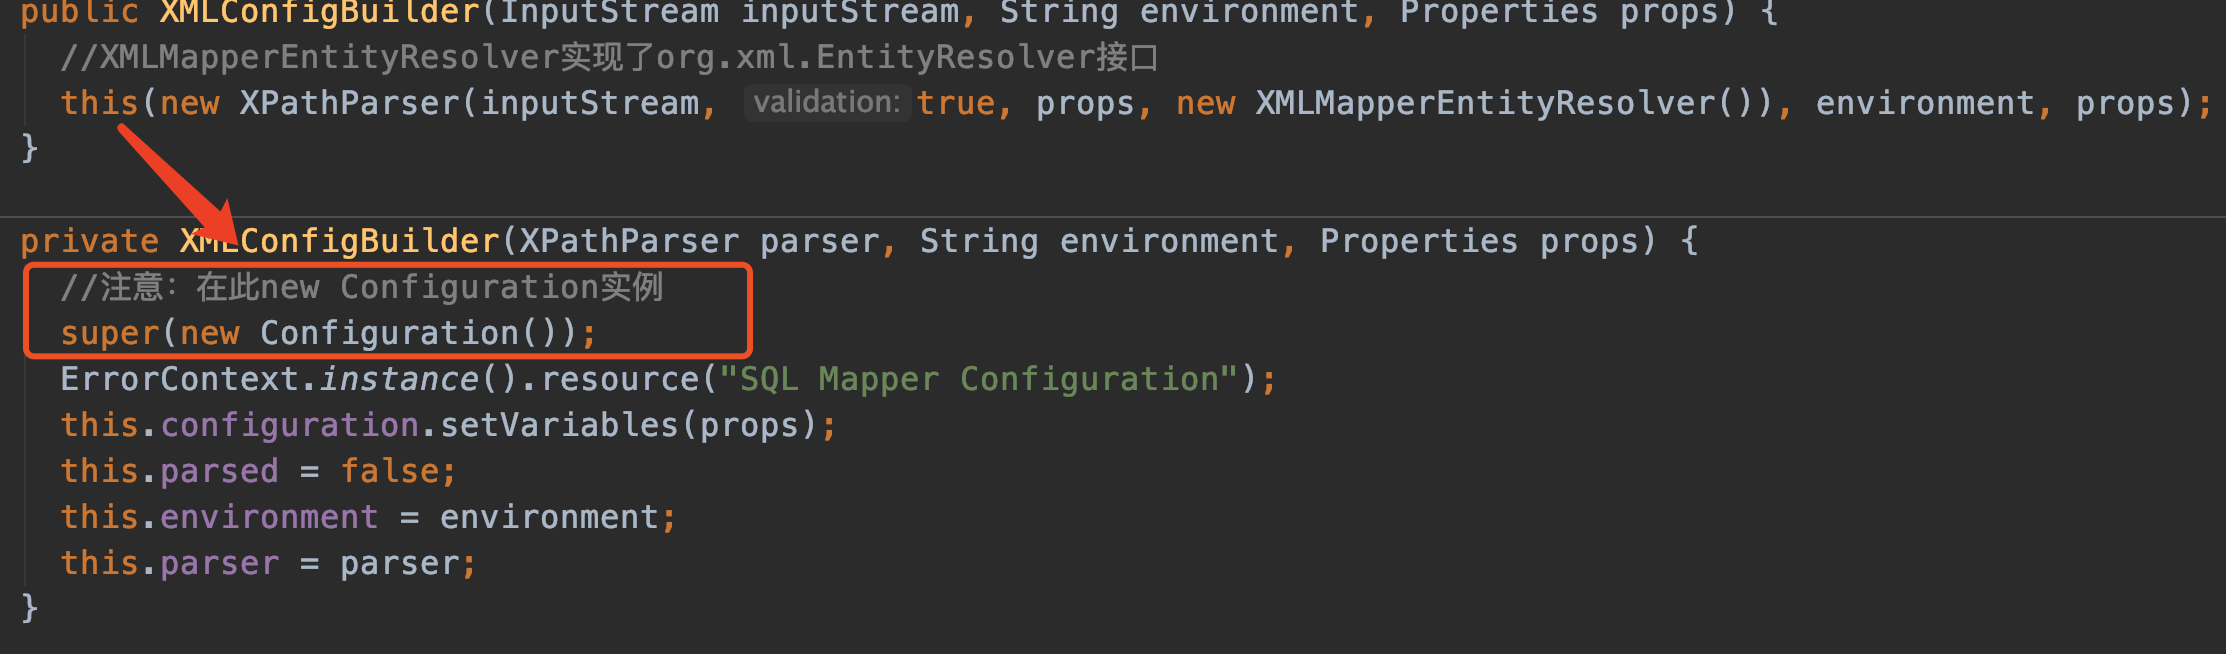
仍然还是调用构造方法,注意在构造方法中调用了父类的构造方法,传进了一个新的Configuration对象。
特别说明,Configuration类在mybatis中可是非常非常重要,几乎无处不在。它保存着mybatis-config.xml中的配置信息以及我们业务mapper中的类信息。真的超级重要。
Configuration1
既然这么重要,我们看看new Configuration的时候做了些什么操作吧。
/**
 * 初始化了内置别名、LanguageDriver
 */
public Configuration() {
  typeAliasRegistry.registerAlias("JDBC", JdbcTransactionFactory.class);
  typeAliasRegistry.registerAlias("MANAGED", ManagedTransactionFactory.class);

  typeAliasRegistry.registerAlias("JNDI", JndiDataSourceFactory.class);
  typeAliasRegistry.registerAlias("POOLED", PooledDataSourceFactory.class);
  typeAliasRegistry.registerAlias("UNPOOLED", UnpooledDataSourceFactory.class);
  ...
    省略了其他
}
因为configuration的内容真的太多了,它有很多成员变量,这些成员变量都是new出来的,所以新建一个configuration对象是个耗时的工作。
TypeAliasRegistry
我们先看看构造器中用到的这个typeAliasRegistry对象吧,它在成员变量中的定义如下:
protected final TypeAliasRegistry typeAliasRegistry = new TypeAliasRegistry();
我们再来看看它:
public class TypeAliasRegistry {

  /**
   * 例子:<typeAlias alias="Author" type="domain.blog.Author"/>
   */
  private final Map<String, Class<?>> typeAliases = new HashMap<>();

  public TypeAliasRegistry() {
    registerAlias("string", String.class);

    registerAlias("byte", Byte.class);
    registerAlias("long", Long.class);
    registerAlias("short", Short.class);
    registerAlias("int", Integer.class);
    ...
      省略
  }
}
TypeAliasRegistry从它的名称就能知道它的作用:别名注册器,啥意思呢?
比如我在mybaits-config中定义了一个别名 <typeAlias alias="Author" type="domain.blog.Author"/>,最终就会调用TypeAliasRegistry的registerAlias方法
registerAlias('Author',Author.class)
如何使用呢?遇到的时候再告诉你吧。
注意一下:在TypeAliasRegistry构造器中我们初始化了基本类型的别名
Configuration2
现在我们回到Configuration1一节的最后,继续。
在Configuration的构造器中我们初始化了
typeAliasRegistry.registerAlias("POOLED", PooledDataSourceFactory.class);
typeAliasRegistry.registerAlias("JDBC", JdbcTransactionFactory.class);
再来看mybatis-config.xml中的环境变量:
<environments default="development">
  <environment id="development">
    <transactionManager type="JDBC"/>
    <dataSource type="POOLED">

    </dataSource>
  </environment>
</environments>
这里提一下,后面我们在解析environments标签的时候会用到我们的别名JDBC、POOLED
现在我们回到XMLConfigBuilder1中的构造器:
private XMLConfigBuilder(XPathParser parser, String environment, Properties props) {
  //注意:在此new Configuration实例
  super(new Configuration());
  ErrorContext.instance().resource("SQL Mapper Configuration");
  this.configuration.setVariables(props);
  this.parsed = false;
  this.environment = environment;
  this.parser = parser;
}
构造器后续的几条语句就没什么好说的了。
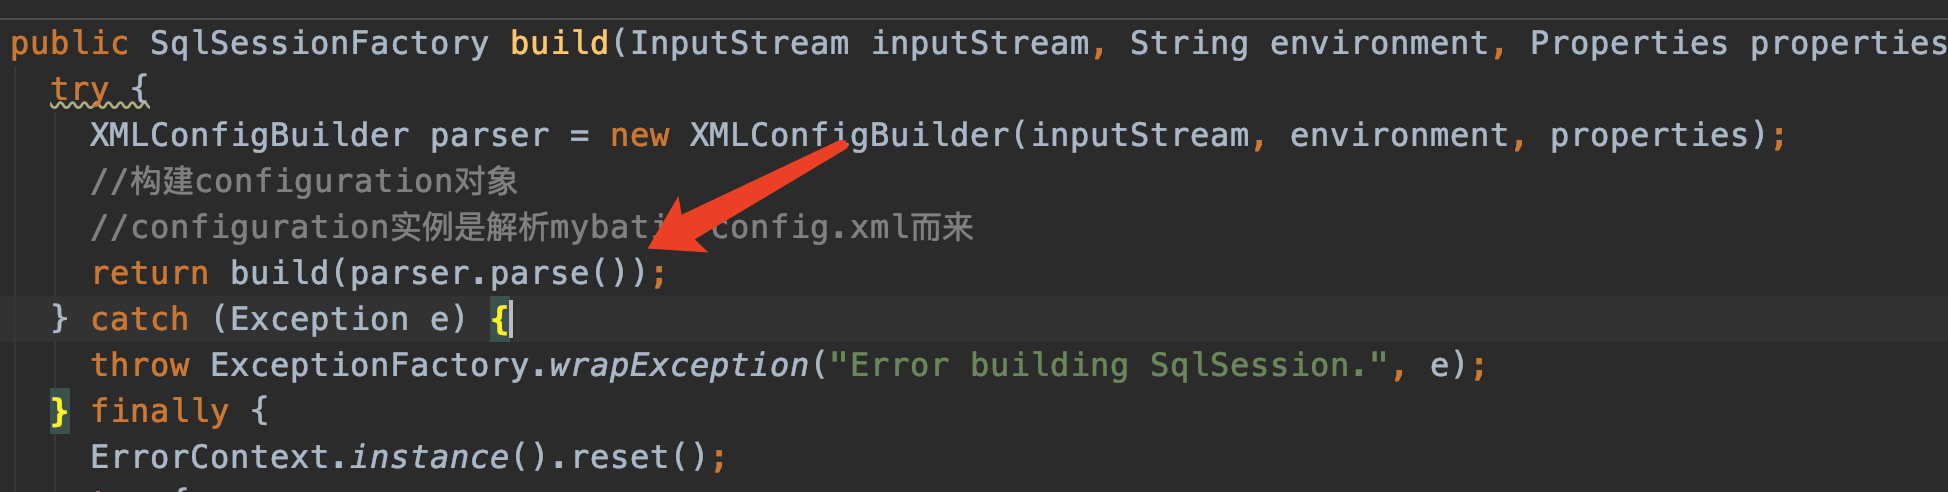
我们又回到了XMLConfigBuilder parser = new XMLConfigBuilder(inputStream, environment, properties);
紧接着调用XMLConfigBuilder的parse方法,正式开始解析mybatis-config.xml
XMLConfigBuilder.parse
因为我们在mybatis-config.xml中只定义了plugins--environments--mappers这几个节点,所以我们就只看这几个节点的解析。(其中settings标签设置了很多默认值,比如下划线转驼峰,可以去看看,这里不讲解)
解析plugins
plugin在mybatis中可是非常出名的,像我们最经常使用的分页插件,入口就在这。
因为这一节只是说xml的解析,所以不能说得太详细。
先贴一下xml中的配置:
<plugins>
  <plugin interceptor="com.twx.mybatis.interceptor.InterceptorDemo1" />
</plugins>
private void pluginElement(XNode parent) throws Exception {
  if (parent != null) {
    for (XNode child : parent.getChildren()) {
      //获取plugin节点的interceptor属性
      String interceptor = child.getStringAttribute("interceptor");

      Properties properties = child.getChildrenAsProperties();
      //反射new
      Interceptor interceptorInstance = (Interceptor) resolveClass(interceptor).getDeclaredConstructor().newInstance();
      interceptorInstance.setProperties(properties);
      //添加到过滤器链interceptorChain中
      configuration.addInterceptor(interceptorInstance);
    }
  }
}
- 获取plugin节点的interceptor属性
- 通过反射生成我们自定义的拦截器(比如分页插件)
- 最后添加到过滤器链中
过滤器链设计得非常巧妙,很精彩。以后再给你们分享。
解析environments
环境变量主要是设置数据库连接地址、用户名、密码等
再贴xml配置:
<environments default="development">
    <environment id="development">
      <transactionManager type="JDBC"/>
      <dataSource type="POOLED">
        <property name="driver" value="com.mysql.cj.jdbc.Driver"/>
        <property name="url" value="jdbc:mysql://localhost:3306/dashboard_heart_beat"/>
        <property name="username" value="twx"/>
        <property name="password" value="soyuan123"/>
      </dataSource>
    </environment>
  </environments>
配合着代码看:
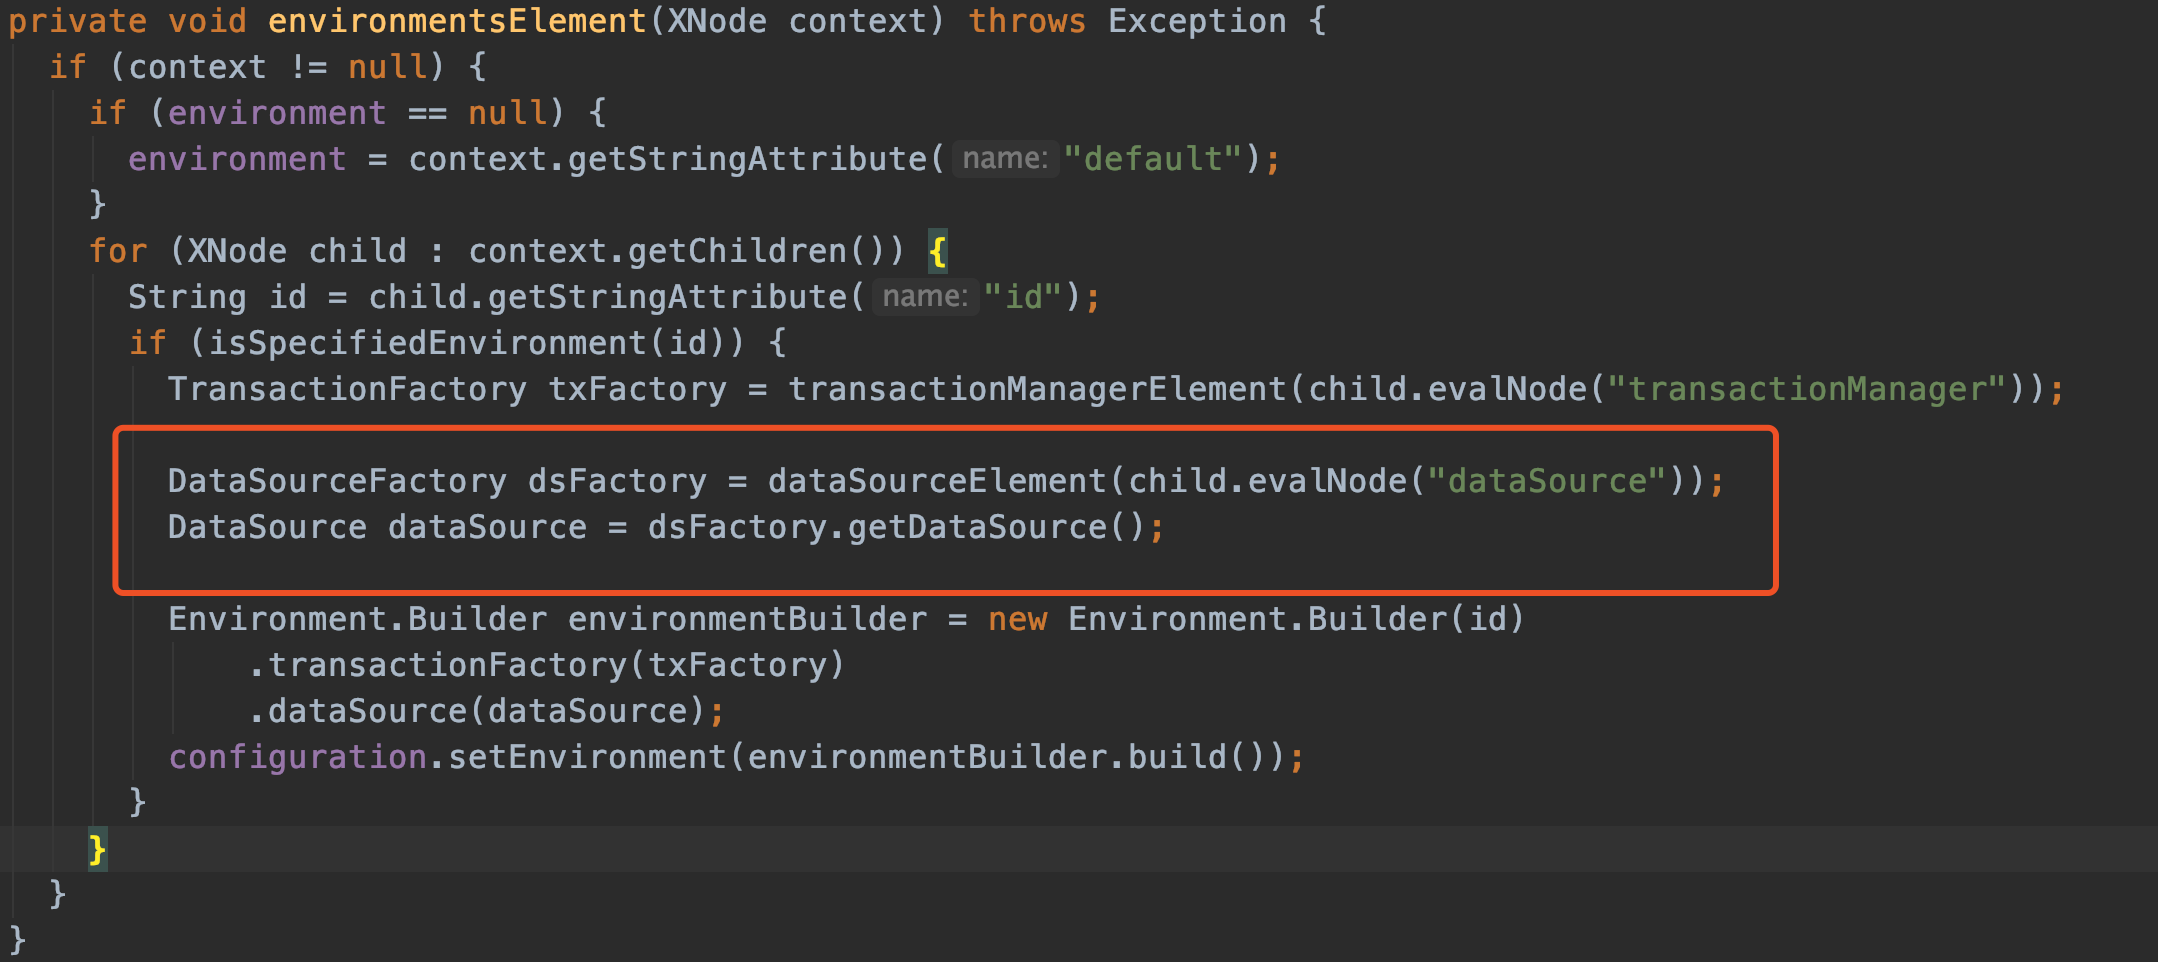
我们来看dataSourceElement这个方法,正好把上面提到的TypeAliasRegistry用上:
private DataSourceFactory dataSourceElement(XNode context) throws Exception {
    if (context != null) {
      //这里的type=POOLED
      String type = context.getStringAttribute("type");
      //这里存储用户名、密码、数据库地址
      Properties props = context.getChildrenAsProperties();
      //如果type=POOLED => PooledDataSourceFactory
      //别名注册地:typeAliasRegistry.registerAlias("POOLED", PooledDataSourceFactory.class);
      DataSourceFactory factory = (DataSourceFactory) resolveClass(type).getDeclaredConstructor().newInstance();
      factory.setProperties(props);
      return factory;
    }
    throw new BuilderException("Environment declaration requires a DataSourceFactory.");
  }
请看代码里的注释。
其中resolveClass(type)在这里是resolveClass("POOLED") ,跟踪一下代码就很容易发现,resolveClass(type)最终调用的是typeAliasRegistry.resolveAlias(alias);。
通过resolveClass(type)拿到Class类型后,就能通过反射生成PooledDataSourceFactory实例了。
接下来就是最最复杂的mappers解析了,我们的select、update、delete都定义在此。
projectInfoMapper.xml
//映射器--这里面非常复杂--转交给XMLMapperBuilder实现
mapperElement(root.evalNode("mappers"));
配合着xml,来看看mapperElement方法吧:
<mappers>
  <mapper resource="com/twx/mybatis/mapper/xml/projectInfo.xml"/>
</mappers>
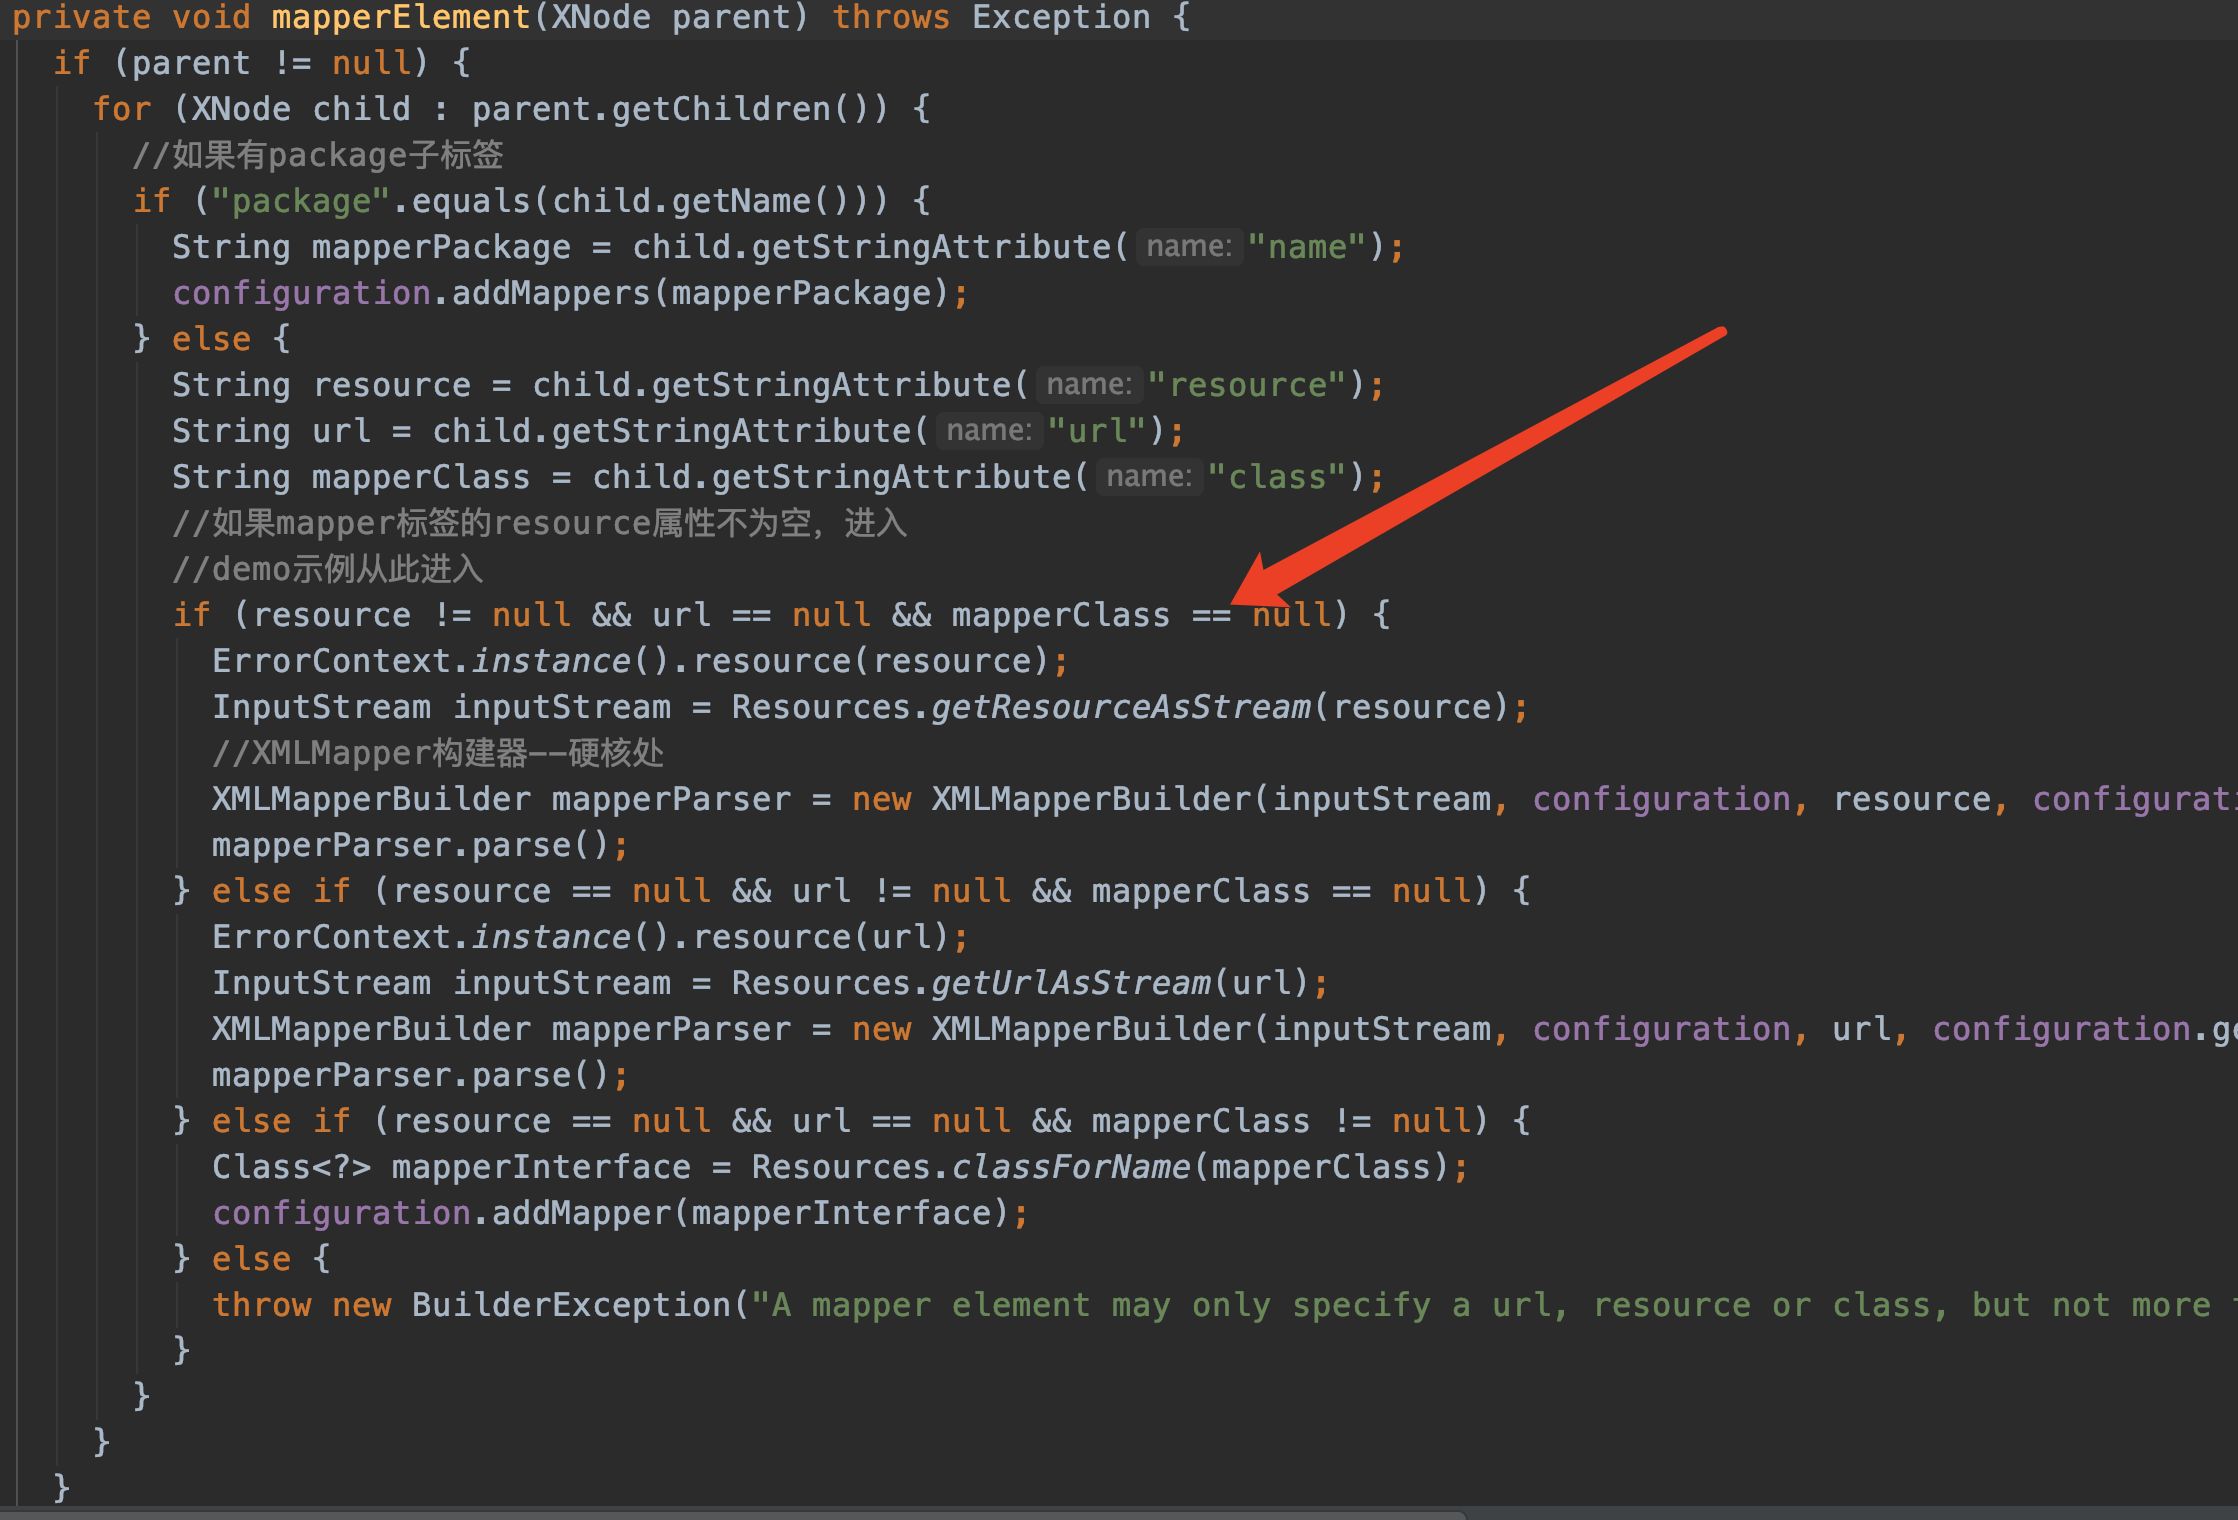
由于我的演示示例中没有定义package标签,代码不会进入。
此次我会进入红色箭头指示的地方,因为我只定义了resource属性
来看硬核的地方:XMLMapperBuilder mapperParser = new XMLMapperBuilder(inputStream, configuration, resource, configuration.getSqlFragments());
XMLMapperBuilder
进入构造方法看看,同时注意它也继承了父类BaseBuilder(之前已经提过了)
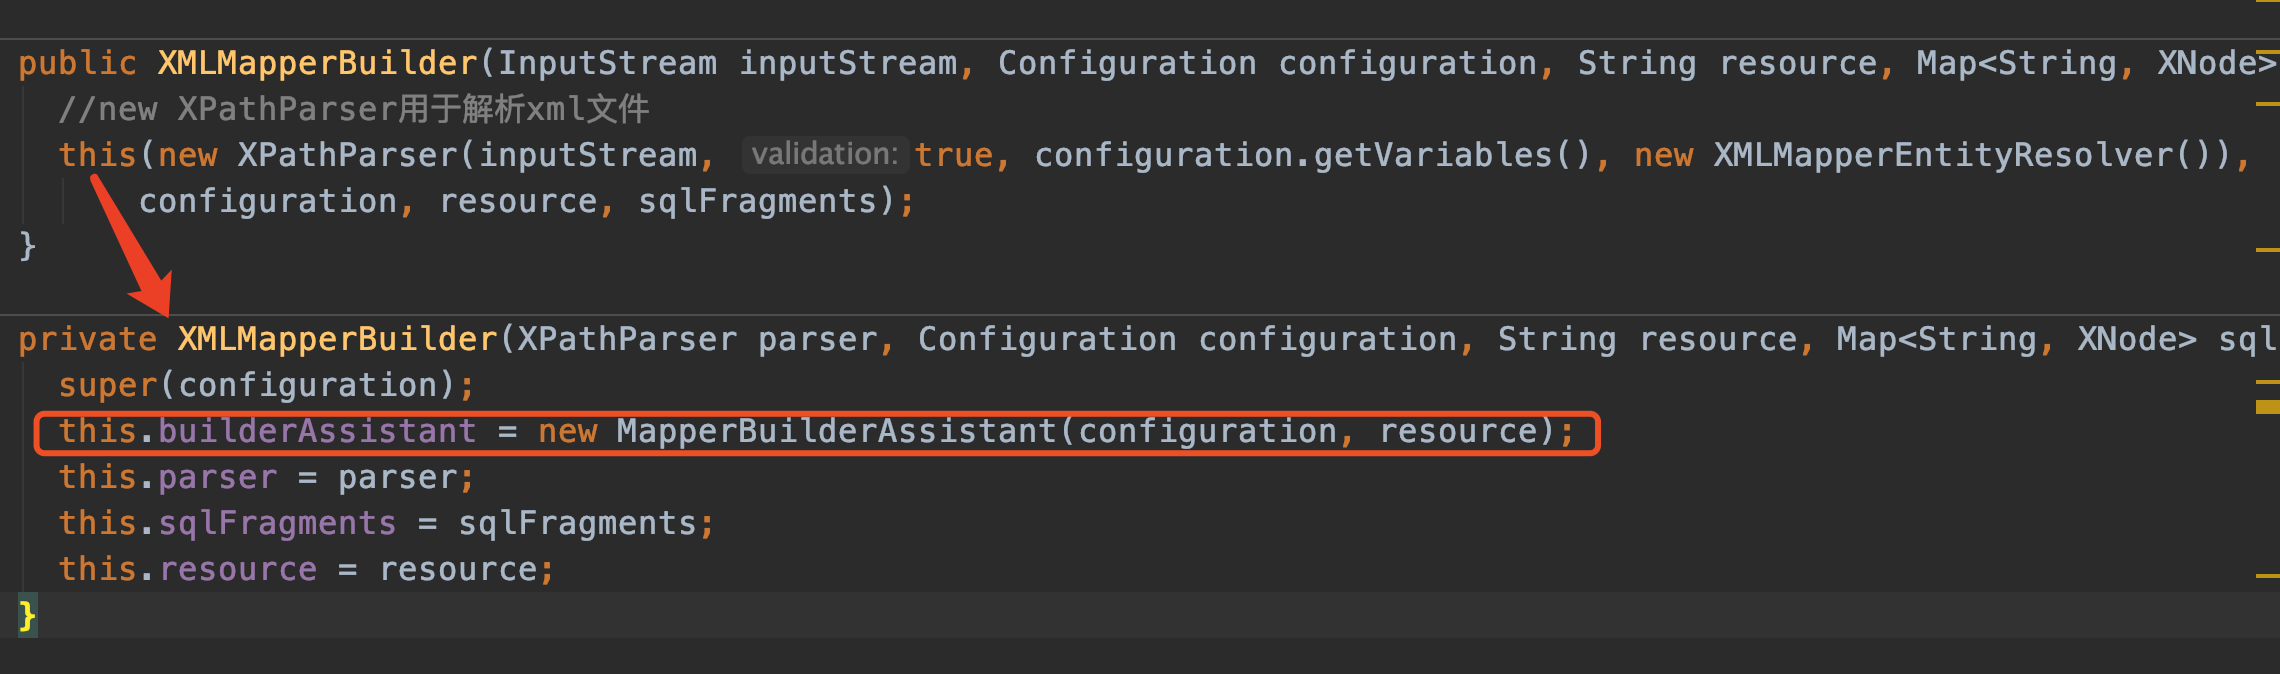
同样也new了个XPathParser解析器,跳过。看上图我红框标记的地方:
this.builderAssistant = new MapperBuilderAssistant(configuration, resource);
这也是个非常重要的类,看名字就知道它是个助手类,负责组装SQL用的。很重要很重要
参数:
- configuration: 之前我们在
XMLConfigBuilder构造器中new出来的,还有印象吗 - resource: mapper文件路径,这里是
com/twx/mybatis/mapper/xml/projectInfo.xml
我们来看看它吧。
MapperBuilderAssistant
public class MapperBuilderAssistant extends BaseBuilder {
  /**
   * xml文件中的命名空间 <br/>
   * 例如:<mapper namespace="com.twx.mybatis.mapper.ProjectInfoMapper">
   */
  private String currentNamespace;
  /**
   * mapper xml 文件的全路径
   */
  private final String resource;
  private Cache currentCache;
  private boolean unresolvedCacheRef; // issue #676

  public MapperBuilderAssistant(Configuration configuration, String resource) {
    super(configuration);
    ErrorContext.instance().resource(resource);
    this.resource = resource;
  }
}
它也继承了BaseBuilder,所以它也有一个Configuration对象的引用(还记得我说过的,Configuration对象很重要,后面非常多类都要用到它。
注意它的几个成员变量:
- currentNamespace:业务xml文件中的命名空间
- resource:业务xml 文件的全路径,设置在
mybatis-config.xml mapper标签的resource属性中 - currentCache:一级缓存,暂时不讲解
它还有很多重要的方法,这里先列举几个常用的:
- applyCurrentNamespace-返回mapper接口方法的完全限定名称
- useNewCache--创建缓存对象
- addResultMap--生成ResultMap,add到configure对象的resultMaps中
- addMappedStatement--生成MappedStatement对象,set到config对象的mappedStatements中
- getStatementResultMaps--根据resultMap参数从config对象中获取ResultMap对象
- buildResultMapping--构建ResultMapping对象
- resolveResultJavaType-返回java bean属性对应的Java类型
XMLMapperBuilder解析
parse
从XMLMapperBuilder构造器出来,紧接着就调用parse方法
XMLMapperBuilder mapperParser = new XMLMapperBuilder(inputStream, configuration, resource, configuration.getSqlFragments());
mapperParser.parse();
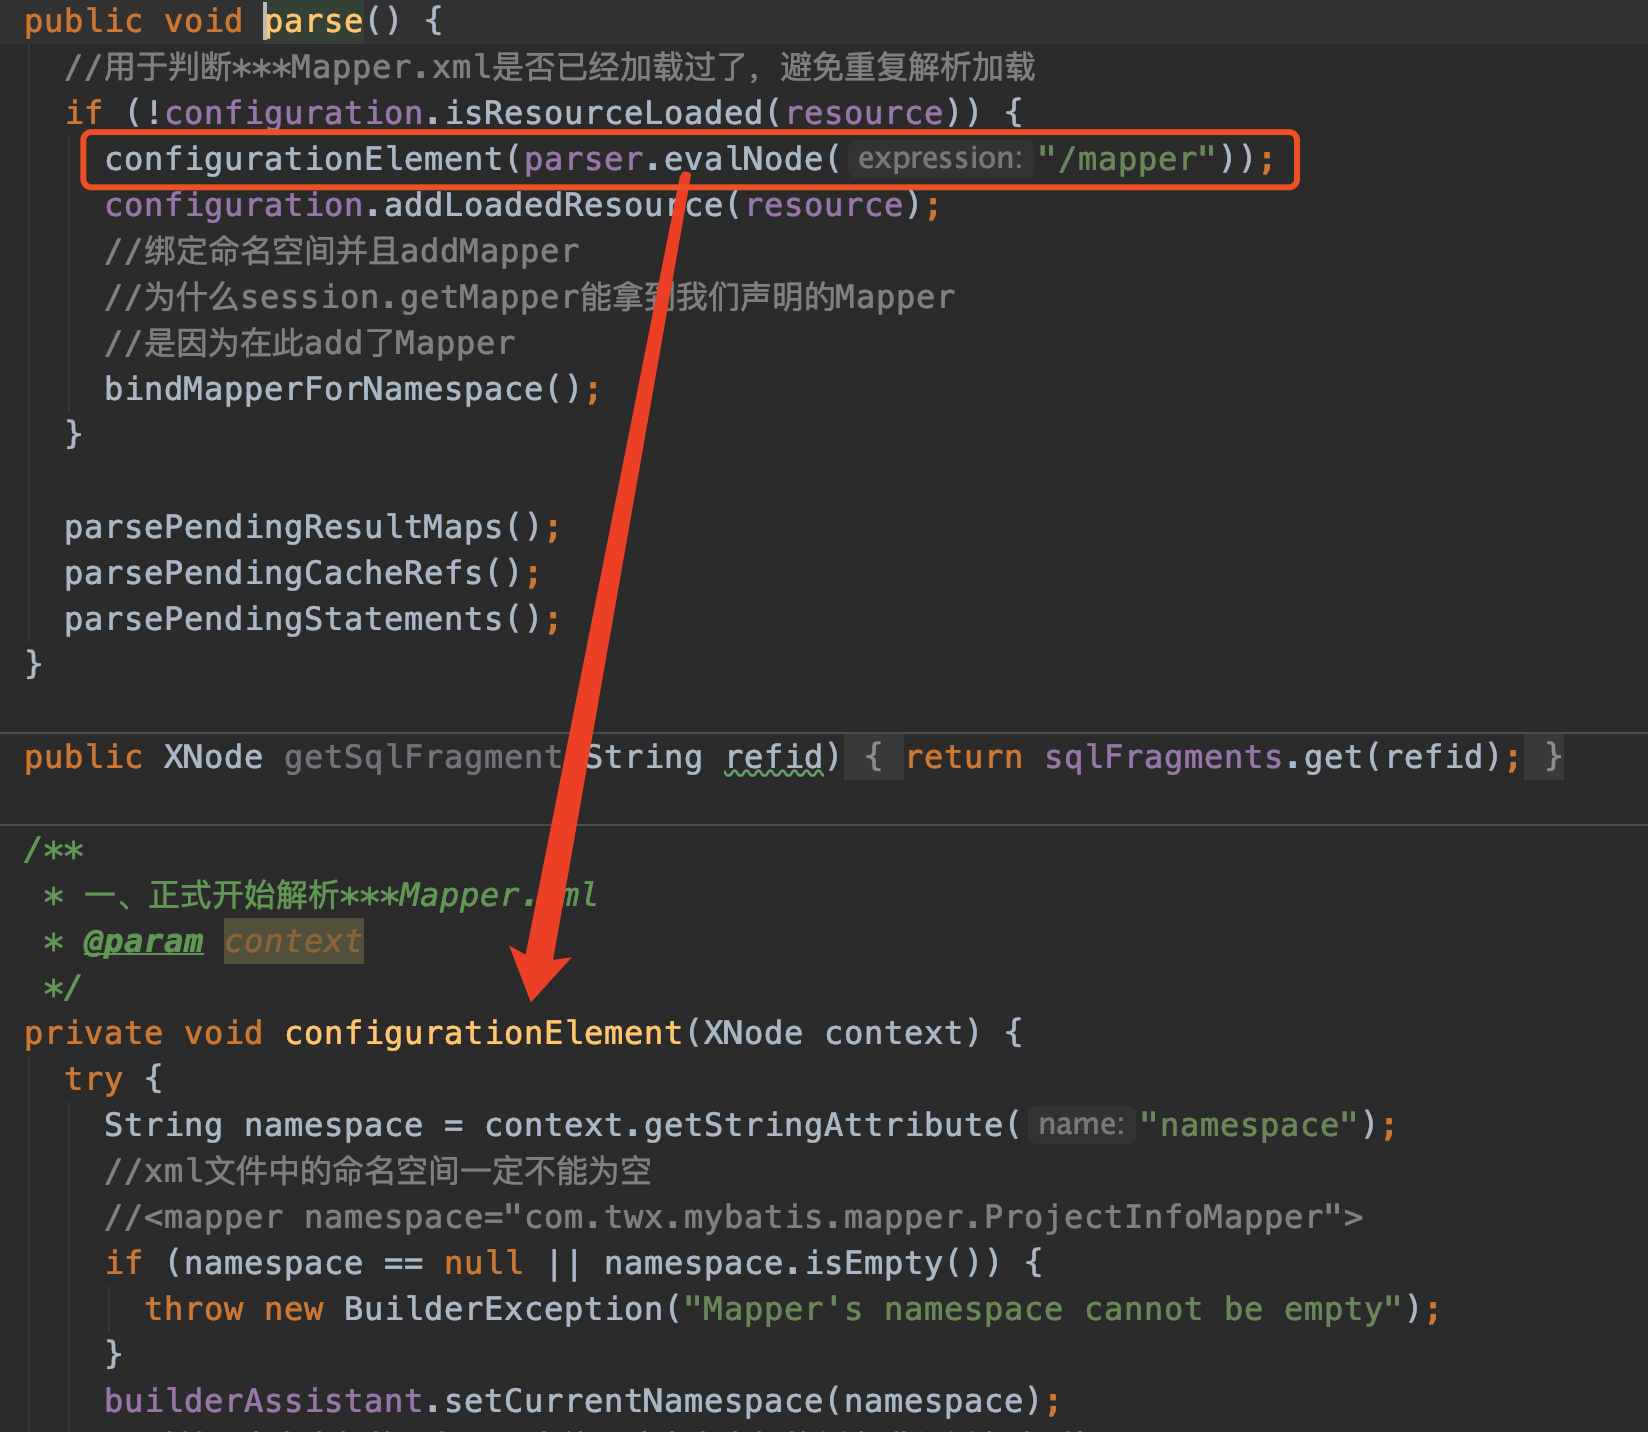
String namespace = context.getStringAttribute("namespace");拿到的是

我们再来看看更具体的configurationElement(XNode context)方法

接下来会着重讲解三个方法:
- resultMapElements
- sqlElement
- buildStatementFromContext
这三个方法对应下图xml文件中的三个标签
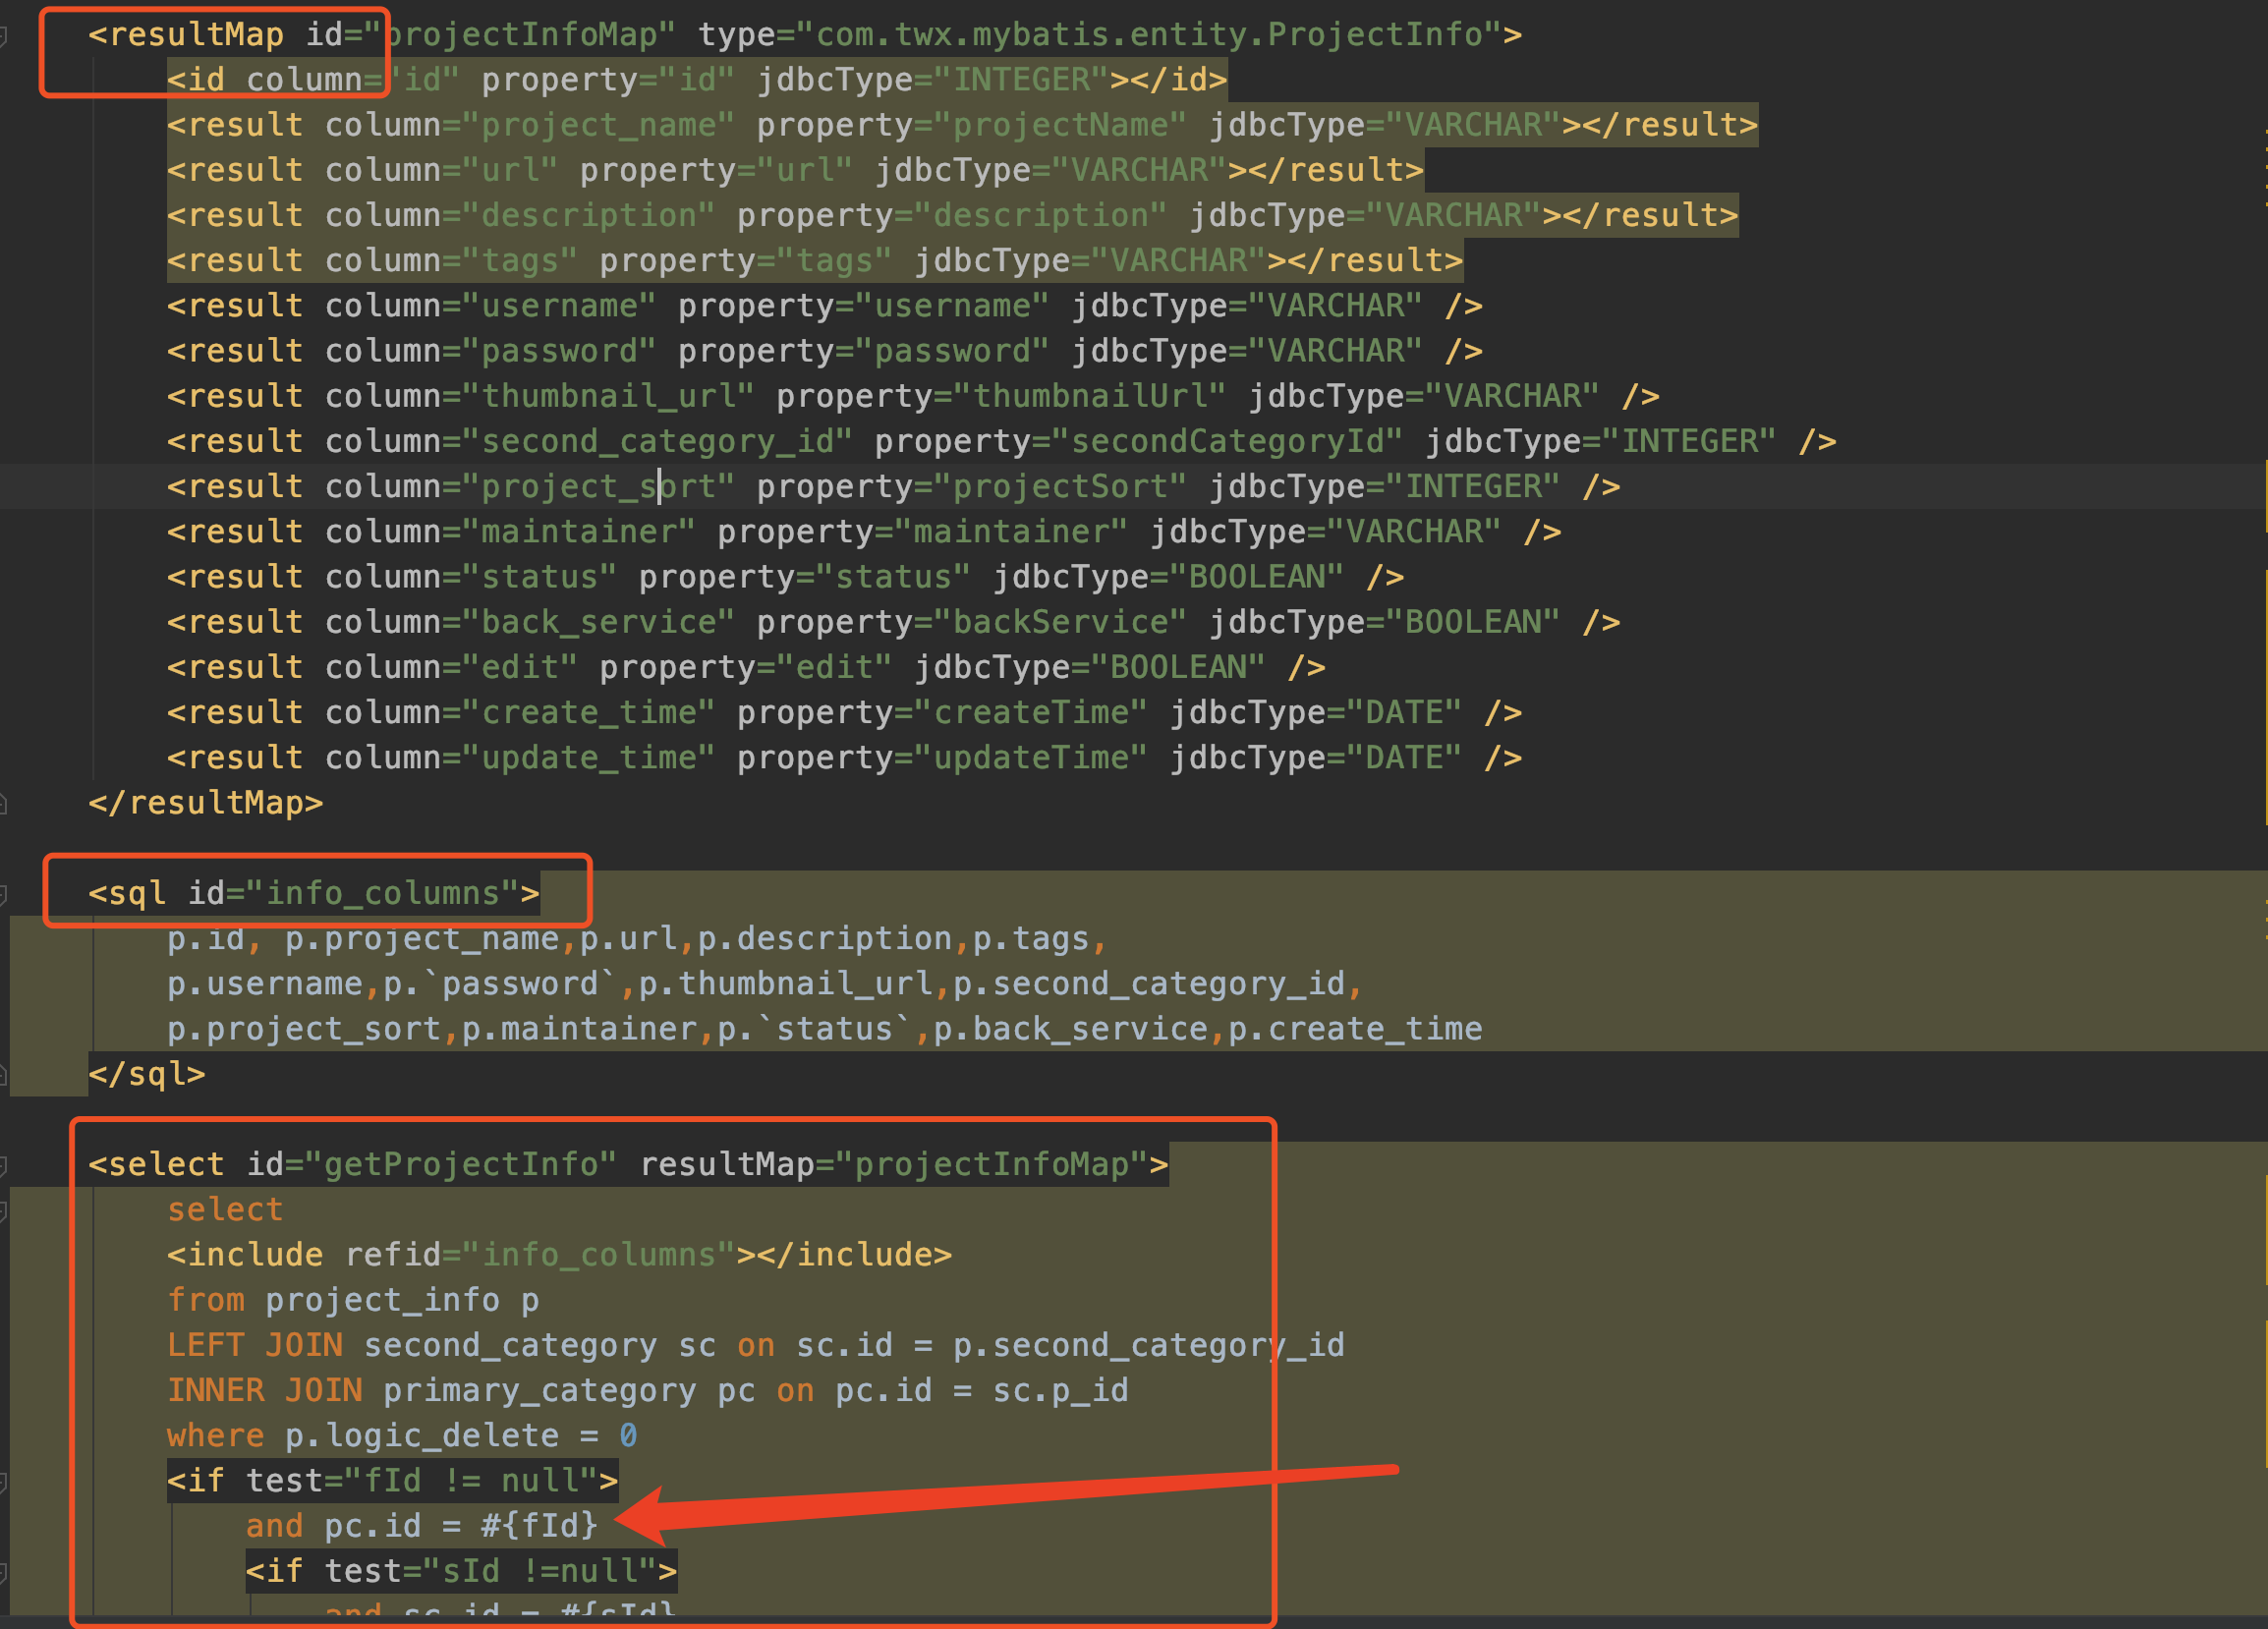
resultMapElements1
先来看如何解析resultMap标签的。
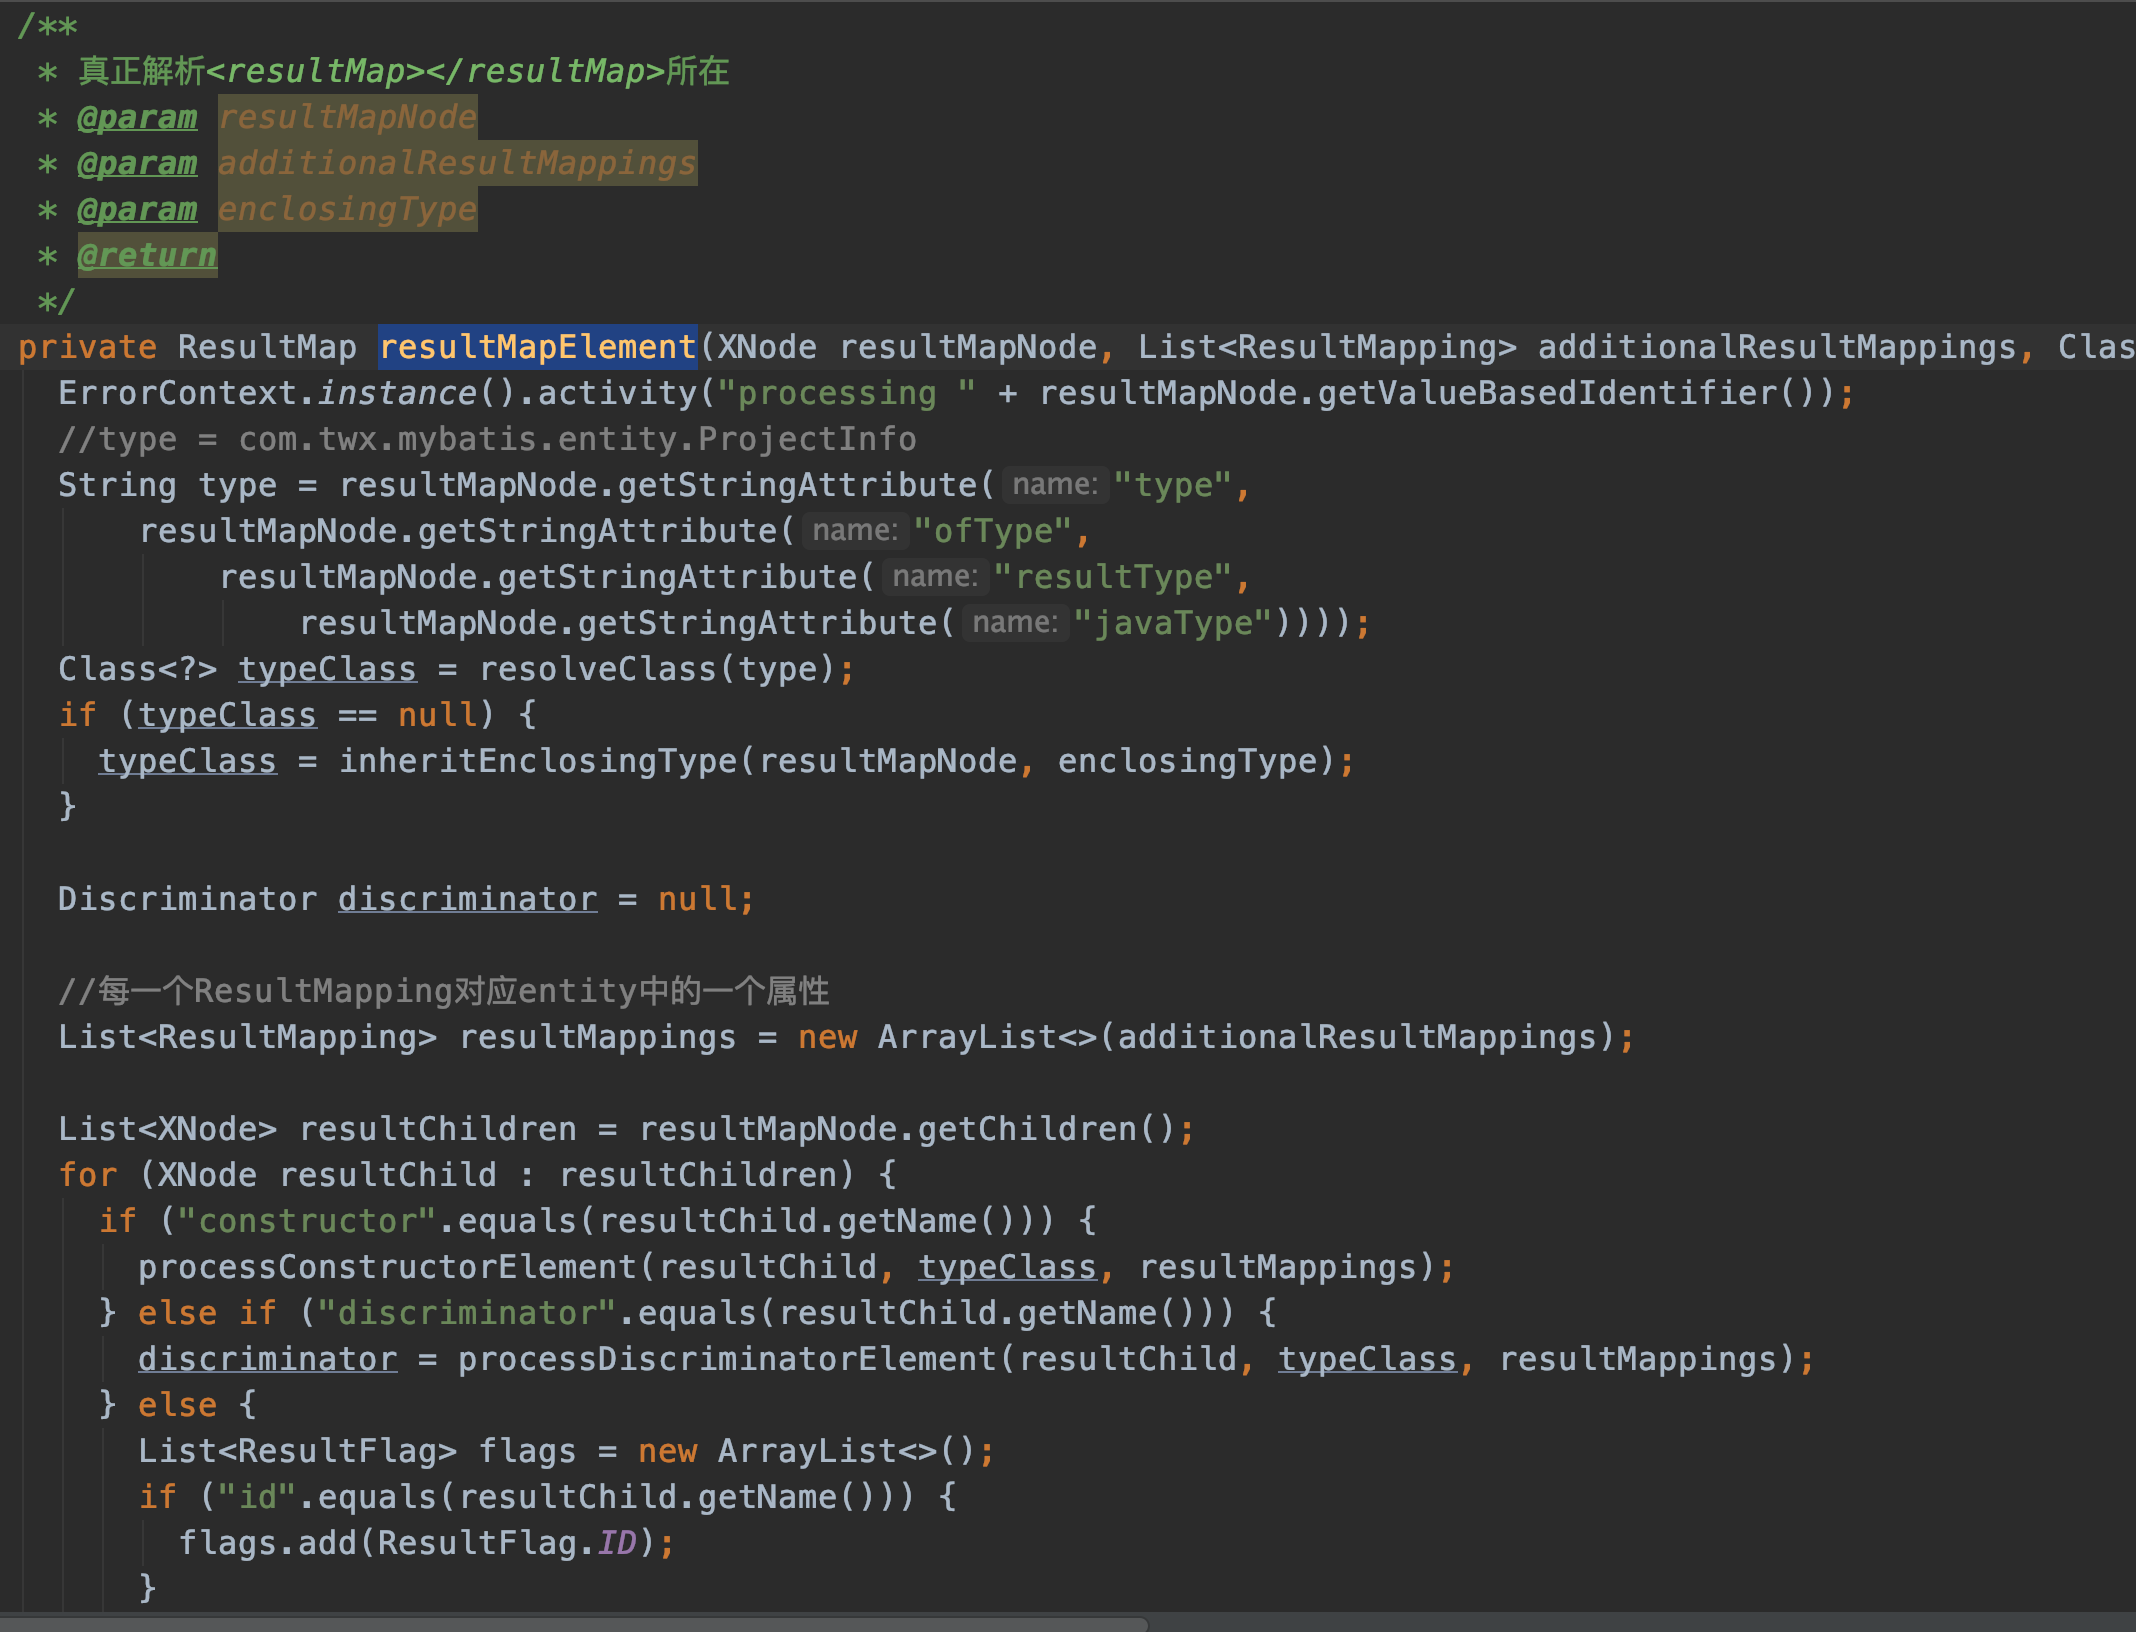
真正解析<resultMap>的方法很长。我们分段看。
<resultMap id="projectInfoMap" type="com.twx.mybatis.entity.ProjectInfo">
省略
</resultMap>
//type = com.twx.mybatis.entity.ProjectInfo
String type = resultMapNode.getStringAttribute("type",
    resultMapNode.getStringAttribute("ofType",
        resultMapNode.getStringAttribute("resultType",
            resultMapNode.getStringAttribute("javaType"))));
由于只传了一个type属性,所以String type=com.twx.mybatis.entity.ProjectInfo
Class<?> typeClass = resolveClass(type);
if (typeClass == null) {
  typeClass = inheritEnclosingType(resultMapNode, enclosingType);
}
typeClass理所应当是com.twx.mybatis.entity.ProjectInfo
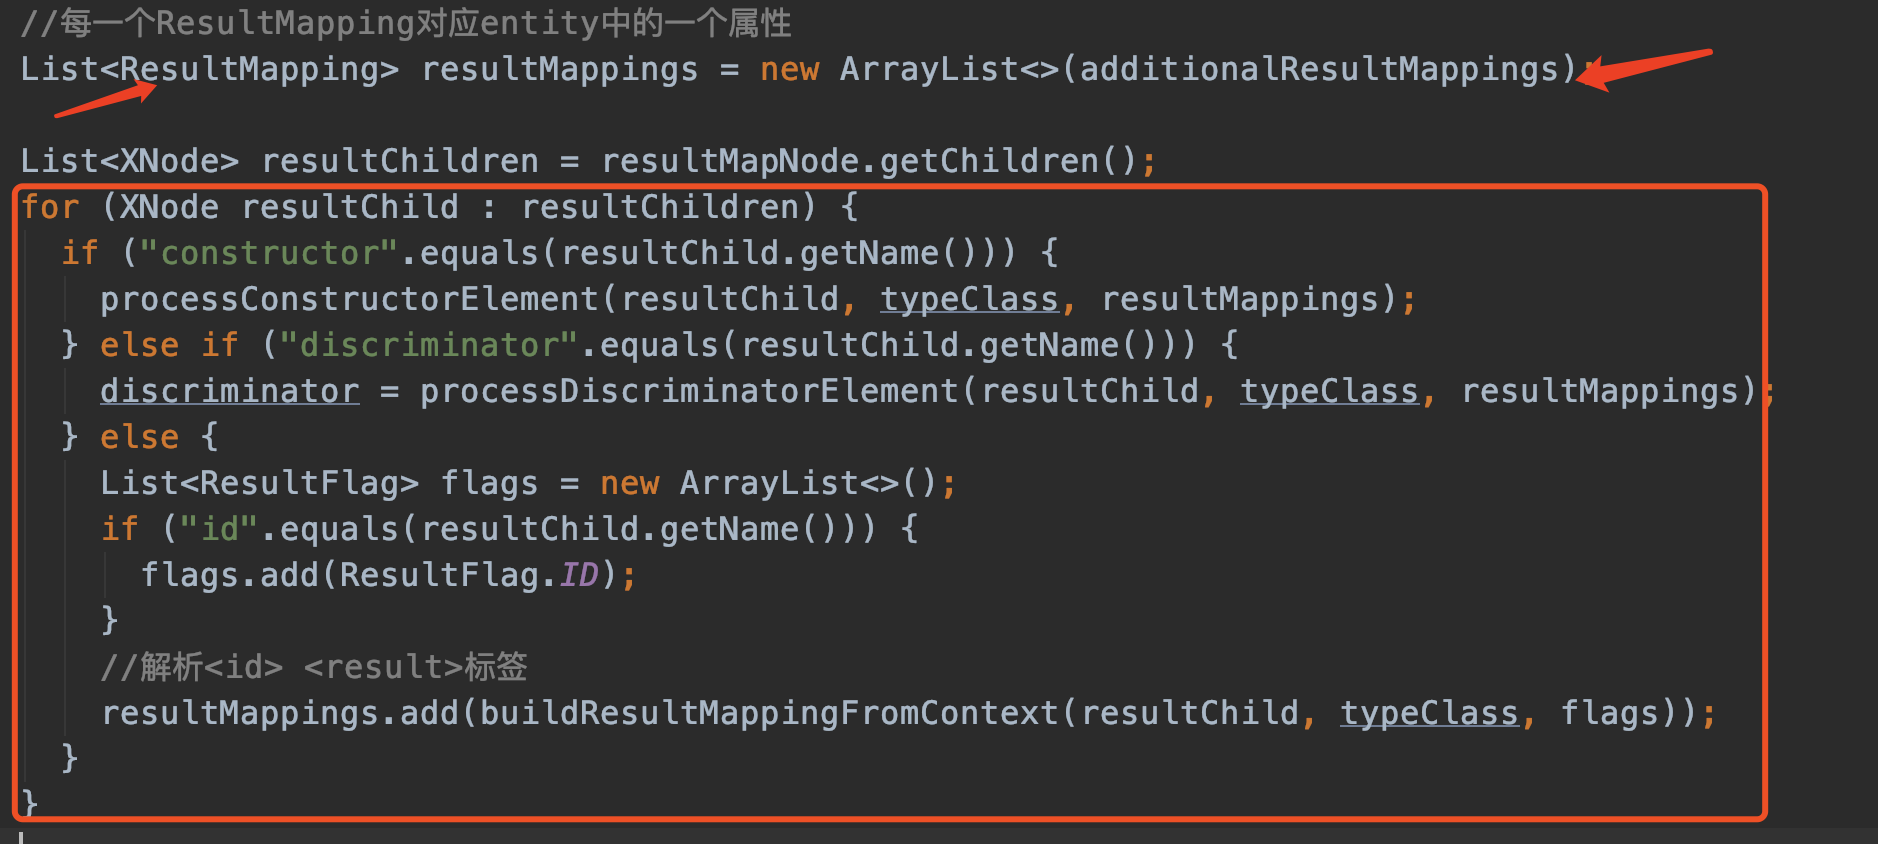
再来看上面这段代码,先解释一下ResultMapping.
ResultMapping
一个ResultMapping对应entity中的一个属性,亦即
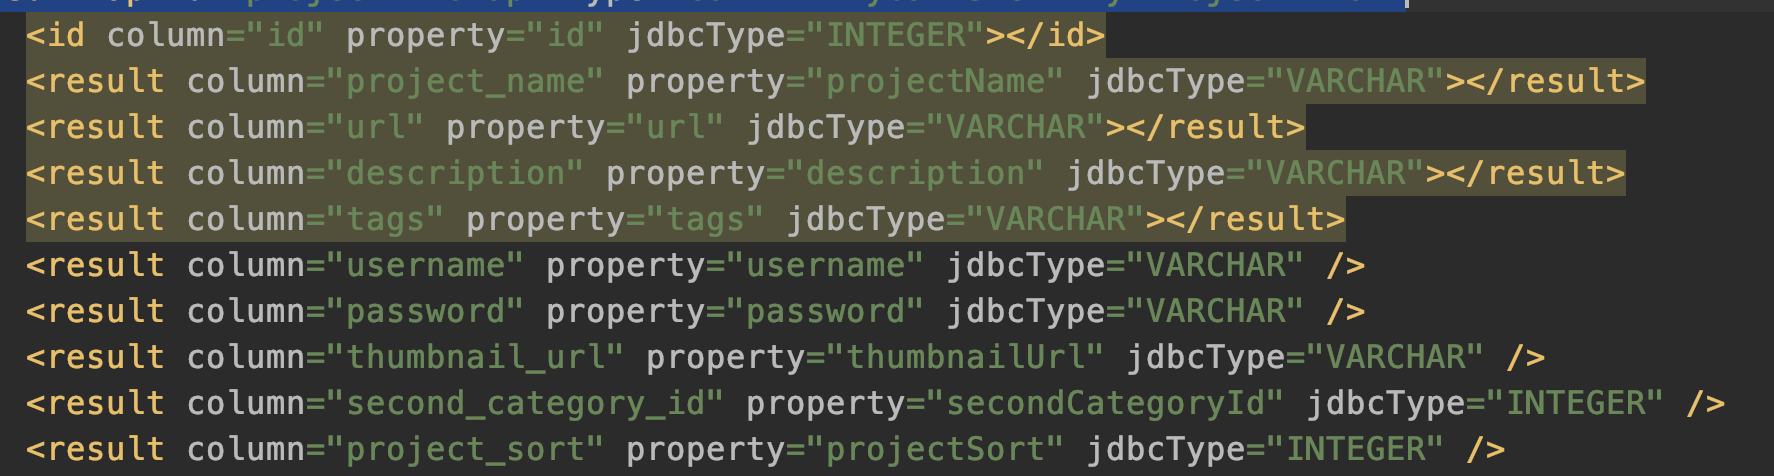
上图xml中的每一行最后都被解析成一个一个的ResultMapping 对象。
理解了这点,我们回到java代码中的for循环。for循环就是解析这些id,result。由于我们没有定义constructor,discriminator,就跳过这几行代码。直接看id 和 result标签的解析。
我们来看这行代码:
//解析<id> <result>标签
resultMappings.add(buildResultMappingFromContext(resultChild, typeClass, flags));
来看buildResultMappingFromContext方法,buildResultMappingFromContext 用于生成一个ResultMapping对象。
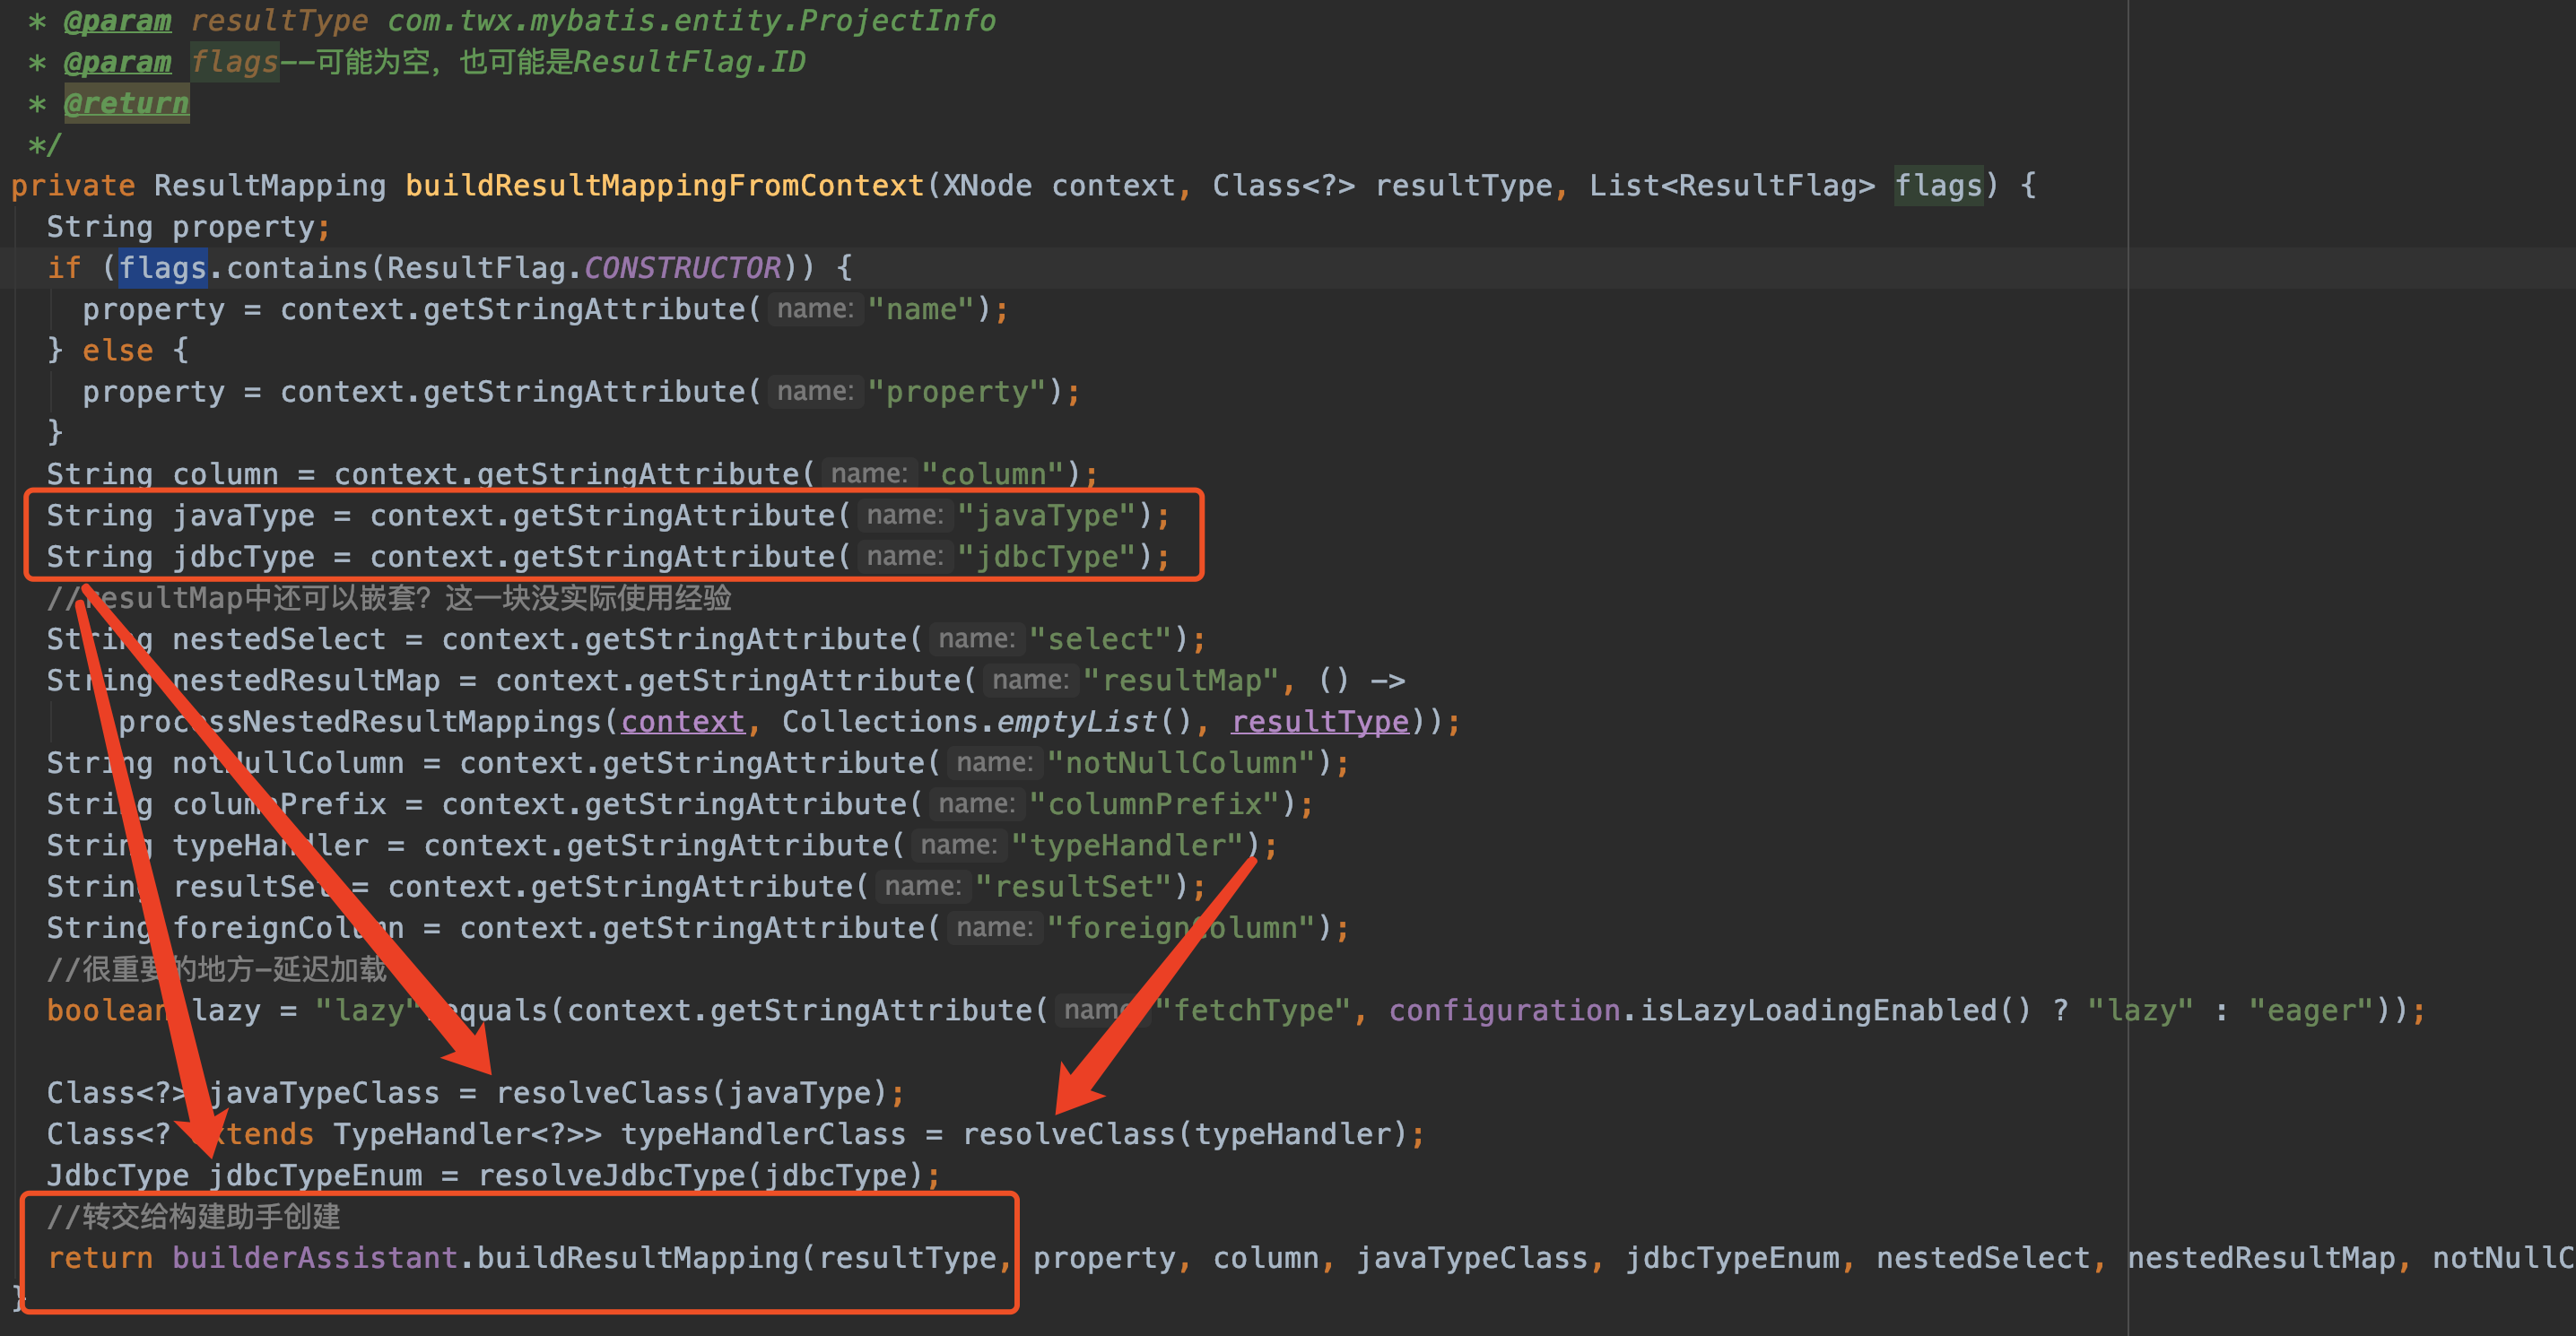
上图这段java代码对照着下图看就很清晰了,不做过多解析。(注意,我们没对resultMap的每个属性声明typeHandler)
代码最后一行我特别标注,最终ResultMapping对象的生成是转交给builderAssistant助手实现的(前面我们提到过,还有印象吗,当时只是提到了方法名称,并没有具体去分析,现在我们去看看)。
我们来看builderAssistant的buildResultMapping方法:
public ResultMapping buildResultMapping(Class<?> resultType, String property, String column, Class<?> javaType, JdbcType jdbcType,
      String nestedSelect, String nestedResultMap, String notNullColumn, String columnPrefix,
      Class<? extends TypeHandler<?>> typeHandler, List<ResultFlag> flags,
      String resultSet, String foreignColumn, boolean lazy) {
    //根据属性property名称例如username获取对应的java类型String
    Class<?> javaTypeClass = resolveResultJavaType(resultType, property, javaType);
    //typeHandler在我们的示例中是null,返回null
    TypeHandler<?> typeHandlerInstance = resolveTypeHandler(javaTypeClass, typeHandler);

    //是否有组合对象
    List<ResultMapping> composites;
    //假如<result column="username" property="username" jdbcType="VARCHAR" />
    // 有配置select属性,那么这里的nestedSelect!=null
    //有配置foreignColumn属性,这里的foreignColumn!=null
    //在我们的示例中,显然两者都为空,所以composites=null
    if ((nestedSelect == null || nestedSelect.isEmpty()) && (foreignColumn == null || foreignColumn.isEmpty())) {
      composites = Collections.emptyList();
    } else {
      composites = parseCompositeColumnName(column);
    }

    return new ResultMapping.Builder(configuration, property, column, javaTypeClass)
        .jdbcType(jdbcType)
        .nestedQueryId(applyCurrentNamespace(nestedSelect, true))
        .nestedResultMapId(applyCurrentNamespace(nestedResultMap, true))
        .resultSet(resultSet)
        .typeHandler(typeHandlerInstance)
        .flags(flags == null ? new ArrayList<>() : flags)
        .composites(composites)
        .notNullColumns(parseMultipleColumnNames(notNullColumn))
        .columnPrefix(columnPrefix)
        .foreignColumn(foreignColumn)
        .lazy(lazy)
        .build();
  }
这个方法的作用是为了:
- 确定java bean属性对应的Class类型
- 确定属性交给什么TypeHandler处理
- 以及属性是否有嵌套查询
最后的return语句其实就是new ResultMapping(),只不过用的是建造者模式而已。
resultMapElements2
我们回到resultMapElements1一节的最后。
//每一个ResultMapping对应entity中的一个属性
 List<ResultMapping> resultMappings = new ArrayList<>(additionalResultMappings);
for (XNode resultChild : resultChildren) {
  ....
    省略
   //解析<id> <result>标签
		resultMappings.add(buildResultMappingFromContext(resultChild, typeClass, flags));
}
经过我们上面对ResultMapping的分析,执行完上面这个for循环后,我们继续。

再次贴上xml:
 <resultMap id="projectInfoMap" type="com.twx.mybatis.entity.ProjectInfo">
   ...
   省略了
  </resultMap>
看代码注释就好。
最后调用ResultMapResolver.resolve()生成ResultMap对象。
ResultMapResolver.resolve() 最终还是调用我一再强调的助手类MapperBuilderAssistant的addResultMap
public ResultMap resolve() {
  return assistant.addResultMap(this.id, this.type, this.extend, this.discriminator, this.resultMappings, this.autoMapping);
}
我们来看MapperBuilderAssistant.addResultMap()
/**
 * 生成ResultMap,add到configure对象的resultMaps中
 * @param id  resultMapId
 * @param type  mapper返回类型
 * @param extend
 * @param discriminator
 * @param resultMappings
 * @param autoMapping
 * @return
 */
public ResultMap addResultMap(String id, Class<?> type, String extend,
    Discriminator discriminator, List<ResultMapping> resultMappings, Boolean autoMapping) {

  //resultMap的完全限定名称
  //例如:com.twx.mybatis.mapper.ProjectInfoMapper.projectInfoMap
  id = applyCurrentNamespace(id, false);

  //TODO: 构造示例研究
  extend = applyCurrentNamespace(extend, true);
  if (extend != null) {
    ...
      省略
  }

  //build方法内部做了很多操作,主要是提取ResultMapping中的属性
  //ResultMapping存储了很多@Result的属性
  ResultMap resultMap = new ResultMap.Builder(configuration, id, type, resultMappings, autoMapping)
      .discriminator(discriminator)
      .build();
  configuration.addResultMap(resultMap);
  return resultMap;
}
不需要关心太多,直接看最后new ResultMap.Builder().build()
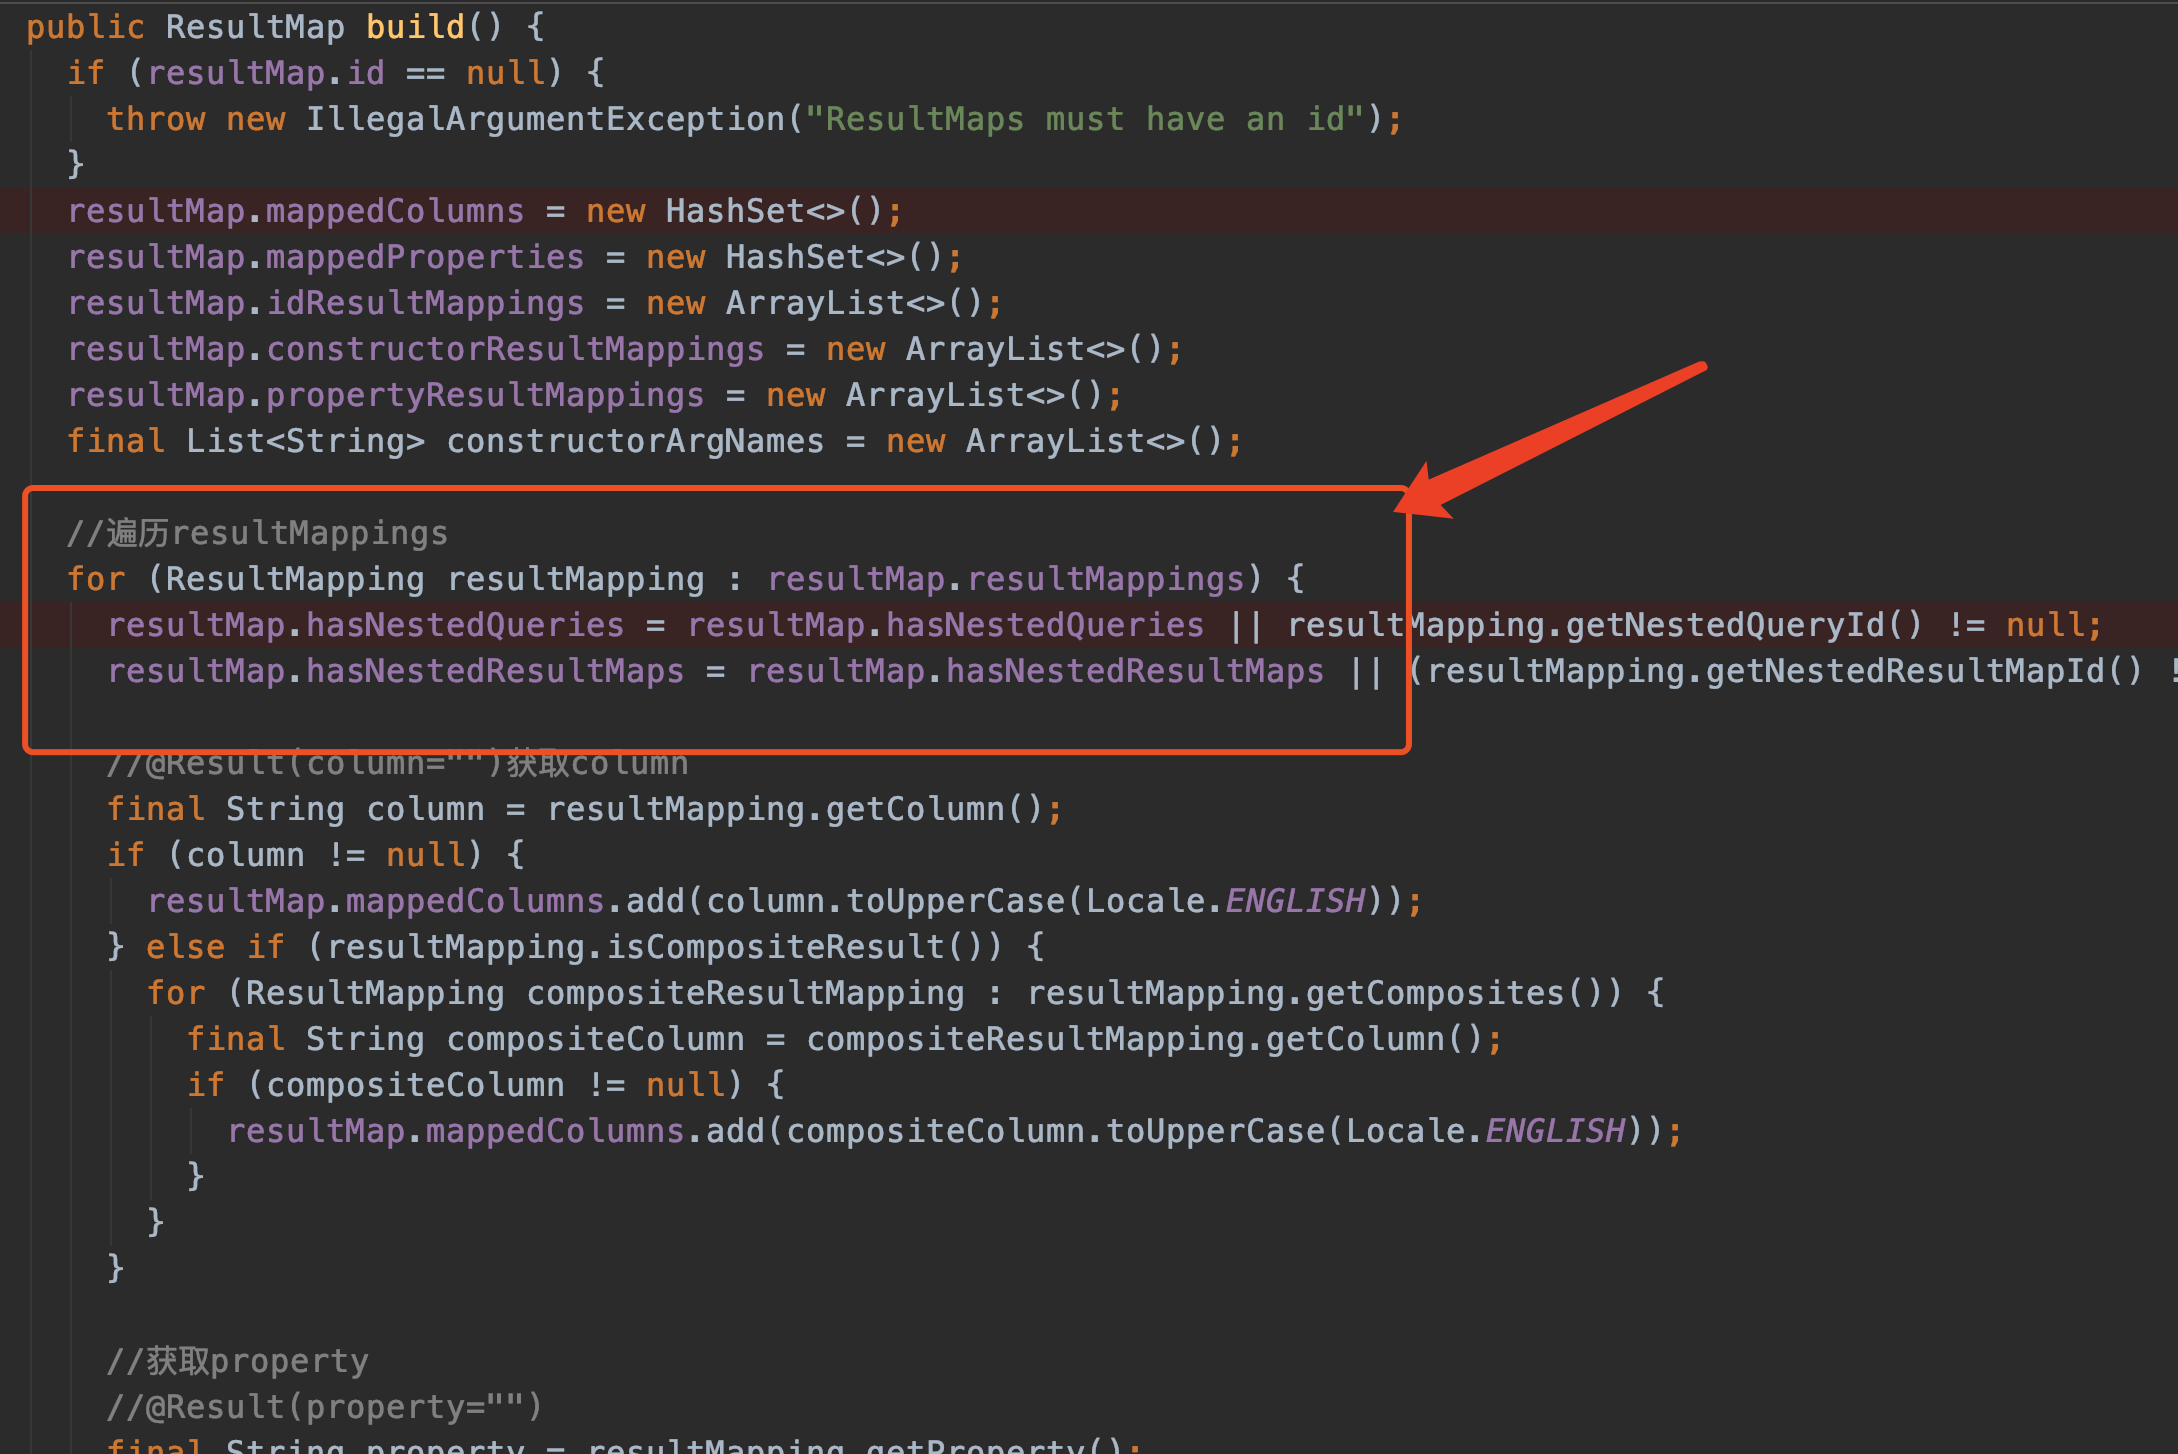
这个方法不详细讲了,大概的内容就是遍历之前生成的List<ResultMapping> resultMappings 给自己的成员变量赋值。下面列举几个关键的成员变量。
/**
 * resultMap的id
 */
private String id;
/**
 * 返回类型,例如com.twx.mybatis.entity.ProjectInfo
 */
private Class<?> type;
private List<ResultMapping> resultMappings;
/**
 * id标签对应的ResultMapping
 */
private List<ResultMapping> idResultMappings;
/**
 * 构造器对应的constructorResultMappings
 */
private List<ResultMapping> constructorResultMappings;
/**
 * id+result标签对应的ResultMapping
 */
private List<ResultMapping> propertyResultMappings;
至此,终于完成了<resultMap> 标签的解析了。
sqlElement
这是我们的第二大标签。我们先看看xml中的定义与使用。你一定很熟悉。
<sql id="info_columns">
  p.id, p.project_name,p.url,p.description,p.tags,
  p.username,p.`password`,p.thumbnail_url,p.second_category_id,
  p.project_sort,p.maintainer,p.`status`,p.back_service,p.create_time
</sql>

<select id="getProjectInfo" resultMap="projectInfoMap">
  select
  <include refid="info_columns"></include>
  from project_info p
</select>

代码实现很简单,只是把<sql> 标签的id和内容存储到sqlFragments。
sqlFragments是Configuration中的sqlFragments引用
sqlFragments的定义:
/**
 * 存储<sql id="all_col"></sql>标签语句,key指代id
 */
protected final Map<String, XNode> sqlFragments = new StrictMap<>("XML fragments parsed from previous mappers");
注意 sqlFragments.put(id, context); 中的context是一个Xnode节点,后续会拿出来解析的。这里不做处理
buildStatementFromContext
最重磅的一个方法了。非常复杂!
做好准备。这是xml解析最后一步了。
那来看buildStatementFromContext:
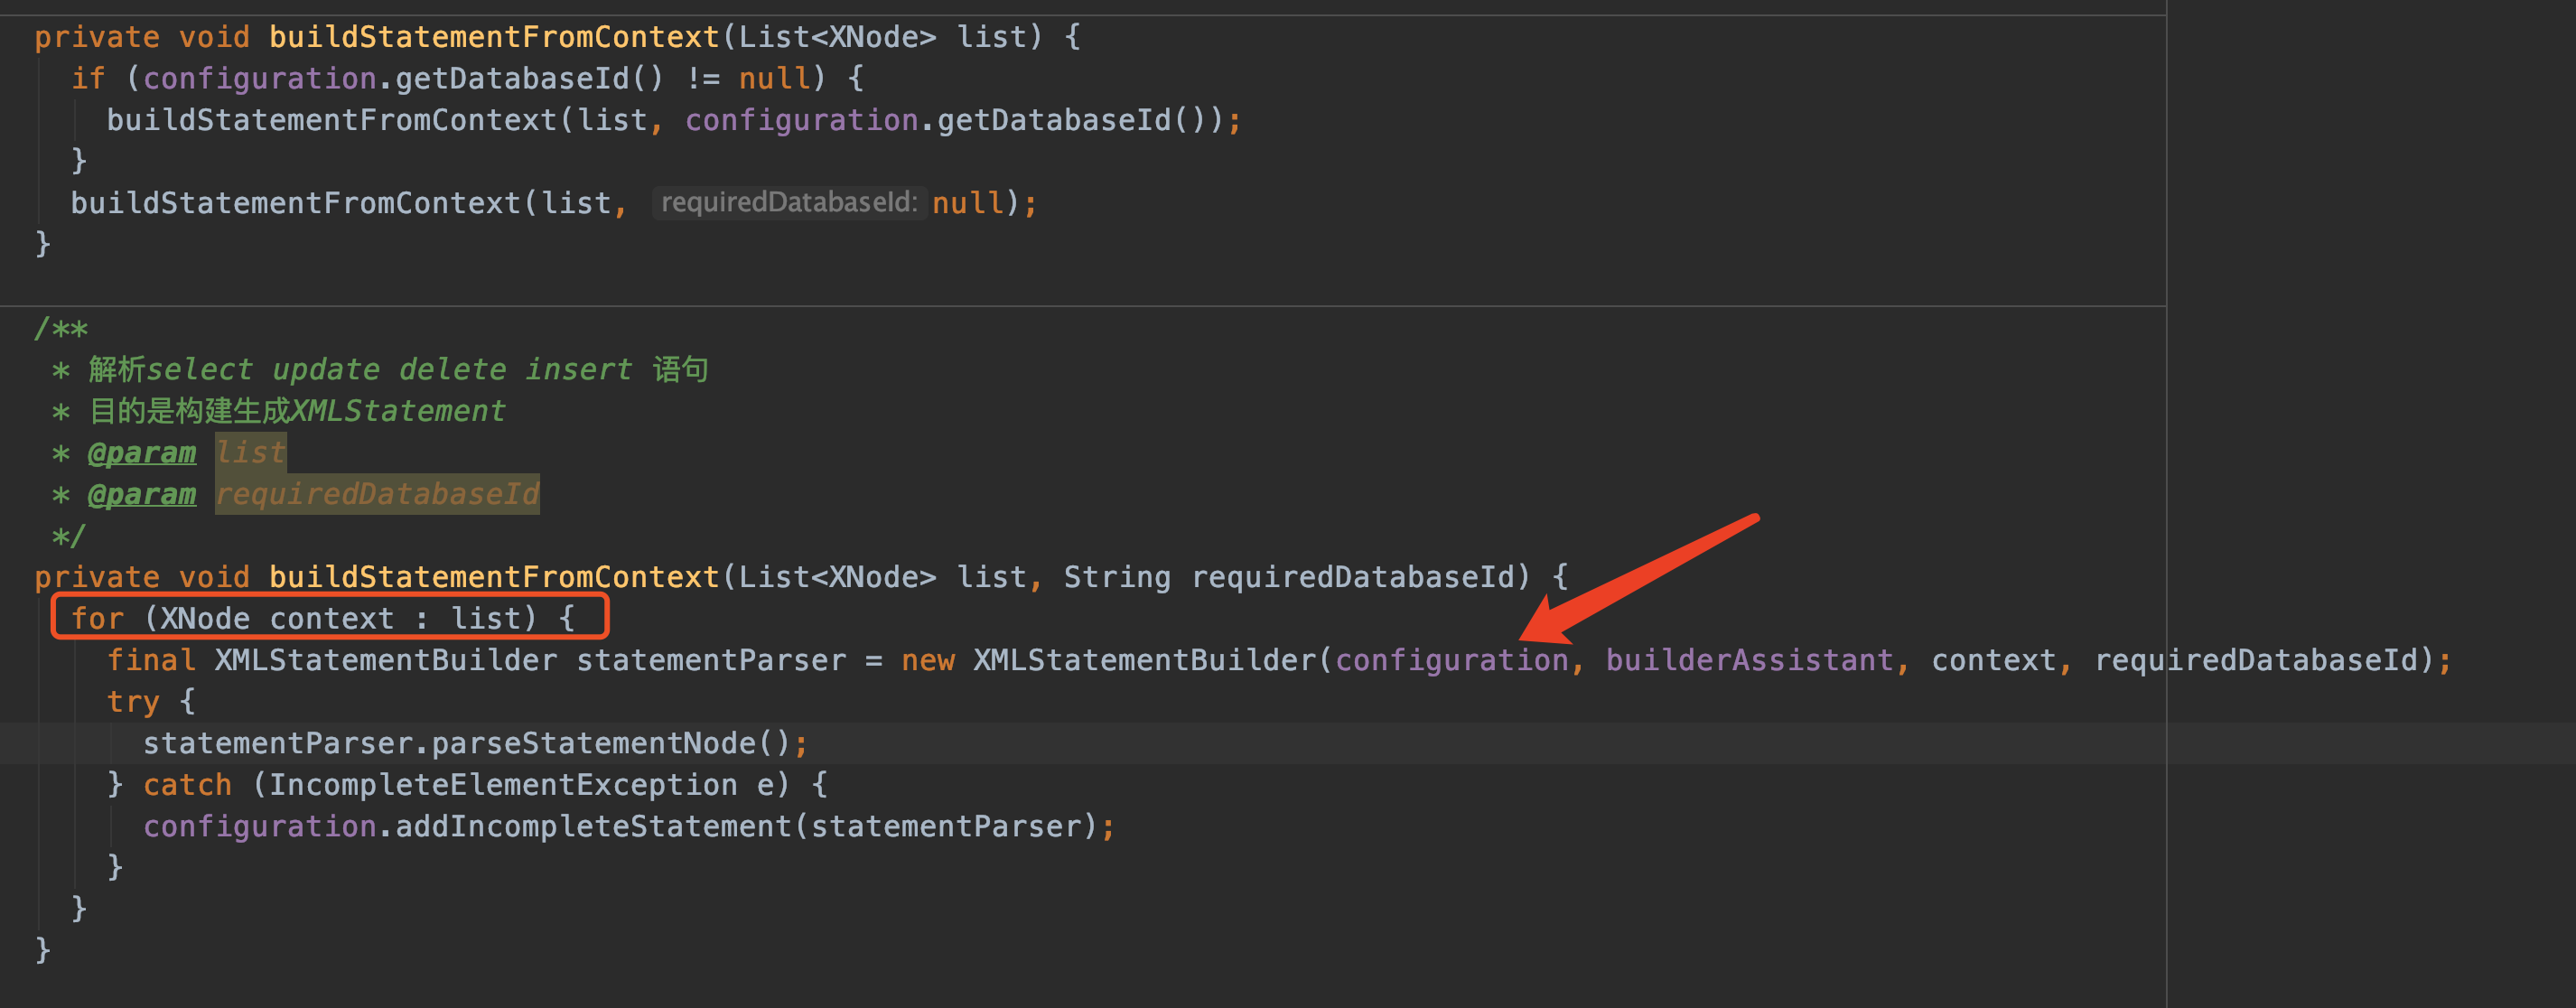
由于解析select delete insert 等语句比较复杂,转交给单独的类XMLStatementBuilder解析
parseStatementNode()
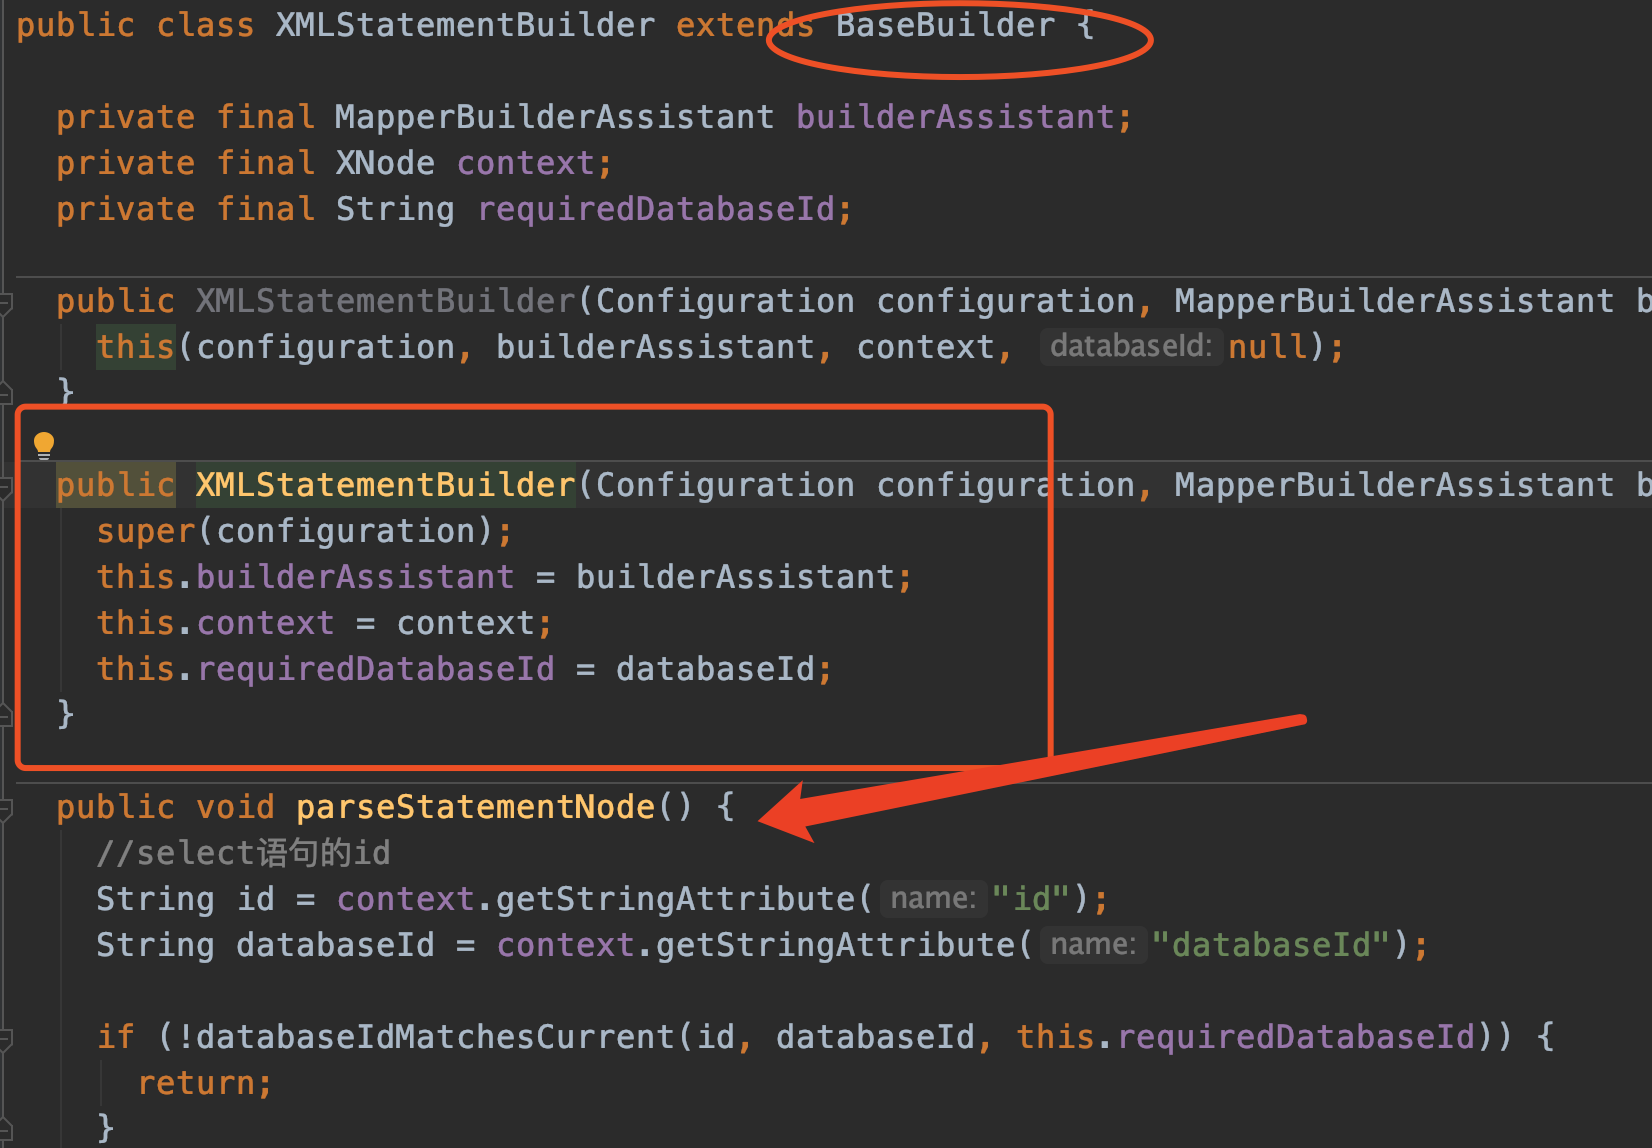
同样继承了BaseBuilder,构造方法没什么好讲的了。之前都说过了。
注意一下context代表的是xml node节点内容。例如:
<select id="getProjectInfo" resultMap="projectInfoMap">
  select
  <include refid="info_columns"></include>
  from project_info p
  LEFT JOIN second_category sc on sc.id = p.second_category_id
  INNER JOIN primary_category pc on pc.id = sc.p_id
  where p.logic_delete = 0
  <if test="fId != null">
    and pc.id = #{fId}
    <if test="sId !=null">
      and sc.id = #{sId}
    </if>
  </if>
  ORDER BY pc.sort,sc.sort,p.project_sort
</select>
我们直接来看parseStatementNode(),这方法也是超级的长。慢慢分析。
String id = context.getStringAttribute("id");
String databaseId = context.getStringAttribute("databaseId");
id在此是getProjectInfo,databaseId=null
String nodeName = context.getNode().getNodeName();
SqlCommandType sqlCommandType = SqlCommandType.valueOf(nodeName.toUpperCase(Locale.ENGLISH));
nodeName是select insert update delete其中一种,在此是select
sqlCommandType=SqlCommandType.SELECT
boolean isSelect = sqlCommandType == SqlCommandType.SELECT;
//将其设置为 true 后,只要语句被调用,都会导致本地缓存和二级缓存被清空,默认值:false。
boolean flushCache = context.getBooleanAttribute("flushCache", !isSelect);
//将其设置为 true 后,将会导致本条语句的结果被二级缓存缓存起来,默认值:对 select 元素为 true。
boolean useCache = context.getBooleanAttribute("useCache", isSelect);
//这个设置仅针对嵌套结果 select 语句:如果为 true,将会假设包含了嵌套结果集或是分组,当返回一个主结果行时,就不会产生对前面结果集的引用。
//这就使得在获取嵌套结果集的时候不至于内存不够用。默认值:false。
boolean resultOrdered = context.getBooleanAttribute("resultOrdered", false);
看代码中的注释。针对select查询语句,useCache默认是true
//解析include语句
XMLIncludeTransformer includeParser = new XMLIncludeTransformer(configuration, builderAssistant);
includeParser.applyIncludes(context.getNode());
上面两行用于解析<include>标签,例如示例中的:
select
<include refid="info_columns"></include>
from project_info p
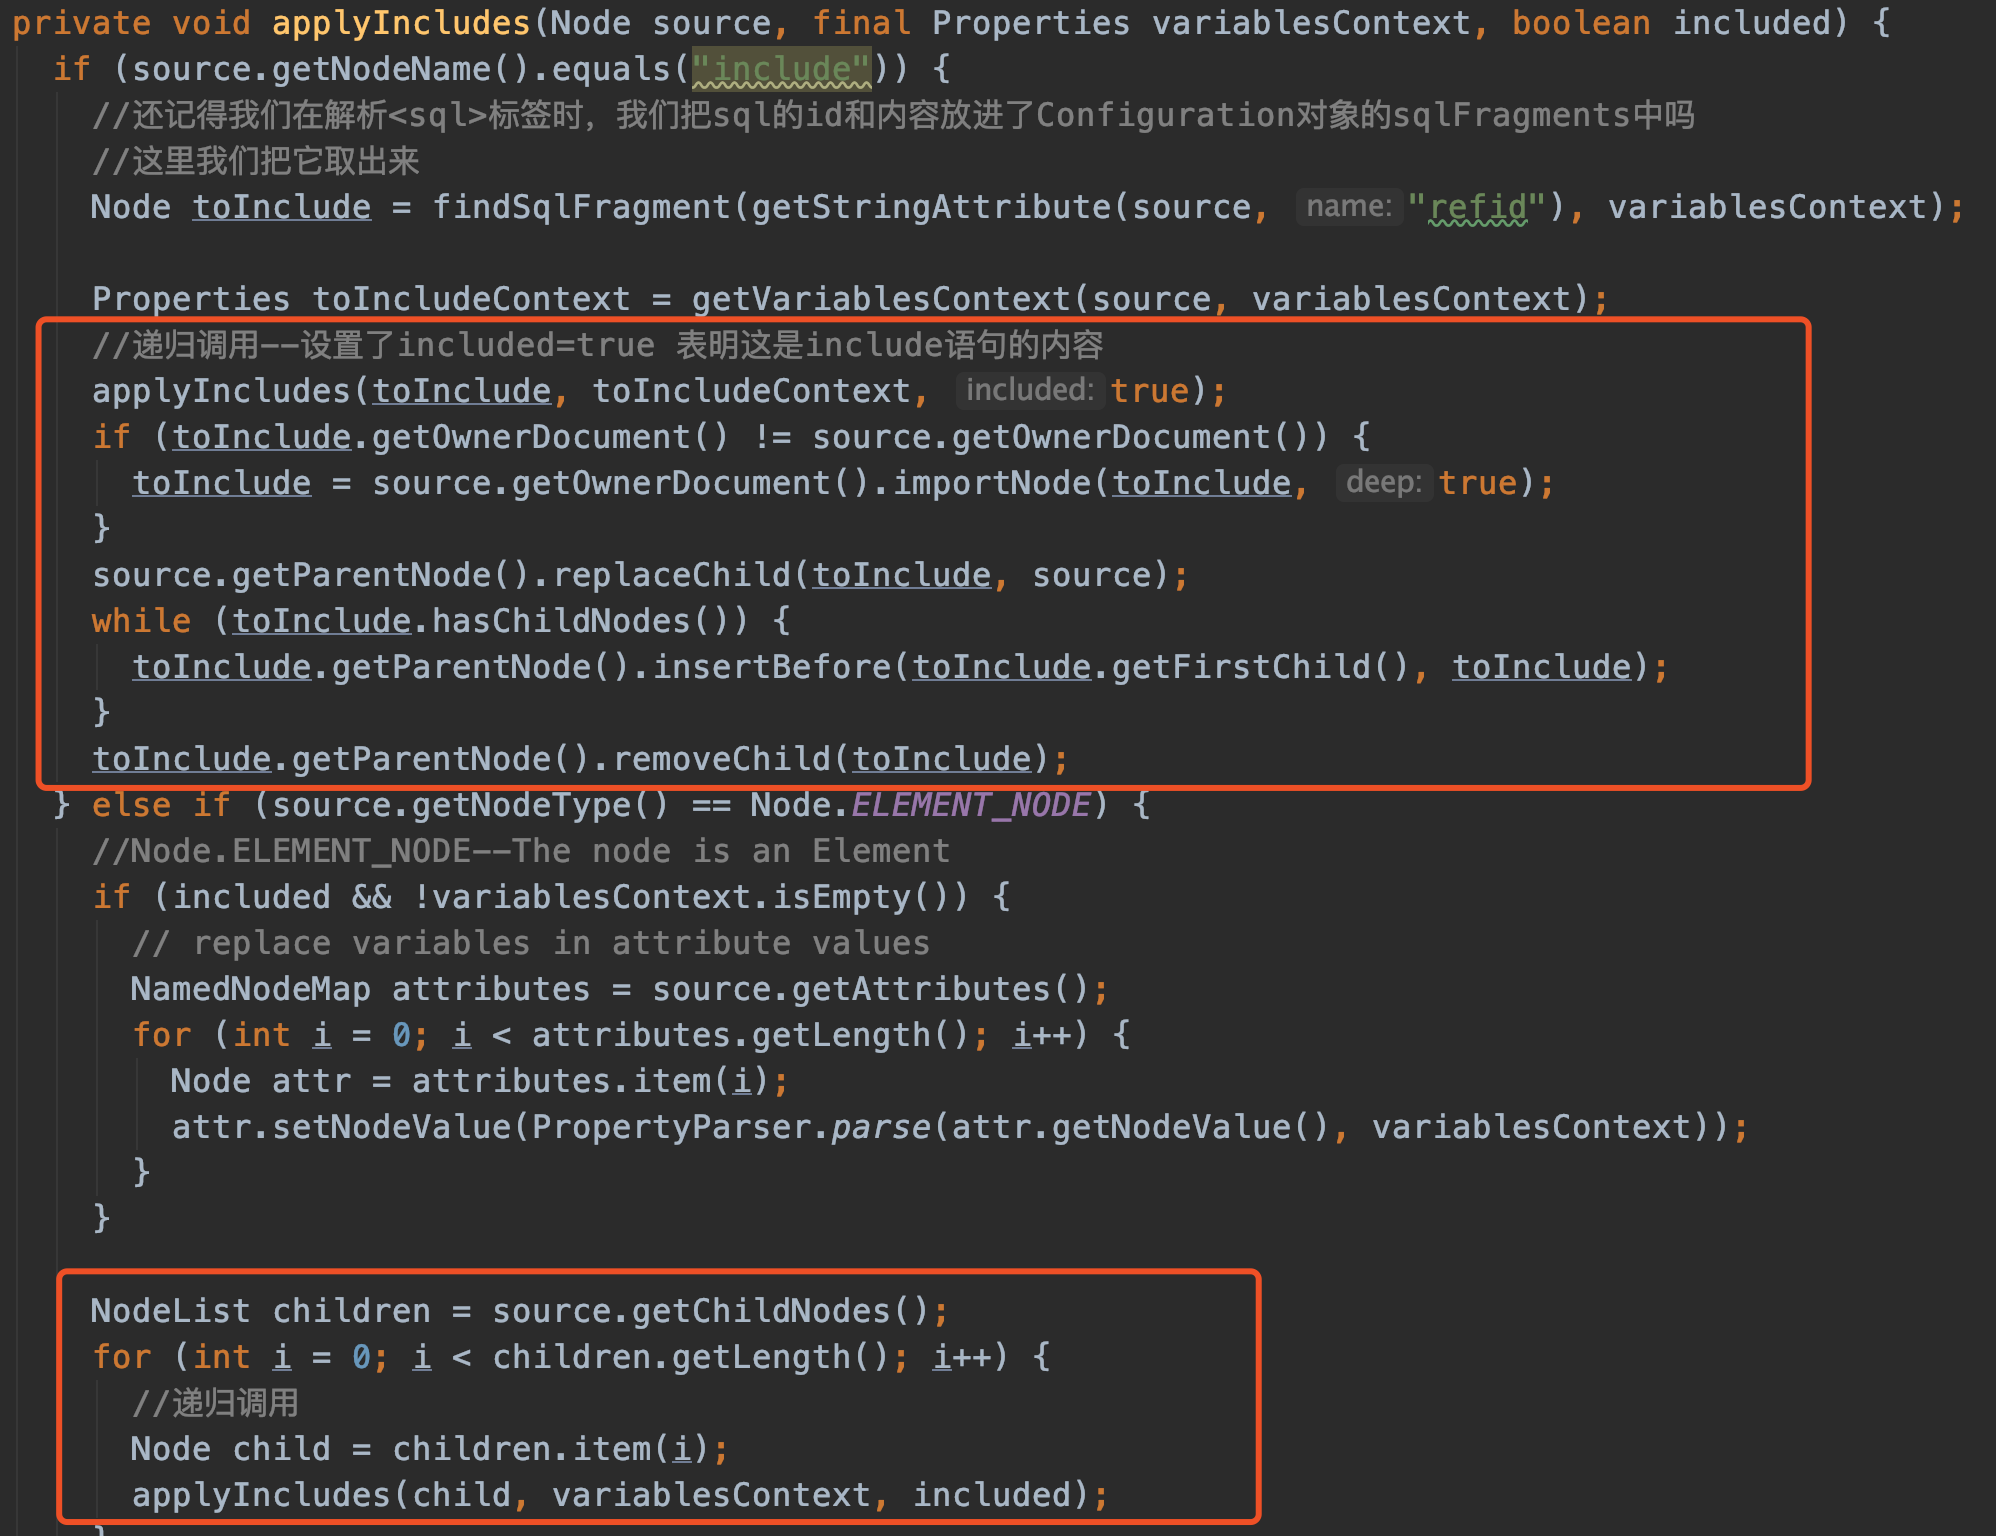
上面替换<include>标签的方法使用到了递归,最核心的是第一个红色框里的代码,找到include对应的<sql>标签,然后替换内容。因为递归的原因,不太好通过文字讲解。(可以自己调试代码感受)
我们继续回到parseStatementNode()
String parameterType = context.getStringAttribute("parameterType");
Class<?> parameterTypeClass = resolveClass(parameterType);

String lang = context.getStringAttribute("lang");
//如果未指定,默认是XMLLanguageDriver
//初始化new Configuration时
//languageRegistry.setDefaultDriverClass(XMLLanguageDriver.class);
LanguageDriver langDriver = getLanguageDriver(lang);
parameterType我们没传,所以parameterType=null
LanguageDriver langDriver 默认是XMLLanguageDriver,看注释
//<selectKey keyProperty="id" resultType="int" order="BEFORE">
//    select CAST(RANDOM()*1000000 as INTEGER) a from SYSIBM.SYSDUMMY1
//  </selectKey>
processSelectKeyNodes(id, parameterTypeClass, langDriver);
用得不多,跳过
// Parse the SQL (pre: <selectKey> and <include> were parsed and removed)
KeyGenerator keyGenerator;
String keyStatementId = id + SelectKeyGenerator.SELECT_KEY_SUFFIX;
keyStatementId = builderAssistant.applyCurrentNamespace(keyStatementId, true);
if (configuration.hasKeyGenerator(keyStatementId)) {
  keyGenerator = configuration.getKeyGenerator(keyStatementId);
} else {
  //(仅适用于 insert 和 update)这会令 MyBatis 使用 JDBC 的 getGeneratedKeys 方法来取出由数据库内部生成的主键
  // (比如:像 MySQL 和 SQL Server 这样的关系型数据库管理系统的自动递增字段),默认值:false。
  keyGenerator = context.getBooleanAttribute("useGeneratedKeys",
      configuration.isUseGeneratedKeys() && SqlCommandType.INSERT.equals(sqlCommandType))
      ? Jdbc3KeyGenerator.INSTANCE : NoKeyGenerator.INSTANCE;
}
过程就不讲了。不重要。
keyStatementId="com.twx.mybatis.mapper.ProjectInfoMapper.getProjectInfo!selectKey"
KeyGenerator keyGenerator = NoKeyGenerator
//如果是动态的,返回DynamicSqlSource
//如果是静态的,返回RawSqlSource
//SqlSource接口有一个方法BoundSql getBoundSql(Object parameterObject);
//能拿到BoundSql
SqlSource sqlSource = langDriver.createSqlSource(configuration, context, parameterTypeClass);
这里面也是非常复杂的。如果你的select语句中有if | foreach | trim| when (...) 或者 ${} 那就是动态的,否则是静态的。
如果是动态的,返回DynamicSqlSource
如果是静态的,返回RawSqlSource
我们来看看XMLLanguageDriver的createSqlSource
@Override
public SqlSource createSqlSource(Configuration configuration, XNode script, Class<?> parameterType) {
  XMLScriptBuilder builder = new XMLScriptBuilder(configuration, script, parameterType);
  return builder.parseScriptNode();
}
内部又借助XMLScriptBuilder的parseScriptNode()实现。
那我们转战战场。
XMLScriptBuilder
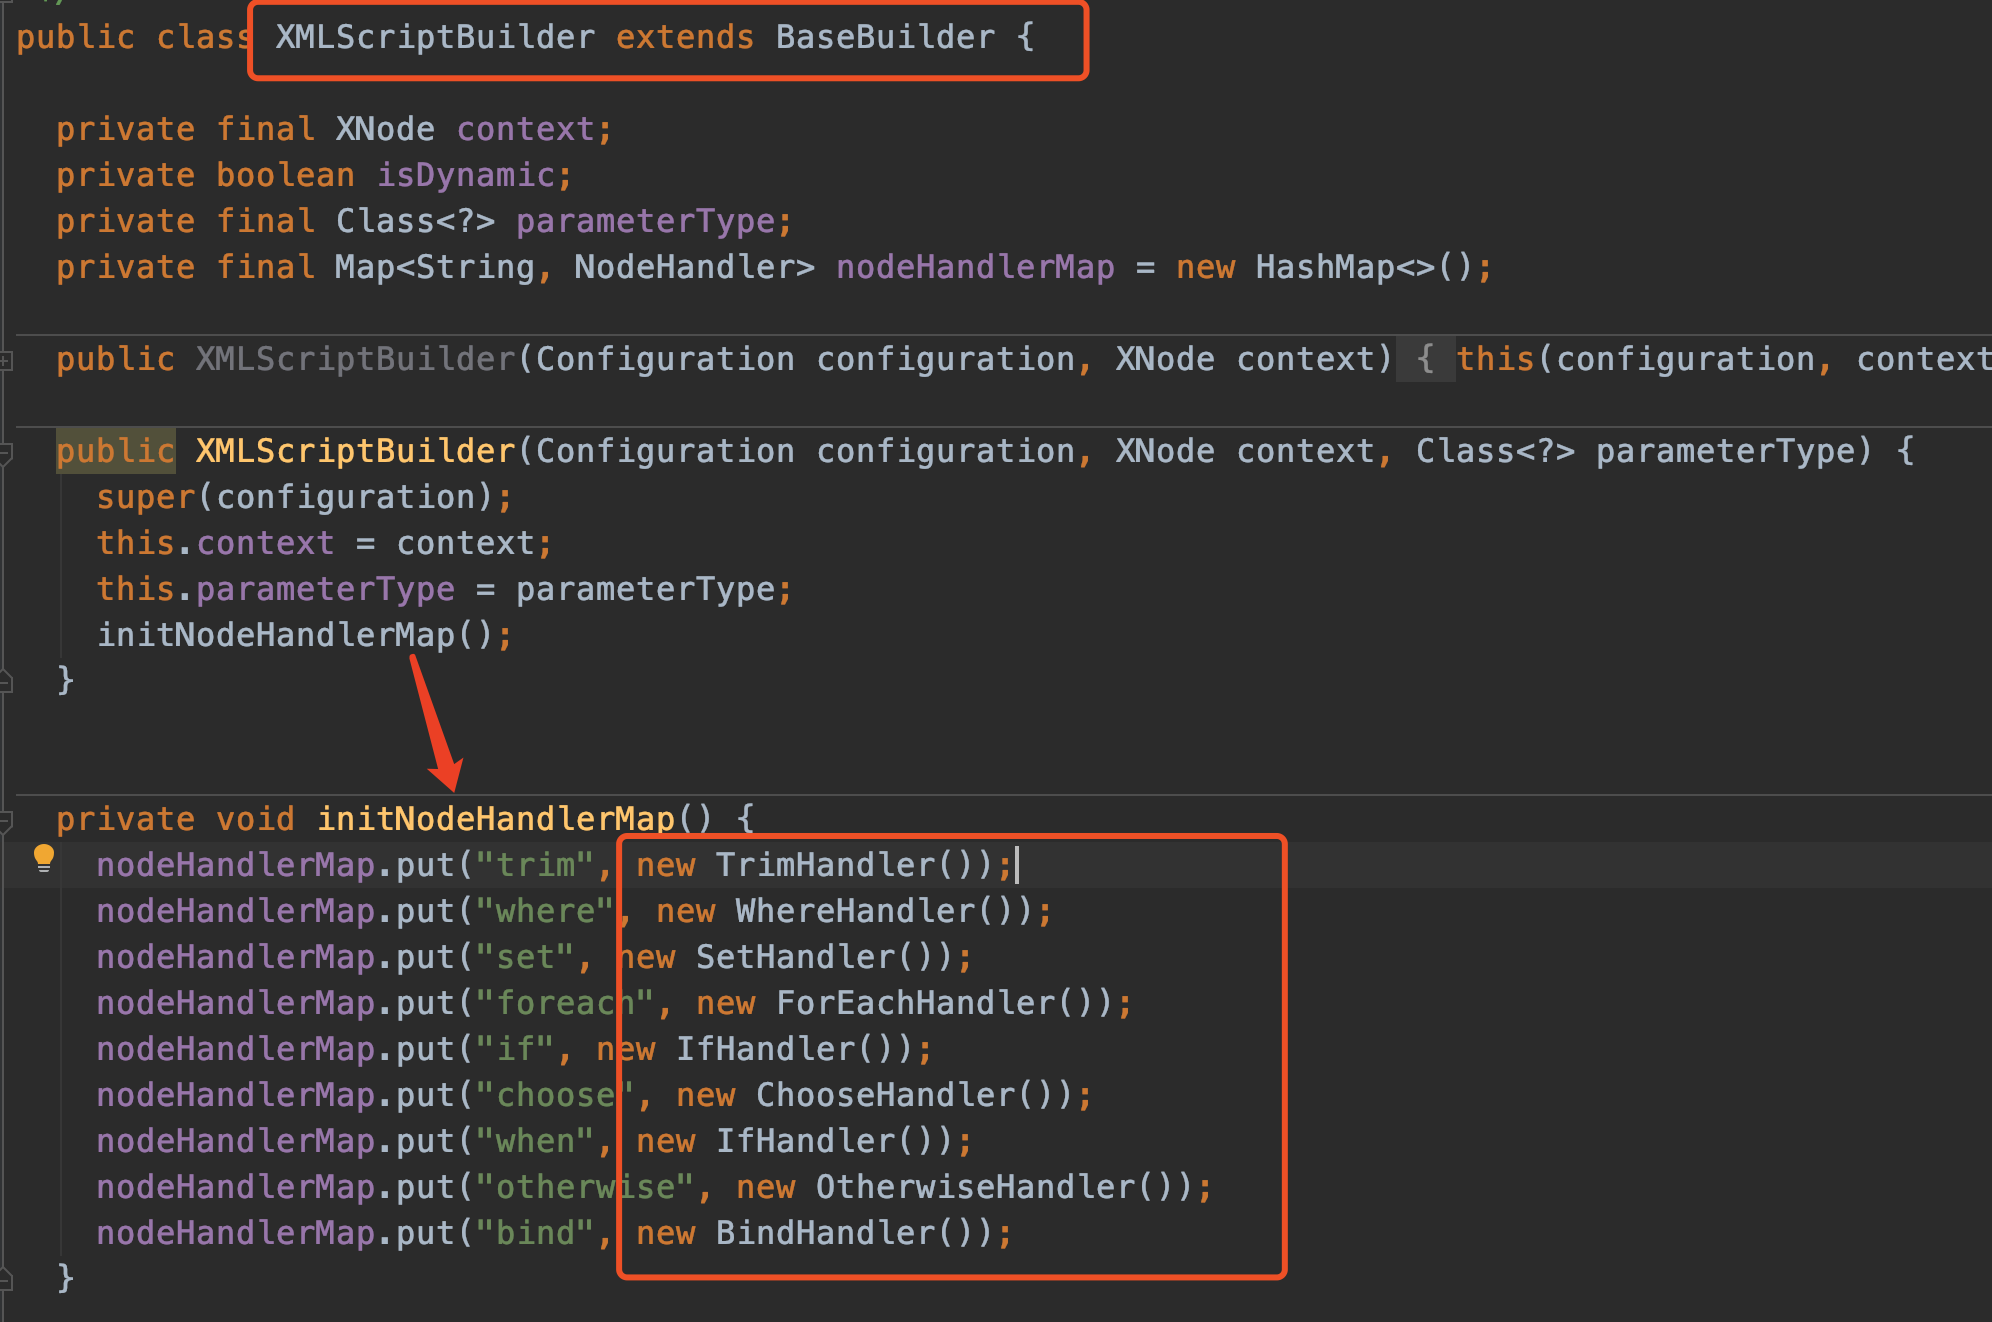
- 同样继承了
BaseBuilder - 构造方法中调用了
initNodeHandlerMap() - initNodeHandlerMap内部有些TrimHandler之类的东西,这些是内部类
我们来看parseScriptNode()方法:
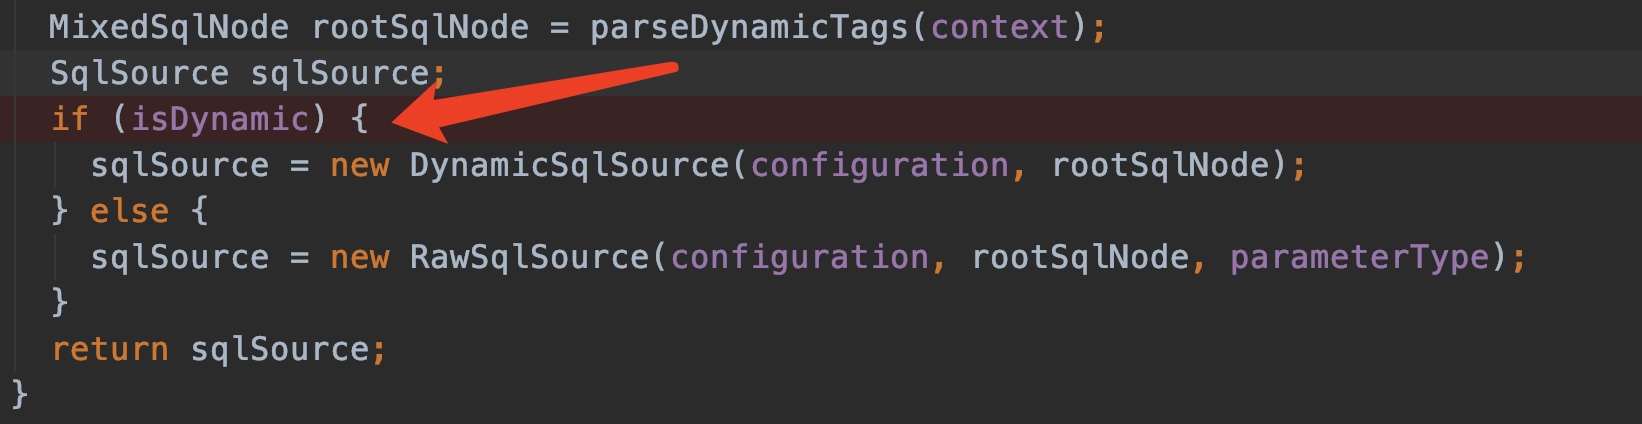
public SqlSource parseScriptNode() {
  //解析<select>标签中的动态变量
  //MixedSqlNode 维护者一个列表List<SqlNode> contents,
  // contents可能包含 StaticTextSqlNode和IfSqlNode或者WhereSqlNode或者其他
  MixedSqlNode rootSqlNode = parseDynamicTags(context);
  SqlSource sqlSource;
  if (isDynamic) {
    sqlSource = new DynamicSqlSource(configuration, rootSqlNode);
  } else {
    sqlSource = new RawSqlSource(configuration, rootSqlNode, parameterType);
  }
  return sqlSource;
}
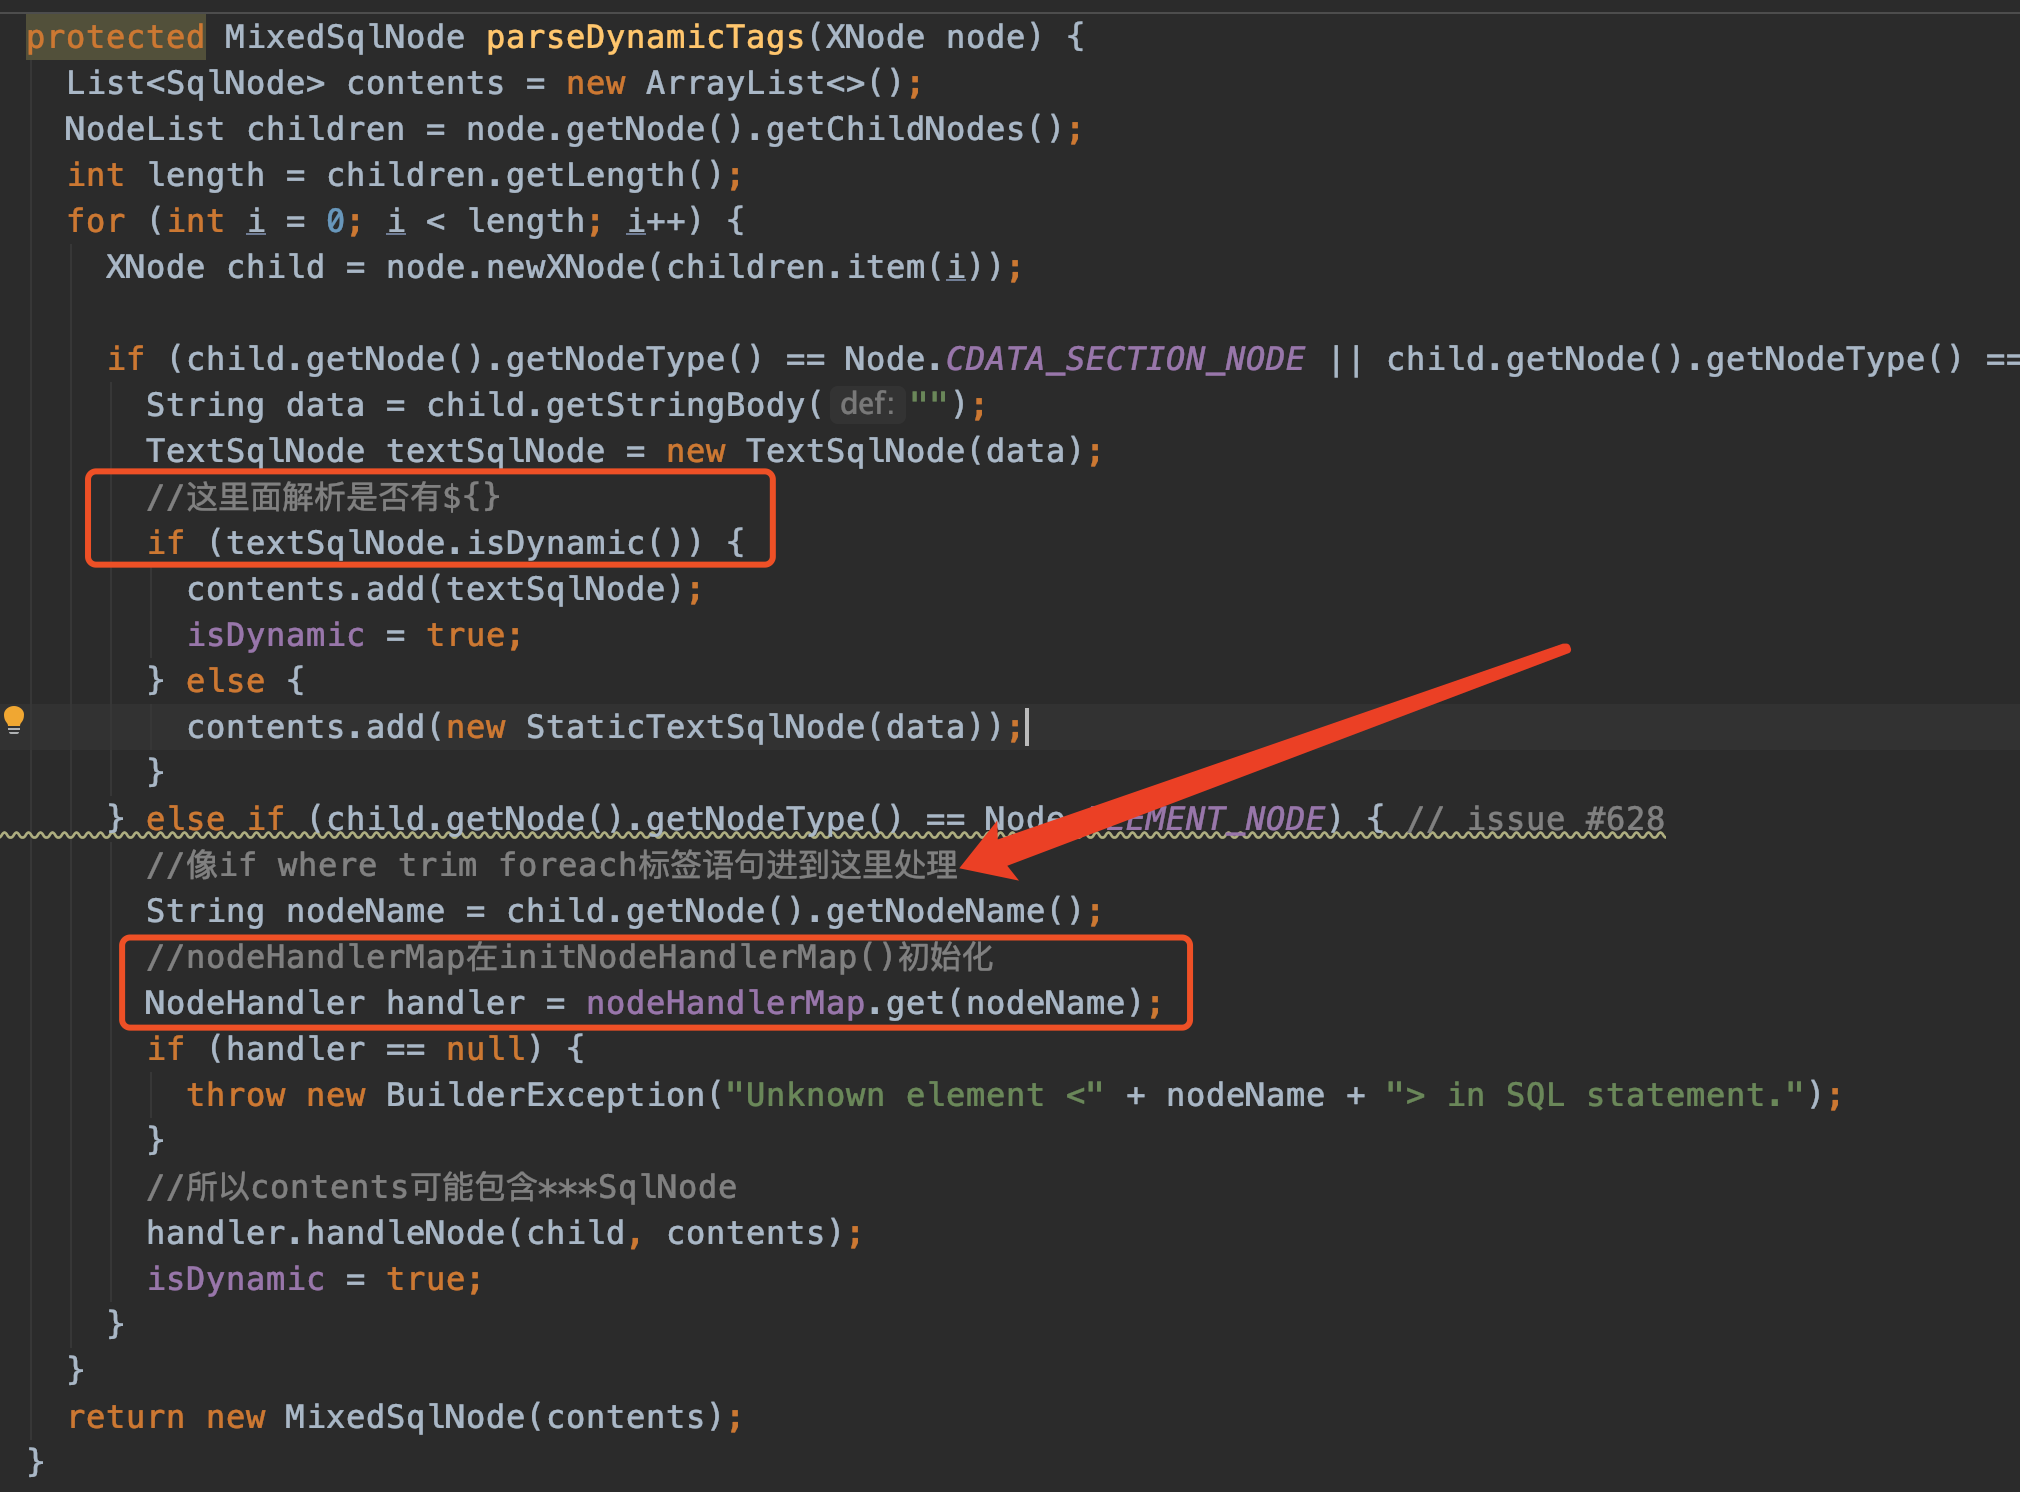
parseDynamicTags(context)的作用是解析<select>标签中的动态变量。
返回的MixedSqlNode维护着一个列表List<SqlNode> contents,contents可能包含 StaticTextSqlNode和IfSqlNode或者WhereSqlNode或者其他。

我们粗略地看看parseDynamicTags(context)就行,内部的textSqlNode.isDynamic()非常复杂的。主要是数据处理。
解析完parseDynamicTags,必然是动态的(我们的示例),所以返回DynamicSqlSource
parseStatementNode()2
那我们继续回到parseStatementNode()的这个地方:
SqlSource sqlSource = langDriver.createSqlSource(configuration, context, parameterTypeClass);
继续往下看。

如果未指定,默认是StatementType.PREPARED
这非常重要,在真正取数据的时候,会根据这个枚举类型new不同的statementHandler对象
详情参照RoutingStatementHandler构造器
switch (ms.getStatementType()) {
  case STATEMENT:
  delegate = new SimpleStatementHandler(executor, ms, parameter, rowBounds, resultHandler, boundSql);
  break;
  case PREPARED:
  delegate = new PreparedStatementHandler(executor, ms, parameter, rowBounds, resultHandler, boundSql);
  break;
  case CALLABLE:
  delegate = new CallableStatementHandler(executor, ms, parameter, rowBounds, resultHandler, boundSql);
  break;
  default:
  throw new ExecutorException("Unknown statement type: " + ms.getStatementType());
  }
在此我们只要知道StatementType statementType=StatementType.PREPARED,用到的时候再细聊。
接下来的这些代码没什么好说的,都是从xml配置取值。
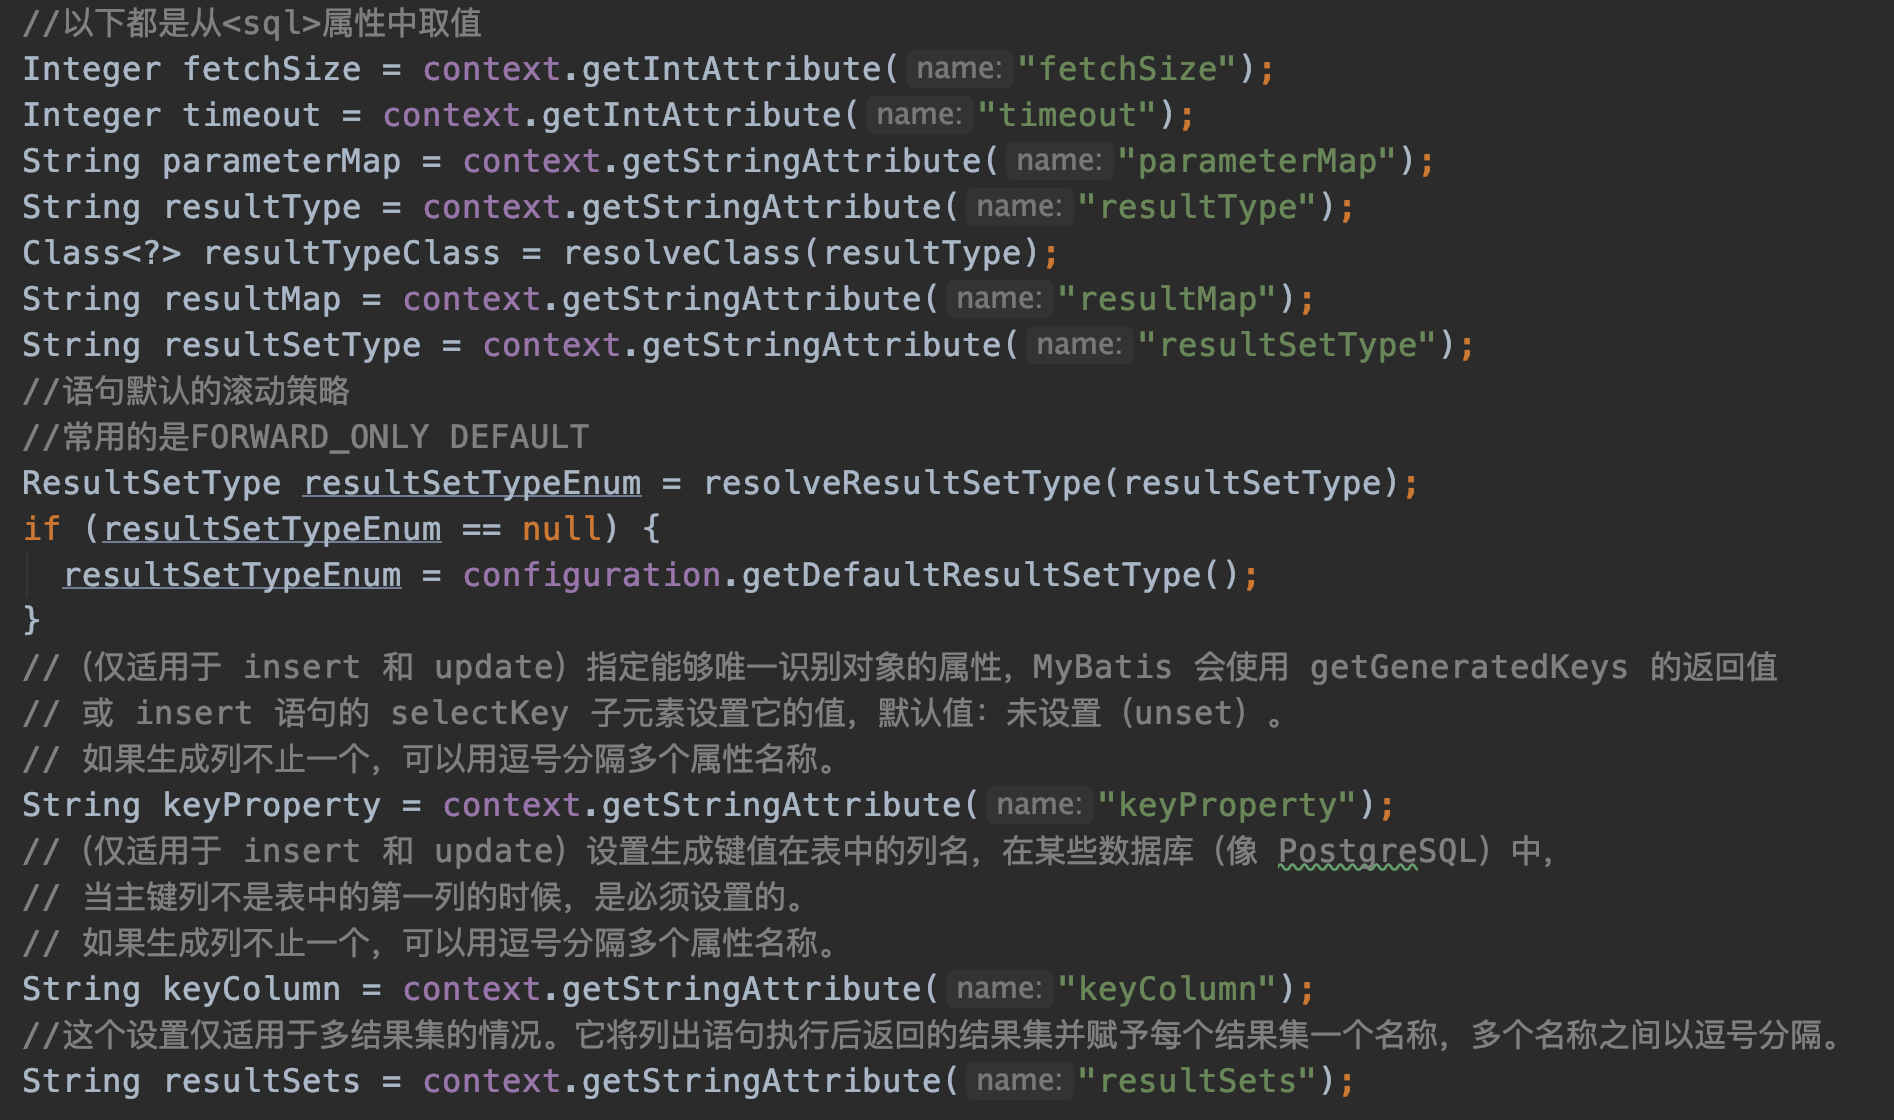
parseStatementNode()方法的最后就是生产MappedStatement对象。
一个MappedStatement对象就代表着你定义的一个<select> 或者<update> 或者<delete>等等
//非常重要: 生成MappedStatement对象,set到config对象的mappedStatements中
builderAssistant.addMappedStatement(id, sqlSource, statementType, sqlCommandType,
    fetchSize, timeout, parameterMap, parameterTypeClass, resultMap, resultTypeClass,
    resultSetTypeEnum, flushCache, useCache, resultOrdered,
    keyGenerator, keyProperty, keyColumn, databaseId, langDriver, resultSets);
我们结合idea看一下具体传进来的是些什么参数吧:
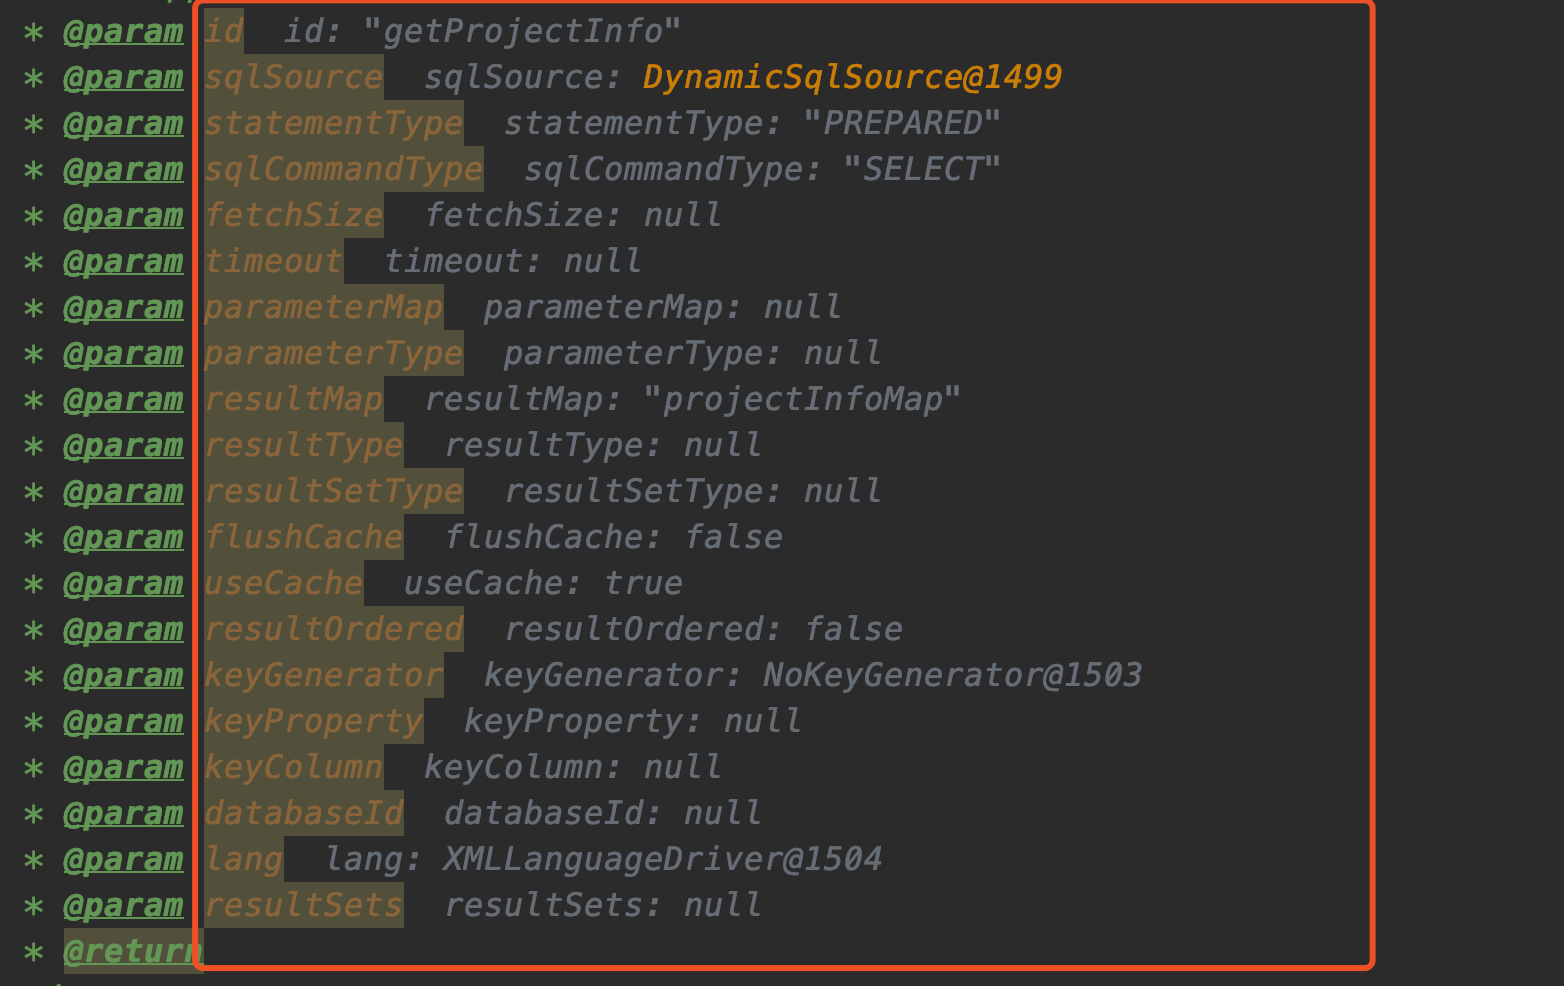
结合着上图的参数,我们来看看builderAssistant.addMappedStatement内部代码
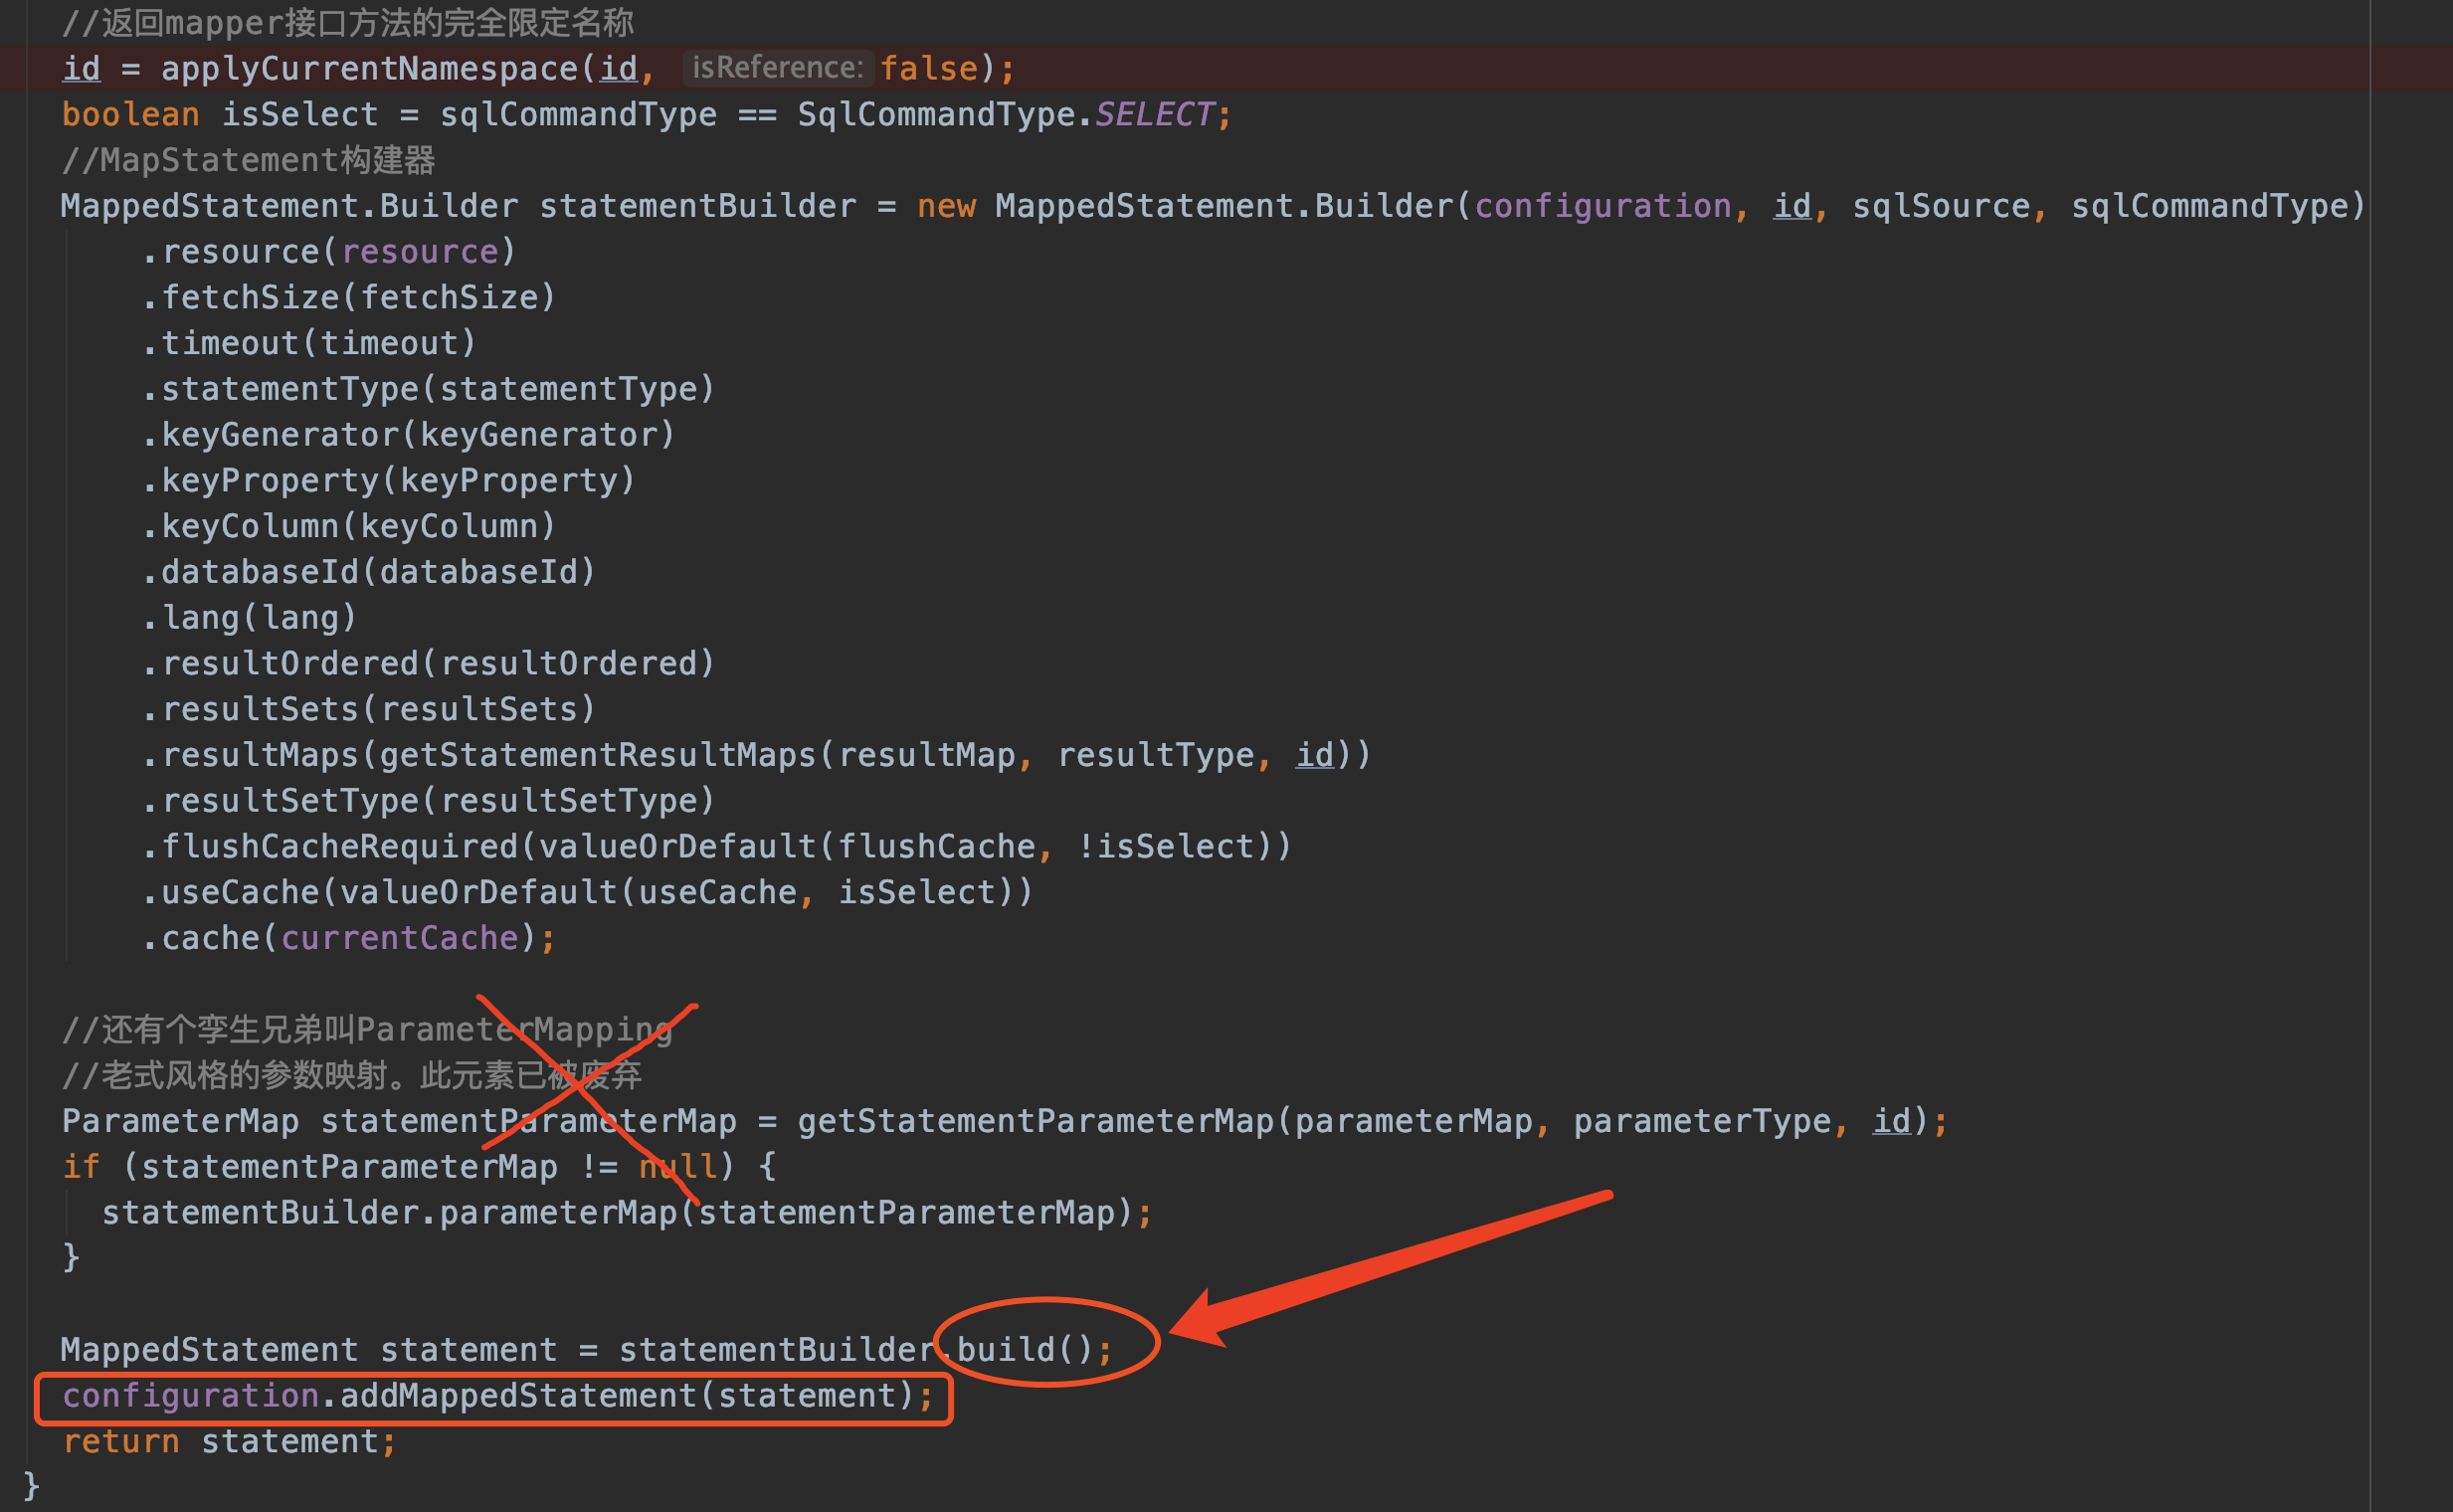
无它--建造者模式生成MappedStatement对象
注意,最后把生成的statement添加到了Configuration对象中去了,即:
/**
 * 很重要:用于存储select insert 等语句
 */
protected final Map<String, MappedStatement> mappedStatements = new StrictMap<MappedStatement>("Mapped Statements collection")
    .conflictMessageProducer((savedValue, targetValue) ->
        ". please check " + savedValue.getResource() + " and " + targetValue.getResource());
添加到了Configuration对象的mappedStatements容器中。key是

