Docker容器与守护进程运维 --项目四
一、Docker容器配置进阶
1、容器的自动重启
Docker提供重启策略控制容器退出时或Docker重启时是否自动启动该容器。
容器默认不支持自动重启,要使用 --restart 选项指定重启策略。
作用:容器自动重启;重启策略能够确保关联的多个容器按照正确的顺序启动。
容器重启选项值:
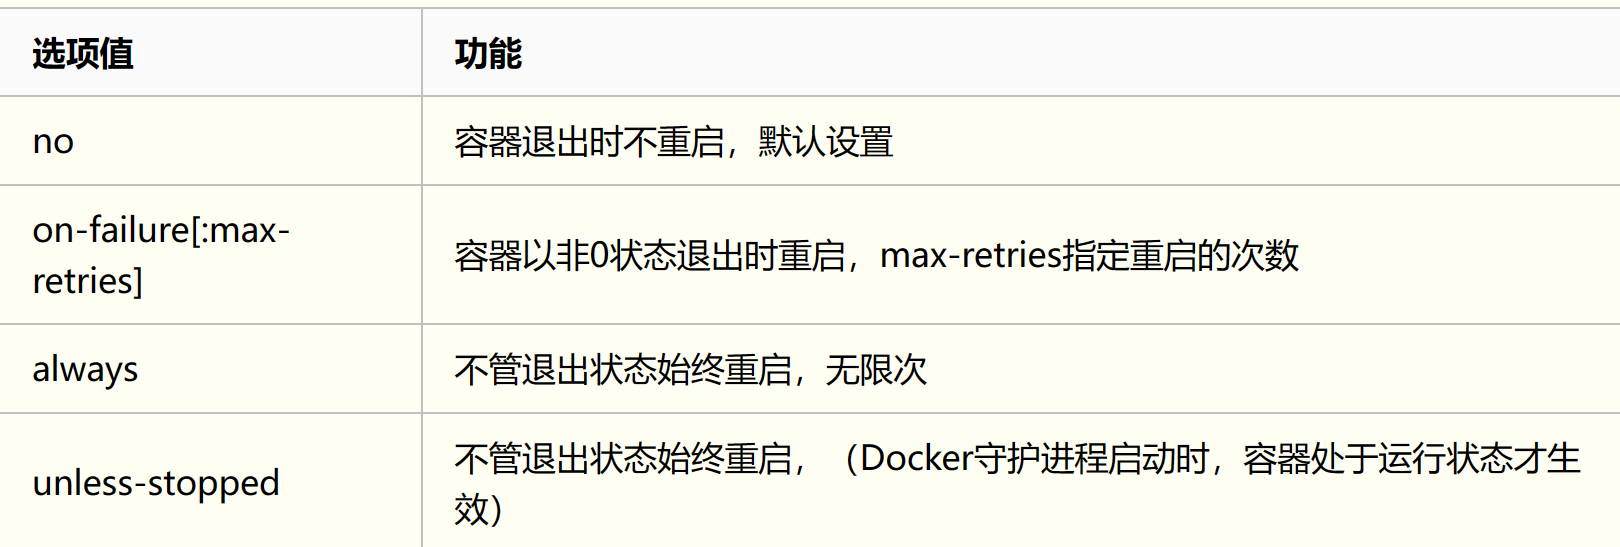
重启策略时的注意事项:
- 重启策略只在容器成功启动后才会生效。(容器运行后生效)
- 如果手动停止一个容器,那么它的重启策略会被忽略,直到Docker守护进程重启或容器手动重启。(手动停止,暂停重启策略)
- Docker Swarm服务的重启策略采用不同的配置方式。(集群采用不同的重启策略)
- 重启策略不同于dockerd命令的
--live-restore选项,这个选项可使Docker升级中,即使网络和用户输入都终端,容器依然保持运行。 - Docker建议使用重启策略,并避免使用进程管理器启动容器:(1)同时使用两者会产生冲突;(2)进程管理器依赖于操作系统,Docker无法监控。
示例:
查看代码
 # 案例1:运行一个始终重启的redis容器,容器退出时Docker重启它
[root@localhost ~]# docker run -d --name testrs --restart=always redis
cdf90c50d38f712020f2bd75e10e20c5ba6aa980747176f7bff4b45d4844ab8a
# 停止Docker后,容器立马重启
[root@localhost ~]# systemctl stop docker
[root@localhost ~]# docker ps
CONTAINER ID   IMAGE     COMMAND                  CREATED         STATUS                  PORTS      NAMES
cdf90c50d38f   redis     "docker-entrypoint.s…"   2 minutes ago   Up Less than a second   6379/tcp   testrs

# 案例2:设置容器最大重启次数
# 设置非0状态最大重启十次
[root@localhost ~]# docker run -dti --restart=on-failure:10 redis bash
fe8f308023cfde7a738ba5a22098dbe8d5f35697db85094a2dc7778a7293f1d5
# 另一个终端执行
[root@localhost ~]# systemctl stop docker
[root@localhost ~]# docker ps -a
CONTAINER ID   IMAGE     COMMAND                  CREATED          STATUS                      PORTS      NAMES
fe8f308023cf   redis     "docker-entrypoint.s…"   20 seconds ago   Up Less than a second       6379/tcp   serene_pascal

# 案例3:已经运行或创建的容器,用 docker update 更改重启策略
[root@localhost ~]# docker update --restart=on-failure:3 fe8f308
fe8f308

# 案例4:手动停止容器,重启策略会忽略
[root@localhost /]# docker run -d --name testrs --restart=always redis
[root@localhost /]# docker stop d3debe3f40e3
[root@localhost /]# docker ps -a
CONTAINER ID   IMAGE     COMMAND                  CREATED             STATUS                     PORTS     NAMES
d3debe3f40e3   redis     "docker-entrypoint.s…"   5 minutes ago       Exited (0) 2 seconds ago             testrs     《————不再重启,策略失效
# 守护进程重启或容器手动重启后,策略恢复
[root@localhost /]# systemctl restart docker
[root@localhost /]# docker ps -a
CONTAINER ID   IMAGE     COMMAND                  CREATED             STATUS                     PORTS      NAMES
d3debe3f40e3   redis     "docker-entrypoint.s…"   6 minutes ago       Up 1 second                6379/tcp   testrs
2、在Docker停止时保持容器继续运行
默认情况下,Docker守护进程终止时,正在运行的容器会关闭。
实时恢复(Live Restore):管理员配置守护进程,让容器在守护进程不可用时依然运行。
实时恢复的作用:减少因Docker守护进程崩溃、计划停机或升级导致的容器停机时间。
(1)启用实时恢复功能
第一种方式是在Docker守护进程配置文件中设置:
sighup(挂断)信号在控制终端或者控制进程死亡时向关联会话中的进程发出,默认进程对SIGHUP信号的处理时终止程序,所以我们在shell下建立的程序,在登录退出连接断开之后,会一并退出。
nohup,故名思议就是忽略SIGHUP信号,一般搭配& 一起使用,&表示将此程序提交为后台作业或者说后台进程组。
示例:
查看代码
 [root@localhost ~]# vi /etc/docker/daemon.json
{
  "live-restore":true       //开启实时功能
}

# 配置生效方法一:
# 修改配置后重启守护进程生效
[root@localhost ~]# systemctl daemon-reload
[root@localhost ~]# systemctl restart docker

# 配置生效方法二:
# 重新加载Docker守护进程,避免容器停止
[root@localhost ~]# systemctl reload docker

# 案例1:
# 1.启动两个容器
[root@localhost ~]# docker ps
CONTAINER ID   IMAGE              COMMAND                  CREATED       STATUS          PORTS     NAMES
1dd65fa55b80   top                "/bin/sh -c 'exec to…"   5 weeks ago   Up 38 seconds             test_exec_entry
52a7de98ccc7   test_shell_entry   "/bin/sh -c 'top -b'"    5 weeks ago   Up 52 seconds             test:
# 2.停止docker守护进程
[root@localhost ~]# systemctl stop docker
Warning: Stopping docker.service, but it can still be activated by:
  docker.socket
[root@localhost ~]# systemctl status docker
● docker.service - Docker Application Container Engine
   Loaded: loaded (/usr/lib/systemd/system/docker.service; enabled; vendor preset: disabled)
   Active: inactive (dead) since Wed 2022-05-11 00:23:16 CST; 8s ago
     Docs: https://docs.docker.com
  Process: 1697 ExecReload=/bin/kill -s HUP $MAINPID (code=exited, status=0/SUCCESS)
  Process: 1853 ExecStart=/usr/bin/dockerd -H fd:// --containerd=/run/containerd/containerd.sock (code=exited, status=0/SUCCESS)
 Main PID: 1853 (code=exited, status=0/SUCCESS)
# 3.查看容器是否依然运行
[root@localhost ~]# docker ps
CONTAINER ID   IMAGE              COMMAND                  CREATED       STATUS              PORTS     NAMES
1dd65fa55b80   top                "/bin/sh -c 'exec to…"   5 weeks ago   Up About a minute             test_exec_entry
52a7de98ccc7   test_shell_entry   "/bin/sh -c 'top -b'"    5 weeks ago   Up 2 minutes                  test


# 案例2:apache容器测试实时恢复
# 1.修改守护进程配置文件,启动实时恢复
[root@localhost ~]# vi /etc/docker/daemon.json
{
  "registry-mirrors": ["https://nxwgbmaq.mirror.aliyuncs.com"],
  "live-restore":true
}
# 2.重启守护进程
[root@localhost ~]# systemctl restart docker
# 3.运行一个apache容器
[root@localhost ~]# docker pull httpd
[root@localhost ~]# docker run --rm -d -p 8080:80 httpd
27c266f2fbc9bb5dd67e442a99b82db440d135506b9d912d624331baae675ca9
# 4.重新加载Docker守护进程
[root@localhost ~]# systemctl reload docker
# 5.查看当前容器
[root@localhost ~]# docker ps
CONTAINER ID   IMAGE     COMMAND              CREATED              STATUS              PORTS                                   NAMES
27c266f2fbc9   httpd     "httpd-foreground"   About a minute ago   Up About a minute   0.0.0.0:8080->80/tcp, :::8080->80/tcp   inspiring_robinson    《————容器依然运行
# 6.kill结束进程
[root@localhost ~]# ps -e | grep dockerd
  5052 ?        00:00:01 dockerd              《————查看获取进程号
[root@localhost ~]# kill -SIGHUP 5052         《————向进程发送sighup信号
[root@localhost ~]# docker ps
CONTAINER ID   IMAGE     COMMAND              CREATED         STATUS         PORTS                                   NAMES
27c266f2fbc9   httpd     "httpd-foreground"   2 minutes ago   Up 2 minutes   0.0.0.0:8080->80/tcp, :::8080->80/tcp   inspiring_robinson      《————容器依然运行
# 7.访问apache验证服务是否正常
[root@localhost ~]# curl 127.0.0.1:8080
<html><body><h1>It works!</h1></body></html>另一种恢复方式:在手动启动dockerd进程时指定--live-restore选项。
不建议使用这种方式,因为不会设置systemd或其他进程管理器的环境,会导致意外发生。
(2)升级期间的实时恢复
实时恢复功能支持Docker守护进程在升级期间保持容器的运行。
存在的问题:
- 只支持Docker 补丁版本升级,不支持主要版本和次要版本的升级。
- 升级过程中跳过版本,守护进程可能无法恢复其与容器的连接。
(3)重启时的实时恢复
限定条件:只有Docker守护进程选项未发生变化,实时恢复才能恢复容器。
(4)实时恢复功能对运行容器的影响
守护进程停止,正在运行的容器可能会填满守护进程通常读取的FIFO日志,阻止容器记录更多日志数据。
缓冲区填满,必须重新启动Docker守护进程来刷新。
可以更改/proc/sys/fs/pipe-max=size来修改内核的缓冲区大小。
(5)dockerd启动失败排错
# 执行该命令显示最后200行linux系统日志信息,并滚动刷新
[root@localhost home]# tail -200f /var/log/messages

# 再开一个session,执行命令
[root@localhost /]# systemctl daemon-reload
[root@localhost /]# systemctl restart docker

# 可以看到日志刷新的信息,即可根据信息提示完成修复
Apr 23 19:32:45 localhost dockerd: unable to configure the Docker daemon with file /etc/docker/daemon.json: invalid character '}' looking for beginning of object key string
3、一个容器中运行多个服务
注意:一个容器可以有多个进程,但为了高效利用Docker,不要让一个容器负责整个应用程序的多个方面,而要通过用户定义网络和共享卷连接多个容器来实现应用程序的多个方面。
容器的主进程负责管理它启动的所有进程。
解决子进程回收:--init选项可以将一个精简的初始化进程作为主进程插入容器,并在容器退出时回收所有的进程。
解决多进程启停最好方式:设置一个上层的进程统一处理这些进程的生命周期(sysinit\upstart\systemd)
在一个容器运行多个服务的方式:
- 将所有命令放入包装器脚本中,并提供测试和调试信息,使用CMD指令运行包装器脚本。
- 如果有一个主进程需要首先启动并保持运行,但是临时需要运行一些其他进程(可能与主进程交互),可以使用bash脚本的作业控制实现。
- 在容器中使用supervisord等进程管理器。
Supervisor 是 Linux/UNIX系统下的一个进程管理工具,守护进程名为supervisord,可以方便地监听、启动、停止、重启一个或多个进程。
该工具管理进程时,如遇到进程被意外杀死,守护进程监听到后,会自动重启。
(1)php:7.3-fpm案例
查看代码
 # 1.创建项目目录
[root@localhost ~]# mkdir php-nginx-supervisord && cd php-nginx-supervisord/

# 2.创建nginx子目录和supervisor子目录,并准备配置文件
[root@localhost php-nginx-supervisord]# mkdir nginx
[root@localhost php-nginx-supervisord]# mkdir supervisor
[root@localhost php-nginx-supervisord]# touch nginx/nginx.conf
[root@localhost php-nginx-supervisord]# mkdir nginx/conf.g
[root@localhost php-nginx-supervisord]# touch nginx/conf.g/site.conf
[root@localhost php-nginx-supervisord]# mkdir supervisor/conf.d/
[root@localhost php-nginx-supervisord]# touch supervisor/conf.d/supervisord.conf
# 查看目录结构
[root@localhost php-nginx-supervisord]# tree
.
├── nginx
│   ├── conf.g
│   │   └── site.conf
│   └── nginx.conf
└── supervisor
    └── conf.d
        └── supervisord.conf
4 directories, 3 files

# 3.编写supervisord.conf文件内容
[root@localhost php-nginx-supervisord]# vi supervisor/conf.d/supervisord.conf
[supervisord]
gfile=/tmp/supervisord.log ; # 日志
logfile_maxbytes=50MB ; # 最大50M日志
logfile_backups=10 ; # 轮循日志备份10个
loglevel=info ; # 日志等级记录info的
pidfile=/tmp/supervisord.pid ;pid
nodaemon=true ; # 在前台启动
minfds=102400 ; # 文件描述符限制
minprocs=2000 ; # 进程数

[rpcinterface:supervisor]
supervisor.rpcinterface_factory = supervisor.rpcinterface:make_main_rpcinterface

[supervisorctl]
serverurl=unix:///tmp/supervisor.sock ; use a unix:// URL for a unix socket

[program:nginx]
command=/usr/sbin/nginx -g 'daemon off';  # 前台启动nginx
autostart=true ; # 随着supervisor自动启动
startsecs=10 ; # 启动10s后算正常启动
autorestart=true ; # 程序退出后自动重启
startretries=3 ; # 启动失败自动重试次数
stdout_logfile_maxbytes=20MB ;stdout   # 日志文件大小最大20Mb
stdout_logfile=/var/log/nginx/out.log

[program:php7-fpm]
command=/usr/local/sbin/php-fpm
autostart=true ; # 随着supervisor自动启动
startsecs=10 ; # 启动10s后算正常启动
autorestart=true ; #程序退出后自动重启
startretries=3 ; # 启动失败自动重试次数
stdout_logfile_maxbytes=20MB ;stdout 日志文件大小最大20Mb

# 4.尝试登录这个php容器,判断系统版本
[root@localhost php-nginx-supervisord]# docker run -ti php:7.3-fpm /bin/bash
# 进入容器检查信息
root@16fddccbb4ce:/var/www/html# cat /etc/issue
Debian GNU/Linux 11 \n \l
root@16fddccbb4ce:/var/www/html# cat /etc/os-release
PRETTY_NAME="Debian GNU/Linux 11 (bullseye)"
NAME="Debian GNU/Linux"
VERSION_ID="11"
VERSION="11 (bullseye)"
VERSION_CODENAME=bullseye
ID=debian
HOME_URL="https://www.debian.org/"
SUPPORT_URL="https://www.debian.org/support"
BUG_REPORT_URL="https://bugs.debian.org/"
# 由此得知为debian 11版本的系统

# 5.准备debian11换源文件sources.list
[root@localhost php-nginx-supervisord]# touch sources.list
[root@localhost php-nginx-supervisord]# vi sources.list
deb http://mirrors.aliyun.com/debian/ bullseye main non-free contrib
deb-src http://mirrors.aliyun.com/debian/ bullseye main non-free contrib
deb http://mirrors.aliyun.com/debian-security/ bullseye-security main
deb-src http://mirrors.aliyun.com/debian-security/ bullseye-security main
deb http://mirrors.aliyun.com/debian/ bullseye-updates main non-free contrib
deb-src http://mirrors.aliyun.com/debian/ bullseye-updates main non-free contrib
deb http://mirrors.aliyun.com/debian/ bullseye-backports main non-free contrib
deb-src http://mirrors.aliyun.com/debian/ bullseye-backports main non-free contrib

# 6.准备nginx.conf文件
[root@localhost php-nginx-supervisord]# vi nginx/nginx.conf
#一个主进程和多个工作进程
worker_processes  1;
events {
    #每个工作进程最大的并发数(一个工作进程可以有多少个线程)
    worker_connections  1024;
}
#http服务器设置
http {
    #设定mime类型,类型由mime.type文件定义
    include       mime.types;
    #长连接超时时间
    keepalive_timeout  65;
    #配置虚拟主机
    server {
        #虚拟主机使用的端口
        listen       80;
        #虚拟主机域名
        server_name  localhost;
        #定义web根路径
        location / {
            #根目录路径
            root   html;
            #索引页
            index  index.html index.htm;
        }
    }
}

# 6.编写Dockerfile文件内容
[root@localhost php-nginx-supervisord]# vi Dockerfile
FROM php:7.3-fpm
COPY sources.list /etc/apt/
RUN apt-get clean && apt-get update && apt-get -y install nginx supervisor procps net-tools && mkdir -p /var/log/supervisor
COPY nginx /etc/nginx
COPY supervisor /etc/supervisor
WORKDIR /var/www
RUN usermod -u 1000 www-data
EXPOSE 80
CMD ["/usr/bin/supervisord"]

# 7.基于Dockerfile构建镜像
[root@localhost php-nginx-supervisord]# docker build -t php-nginx-supervisord .
[+] Building 134.0s (14/14) FINISHED
 => [internal] load build definition from Dockerfile                          0.0s
 => => transferring dockerfile: 350B                                          0.0s
 => [internal] load .dockerignore                                             0.0s
 => => transferring context: 2B                                               0.0s
 => [internal] load metadata for docker.io/library/php:7.3-fpm                0.0s
 => CACHED [1/9] FROM docker.io/library/php:7.3-fpm                           0.0s
 => [internal] load build context                                             0.0s
 => => transferring context: 902B                                             0.0s
 => [2/9] COPY sources.list /etc/apt/                                         0.0s
 => [3/9] RUN apt-get clean && apt-get update                                34.9s
 => [4/9] RUN apt-get -y install nginx supervisor procps net-tools           85.5s
 => [5/9] RUN mkdir -p /var/log/supervisor                                    0.3s
 => [6/9] COPY nginx /etc/nginx                                               0.0s
 => [7/9] COPY supervisor /etc/supervisor                                     0.0s
 => [8/9] WORKDIR /var/www                                                    0.0s
 => [9/9] RUN usermod -u 1000 www-data                                        0.3s
 => exporting to image                                                       12.9s
 => => exporting layers                                                      12.9s
 => => writing image sha256:801d960db6395bde049fe7f3ffcec0de1a8e3b918a219b27  0.0s
 => => naming to docker.io/library/php-nginx-supervisord                      0.0s

# 8.基于该镜像启动容器
[root@localhost php-nginx-supervisord]# docker images
REPOSITORY              TAG       IMAGE ID       CREATED              SIZE
php-nginx-supervisord   latest    62a3c736e277   About a minute ago   516MB
[root@localhost php-nginx-supervisord]# docker run -tid -p 8080:80 php-nginx-supervisord
44e42a4ae258ebe1f37a0b940afda5462f79260686477c89270cd8103ac61adf

# 9.测试web服务
访问:http://192.168.200.103:8080/
登录容器查看进程:
[root@localhost php-nginx-supervisord]# docker exec -ti 5b6d610e032e /bin/bash
root@5b6d610e032e:/var/www# ps auxf
USER        PID %CPU %MEM    VSZ   RSS TTY      STAT START   TIME COMMAND
root         41  0.0  0.1   4100  3456 pts/1    Ss   08:57   0:00 /bin/bash
root         51  0.0  0.1   6700  2816 pts/1    R+   08:58   0:00  \_ ps auxf
root          1  0.3  1.2  29492 24156 pts/0    Ss+  08:57   0:00 /usr/bin/python3 /usr/bin/supervi
root          7  0.4  1.1  73228 22332 pts/0    S    08:57   0:00 php-fpm: master process (/usr/loc
www-data     15  0.0  0.4  73228  8784 pts/0    S    08:57   0:00  \_ php-fpm: pool www
www-data     16  0.0  0.4  73228  8784 pts/0    S    08:57   0:00  \_ php-fpm: pool www
root         49  0.0  0.0   8532  1424 ?        Ss   08:58   0:00 nginx: master process /usr/sbin/n
nobody       50  0.0  0.1   8988  2576 ?        S    08:58   0:00  \_ nginx: worker process
(2)centos镜像案例
# 案例:将supervisord和配置和要管理的应用程序(nginx和tomcat)打包到一个镜像中,一个容器运行多个服务
# 1.创建dockerfile目录
[root@hecs-hqs-01 ~]# mkdir web-supervisord
[root@hecs-hqs-01 web-supervisord]# cd web-supervisord/

# 2.编写Dockerfile
[root@hecs-hqs-01 web-supervisord]#  vi Dockerfile            《————dockerfile目录
FROM centos:7
MAINTAINER hqs@163.com
COPY CentOS-Base.repo /etc/yum.repos.d/CentOS-Base.repo
COPY nginx_install.sh /tmp/nginx_install.sh
RUN sh /tmp/nginx_install.sh; \rm -rf /usr/local/src/*
RUN sed -i -e '/worker_processes/a daemon off;' /usr/local/nginx/conf/nginx.conf;
COPY jdk-8u162-linux-x64.tar.gz /usr/local/src/jdk-8u162-linux-x64.tar.gz
COPY tomcat_install.sh /tmp/tomcat_install.sh
RUN sh /tmp/tomcat_install.sh; \rm -rf /usr/local/src/*
COPY supervisor_install.sh /tmp/supervisor_install.sh
COPY supervisord.conf /etc/supervisord.conf
COPY start_tomcat.sh /usr/local/tomcat/bin/mystart.sh
RUN sh /tmp/supervisor_install.sh; \rm -rf /tmp/*.sh
CMD ["supervisord", "-c", "/etc/supervisord.conf"]

# 3.默认源下载慢且总有问题,更换为163的yum源
[root@hecs-hqs-01 web-supervisord]# vi CentOS-Base.repo
[base]
name=CentOS-$releasever - Base
baseurl=http://mirrors.163.com/centos/$releasever/os/$basearch/
gpgcheck=1
gpgkey=file:///etc/pki/rpm-gpg/RPM-GPG-KEY-CentOS-7

#released updates
[updates]
name=CentOS-$releasever - Updates
baseurl=http://mirrors.163.com/centos/$releasever/updates/$basearch/
gpgcheck=1
gpgkey=file:///etc/pki/rpm-gpg/RPM-GPG-KEY-CentOS-7

#additional packages that may be useful
[extras]
name=CentOS-$releasever - Extras
baseurl=http://mirrors.163.com/centos/$releasever/extras/$basearch/
gpgcheck=1
gpgkey=file:///etc/pki/rpm-gpg/RPM-GPG-KEY-CentOS-7

#additional packages that extend functionality of existing packages
[centosplus]
name=CentOS-$releasever - Plus
baseurl=http://mirrors.163.com/centos/$releasever/centosplus/$basearch/
gpgcheck=1
enabled=0
gpgkey=file:///etc/pki/rpm-gpg/RPM-GPG-KEY-CentOS-7


# 4.准备nginx安装脚本
[root@hecs-hqs-01 web-supervisord]# vi nginx_install.sh
yum install -y wget tar gcc gcc-c++ make pcre pcre-devel zlib zlib-devel openssl openssl-devel
cd /usr/local/src
wget 'http://nginx.org/download/nginx-1.12.2.tar.gz'
tar -zxvf nginx-1.12.2.tar.gz
cd nginx-1.12.2
./configure --prefix=/usr/local/nginx --with-http_ssl_module --with-stream --with-stream_ssl_module
make
make install
exit 0

# 5.准备tomcat安装脚本
[root@hecs-hqs-01 web-supervisord]# vi tomcat_install.sh
yum install -y wget tar
cd /usr/local/src/
tar -zxvf jdk-8u162-linux-x64.tar.gz
mv jdk1.8.0_162 /usr/local/
#/usr/local/jdk1.8.0_162/bin/java -version
#配置java环境变量
echo 'JAVA_HOME=/usr/local/jdk1.8.0_162/' >>/etc/profile
echo 'PATH=$PATH:$JAVA_HOME/bin' >>/etc/profile
echo 'CLASSPATH=.:$JAVA_HOME/lib/tools.jar:$JAVA_HOME/lib/dt.jar:$CLASSPATH' >>/etc/profile
source /etc/profile
wget https://mirrors.tuna.tsinghua.edu.cn/apache/tomcat/tomcat-8/v8.5.78/bin/apache-tomcat-8.5.78.tar.gz
tar -zxvf apache-tomcat-8.5.78.tar.gz
mv apache-tomcat-8.5.78 /usr/local/tomcat


# 6.下载jdk
# 官网下载地址:https://www.oracle.com/java/technologies/javase/javase8-archive-downloads.html 需要注册才能下载
[root@hecs-hqs-01 web-supervisord]# ls


# 7.准备supervisor安装脚本
[root@hecs-hqs-01 web-supervisord]# vi supervisor_install.sh
yum -y install epel-release
yum -y install python2-pip
pip install supervisor


# 8.准备supervisor配置文件
[root@hecs-hqs-01 web-supervisord]# vi supervisord.conf
[unix_http_server]
file=/tmp/supervisor.sock ; the path to the socket file

[supervisord]
logfile=/tmp/supervisord.log ; # 日志
logfile_maxbytes=50MB ; # 最大50M日志
logfile_backups=10 ; # 轮循日志备份10个
loglevel=info ; # 日志等级记录info的
pidfile=/tmp/supervisord.pid ;pid
nodaemon=true ; # 在前台启动
minfds=102400 ; # 文件描述符限制
minprocs=2000 ; # 进程数

[rpcinterface:supervisor]
supervisor.rpcinterface_factory = supervisor.rpcinterface:make_main_rpcinterface

[supervisorctl]
serverurl=unix:///tmp/supervisor.sock ; use a unix:// URL for a unix socket

[program:nginx]
command=/usr/local/nginx/sbin/nginx ; # 前台启动nginx
autostart=true ; # 随着supervisor自动启动
startsecs=10 ; # 启动10s后算正常启动
autorestart=true ; # 程序退出后自动重启
startretries=3 ; # 启动失败自动重试次数
stdout_logfile_maxbytes=20MB ;stdout # 日志文件大小最大20Mb
stdout_logfile=/usr/local/nginx/logs/out.log

[program:tomcat]
command=sh /usr/local/tomcat/bin/mystart.sh ; # 前台启动tomcat
autostart=true ; # 随着supervisor自动启动
startsecs=10 ; # 启动10s后算正常启动
autorestart=true ; #程序退出后自动重启
startretries=3 ; # 启动失败自动重试次数
stdout_logfile_maxbytes=20MB ;stdout 日志文件大小最大20Mb
stdout_logfile=/usr/local/tomcat/logs/catalina.out

# 9.tomcat启动脚本准备
# 由于supervisor无法使用source,需要编写个脚本来启动
[root@hecs-hqs-01 web-supervisord]# vi start_tomcat.sh
source /etc/profile
/usr/local/tomcat/bin/catalina.sh run


# 10.构建镜像
[root@hecs-hqs-01 web-supervisord]# docker build -t web-supervisor .
[root@localhost web-supervisord]# docker images
REPOSITORY         TAG       IMAGE ID       CREATED         SIZE
web-supervisor     latest    5198c5737571   7 minutes ago   1.44GB

# 11.启动容器测试
[root@localhost web-supervisord]# docker run -d web-supervisor /bin/bash -c 'supervisord -c /etc/supervisord.conf'
a326e2589794c4b2a19c23d177f2c418d0583c87605342fd7445694dc40e2219


# 6.基于镜像启动容器和测试web服务
docker exec -it 76782ab /bin/bash
ifconfig

curl 127.0.0.1
curl 127.0.0.1:8080
4、容器健康检查机制
进程级的健康检查:最简单的,检验进程是否运行。重启策略可以根据检查情况重启已停止的容器。这个检查不足:无法发现应用程序问题。
Docker提供了健康检查机制,可以通过Dockerfile文件在镜像中注入,也可以在启动容器时通过相应选项实现。
(1)在Dockerfile中使用HEALTHCHECK指令
可以在Dockerfile中使用HEALTHCHECK指令声明健康检测配置,用于判断容器主进程的服务状态是否正常,反映容器的实际健康状态。
Dockerfile构建镜像时,加入了HEALTHCHECK指令,基于这样镜像启动的容器,就具备了健康状态检查能力,能自动进行健康检查。
Dockerfile中,只能出现一次HEALTHCHECK指令,出现多次,仅最后一次生效。
一旦有一次健康检查成功,Docker就会确认容器为健康状态。
HEALTHCHECK指令格式:
1.设置检查容器健康状况的命令.
HEALTHCHECK [选项] CMD <命令>

# 选项:
    --interval:设置容器运行后开始健康检查的时间间隔,默认30s。
    --timeout:设置允许健康检查命令允许的最长时间,默认30s。超时即失败。
    --start-period:设置容器启动的初始化时间。(启动过程中的健康检查失败不报错)
    --retries:设置允许连续重试的次数,默认3次。(连续检查失败后视为不健康)

# CMD指令后的命令:指定执行健康检查的具体命令。可以使用shell格式或exec格式。

# 返回值:CMD指令后面的“命令” 执行完毕返回值表示容器的运行状况。
    0:成功。容器是健康且可用的。
    1:失败。容器不健康,不能正常工作。
    2:保留值。暂时不要使用。

# 示例:每5分钟健康检查一次,访问web服务器主页,每次检查3秒以内
HEALTHCHECK --interval=5m --timeout=3s CMD curl -f http://localhost/ || exit 1       # || 表示上一条命令执行失败后,才执行下一条命令,退出返回值为1,告诉docker健康检查失败
2.表示禁止从基础镜像继承HEALTHCHECK指令设置
HEALTHCHECK NONE
(2)启动容器时通过相应选项实现健康检查
可以在执行 docker run 或 docker create 命令启动创建容器时指定容器的健康检查策略。
##选项
[root@localhost ~]# docker run --help
      --health-cmd string                  # 指定和运行健康检查
      --health-interval duration           # 设置容器运行后开始健康检查的时间间隔(单位:ms/s/m/h),默认是0s
      --health-retries int                 # 设置连续失败需要报告的次数
      --health-start-period duration       # 设置容器启动的初始化时间(单位:ms/s/m/h),默认是0s
      --health-timeout duration            # 设置允许健康检查命令允许的最长时间(单位:ms/s/m/h),默认是0s
      --no-healthcheck                     # 禁用容器健康检查指令
(3)案例:测试容器的健康检查功能
容器启动,开始执行健康检查命令,并周期执行,如果返回0,容器处于健康状态。如果返回非0值,容器不健康。
案例1:dockerfile中实现健康检查案例
查看代码
 # 改写上面的php-nginx-supervisord案例
[root@localhost php-nginx-supervisord]# vi Dockerfile
FROM php:7.3-fpm
COPY sources.list /etc/apt/
RUN apt-get clean && apt-get update
RUN apt-get -y install nginx supervisor procps net-tools
RUN mkdir -p /var/log/supervisor
COPY nginx /etc/nginx
COPY supervisor /etc/supervisor
WORKDIR /var/www
RUN usermod -u 1000 www-data
EXPOSE 80
HEALTHCHECK --interval=5m --timeout=3s CMD curl -f http://localhost/ || exit 1  ##每5分钟健康检查一次,访问web服务器主页,每次检查3秒以内
CMD ["/usr/bin/supervisord"]
# 构建镜像、启动容器
[root@localhost php-nginx-supervisord]# docker build -t php-nginx-supervisord .
[root@localhost php-nginx-supervisord]# docker run -tid -p 8080:80 php-nginx-supervisord
# 查看容器状态
[root@localhost php-nginx-supervisord]# docker ps
CONTAINER ID   IMAGE                   COMMAND                  CREATED         STATUS                            PORTS                                             NAMES
7bcf645de0ee   php-nginx-supervisord   "docker-php-entrypoi…"   2 seconds ago   Up 2 seconds (health: starting)   9000/tcp, 0.0.0.0:8080->80/tcp, :::8080->80/tcp   nervous_bartik
[root@localhost php-nginx-supervisord]# docker ps
CONTAINER ID   IMAGE                   COMMAND                  CREATED         STATUS                   PORTS                                             NAMES
7bcf645de0ee   php-nginx-supervisord   "docker-php-entrypoi…"   3 minutes ago   Up 3 minutes (healthy)   9000/tcp, 0.0.0.0:8080->80/tcp, :::8080->80/tcp   nervous_bartik
案例2:启动容器时设置选项实现健康检查
查看代码
 # 1.下载busybox镜像
[root@localhost ~]# docker pull busybox


# 2.创建容器设置健康检查,检查间隔20s,失败重复1次;并立即查看容器的健康检查状态
[root@localhost ~]#  docker run --rm --name test-health -d \
> --health-cmd 'stat /etc/passwd || exit 1' \
> --health-interval 20s --health-retries 1 \
> busybox sleep 1d;

[root@localhost ~]#  docker inspect  --format '{{.State.Health.Status}}' test-health
d8fa5965abc02ec8d01722f98257ba2b8f76d50af05890dc8c6e1a18573ee6a3
starting       《————容器启动后的健康状态为Starting

# 3.延迟20s时间,再次查看容器的健康检查状态
[root@localhost ~]# sleep 20s;docker inspect  --format '{{.State.Health.Status}}' test-health
healthy        《————容器处于健康状态

# 4.删除容器的/etc/passwd文件,模拟健康问题
[root@localhost ~]# docker exec test-health rm /etc/passwd

# 5.延迟20s时间,再次查看容器的健康检查状态
[root@localhost ~]# sleep 20s;docker inspect  --format '{{.State.Health.Status}}' test-health
unhealthy     《————容器处于不健康状态
# 进一步查看容器的详情
[root@localhost ~]# docker inspect  --format '{{json .State.Health}}' test-health
{"Status":"unhealthy","FailingStreak":6,"Log":[{"Start":"2022-05-12T04:06:13.855633253+08:00","End":"2022-05-12T04:06:13.899152317+08:00","ExitCode":1,"Output":"stat: can't stat '/etc/passwd': No such file or directory\n"},{"Start":"2022-05-12T04:06:33.910019299+08:00","End":"2022-05-12T04:06:33.953470925+08:00","ExitCode":1,"Output":"stat: can't stat '/etc/passwd': No such file or directory\n"},{"Start":"2022-05-12T04:06:53.956520997+08:00","End":"2022-05-12T04:06:53.998897439+08:00","ExitCode":1,"Output":"stat: can't stat '/etc/passwd': No such file or directory\n"},{"Start":"2022-05-12T04:07:14.002929368+08:00","End":"2022-05-12T04:07:14.045233889+08:00","ExitCode":1,"Output":"stat: can't stat '/etc/passwd': No such file or directory\n"},{"Start":"2022-05-12T04:07:34.050748795+08:00","End":"2022-05-12T04:07:34.090015044+08:00","ExitCode":1,"Output":"stat: can't stat '/etc/passwd': No such file or directory\n"}]}
# 上述信息中报错:stat: can't stat '/etc/passwd': No such file or directory\n,符合前面模拟的健康问题

# 6.查看容器的当前状态
[root@localhost ~]# docker ps
CONTAINER ID   IMAGE     COMMAND      CREATED         STATUS                     PORTS     NAMES
d8fa5965abc0   busybox   "sleep 1d"   5 minutes ago   Up 5 minutes (unhealthy)             test-health
5、运行时选项覆盖Dockerfile指令
Dockerfile中的FROM、MAINTAINER、RUN和ADD这四个指令在运行时是不能被覆盖的,其他的指令在执行docker run(或docker create)命令时都会被相应地覆盖。
从镜像运行一个容器时,可以指定一个新的命令来覆盖Dockerfile的CMD指令。
如果镜像的Dockerfile还声明了ENTRYPOINT指令,则Dockerfile的CMD指令或容器运行时指定的命令均作为参数追加到ENTRYPOINT指令中。
(1)覆盖CMD指令
[root@localhost ~]# docker history ubuntu
IMAGE          CREATED       CREATED BY                                      SIZE      COMMENT
ff0fea8310f3   7 weeks ago   /bin/sh -c #(nop)  CMD ["bash"]                 0B           《——————默认命令
<missing>      7 weeks ago   /bin/sh -c #(nop) ADD file:1d3b09cf9e041d608…   72.8MB

# 语法
[root@localhost ~]# docker run --help
Usage:  docker run [OPTIONS] IMAGE [COMMAND] [ARG...]

# 不覆盖的案例:使用CMD的默认命令
[root@localhost ~]# docker run -tid ubuntu
d6adcb9ca10de89dcb1a1f8ab49b33a715b502e4aa4f1ec240774a7f4d2aa9f5

# 覆盖案例
[root@localhost ~]# docker run -tid ubuntu top            《————top替换默认的bash
0485fee218e64e858ca5b2214b9349b523a3bd41d1ad86c08877240635fa0d32
注意:
如果镜像的Dockerfile还声明了ENTRYPOINT指令,则Dockerfile的CMD指令或容器运行时指定的命令均作为参数追加到ENTRYPOINT指令中。
(2)覆盖ENTRYPOINT指令
使用 --entrypoint选项可以覆盖定义镜像的 Dockerfile 中的 ENTRYPOINT 指令设置。
镜像的 ENTRYPOINT 指令定义容器启动时要执行的命令,在启动容器时不容易被覆盖。
注意:运行时使用--entrypoint 选项将清除镜像胡任何默认命令。
查看代码
# 案例
[root@localhost ~]# docker pull redis
[root@localhost ~]# docker history redis
IMAGE          CREATED        CREATED BY                                      SIZE      COMMENT
7614ae9453d1   4 months ago   /bin/sh -c #(nop)  CMD ["redis-server"]         0B
<missing>      4 months ago   /bin/sh -c #(nop)  EXPOSE 6379                  0B
<missing>      4 months ago   /bin/sh -c #(nop)  ENTRYPOINT ["docker-entry…   0B
<missing>      4 months ago   /bin/sh -c #(nop) COPY file:df205a0ef6e6df89…   374B
<missing>      4 months ago   /bin/sh -c #(nop) WORKDIR /data                 0B
<missing>      4 months ago   /bin/sh -c #(nop)  VOLUME [/data]               0B
<missing>      4 months ago   /bin/sh -c mkdir /data && chown redis:redis …   0B
...省略

# 默认自动运行redis-server的容器中,再运行一个shell
[root@localhost ~]# docker run -ti --entrypoint /bin/bash redis
root@484cb9c42858:/usr/local/bin# ls
docker-entrypoint.sh  redis-benchmark  redis-check-rdb	redis-sentinel
gosu		      redis-check-aof  redis-cli	redis-server
root@bd7640ba7206:/data# exit
exit

# 传递更多参数给ENTRYPOINT
# 默认传递--help给redis-server
[root@localhost ~]# docker run -ti  redis --help
Usage: ./redis-server [/path/to/redis.conf] [options] [-]
       ./redis-server - (read config from stdin)
       ./redis-server -v or --version
       ./redis-server -h or --help
...省略
# 传递--help给redis-cli
[root@localhost ~]# docker run -ti --entrypoint redis-cli redis --help
redis-cli 6.2.6
Usage: redis-cli [OPTIONS] [cmd [arg [arg ...]]]
  -h <hostname>      Server hostname (default: 127.0.0.1).
  -p <port>          Server port (default: 6379).
  -s <socket>        Server socket (overrides hostname and port).
...省略

# 传递空字符串重置容器的入口命令
[root@localhost ~]# docker run -ti --entrypoint="" redis bash
root@5cb647f12d63:/data# exit
exit
(3)覆盖EXPOSE传入端口指令
EXPOSE指令定义对外提供服务的初始传入端口,这些端口可用于容器中的进程。
###选项
[root@localhost ~]# docker run --help
      --expose []                     # 对外暴露容器的一个端口或一个端口范围
      --link []                       # 添加到其他容器的连接
  -p, --publish []                    # 将容器的一个端口或端口范围发布到主机
  -P, --publish-all                     # 将所有的端口发布到主机随机端口

# 案例:
[root@localhost ~]# mkdir expose-test  && cd expose-test/
[root@localhost expose-test]# vi default.conf
server {
    listen       81;
    listen  [::]:81;
    server_name  localhost;

    #access_log  /var/log/nginx/host.access.log  main;

    location / {
        root   /usr/share/nginx/html;
        index  index.html index.htm;
    }

    # redirect server error pages to the static page /50x.html
    #
    error_page   500 502 503 504  /50x.html;
    location = /50x.html {
        root   /usr/share/nginx/html;
    }
}
[root@localhost expose-test]# vi Dockerfile
FROM nginx
ADD default.conf /etc/nginx/conf.d/
# 构建镜像
[root@localhost expose-test]# docker build -t expose-test .

# 运行容器
[root@localhost expose-test]# docker run -tid --expose 81 -P expose-test
[root@localhost expose-test]# docker ps
CONTAINER ID   IMAGE         COMMAND                  CREATED              STATUS              PORTS                                                                              NAMES
cfd19ef475fd   expose-test   "/docker-entrypoint.…"   2 seconds ago        Up 2 seconds        0.0.0.0:49155->80/tcp, :::49155->80/tcp, 0.0.0.0:49154->81/tcp, :::49154->81/tcp   determined_allen
# 访问网页发现49154端口才可以访问到网页
(4)覆盖ENV指令
linux中的容器,Docker自动设置了如下环境变量(默认值):
- HOME(用户主目录):根据USER值设置
- HOSTNAME(主机名):默认为容器名
- PATH(执行文件的默认路径):常用目录
- TERM(终端):若容器分配了伪TTY,则为xterm。
可以使用若干 -e 选项设置任何环境变量,并可以覆盖上述默认环境变量或Dockerfile中ENV指令定义的环境变量。
# 选项
[root@localhost ~]# docker run --help
  -e, --env []                      # 设置环境变量
      --env-file []                 # 读取文件中环境变量
                                       environment variables

# 案例
[root@localhost ~]# export today=Sunday
[root@localhost ~]# echo $today
Sunday
[root@localhost ~]# docker run -t -e "deep=purple" \
> -e today \
> --rm alpine env
# 输出如下信息
PATH=/usr/local/sbin:/usr/local/bin:/usr/sbin:/usr/bin:/sbin:/bin
HOSTNAME=40951973766d
TERM=xterm
deep=purple
today=Sunday
HOME=/root
(5)HEALTHCHECK和WORDDIR指令
覆盖HEALTHCHECK的相关选项:
查看代码
[root@localhost ~]# docker run --help
      --health-cmd string                  # 指定和运行健康检查
      --health-interval duration           # 设置容器运行后,健康检查的时间间隔(单位:ms/s/m/h),默认是0s
      --health-retries int                 # 设置连续失败需要报告的次数
      --health-start-period duration       # 设置容器启动的初始化时间(单位:ms/s/m/h),默认是0s

      --health-timeout duration            # 设置允许健康检查命令允许的最长时间(单位:ms/s/m/h),默认是0s
      --no-healthcheck                     # 禁用容器健康检查指令
容器中运行二进制文件的默认工作目录是根目录(/),Dockerfile中可以使用WORDDIR指令自定义工作目录。还可以使用 -w选项覆盖WORKDIR指令设置。
查看代码
 #选项
[root@localhost ~]# docker run --help
  -w, --workdir string                 Working directory              # 修改容器的工作目录
                                       inside the container
# 案例:
[root@localhost expose-test]# docker run -tid -w /usr/local nginx
[root@localhost expose-test]# docker exec -ti 59362a6f79d4 /bin/bash
root@59362a6f79d4:/usr/local# pwd
/usr/local                《————工作目录为/usr/local
(6)USER
容器默认用户是root(UID=0),Dockerfile的USER指令可以指定容器运行第一个进程时的默认用户。
启动容器的时候,可以使用 -u(--user)选项指定新的默认用户覆盖镜像的USER指令。
查看代码
 # 选项
[root@localhost ~]# docker run --help
  -u, --user string                    Username or UID            # 指定容器运行第一个进程的默认用户,可以使用用户名、UID、组名、GID参数
                            语法:<name|uid>[:<group|gid>])

# 案例
[root@localhost expose-test]# docker run -ti -u daemon ubuntu
daemon@8aeca4a93520:/$
[root@localhost expose-test]# docker run -ti -u mail  ubuntu
mail@137b5fdfa150:/$
(7)VOLUME指令
Dockerfile中可以使用 VOLUME 指令定义一个或多个与镜像关联的卷。
容器启动时可以使用 -v 、--mount、--volume-from选项来指定挂载卷。详见:docker存储管理
二、限制容器资源使用
1、容器内存资源限制
资源限制原因:
1.防止容器占用过多资源,影响其他容器或宿主机
2.保证容器稳定运行,避免OOM等情况.   OOM现象:根据优先机制kill掉宿主机上最高的进程从而来释放空间,只要是宿主机的进程都可能被kill掉的。
3.进行资源隔离,提高安全性
容器可使用的内容包括:物理内存、交换空间(SWAP)。
Docker 默认没有设置内存限制的,容器进程可以根据需要尽可能多地使用内存和交换空间。
硬限制:仅允许容器使用不超过给定值的用户内存或系统内存。
软限制:允许容器按需使用内存,但不能影响到内存使用或与占用主机内存。
(1)用户内存限制
同时设置内存和交换空间时,交换空间限制必须大于物理内存限制。
[root@localhost ~]# docker run --help
  -m, --memory bytes                   Memory limit                 # 容器可用内存限制,最低是4MB
      --memory-swap bytes                                           # 容器可以使用的交换空间,-1为无限
                                       unlimited swap
注意: 以上选项都没有是,对容器的内存是无限制
# 案例1:对容器内存使用不限制
[root@localhost ~]# docker run -ti ubuntu /bin/bash

# 案例2:设置内存限制并取消交换空间的限制
[root@localhost ~]# docker run -ti -m 300M --memory-swap -1  ubuntu /bin/bash

# 案例3:只设置内存限制
[root@localhost ~]# docker run -ti -m 300M  ubuntu /bin/bash
[root@localhost ~]# docker inspect --format='{{.HostConfig.Memory}}' a84ca902dbab
314572800      《————314572800/1024/1024=300

# 案例4:同时设置内存和交换空间
[root@localhost ~]# docker run -ti -m 300M --memory-swap 1G  ubuntu /bin/bash
(2)内核内存限制
内核内存不能使用交换空间,消耗过多的内核内存会导致系统服务被阻塞。
内核内存不独立于用户内存,一般在用户内存限制的基础上限制内核内存。
限制内核内存的效果:当内核内存太多时,系统会阻止新进程创建。
[root@localhost ~]# docker run --help
      --kernel-memory bytes            Kernel memory limit         # 容器内核内存限制

# 案例1:同时设置用户内存和内核内存
[root@localhost ~]# docker run -ti -m 200M --kernel-memory 50M ubuntu /bin/bash

# 案例2:只设置内核内存,内存不限制
[root@localhost ~]# docker run -ti --kernel-memory 50M ubuntu /bin/bash
(3)设置内存预留实现软限制
作为一个软限制功能,内存预留并不能保证不会超过限制。主要目的是确保当内存争用严重时,内存就按预留设置进行分配。
内存软限制设置效能:确保容器不会长时间消耗过多内存,每次内存回收将容器内存消耗缩减到软限制之下。
软限制设置规则:
内存预留值应当始终低于硬限制,否则硬限制会优先触发。
将内存预留值设置为0表示不作限制。
[root@localhost ~]# docker run --help
      --memory-reservation bytes       Memory soft limit    # 设置内存预留。0表示无限制

# 示例1:限制内存为500MB,内存预留值(软限制)为200MB
[root@localhost ~]# docker run -ti -m 500M --memory-reservation 200M ubuntu /bin/bash

# 示例2:设置内存软限制为1GB,没有设置内存硬限制
[root@localhost ~]# docker run -ti --memory-reservation 1G ubuntu /bin/bash
2、容器所用CPU资源限制
默认设置是所有容器都可以平等地使用主机CPU资源而不受限制。
(1)CPU份额限制
默认情况,所有容器得到相同比例的CPU周期。
通过设置CPU份额权重,分配容器可以使用的CPU周期。
[root@localhost ~]# docker run --help
  -c, --cpu-shares int                 CPU shares (relative weight)   # 设置CPU份额权重,默认值1024

# 案例
[root@localhost ~]# docker run -tid -c 512 ubuntu /bin/bash
5c51e13530879ab7ed56bc42c1f71de0b6a2bff9cadbac6fb1364fa4c11c529a
(2)CPU周期限制
默认的CFS(完全公平调度器)周期为100ms(100000us)。 设置CPU周期限制容器CPU资源使用。
[root@localhost ~]# docker run --help
	  # --cpu-period 和 --cpu-quota 选项都是以1个CPU为基准。
      --cpu-period int                 Limit CPU CFS (Completely Fair Scheduler) period    # 限制容器CPU CFS周期
      --cpu-quota int                  Limit CPU CFS (Completely Fair Scheduler) quota     # 限制容器CPU CFS配额
	  --cpus decimal                   Number of CPUs         # 指定容器可用CPU资源,浮点数,默认0.000(不受限)

# 案例1:若只有一个cpu,容器可以每50ms获得50%的CPU运行时间
[root@localhost ~]# docker run -ti --cpu-period=50000 --cpu-quota=25000 ubuntu /bin/bash

# 案例2:效果同上
[root@localhost web-supervisord]# docker run -ti --cpus=0.5 ubuntu /bin/bash
(3)CPU放置限制
限制容器进程运行在什么CPU上。
[root@localhost web-supervisord]# docker run --help
      --cpuset-cpus string             CPUs in which to allow execution (0-3, 0,1)

# 案例:
# 容器的进程允许运行在cpu1\cpu2\cpu3
[root@localhost ~]# docker run -ti --cpuset-cpus='1-3' ubuntu /bin/bash
# 容器的进程允许运行在cpu0
[root@localhost ~]# docker run -ti --cpuset-cpus='0' ubuntu /bin/bash
# 容器的进程允许运行在cpu0\cpu4
[root@localhost ~]# docker run -ti --cpuset-cpus='0,4' ubuntu /bin/bash
(4)CPU配额限制
--cpu-quota限制容器进程的CPU配额。
默认值0 表示容器占用一个CPU 100%的CPU资源。
设为 50000 表示容器至多使用CPU50%的资源。
# 容器每100ms(100000us)占用50%
[root@localhost ~]# docker run -tid --cpu-quota=50000 ubuntu

# 容器占用CPU 100%的资源
[root@localhost ~]# docker run -tid --cpu-quota=0 ubuntu
3、容器所用块I/O带宽的限制
块I/O带宽(Block I/O Bandwith,Blkio):磁盘读写带宽。
Docker 可设置权重,限制容器读写磁盘的带宽。
(1)设置块I/O权重
使用--blkio-weight选项设置一个容器相对于所有其他正在运行的容器的块I/O带宽权重。
可设置的块I/O带宽权重范围是10-1000。
默认所有的容器的权重值为500。0表示被禁用。
[root@localhost ~]# docker run --help
      --blkio-weight uint16            Block IO (relative
                                       weight), between 10
                                       and 1000, or 0 to
                                       disable (default 0)

案例:
[root@localhost ~]# docker run -tid --blkio-weight 300 ubuntu /bin/bash

[root@localhost ~]# docker run -tid --blkio-weight 0 ubuntu /bin/bash
(2)限制设备读写效率
Docker 按照两种指标限制容器的设备读写速率:每秒字节数、每秒I/O次数。
1)每秒字节数
使用--device-read-bps选项限制指定设备的读取速率,即每秒读取的字节数。
使用--device-write-bps选项限制指定设备的写入速率
单位可以是kb,mb或gb中的一个。
[root@localhost ~]# docker run --help
      --device-read-bps list           Limit read rate (bytes
                                       per second) from a
                                       device (default [])
      --device-write-bps list          Limit write rate
                                       (bytes per second) to
                                       a device (default [])
# 案例:限制/dev/sda的读取速率为1kb/s
[root@localhost ~]# docker run -ti --device-read-bps /dev/sda:1kb ubuntu   # /dev/sda1和/dev/sda2会报错,只能控制磁盘IO不能控制分区IO
[root@localhost ~]# docker inspect --format="{{json .HostConfig.BlkioDeviceReadBps}}" 5d377a47bfe4
[{"Path":"/dev/sda","Rate":1024}]        《——————1024byte即1kb
# 限制/dev/sda的写入速率为1mb/s
[root@localhost ~]# docker run -tid --device-write-bps /dev/sda:1mb ubuntu
[root@localhost ~]# docker inspect --format="{{json .HostConfig.BlkioDeviceWriteBps}}" 37cd8b0da954
[{"Path":"/dev/sda","Rate":1048576}]     《——————1048576byte即1mb
2)每秒I/O次数
限制指定设备的读取和写入速率,用每秒I/O次数表示。
[root@localhost ~]# docker run --help
      --device-read-iops list          Limit read rate (IO
                                       per second) from a
                                       device (default [])
      --device-write-iops list         Limit write rate (IO
                                       per second) to a
                                       device (default [])

# 案例:限制/dev/sda设备的读取速率为每秒1000次
[root@localhost ~]# docker run -ti --device-read-iops /dev/sda:1000 ubuntu
[root@localhost ~]# docker inspect --format="{{json .HostConfig.BlkioDeviceReadIOps}}" 1a9e1fb4c8fc
[{"Path":"/dev/sda","Rate":1000}]

# 限制 /dev/sda 设置的写入速率为每秒15次
[root@localhost ~]# docker run -ti --device-write-iops /dev/sda:15 ubuntu
[root@localhost ~]# docker inspect d5440f301bc5 --format="{{json .HostConfig.BlkioDeviceWriteIOps}}"
[{"Path":"/dev/sda","Rate":15}]
4、资源限制的实现机制
对容器使用的内存、CPU和块I/O带宽资源的限制具体是由控制组的相应子系统来实现的。
- memory子系统设置控制组中的任务所使用的内存限制。
- cpu子系统通过调度程序提供对CPU的控制组任务的访问。
- blkio子系统为块设备(如磁盘、固态硬盘、USB等)设置输入和输出限制。
注意:在docker run命令中使用--cpu-shares、--memory、--device-read-bps等选项实际上就是在配置控制组,相关的配置文件保存在/sys/fs/cgroup目录中。
查看代码
 # 1.创建容器内存限额300M,CPU权重512
[root@localhost docker]# docker run -tid -p 8080:80 -m 300M --cpu-shares=512 httpd
3cdbdafe0398d40daa8bf334413dc748a3a707cfac96c8ff0ee22a87e5d85e60

# 2.查看/sys/fs/cgroup目录中容器CPU的配置信息
[root@localhost ~]# cd /sys/fs/cgroup/cpu/docker
# 里面有容器ID命名的目录,包含容器CPU相关配置
[root@localhost 3cdbdafe0398d40daa8bf334413dc748a3a707cfac96c8ff0ee22a87e5d85e60]# cat cpu.shares
512

# 3.查看容器内存限制信息
[root@localhost ~]# cd /sys/fs/cgroup/memory/docker/3cdbdafe0398d40daa8bf334413dc748a3a707cfac96c8ff0ee22a87e5d85e60/
[root@localhost 3cdbdafe0398d40daa8bf334413dc748a3a707cfac96c8ff0ee22a87e5d85e60]# cat memory.limit_in_bytes
314572800      《——————换算为300M
5、动态更改容器的资源限制
docker update 命令可以动态地更新容器配置,防止容器在主机上使用太多的资源。
除了kernel-memory选项,其他选项都是立即生效。kernel-memory选项只能应用于停止的容器,在下一次重启时生效。
[root@localhost ~]# docker update --help
Usage:  docker update [OPTIONS] CONTAINER [CONTAINER...]
Update configuration of one or more containers
Options:
      --blkio-weight uint16        Block IO (relative weight), between 10 and 1000, or 0 to disable (default 0)
      --cpu-period int             Limit CPU CFS (Completely Fair Scheduler) period
      --cpu-quota int              Limit CPU CFS (Completely Fair Scheduler) quota
      --cpu-rt-period int          Limit the CPU real-time period in microseconds
      --cpu-rt-runtime int         Limit the CPU real-time runtime in microseconds
  -c, --cpu-shares int             CPU shares (relative weight)
      --cpus decimal               Number of CPUs
      --cpuset-cpus string         CPUs in which to allow execution (0-3, 0,1)
      --cpuset-mems string         MEMs in which to allow execution (0-3, 0,1)
      --kernel-memory bytes        Kernel memory limit
  -m, --memory bytes               Memory limit                                      ##内存限制
      --memory-reservation bytes   Memory soft limit
      --memory-swap bytes          Swap limit equal to memory plus swap: '-1' to enable unlimited swap
      --pids-limit int             Tune container pids limit (set -1 for unlimited)
      --restart string             Restart policy to apply when a container exits


# 案例:
[root@localhost docker]# docker run -tid -p 8080:80 -m 300M --cpu-shares=512 httpd
[root@localhost ~]# docker inspect e2b4e487a27f --format="{{.HostConfig.CpuShares}}-{{.HostConfig.Memory}}-{{.HostConfig.MemorySwap}}"
512-314572800-629145600

[root@localhost ~]# docker update -m 500M --cpu-shares=400 --memory-swap 800M e2b4e487a27f
[root@localhost ~]# docker inspect e2b4e487a27f --format="{{.HostConfig.CpuShares}}-{{.HostConfig.Memory}}-{{.HostConfig.MemorySwap}}"
400-524288000-838860800

 浙公网安备 33010602011771号