ThreadLocal内存泄漏问题实践(二)
在上一篇中,ThreadLocal内存泄漏问题实践(一) (2018-07-17 14:32)
我们实践了多线程实战P154页结果与书上得到了不同的结果,本文予以查明原因
1 我们对代码稍作修改(不影响大局,只是局部美化)
package JVM;

import java.lang.reflect.Field;
import java.util.concurrent.CountDownLatch;
import java.util.concurrent.ExecutorService;
import java.util.concurrent.Executors;
import java.util.concurrent.atomic.AtomicInteger;

/**
 * https://www.cnblogs.com/silyvin/articles/9323220.html
 */
public class TestThreadLocal {

    private static final int THREAD_POOL_LENGTH = 10;
    private static final int THREAD_COUNT = 11;
    private static final int ATOMICINTEGER_INIT_VALUE = 0;
    private static final int SLEEP_LENGTH = 1000;

    public static void main(String[] args) throws InterruptedException {

        ExecutorService ex = Executors.newFixedThreadPool(THREAD_POOL_LENGTH);
        TestThread testThread = new TestThread() {
            @Override
            protected void finalize() throws Throwable {
                System.out.println("testThread回收");
            }
        };

        for(int i=0; i<THREAD_COUNT; ++i) {
            ex.execute(testThread);
        }

        TestThread.countDownLatch.await();
        System.out.println("任务1完成");

        TestThread.threadLocal = null;
        System.gc();
        System.out.println("第1次gc");

        Thread.sleep(SLEEP_LENGTH);

        TestThread.threadLocal = new ThreadLocal<TestKey>();
        TestThread.countDownLatch = new CountDownLatch(THREAD_COUNT);
        for(int i=0; i<THREAD_COUNT; ++i) {
            ex.execute(testThread);
        }

        TestThread.countDownLatch.await();
        System.out.println("任务2完成");

        System.gc();
        System.out.println("第2次gc");

        Thread.sleep(SLEEP_LENGTH);

        ex.shutdown();
    }

    private static class TestKey {
        Integer key;

        public TestKey(Integer integer) {
            key = integer;
        }

        @Override
        public String toString() {
            return String.valueOf(key);
        }

        @Override
        protected void finalize() throws Throwable {
            System.out.println("回收TestKey:"+key);
        }
    };

    private static class TestThread implements Runnable {

        private static AtomicInteger atomicInteger = new AtomicInteger(ATOMICINTEGER_INIT_VALUE);
        public static CountDownLatch countDownLatch = new CountDownLatch(THREAD_COUNT);

        public static ThreadLocal<TestKey> threadLocal = new ThreadLocal<TestKey>() {
            @Override
            protected void finalize() throws Throwable {
                System.out.println("回收threadlocal:" + this);
            }
        };

        @Override
        public void run() {
            TestKey key = new TestKey(atomicInteger.incrementAndGet());

            int i=-1;
            Object hash = null;
            try {
                // 由于这里threadLocal是子类,故报java.lang.NoSuchFieldException: threadLocalHashCode
          //    threadLocal.getClass().getDeclaredField("threadLocalHashCode");
                Field field = ThreadLocal.class.getDeclaredField("threadLocalHashCode");
                field.setAccessible(true);
                hash = field.get(threadLocal);
                i = ((Integer)hash) & (16-1);
            } catch (Exception e) {
                e.printStackTrace();
            }

            threadLocal.set(key);
            System.out.println("线程:"+Thread.currentThread()+":"+ key + ":" + hash + ":" +i);
        //    threadLocal.remove();  // 这一句不加仍然导致内存泄漏
            try {
                Thread.sleep(SLEEP_LENGTH);
            } catch (InterruptedException e) {
                e.printStackTrace();
            }
            countDownLatch.countDown();

        }
    }
}
在之前的代码上,最主要加上这段,我们把它领出来:
            int i=-1;
            Object hash = null;
            try {
                // threadLocal.getClass().getDeclaredAnnotation() 会报异常
                Field field = ThreadLocal.class.getDeclaredField("threadLocalHashCode");
                field.setAccessible(true);
                hash = field.get(threadLocal);
                i = ((Integer)hash) & (16-1);
            } catch (Exception e) {
                e.printStackTrace();
            }
功能:
1)把前后2次实例化的作为Map的key的threadlocal对象的hashcode打印出来
2)把hashcode在桶(初识长度为16)的索引打出来
3)除此之外,还有一个变化在于,一次往大小为10的线程池塞11个线程对象,营造前10个线程有一个TestKey会被第11个线程对象的新TestKey覆盖而打断强引用导致finalize的情况
4)可以看到threadLocalHashCode是个private变量,这里用ThreadLocal.class(而非我们定义的匿名子类o.getClass() )的getDeclaredField方法获取getDeclaredField和getField的区别
在mac下运行多次都是
线程:Thread[pool-1-thread-1,5,main]:1:-387276957:3
线程:Thread[pool-1-thread-2,5,main]:2:-387276957:3
线程:Thread[pool-1-thread-3,5,main]:3:-387276957:3
线程:Thread[pool-1-thread-4,5,main]:4:-387276957:3
线程:Thread[pool-1-thread-5,5,main]:5:-387276957:3
线程:Thread[pool-1-thread-6,5,main]:6:-387276957:3
线程:Thread[pool-1-thread-7,5,main]:7:-387276957:3
线程:Thread[pool-1-thread-8,5,main]:8:-387276957:3
线程:Thread[pool-1-thread-9,5,main]:9:-387276957:3
线程:Thread[pool-1-thread-10,5,main]:10:-387276957:3
线程:Thread[pool-1-thread-2,5,main]:11:-387276957:3
任务1完成
第1次gc
回收TestKey:2
回收threadlocal:JVM.TestThreadLocal$TestThread$1@554dfb98
线程:Thread[pool-1-thread-3,5,main]:12:1253254570:10
线程:Thread[pool-1-thread-4,5,main]:15:1253254570:10
线程:Thread[pool-1-thread-6,5,main]:16:1253254570:10
线程:Thread[pool-1-thread-9,5,main]:19:1253254570:10
线程:Thread[pool-1-thread-10,5,main]:20:1253254570:10
线程:Thread[pool-1-thread-5,5,main]:14:1253254570:10
线程:Thread[pool-1-thread-1,5,main]:13:1253254570:10
线程:Thread[pool-1-thread-2,5,main]:21:1253254570:10
线程:Thread[pool-1-thread-8,5,main]:18:1253254570:10
线程:Thread[pool-1-thread-7,5,main]:17:1253254570:10
线程:Thread[pool-1-thread-3,5,main]:22:1253254570:10
任务2完成
第2次gc
回收TestKey:12
同样,没有看到第1次gc理应回收的10个TestKey的析构,只有每次第11个线程对象threadlocal.set覆盖了之前10个线程对象的某个线程的对象时,由于是同一个threadlocal对象,hashcode相同,直接把原来的value挤走了,如图:
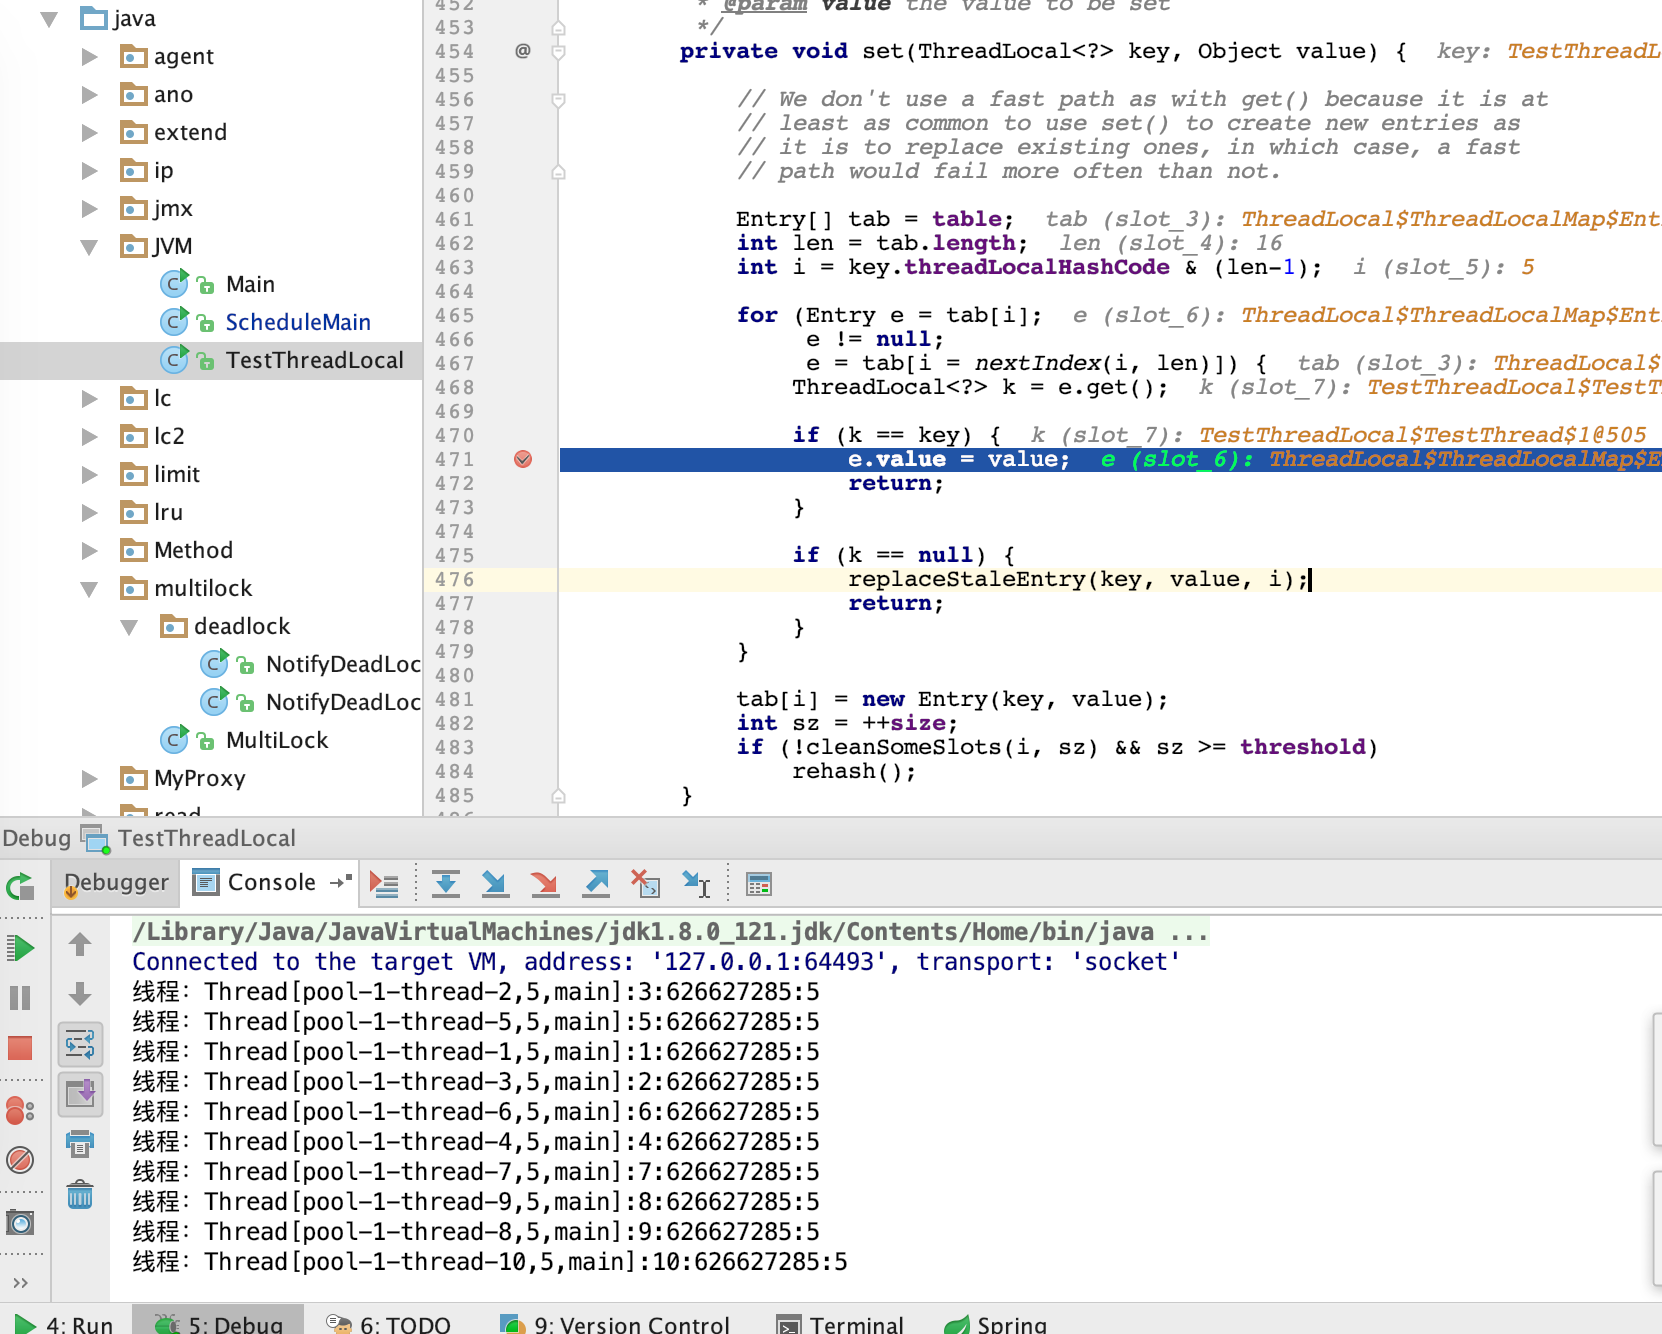
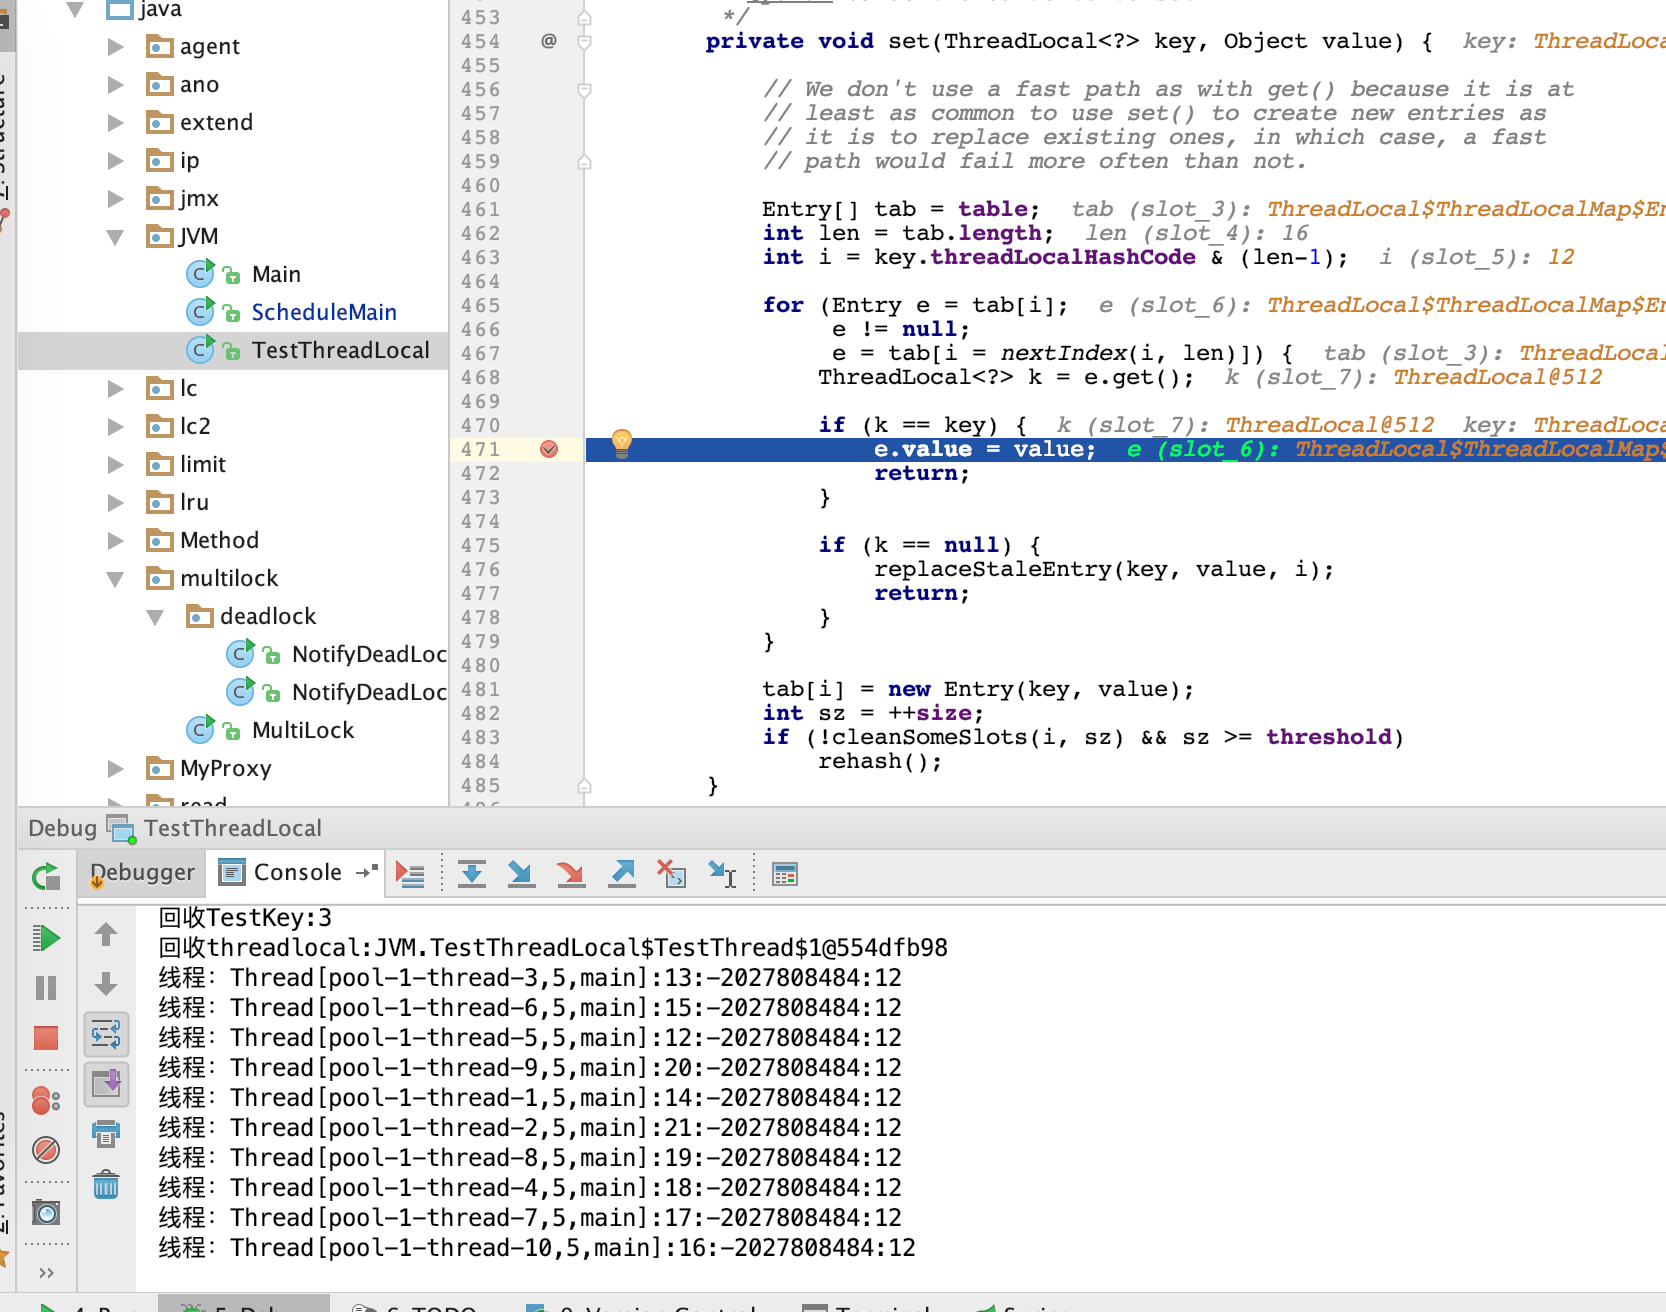
可以看到
1)2次第11个线程,同一个threadlocal对象挤走原TestKey对象(value)的调用路径,解除引用后,2次各有一个TestKey对象进入finalize
2)ThreadLocalMap不像hashmap,未使用链地址法处理hash冲突,而是使用线性探测法,为什么:解决hash冲突方法
3)如果该位置的key已经==null,我们可以看到会调用replaceStaleEntry去清理可能存在的脏对象,然后放入新对象
4)hashcode是可能越界成为负数的
到现在为止,线索又断了
2 真相——深入源码
https://www.jianshu.com/p/dde92ec37bd1
ThreadLocalMap清理 key为null的entry,源码注释为stale entry,也称“脏对象”的最主要代码除了上截图,还有为:
        private boolean cleanSomeSlots(int i, int n) {
            boolean removed = false;
            Entry[] tab = table;
            int len = tab.length;
            do {
                i = nextIndex(i, len);
                Entry e = tab[i];
                if (e != null && e.get() == null) {
                    n = len;
                    removed = true;
                    i = expungeStaleEntry(i);
                }
            } while ( (n >>>= 1) != 0);
            return removed;
        }
        /**
         * Increment i modulo len.
         */
        private static int nextIndex(int i, int len) {
            return ((i + 1 < len) ? i + 1 : 0);
        }
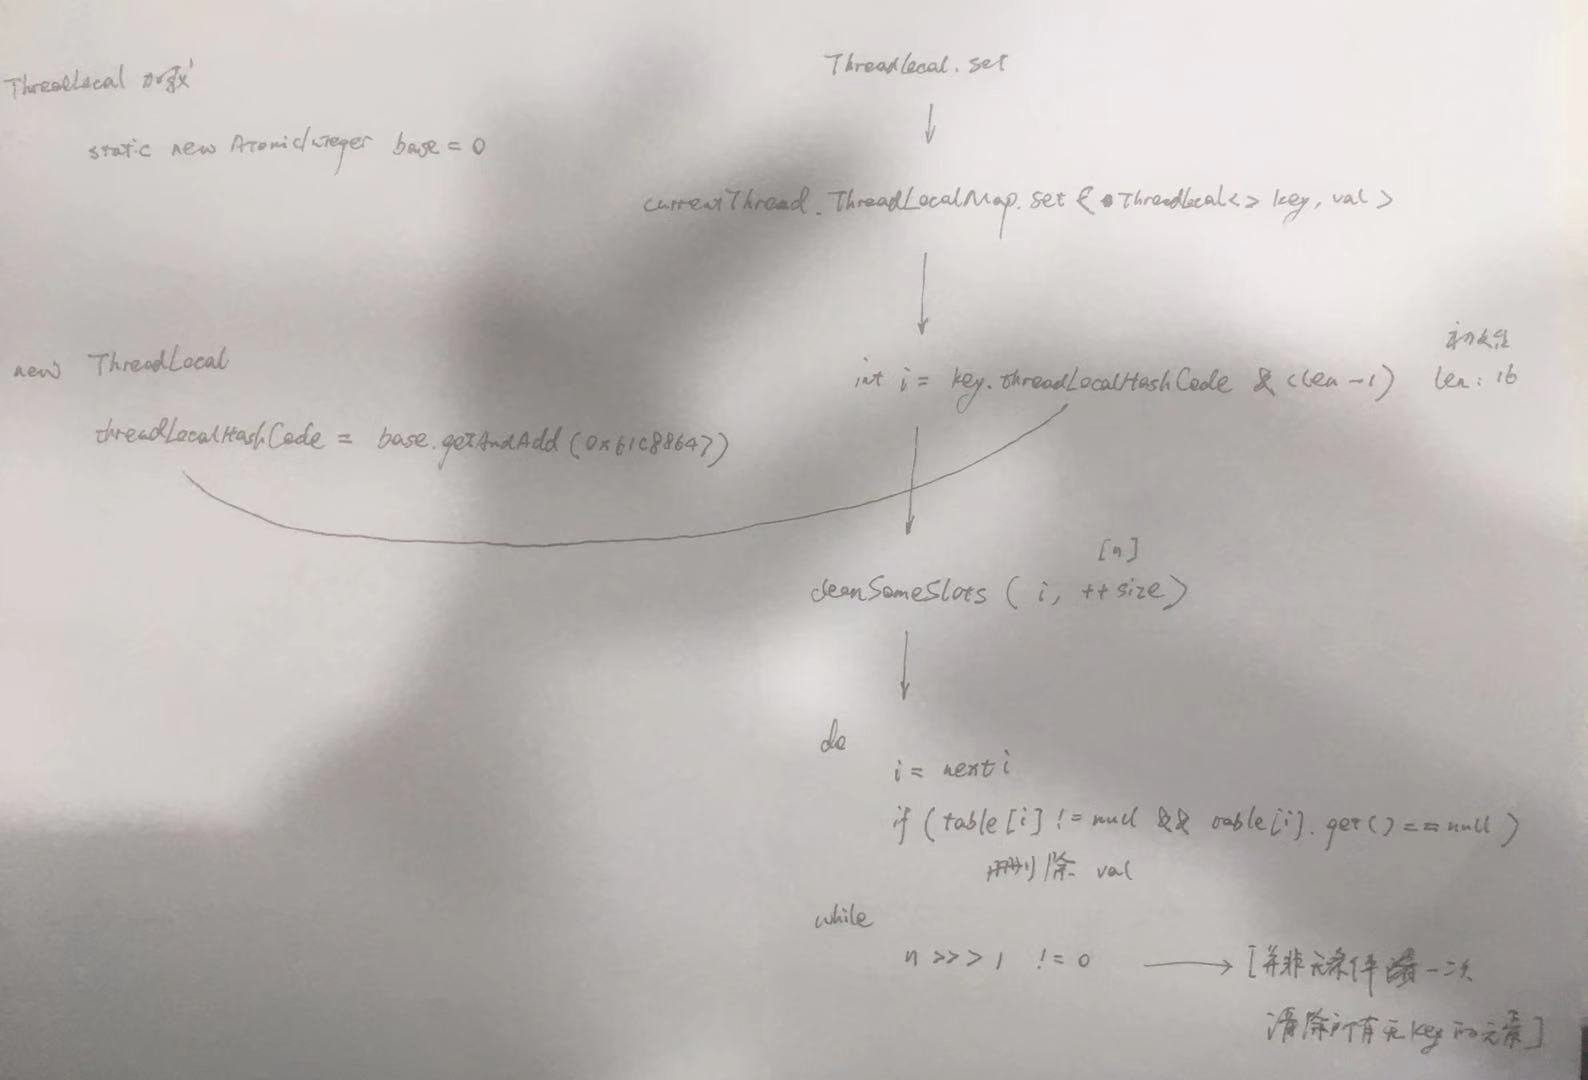
其中expungeStaleEntry为真正干掉脏对象的函数,其中i为元素的索引,n为元素的总数,我们可以看到,并不会一次做个全局扫描一次清理所有的脏对象,而是先搞一小段,如果碰到脏对象了,清除之,并把n置为数组长度(通常初始值为16),扩大扫描范围,如果在整个搜索过程没遇到脏entry的话,搜索结束,采用这种方式的主要是用于时间效率上的平衡。整个流程:
所以那第一次10个TestKey未被清理掉是正常的,第一个threadlocal对象索引是3,第二次set时,第二个threadlocal索引对象是10,故i=10,n=2,
do while循环先扫描11,发现没有脏对象,n>>>1=1>0,故做一次i++,扫描12,发现又没有脏对象,n>>>1=0,循环结束。
幸运的是,在另一台windows的机器上,出现了一次回收10个TestKey对象,不过10次里面出现2次吧
线程:Thread[pool-1-thread-2,5,main]:2:-387276957:3
线程:Thread[pool-1-thread-4,5,main]:4:-387276957:3
线程:Thread[pool-1-thread-1,5,main]:3:-387276957:3
线程:Thread[pool-1-thread-3,5,main]:1:-387276957:3
线程:Thread[pool-1-thread-5,5,main]:5:-387276957:3
线程:Thread[pool-1-thread-6,5,main]:6:-387276957:3
线程:Thread[pool-1-thread-7,5,main]:7:-387276957:3
线程:Thread[pool-1-thread-10,5,main]:8:-387276957:3
线程:Thread[pool-1-thread-9,5,main]:10:-387276957:3
线程:Thread[pool-1-thread-8,5,main]:9:-387276957:3
线程:Thread[pool-1-thread-4,5,main]:11:-387276957:3
任务1完成
第1次gc
回收TestKey:4
回收threadlocal:com.xxxx.demo.TT$TestThread$1@fe8238f
线程:Thread[pool-1-thread-2,5,main]:12:-1401181199:1
线程:Thread[pool-1-thread-7,5,main]:13:-1401181199:1
线程:Thread[pool-1-thread-6,5,main]:14:-1401181199:1
线程:Thread[pool-1-thread-5,5,main]:15:-1401181199:1
线程:Thread[pool-1-thread-3,5,main]:16:-1401181199:1
线程:Thread[pool-1-thread-1,5,main]:17:-1401181199:1
线程:Thread[pool-1-thread-8,5,main]:18:-1401181199:1
线程:Thread[pool-1-thread-9,5,main]:19:-1401181199:1
线程:Thread[pool-1-thread-10,5,main]:20:-1401181199:1
线程:Thread[pool-1-thread-4,5,main]:21:-1401181199:1
线程:Thread[pool-1-thread-9,5,main]:22:-1401181199:1
任务2完成
第2次gc
回收TestKey:19
回收TestKey:3
回收TestKey:1
回收TestKey:6
回收TestKey:5
回收TestKey:2
回收TestKey:11
回收TestKey:10
回收TestKey:9
回收TestKey:8
回收TestKey:7
第一个threadlocal对象索引是3,第二次set时,第二个threadlocal索引对象是1,故i=1,n=2,
do while循环先扫描2,发现没有脏对象,n>>>1=1>0,故做一次i++,扫描3,发现脏对象,干掉,引用链干掉后,TestKey进入fanalize
另外8次:
线程:Thread[pool-1-thread-3,5,main]:2:1253254570:10
线程:Thread[pool-1-thread-1,5,main]:3:1253254570:10
线程:Thread[pool-1-thread-2,5,main]:1:1253254570:10
线程:Thread[pool-1-thread-4,5,main]:4:1253254570:10
线程:Thread[pool-1-thread-5,5,main]:5:1253254570:10
线程:Thread[pool-1-thread-6,5,main]:6:1253254570:10
线程:Thread[pool-1-thread-7,5,main]:7:1253254570:10
线程:Thread[pool-1-thread-8,5,main]:8:1253254570:10
线程:Thread[pool-1-thread-9,5,main]:9:1253254570:10
线程:Thread[pool-1-thread-10,5,main]:10:1253254570:10
线程:Thread[pool-1-thread-1,5,main]:11:1253254570:10
任务1完成
第1次gc
回收TestKey:3
回收threadlocal:com.xxxx.demo.TT$TestThread$1@fe8238f
线程:Thread[pool-1-thread-3,5,main]:12:-1401181199:1
线程:Thread[pool-1-thread-4,5,main]:15:-1401181199:1
线程:Thread[pool-1-thread-8,5,main]:18:-1401181199:1
线程:Thread[pool-1-thread-6,5,main]:14:-1401181199:1
线程:Thread[pool-1-thread-5,5,main]:13:-1401181199:1
线程:Thread[pool-1-thread-1,5,main]:21:-1401181199:1
线程:Thread[pool-1-thread-10,5,main]:20:-1401181199:1
线程:Thread[pool-1-thread-7,5,main]:19:-1401181199:1
线程:Thread[pool-1-thread-9,5,main]:17:-1401181199:1
线程:Thread[pool-1-thread-2,5,main]:16:-1401181199:1
线程:Thread[pool-1-thread-1,5,main]:22:-1401181199:1
任务2完成
第2次gc
回收TestKey:21
至此,我们今天总算把ThreadLocal内存泄漏问题实践(一) (2018-07-17 14:32)遗留的问题搞定了
3 即便如此,也要注意,当threadloca对象被申明为static时,要ThreadLocal为什么要设计成private static
4 还有个小问题,为什么threadLocal对象的hashcode那么灵活,表现出随机性,每次都不一样,基本判断为有守护线程在主程序运行之前已经在操作ThreadLocal 的static AtomicInteger了,不再深究
public class ThreadLocal<T> {
    /**
     * ThreadLocals rely on per-thread linear-probe hash maps attached
     * to each thread (Thread.threadLocals and
     * inheritableThreadLocals).  The ThreadLocal objects act as keys,
     * searched via threadLocalHashCode.  This is a custom hash code
     * (useful only within ThreadLocalMaps) that eliminates collisions
     * in the common case where consecutively constructed ThreadLocals
     * are used by the same threads, while remaining well-behaved in
     * less common cases.
     */
    private final int threadLocalHashCode = nextHashCode();

    /**
     * The next hash code to be given out. Updated atomically. Starts at
     * zero.
     */
    private static AtomicInteger nextHashCode =
        new AtomicInteger();

    /**
     * The difference between successively generated hash codes - turns
     * implicit sequential thread-local IDs into near-optimally spread
     * multiplicative hash values for power-of-two-sized tables.
     */
    private static final int HASH_INCREMENT = 0x61c88647;

    /**
     * Returns the next hash code.
     */
    private static int nextHashCode() {
        return nextHashCode.getAndAdd(HASH_INCREMENT);
    }
5 神奇的0x61c88647(https://mp.weixin.qq.com/s/H28cSuA7b2OK7vJ0L2qWgA)
既然ThreadLocal用map就避免不了冲突的产生,当向thread-local变量中设置多个值的时产生的碰撞,碰撞解决是通过开放定址法, 且是线性探测(linear-probe)解决hash冲突方法,利用特殊的哈希码0x61c88647大大降低碰撞的几率,每当创建ThreadLocal实例时这个值都会累加 0x61c88647, 目的在上面的注释中已经写的很清楚了:为了让哈希码能均匀的分布在2的N次方的数组里

 浙公网安备 33010602011771号