
NRF52832空中升级DFU
Secure DFU环境搭建
升级原理,加密原理在此不做描述,详情参考http://www.cnblogs.com/iini/p/9314246.html
1.工具一览
- gcc-arm-none-eabi编译环境:GCC编译环境
https://developer.arm.com/open-source/gnu-toolchain/gnu-rm/downloads
- mingw 平台(win版的Linux命令行)
https://sourceforge.net/projects/mingw/files/latest/download?source
- micro-ecc-master源码
https://github.com/kmackay/micro-ecc
- python 安装文件
https://www.python.org/downloads/
- pc-nrfutil
https://github.com/NordicSemiconductor/pc-nrfutil/
- nrfgo-studio
- nrf connect app
2.安装指导
Secure DFU需要micro-ecc库进行签名验证,需要micro_ecc_lib_nrf52.lib,需要使用GCC编译器生成。
2.1 gcc-arm-none-eabi安装
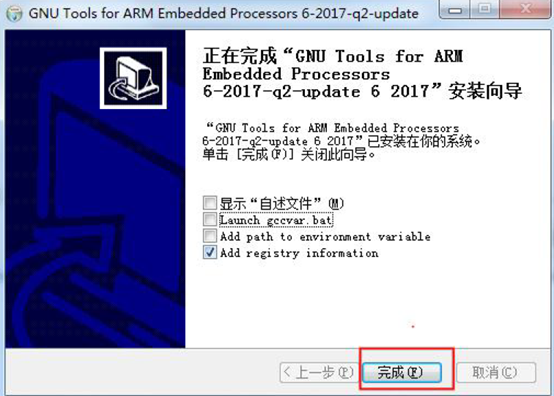
gcc-arm-none-eabi-4_9-2015q3-20150921-win32.exe,直接双击安装,注意使用默认安装路径,不要修改
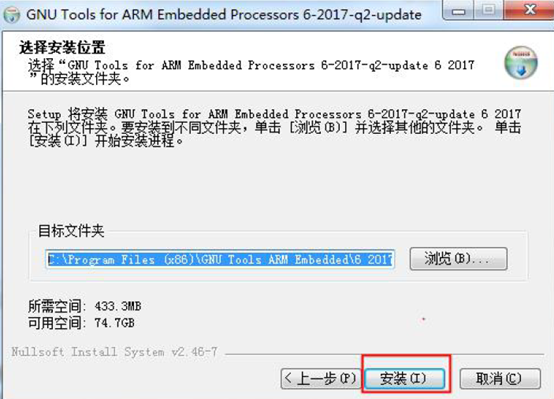
安装完成
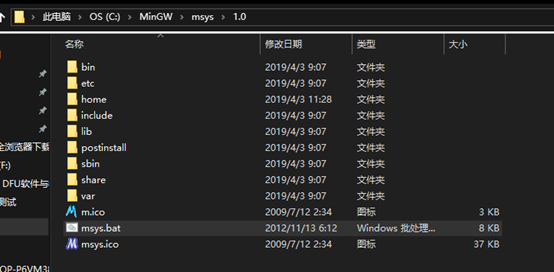
2.2 mingw 平台安装
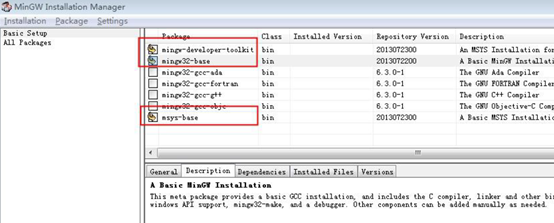
双击mingw-get-setup.exe,点击install进行安装,选择默认路径

安装好后弹出package包安装界面MinGW Installation Manager,按下图所示进行选择
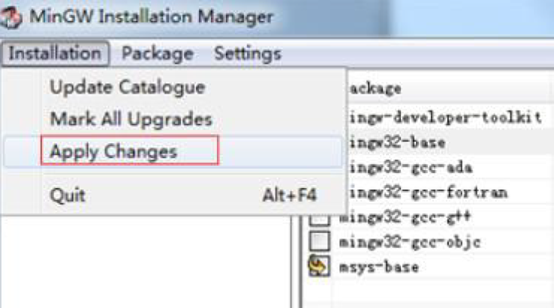
选择后,点击InstallationàApply Changes

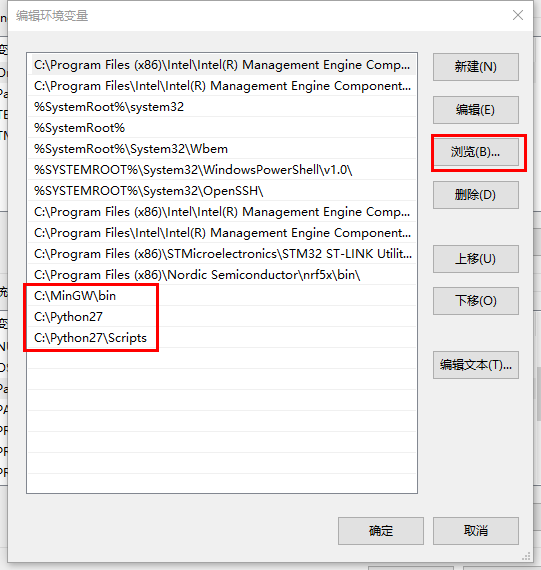
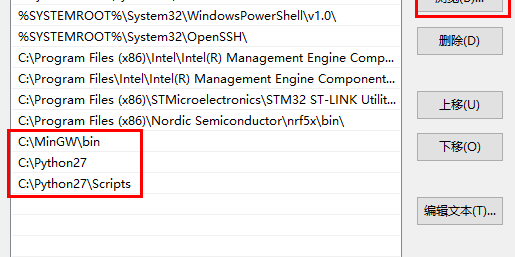
2.3 mingw 环境变量配置
安装好MinGW,需要在系统环境变量Path添加路径

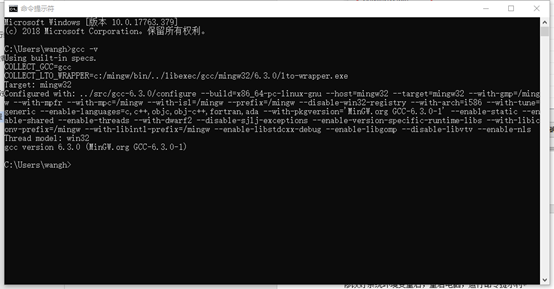
平台安装验证:
修改好系统环境变量后,重启电脑,运行命令提示符,如下所示则安装成功
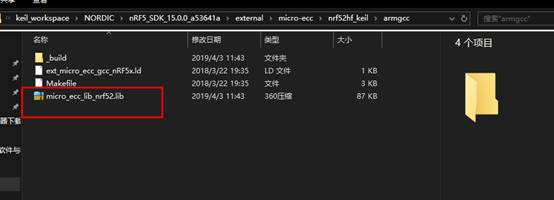
2.4 micro-ecc库生成
需要生成micro_ecc_lib_nrf52.lib,也可直接使用已经编译好的文件micro-ecc_sdk14_15_newer.rar解压后替换micro-ecc文件夹。
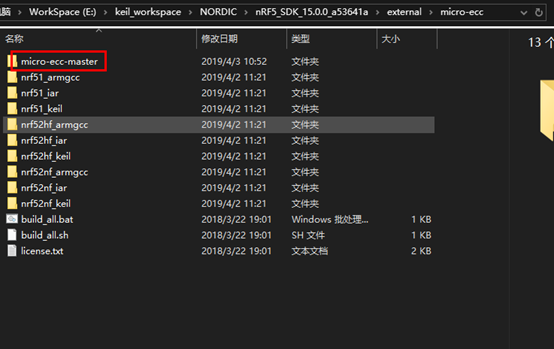
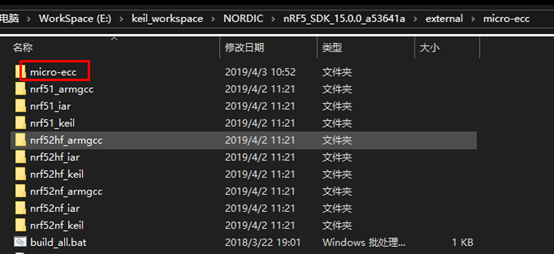
1.将micro-ecc-master源码复制到SDK目录下的external\micro-ecc中,并重命名为micro-ecc
2.打开MinGW的命令行msys.bat
在批处理框里输入要生成库的gcc算法路径
cd E:/keil_workspace/NORDIC/nRF5_SDK_15.0.0_a53641a/external/micro-ecc/nrf52hf_keil/armgcc
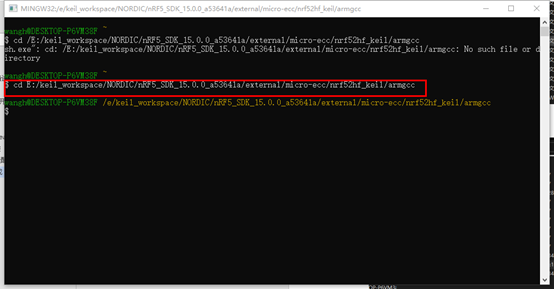
之后输入make

出现错误后,按照提示修改gcc的Makefile.windows文件如下
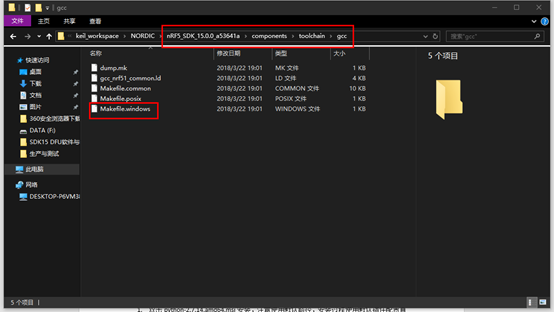
将gcc编译器路径更换为实际路径
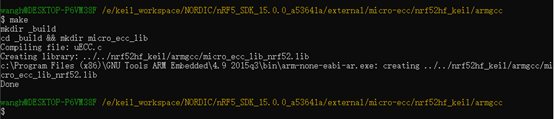
#GNU_INSTALL_ROOT := C:/Program Files (x86)/GNU Tools ARM Embedded/6 2017-q2-update/bin/
GNU_INSTALL_ROOT := C:/Program Files (x86)/GNU Tools ARM Embedded/4.9 2015q3/bin/
#GNU_VERSION := 6.3.1
GNU_VERSION := 6.3.0
GNU_PREFIX := arm-none-eabi
修改之后,编译OK
2.5 python 安装
1.双击python-2.7.14.amd64.msi安装,注意使用默认路径,安装过程使用默认插件配置直接一直next。
2.系统环境变量添加
3.安装验证
修改环境变量后重启电脑,命令行输入python -V

2.6 nrfutil工具安装
需要联网
打开命令行,输入pip install nrfutil安装nrfutil

安装完成后,输入nrfutil version,如下则表示安装成功

3.升级文件制作
为便于调试与生产上的烧录,编写一些 bat 文件来操作nrfutil工具指令
工程在sdk中的目录 E:\keil_workspace\NORDIC\nRF52832_htwh_sdk15.0\examples\ble_peripheral\ble_app_gnt_freertos-release
脚本文件目录 E:\keil_workspace\NORDIC\nRF52832_htwh_sdk15.0\examples\ble_peripheral\ble_app_gnt_freertos-release\wh_Script_SDK15_S132_nRF52832_GNT
3.1 密钥生成文件
key_generate.bat
生成的 dfu_public_key.c 文件会拷贝到 dfu 文件夹下供 secure_bootloader 使用
@echo off

pause
echo "执行之前需要确认文件路径,修改完成后可注释..."
pause


::1)通过nrfutil生产私钥和公钥文件
::generate private key
nrfutil keys generate priv.pem
::generate public key related with private key: priv.pem
nrfutil keys display --key pk --format code priv.pem --out_file dfu_public_key.c


::2)复制dfu_public_key.c文件到dfu工程
::修改指定文件夹或文件自己修改ObjPath源文件位置,HexDestPath目标文件或文件夹位置
set ObjPath=dfu_public_key.c

set HexDestPath=E:\keil_workspace\NORDIC\nRF52832_htwh_sdk15.0\examples\dfu

::复制指定路径指定文件或文件夹,至HexDestPath路径文件夹
echo y | xcopy "%ObjPath%" /e /r /k "%HexDestPath%"
::xcopy /e/c/h/z "%~pd0*.*" "%out%"

pause
3.2 升级包制作bat文件
zip_generate.bat
文件中的工程目录请根据实际路径修改
@echo off

::1)复制工程hex文件到指定文件夹, 需设置文件地址
::修改指定文件夹或文件自己修改ObjPath源文件位置,HexDestPath目标文件或文件夹位置
set ObjPath=E:\keil_workspace\NORDIC\nRF52832_htwh_sdk15.0\examples\ble_peripheral\ble_app_gnt_freertos-release\pca10040\s132\arm5_no_packs\_build\gnt_app.hex

set HexDestPath=E:\keil_workspace\NORDIC\nRF52832_htwh_sdk15.0\examples\ble_peripheral\ble_app_gnt_freertos-release\wh_Script_SDK15_S132_nRF52832_GNT

::复制指定路径指定文件或文件夹,至HexDestPath路径文件夹
echo y | xcopy "%ObjPath%" /e /r /k "%HexDestPath%"
::xcopy /e/c/h/z "%~pd0*.*" "%out%"


::2)生成升级用zip文件
::nrfutil.exe pkg generate --hw-version 52 --application-version 1 --application gnt_app.hex --sd-req 0xA8 --key-file private.key gnt_app_Dfu15.zip

nrfutil pkg generate --hw-version 52 --application-version 1 --application gnt_app.hex --sd-req 0xA8 --key-file private.key gnt_app_Dfu15.zip


::pause
3.2 生产烧录文件制作bat文件
会将应用gnt_app.hex、bootloader.hex、settings.hex、s132_nrf52_6.0.0_softdevice.hex这四个程序合为whole.hex,用于生产烧录;
mergehex.bat
@echo off

::1)生成 settings page for current image: gnt_app.hex
::Bootloader settings存储在Flash最后一个page,它将决定复位后芯片的行为,比如是进入DFU模式还是应用模式,同时它还包含image的CRC值和版本等信息。如果要求芯片复位后进入application,必须正确生成该bootloader settings hex

nrfutil settings generate --family NRF52 --application gnt_app.hex --application-version 1 --bootloader-version 1 --bl-settings-version 1 settings.hex


::2)合成一个hex用于生产烧录
::merge bootloader and settings
mergehex.exe --merge bootloader.hex settings.hex --output bl_temp.hex
::merge bootloader, app and softdevice
mergehex.exe --merge bl_temp.hex gnt_app.hex s132_nrf52_6.0.0_softdevice.hex --output whole.hex

::pause

::merge bootloader and settings
4.工程添加DFU服务
1.工程文件
工程文件添加
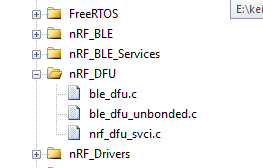
头文件路径包含


2.工程内容修改
在main.c中添加 DFU 服务支持
// 头文件包含
#if (DFU_SUPPORT == 1)
#include "nrf_dfu_ble_svci_bond_sharing.h"
#include "nrf_svci_async_function.h"
#include "nrf_svci_async_handler.h"
#include "ble_dfu.h"
#include "nrf_power.h"
#include "nrf_bootloader_info.h"
#endif

#if (DFU_SUPPORT == 1)

// 进入DFU,应用关机之前的一些操作,注册到power manager电源管理中
static bool app_shutdown_handler(nrf_pwr_mgmt_evt_t event)
{
    switch (event)
    {
        case NRF_PWR_MGMT_EVT_PREPARE_DFU:
            NRF_LOG_INFO("Power management wants to reset to DFU mode.");
            #if (GNT_WDT_EN == 1)
            my_wdt_feed();
            #endif

            break;

        default:
            // YOUR_JOB: Implement any of the other events available from the power management module:
            //      -NRF_PWR_MGMT_EVT_PREPARE_SYSOFF
            //      -NRF_PWR_MGMT_EVT_PREPARE_WAKEUP
            //      -NRF_PWR_MGMT_EVT_PREPARE_RESET
            return true;
    }

    NRF_LOG_INFO("Power management allowed to reset to DFU mode.");
    return true;
}

// 注册应用关机事件处理函数(常用于关机前需要进行的一些操作:如flash操作,控制模块的关闭等)
NRF_PWR_MGMT_HANDLER_REGISTER(app_shutdown_handler, 0);

static void buttonless_dfu_sdh_state_observer(nrf_sdh_state_evt_t state, void * p_context)
{
    if (state == NRF_SDH_EVT_STATE_DISABLED)
    {
        NRF_LOG_INFO("NRF_SDH_EVT_STATE_DISABLED to DFU mode.");
        // Softdevice was disabled before going into reset. Inform bootloader to skip CRC on next boot.
        nrf_power_gpregret2_set(BOOTLOADER_DFU_SKIP_CRC);

        //Go to system off.
        nrf_pwr_mgmt_shutdown(NRF_PWR_MGMT_SHUTDOWN_GOTO_SYSOFF);
    }
}

/* nrf_sdh state observer. */
NRF_SDH_STATE_OBSERVER(m_buttonless_dfu_state_obs, 0) =
{
    .handler = buttonless_dfu_sdh_state_observer,
};

#endif


#if (DFU_SUPPORT == 1)
/**@brief Function for handling dfu events from the Buttonless Secure DFU service
 *
 * @param[in]   event   Event from the Buttonless Secure DFU service.
 */
static void ble_dfu_evt_handler(ble_dfu_buttonless_evt_type_t event)
{
    switch (event)
    {
        case BLE_DFU_EVT_BOOTLOADER_ENTER_PREPARE:
            NRF_LOG_INFO("Device is preparing to enter bootloader mode.");
            // YOUR_JOB: Disconnect all bonded devices that currently are connected.
            //           This is required to receive a service changed indication
            //           on bootup after a successful (or aborted) Device Firmware Update.
            break;

        case BLE_DFU_EVT_BOOTLOADER_ENTER:
            // YOUR_JOB: Write app-specific unwritten data to FLASH, control finalization of this
            //           by delaying reset by reporting false in app_shutdown_handler
            NRF_LOG_INFO("Device will enter bootloader mode.");
            break;

        case BLE_DFU_EVT_BOOTLOADER_ENTER_FAILED:
            NRF_LOG_ERROR("Request to enter bootloader mode failed asynchroneously.");
            // YOUR_JOB: Take corrective measures to resolve the issue
            //           like calling APP_ERROR_CHECK to reset the device.
            break;

        case BLE_DFU_EVT_RESPONSE_SEND_ERROR:
            NRF_LOG_ERROR("Request to send a response to client failed.");
            // YOUR_JOB: Take corrective measures to resolve the issue
            //           like calling APP_ERROR_CHECK to reset the device.
            APP_ERROR_CHECK(false);
            break;

        default:
            NRF_LOG_ERROR("Unknown event from ble_dfu_buttonless.");
            break;
    }
}
#endif


static void services_init(void)
{
    ret_code_t         err_code;
    nrf_ble_qwr_init_t qwr_init = {0};

    // Initialize Queued Write Module.
    qwr_init.error_handler = nrf_qwr_error_handler;

    err_code = nrf_ble_qwr_init(&m_qwr, &qwr_init);
    APP_ERROR_CHECK(err_code);


    // 添加GPS_NB_TAG服务
    ble_gnts_init_t     gnts_init;

    memset(&gnts_init, 0, sizeof(gnts_init));
    gnts_init.data_handler = gnts_data_handler;

    err_code = ble_gnts_init(&m_gnts, &gnts_init);
    APP_ERROR_CHECK(err_code);

#if (DFU_SUPPORT == 1)
    ble_dfu_buttonless_init_t dfus_init = {0};
    // Initialize the async SVCI interface to bootloader.
    err_code = ble_dfu_buttonless_async_svci_init();
    APP_ERROR_CHECK(err_code);

    dfus_init.evt_handler = ble_dfu_evt_handler;

    err_code = ble_dfu_buttonless_init(&dfus_init);
    APP_ERROR_CHECK(err_code);
#endif

}
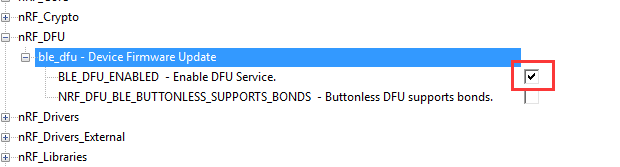
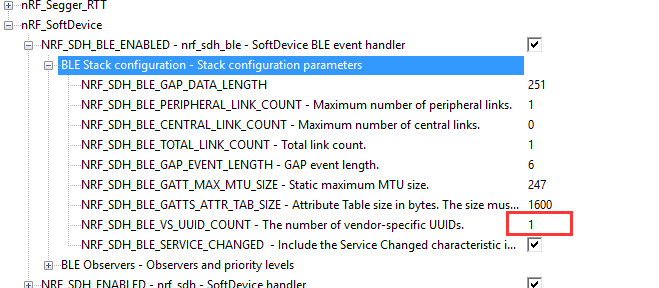
3. sdk_config.h 文件设置
另外 bootloader 工程中需要设置进入boot方式

5. 实际测试
用keil编译工程之后,运行bat文件生成升级用 zip 包
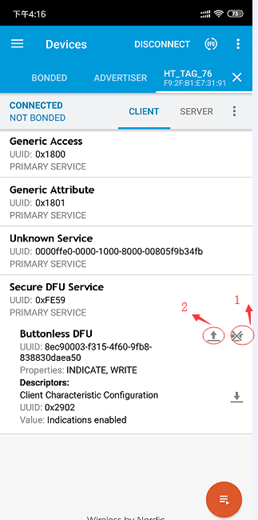
连接设备蓝牙
1.使能Buttonless DFU的CCCD项;
2.点击按键2
点击SEND,设备进入boot模式,关闭当前连接,进入扫描项SCAN,连接DfuTrag
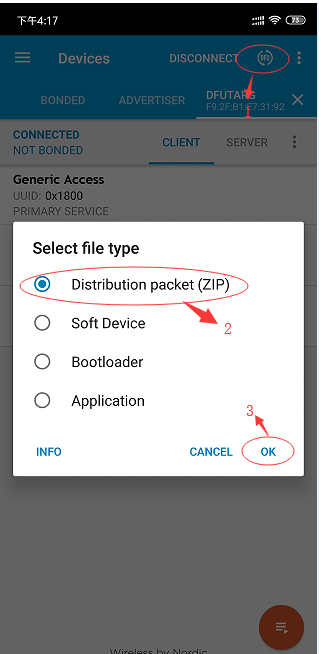
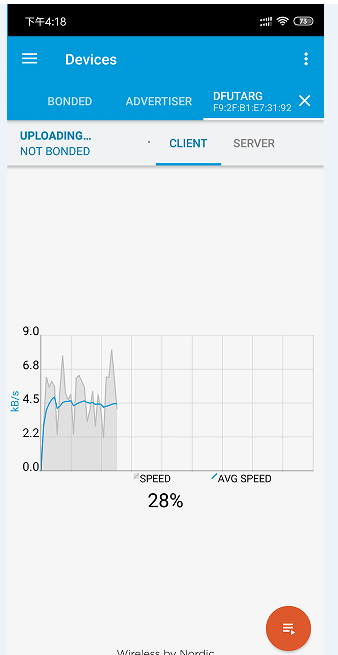
点击右上角的DFU小图标,选择ZIP文件(SDK12之后仅支持ZIP格式升级),点击OK,进入文件浏览器选择升级文件后自动开始升级,到100%时升级完成。

 浙公网安备 33010602011771号