

(七)OpenCV-Python学习—几何形状拟合
通过阈值分割提取图像中的目标物体前景,或者边缘提取目标物体的轮廓,在这些前景中可以寻找感兴趣的几何形状,如直线,圆,三角形,矩形等。
opencv中提供了拟合像素点的最小外包旋转矩形,最小外包直立矩形,最小外包圆,最小外包三角形和最小凸包,其对应函数使用如下:
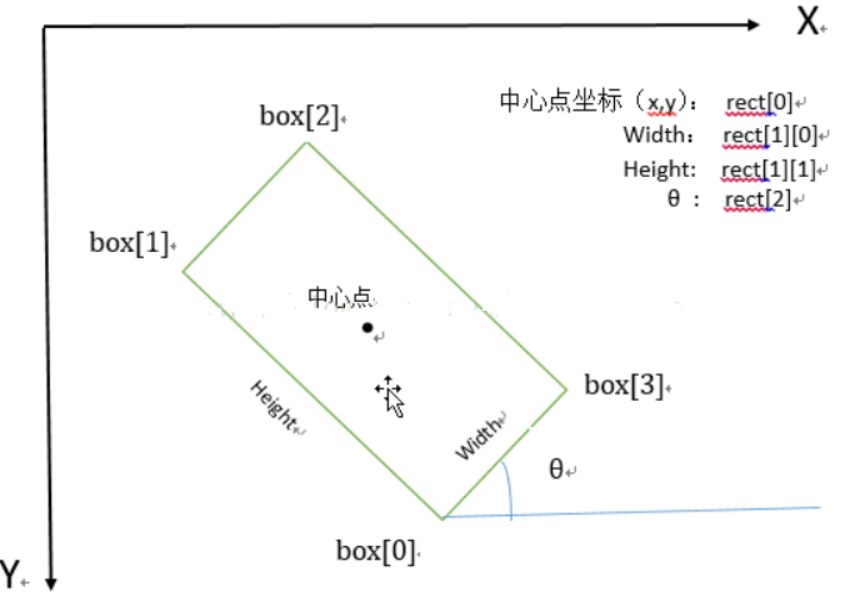
opencv 中函数minAreaRect()计算坐标点集的最小外包面积矩形,返回矩形的中心坐标点,宽和高,以及旋转角度,一般再通过函数boxPoints()能活得矩形框的四个顶点坐标,两个函数的参数和返回值说明如下:
center, size, angle = cv2.minAreaRect(points)
points: 坐标点array,数据类型为数据类型为int32或者float32
        points = np.array([[154, 154],[253, 171], [154, 176],[248, 204]], np.int32)
center: 旋转矩形的中心点
size: 矩形的宽,高; 结果可能为(h, w)或者(w, h)
angle: 相对于x轴正方向的旋转角度,顺时针旋转为正数,逆时针旋转为负数,在(-90, 0)之间
vertices = cv2.boxPoints(box)
box: 为minAreaRect()的返回值
box = (center, size, angle), 注意为一个元组,最外面括号不能少
box = ((201.00001525878906, 179.00001525878906),
(33.37017059326172,101.1060562133789), -80.25636291503906)
vertices:返回矩形的四个顶点坐标
vertices=[[248.00002 204.00002],
[148.35243 186.88881],
[154.00002 154.00002],
[253.6476 171.11122]]
返回值中旋转角度值得注意一下:
1. 旋转角度θ是水平轴(x轴)逆时针旋转,与碰到的矩形的第一条边的夹角。并且这个边的边长是width,另一条边边长是height。也就是说,在这里,width与height不是按照长短来定义的。
2. 在opencv中,坐标系原点在左上角,相对于x轴,逆时针旋转角度为负,顺时针旋转角度为正。所以,θ∈(-90度,0]。
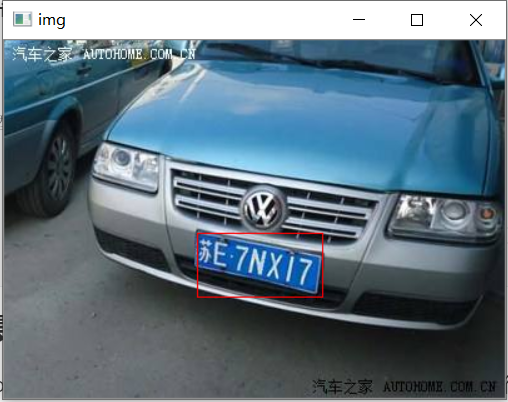
下面为minAreaRect() 的使用代码和示例:


#coding:utf-8

import cv2
import numpy as np

def draw_rect(img_file, points):
    img = cv2.imread(img_file)
    center, size, angle = cv2.minAreaRect(points)   #中心点坐标,尺寸,旋转角度
    print(center, size, angle)
    vertices= cv2.boxPoints((center, size, angle))
    print(vertices)

    for i in range(4):
        point1 = vertices[i, :]
        point2 = vertices[(i+1)%4, :]
        cv2.line(img, tuple(point1), tuple(point2), (0, 0, 255), 2)

    cv2.imshow("img", img)
    cv2.waitKey(0)
    cv2.destroyAllWindows()

if __name__ == "__main__":
    img_file = r"D:\data\timg.jpg"

    points1 = np.array([[154, 154],[253, 171], [154, 176],[248, 204]], np.int32)  # 数据类型为int32或者float32
    draw_rect(img_file, points1)


    # points2 = np.array([[148, 171], [247, 153], [253, 186], [154, 204]], np.int32)
    # draw_rect(img_file, points2)

注意对比上图中左边红色框和右边绿色框返回的结果,中心坐标差不多,但是size和angle都不一样。
最小外包直立矩形
boundingRect()函数返回坐标点集的最小外包直立矩形,平行于坐标轴的矩形,没有旋转角, 其参数如下:
rect = cv2.boundingRect(points)
    points: 坐标点array,数据类型为数据类型为int32或者float32
        points = np.array([[154, 154],[253, 171], [154, 176],[248, 204]], np.int32)
    rect: 矩形的左上角坐标,宽,高 (x, y, w, h)
        rect = (154, 154, 100, 51)
boundingRect() 使用代码和示例如下:
#coding:utf-8

import cv2
import numpy as np

img_file = r"D:\data\timg.jpg"
img = cv2.imread(img_file)
points1 = np.array([[154, 154],[253, 171], [154, 176],[248, 204]], np.int32)  # 数据类型为int32或者float32
rect = cv2.boundingRect(points1)
print(rect)
x, y, w, h = rect

cv2.rectangle(img,(x, y), (x+w, y+h), (0, 0, 255), 0)

cv2.imshow("img", img)
cv2.waitKey(0)
cv2.destroyAllWindows()
最小外包圆
minEnclosingCircle() 函数返回坐标点集的最小外包圆,其使用参数如下:
center, radius=cv2.minEnclosingCircle(points)
    points: 坐标点array,数据类型为数据类型为int32或者float32
        points = np.array([[154, 154],[253, 171], [154, 176],[248, 204]], np.int32)
    center:圆心坐标, 如(201.0, 179.0)
    radius: 圆直径, 如53.23542404174805
minEnclosingCircle() 代码使用示例如下:
#coding:utf-8

import cv2
import numpy as np

img_file = r"D:\data\timg.jpg"
img = cv2.imread(img_file)
points1 = np.array([[154, 154],[253, 171], [154, 176],[248, 204]], np.int32)  # 数据类型为int32或者float32
center, radius = cv2.minEnclosingCircle(points1)
print(center, radius)

cv2.circle(img, (int(center[0]), int(center[1])), int(radius), (0, 0, 255), 2)  # 传入center和radius需要为整形

cv2.imshow("img", img)
cv2.waitKey(0)
cv2.destroyAllWindows()

最小外包三角形
minEnclosingTriangle()函数返回坐标点集的最小外三角形,其使用参数如下:
area, triangle=cv.minEnclosingTriangle(points)
    points: 坐标点array,数据类型为数据类型为int32或者float32,注意shape必须为n*1*2
        points = np.array([[[154 154]],[[253 171]],[[154 176]],[[248 204]]], np.int32)
    area: 三角形的顶点
    triangle: 三角形的三个顶点
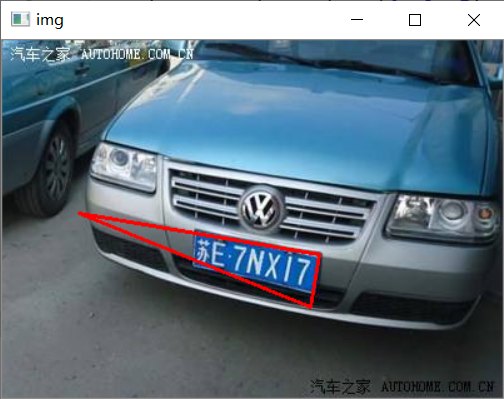
minEnclosingTriangle() 代码使用示例如下:
#coding:utf-8

import cv2
import numpy as np

img_file = r"D:\data\timg.jpg"
img = cv2.imread(img_file)
points = np.array([[154, 154],[253, 171], [154, 176],[248, 204]], np.int32)  # 数据类型为int32或者float32
points = points.reshape(4, 1, 2)  #注意shape必须为n*1*2
print(points)
area, triangle = cv2.minEnclosingTriangle(points)
print(area, triangle, triangle.shape)
for i in range(3):
    point1 = triangle[i, 0, :]
    point2 = triangle[(i+1)%3, 0, :]
    print(point1)
    cv2.line(img, tuple(point1), tuple(point2), (0, 0, 255), 2)

cv2.imshow("img", img)
cv2.waitKey(0)
cv2.destroyAllWindows()
最小凸包
convexHull()函数返回坐标点集的最小凸包,凸包实际上就是把坐标点集最外层的坐标点连接起来构成的凸多边形。其使用参数如下:
hull=cv.convexHull(points, clockwise=False, returnPoints=True)
    points: 坐标点array,数据类型为数据类型为int32或者float32
        points =np.array([[154, 154],[187, 150],[253, 171], [190, 197],
                   [259, 187],[154, 176],[248, 204], [141, 164]], np.int32)
    clockwise: 为True时,返回的凸包顶点顺时针方向排列,否则逆时针排列,默认为False
    returnPoints:为True时,返回凸包的顶点坐标,否则返回坐标点在点集中的index,默认为True
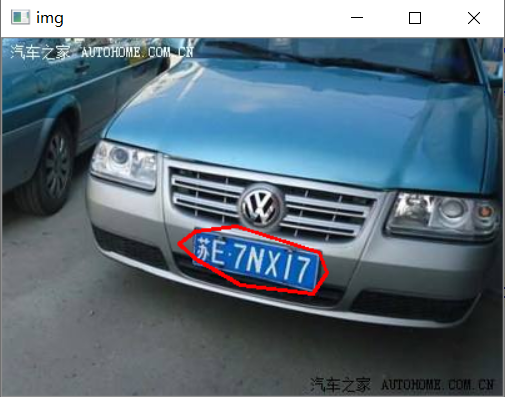
convexHull()代码使用示例如下:
import cv2
import numpy as np

img_file = r"D:\data\timg.jpg"
img = cv2.imread(img_file)
points = np.array([[154, 154],[187, 150],[253, 171], [190, 197],
                   [259, 187],[154, 176],[248, 204], [141, 164]], np.int32)  # 数据类型为int32或者float32
hull = cv2.convexHull(points)
n = hull.shape[0]
for i in range(n):
    point1 = hull[i, 0, :]
    point2 = hull[(i+1)%n, 0, :]
    cv2.line(img, tuple(point1), tuple(point2), (0,0,255), 2)


cv2.imshow("img", img)
cv2.waitKey(0)
cv2.destroyAllWindows()
2 霍夫直线检测
对于标准霍夫直线检测的理解,主要在于三点:
-
平面坐标系中的一条直线,可以转换为极坐标系中的一个坐标点
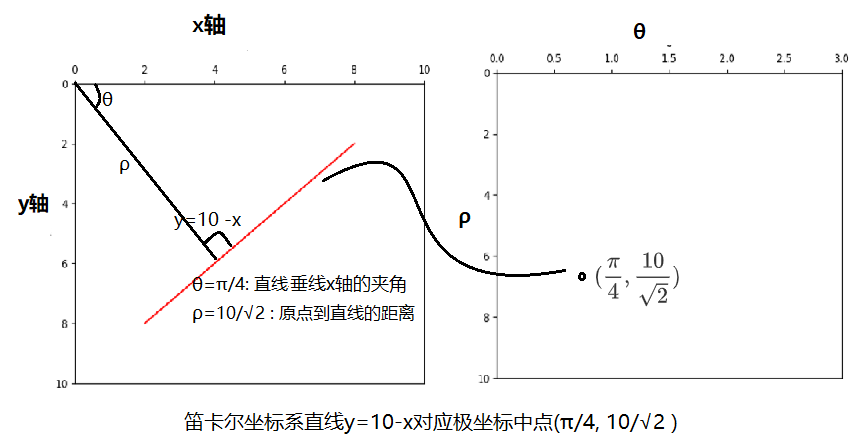

-
平面坐标系中过一点有无数条直线,这些直线在极坐标系中对应无数个坐标点,且这些点共同形成了极坐标系中的一条曲线
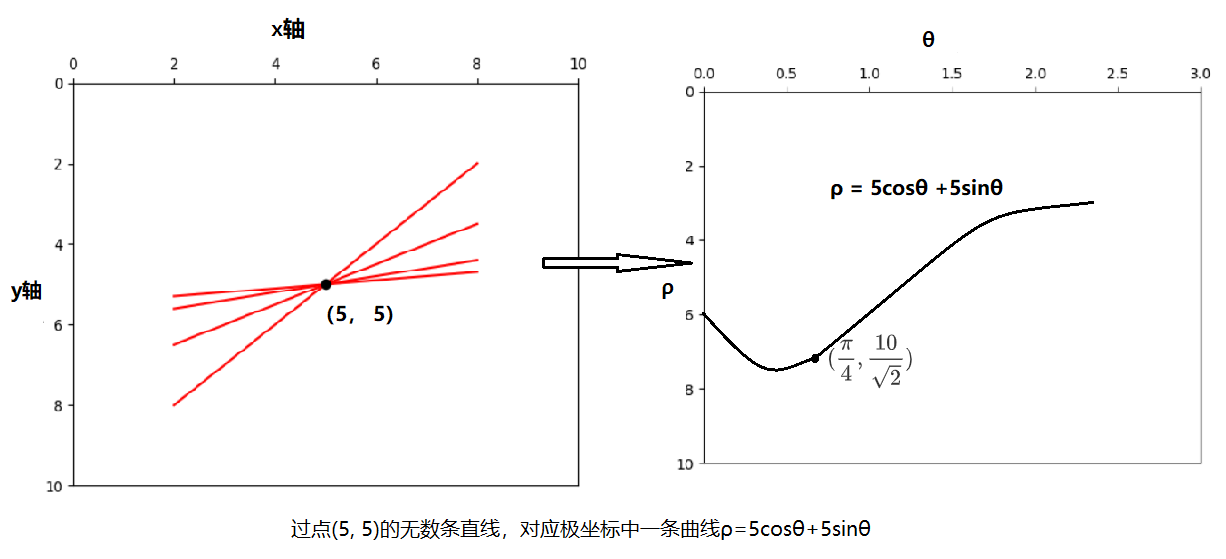
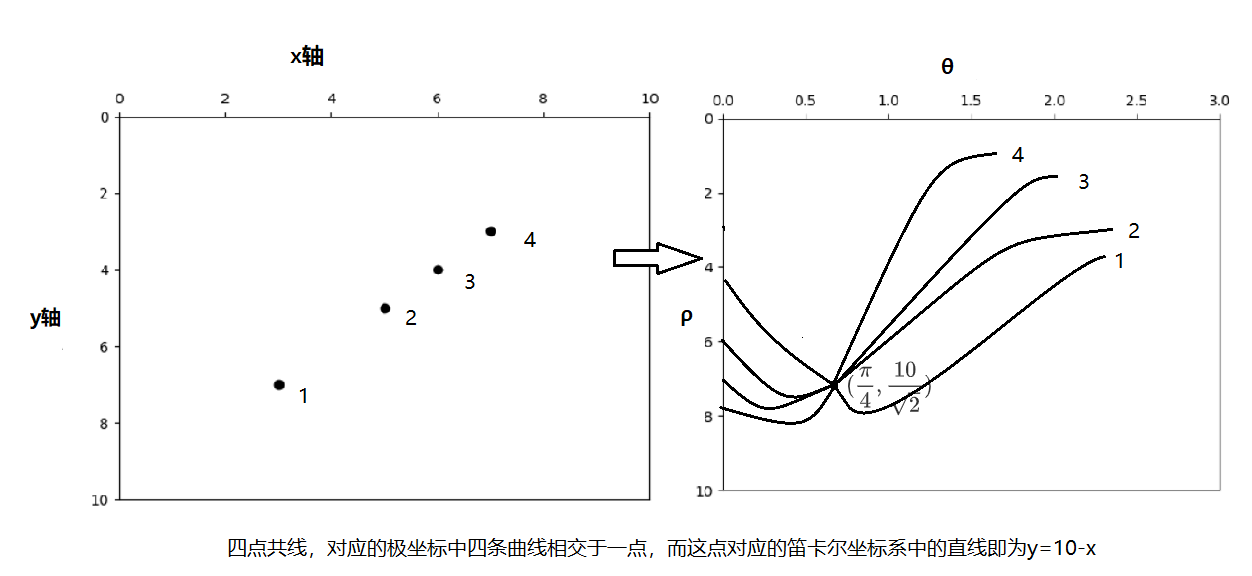
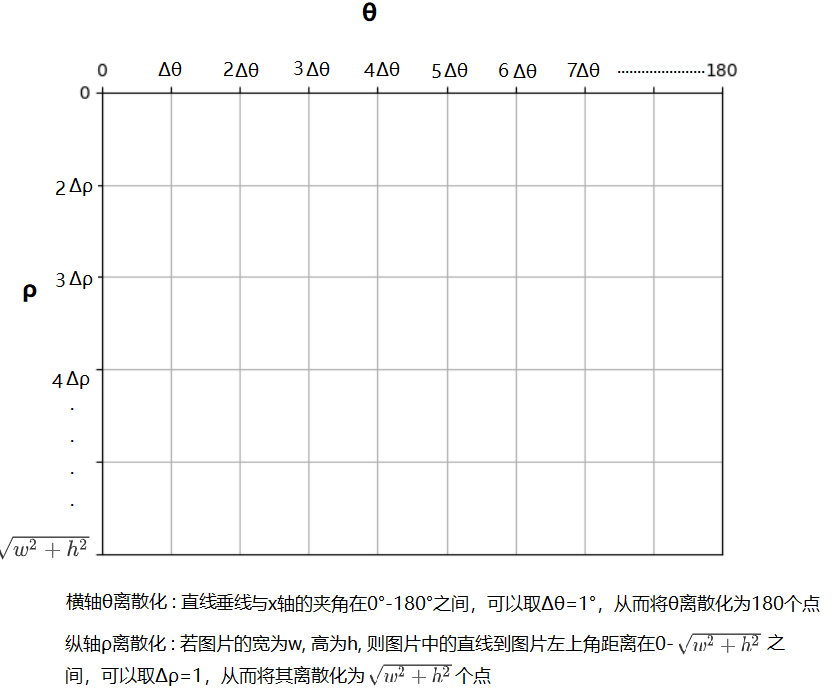
投票器
实际在判断霍夫空间中曲线的交点时,采用的时将曲线进行离散化,制定一个投票器(投票器中每一点对应一条直线),将边缘二值图中的像素点分别映射到投票器中,投票器中投票数较多的点则对应直线交点
自己实现霍夫直线检测代码和对应结果如下:
#coding:utf-8
import numpy as np
import math
import cv2

def HTline(image, stepTheta=1, stepRho=1):
    rows, cols = image.shape
    L = round(math.sqrt(pow(rows-1, 2.0)+pow(cols-1, 2.0))) +1
    numtheta = int(180/stepTheta)
    numRh0 = int(2*L/stepRho + 1)   # L到2L+1之间
    accumulator = np.zeros((numRh0, numtheta), np.int32)
    accuDict = {}  # 每条直线上点的集合
    for i in range(numRh0):
        for j in range(numtheta):
            accuDict[(i, j)] = []
    for y in range(rows):
        for x in range(cols):
            if image[y][x] == 255:
                for m in range(numtheta):
                    rho = x*math.cos(stepTheta*m*math.pi/180) + y*math.sin(stepTheta*m*math.pi/180)
                    n = int(round(L+rho)/stepRho)
                    accumulator[n, m] += 1
                    accuDict[(n, m)].append((x, y))
    return accumulator, accuDict

if __name__ == "__main__":
    img_path = r"D:\data\building.jpg"
    img = cv2.imread(img_path)
    img_gray = cv2.cvtColor(img, cv2.COLOR_BGR2GRAY)
    img_edge = cv2.Canny(img_gray, threshold1=50, threshold2=200, apertureSize=3)  # 返回edge是0和255组成的二值图

    accumulator, accudict = HTline(img_edge, 1, 1)
    voteThresh = 200
    rows, cols = accumulator.shape
    for r in range(rows):
        for c in range(cols):
            if accumulator[r, c] > voteThresh:
                points = accudict[(r, c)]
                cv2.line(img, points[0], points[-1], (0, 0, 255), 2)

    cv2.namedWindow("img", cv2.WINDOW_NORMAL)
    cv2.imshow("img", img)
    cv2.namedWindow("img_edge", cv2.WINDOW_NORMAL)
    cv2.imshow("img_edge", img_edge)
    cv2.waitKey(0)
    cv2.destroyAllWindows()
HoughLines()和HoughLinesP()
opencv中提供了HoughLines()和HoughLinesP()两个函数进行霍夫直线检测:
HoughLines:标准霍夫变换,多尺度霍夫变换; 其对应的参数和含义如下:
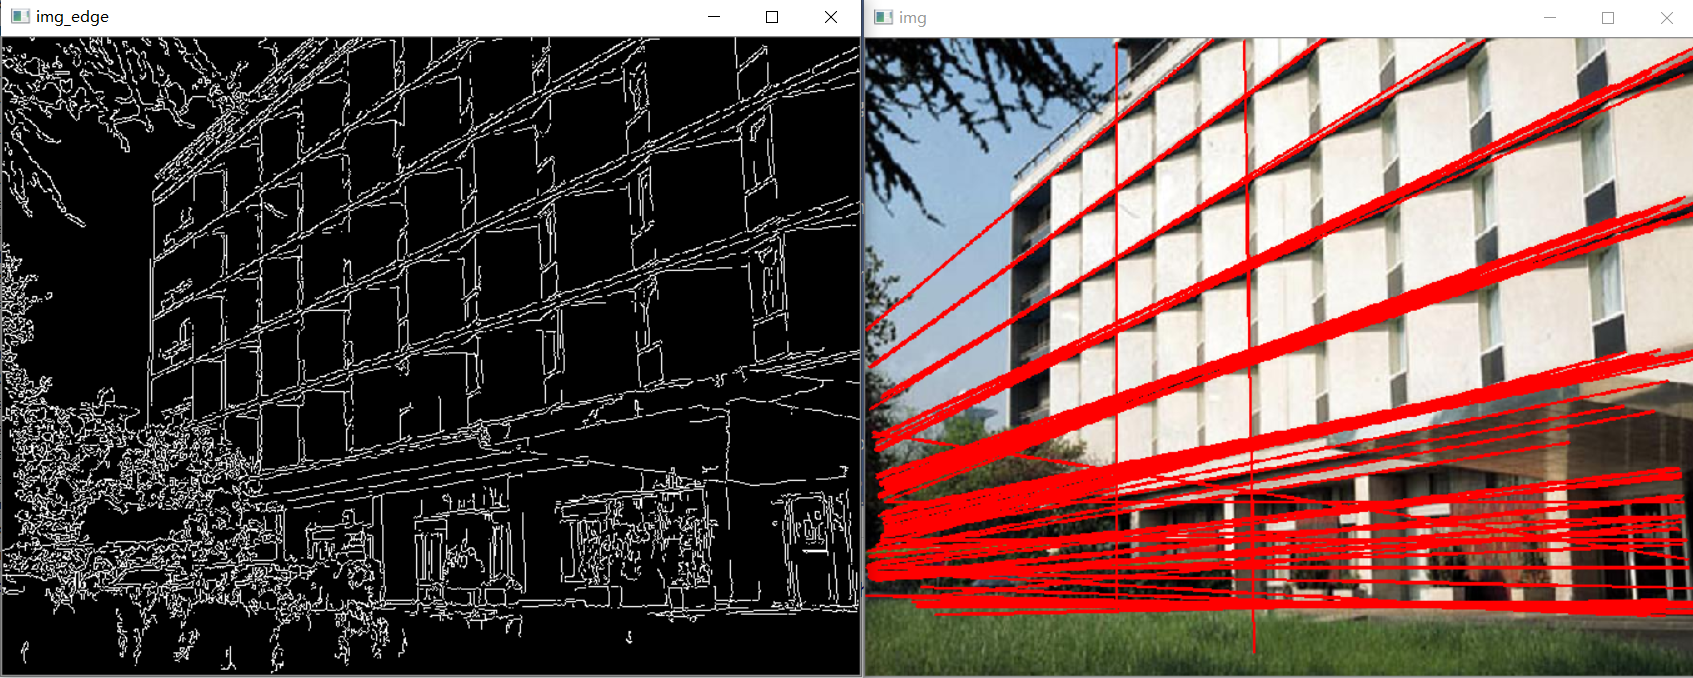
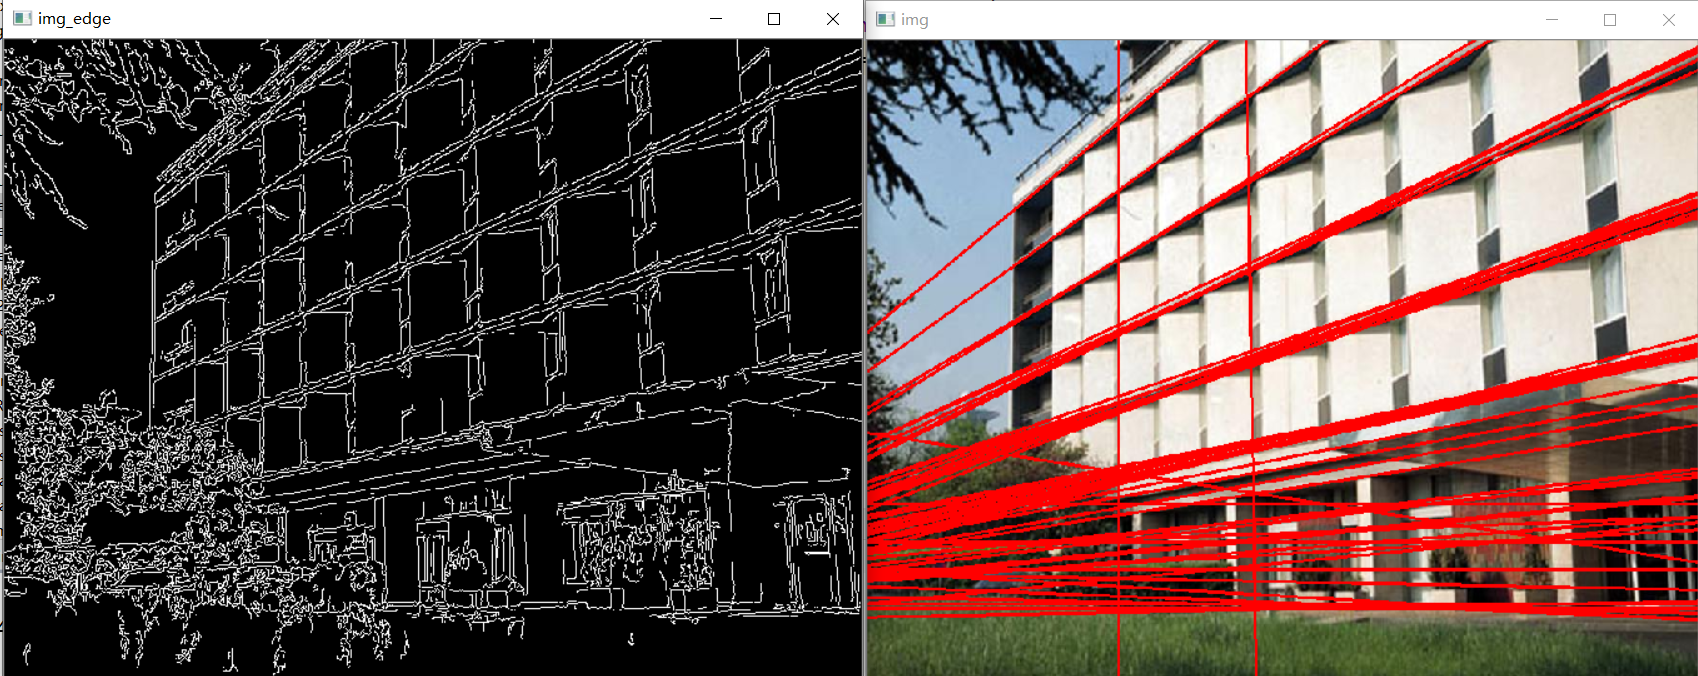
lines=cv.HoughLines(image, rho, theta, threshold, srn=0, stn=0, min_theta=0, max_theta=CV_PI)

    image: 单通道的灰度图或二值图
    rho: 距离步长,单位为像素(上述投票器中纵轴)
    theta: 角度步长,单位为弧度 (上述投票器中横轴)
    threshold: 投票器中计数阈值,当投票器中某个点的计数超过阈值,则认为该点对应图像中的一条直线,也可以理解为图像空间空中一条直线上的像素点个数阈值(如设为5,则表示这条直线至少包括5个像素点)
    srn:默认为0, 用于在多尺度霍夫变换中作为参数rho的除数,rho=rho/srn
    stn:默认值为0,用于在多尺度霍夫变换中作为参数theta的除数,theta=theta/stn
        (如果srn和stn同时为0,就表示HoughLines函数执行标准霍夫变换,否则就是执行多尺度霍夫变换)
    min_theta: 默认为0,表示直线与坐标轴x轴的最小夹角为0
    max_theta:默认为CV_PI,表示直线与坐标轴x轴的最大夹角为180度

lines:返回的直线集合,每一条直线表示为 (ρ,θ) or (ρ,θ,votes),ρ表示(0,0)像素点到该直线的距离,θ表示直线与坐标轴x轴的夹角,votes表示投票器中计数值
HoughLines()使用代码及其对应结果示例如下:
import cv2
import math
img_path = r"D:\data\building.jpg"
img = cv2.imread(img_path)
img_gray = cv2.cvtColor(img, cv2.COLOR_BGR2GRAY)
img_edge = cv2.Canny(img_gray, threshold1=50, threshold2=200, apertureSize=3)
lines = cv2.HoughLines(img_edge, rho=1, theta=math.pi/180, threshold=200)
print(lines)
# [[[ 355.           1.1693705]]
#  [[ 454.           1.37881  ]]
for line in lines:
    rho = line[0][0]
    theta = line[0][1]
    a = math.cos(theta)
    b = math.sin(theta)
    x0 = rho*a
    y0 = rho*b  # 原点到直线的垂线,与直线的交点
    x1 = int(x0+1000*(-b))   # 取1000长度,在(x0, y0)上下从直线中各取一点 (由于图像坐标系y轴反向,所以为-b)
    y1 = int(y0+1000*a)
    x2 = int(x0 - 1000 * (-b))
    y2 = int(y0 - 1000 * a)
    cv2.line(img, (x1, y1), (x2, y2), (0, 0, 255), 2)

cv2.namedWindow("img", cv2.WINDOW_NORMAL)
cv2.imshow("img", img)
cv2.namedWindow("img_edge", cv2.WINDOW_NORMAL)
cv2.imshow("img_edge", img_edge)
cv2.waitKey(0)
cv2.destroyAllWindows()
HoughLinesP:概率霍夫直线检测(可以检测线段)
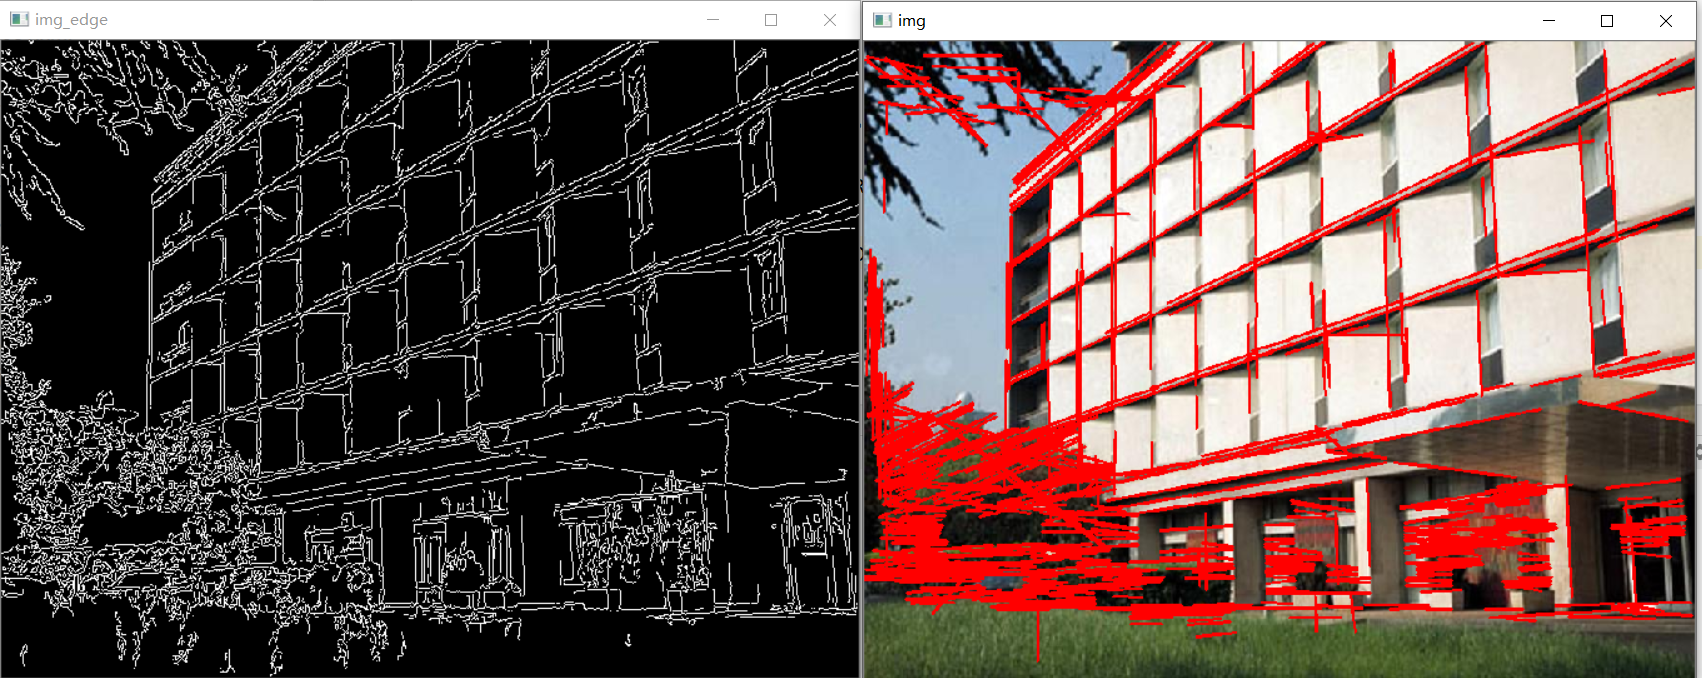
lines=cv.HoughLinesP(image, rho, theta, threshold, minLineLength=0, maxLineGap=0)
    rho: 距离步长,单位为像素
    theta: 角度步长,单位为弧度
    threshold: 投票器中计数阈值,当投票器中某个点的计数超过阈值,则认为该点对应图像中的一条直线,也可以理解为图像空间空中一条直线上的像素点个数阈值(如设为5,则表示这条直线至少包括5个像素点)
    minLineLength: 默认值为0,表示最小线段长度阈值(小于该阈值的会过滤掉)
    maxLineGap: 默认值为0,表示直线断裂的最大间隔距离阈值。即如果有两条线段是在一条直线上,但它们之间有间隙,那么如果这个间隔距离小于该值,则被认为是一条线段,否则认为是两条线段。

lines:返回的直线集合,每一条直线表示为(x1,y1,x2,y2),(x1,y1)和(x2,y2)表示线段的两个端点坐标值
HoughLinesP()使用示例代码和对应效果如下:
import cv2
import math
img_path = r"D:\data\building.jpg"
img = cv2.imread(img_path)
img_gray = cv2.cvtColor(img, cv2.COLOR_BGR2GRAY)
img_edge = cv2.Canny(img_gray, threshold1=50, threshold2=200, apertureSize=3)
lines = cv2.HoughLinesP(img_edge, rho=1, theta=math.pi/180, threshold=80, minLineLength=30, maxLineGap=10)
print(lines)
# [[[147 323 842  28]]
#  [[763 314 867 294]]
for line in lines:
    cv2.line(img, tuple(line[0][:2]), tuple(line[0][2:]), (0, 0, 255), 2)

cv2.namedWindow("img", cv2.WINDOW_NORMAL)
cv2.imshow("img", img)
cv2.namedWindow("img_edge", cv2.WINDOW_NORMAL)
cv2.imshow("img_edge", img_edge)
cv2.waitKey(0)
cv2.destroyAllWindows()
3 霍夫圆检测
标准霍夫圆检测
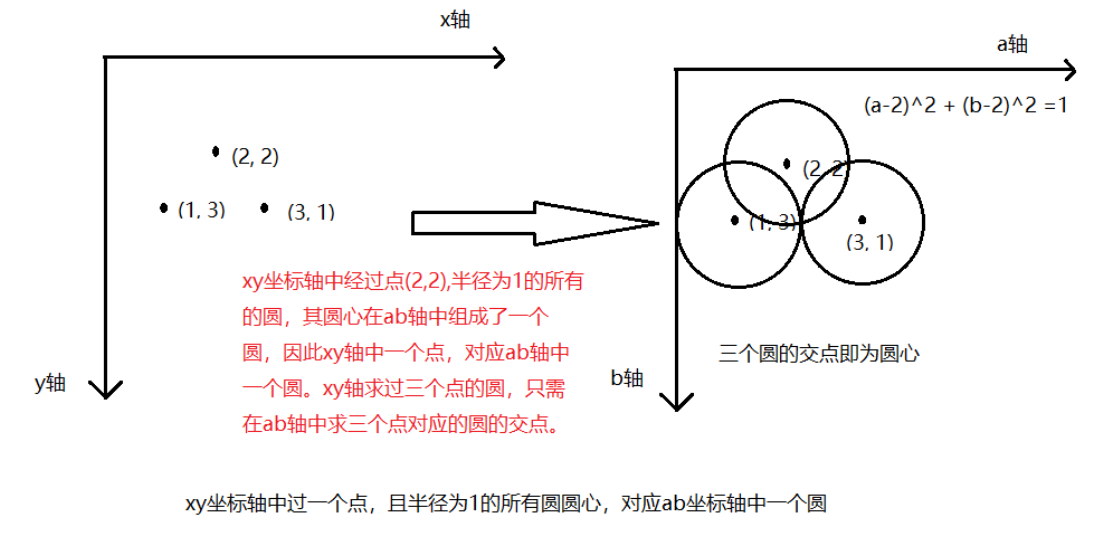
和标准霍夫直线检测一样,标准霍夫圆检测也有一个坐标轴转换过程,其理解主要在于三点:
-
xy坐标轴中过一个点,且半径为1所有圆的圆心,对应ab坐标轴中一个圆
-
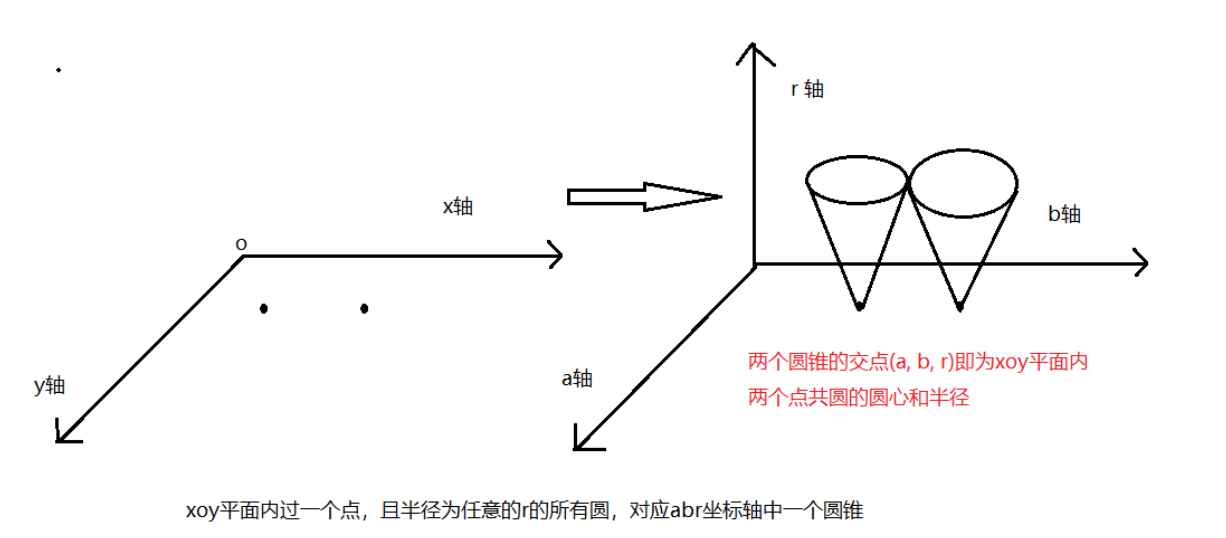
xoy平面内过一点,且半径为任意r的所有圆,对应abr坐标轴中一个圆锥
-
求xoy平面内多个点是否共圆,相当于判断abr坐标轴中多个圆锥的锥面是否相交
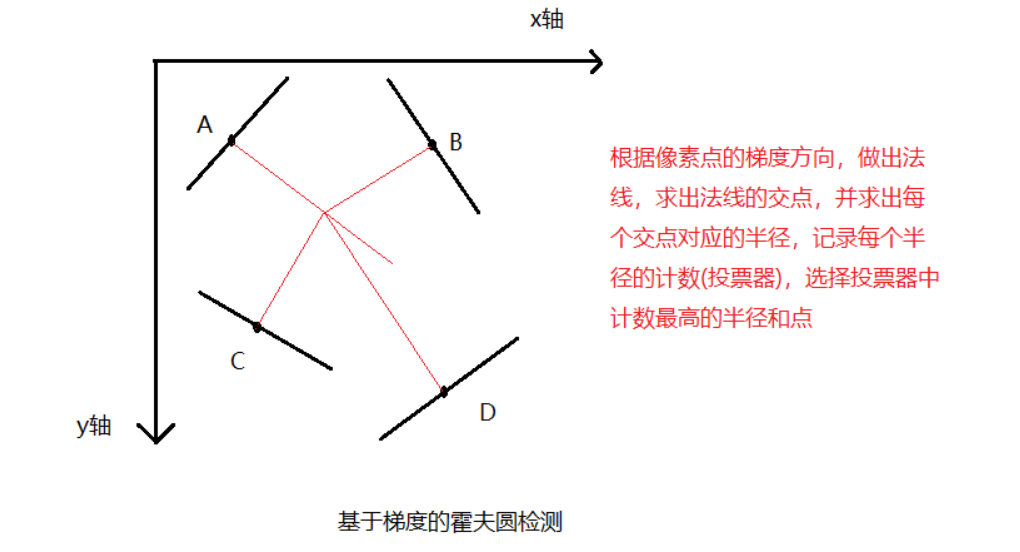
基于梯度的霍夫圆检测
标准霍夫圆检测计算量大,比较耗时,基于梯度的霍夫圆检测是对其的一种改进, 其计算步骤如下:
-
得到像素点的梯度方向(边缘提取过程中可以计算得到
-
画出像素点梯度方向的法线,并计算这些法线的交点作为圆心,用投票器记录每个交点对应半径的计数
-
投票器中选择计数最高的半径,并选择对应的圆心
opencv提供了基于梯度的霍夫圆检测函数HoughCircles
circles    =cv2.HoughCircles(image, method, dp, minDist, param1=100, param2=100, minRadius=0, maxRadius=0)
    image: 单通道灰度图
    method: 霍夫圆检测方法,包括HOUGH_GRADIENT和HOUGH_GRADIENT_ALT
    dp: 图片的分辨率和投票器的分辨率比值,dp=2表示投票器的宽高为图片的一半;对于HOUGH_GRADIENT_ALT方法,推荐dp=1.5
    minDist: 圆心之间的最小距离,距离太小时会产生很多相交的圆,距离太大时会漏掉正确的圆
    param1:canny边缘检测双阈值中的高阈值,低阈值默认是其一半
    param2: 对于HOUGH_GRADIENT方法,投票器计数阈值(基于圆心和半径的投票器);对于HOUGH_GRADIENT_ALT方法,表示接近一个圆的程度,param2越趋近1,拟合形状越趋近于圆,推荐param2=0.9
    minRadius:需要检测圆的最小半径
    maxRadius:需要检测圆的最大半径,maxRadius<=0时采用图片的最大尺寸(长或宽)
    (HOUGH_GRADIENT_ALT是对HOUGH_GRADIENT的改进,提取圆效果更好)

circles: 返回N个圆的信息,存储在1*N*3,每个圆组成为(x, y, radius),其中(x, y)为圆心,radius为半径
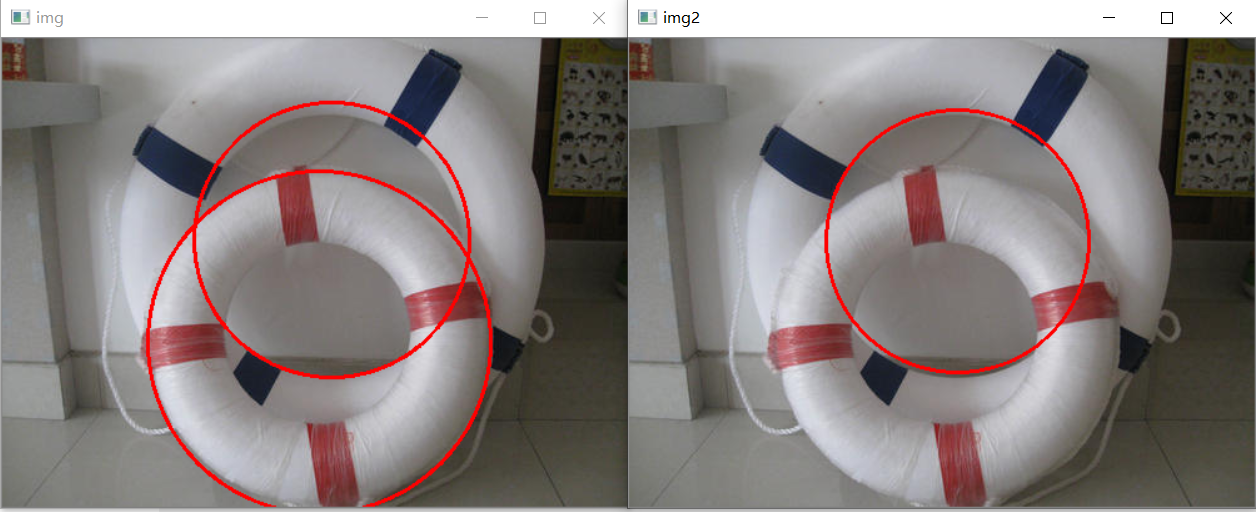
HoughCircles()函数使用代码和结果如下:
#coding:utf-8
import cv2
# img_path = r"D:\data\boat.png"
img_path = r"D:\data\3317881690.jpg"
img = cv2.imread(img_path)
img2 = img.copy()
img_gray = cv2.cvtColor(img, cv2.COLOR_BGR2GRAY)
circles = cv2.HoughCircles(img_gray, cv2.HOUGH_GRADIENT, 2, 30, param1=200, param2=100, minRadius=20)
print(circles)
for circle in circles[0]:
    center_x, center_y, radius = circle
    cv2.circle(img, (center_x, center_y), int(radius),(0, 0, 255), 2)

circles2 = cv2.HoughCircles(img_gray, cv2.HOUGH_GRADIENT_ALT, 2, 30, param1=300, param2=0.85, minRadius=20)
print(circles2)

for circle in circles2[0]:
    center_x, center_y, radius = circle
    cv2.circle(img2, (center_x, center_y), int(radius),(0, 0, 255), 2)

# cv2.namedWindow("img", cv2.WINDOW_NORMAL)
cv2.imshow("img", img)
# cv2.namedWindow("img2", cv2.WINDOW_NORMAL)
cv2.imshow("img2", img2)
cv2.waitKey(0)
cv2.destroyAllWindows()

 浙公网安备 33010602011771号