


原文:http://www.codeproject.com/useritems/LineCounterAddin.asp
注意:1.本文中的提到的“外接程序”等同与“插件程序”
2.本文提供的源码是在原作的基础上有过修改。
代码行数统计器(二):http://sifang2004.cnblogs.com/archive/2006/06/26/436178.html
代码行数统计器(一)
--Visual Studio 2005插件开发
前段日子也写篇关于开发Visual Studio 2005插件的文章,《用Visual Studio 2005 开发VB.NET-C#语言转换插件》,对这个也产生了点兴趣,后又在codeproject上看到了这篇文章,开发一个可以统计整个项目代码行数的插件,觉得还是挺不错的,准备介绍给E文不是很好的朋友,当然没有必要对文章进行整体翻译,只要达到我们学习的目的就行了,而且代码也是经过我做了些修改(我现在还有点纳闷,为什么他的源码编译后可以正常运行,我是修改了几个小时才能让它正确运行的,特别是在中文环境中,需要修改的地方更多),如果你觉得本文让你受益,那就向原著致以谢意吧!
背景
其实这种统计工程中各个文件及其整体的代码行数的插件在WndTabs.com已经出现很久了,只是直到现在它还没有出现支持VS2005的插件,那插件的运行效果显示如下:

这插件的用处不用我说了,也许你说你用不上,但有的却是喜欢至极了。
下面就是本文要完成的插件,运行后的效果图:
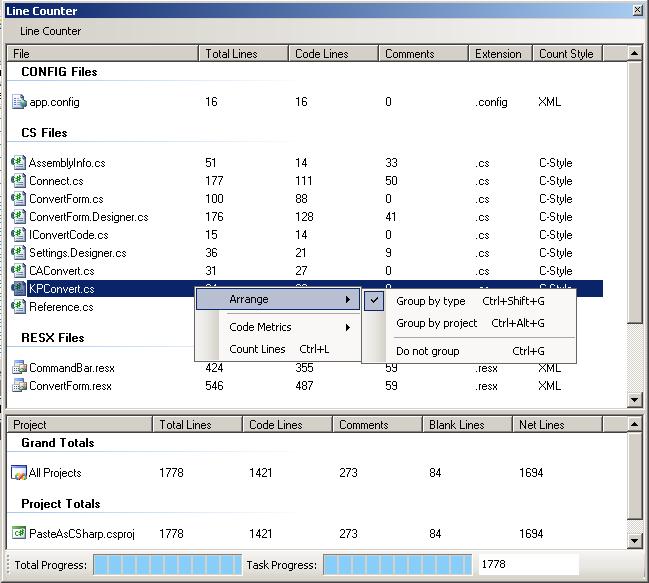
是不是觉得更加漂亮点呢,至于功能,基本上差不多,如果你还需要更多的功能,完全可以自己去扩展,没有看本文之前,也许还一头雾水,但看完本文,你就有点蠢蠢欲动了。
Visual Studio自动化和扩展
Visual Studio最大的特性之一就是其扩展性,对此我们中很多人应该都有所了解。Visual Studio 提供了三种不同级别的扩展:宏、外接程序和向导(就是我们本文中到的插件程序)以及 Visual Studio行业合作伙伴 (VSIP) 计划。
若要创建自动化应用程序(如外接程序),则必须执行一些步骤获取对自动化成员的访问权。首先必须引用必需的自动化程序集,然后必须获取对顶级对象 DTE2 的引用。
在 Visual Studio .NET 2002 和 Visual Studio .NET 2003 中,所有的核心自动化项均位于名为 EnvDTE 的程序集中,并且其最高分层对象为 DTE 对象。该对象是所有核心自动化对象、集合及其成员的父对象。DTE2 是从 DTE 派生的。
对于 Visual Studio 2005,只对这些核心自动化对象、集合及成员的一部分进行添加和更新。所有新的更新功能都位于名为 EnvDTE80 的程序集中(EnvDTE 8.0 版),而不会更新现有的程序集和危及现有外接程序和自动化项目的向后兼容性。EnvDTE80 中大多数更新的函数保留与早期版本相同的名称,但是在函数名后加上数字 2。例如,在新版本中,TaskItems 集合名为 TaskItems2,Solution 对象名为 Solution2。由于新成员比早期版本的功能更强健,并且包含最新功能,因此推荐在编写新的自动化应用程序时使用新对象和新集合。
虽然新项位于 EnvDTE80 中,但是大多数核心自动化功能仍然位于 EnvDTE 中。因此,在编写新的自动化应用程序(如外接程序)时,一定要引用 EnvDTE 和 EnvDTE80 两者。另外,如果使用 EnvDTE 程序集中的成员,也必须设置对 DTE 对象和 DTE2 对象的引用。这使您可以访问所有的项。
外接程序是一些可以为您节省时间和精力的应用程序,可附加到 Visual Studio 集成开发环境 (IDE) 中使用。外接程序是 COM 对象,它们实现 IDTExtensibility2 接口,并通过 EnvDTE 和 EnvDTE80 程序集中包含的核心自动化对象模型与 IDE 通信。工具栏模型包含在 Microsoft.VisualStudio.CommandBars 中。
使用到的主要对象就是DTE对象,利用它我们能编程控制在Visual Studio中的任何东西,从工具栏,装卸工具窗口,甚至编辑文件和初始化编译。
创建一个插件工程
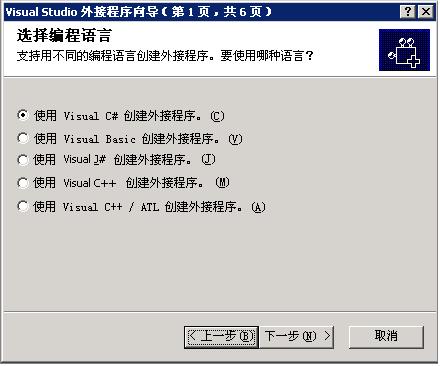
Visual Studio 2005插件能使用任何编程语言写,当你在运行Add-In向导(也就是插件工程向导)时,你可以选择使用何种语言编写,向导还会向你显示其它的选项,具体每个选项的含义与作用,请参考MSDN,我只列举如下(外接程序就是本文所说的插件):
1. 创建一个新的 Visual Studio 外接程序项目。这会启动“外接程序向导”。
该项目类型位于“其他项目类型”下的“扩展性”文件夹中。
2. 在“选择编程语言”页选择一种语言。
这使您可以选择将用来编写外接程序的编程语言。
3. 在“选择应用程序宿主”页选择一个或多个应用程序,如 Visual Studio。
这使您可以选择需要的应用程序以便创建外接程序后可在其中运行该外接程序,如 Visual Studio 或 Visual Studio“宏 IDE”。
4. 在“输入名称和说明”页中输入外接程序的名称和说明。
创建外接程序后,此名称和说明显示在“外接程序管理器”对话框的“可用外接程序”列表中,它告诉用户外接程序的用途和工作方式等。
5. 在“选择外接程序选项”页可以指定:
² 是否希望外接程序显示在“工具”菜单中。
² 希望启动外接程序的时间。
² 外接程序是否不使用模型用户界面 (UI),以便可以和命令行生成一起安全地使用。
此页使您可以指定外接程序的某些行为选项。
6. 在“选择‘帮助’中的‘关于’信息”页指定是否要将外接程序的信息显示在 Visual Studio“帮助”中的“关于”窗口中,如果是这样,就会显示所需信息。
可以添加到 Visual Studio“帮助”中的“关于”窗口的信息包括版本号、支持详细信息和授权数据等。
完成步骤 1 - 6 后,选定的选项会显示在“摘要”页中。
7. 选择“完成”创建外接程序。
现在,您已经拥有了一个功能齐全的基本外接程序。若要使外接程序能够执行一些有用的操作,则必须添加相应代码。
根据“Add-In Wizard”创建一个外接程序,它具有全面的功能,但是只有基本框架,创建完该程序后可立即运行它。向导会自动生成一个Connect.cs文件,这个文件就是任何Visual Studio插件的起动点,它实现了一些关键接口,例如IDTExtensibility2, IDTCommandTarget,在几个关键方法中提供一些启动代码,最重要的一个方法就是OnConnection(object application, ext_ConnectMode connectMode, object addInInst, ref Array custom)。当启动一个插件时,第一个调用的方法就是它,你可以在其中增加一些初始化代码,以及一些技术性的处理代码,只要这些是工作在Visual Studio自动模型所公开的范围之内。通常,该方法被插件向导生成的代码填充,它实现你当时所做出的选择(例如,增加一个工具菜单项)。
在Onconnection方法中许多代码都有很好注释说明,我们就不详细解释了,首先我们要注意的这三行代码:
_applicationObject = (DTE2)application;
_addInInstance = (AddIn)addInInst;
if (connectMode == ext_ConnectMode.ext_cm_AfterStartup || connectMode == ext_ConnectMode.ext_cm_Startup)
第一行就是缓存一个DTE对象,这是在Visual Studio启动插件时由它提供的,第二行就是缓存插件自己的一个实例,在你的编写的插件代码中你将会经常调用它,第三行是一个if语句,当插件启动后,涉及到的条件的处理,Visual Studio通常会两次启动插件,一次就是设置自己的UI,如菜单项,菜单栏按钮等等;另外,当插件真正运行后,插件被再次启动,这可以发生在两种不同情况下(第一是当VS启动后自动运行,或者是在VS启动后通过其它进程来运行)。If语句中两个条件含义你可以参照下表:
|
成员名称 |
说明 |
|
ext_cm_AfterStartup |
外接程序是在 Visual Studio 启动后加载的。 |
|
ext_cm_CommandLine |
外接程序是从命令行加载的。 |
|
ext_cm_External |
外接程序是由外部客户端加载的。(Visual Studio 不再使用此设置。) |
|
ext_cm_Solution |
外接程序是在解决方案中加载的。 |
|
ext_cm_Startup |
外接程序是在 Visual Studio 启动时加载的。 |
|
ext_cm_UISetup |
外接程序是为用户界面设置而加载的。 |
枚举ext_ConnectMode的成员
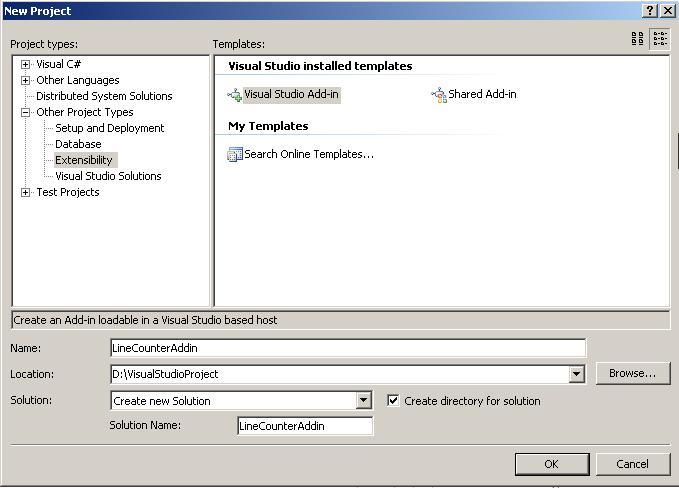
OnConnection方法中的其它代码都有注释,根据你当初在向导中做出的选择,代码会有所不同,对于该Line Counter插件来说,我们去掉了所有的自动生成的代码,完全用自己写的代码代替了,如果你希望跟着本文听我解释如果创建一个工具栏插件,那么按如下设置创建一个新的工程:
工程名称:LineCounterAddin
语言:c#
插件名称:Line Counter
插件描述:Line Counter 2005 - Source Code Line Counter
其它选项:默认
工程创建后,添加如下引用:
System.Drawing
System.Windows.Forms
最后,添加一个用户控件LineCounterBrowser,该用户控件是本插件的主要的交换接口,它就像普通的Widows Form那样工作,当然这不是本文讨论的重点,你可以下载源码,从源码中查看该用户控件的详细细节,现在,我们向新的用户控件中加入下面的代码:
private DTE
public DTE2 DTE
{
set
{
m_dte = value;
}
}
暂时在用户控件代码中我们不需要任何其它东西,这个属性以及相应的变量为我们提供了一种从Connect类向我们的UI类传递DTE对象引用的方法。我们在Connect类的OnConnection方法中设定该属性,OnConnection方法中的全部代码就如下面的,已经注释的非常清楚,在这我就不做深入解释了。
public void OnConnection(object application, ext_ConnectMode connectMode, object addInInst, ref Array custom)
{
// Cache the DTE and add-in instance objects
_applicationObject = (DTE2)application;
_addInInstance = (AddIn)addInInst;
// Only execute the startup code if the connection mode is a startup mode
if (connectMode == ext_ConnectMode.ext_cm_AfterStartup || connectMode == ext_ConnectMode.ext_cm_Startup)
{
try
{
// Declare variables
string ctrlProgID, guidStr;
EnvDTE80.Windows2 toolWins;
object objTemp = null;
// The Control ProgID for the user control
ctrlProgID = "LineCounterAddin.LineCounterBrowser";
// This guid must be unique for each different tool window,
// but you may use the same guid for the same tool window.
// This guid can be used for indexing the windows collection,
// for example: applicationObject.Windows.Item(guidstr)
guidStr = "{
// Get the executing assembly...
System.Reflection.Assembly asm = System.Reflection.Assembly.GetExecutingAssembly();
// Get Visual Studio's global collection of tool windows...
toolWins = (Windows2)_applicationObject.Windows;
// Create a new tool window, embedding the LineCounterBrowser control inside it...
m_toolWin = toolWins.CreateToolWindow2(_addInInstance, asm.Location, ctrlProgID, "Line Counter", guidStr, ref objTemp);
// Pass the DTE object to the user control...
LineCounterBrowser browser = (LineCounterBrowser)objTemp;
browser.DTE = _applicationObject;
// and set the tool windows default size...
m_toolWin.Visible = true; // MUST make tool window visible before using any methods or properties,
// otherwise exceptions will occurr.
//toolWin.Height = 400;
//toolWin.Width = 600;
}
catch (Exception ex)
{
Debug.WriteLine(ex.Message);
Debug.WriteLine(ex.StackTrace);
}
}
// Create the menu item and toolbar for starting the line counter
if (connectMode == ext_ConnectMode.ext_cm_UISetup)
{
try
{
// Get the command bars collection, and find the MenuBar command bar
CommandBars cmdBars = ((Microsoft.VisualStudio.CommandBars.CommandBars)_applicationObject.CommandBars);
CommandBar menuBar = cmdBars["MenuBar"];
// Add command to 'Tools' menu
CommandBarPopup toolsPopup = (CommandBarPopup)menuBar.Controls["Tools"];
AddPopupCommand(toolsPopup, "LineCounterAddin", "Line Counter 2005", "Display the Line Counter 2005 window.", 1);
// Add new command bar with button
CommandBar buttonBar = AddCommandBar("LineCounterAddinToolbar", MsoBarPosition.msoBarFloating);
AddToolbarCommand(buttonBar, "LineCounterAddinButton", "Line Counter 2005", "Display the Line Counter 2005 window.", 1);
}
catch (Exception ex)
{
string error = ex.Message;
}
}
}
在Visual Studio的执行期间的不同点,OnConnection方法会运行几次,我们关注的是方法被调用的可能原因中的两个,其一是UI Setpup,另外就是Startup,当因为UI Setpup OnConnection方法被调用时,为了这个插件,我们想用一个菜单项以及菜单栏按钮更新Visual Studio的用户接口,我们是在OnConnection方法中的第二个if语句中完成的。当OnConnection方法因为Startup(有两种不同的方法-当VS启动时,VS启动后)调用时我们显示我们的插件。
当执行UI Setup时,我们已经创建了几个private辅助方法来简化处理,下面,你能发现不少方法能帮助你在Visual Studio中建立新的CommandBar,还可以向这些CommandBar中添加命令。这些方法还包含向菜单中添加菜单项,这些方法也都注释得非常清楚了。关于这些方法,要注意的一件事情就是他们认为你的插件项目中有一个包含你所有你希望为你命令使用的图片(包括菜单项以及你工具条上的按钮。等下我就解释如何添加自定义的图标。
/// <summary>
/// Add a command bar to the VS2005 interface.
/// </summary>
/// <param name="name">The name of the command bar</param>
/// <param name="position">Initial command bar positioning</param>
/// <returns></returns>
private CommandBar AddCommandBar(string name, MsoBarPosition position)
{
// Get the command bars collection
CommandBars cmdBars = ((Microsoft.VisualStudio.CommandBars.CommandBars)_applicationObject.CommandBars);
CommandBar bar = null;
try
{
try
{
// Create the new CommandBar
bar = cmdBars.Add(name, position, false, false);
}
catch (ArgumentException)
{
// Try to find an existing CommandBar
bar = cmdBars[name];
}
}
catch
{
}
return bar;
}
/// <summary>
/// Add a menu to the VS2005 interface.
/// </summary>
/// <param name="name">The name of the menu</param>
/// <returns></returns>
private CommandBar AddCommandMenu(string name)
{
// Get the command bars collection
CommandBars cmdBars = ((Microsoft.VisualStudio.CommandBars.CommandBars)_applicationObject.CommandBars);
CommandBar menu = null;
try
{
try
{
// Create the new CommandBar
menu = cmdBars.Add(name, MsoBarPosition.msoBarPopup, false, false);
}
catch (ArgumentException)
{
// Try to find an existing CommandBar
menu = cmdBars[name];
}
}
catch
{
}
return menu;
}
/// <summary>
/// Add a command to a popup menu in VS2005.
/// </summary>
/// <param name="popup">The popup menu to add the command to.</param>
/// <param name="name">The name of the new command.</param>
/// <param name="label">The text label of the command.</param>
/// <param name="ttip">The tooltip for the command.</param>
/// <param name="iconIdx">The icon index, which should match the resource ID in the add-ins resource assembly.</param>
private void AddPopupCommand(CommandBarPopup popup, string name, string label, string ttip, int iconIdx)
{
// Do not try to add commands to a null menu
if (popup == null)
return;
// Get commands collection
Commands2 commands = (Commands2)_applicationObject.Commands;
object[] contextGUIDS = new object[] { };
try
{
// Add command
Command command = commands.AddNamedCommand2(_addInInstance, name, label, ttip, false, iconIdx, ref contextGUIDS, (int)vsCommandStatus.vsCommandStatusSupported + (int)vsCommandStatus.vsCommandStatusEnabled, (int)vsCommandStyle.vsCommandStylePictAndText, vsCommandControlType.vsCommandControlTypeButton);
if ((command != null) && (popup != null))
{
command.AddControl(popup.CommandBar, 1);
}
}
catch (ArgumentException)
{
// Command already exists, so ignore
}
}
/// <summary>
/// Add a command to a toolbar in VS2005.
/// </summary>
/// <param name="bar">The bar to add the command to.</param>
/// <param name="name">The name of the new command.</param>
/// <param name="label">The text label of the command.</param>
/// <param name="ttip">The tooltip for the command.</param>
/// <param name="iconIdx">The icon index, which should match the resource ID in the add-ins resource assembly.</param>
private void AddToolbarCommand(CommandBar bar, string name, string label, string ttip, int iconIdx)
{
// Do not try to add commands to a null bar
if (bar == null)
return;
// Get commands collection
Commands2 commands = (Commands2)_applicationObject.Commands;
object[] contextGUIDS = new object[] { };
try
{
// Add command
Command command = commands.AddNamedCommand2(_addInInstance, name, label, ttip, false, iconIdx, ref contextGUIDS, (int)vsCommandStatus.vsCommandStatusSupported + (int)vsCommandStatus.vsCommandStatusEnabled, (int)vsCommandStyle.vsCommandStylePict, vsCommandControlType.vsCommandControlTypeButton);
if (command != null && bar != null)
{
command.AddControl(bar, 1);
}
}
catch (ArgumentException)
{
// Command already exists, so ignore
}
}
现在我们有了必要的代码,让插件正确地集成到Visual Studio用户接口中去的代码,并当得到请求时显示插件,我们需要增加命令处理,在插件中处理命令是一件相当简单的事情,这个 IDTCommandTarget接口,我们的Connect 类实现了它,提供了一些必要的方法从Visual Studio中正确地处理命令。你将需要根据下面的代码更新QueryStatus和Exec 方法,下面的代码的含义是,当它的菜单项或者工具条按钮被点击后显示出Line Counter插件。
public void QueryStatus(string commandName, vsCommandStatusTextWanted neededText, ref vsCommandStatus status, ref object commandText)
{
if(neededText == vsCommandStatusTextWanted.vsCommandStatusTextWantedNone)
{
// Respond only if the command name is for our menu item or toolbar button
if (commandName == "LineCounterAddin.Connect.LineCounterAddin" || commandName == "LineCounterAddin.Connect.LineCounterAddinButton")
{
// Disable the button if the Line Counter window is already visible
if (m_toolWin.Visible)
{
// Set status to supported, but not enabled
status = (vsCommandStatus)vsCommandStatus.vsCommandStatusSupported;
}
else
{
// Set status to supported and eneabled
status = (vsCommandStatus)vsCommandStatus.vsCommandStatusSupported | vsCommandStatus.vsCommandStatusEnabled;
}
return;
}
}
}
public void Exec(string commandName, vsCommandExecOption executeOption, ref object varIn, ref object varOut, ref bool handled)
{
handled = false;
if(executeOption == vsCommandExecOption.vsCommandExecOptionDoDefault)
{
// Respond only if the command name is for our menu item or toolbar button
if (commandName == "LineCounterAddin.Connect.LineCounterAddin" || commandName == "LineCounterAddin.Connect.LineCounterAddinButton")
{
// Only display the add-in if it is not already visible
if (m_toolWin != null && m_toolWin.Visible == false)
{
m_toolWin.Visible = true;
}
handled = true;
return;
}
}
}
随着OnConnection方法的完成,你就已经建立了一个漂浮工具窗口的插件,完整的用户控件能让你计算你的解决方案中总共的代码行数,各个工程的代码行数,以及各个文件的代码行数。
代码行数统计器(二):http://sifang2004.cnblogs.com/archive/2006/06/26/436178.html

 浙公网安备 33010602011771号