(一)Spring框架基础
一、什么是spring框架
-
spring是J2EE应用程序框架,是轻量级的IoC和AOP的容器框架,主要是针对javaBean的生命周期进行管理的轻量级容器,可以单独使用,也可以和Struts框架,ibatis框架等组合使用。
二、架构概述

2.1 IoC(Inversion of Control) :控制反转
- 对象创建责任的反转,在spring中BeanFacotory是IoC容器的核心接口,负责实例化,定位,配置应用程序中的对象及建立这些对象间的依赖。XmlBeanFacotory实现BeanFactory接口,通过获取xml配置文件数据,组成应用对象及对象间的依赖关系。

-
spring中有三种注入方式,一种是set注入,一种是接口注入,另一种是构造方法注入。
2.1.1 第一个基于spring框架的程序(使用spring框架的ioc的优势)
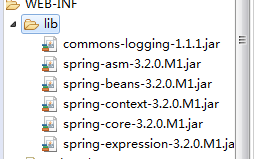
- 导包,由于本例是最简单的spring的程序,所以jar包比较少。

- 创建spring的配置文件。
spring.xml
<?xml version="1.0" encoding="UTF-8"?>

<beans xmlns="http://www.springframework.org/schema/beans"
 xmlns:xsi="http://www.w3.org/2001/XMLSchema-instance"
 xmlns:util="http://www.springframework.org/schema/util"
 xmlns:p="http://www.springframework.org/schema/p"
 xmlns:aop="http://www.springframework.org/schema/aop"
 xmlns:tx="http://www.springframework.org/schema/tx"
 xsi:schemaLocation="
 http://www.springframework.org/schema/beans http://www.springframework.org/schema/beans/spring-beans-2.0.xsd
 http://www.springframework.org/schema/util http://www.springframework.org/schema/util/spring-util-2.0.xsd
 http://www.springframework.org/schema/tx http://www.springframework.org/schema/tx/spring-tx-2.0.xsd
 http://www.springframework.org/schema/aop http://www.springframework.org/schema/aop/spring-aop-2.0.xsd">

 <!-- 以上为头文件,必须在eclipse的xml catalog里有相应xsd文件, 有了头文件之后会有提示-->

 <bean  class="test.Man"  name="man"></bean>   <!-- 创建test包里的Man类的对象,对象名为man -->
 </beans>
- Test.java
package test;

import org.springframework.context.ApplicationContext;
import org.springframework.context.support.ClassPathXmlApplicationContext;
import org.springframework.context.support.FileSystemXmlApplicationContext;

public class Test {

    public static void main(String[] args) {
        Test test=new Test();

        test.one();
        test.two();
        test.three();

    }
/**
 * 普通模式:哪里需要对象,就在哪个方法里new 一个类的对象然后是用。
 * 存在的不足:如果有很多个类都使用一个对象,而这个对象改变了的话,就需要在很多个类里修改这个对象。
 */
    private void one() {
        PersonI man=new Man();
        man.eat();
        man.sleep();

    }

    /**
     * 设计模式(工厂模式、门面模式):
     * ,优势:如果PersonI的实现类修改了,只要在工厂PersonFactory中修改相应的类即可,而这里无须修改。
     */
    private void two() {
        PersonI woman=PersonFactory.getWomen(); //工厂模式 ,优势:如果PersonI的实现类修改了,只要在工厂PersonFactory中修改相应的类即可,而这里无须修改。
        woman.eat();
        woman.sleep();

    }

    /**
     * spring的ioc模式,将对象的实例化交给spring框架(spring容器)
     */
    private void three() {
        /**
         * 这里的Man对象是在spring.xml中创建(new)好了
         */
    //    ApplicationContext applicationContext=new FileSystemXmlApplicationContext("src/spring.xml");  //推荐使用new ClassPathXmlApplicationContext
        ApplicationContext applicationContext=new ClassPathXmlApplicationContext("spring.xml");
        Man man=(Man)applicationContext.getBean("man");  //getBean("man")里的man是spring.xml文件里的id或者name为man的bean
        man.sleep();
        man.eat();

    }

}
- PersonFactory.java
package test;

/**
 * 工厂模式,
 * @author Administrator
 *
 */
public class PersonFactory {
    public static PersonI getMan(){

        PersonI man=new Man();
        return man;

    }

    public static PersonI getWomen(){
        PersonI women=new Women();

        return women;

    }
}
- PersonI.java
package test;

public interface PersonI {
    void eat();
    void sleep();
}

class Man implements PersonI{

    public void eat() {
        System.out.println("Man 中的eat方法");

    }

    public void sleep() {
        System.out.println("Man 中的sleep方法");

    }

}

 class Women implements PersonI{

    public void eat() {
        System.out.println("Women 中的eat方法");

    }

    public void sleep() {
        System.out.println("Women 中的sleep方法");

    }
}
结果:


- 其中id和name标签属性都是bean的名称,区别在于id表示的bean如果这个xml被别的xml文件继承,则这个bean也可以在别的xml文件里使用。而name则不可以。
- abstract="true" 表示这个bean是抽象的,不能实例化只能被继承。
- parent="" 表示继承于某个类。
- init-method="" 表示这个bean创建的时候就调用这个方法,当然这个方法的调用会在构造方法调用之后。 destroy-method="" 表示bean销毁的时候调用这个方法,有时候不会调用。
- scope="singleton || prototype " singleton表示单例模式,对象只产生一个实例,init-method方法和destroy-method方法只执行一次。 prototype表示原型模式,每次产生一个对象,每次产生一个对象init-method方法和destroy-method方法都会执行一次。
2.2 DI:依赖注入 (三种)
- 一种是set注入,一种是接口注入,另一种是构造方法注入。
(1) set注入
(2) 构造器注入
这种方式的注入是指带有参数的构造函数注入,看下面的例子,我创建了两个成员变量SpringDao和User,但是并未设置对象的set方法,所以就不能支持第一种注入方式,
这里的注入方式是在SpringAction的构造函数中注入,也就是说在创建SpringAction对象时要将SpringDao和User两个参数值传进来:
    public class SpringAction {
        //注入对象springDao
        private SpringDao springDao;
        private User user;

        public SpringAction(SpringDao springDao,User user){
            this.springDao = springDao;
            this.user = user;
            System.out.println("构造方法调用springDao和user");
        }

            public void save(){
            user.setName("卡卡");
            springDao.save(user);
        }
    }
在XML文件中同样不用<property>的形式,而是使用<constructor-arg>标签,ref属性同样指向其它<bean>标签的name属性:
    <!--配置bean,配置后该类由spring管理-->
        <bean name="springAction" class="com.bless.springdemo.action.SpringAction">
            <!--(2)创建构造器注入,如果主类有带参的构造方法则需添加此配置-->
            <constructor-arg ref="springDao" index="0"></constructor-arg>
            <constructor-arg ref="user"  index="1"></constructor-arg>
        </bean>
            <bean name="springDao" class="com.bless.springdemo.dao.impl.SpringDaoImpl"></bean>
             <bean name="user" class="com.bless.springdemo.vo.User"></bean>
(3) 接口注入
- Person.java
package test;

import org.springframework.context.ApplicationContext;
import org.springframework.context.support.ClassPathXmlApplicationContext;

public class Person {

    private Phone phone;

/**
 * set注入
 * @param phone 接口
 */
    public void setPhone(Phone phone) {
        this.phone = phone;
    }

    public void usePhone(){
        this.phone.games();

    }

    public static void main(String[] args) {
        ApplicationContext context=new ClassPathXmlApplicationContext("spring.xml");
        Person person=(Person)context.getBean("person");
        person.usePhone();
    }
}
- spring.xml
 xmlns:util="http://www.springframework.org/schema/util"
 xmlns:p="http://www.springframework.org/schema/p"
 xmlns:aop="http://www.springframework.org/schema/aop"
 xmlns:tx="http://www.springframework.org/schema/tx"
 xsi:schemaLocation="
 http://www.springframework.org/schema/beans http://www.springframework.org/schema/beans/spring-beans-2.0.xsd
 http://www.springframework.org/schema/util http://www.springframework.org/schema/util/spring-util-2.0.xsd
 http://www.springframework.org/schema/tx http://www.springframework.org/schema/tx/spring-tx-2.0.xsd
 http://www.springframework.org/schema/aop http://www.springframework.org/schema/aop/spring-aop-2.0.xsd">

 <!-- 以上为头文件,必须在eclipse的xml catalog里有相应xsd文件, 有了头文件之后会有提示-->

    <bean name="person" class="test.Person">
        <property name="phone" ref="huawei"></property>
    </bean>

    <bean name="iPhone" class="test.iPhone"></bean>
    <bean name="huawei" class="test.HuaWei"></bean>

    </beans>
- Person类的成员属性Phone phone;是一个接口,在spring.xml实例化Person的时候,把Phone接口的实现类对象“huawei”引入到Person类中,如果要引用其他对象,只需要把ref="huawei" 即可,其他代码不用改变。
2.3 AOP面向切面编程
aop就是纵向的编程,如下图所示,业务1和业务2都需要一个共同的操作,与其往每个业务中都添加同样的代码,不如写一遍代码,让两个业务共同使用这段代码。
spring中面向切面变成的实现有两种方式,一种是动态代理,一种是CGLIB,动态代理必须要提供接口,而CGLIB实现是有继承。
(1)AOP之代理模式(proxy模式)
- 代理模式:通俗来讲,比如我们去买动车票,可以去动车站售票点买票,或者去代理点买票。通常来讲,售票点只提供售票而代理点不仅可以售票而且可以实现其他的功能。 从程序设计上讲,如果我们希望某个类不被直接使用,那么我们可以创建这个类的代理,代理并不真正实现功能,而是经过处理之后调用被代理类的功能,比如客户到代理点买票,代理点的票是从售票点买来的(相当于调用实现类的方法),可以得出: 代理应该实现一个接口(被代理类也实现这个接口),也有被代理类作为成员变量。
- 静态代理 or 动态代理
案例一: 静态代理
TicketIFC.java(售票接口)
package proxy;

public interface TicketIFC {

    void sellTicket();

}
Ticket_station.java(实现类)
package proxy;

public class Ticket_station implements TicketIFC{

    public void sellTicket() {
        System.out.println("售票站售票");
    }


}
Ticket_proxy.java(代理类,实现售票接口且有实现类对象)
package proxy;

public class Ticket_proxy implements TicketIFC{

    private TicketIFC ticketIFC;

    public Ticket_proxy(TicketIFC ticketIFC){
        this.ticketIFC=ticketIFC;

    }

    public void sellTicket() {
        this.ticketIFC.sellTicket();
    }

}
Test.java(测试类)
package proxy;

public class Test {

    public static void main(String[] args) {

        TicketIFC ticketIFC=new Ticket_proxy(new Ticket_station());

        ticketIFC.sellTicket();

    }
}
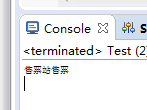
结果:

案例二:动态代理(代理类是在运行时动态产生的)
- AOP的原理就是java的动态代理机制。
- 在java的动态代理机制中,有两个重要的类或接口,一个是 InvocationHandler(Interface)、另一个则是 Proxy(Class),这一个类和接口是实现我们动态代理所必须用到的。
- 每一个动态代理类都必须要实现InvocationHandler这个接口,并且每个代理类的实例都关联到了一个handler,当我们通过代理对象调用一个方法的时候,这个方法的调用就会被转发为由InvocationHandler这个接口的 invoke 方法来进行调用。
- 代理类原则: 1.实现某一接口 2.被代理的实现类。
PersonI.java (接口)
package spring_project_01;

public interface PersonI {

    void eat();
    void sleep();
}
Man.java(实现类)
package spring_project_01;

public class Man implements PersonI{

    public void eat() {
        System.out.println("Man中的eat方法");

    }

    public void sleep() {
        System.out.println("Man中的sleep方法");

    }

}
Women.java(实现类)
package spring_project_01;

public class Women implements PersonI{
    public void eat() {
        System.out.println("Women中的eat方法");

    }

    public void sleep() {
        System.out.println("Women中的sleep方法");

    }

}
ProxyUtil.java(代理类创建工具)
package proxy_dynamic;

import java.lang.reflect.InvocationHandler;
import java.lang.reflect.Method;
import java.lang.reflect.Proxy;
/**
 * 动态创建代理类
 * @author Administrator
 *
 */
public class ProxyUtil implements InvocationHandler{

    private Object targetObj;
    public Object createProxy(Object targetObj){
        this.targetObj=targetObj;
        //Proxy.newProxyInstance参数为被代理类的类加载器、被代理类的接口,以及一个InvocationHandler对象,表示的是当我这个动态代理对象在调用方法的时候,会关联到哪一个InvocationHandler对象上
        Object proxyObj=Proxy.newProxyInstance(targetObj.getClass().getClassLoader(), targetObj.getClass().getInterfaces(), this);

        return proxyObj;
    }
    /**
     * proxy:指代我们所代理的那个真实对象
     * method:指代的是我们所要调用真实对象的某个方法的Method对象
     * args:指代的是调用真实对象某个方法时接受的参数
     */
    public Object invoke(Object proxy, Method method, Object[] args) throws Throwable {
        System.out.println("在被代理对象方法调用前会自动调用");

        System.out.println("代理对象方法调用前");
        Object objectReturnValue=    method.invoke(this.targetObj, args);  //在代理实例上处理方法调用并返回结果。java反射机制,即用方法调用对象。
        System.out.println("代理对象方法调用后");

        return objectReturnValue;
    }
}
Test.java(测试类)
package proxy_static;

public class Test {


    public static void main(String[] args) {

        TicketIFC ticketIFC=new Ticket_proxy(new Ticket_station());

        ticketIFC.sellTicket();

    }
}
结果:

案例三:模拟事务(实物的提交和回滚都不再dao层实现,而是采用代理模式实现)
1. 数据字典:


2. RoleServiceI.java(接口)
package proxy_jdbc;

public interface RoleServiceI {

    void addRole() throws Exception;

}
3. RoleServiceImpl.java(实现类,在动态代理模式下本类并不做事务的处理,把事务处理在代理类的invoke方法里处理)
package proxy_jdbc;

import java.sql.Connection;
import java.sql.Statement;

public class RoleServiceImpl implements RoleServiceI{

    public void addRole() throws Exception {

            Connection conn=null;
            Statement stat=null;
            StringBuffer SQL=new StringBuffer();


            conn=DBUtil.getConn();
            System.out.println("dao中的conn="+conn);
            stat=conn.createStatement();

            /**
             * 插入到角色表
             */

            SQL.setLength(0);
            SQL.append("insert into role values(2,'管理员','管理员备注')");
            stat.executeUpdate(SQL.toString());

            /**
             * 插入到用户表
             */

            SQL.setLength(0);
            SQL.append("insert into user values('111',11,'女')");
            stat.executeUpdate(SQL.toString());

            DBUtil.close(null, stat, null);   //这里只关闭stat流,conn流在ServiceProxyUtil.invoke方法里统一关闭。

    }
}
4. ServiceProxyUtil.java(动态代理生成工具):统一处理事务。
package proxy_jdbc;

import java.lang.reflect.InvocationHandler;
import java.lang.reflect.Method;
import java.lang.reflect.Proxy;
import java.sql.Connection;
import java.sql.SQLException;

/**
 * 动态代理类创建工具
 * @author Administrator
 *
 */
public class ServiceProxyUtil implements InvocationHandler{

    private Object targetObj;

    public Object createServiceProxy(Object targetObj){
        this.targetObj=targetObj;

        Object proxy=Proxy.newProxyInstance(targetObj.getClass().getClassLoader(), targetObj.getClass().getInterfaces(), this);

        return proxy;
    }

    public Object invoke(Object proxy, Method method, Object[] args) throws Throwable {
        /**
         * 在本方法里对jdbc的事务进行处理和conn流的关闭,在dao层就不用再处理了。
         */
        Object returnValue=null;
        Connection conn=null;
        try {
            conn=DBUtil.getConn();
            System.out.println("proxy中的conn="+conn);
            conn.setAutoCommit(false); //禁止自动提交事务

            returnValue=method.invoke(this.targetObj, args); //执行实现类方法

            System.out.println("提交事务");
            conn.commit();

        } catch (Exception e) {
              System.out.println("出现异常,回滚事务");
              conn.rollback();
        }finally{
                DBUtil.close(conn, null, null);
        }
        return returnValue;
    }

}
5. ServiceFactory.java(静态工厂)
package proxy_jdbc;
/**
 * 静态工厂
 * @author Administrator
 *
 */
public class ServiceFactory {
    public static RoleServiceI getRoleServiceImpl(){

        RoleServiceI roleService=new RoleServiceImpl();
        return roleService;

    }
}
6. Test.java(测试类)
package proxy_jdbc;

public class Test {
    public static void main(String[] args) {
        //创建动态代理创建工具
        ServiceProxyUtil proxyUtil=new ServiceProxyUtil();

        //用动态代理创建工具创建出一个服务层的实现类,
        RoleServiceI roleServiceImpl=(RoleServiceI)proxyUtil.createServiceProxy(ServiceFactory.getRoleServiceImpl());

        try {
            roleServiceImpl.addRole();
        } catch (Exception e) {
            e.printStackTrace();
        }

    }
}
7. DBUtil.java
package proxy_jdbc;

import java.sql.Connection;
import java.sql.DriverManager;
import java.sql.ResultSet;
import java.sql.SQLException;
import java.sql.Statement;

public class DBUtil {
    /**
     * ThreadLocal本地线程,类似HttpSession操作,HttpSession针对每一个用户请求,而ThreadLocal针对每一个线程。
   * 这个对象用于实现当Connection创建之后除非关闭否则一直都是操作这个Connection对象
     */
        private static ThreadLocal<Connection> local=new ThreadLocal<Connection>();

        private static final String DRIVER="com.mysql.jdbc.Driver";
        private static final String USER="root";
        private static final String PASSWD="";
        private static final String URL="jdbc:mysql://127.0.0.1:3306/user?useUnicode=true&characterEncoding=UTF-8";

static{
    try {
        Class.forName(DRIVER);
    } catch (Exception e) {

        throw new RuntimeException("无法加载驱动包");
    }


}

 public static Connection getConn(){
     Connection conn=null;
     try {
         if(local.get() !=null){
             //如果本地线程里有值,说明这个数据库连接被创建过,所以还是使用这个连接
             conn=local.get();
         }else{
             //如果本地线程为空,则创建一个数据库连接。
            conn= DriverManager.getConnection(URL,USER,PASSWD);
            local.set(conn);
         }


    } catch (SQLException e) {
        e.printStackTrace();
    }

     return conn;
 }

 public static void close(Connection conn,Statement stat,ResultSet rs) throws Exception{
     if(conn!=null && !conn.isClosed()){

         if(local.get() !=null ){
             local.remove();
         }
         conn.close();
     }
     if(stat!=null && !stat.isClosed()){
         stat.close();
     }
     if(rs!=null && !rs.isClosed()){
         rs.close();
     }
 }

}
结果:

 数据已插入。
- 案例三项目文件存于 --> 码云-开源中国 --> spring框架之动态代理


 浙公网安备 33010602011771号