初始化一个vite+vue3的前端项目要做的额外的事儿
添加 .editorconfig 文件
# http://editorconfig.org
root = true

[*]
charset = utf-8
indent_style = space
indent_size = 4
end_of_line = lf
insert_final_newline = true
trim_trailing_whitespace = true

[*.md]
insert_final_newline = false
trim_trailing_whitespace = false
添加 ESLint
- 安装依赖
npm add -D eslint vite-plugin-eslint @babel/core @babel/eslint-parser
- 根目录创建
.eslintrc.cjs
module.exports = {
    "root":true,
	"env": {
		"browser": true,
		"es2021": true,
		"node": true
	},
	"extends": [
        'eslint-config-prettier',
		"eslint:recommended", // 使用推荐的eslint
		"plugin:@typescript-eslint/recommended",
		"plugin:vue/vue3-essential",
        'plugin:vue/vue3-essential',
        //1.继承.prettierrc.js文件规则  2.开启rules的 "prettier/prettier": "error"  3.eslint fix的同时执行prettier格式化
        'plugin:prettier/recommended',
	],
    "parser": 'vue-eslint-parser',
	"parserOptions": {
		"ecmaVersion": "latest",
		"parser": "@typescript-eslint/parser",
		"sourceType": "module"
	},
	"plugins": [
		"@typescript-eslint",
		"vue"
	],
    globals: {
        defineProps: 'readonly',
        defineEmits: 'readonly',
        defineExpose: 'readonly',
        withDefaults: 'readonly',
    },
	"rules": {

	}
};
- 配置
vite.config.ts文件
import { defineConfig } from 'vite';
import vue from '@vitejs/plugin-vue';
import eslintPlugin from 'vite-plugin-eslint';

// https://vitejs.dev/config/
export default defineConfig({
	plugins: [
		vue(),
		eslintPlugin({
			include: ['src/**/*.ts', 'src/**/*.vue', 'src/*.ts', 'src/*.vue'],
		}),
	],
	// 其他配置 ......
});
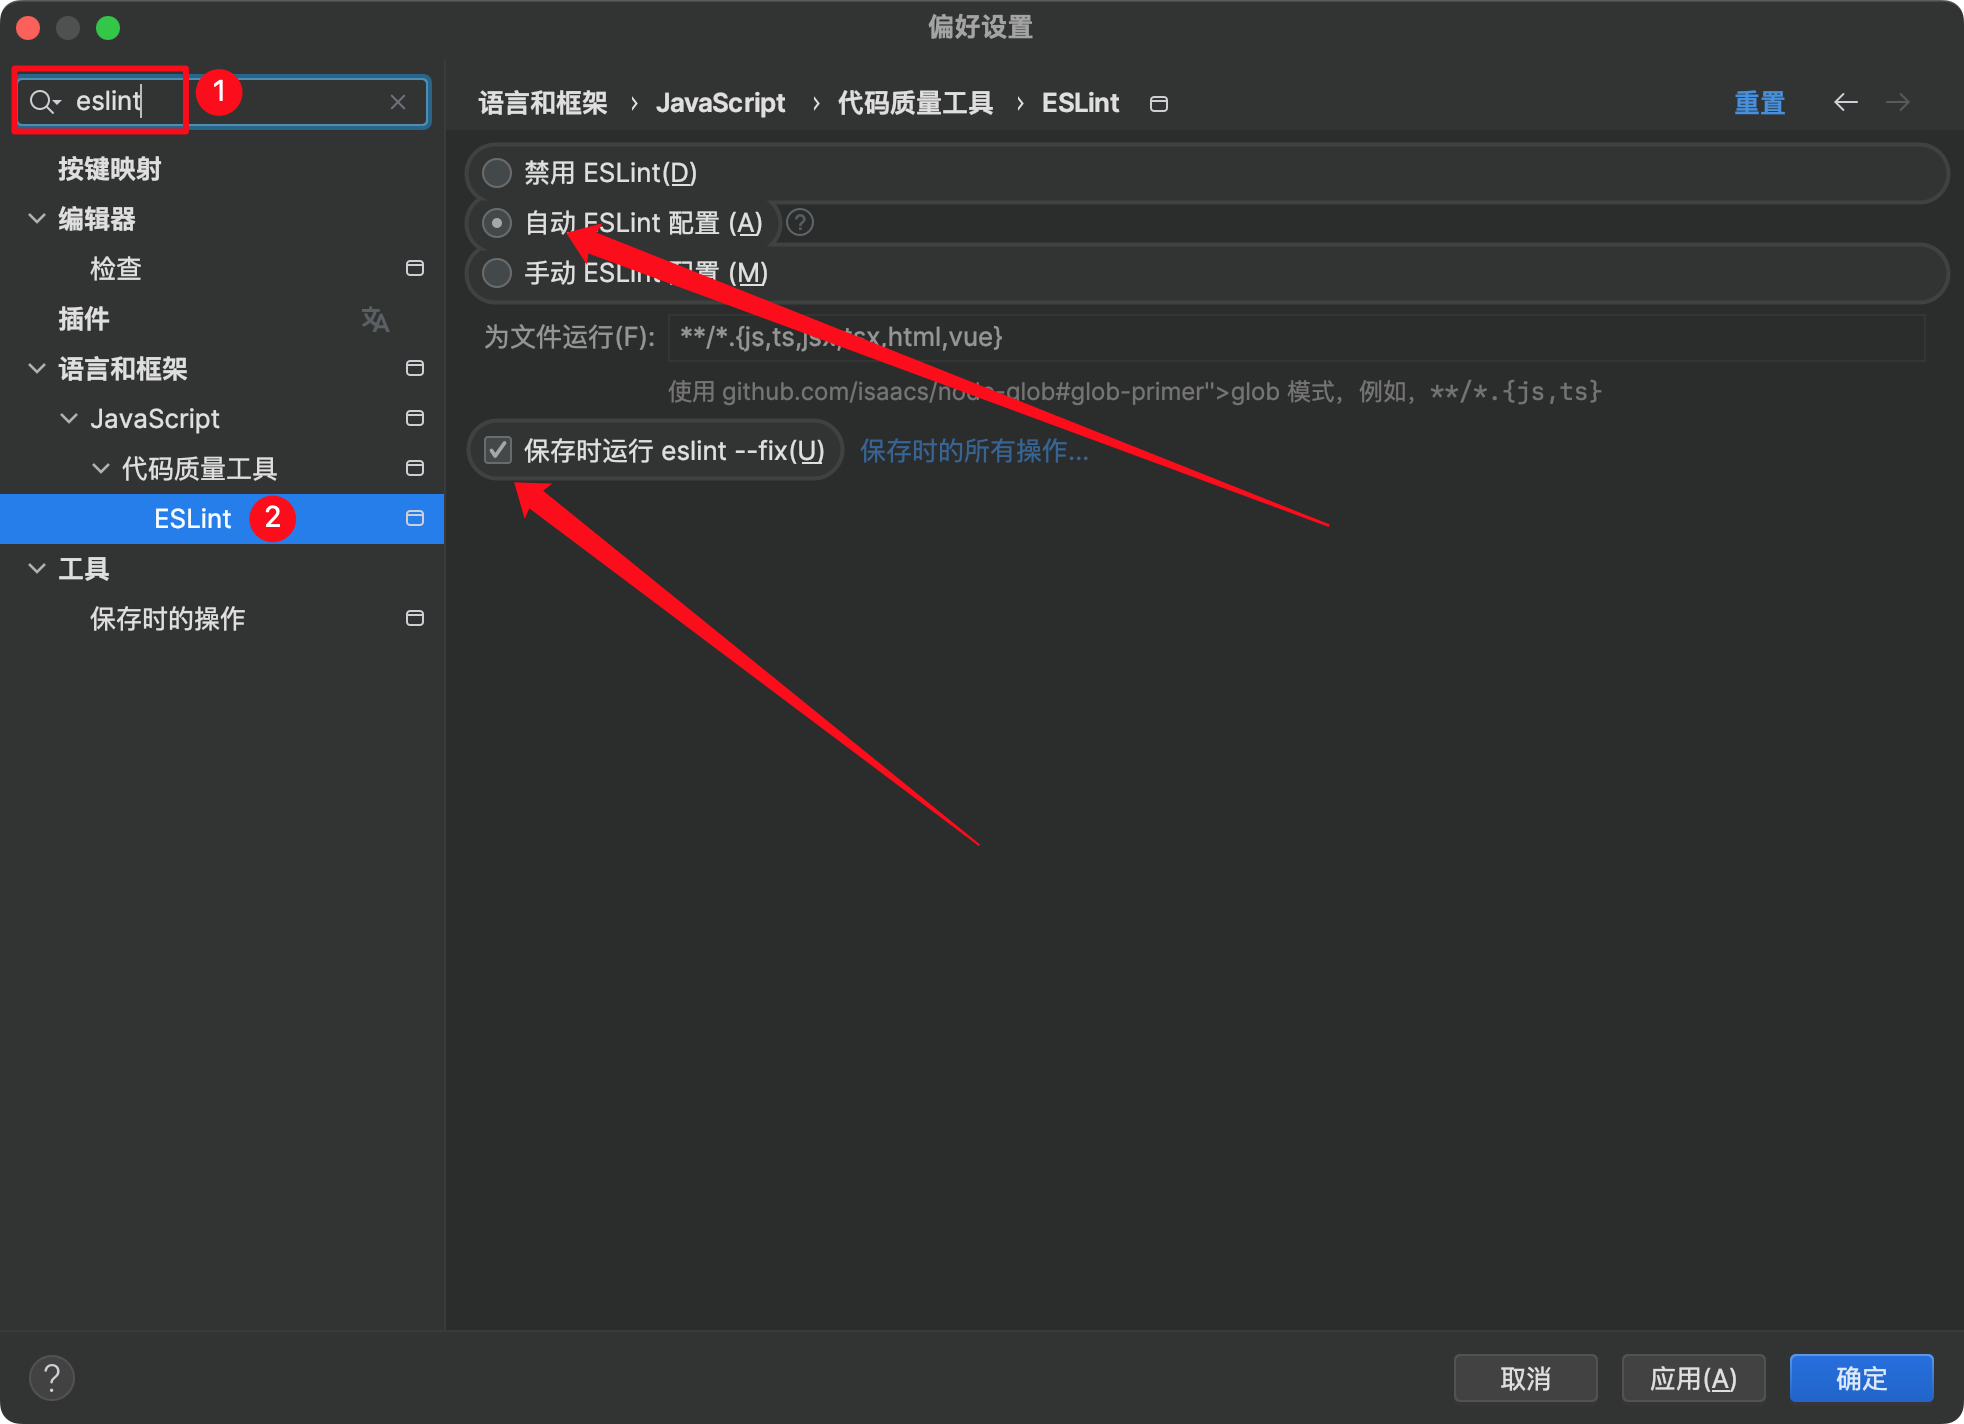
- webstorm 开启 eslint
如果是vscode, 则需要安装 ESLint插件
安装 Prettier
- 安装依赖
npm add -D prettier
npm add -D eslint-config-prettier #eslint兼容的插件
npm add -D eslint-plugin-prettier #eslint的prettier
- 根目录添加
.prettierrc.cjs文件
在根目录下面添加.prettierrc.js文件夹,然后将下面的配置添加到其中。如果不想格式化某些文件可以再添加一个.prettierignore的文件,用法和.gitignore文件差不多,将不需要格式化的文件夹或文件通过正则匹配或者具名的方式添加进去,这样就不会格式化对应的文件了。
// .prettierrc.js
module.exports = {
    // 一行最多多少个字符
    printWidth: 120,
    // 指定每个缩进级别的空格数
    tabWidth: 4,
    // 使用制表符而不是空格缩进行
    useTabs: true,
    // 在语句末尾是否需要分号
    semi: true,
    // 是否使用单引号
    singleQuote: true,
    // 更改引用对象属性的时间 可选值"<as-needed|consistent|preserve>"
    quoteProps: 'as-needed',
    // 在JSX中使用单引号而不是双引号
    jsxSingleQuote: false,
    // 多行时尽可能打印尾随逗号。(例如,单行数组永远不会出现逗号结尾。) 可选值"<none|es5|all>",默认none
    trailingComma: 'none',
    // 在对象文字中的括号之间打印空格
    bracketSpacing: true,
    // jsx 标签的反尖括号需要换行
    jsxBracketSameLine: false,
    // 在单独的箭头函数参数周围包括括号 always:(x) => x \ avoid:x => x
    arrowParens: 'avoid',
    // 这两个选项可用于格式化以给定字符偏移量(分别包括和不包括)开始和结束的代码
    rangeStart: 0,
    rangeEnd: Infinity,
    // 指定要使用的解析器,不需要写文件开头的 @prettier
    requirePragma: false,
    // 不需要自动在文件开头插入 @prettier
    insertPragma: false,
    // 使用默认的折行标准 always\never\preserve
    proseWrap: 'preserve',
    // 指定HTML文件的全局空格敏感度 css\strict\ignore
    htmlWhitespaceSensitivity: 'css',
    // Vue文件脚本和样式标签缩进
    vueIndentScriptAndStyle: true,
    //在 windows 操作系统中换行符通常是回车 (CR) 加换行分隔符 (LF),也就是回车换行(CRLF),
    //然而在 Linux 和 Unix 中只使用简单的换行分隔符 (LF)。
    //对应的控制字符为 "\n" (LF) 和 "\r\n"(CRLF)。auto意为保持现有的行尾
    // 换行符使用 lf 结尾是 可选值"<auto|lf|crlf|cr>"
    endOfLine: 'auto',
    // 将>多行 HTML(HTML、JSX、Vue、Angular)元素放在最后一行的末尾,而不是单独放在下一行(不适用于自闭合元素
    bracketSameLine:false
};
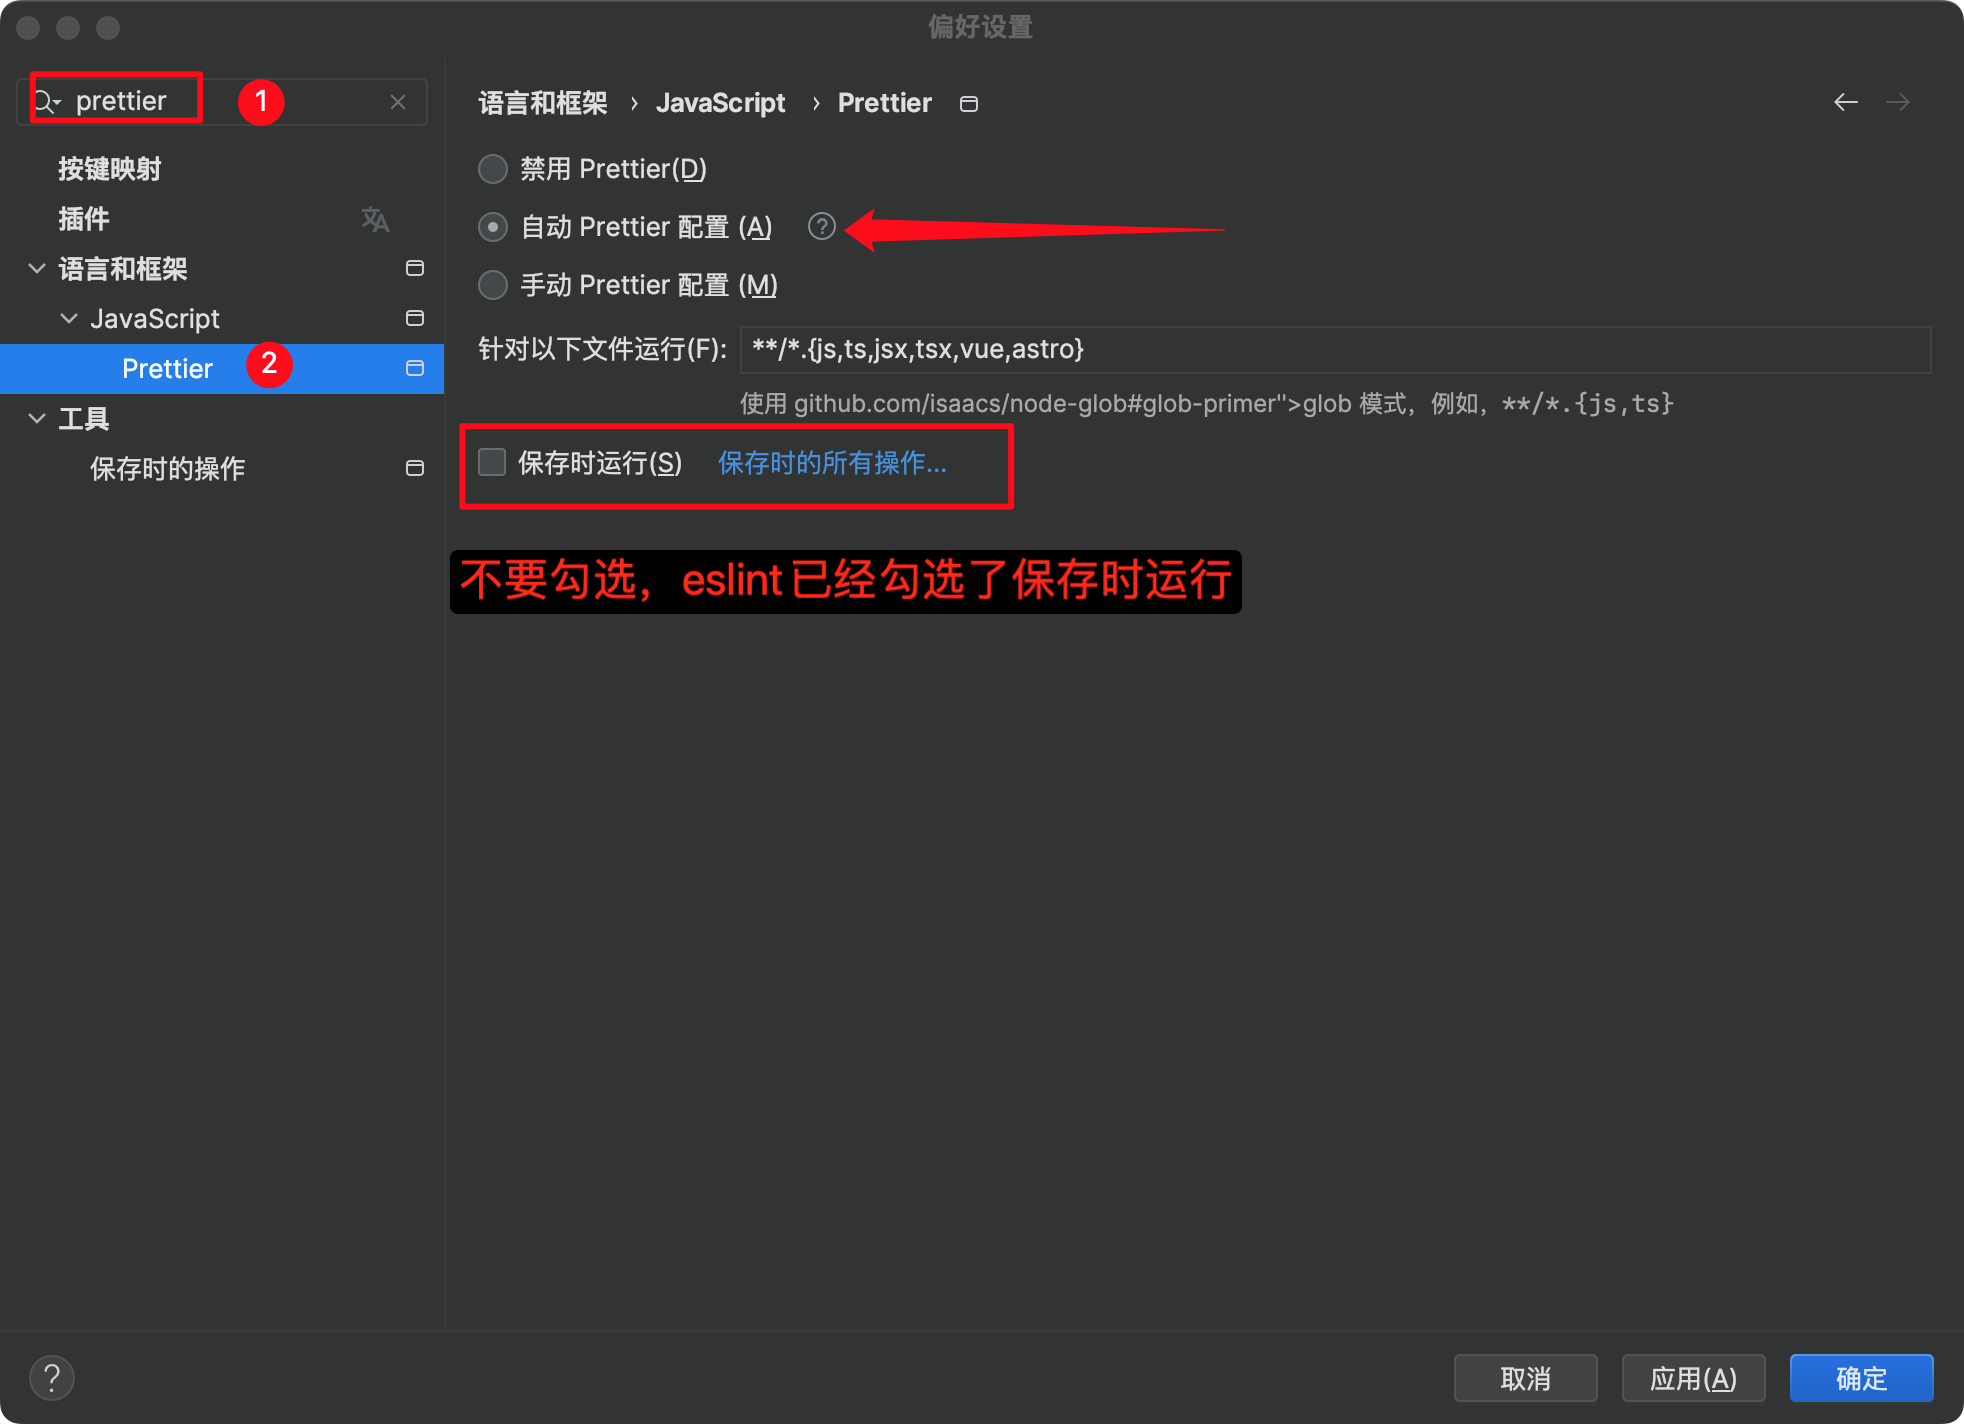
- webstorm 开启 prettierrc
VsCode需要安装prettier插件
安装 svg 图片相关插件
- 安装依赖
npm i -D vite-svg-loader vite-plugin-svg-icons
- 配置插件
// vite.config.ts
import svgLoader from 'vite-svg-loader'
import { createSvgIconsPlugin } from 'vite-plugin-svg-icons';
import svgLoader from 'vite-svg-loader';
import path from 'path';

export default defineConfig({
  plugins: [
    vue(),
    createSvgIconsPlugin({
        // 指定需要缓存的图标文件夹
        iconDirs: [path.resolve(process.cwd(), 'src/assets/icons')],
        // 指定生成的 SVG sprite 文件的存放位置
        symbolId: 'icon-[dir]-[name]' // 指定symbolId格式
    }),
    svgLoader(),
  ]
})
- main.ts 入口文件中引入
// 不引入 vite-plugin-svg-icons 将无法使用
import 'virtual:svg-icons-register'
- vite-svg-loader 使用
<template>
  <MyIcon />
</template>

<script setup>
import MyIcon from './my-icon.svg'
</script>
- vite-plugin-svg-icons 使用
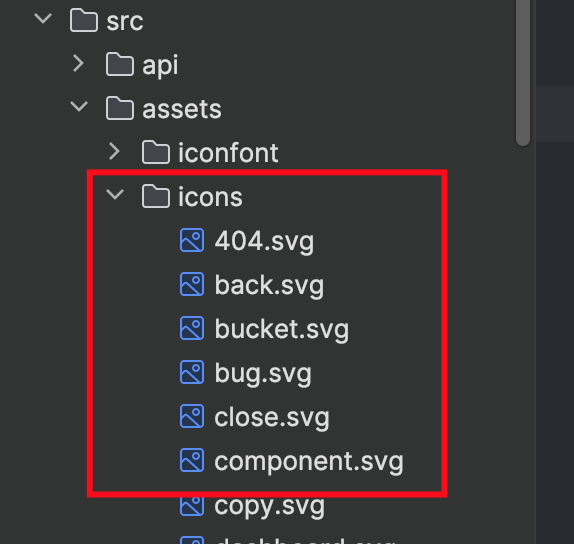
首先创建目录 src/assets/icons ,将svg文件都保存到当前目录
接着创建一个公共组件 ShIcon 组件,放到components目录下
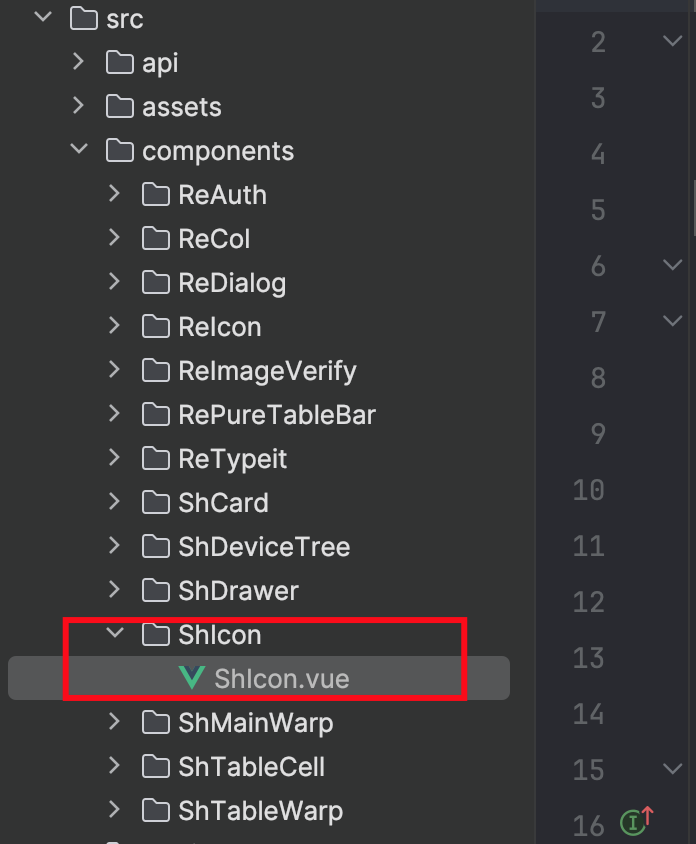
ShIcon.vue 内容为:
<template>
    <svg aria-hidden="true" :style="{ width, height }" :fill="color">
        <use :xlink:href="prefix + name" />
    </svg>
</template>
<script setup lang="ts">
    interface Props {
        prefix?: string;
        name: string;
        color?: string;
        width?: string;
        height?: string;
    }

    withDefaults(defineProps<Props>(), {
        prefix: '#icon-',
        color: '',
        width: '1em',
        height: '1em'
    });
</script>
<style scoped></style>
再其他组件中使用 ShIcon.vue 组件,这里特别说明一下,如果要改变svg颜色,只需要给组件增加 样式: fill: #6b7280 这个属性即可,
// name 传入的值就是 svg文件的文件名,下面的案例前提是 icons 文件夹中有一个 info.svg 文件
...
<ShIcon class="fill-gray-500" name="info" width="14px" height="14px" />
...
博客中所涉及到的图片都有版权,请谨慎使用

 浙公网安备 33010602011771号