Frp-frp下反向代理实现https协议
前言:由于需要很多地方用到内网穿透环境,所以选择了frp,近阶段需要Https,所以有了此文,
本文分为frp自身功能和frp+Nginx进行反向代理实现https
环境介绍:我这里的环境是服务端和客户端的配置均是可以在Linux/Windows下运行的,唯一需要注意的是linux上证书和windows获取方式不同,windows较麻烦,这里就不演示了,我这里用的是域名绑定的Linux服务端生成证书存放在Windows客户端下的
| 系统 | 版本 |
|---|---|
| Linux | CentOS7 |
| Windows | Windows Server2012 |
一、frp
frp的Github地址:https://github.com/fatedier/frp/releases
注意服务端和客户端的版本是需要一致的
如只有一端不知道版本可以进入目录通过./frps -v或者./frpc -v查看版本号
详细操作这里就不介绍了,可以参考其他文章
二、证书生成
我这里用的是Let’s Encrypt,毕竟免费,哈哈,安装方式用的是Certbot
这里的Certbot安装方式已经过时,请跳转到https://www.cnblogs.com/shook/p/14486938.html进行查看(2021.03更新)
下面是wiki上的简介:
- Let’s Encrypt 是一个将于2015年末推出的数字证书认证机构,将通过旨在消除当前手动创建和安装证书的复杂过程的自动化流程,为安全网站提供免费的SSL/TLS证书。 Let’s Encrypt 是由互联网安全研究小组(ISRG,一个公益组织)提供的服务。主要赞助商包括电子前哨基金会,Mozilla基金会,Akamai以及思科。2015年4月9日,ISRG与Linux基金会宣布合作。用以实现这一新的数字证书认证机构的协议被称为自动证书管理环境(ACME)。 GitHub上有这一规范的草案,且提案的一个版本已作为一个Internet草案发布。Let’s Encrypt 宣称这一过程将十分简单、自动化并且免费。 2015年8月7日,该服务更新其推出计划,预计将在2015年9月7日当周某时发布首个证书,随后向列入白名单的域名发行少量证书并逐渐扩大发行。若一切按计划进行,该服务预计将在2015年11月16日当周某时全面开始提供.
注意:在装证书之前先把Nginx或者80.443相关服务先停止,不然会发生端口冲突发生如下错误
Cleaning up challenges
Problem binding to port 80: Could not bind to IPv4 or IPv6.
Linux下安装:
Github代码下载:git clone https://github.com/letsencrypt/letsencrypt.git
目录结构:

先执行:
yum install snapd
systemctl enable --now snapd.socket
ln -s /var/lib/snapd/snap /snap
再进入目录:
执行:
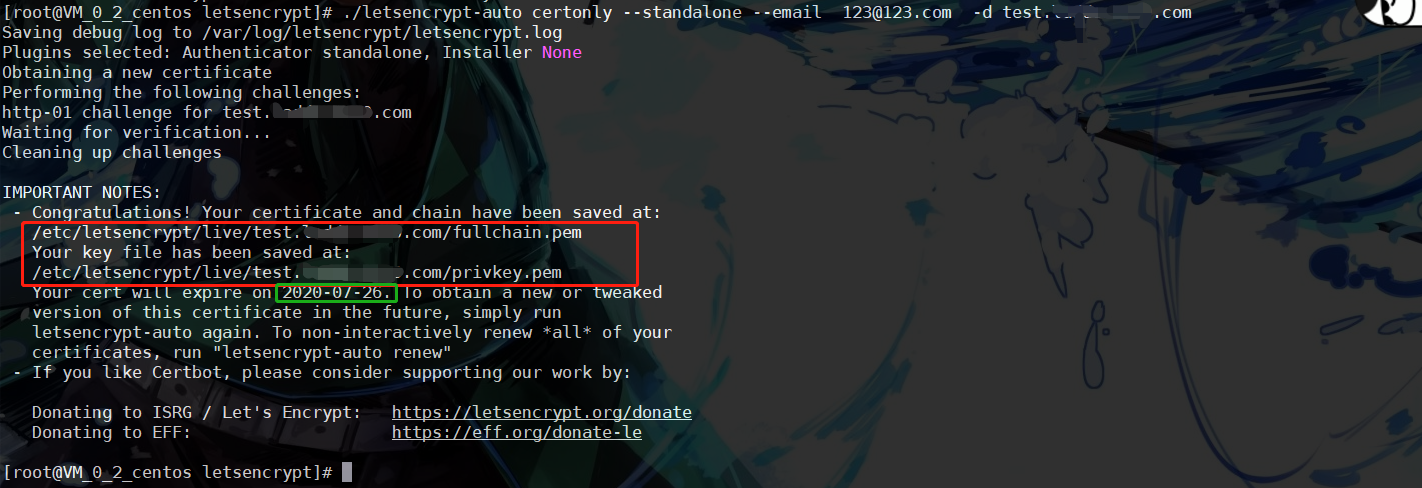
./letsencrypt-auto certonly --standalone --email 123@123.com -d 二级域名.域名.com
如果使用的是xx云默认的python环境出现
subprocess.CalledProcessError: Command '['virtualenv', '--no-site-packages', '--python', '/usr/bin/python2.7 ', '/opt/eff.org/certbot/venv']' returned non-zero exit status 1
这种错误
使用:pip install --upgrade virtualenv==16.7.9升级即可
没有报错的话会出现如下提示:
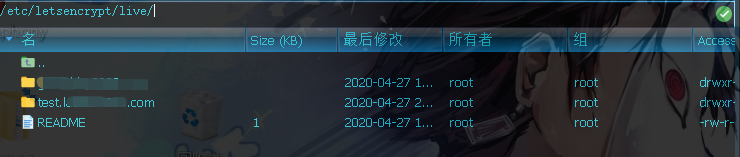
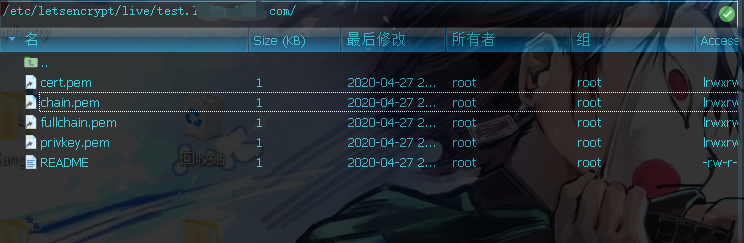
可以看到证书存放地址以及域名过期时间
进入目录查看一下
这里只展示单域名,现在通配符泛域名解析letsencrypt也是支持的了,但是需要DNS解析,我这里以后有需要会写出方法
- certbot自动定时续期证书方法
certbot renew #手动测试,查看证书过期时间
certbot renew --force-renewal #忽略证书过期时间,直接重置证书时间
crontab -e #定时任务
0 0 1 * * /usr/bin/certbot renew --force-renewal #编辑文件
三、frp自身进行反向代理实现https
- 为了体现内网穿透,这里我们准备了一台服务端和一台客户端,系统分别是CentOS和WindowsServer,具体情况具体分析吧
需要注意的是这里的证书是放在客户端下的
服务端配置(Linux上frps.ini)
[common]
bind_port=7000                       #服务端端口
#privilege_token=*******             #客户端连接凭证
max_pool_count=5                     #最大连接数
vhost_http_port = 80                 #客户端http映射的端口
vhost_https_port = 443               #客户端https映射的端口
dashboard_port=7505                  #服务端看板的访问端口
dashboard_user=root                  #服务端看板账户
dashboard_pwd=***                    #服务端看板账户密码
配置完之后运行服务端
Linux : ./frps -c ./frps.ini
Windows : 进入目录frps.exe
服务端配置完成
客户端配置(Windows上frpc.ini)
server_addr = 192.168.100.100                    #服务端的IP地址,好像也可以写域名,没试过
server_port = 7000                               #服务端端口

[test_http]                                      #Http服务,映射的是服务端http80端口
type = http                                      #服务方式
local_ip = 127.0.0.1                             #服务端ip,可写本地,局域网等做反向代理的ip
local_port = 8000                                #服务端端口
custom_domains = test.test.com                   #需要反向代理的域名,就是服务端要代理的域名

[test_https]                                     #Https服务,映射的是服务端https443端口
type = https                                     #服务方式
local_ip = 127.0.0.1                             #服务端ip,可写本地,局域网等做反向代理的ip
local_port = 8000                                #服务端端口
custom_domains = test.test.com                   #需要反向代理的域名,就是服务端要代理的域名

# 以下为https新加的内容
plugin = https2http                             #将 https请求转换成http请求后再发送给本地服务
plugin_local_addr = 127.0.0.1:8000              #转换http后的端口

#证书相关配置
plugin_crt_path = C:\Users\Administrator\Desktop\test.test.com\fullchain1.crt  #linux下生成的证书为fullchain.pem格式,复制到Windows上改成.crt后缀即可
plugin_key_path = C:\Users\Administrator\Desktop\test.test.com\privkey1.key    #linux下生成的证书为privkey.pem格式,复制到Windows上改成.key后缀即可
plugin_host_header_rewrite = 127.0.0.1
plugin_header_X-From-Where = frp
配置完之后运行服务端
Linux : ./frpc -c ./frpc.ini
Windows : 进入目录frpc.exe
服务端配置完成
关于frp命令的后台启动方法
使用systemctl来控制启动
```sudo vim /lib/systemd/system/frps.service````
写入以下内容
[Unit]
Description=fraps service
After=network.target syslog.target
Wants=network.target

[Service]
Type=simple
#启动服务的命令(此处写你的frps的实际安装目录)
ExecStart=/yourpath/frps -c /yourpath/frps.ini
[Install]
WantedBy=multi-user.target
然后就启动frps
sudo systemctl start frps
再打开自启动
sudo systemctl enable frps
如果要重启应用,可以这样,sudo systemctl restart frps
如果要停止应用,可以输入,sudo systemctl stop frps
如果要查看应用的日志,可以输入,sudo systemctl status frps
就可以运行了
frp官方文档:https://github.com/fatedier/frp/blob/master/README_zh.md 建议多读官方的文档
frps完整版配置文件:https://github.com/fatedier/frp/blob/master/conf/frps_full.ini
frpc完整版配置文件:https://github.com/fatedier/frp/blob/master/conf/frpc_full.ini
四、 Nginx+frp的配置
这里的环境也是一台服务端和一台客户端,系统分别是CentOS和WindowsServer
需要注意的是这里的证书是放在服务端下的
Nginx这里不介绍安装了
直接上配置文件 .conf
server
	{
        listen 80;                                                               # http对应端口
	listen 443 ssl;                                                          # https对应端口,
  	ssl_certificate /etc/letsencrypt/live/test.test.com/fullchain.pem;       # 证书存放位置
  	ssl_certificate_key /etc/letsencrypt/live/test.test.com/privkey.pem;     # 证书存放位置
        server_name *.test.test.com;                                             # ip,域名,我这里以泛域名举例,毕竟是做反向代理,http就不用配置了
                                                                                 # https还可以做其他安全配置,需要的去看其他文章
    location / {
        proxy_pass  http://127.0.0.1:12369;                                      # 映射的frp服务端frps.ini的 vhost_http_port端口
        proxy_set_header X-Forwarded-For $proxy_add_x_forwarded_for;
        proxy_set_header Host $http_host;
        proxy_set_header X-NginX-Proxy true;
        proxy_http_version 1.1;
        proxy_set_header Upgrade $http_upgrade;
        proxy_set_header Connection "upgrade";
        proxy_max_temp_file_size 0;
        proxy_redirect off;
        proxy_read_timeout 240s;
    }
                                                                                 # 我这里没做http强制转换为https,有需要的可以做一下
        error_page   500 502 503 504  /50x.html;
  	location = /50x.html {
        root   /usr/share/nginx/html;
    }
}
改完了记得重载配置
服务端配置(Linux上frps.ini)
[common]
bind_port=7000                       #服务端端口
#privilege_token=*******             #客户端连接凭证
max_pool_count=5                     #最大连接数
vhost_http_port = 12369              #客户端http映射的端口,就是上面Nginx的proxy_pass对应端口
vhost_https_port = 12399             #客户端https映射的端口
dashboard_port=7505                  #服务端看板的访问端口
dashboard_user=root                  #服务端看板账户
dashboard_pwd=***                    #服务端看板账户密码
配置完之后还是运行服务端测试一下
Linux : ./frps -c ./frps.ini
Windows : 进入目录frps.exe
客户端配置(Windows上frpc.ini)
server_addr = 192.168.100.100                    #服务端的IP地址,好像也可以写域名,没试过
server_port = 7000                               #服务端端口

[test_http]                                      #Http服务,映射的是服务端http80端口
type = http                                      #服务方式
local_ip = 127.0.0.1                             #服务端ip,可写本地,局域网等做反向代理的ip
local_port = 8000                                #服务端端口
custom_domains = test.test.com                   #需要反向代理的域名,就是服务端要代理的域名
配置完之后还是运行客户端测试一下
Linux : ./frpc -c ./frpc.ini
Windows : 进入目录frpc.exe

到此的话应该就没有其他问题了

 浙公网安备 33010602011771号