


5.0 路由组件的使用
一、概述
路由器:路由器管理路由;
路由:路由是一种映射关系,一个key对应一个value,key是path,对于后台路由,
value是处理请求的回调函数,对于前台路由value是组件。
一般的组件映射成标签,路由组件映射成路由。
说明:
1) 官方提供的用来实现 SPA(单个页面) 的 vue 插件
2) github: https://github.com/vuejs/vue-router
3) 中文文档: http://router.vuejs.org/zh-cn/
4) 下载: npm install vue-router --save
vue-router的理解和使用:
router-view/router-link/keep-alive
$router: 路由器对象,包含一些操作路由的功能函数,来实现编程式导航(跳转路由);
$route: 当前路由对象,一些当前路由信息数据的容器,path/meta/query/params
1. 路由的使用:
(1) VueRouter(): 用于创建路由器的构建函数
new VueRouter({ // 创建路由器实例
// 多个配置项(配置对象)
})
(2)路由配置
routes: [
{ // 一般路由
path: '/about',
component: About
},
{ // 自动跳转路由
path: '/',
redirect: '/about'
}
]
(3)注册路由器
import router from './router'
new Vue({
router
})
(4)使用路由组件标签
<router-link>: 用来生成路由链接(当点击路由连接的时候需要在界面上显示当前路由组件)
eg: <router-link to="/home">Go to home</router-link>
<router-link to="/about">Go to about</router-link>
<router-view>: 用来显示当前路由组件界面
eg: <div>
<router-view></router-view> //表示如果点击了路由链接(/about),则该路由链接的界面显示在这里,即显示在这个div里面.
</div>
2. 缓存路由组件对象
正常情况下,一个路由组件被切换的时候,这个路由组件就会死亡,在切换回来时,又重先创建。
路由组件的缓存就是,在切换的时候将路由组件进行缓存,不要让它死亡。实现:
<keep-alive>
<router-view></router-view> // 缓存路由组件对象,只是平时我们会说缓存路由组件 (这里为保持About和Home活着)
</keep-alive>
现象:在如下图About组件的输入框输入abc后,切换到Home组件,然后在切回About组件,此时输入框还显示abc。
3. 向路由组件传递参数
方式一: 路由路径携带参数(param/query)
这里的参数有两种类型,param参数和query参数(这两种参数的传递等效),以下实例为param参数的传递,如果要使用query参数类型
传递参数,则不需要写下面的:id占位符,<router-link>路由链接中,路径的拼接方式和以前一样如: xxxx?id=1
1) 配置路由
children: [
{
path: 'mdetail/:id', //占位符
component: MessageDetail
}
]
2) 路由路径
<router-link :to="'/home/message/mdetail/'+m.id">{{m.title}}</router-link>
3) 路由组件中读取请求参数
this.$route.params.id
方式二:<router-view>属性携带数据
<router-view :msg="msg"></router-view>
以下实例中App.vue通过msg属性将数据传递至About组件中。
4. 编程式路由导航
相关 API
1) this.$router.push(path): 相当于点击路由链接(可以返回到当前路由界面)
2) this.$router.replace(path): 用新路由替换当前路由(不可以返回到当前路由界面)
3) this.$router.back(): 请求(返回)上一个记录路由
4) this.$router.go(-1): 请求(返回)上一个记录路由
5) this.$router.go(1): 请求下一个记录路由
二、使用(基本路由/嵌套路由)
先下载vue-router包:npm install vue-router --save
非路由组件一般放在components文件夹下,路由组件一般放在views|pages文件夹下;
1. 路由的使用步骤:
步骤一: 定义路由组件
index.html:


<!DOCTYPE html>
<html>
<head>
  <meta charset="utf-8">
  <meta name="viewport" content="width=device-width,initial-scale=1.0">
  <link rel="stylesheet" href="/static/css/bootstrap.css">
  <title>vue_demo</title>

  <style> /*设置选择路由时的样式,!important表示 提高指定样式规则的应用优先权*/
    .router-link-active {
      color: red !important;
    }
  </style>
</head>
<body>
<div id="app"></div>
<!-- built files will be auto injected -->
</body>
</html>
App.vue:
<template>
  <div>
    <div class="row">
      <div class="col-xs-offset-2 col-xs-8">
        <div class="page-header"><h2>Router Test</h2></div>
      </div>
    </div>

    <div class="row">
      <!--左边部分-->
      <div class="col-xs-2 col-xs-offset-2">
        <div class="list-group">
          <!--5.使用路由标签-->
          <!-- 生成路由链接 -->
          <router-link to="/about" class="list-group-item">About</router-link>
          <router-link to="/home" class="list-group-item">Home</router-link>
        </div>
      </div>

      <!--右边部分-->
      <div class="col-xs-6">
        <div class="panel">
          <div class="panel-body">
            <!-- 显示当前组件 -->
            <keep-alive>
              <!--传递一个属性,值为abc,如果写成:msg="abc", 则abc为变量-->
              <router-view msg="abc"></router-view>
            </keep-alive>
          </div>
        </div>
      </div>

    </div>
  </div>
</template>

<!--根组件-->
<script>
  export default {}
</script>

<style>

</style>
About.vue/Home.vue:用户演示基本路由
<template>
  <div>
    <h2>About</h2>
    <p>{{msg}}</p>
    <input type="text">
  </div>
</template>

<!--About组件-->
<script>
  export default {
    // 接收一个属性,这个属性是由App组件路由传递过来的
    props: {
      msg: String
    }
  }
</script>

<style>

</style>
<template>
  <div>
    <h2>Home</h2>
    <div>
      <ul class="nav nav-tabs">
        <!--使用路由:路由链接-->
        <li><router-link to="/home/news">News</router-link></li>
        <li><router-link to="/home/message">Message</router-link></li>
      </ul>

      <!--使用路由:当前路由-->
      <router-view></router-view>
    </div>
  </div>
</template>

<!--Home组件-->
<script>
  export default {}
</script>

<style>

</style>
News.vue/Message.vue:Home下的子路由,用户演示嵌套路由
<template>
  <ul>
    <li v-for="(news, index) in newsArr" :key="index">{{news}}</li>
  </ul>
</template>

<script>
  export default {
    data () {
      return {
        newsArr: ['News001', 'News002', 'News003']
      }
    }
  }
</script>

<style>

</style>
<template>
  <!--根标签div:只能有一个-->
  <div>
    <ul>
      <!-- :key一般写index,如果这个对象里面有标识属性,则最好写标识属性-->
      <li v-for="m in messages" :key="m.id">
        <!--要拼接字符串得是js语法,不能是html的语法,所以,这里是:to="" , 如果用es5的语法则为 :to="''", 如果用es6的语法则为:to="``"-->
        <router-link :to="`/home/message/detail/${m.id}`">{{m.title}}</router-link>
        <button @click="pushShow(m.id)">push查看</button>
        <button @click="replaceShow(m.id)">replace查看</button>
      </li>
    </ul>
    <button @click="$router.back()">回退</button>
    <hr>
    <router-view></router-view>
  </div>
</template>

<script>
  export default {
    data () {
      return {
        messages: [
          /* {id: 1, title: 'Message001'},
           {id: 3, title: 'Message003'},
           {id: 5, title: 'Message005'}*/
        ]
      }
    },

    mounted () { // 用于异步操作
      // 模拟ajax请求从后台获取数据,注意:回调函数要用箭头函数
      setTimeout(() => {
        const messages = [
          {id: 1, title: 'Message001'},
          {id: 3, title: 'Message003'},
          {id: 5, title: 'Message005'}
        ]
        this.messages = messages
      }, 1000)
    },

    methods: {
      pushShow (id) {
        this.$router.push(`/home/message/detail/${id}`)
      },

      replaceShow (id) {
        this.$router.replace(`/home/message/detail/${id}`)
      }
    }
  }
</script>

<style>

</style>
MessageDetail.vue: Message下的子路由
<template>
  <ul>
    <!--$route表示当前路由-->
    <li>id: {{$route.params.id}}</li>
    <li>title: {{detail.title}}</li>
    <li>content: {{detail.content}}</li>
  </ul>
</template>

<script>
  /*这里面就没有做异步了,真实的情况应该是详情页面根据传递过来的id去后台查询*/
  const messageDetails = [
    {id: 1, title: 'Message001', content: 'message content00111....'},
    {id: 3, title: 'Message003', content: 'message content00222....'},
    {id: 5, title: 'Message005', content: 'message content00333....'}
  ]
  export default {
    data() {
      return {
        detail: {}  // 里面的属性不用列举
      }
    },
    mounted () {// 改变当前路由组件参数数据时, 不会重新创建组件对象, mounted不会重新执行,所以这里需要用watch去监视
      // 模拟异步到后台查询数据
      setTimeout(() => {
        const id = this.$route.params.id // 这是传递过来的id,有可能传递过来后就变成文本了,乘以1后就变成数字了
        this.detail = messageDetails.find(detail => detail.id===id*1)
      }, 1000)
    },

    watch: {
      // 方法一
      // $route: function () { // 改变当前路由组件参数数据时自动调用(组件对象有$route这个属性)
      //   console.log('$route()')
      //   const id = this.$route.params.id
      //   this.detail = messageDetails.find(detail => detail.id===id*1)
      // }
      $route: function (value) { // 方式二
        console.log(value);
        const id = value.params.id
        console.log(id);
        this.detail = messageDetails.find(detail => detail.id===id*1)
      }
    }
  }
</script>

<style>

</style>
步骤二:注册路由组件(将路由组件映射成路由)
router/ index.js:
/*
路由器对象模块
 */
import Vue from 'vue' //引入vue
import VueRouter from 'vue-router' //1. 引入vue的路由器组件

import About from '../pages/About.vue' //引入路由组件
import Home from '../pages/Home.vue'
import News from '../pages/News.vue'
import Message from '../pages/Message.vue'
import MessageDetail from '../pages/MessageDetail.vue'

Vue.use(VueRouter) // 2.声明使用vue-router插件

// 3.对外暴露路由器对象(这里为默认暴露,默认暴露,引入时可以使用任何名字)
export default new VueRouter({
  routes: [   // 注册应用中所有的路由
    {
      path: '/about',
      component: About
    },
    {
      path: '/home',
      component: Home,
      children: [  // 配置子路由组件
        {
          path: '/home/news', // path最左侧的/永远代表根路由
          component: News
        },
        {
          path: 'message', // 这是简化写法
          component: Message,
          children: [
            {
              path: 'detail/:id',  // :id表示占位符
              component: MessageDetail
            }
          ]
        },
        {
          path: '', // 设置子路由的默认显示,代表当前,这里为/home,因为这是/home下的自路由
          redirect: '/home/news'
        }
      ]
    },
    {
      path: '/',  // 设置默认请求about,即当请求根路径的时候
      redirect: '/about' // 重定向请求/about
    }
  ]
})
main.js:注册路由器
/*
入口JS
 */
import Vue from 'vue'
import App from './App.vue'
import router from './router' //引入路由器(因为是index.js,所以这里直接写到./router就可以了)


new Vue({//配置对象的属性名都是一些确定的属性名,不能随便修改
  el: '#app',
  components: {App}, // 映射组件标签
  template: '<App/>', // 指定需要渲染到页面的模板
  router  // 4.注册路由器  等价于 router: router
})
步骤三:使用路由(标签)
关于路由的使用主要是使用路由标签-路由链接 <router-link> 、当前路由<router-view>,在以上实例中主要存在App.vue、
News.vue、Messages中。
效果图:
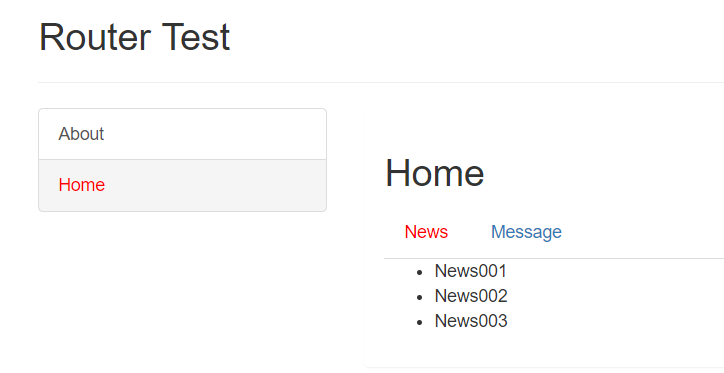 |
|
图1 图2

 浙公网安备 33010602011771号