
使用Docker来部署django+vue项目
一、django项目的部署
(一)django项目的搭建
1、搭建虚拟环境
项目是需要依赖环境的,所以我们需要先创建一个虚拟环境:
C:\Users\Administrator>mkvirtualenv django-vue-demo --no-setuptools
Using real prefix 'e:\\python\\python3.5.2\\progress'
New python executable in C:\Users\Administrator\Envs\django-vue-demo\Scripts\pyt
hon.exe
Installing pip, wheel...done.
注意因为直接mkvirtualenv django-vue-demo会安装失败,所以先不要安装settools,待上面完成后再进行安装settools工具。
(django-vue-demo) C:\Users\Administrator>pip install setuptools
Collecting setuptools
  Using cached setuptools-45.1.0-py3-none-any.whl (583 kB)
Installing collected packages: setuptools
Successfully installed setuptools-45.1.0
2、创建项目
- 在虚拟环境中安装django包
(django-vue-demo) C:\Users\Administrator>pip install django==2.0
Collecting django==2.0
  Using cached Django-2.0-py3-none-any.whl (7.1 MB)
Collecting pytz
  Using cached pytz-2019.3-py2.py3-none-any.whl (509 kB)
Installing collected packages: pytz, django
Successfully installed django-2.0 pytz-2019.3
- 使用pycharm创建django项目
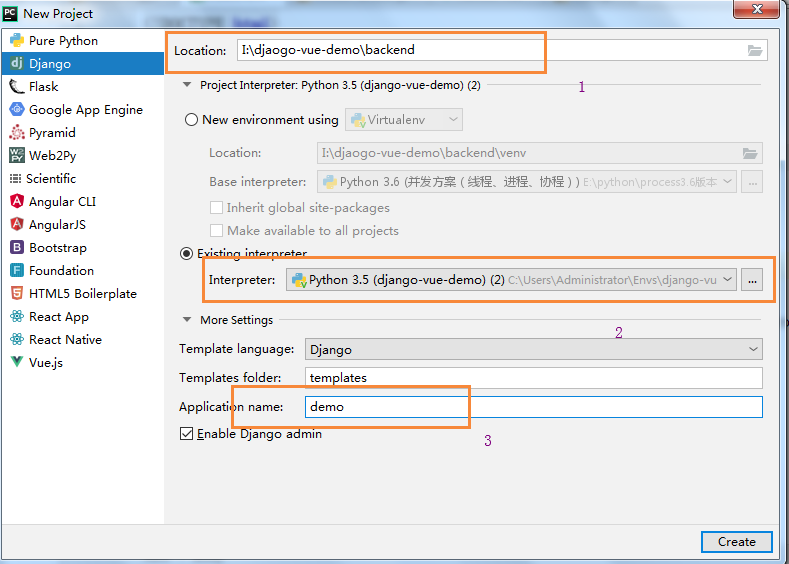
注意需要填写以上3处地方,尤其是第2处地方,选择刚刚新建虚拟环境的python解释器。
3、数据库配置
在这个项目中需要使用到mysql数据库,所以先将mysql数据库进行配置:
- 安装pymysql
(django-vue-demo) C:\Users\Administrator>pip install pymysql
Collecting pymysql
  Using cached PyMySQL-0.9.3-py2.py3-none-any.whl (47 kB)
Installing collected packages: pymysql
Successfully installed pymysql-0.9.3
- 在__init__.py文件中导入pymysql
在与settings同级的__init__.py文件中导入pymysql:
import pymysql

pymysql.install_as_MySQLdb()
- settings.py中配置mysql
# Database
# https://docs.djangoproject.com/en/2.0/ref/settings/#databases

DATABASES = {
    'default': {
        'ENGINE': 'django.db.backends.mysql',
        'NAME': 'demo',
        'USER': 'root',
        'PASSWORD': '',
        'HOST': 'localhost',
        'PORT': '3306',
    }
}
注意的是你需要先在数据库中创建一个demo的数据库。
- 生成数据库表
python manage.py makemigrations
python manage.py migrate
4、同源策略配置
这个配置主要是解决浏览器的同源策略,例如前台访问后台接口会报如下错误:
Access to XMLHttpRequest at 'http://127.0.0.1:8000/test/' from origin 'http://localhost:8080' has been blocked by CORS policy: No 'Access-Control-Allow-Origin' header is present on the requested resource.
为了解决这个问题,我们在后台可以进行一些配置来解决这个问题,详情查看我的这篇博客:https://www.cnblogs.com/shenjianping/p/11718925.html
5、写一个测试API
def test(request):
    result = {
        "meta":{
            "code":2001,
            "message":"请求失败"
        },
        "data":[]
    }
    try:
        UserSet = models.UserInfo.objects.values('id','username','password','position','age')
        result["meta"]["code"]=2000
        result["meta"]["message"]="请求成功"
        result["data"]=list(UserSet)
        print(UserSet)
    except Exception as e:
        pass
    return HttpResponse(json.dumps(result))
(二)部署
1、创建网络
因为在一台服务器上部署,所以建一个bridge网络:
[root@centos-7 backend]# docker network create django_web
73b739d646ab56d2913594724d08c08ee6125e4e84211b894d5f24d67c6cab85
2、部署mysql服务
因为web应用依赖于mysql数据服务,所以先启动mysql服务:
- 拉取mysql镜像
[root@centos-7 backend]# docker pull mysql
- 启动mysql服务
[root@centos-7 ~]# docker run -d -p 3307:3306 --network django_web --name django_mysql \
                 -v $PWD/db:/var/lib/mysql -e MYSQL_ROOT_PASSWORD=123456 mysql:latest
- 创建数据库
我们需要进入mysql中创建自己的数据库:
[root@centos-7 ~]# docker exec -it 44b1 /bin/sh  #进入容器
# mysql -uroot -p
Enter password:
Welcome to the MySQL monitor.  Commands end with ; or \g.
Your MySQL connection id is 8

mysql> create DATABASE demo DEFAULT CHARSET utf8 COLLATE utf8_general_ci; #创建数据库
Query OK, 1 row affected, 2 warnings (0.01 sec)
3、部署web服务
- 服务器上文件目录
[root@centos-7 web]# ls
backend  Dockerfile  pip.conf
[root@centos-7 web]# cd backend/
[root@centos-7 backend]# ls
backend  db.sqlite3  demo  manage.py  requirements.txt  start.sh  templates
可以看到在web目录下有backend是项目,还有Dockerfile以及pip.conf文件;然后再backend目录中有requirements.txt包文件、starts.sh脚本文件。
- 各文件内容
Dockerfile文件:
FROM    python:3.5.2
RUN mkdir -p  /usr/src/app   #在容器中新建一个文件夹app
COPY pip.conf  /root/.pip/pip.conf  #更改pip源
COPY ./backend/  /usr/src/app/  #将banckend项目下的文件全部拷贝到容器中
RUN chmod +x /usr/src/app/start.sh #赋予脚本文件执行权限
RUN pip install cryptography #安装数据库认证相关的包,实际上这可以直接放在requirements.txt文件中
RUN pip install -r /usr/src/app/requirements.txt
WORKDIR /usr/src/app #切换工作目录,否则找不到脚本文件
CMD ./start.sh
pip.conf
[global]
index-url = http://mirrors.aliyun.com/pypi/simple/
[install]
trusted-host=mirrors.aliyun.com
requirements.txt
这个文件是开发时需要的各种包,你可以进入开发环境的虚拟环境进行导出:
pip freeze > requirements.txt #导出到当前路径下
starts.sh
这是Dockerfile文件CMD中的执行命令脚本:
#!/bin/sh
python manage.py makemigrations &
python manage.py migrate &
python manage.py runserver 0.0.0.0:8000
值得注意的是这个脚本与manage.py位于同一级。
- 项目中settings中的配置
因为之前mysql已经启动了,项目中配置了mysql的配置,所以settings中对这一块需要做一些改变:
DATABASES = {
    'default': {
        'ENGINE': 'django.db.backends.mysql',
        'NAME': 'demo', #这是在mysql启动后创建的数据库
        'USER': 'root',
        'PASSWORD': '123456',
        'HOST': 'django_mysql',  #启动mysql服务指定的名称
        'PORT': '3306',
    }
}
- 生成镜像
[root@centos-7 web]# docker build -t django_web .
- 运行该镜像(默认执行CMD中的脚本命令)
[root@centos-7 web]# docker run --network django_web --name django_web -p 8001:8000 django_web
- 容器列表
[root@centos-7 mysql]# docker ps
CONTAINER ID   IMAGE         COMMAND                  CREATED             STATUS              PORTS                      NAMES
d036b07b6c53  django_web  "/bin/sh -c ./start.…"   57 minutes ago      Up 57 minutes       0.0.0.0:8001->8000/tcp       django_web
b1b1d0c62561  mysql:latest  "docker-entrypoint.s…"   2 hours ago         Up 2 hours 33060/tcp, 0.0.0.0:3307->3306/tcp   django_mysql
上面就是目前的容器列表,所以前台访问后台可以通过本机的8001端口即可。
二、Vue项目部署
(一)项目搭建
- 创建项目
首先进入你需要进入一个目录,这个目录用于你放置项目的地方:
C:\Users\Administrator>i:

I:\djaogo-vue-demo>cd I:\djaogo-vue-demo
然后使用脚手架创建项目:
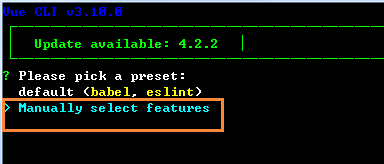
I:\djaogo-vue-demo>vue create fronted
这个npm提示选择yes即可,然后会问你是自动创建还是手动(Manually)创建,手动会有更多选项,这里不需要选择default,可选择Manually。
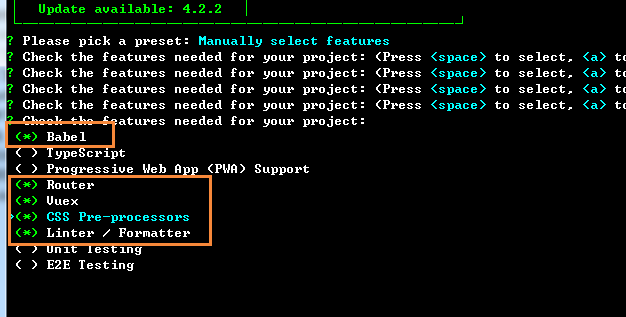
会出现如下界面:

这里有很多选项:
(*) Babel  #解决兼容性问题,支持 ES6 的代码转译成浏览器能识别的代码
( ) TypeScript  #是一种给 JavaScript 添加特性的语言扩展,增加了很多功能,微软开发的
( ) Progressive Web App (PWA) Support  #渐进式的Web应用程序支持
( ) Router  #是 vue-router 路由
( ) Vuex  #是Vue中的状态管理模式+库
( ) CSS Pre-processors  #支持 CSS 预处理器, Sass/Less预处理器
(*) Linter / Formatter  #支持代码风格检查和格式化
( ) Unit Testing  #支持单元测试
( ) E2E Testing  #支持 E2E 测试
我们可以选择以下的选项:
当上面使用space选择后然后使用enter确认,出现:

询问是否使用history模式,我们选择Y,出现:

后面出现的一次按照如下填写即可:
ESLint + Prettier(检查与格式化代码)--》 Lint on save(保存就检测)--》In dedicated config files(分别使用独立文件放置)--》保存这个特性到项目
注意选择npm下载即可:
当这些完成后我们就可以对其添加一些我们自己写的东西了。
- 安装组件
这里我主要是想让前后端进行通信,所以需要安装axios,那么就进行axios的封装:
I:\djaogo-vue-demo\fronted>cnpm install axios
√ Installed 1 packages
√ Linked 3 latest versions
√ Run 0 scripts
√ All packages installed (4 packages installed from npm registry, used 2s(netwo
rk 2s), speed 62.37kB/s, json 4(14.62kB), tarball 109.44kB)
在项目的src目录下新建utils文件夹,并在里面新建requests.js文件:
import axios from 'axios'

const request = axios.create(
  {
    baseURL:'http://127.0.0.1:8001',
    timeout:5000
  }
)

export default request
- 调用接口
另外,再在src目录下新建api目录,api目录下新建test.js文件,可用于测试。
调用后台接口:
import request from '@/utils/request'

export default {

  getList(){
    const req = request({
      method:'get',
      url:'/test/'
    })
    return req
  }
}
在页面中进行调用接口,并传递给子组件进行渲染:


<template>
    <div>
    <Table v-bind:testList="testList" v-loading="tableLoading"></Table>
    </div>
</template>

<script>
  import Table from "../components/Table";
  import testApi from "../api/test"
  export default {
    name: "Main",
    components: { Table },
    data(){
      return {
        testList:[],
        tableLoading:true
      }
    },
    created(){
      this.getData()
    },
    methods:{
      getData(){
        testApi.getList().then(response=>{
          const {data, meta: {code,message}} = response.data;
          if(code===2000){
                this.testList = data;
                this.tableLoading = false
          }
          console.log('data',data,code,message)
        })
      }
    }
  };
</script>

<style scoped>

</style>
子组件:
<template>
    <el-table
            :data="testList"
            style="width: 100%">
        <el-table-column
                prop="username"
                label="姓名"
                width="180">
        </el-table-column>
        <el-table-column
                prop="password"
                label="密码"
                width="180">
        </el-table-column>
        <el-table-column
                prop="position"
                label="职位">
        </el-table-column>
    </el-table>
</template>

<script>
  export default {
    name: "table",
    data() {
      return {
      }
    },
    props:{
      testList:Array
    }
  };
</script>

<style scoped>

</style>
此时,就可以正常开发,基于此进行下面的部署。
(二)项目部署
1、打包项目
在根目录下通过以下命令进行打包:
npm run build
此时会在项目里面有一个dist目录文件夹。
2、在服务器上新建文件夹
在服务器上新建一个fronted的文件夹,用于存放前台服务的一些文件夹和文件,将dist文件夹的压缩包上传,并且创建Dokcerfile和nginx.conf文件
[root@centos-7 fronted]# ls
dist.zip  Dockerfile  nginx.conf
将zip文件解压缩:
[root@centos-7 fronted]# unzip dist.zip
编写Dockerfile文件:
FROM nginx  #基础镜像
COPY dist/  /usr/share/nginx/html/  #将dist下的文件拷贝到html目录下
COPY nginx.conf  /etc/nginx/nginx.conf #用本地的nginx.conf配置文件替换nginx中的配置文件
编写nginx.conf文件:
worker_processes auto;

events {
    worker_connections  1024;
}

http {
    include       mime.types;
    default_type  application/octet-stream;

    sendfile        on;
    keepalive_timeout  65;

    client_max_body_size   20m;
    server {
        listen       80;
        server_name  localhost;
        location / {
           root   /usr/share/nginx/html;
           index  index.html index.htm;
           try_files $uri $uri/ /index.html;
        }
        error_page   500 502 503 504  /50x.html;
        location = /50x.html {
            root   html;
        }
    }
}
- 创建镜像
[root@centos-7 fronted]# docker build -t fronted:1.0 .
注意后面的点不要丢了。
- 运行容器
[root@centos-7 fronted]# docker run -d --name fronted -p 80:80 fronted:1.0
404153a8e7149113852dcdc7b76e464093bb9a07aa02fa26457e1f53c1e3ae0f
然后既可以访问本机地址的80端口了。

 浙公网安备 33010602011771号