


pytest-内置fixture
4 内置 Fixture
4.1 使用 tmpdir 和 tmpdir_factory
内置的 tmpdir 和 tmpdir_factory 负责在测试开始运行前创建临时文件目录,并在测试结束后删除。
如果测试代码要对文件进行读/写操作,那可以使用 tmpdir 或 tmpdir_factory 来创建文件或目录。单个测试使用 tmpdir,多个测试使用 tmpdir_factory。
tmpdir 的作用范围是函数级别,tmpdir_factory 的作用范围是会话级别。单个测试需要临时目录或文件应该使用 tmpdir,如果每个测试函数都要重新创建目录或文件,也请使用 tmpdir。
 1 def test_tmpdir(tmpdir):
 2     # tmpdir already has a path name associated with it
 3     # join() extends the path to include a filename
 4     # the file is created when it's written to
 5     a_file = tmpdir.join('something.txt')
 6
 7     # you can create directories
 8     a_sub_dir = tmpdir.mkdir('anything')
 9
10     # you can create files in directories (created when written)
11     another_file = a_sub_dir.join('something_else.txt')
12
13     # this write creates 'something.txt'
14     a_file.write('contents may settle during shipping')
15
16     # this write creates 'anything/something_else.txt'
17     another_file.write('something different')
18
19     # you can read the files as well
20     assert a_file.read() == 'contents may settle during shipping'
21     assert another_file.read() == 'something different'
22
23
24 def test_tmpdir_factory(tmpdir_factory):
25     # you should start with making a directory
26     # a_dir acts like the object returned from the tmpdir fixture
27     a_dir = tmpdir_factory.mktemp('mydir')
28
29     # base_temp will be the parent dir of 'mydir'
30     # you don't have to use getbasetemp()
31     # using it here just to show that it's available
32     base_temp = tmpdir_factory.getbasetemp()
33     print('base:', base_temp)
34
35     # the rest of this test looks the same as the 'test_tmpdir()'
36     # example except I'm using a_dir instead of tmpdir
37
38     a_file = a_dir.join('something.txt')
39     a_sub_dir = a_dir.mkdir('anything')
40     another_file = a_sub_dir.join('something_else.txt')
41
42     a_file.write('contents may settle during shipping')
43     another_file.write('something different')
44
45     assert a_file.read() == 'contents may settle during shipping'
46     assert another_file.read() == 'something different'
在其他作用范围内使用临时目录
tmpdir_factory 的作用范围是会话级别的,tmpdir 的作用范围是函数级别的。如果需要模块或类级别作用范围的目录,可以利用 tmpdir_factory 再创建一个 fixture。
假定有一个测试模块,其中有很多测试用例要读取一个JSON文件,我们可以在模块本身或 conftest.py 中创建一个作用范围是模块级别的 fixture,用于配置该文件。
 1 #-----conftest.py
 2
 3 @pytest.fixture(scope='module')
 4 def author_file_json(tmpdir_factory):
 5     """Write some authors to a data file."""
 6     python_author_data = {
 7         'Ned': {'City': 'Boston'},
 8         'Brian': {'City': 'Portland'},
 9         'Luciano': {'City': 'Sau Paulo'}
10     }
11
12     file = tmpdir_factory.mktemp('data').join('author_file.json')
13     print('file:{}'.format(str(file)))
14
15     with file.open('w') as f:
16         json.dump(python_author_data, f)
17     return file
18
19
20 #-----test_authors.py
21 def test_brian_in_portland(author_file_json):
22     """A test that uses a data file."""
23     with author_file_json.open() as f:
24         authors = json.load(f)
25     assert authors['Brian']['City'] == 'Portland'
26
27
28 def test_all_have_cities(author_file_json):
29     """Same file is used for both tests."""
30     with author_file_json.open() as f:
31         authors = json.load(f)
32     for a in authors:
33         assert len(authors[a]['City']) > 0
如果一个测试数据文件能服务于多个测试用例,那么就没必要为每个用例创建一个数据文件。
4.2 使用 pytestconfig
内置的 pytestconfig 可以通过命令行参数、选项、配置文件、插件、运行目录等方式来控制 pytest。pytestconfig 是 request.config 的快捷方式,它在 pytest 文档里有时候被称为“pytest配置对象”。
暂时用处还没挖掘,待后续补充
4.3 使用 cache
cache 的作用是存储一段测试会话的信息,在下一段测试会话中使用。使用 pytest 内置的 --last-failed 和 --failed-first 标识可以很好地展示 cache 的功能。
- --cache-show:show cache contents, don't perform collection or tests
- --cache-clear:remove all cache contents at start of test run
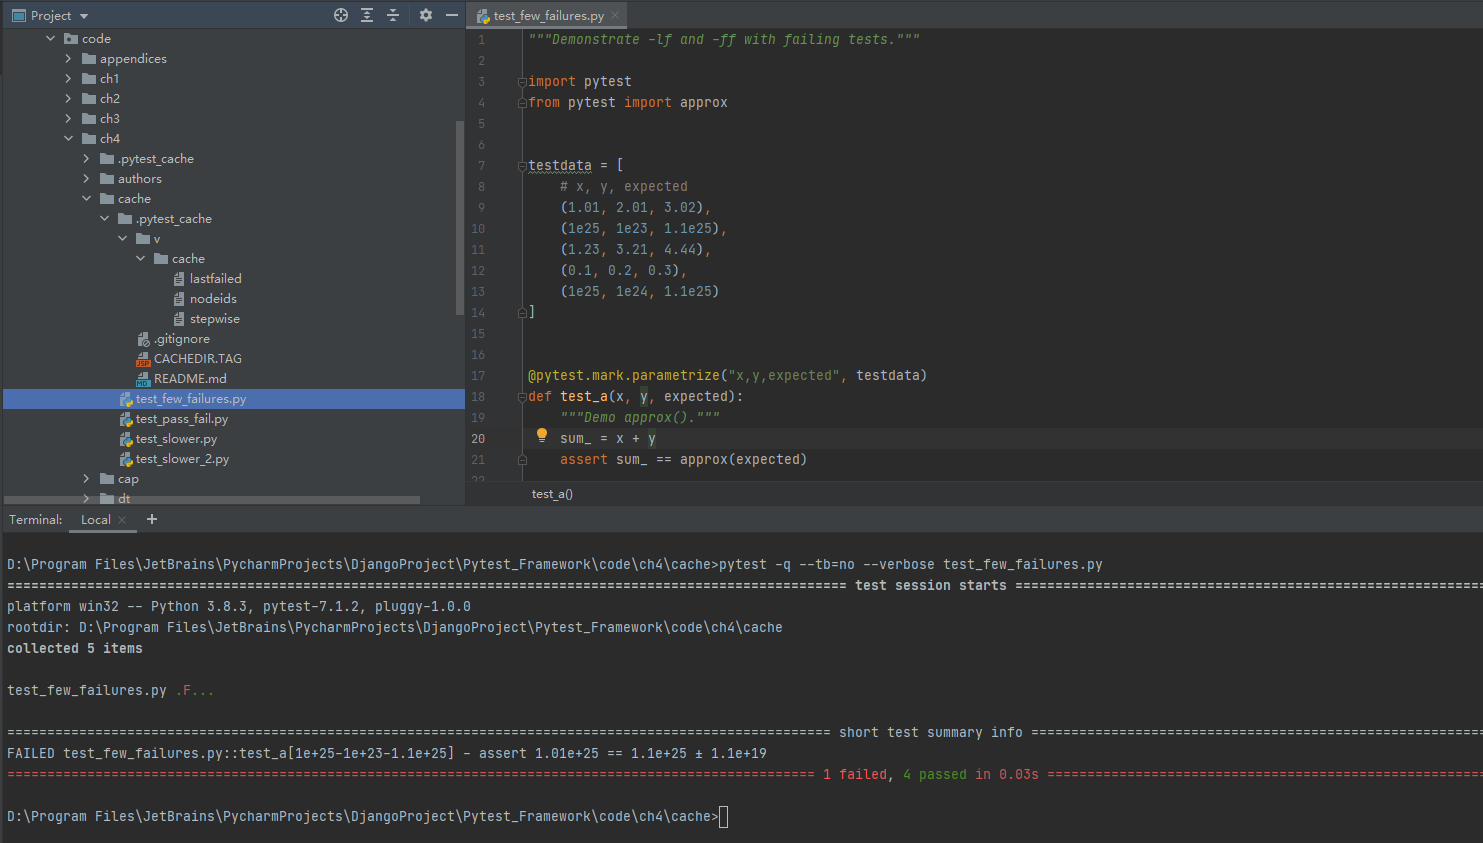
 1 #----test_few_failtures.py
 2
 3 testdata = [
 4     # x, y, expected
 5     (1.01, 2.01, 3.02),
 6     (1e25, 1e23, 1.1e25),
 7     (1.23, 3.21, 4.44),
 8     (0.1, 0.2, 0.3),
 9     (1e25, 1e24, 1.1e25)
10 ]
11
12
13 @pytest.mark.parametrize("x,y,expected", testdata)
14 def test_a(x, y, expected):
15     """Demo approx()."""
16     sum_ = x + y
17     assert sum_ == approx(expected)
运行这个测试函数,使用 --verbose 标识来显示函数名称,可以直观看到有个函数测试失败。
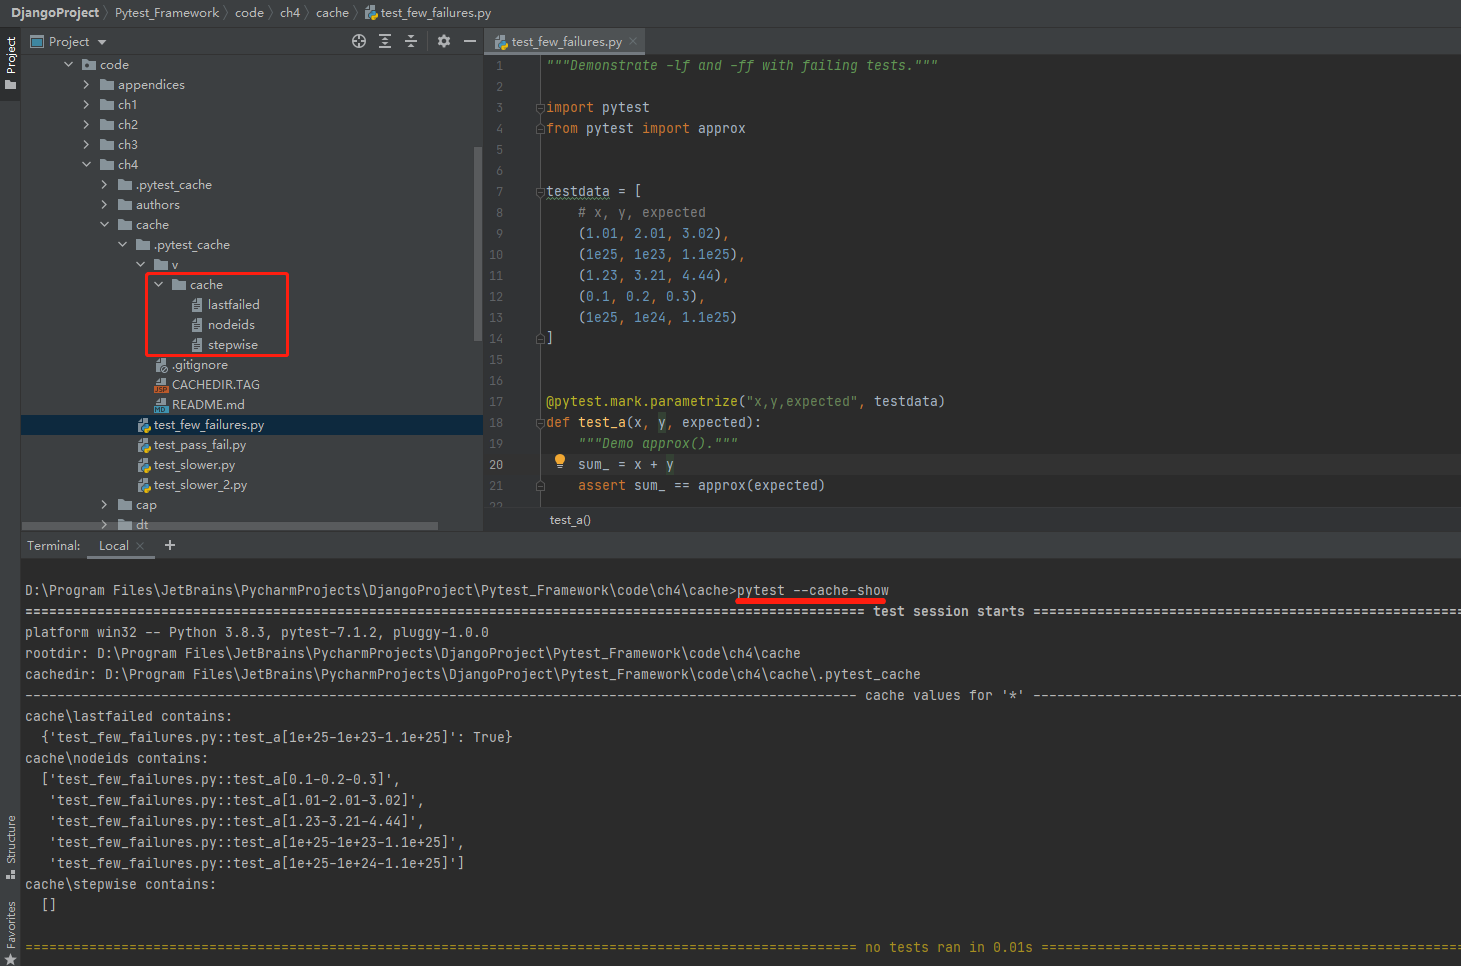
可以使用 --cache-show 标识来显示存储的信息,可以看到在项目的 ./.pytest_cache/v/cache 目录下存储了三个文件,其中 lastfailed 是存储上一次测试失败的信息。
我们来创建一个 fixture,记录测试的耗时,并存储到 cache 里,如果接下来的测试耗时大于之前的两倍,就抛出超时异常。
cache的接口很简单
- cache.get(key, default)
- cache.set(key, value)
习惯上,键名以应用名字或插件名字开始,接着是/,然后是分隔开的键字符串。键值可以是任何可转化成JSON的东西,因为是 .cache 目录里是用 JSON 格式存储的。
 1 #----test_slower.py
 2
 3 @pytest.fixture(autouse=True)
 4 def check_duration(request, cache):
 5     key = 'duration/' + request.node.nodeid.replace(':', '_')
 6     # nodeid's can have colons
 7     # keys become filenames within .cache
 8     # replace colons with something filename safe
 9     start_time = datetime.datetime.now()
10     yield
11     stop_time = datetime.datetime.now()
12     this_duration = (stop_time - start_time).total_seconds()
13     last_duration = cache.get(key, None)
14     cache.set(key, this_duration)
15     if last_duration is not None:
16         errorstring = "test duration over 2x last duration"
17         assert this_duration <= last_duration * 2, errorstring
18
19
20 @pytest.mark.parametrize('i', range(5))
21 def test_slow_stuff(i):
22     time.sleep(random.random())
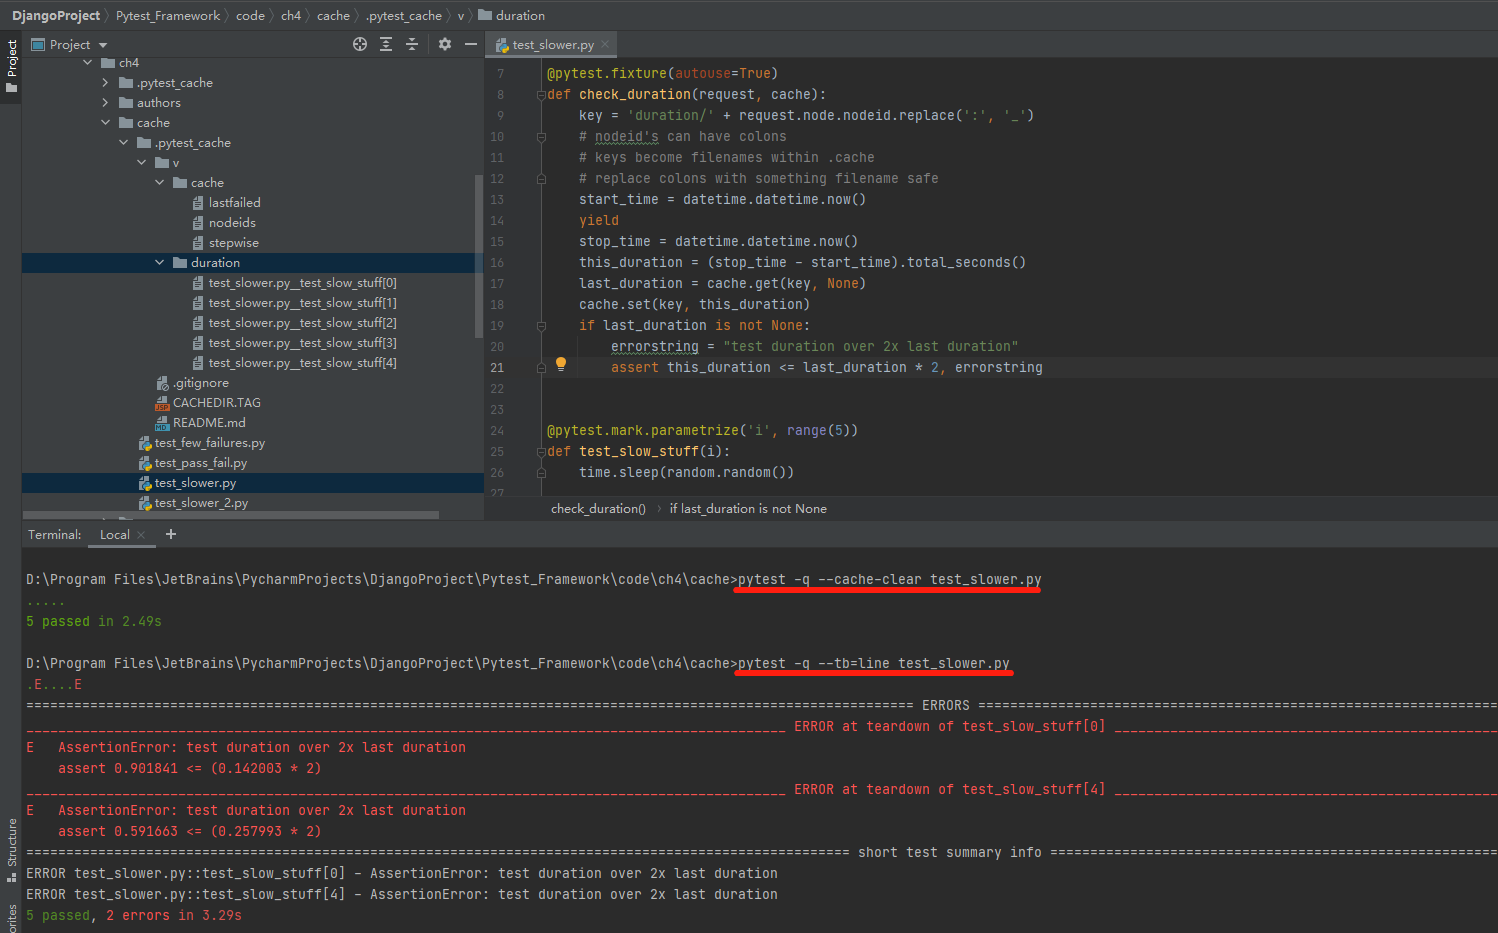
第一次执行时使用了 --cache-clear,用于清空缓存
可以观察到 ./.pytest_cache/v/duration 目录下存了几个文件,duration/test_slower.py__test_slow_stuff[0] 和 代码中的 key=duration/' + request.node.nodeid.replace(':', '_') 是一致的。
每个文件里存的其实就是 键值对中的值

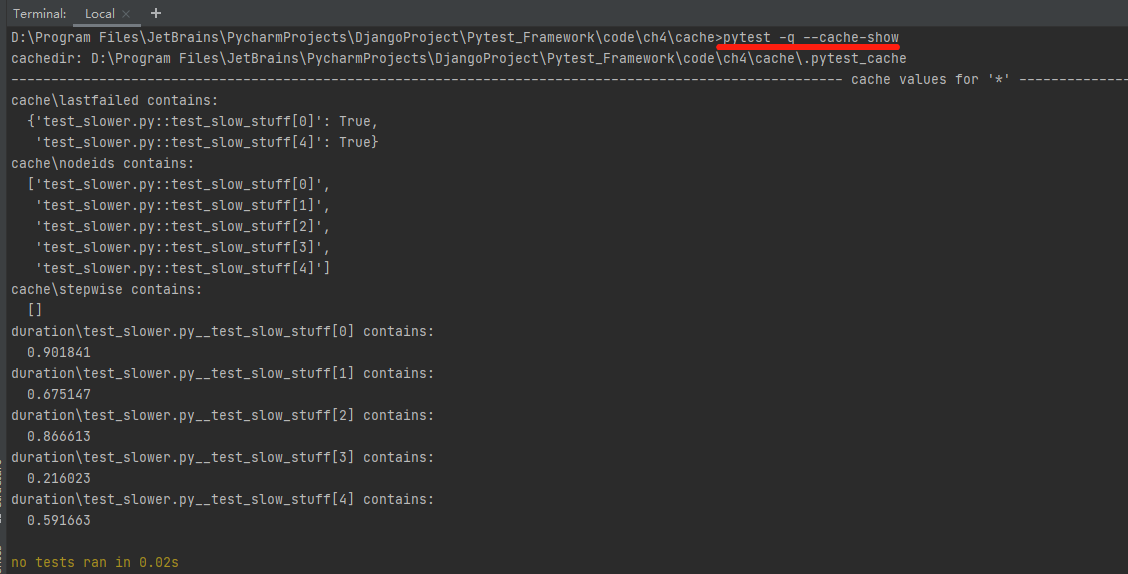
可以用 --cache-show 看看 cache 里存储了什么信息。
接下来的每个测试都将读/写 cache,可以把原先的 fixture 拆分成两个小 fixture:一个作用范围是函数级别,用于测量运行时间;另一个作用范围是会话级别,用来读/写cache。
重构后的代码
 1 Duration = namedtuple('Duration', ['current', 'last'])
 2
 3
 4 @pytest.fixture(scope='session')
 5 def duration_cache(request):
 6     key = 'duration/testdurations'
 7     d = Duration({}, request.config.cache.get(key, {}))
 8     yield d
 9     request.config.cache.set(key, d.current)
10
11
12 @pytest.fixture(autouse=True)
13 def check_duration(request, duration_cache):
14     d = duration_cache
15     nodeid = request.node.nodeid
16     start_time = datetime.datetime.now()
17     yield
18     duration = (datetime.datetime.now() - start_time).total_seconds()
19     d.current[nodeid] = duration
20     if d.last.get(nodeid, None) is not None:
21         errorstring = "test duration over 2x last duration"
22         assert duration <= (d.last[nodeid] * 2), errorstring
23
24
25 @pytest.mark.parametrize('i', range(5))
26 def test_slow_stuff(i):
27     time.sleep(random.random())
4.4 使用 capsys
pytest 内置的 capsys 有两个功能:允许使用代码读取 stdout 和 stderr;可以临时禁制抓取日志输出。
假设某个函数要把欢迎信息输出到 stdout,你不能使用返回值来测试它,只能测试 stdout,这时可以使用 capsys 来测试。
 1 def greeting(name):
 2     print('Hi, {}'.format(name))
 3
 4
 5 def test_greeting(capsys):
 6     greeting('Earthling')
 7     out, err = capsys.readouterr()
 8     assert out == 'Hi, Earthling\n'
 9     assert err == ''
10
11     greeting('Brian')
12     greeting('Nerd')
13     out, err = capsys.readouterr()
14     assert out == 'Hi, Brian\nHi, Nerd\n'
15     assert err == ''
16
17
18 def yikes(problem):
19     print('YIKES! {}'.format(problem), file=sys.stderr)
20
21
22 def test_yikes(capsys):
23     yikes('Out of coffee!')
24     out, err = capsys.readouterr()
25     assert out == ''
26     assert 'Out of coffee!' in err
pytest 通常会抓取测试用例及被测试代码的输出。仅当全部测试会话执行结束后,抓取到的输出才会随着失败的测试显示出来。--s 参数可以关闭这个功能,在测试仍在运行期间就把输出直接发送到 stdout。
通常这很方便,但是有时你可能又需要其中的部分信息。此时可以使用 capsys,capsys.disabled() 可以临时让输出绕过默认的输出捕获机制。
1 def test_capsys_disabled(capsys):
2     with capsys.disabled():
3         print('\nalways print this')
4     print('normal print, usually captured')
4.5 使用 monkeypatch
monkey patch 可以在运行期间对类或模块进行动态修改。在测试中,monkey patch 常用于替换被测试代码的部分运行环境,或者将输入依赖或输出依赖替换成更容易测试的对象或函数。
pytest 内置的 monkeypatch 允许你在单一测试的环境里做这些事情。测试结束后,无论结果是通过还是失败,代码都会复原(所有修改都会撤销)。
monkeypatch 提供以下函数:
- setattr(target, name, value=<notset>, raising=True):设置一个属性
- delattr(target, name=<notset>, raising=True):删除一个属性
- setitem(dic, name, value):设置字典中的一条记录
- delitem(dic, name, raising=True):删除字典中的一条记录
- setenv(name, value, prepend=None):设置一个环境变量
- delenv(name, raising=True):删除一个环境变量
- syspath_prepend(path):将路径path加入sys.path并放在最前,sys.path是Python导入的系统路径列表
- chdir(path):改变当前的工作目录
raising 参数用于指示 pytest 是否在记录不存在时抛出异常。setenv()函数里的 prepend 参数可以是一个字符,如果这样设置的话,那么环境变量的值就是 value+prepend+<old value>。
 1 #----cheese.py
 2
 3 def read_cheese_preferences():
 4     full_path = os.path.expanduser('~/.cheese.json')
 5     with open(full_path, 'r') as f:
 6         prefs = json.load(f)
 7     return prefs
 8
 9
10 def write_cheese_preferences(prefs):
11     full_path = os.path.expanduser('~/.cheese.json')
12     with open(full_path, 'w') as f:
13         json.dump(prefs, f, indent=4)
14
15
16 def write_default_cheese_preferences():
17     write_cheese_preferences(_default_prefs)
18
19
20 _default_prefs = {
21     'slicing': ['manchego', 'sharp cheddar'],
22     'spreadable': ['Saint Andre', 'camembert',
23                    'bucheron', 'goat', 'humbolt fog', 'cambozola'],
24     'salads': ['crumbled feta']
25 }
 1 #----test_cheese.py
 2
 3 def test_def_prefs_change_defaults(tmpdir, monkeypatch):
 4     # write the file once
 5     fake_home_dir = tmpdir.mkdir('home')
 6     monkeypatch.setattr(cheese.os.path, 'expanduser',
 7                         (lambda x: x.replace('~', str(fake_home_dir))))
 8     cheese.write_default_cheese_preferences()
 9     defaults_before = copy.deepcopy(cheese._default_prefs)
10
11     # change the defaults
12     monkeypatch.setitem(cheese._default_prefs, 'slicing', ['provolone'])
13     monkeypatch.setitem(cheese._default_prefs, 'spreadable', ['brie'])
14     monkeypatch.setitem(cheese._default_prefs, 'salads', ['pepper jack'])
15     defaults_modified = cheese._default_prefs
16
17     # write it again with modified defaults
18     cheese.write_default_cheese_preferences()
19
20     # read, and check
21     actual = cheese.read_cheese_preferences()
22     assert defaults_modified == actual
23     assert defaults_modified != defaults_before
4.6 使用 doctest_namespace
doctest 模块是 Python 标准库的一部分,借助它,可以在函数的文档字符串中放入示例代码,并通过测试确保有效。你可以使用 --doctest-modules 标识搜寻并运行 doctest 测试用例。
在构建被标注为 autouse 的 fixture 时,可以使用内置的 doctest_namespace,这能够使 doctest 中的测试用例在运行时识别某些作用于 pytest 命名空间的字符标识,从而增强文档字符串的可读性。
pytest 将每个字符串里的代码看成是不同的测试用例
 1 #----unnecessary_math.py
 2
 3 """
 4 This module defines multiply(a, b) and divide(a, b).
 5
 6 >>> import unnecessary_math as um
 7
 8 Here's how you use multiply:
 9
10 >>> um.multiply(4, 3)
11 12
12 >>> um.multiply('a', 3)
13 'aaa'
14
15 Here's how you use divide:
16
17 >>> um.divide(10, 5)
18 2.0
19 """
20
21
22 def multiply(a, b):
23     """
24     Returns a multiplied by b.
25
26     >>> um.multiply(4, 3)
27     12
28     >>> um.multiply('a', 3)
29     'aaa'
30     """
31     return a * b
32
33
34 def divide(a, b):
35     """
36     Returns a divided by b.
37
38     >>> um.divide(10, 5)
39     2.0
40     """
41     return a / b
1 #----conftest.py
2
3 import pytest
4 import unnecessary_math
5
6
7 @pytest.fixture(autouse=True)
8 def add_um(doctest_namespace):
9     doctest_namespace['um'] = unnecessary_math
4.7 使用 recwarn
内置的 recwarn 可以用来检查待测代码产生的警告信息。
 1 def lame_function():
 2     warnings.warn("Please stop using this", DeprecationWarning)
 3     # rest of function
 4
 5
 6 def test_lame_function(recwarn):
 7     lame_function()
 8     assert len(recwarn) == 1
 9     w = recwarn.pop()
10     assert w.category == DeprecationWarning
11     assert str(w.message) == 'Please stop using this'
12
13
14 def test_lame_function_2():
15     with pytest.warns() as warning_list:
16         lame_function()
17
18     assert len(warning_list) == 1
19     w = warning_list.pop()
20     assert w.category == DeprecationWarning
21     assert str(w.message) == 'Please stop using this'
recwarn 的值就像是一个警告信息列表,列表里的每个警告信息都有4个属性 category、message、filename、lineno。
警告信息在测试开始后收集,如果你在意的警告信息出现在测试尾部,则可以在信息收集前使用 recwarn.clear() 清除不需要的内容。
除了 recwarn,pytest 还可以使用 pytest.warns() 来检查警告信息。

 浙公网安备 33010602011771号