DolphinScheduler 1.3.2集群版(基于CDH5.13.1)安装手册
0.介绍说明
Apache DolphinScheduler是一个分布式去中心化,易扩展的可视化DAG工作流任务调度系统。致力于解决数据处理流程中错综复杂的依赖关系,使调度系统在数据处理流程中开箱即用。
我们的目标是希望通过使用 DS 完成带调度的数据加工,为后续的模型或算法提供数据支持。
1.环境依赖
通过官网确定当前服务器的基础软件安装情况,以下是安装依赖
PostgreSQL (8.2.15+) or MySQL (5.6或者5.7系列) : 两者任选其一即可
JDK (1.8+) : 必装,请安装好后在/etc/profile下配置 JAVA_HOME 及 PATH 变量
ZooKeeper (3.4.6+) :必装
Hadoop (2.6+) or MinIO :选装,如果需要用到资源上传功能,可以选择上传到Hadoop or MinIO上
不用考虑DS越早的版本越能兼容越早的依赖环境的版本,他们的依赖都是一样的,越新的稳定版本安装步骤越就简单,而且旧版本的BUG在新版本中得到了解决。
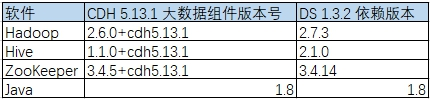
以上是安装DS官方安装包最低的要求,我们使用的环境是CDH5.13.1,实际环境的相关组件版本早于最低要求,所以需要对源码进行编译。
用户说明
可以使用服务器中已存在的非root用户(如appuser),也可以专门新建一个用户dolphinscheduler,DS的租户只能从用户中选择。
本文以 appuser 作为Dolphin Scheduler用户
集群角色规划
因为CDH机器的规模较小,我们这边采用了如下配置,可以根据实际情况扩展server004中的服务角色到别的服务器

以下是Dolphin Scheduler相关服务的内存占用情况,在规划服务器角色的时候也需要考虑内存占用因素

2.前置准备
2.1 安装MySQL
说明
参考 CentOS 7离线安装MySQL 5.7
https://www.jellythink.com/archives/14
在Client 服务器中检查是否安装了MySQL,前提是确认MySQL服务器在你的集群中是否有别的用途,再决定要不要先卸载 !!!
1.检查是否安装了 MySQL
rpm -qa | grep mysql

2.检查是否安装了mariadb
rpm -qa | grep mariadb

3.如果已经存在则卸载
rpm -e --nodeps xxx
下载mysql-5.7.30
下载地址 https://downloads.mysql.com/archives/community/

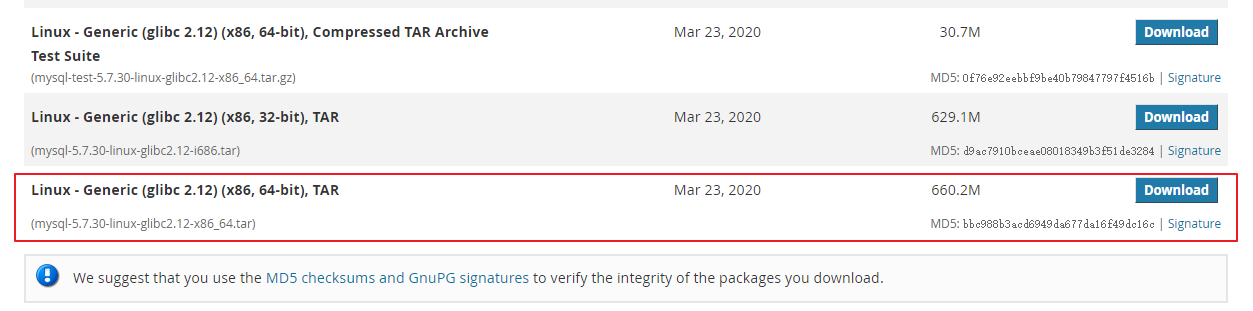
将下载的离线安装包mysql-5.7.30-linux-glibc2.12-x86_64.tar上传到/home/appuser/mysql中
解压离线安装包
# 解压缩
tar -xvf /home/appuser/mysql/mysql-5.7.30-linux-glibc2.12-x86_64.tar

# 会得到一个mysql-5.7.30-linux-glibc2.12-x86_64.tar.gz文件,再解压缩
tar -zxvf /home/appuser/mysql/mysql-5.7.30-linux-glibc2.12-x86_64.tar.gz

# 建立软链接,便于以后版本升级
ln -s mysql-5.7.30-linux-glibc2.12-x86_64 mysql

# 修改mysql文件夹下所有文件的用户和用户组
chown -R appuser:appuser mysql/

创建临时目录、数据目录和日志目录
mkdir -p /home/appuser/mysql/3306/data
mkdir -p /home/appuser/mysql/3306/log
mkdir -p /home/appuser/mysql/3306/tmp

创建MySQL配置文件
# 创建配置文件
cd /etc

# 在my.cnf文件中添加对应的配置项
cp my.cnf my.cnf.bak20201023
vi my.cnf
my.cnf 内容如下


 1 [client]                                        # 客户端设置,即客户端默认的连接参数
 2 port = 3306                                    # 默认连接端口
 3 socket = /home/appuser/mysql/3306/tmp/mysql.sock                        # 用于本地连接的socket套接字,mysqld守护进程生成了这个文件
 4
 5
 6
 7
 8 [mysqld]                                        # 服务端基本设置
 9 # 基础设置
10 server-id = 1                                  # Mysql服务的唯一编号 每个mysql服务Id需唯一
11 port = 3306                                    # MySQL监听端口
12 basedir = /home/appuser/mysql/mysql                      # MySQL安装根目录
13 datadir = /home/appuser/mysql/3306/data                      # MySQL数据文件所在位置
14 tmpdir  = /home/appuser/mysql/3306/tmp                                  # 临时目录,比如load data infile会用到
15 socket = /home/appuser/mysql/3306/tmp/mysql.sock        # 为MySQL客户端程序和服务器之间的本地通讯指定一个套接字文件
16 pid-file = /home/appuser/mysql/3306/log/mysql.pid      # pid文件所在目录
17 skip_name_resolve = 1                          # 只能用IP地址检查客户端的登录,不用主机名
18 character-set-server = utf8mb4                  # 数据库默认字符集,主流字符集支持一些特殊表情符号(特殊表情符占用4个字节)
19 transaction_isolation = READ-COMMITTED          # 事务隔离级别,默认为可重复读,MySQL默认可重复读级别
20 collation-server = utf8mb4_general_ci          # 数据库字符集对应一些排序等规则,注意要和character-set-server对应
21 init_connect='SET NAMES utf8mb4'                # 设置client连接mysql时的字符集,防止乱码
22 lower_case_table_names = 1                      # 是否对sql语句大小写敏感,1表示不敏感
23 max_connections = 400                          # 最大连接数
24 max_connect_errors = 1000                      # 最大错误连接数
25 explicit_defaults_for_timestamp = true          # TIMESTAMP如果没有显示声明NOT NULL,允许NULL值
26 max_allowed_packet = 128M                      # SQL数据包发送的大小,如果有BLOB对象建议修改成1G
27 interactive_timeout = 1800                      # MySQL连接闲置超过一定时间后(单位:秒)将会被强行关闭
28 wait_timeout = 1800                            # MySQL默认的wait_timeout值为8个小时, interactive_timeout参数需要同时配置才能生效
29 tmp_table_size = 16M                            # 内部内存临时表的最大值 ,设置成128M;比如大数据量的group by ,order by时可能用到临时表;超过了这个值将写入磁盘,系统IO压力增大
安装MySQL数据库
# 进入MySQL的bin目录
cd /home/appuser/mysql/mysql/bin

# 初始化数据库,并指定启动mysql的用户
./mysqld --initialize --user=appuser

# 复制启动脚本到资源目录
cp /home/appuser/mysql/mysql/support-files/mysql.server /etc/rc.d/init.d/mysqld

# 增加mysqld服务控制脚本执行权限
chmod +x /etc/rc.d/init.d/mysqld

# 将mysqld服务加入到系统服务
chkconfig --add mysqld

# 检查mysqld服务是否已经生效
chkconfig --list mysqld

# 切换至mysql用户,启动mysql
su appuser
service mysqld start

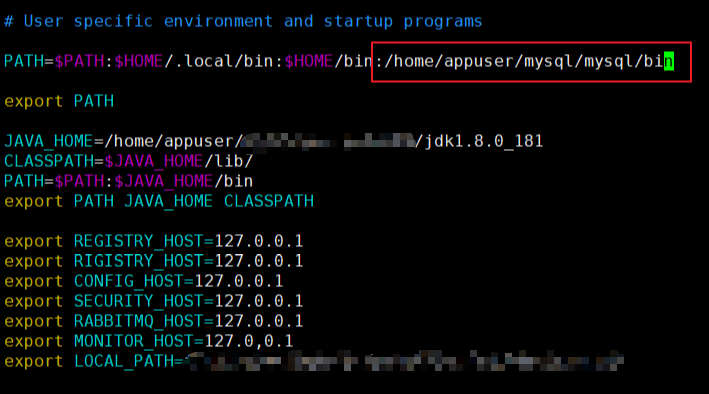
# 切换至mysql用户
su - appuser

# 修改配置文件,增加export PATH=$PATH:/home/appuser/mysql/mysql/bin
cp .bash_profile .bash_profile_bak2020102
vi .bash_profile

# 立即生效
source .bash_profile
# 登陆mysql
mysql -uroot -p

# 修改root用户密码
set password for root@localhost=password("123456");
修改pom.xml的properties
旧
<hadoop.version>2.7.3</hadoop.version>
<hive.jdbc.version>2.1.0</hive.jdbc.version>
<zookeeper.version>3.4.14</zookeeper.version>
<java.version>1.8</java.version>
新
<hadoop.version>2.6.0</hadoop.version>
<hive.jdbc.version>1.1.0</hive.jdbc.version>
<zookeeper.version>3.4.14</zookeeper.version>
<java.version>1.8</java.version>
CDH 中 ZK 的版本是3.4.5 ,通过修改依赖文件pom.xml的方法,重新通过Maven下载依赖包,结果发现项目中需要的一些方法 ZK 3.4.5中没有
后来把这个依赖更改回去,经实际测试可用
注释掉MySQL的依赖
<!--            <dependency>
                <groupId>mysql</groupId>
                <artifactId>mysql-connector-java</artifactId>
                <version>${mysql.connector.version}</version>
                <scope>test</scope>
            </dependency>-->
在IDEA中通过 Maven reimport 修改好的 pom.xml
mvn -U clean package -Prelease -Dmaven.test.skip=true
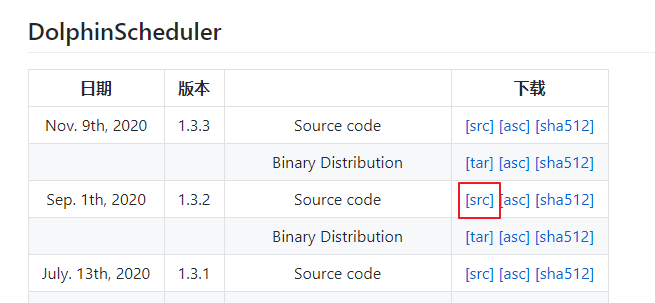
在 dolphinscheduler-dist 这个 module 下的 target 目录中能找到打包好的 tar.gz 包 apache-dolphinscheduler-incubating-1.3.2-SNAPSHOT-dolphinscheduler-bin.tar.gz
3.安装步骤
3.1 解压
编译后的包名 apache-dolphinscheduler-incubating-1.3.2-SNAPSHOT-dolphinscheduler-bin.tar.gz
# 创建部署目录
mkdir -p /home/appuser/dolphin/package;
cd /home/appuser/dolphin/package;

# 解压缩
tar -zxvf apache-dolphinscheduler-incubating-1.3.2-SNAPSHOT-dolphinscheduler-bin.tar.gz
mv apache-dolphinscheduler-incubating-1.3.2-SNAPSHOT-dolphinscheduler-bin  dolphinscheduler-bin
3.2 创建部署用户并赋予目录操作权限
在这边我们结合实际情况进行如下操作
省略掉创建新用户和设置值密码,已有用户 appuser
只需要对server001、server002、server003、server004 服务器的appuser用户配置免密登录且修改目录权限即可
# 备份所要修改的配置文件
cp /etc/sudoers /etc/sudoers_bak20201023

# 修改权限
chmod 640 /etc/sudoers

# 编辑/etc/sudoers 在最后添加一行 appuser ALL=(ALL) NOPASSWD: ALL
vi /etc/sudoers

# 将权限改回来
chmod 440 /etc/sudoers

vi /etc/hosts

#add ip hostname
192.168.xxx.xxx server001
192.168.xxx.xxx server002
192.168.xxx.xxx server003
192.168.xxx.xxx server004
注意:请删掉或者注释掉127.0.0.1这行
同步server004上的/etc/hosts到所有部署机器
for ip in ds2 ds3;     #请将此处ds2 ds3替换为自己要部署的机器的hostname
do
    sudo scp -r /etc/hosts  $ip:/etc/          #在运行中需要输入root密码
done
3.3 ssh免密配置
在server004上,切换到部署用户并配置ssh本机免密登录
su appuser;

ssh-keygen -t rsa -P '' -f ~/.ssh/id_rsa
cat ~/.ssh/id_rsa.pub >> ~/.ssh/authorized_keys
chmod 600 ~/.ssh/authorized_keys
注意:正常设置后,server004用户在执行命令ssh localhost 是不需要再输入密码的
在server004上,配置部署用户appuser ssh打通到其他待部署的机器
su appuser;
for ip in ds2 ds3;     #请将此处ds2 ds3替换为自己要部署的机器的hostname
do
    ssh-copy-id  $ip   #该操作执行过程中需要手动输入dolphinscheduler用户的密码
done
# 当然 通过 sshpass -p xxx ssh-copy-id $ip 就可以省去输入密码了

# 执行的命令
ssh-copy-id  server001
ssh-copy-id  server002
ssh-copy-id  server003
修改目录dolphinscheduler-bin的权限
chown -R appuser:appuser dolphinscheduler-bin
3.4 数据库初始化
进入数据库,默认数据库是PostgreSQL,如选择MySQL的话,使用默认的即可。
进入数据库命令行窗口后,执行数据库初始化命令,设置访问账号和密码。注: {user} 和 {password} 需要替换为具体的数据库用户名和密码
mysql> CREATE DATABASE dolphinscheduler DEFAULT CHARACTER SET utf8 DEFAULT COLLATE utf8_general_ci;
mysql> GRANT ALL PRIVILEGES ON dolphinscheduler.* TO '{user}'@'%' IDENTIFIED BY '{password}';
mysql> GRANT ALL PRIVILEGES ON dolphinscheduler.* TO '{user}'@'localhost' IDENTIFIED BY '{password}';
mysql> flush privileges;
执行以下命令
CREATE DATABASE dolphinscheduler DEFAULT CHARACTER SET utf8 DEFAULT COLLATE utf8_general_ci;
GRANT ALL PRIVILEGES ON dolphinscheduler.* TO 'appuser'@'%' IDENTIFIED BY 'appuser';
GRANT ALL PRIVILEGES ON dolphinscheduler.* TO 'appuser'@'localhost' IDENTIFIED BY 'appuser';
flush privileges;
创建表和导入基本数据
修改 conf 目录下 datasource.properties 中的下列配置
[appuser@server004 conf]$ pwd
/home/appuser/dolphin/package/dolphinscheduler-bin/conf
[appuser@server004 conf]$ cp datasource.properties datasource.properties_bak20201026
[appuser@server004 conf]$ vi datasource.properties
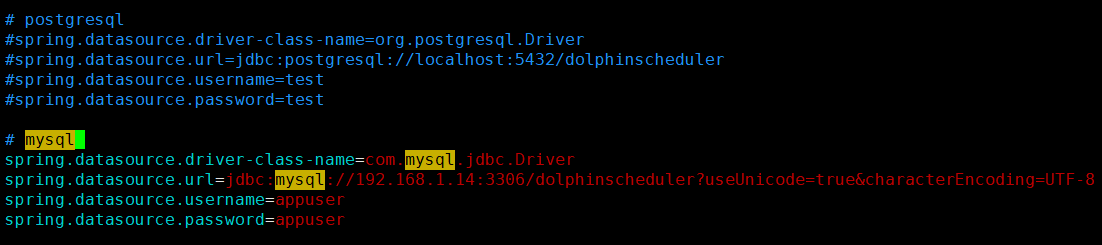
如果选择 MySQL,请注释掉 PostgreSQL 相关配置(反之同理),然后正确配置数据库连接相关信息
# postgre
#spring.datasource.driver-class-name=org.postgresql.Driver
#spring.datasource.url=jdbc:postgresql://localhost:5432/dolphinscheduler
# mysql
spring.datasource.driver-class-name=com.mysql.jdbc.Driver
spring.datasource.url=jdbc:mysql://xxx:3306/dolphinscheduler?useUnicode=true&characterEncoding=UTF-8     需要修改ip,本机localhost即可
spring.datasource.username=xxx                        需要修改为上面的{user}值
spring.datasource.password=xxx                        需要修改为上面的{password}值
修改配置文件如下
# mysql
spring.datasource.driver-class-name=com.mysql.jdbc.Driver
spring.datasource.url=jdbc:mysql://192.168.1.14:3306/dolphinscheduler?useUnicode=true&characterEncoding=UTF-8
spring.datasource.username=appuser
spring.datasource.password=appuser
before

after
修改并保存完后,执行 script 目录下的创建表及导入基础数据脚本
[appuser@server004 dolphinscheduler-bin]$ pwd
/home/appuser/dolphin/package/dolphinscheduler-bin
[appuser@server004 dolphinscheduler-bin]$ sh script/create-dolphinscheduler.sh
3.5 修改运行参数
修改 conf/env 目录下的 .dolphinscheduler_env.sh 环境变量(以相关用到的软件都安装在/opt/soft下为例)
[appuser@server004 env]$ pwd
/home/appuser/dolphin/package/dolphinscheduler-bin/conf/env
[appuser@server004 env]$ cp dolphinscheduler_env.sh dolphinscheduler_env.sh_bak20201016
[appuser@server004 env]$ ll
总用量 8
-rw-r--r-- 1 appuser appuser 1301 10月 26 10:13 dolphinscheduler_env.sh
-rw-r--r-- 1 appuser appuser 1301 10月 26 16:47 dolphinscheduler_env.sh_bak20201016
export HADOOP_HOME=/opt/cloudera/parcels/CDH/lib/hadoop
export HADOOP_CONF_DIR=/opt/cloudera/parcels/CDH/lib/hadoop/etc/hadoop
export SPARK_HOME1=/opt/cloudera/parcels/CDH/lib/spark
export SPARK_HOME2=/opt/cloudera/parcels/SPARK2/lib/spark2
export PYTHON_HOME=/opt/cloudera/parcels/Anaconda/bin/python
export JAVA_HOME=/usr/java/jdk1.8.0_111-cloudera
export HIVE_HOME=/opt/cloudera/parcels/CDH/lib/hive
export FLINK_HOME=/opt/soft/flink
export DATAX_HOME=/opt/soft/datax/bin/datax.py

export PATH=$HADOOP_HOME/bin:$SPARK_HOME1/bin:$SPARK_HOME2/bin:$PYTHON_HOME:$JAVA_HOME/bin:$HIVE_HOME/bin:$PATH:$FLINK_HOME/bin:$DATAX_HOME:$PATH
注: 这一步非常重要,例如 JAVA_HOME 和 PATH 是必须要配置的,没有用到的可以忽略或者注释掉
将jdk软链到/usr/bin/java下(仍以 JAVA_HOME=/app/soft/jdk 为例)
sudo ln -s /app/soft/jdk/bin/java /usr/bin/java
3.6 修改一键部署脚本参数
修改一键部署脚本 install.sh中的各参数,特别注意以下参数的配置
[appuser@server004 config]$ pwd
/home/appuser/dolphin/package/dolphinscheduler-bin/conf/config
[appuser@server004 config]$ cp install_config.conf install_config.conf_bak20201026
[appuser@server004 config]$ vi install_config.conf
以下配置仅供参考
 1 # 这里填 mysql or postgresql
 2 dbtype="mysql"
 3 # 数据库连接地址
 4 dbhost="localhost:3306"
 5 # 数据库名
 6 dbname="dolphinscheduler"
 7 # 数据库用户名,此处需要修改为上面设置的{user}具体值
 8 username="xxx"
 9 # 数据库密码, 如果有特殊字符,请使用\转义,需要修改为上面设置的{passowrd}具体值
10 passowrd="xxx"
11 #将DS安装到哪个目录,如: /opt/soft/dolphinscheduler,不同于现在的目录
12 installPath="/opt/soft/dolphinscheduler"
13 #使用哪个用户部署,使用1.3小节创建的用户
14 deployUser="dolphinscheduler"
15 #Zookeeper地址,单机本机是localhost:2181,记得把2181端口带上
16 zkQuorum="localhost:2181"
17 #在哪些机器上部署DS服务,本机选localhost
18 ips="localhost"
19 #master服务部署在哪台机器上
20 masters="localhost"
21 #worker服务部署在哪台机器上
22 workers="localhost"
23 #报警服务部署在哪台机器上
24 alertServer="localhost"
25 #后端api服务部署在在哪台机器上
26 apiServers="localhost"
27
28
29 # 邮件配置,以qq邮箱为例
30 # 邮件协议
31 mailProtocol="SMTP"
32 # 邮件服务地址
33 mailServerHost="smtp.exmail.qq.com"
34 # 邮件服务端口
35 mailServerPort="25"
36 # mailSender和mailUser配置成一样即可
37 # 发送者
38 mailSender="xxx@qq.com"
39 # 发送用户
40 mailUser="xxx@qq.com"
41 # 邮箱密码
42 mailPassword="xxx"
43 # TLS协议的邮箱设置为true,否则设置为false
44 starttlsEnable="true"
45 # 邮件服务地址值,参考上面 mailServerHost
46 sslTrust="smtp.exmail.qq.com"
47 # 开启SSL协议的邮箱配置为true,否则为false。注意: starttlsEnable和sslEnable不能同时为true
48 sslEnable="false"
49 # excel下载路径
50 xlsFilePath="/tmp/xls"
51 # 业务用到的    sql等资源文件上传到哪里,可以设置:HDFS,S3,NONE,单机如果想使用本地文件系统,请配置为HDFS,因为HDFS支持本地文件系统;如果不需要资源上传功能请选择NONE。强调一点:使用本地文件系统不需要部署hadoop
52 resUploadStartupType="HDFS"
53 # 这里以保存到本地文件系统为例
54 #注:如果上传资源想保存在hadoop上,hadoop集群的NameNode启用了HA的话,需要将hadoop的配置文件core-site.xml和hdfs-site.xml放到安装路径(上面的installPath)的conf目录下,本例即是放到/opt/soft/dolphinscheduler/conf下面,并配置namenode cluster名称;如果NameNode不是HA,则只需要将mycluster修改为具体的ip或者主机名即可
55 defaultFS="file:///data/dolphinscheduler"    #hdfs://{具体的ip/主机名}:8020
56
57
58 # 如果ResourceManager是HA,则配置为ResourceManager节点的主备ip或者hostname,比如"192.168.xx.xx,192.168.xx.xx",否则如果是单ResourceManager或者根本没用到yarn,请配置yarnHaIps=""即可,我这里没用到yarn,配置为""
59 yarnHaIps=""
60 # 如果是单ResourceManager,则配置为ResourceManager节点ip或主机名,否则保持默认值即可。我这里没用到yarn,保持默认
61 singleYarnIp="ark1"
62 # 由于hdfs支持本地文件系统,需要确保本地文件夹存在且有读写权限
63 hdfsPath="/data/dolphinscheduler"
64 注:如果打算用到资源中心功能,请执行以下命令:
65 sudo mkdir /data/dolphinscheduler
66 sudo chown -R dolphinscheduler:dolphinscheduler /data/dolphinscheduler
原始配置文件
  1 #
  2 # Licensed to the Apache Software Foundation (ASF) under one or more
  3 # contributor license agreements.  See the NOTICE file distributed with
  4 # this work for additional information regarding copyright ownership.
  5 # The ASF licenses this file to You under the Apache License, Version 2.0
  6 # (the "License"); you may not use this file except in compliance with
  7 # the License.  You may obtain a copy of the License at
  8 #
  9 #     http://www.apache.org/licenses/LICENSE-2.0
 10 #
 11 # Unless required by applicable law or agreed to in writing, software
 12 # distributed under the License is distributed on an "AS IS" BASIS,
 13 # WITHOUT WARRANTIES OR CONDITIONS OF ANY KIND, either express or implied.
 14 # See the License for the specific language governing permissions and
 15 # limitations under the License.
 16 #
 17
 18
 19 # NOTICE: If the following config has special characters in the variable `.*[]^${}\+?|()@#&`, Please escape, for example, `[` escape to `\[`
 20 # postgresql or mysql
 21 dbtype="mysql"
 22
 23 # db config
 24 # db address and port
 25 dbhost="192.168.xx.xx:3306"
 26
 27 # db username
 28 username="xx"
 29
 30 # db password
 31 # NOTICE: if there are special characters, please use the \ to escape, for example, `[` escape to `\[`
 32 password="xx"
 33
 34 # database name
 35 dbname="dolphinscheduler"
 36
 37
 38 # zk cluster
 39 zkQuorum="192.168.xx.xx:2181,192.168.xx.xx:2181,192.168.xx.xx:2181"
 40
 41 # zk root directory
 42 zkRoot="/dolphinscheduler"
 43
 44 # Note: the target installation path for dolphinscheduler, please not config as the same as the current path (pwd)
 45 installPath="/data1_1T/dolphinscheduler"
 46
 47 # deployment user
 48 # Note: the deployment user needs to have sudo privileges and permissions to operate hdfs. If hdfs is enabled, the root directory needs to be created by itself
 49 deployUser="dolphinscheduler"
 50
 51
 52 # alert config
 53 # mail server host
 54 mailServerHost="smtp.exmail.qq.com"
 55
 56 # mail server port
 57 # note: Different protocols and encryption methods correspond to different ports, when SSL/TLS is enabled, make sure the port is correct.
 58 mailServerPort="25"
 59
 60 # sender
 61 mailSender="xxxxxxxxxx"
 62
 63 # user
 64 mailUser="xxxxxxxxxx"
 65
 66 # sender password
 67 # note: The mail.passwd is email service authorization code, not the email login password.
 68 mailPassword="xxxxxxxxxx"
 69
 70 # TLS mail protocol support
 71 starttlsEnable="true"
 72
 73 # SSL mail protocol support
 74 # only one of TLS and SSL can be in the true state.
 75 sslEnable="false"
 76
 77 #note: sslTrust is the same as mailServerHost
 78 sslTrust="smtp.exmail.qq.com"
 79
 80
 81 # resource storage type:HDFS,S3,NONE
 82 resourceStorageType="NONE"
 83
 84 # if resourceStorageType is HDFS,defaultFS write namenode address,HA you need to put core-site.xml and hdfs-site.xml in the conf directory.
 85 # if S3,write S3 address,HA,for example :s3a://dolphinscheduler,
 86 # Note,s3 be sure to create the root directory /dolphinscheduler
 87 defaultFS="hdfs://mycluster:8020"
 88
 89 # if resourceStorageType is S3, the following three configuration is required, otherwise please ignore
 90 s3Endpoint="http://192.168.xx.xx:9010"
 91 s3AccessKey="xxxxxxxxxx"
 92 s3SecretKey="xxxxxxxxxx"
 93
 94 # if resourcemanager HA enable, please type the HA ips ; if resourcemanager is single, make this value empty
 95 yarnHaIps="192.168.xx.xx,192.168.xx.xx"
 96
 97 # if resourcemanager HA enable or not use resourcemanager, please skip this value setting; If resourcemanager is single, you only need to replace yarnIp1 to actual resourcemanager hostname.
 98 singleYarnIp="yarnIp1"
 99
100 # resource store on HDFS/S3 path, resource file will store to this hadoop hdfs path, self configuration, please make sure the directory exists on hdfs and have read write permissions。/dolphinscheduler is recommended
101 resourceUploadPath="/dolphinscheduler"
102
103 # who have permissions to create directory under HDFS/S3 root path
104 # Note: if kerberos is enabled, please config hdfsRootUser=
105 hdfsRootUser="hdfs"
106
107 # kerberos config
108 # whether kerberos starts, if kerberos starts, following four items need to config, otherwise please ignore
109 kerberosStartUp="false"
110 # kdc krb5 config file path
111 krb5ConfPath="$installPath/conf/krb5.conf"
112 # keytab username
113 keytabUserName="hdfs-mycluster@ESZ.COM"
114 # username keytab path
115 keytabPath="$installPath/conf/hdfs.headless.keytab"
116
117
118 # api server port
119 apiServerPort="12345"
120
121
122 # install hosts
123 # Note: install the scheduled hostname list. If it is pseudo-distributed, just write a pseudo-distributed hostname
124 ips="ds1,ds2,ds3,ds4,ds5"
125
126 # ssh port, default 22
127 # Note: if ssh port is not default, modify here
128 sshPort="22"
129
130 # run master machine
131 # Note: list of hosts hostname for deploying master
132 masters="ds1,ds2"
133
134 # run worker machine
135 # note: need to write the worker group name of each worker, the default value is "default"
136 workers="ds1:default,ds2:default,ds3:default,ds4:default,ds5:default"
137
138 # run alert machine
139 # note: list of machine hostnames for deploying alert server
140 alertServer="ds3"
141
142 # run api machine
143 # note: list of machine hostnames for deploying api server
144 apiServers="ds1"
实际上的配置文件
  1 #
  2 # Licensed to the Apache Software Foundation (ASF) under one or more
  3 # contributor license agreements.  See the NOTICE file distributed with
  4 # this work for additional information regarding copyright ownership.
  5 # The ASF licenses this file to You under the Apache License, Version 2.0
  6 # (the "License"); you may not use this file except in compliance with
  7 # the License.  You may obtain a copy of the License at
  8 #
  9 #     http://www.apache.org/licenses/LICENSE-2.0
 10 #
 11 # Unless required by applicable law or agreed to in writing, software
 12 # distributed under the License is distributed on an "AS IS" BASIS,
 13 # WITHOUT WARRANTIES OR CONDITIONS OF ANY KIND, either express or implied.
 14 # See the License for the specific language governing permissions and
 15 # limitations under the License.
 16 #
 17
 18
 19 # NOTICE: If the following config has special characters in the variable `.*[]^${}\+?|()@#&`, Please escape, for example, `[` escape to `\[`
 20 # postgresql or mysql
 21 dbtype="mysql"
 22
 23 # db config
 24 # db address and port
 25 dbhost="192.168.1.14:3306"
 26
 27 # db username
 28 username="appuser"
 29
 30 # db password
 31 # NOTICE: if there are special characters, please use the \ to escape, for example, `[` escape to `\[`
 32 password="appuser"
 33
 34 # database name
 35 dbname="dolphinscheduler"
 36
 37
 38 # zk cluster
 39 zkQuorum="192.168.1.11:2181,192.168.1.12:2181,192.168.1.13:2181"
 40
 41 # zk root directory
 42 zkRoot="/dolphinscheduler"
 43
 44 # Note: the target installation path for dolphinscheduler, please not config as the same as the current path (pwd)
 45 installPath="/home/appuser/dolphin/soft"
 46
 47 # deployment user
 48 # Note: the deployment user needs to have sudo privileges and permissions to operate hdfs. If hdfs is enabled, the root directory needs to be created by itself
 49 deployUser="appuser"
 50
 51
 52 # alert config
 53 # mail server host
 54 mailServerHost="smtp.exmail.qq.com"
 55
 56 # mail server port
 57 # note: Different protocols and encryption methods correspond to different ports, when SSL/TLS is enabled, make sure the port is correct.
 58 mailServerPort="25"
 59
 60 # sender
 61 mailSender="xxxxxxxxxx"
 62
 63 # user
 64 mailUser="xxxxxxxxxx"
 65
 66 # sender password
 67 # note: The mail.passwd is email service authorization code, not the email login password.
 68 mailPassword="xxxxxxxxxx"
 69
 70 # TLS mail protocol support
 71 starttlsEnable="true"
 72
 73 # SSL mail protocol support
 74 # only one of TLS and SSL can be in the true state.
 75 sslEnable="false"
 76
 77 #note: sslTrust is the same as mailServerHost
 78 sslTrust="smtp.exmail.qq.com"
 79
 80
 81 # resource storage type:HDFS,S3,NONE
 82 resourceStorageType="HDFS"
 83
 84 # if resourceStorageType is HDFS,defaultFS write namenode address,HA you need to put core-site.xml and hdfs-site.xml in the conf directory.
 85 # if S3,write S3 address,HA,for example :s3a://dolphinscheduler,
 86 # Note,s3 be sure to create the root directory /dolphinscheduler
 87 defaultFS="hdfs://server001:8020"
 88
 89 # if resourceStorageType is S3, the following three configuration is required, otherwise please ignore
 90 s3Endpoint="http://192.168.xx.xx:9010"
 91 s3AccessKey="xxxxxxxxxx"
 92 s3SecretKey="xxxxxxxxxx"
 93
 94 # if resourcemanager HA enable, please type the HA ips ; if resourcemanager is single, make this value empty
 95 yarnHaIps=""
 96
 97 # if resourcemanager HA enable or not use resourcemanager, please skip this value setting; If resourcemanager is single, you only need to replace yarnIp1 to actual resourcemanager hostname.
 98 singleYarnIp="192.168.1.12"
 99
100 # resource store on HDFS/S3 path, resource file will store to this hadoop hdfs path, self configuration, please make sure the directory exists on hdfs and have read write permissions。/dolphinscheduler is recommended
101 resourceUploadPath="/dolphinscheduler"
102
103 # who have permissions to create directory under HDFS/S3 root path
104 # Note: if kerberos is enabled, please config hdfsRootUser=
105 hdfsRootUser="hdfs"
106
107 # kerberos config
108 # whether kerberos starts, if kerberos starts, following four items need to config, otherwise please ignore
109 kerberosStartUp="false"
110 # kdc krb5 config file path
111 krb5ConfPath="$installPath/conf/krb5.conf"
112 # keytab username
113 keytabUserName="hdfs-mycluster@ESZ.COM"
114 # username keytab path
115 keytabPath="$installPath/conf/hdfs.headless.keytab"
116
117
118 # api server port
119 apiServerPort="12345"
120
121
122 # install hosts
123 # Note: install the scheduled hostname list. If it is pseudo-distributed, just write a pseudo-distributed hostname
124 ips="server004"
125
126 # ssh port, default 22
127 # Note: if ssh port is not default, modify here
128 sshPort="22"
129
130 # run master machine
131 # Note: list of hosts hostname for deploying master
132 masters="server004"
133
134 # run worker machine
135 # note: need to write the worker group name of each worker, the default value is "default"
136 workers="server004:default"
137
138 # run alert machine
139 # note: list of machine hostnames for deploying alert server
140 alertServer="server004"
141
142 # run api machine
143 # note: list of machine hostnames for deploying api server
144 apiServers="server004"
3.7 开始部署
执行install.sh部署脚本
切换到部署用户dolphinscheduler,然后执行一键部署脚本
cd /home/appuser/dolphin/package/dolphinscheduler-bin
sh install.sh
注意:
第一次部署的话,在运行中第3步`3,stop server`出现5次以下信息,此信息可以忽略
sh: bin/dolphinscheduler-daemon.sh: No such file or directory
脚本完成后,会启动以下5个服务,使用jps命令查看服务是否启动(jps为java JDK自带)
MasterServer         ----- master服务
WorkerServer         ----- worker服务
LoggerServer         ----- logger服务
ApiApplicationServer ----- api服务
AlertServer          ----- alert服务
如果以上服务都正常启动,说明自动部署成功
部署成功后,可以进行日志查看,日志统一存放于logs文件夹内
logs/
    ├── dolphinscheduler-alert-server.log
    ├── dolphinscheduler-master-server.log
    |—— dolphinscheduler-worker-server.log
    |—— dolphinscheduler-api-server.log
    |—— dolphinscheduler-logger-server.log
3.8 登录系统
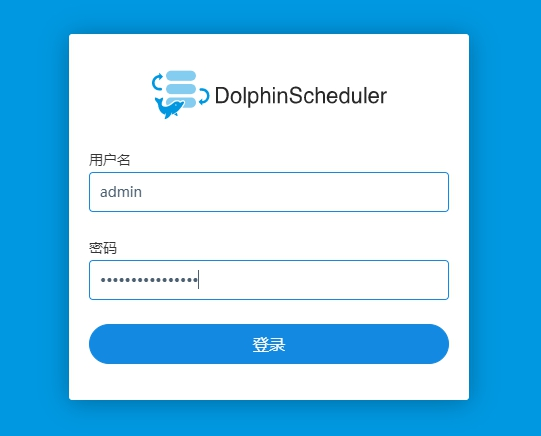
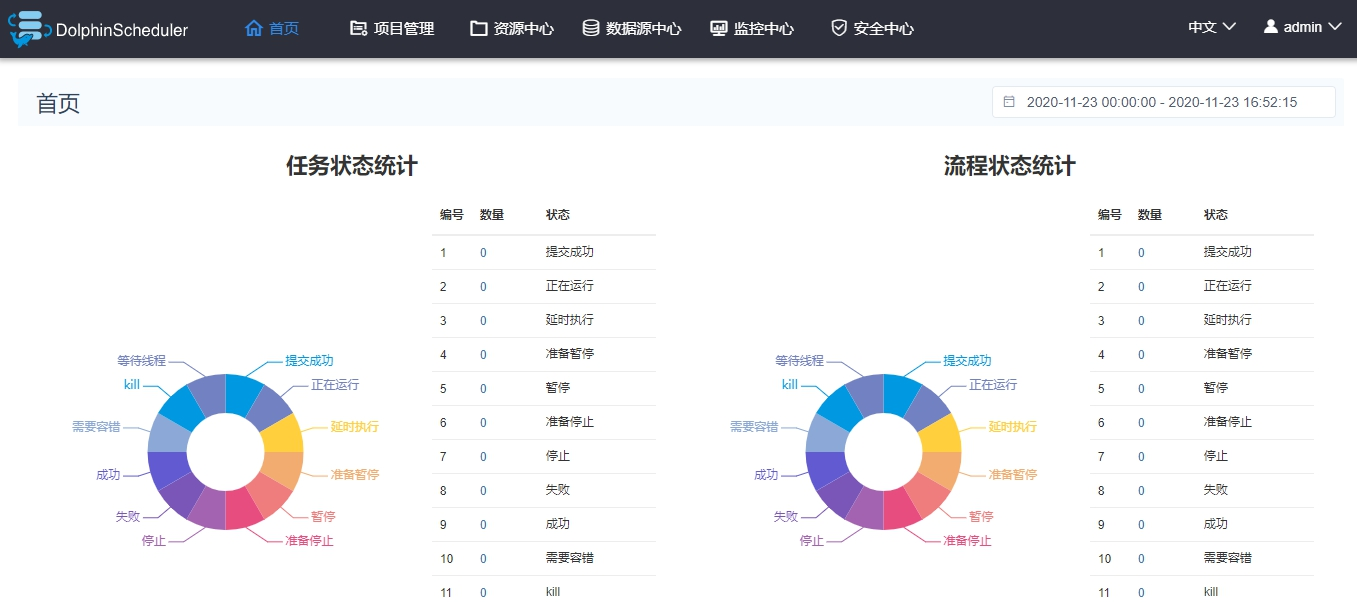
访问前端页面地址: http://192.168.xx.xx:12345/dolphinscheduler ,出现前端登录页面,接口地址(自行修改)
默认用户名密码:admin/dolphinscheduler123
相关启动与停止服务的命令
# 一键停止集群所有服务
sh ./bin/stop-all.sh

# 一键开启集群所有服务
sh ./bin/start-all.sh

# 启停Master
sh ./bin/dolphinscheduler-daemon.sh start master-server
sh ./bin/dolphinscheduler-daemon.sh stop master-server

# 启停Worker
sh ./bin/dolphinscheduler-daemon.sh start worker-server
sh ./bin/dolphinscheduler-daemon.sh stop worker-server

# 启停Api
sh ./bin/dolphinscheduler-daemon.sh start api-server
sh ./bin/dolphinscheduler-daemon.sh stop api-server

# 启停Logger
sh ./bin/dolphinscheduler-daemon.sh start logger-server
sh ./bin/dolphinscheduler-daemon.sh stop logger-server

# 启停Alert
sh ./bin/dolphinscheduler-daemon.sh start alert-server
sh ./bin/dolphinscheduler-daemon.sh stop alert-server
参考链接
Apache DolphinScheduler v1.3.1 使用手册
https://www.bookstack.cn/read/dolphinscheduler-1.3.0-zh/%E9%83%A8%E7%BD%B2%E6%96%87%E6%A1%A3.md
官网DS集群模式部署文档
https://dolphinscheduler.apache.org/zh-cn/docs/1.2.1/user_doc/cluster-deployment.html
如何在CDH5上部署Dolphin Scheduler 1.3.1
https://my.oschina.net/u/3701426/blog/4419921
GitHub DolphinScheduler1.3.2文档
https://github.com/apache/incubator-dolphinscheduler-website/tree/master/docs/zh-cn/1.3.2/user_doc
CentOS 7离线安装MySQL 5.7
https://www.jellythink.com/archives/14

 浙公网安备 33010602011771号