2022.6.2 实现Controller接口
控制器Controller
-
控制器复杂提供访问应用程序的行为,通常通过接口定义或注解定义两种方法实现。
-
控制器负责解析用户的请求并将其转换为一个模型。
-
在Spring MVC中一个控制器类可以包含多个方法
-
在Spring MVC中,对于Controller的配置方式有很多种
实现Controller接口
Controller是一个接口,在org.springframework.web.servlet.mvc包下,接口中只有一个方法
测试

-
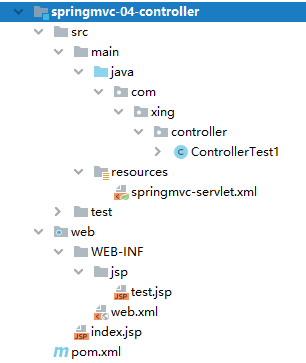
新建一个Moudle,springmvc-04-controller 。
web.xml
<?xml version="1.0" encoding="UTF-8"?> <web-app xmlns="http://xmlns.jcp.org/xml/ns/javaee" xmlns:xsi="http://www.w3.org/2001/XMLSchema-instance" xsi:schemaLocation="http://xmlns.jcp.org/xml/ns/javaee http://xmlns.jcp.org/xml/ns/javaee/web-app_4_0.xsd" version="4.0"> <!--1.注册servlet--> <servlet> <servlet-name>SpringMVC</servlet-name> <servlet-class>org.springframework.web.servlet.DispatcherServlet</servlet-class> <!--通过初始化参数指定SpringMVC配置文件的位置,进行关联--> <init-param> <param-name>contextConfigLocation</param-name> <param-value>classpath:springmvc-servlet.xml</param-value> </init-param> <!-- 启动顺序,数字越小,启动越早 --> <load-on-startup>1</load-on-startup> </servlet> <!--所有请求都会被springmvc拦截 --> <servlet-mapping> <servlet-name>SpringMVC</servlet-name> <url-pattern>/</url-pattern> </servlet-mapping> </web-app> -
编写一个Controller类,ControllerTest1
package com.xing.controller; import org.springframework.web.servlet.ModelAndView; import org.springframework.web.servlet.mvc.Controller; import javax.servlet.http.HttpServletRequest; import javax.servlet.http.HttpServletResponse; //定义控制器 //注意点:不要导错包,实现Controller接口,重写方法; public class ControllerTest1 implements Controller { public ModelAndView handleRequest(HttpServletRequest httpServletRequest,HttpServletResponse httpServletResponse) throws Exception { //返回一个模型视图对象 ModelAndView mv = new ModelAndView(); mv.addObject("msg","Test1Controller"); mv.setViewName("test"); return mv; } } -
编写完毕后,去Spring配置文件中注册请求的bean;name对应请求路径,class对应处理请求的类
<?xml version="1.0" encoding="UTF-8"?> <beans xmlns="http://www.springframework.org/schema/beans" xmlns:xsi="http://www.w3.org/2001/XMLSchema-instance" xmlns:context="http://www.springframework.org/schema/context" xmlns:mvc="http://www.springframework.org/schema/mvc" xsi:schemaLocation="http://www.springframework.org/schema/beans http://www.springframework.org/schema/beans/spring-beans.xsd http://www.springframework.org/schema/context https://www.springframework.org/schema/context/spring-context.xsd http://www.springframework.org/schema/mvc https://www.springframework.org/schema/mvc/spring-mvc.xsd"> <!-- <context:component-scan base-package="com.xing.controller"/>--> <!-- <mvc:default-servlet-handler />--> <!-- <mvc:annotation-driven />--> <!-- 视图解析器 --> <bean class="org.springframework.web.servlet.view.InternalResourceViewResolver" id="internalResourceViewResolver"> <!-- 前缀 --> <property name="prefix" value="/WEB-INF/jsp/" /> <!-- 后缀 --> <property name="suffix" value=".jsp" /> </bean> <!-- http://localhost:8080/t1--> <bean name="/t1" class="com.xing.controller.ControllerTest1"/> </beans> -
编写前端test.jsp,注意在WEB-INF/jsp目录下编写,对应我们的视图解析器
<%@ page contentType="text/html;charset=UTF-8" language="java" %> <html> <head> <title>Title</title> </head> <body> ${msg} </body> </html> -
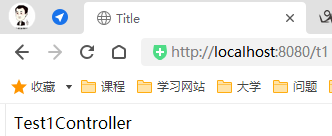
配置Tomcat运行测试,我这里没有项目发布名配置的就是一个 / ,所以请求不用加项目名,OK!
![]()
说明:
-
实现接口Controller定义控制器是较老的办法
-
缺点是:一个控制器中只有一个方法,如果要多个方法则需要定义多个Controller;定义的方式比较麻烦;
使用注解@Controller
-
@Controller注解类型用于声明Spring类的实例是一个控制器(在讲IOC时还提到了另外3个注解);
-
Spring可以使用扫描机制来找到应用程序中所有基于注解的控制器类,为了保证Spring能找到你的控制器,需要在配置文件中声明组件扫描。
springmvc-servlet.xml
<?xml version="1.0" encoding="UTF-8"?>
<beans xmlns="http://www.springframework.org/schema/beans"
       xmlns:xsi="http://www.w3.org/2001/XMLSchema-instance"
       xmlns:context="http://www.springframework.org/schema/context"
       xmlns:mvc="http://www.springframework.org/schema/mvc"
       xsi:schemaLocation="http://www.springframework.org/schema/beans
       http://www.springframework.org/schema/beans/spring-beans.xsd
       http://www.springframework.org/schema/context
       https://www.springframework.org/schema/context/spring-context.xsd
       http://www.springframework.org/schema/mvc
       https://www.springframework.org/schema/mvc/spring-mvc.xsd">

    <context:component-scan base-package="com.xing.controller"/>
<!--    <mvc:default-servlet-handler />-->
<!--    <mvc:annotation-driven />-->

    <!-- 视图解析器 -->
    <bean class="org.springframework.web.servlet.view.InternalResourceViewResolver"
          id="internalResourceViewResolver">
        <!-- 前缀 -->
        <property name="prefix" value="/WEB-INF/jsp/" />
        <!-- 后缀 -->
        <property name="suffix" value=".jsp" />
    </bean>

<!--    http://localhost:8080/t1-->
    <bean name="/t1" class="com.xing.controller.ControllerTest1"/>

</beans>
-
增加一个ControllerTest2类,使用注解实现;
package com.xing.controller; import org.springframework.stereotype.Controller; import org.springframework.ui.Model; import org.springframework.web.bind.annotation.RequestMapping; //@Controller代表这个类会被Spring接管, //被这个注解的类中的所有方法,如果返回值是String,并且有具体页面可以跳转,那么就会被视图解析器解析; @Controller public class ControllerTest1 { @RequestMapping("xwn") //http://localhost:8080/xwn public String hello(Model model) { //封装数据 model.addAttribute("msg", "hellomvc"); return "test"; //返回视图的名字 /WEB-INF/jsp/test.jsp } } -
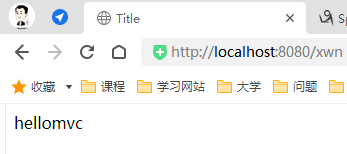
运行tomcat测试
![img]()
![]()
可以发现,我们的两个请求都可以指向一个视图,但是页面结果的结果是不一样的,从这里可以看出视图是被复用的,而控制器与视图之间是弱偶合关系。
注解方式是平时使用的最多的方式!
RequestMapping
@RequestMapping
-
@RequestMapping注解用于映射url到控制器类或一个特定的处理程序方法。可用于类或方法上。用于类上,表示类中的所有响应请求的方法都是以该地址作为父路径。
-
为了测试结论更加准确,我们可以加上一个项目名测试 myweb(配置tomcat时加的)
-
只注解在方法上面
@Controller public class TestController { @RequestMapping("/h1") public String test(){ return "test"; } }访问路径:http://localhost:8080 / 项目名 / h1
-
同时注解类与方法
@Controller @RequestMapping("/admin") public class TestController { @RequestMapping("/h1") public String test(){ return "test"; } }访问路径:http://localhost:8080 / 项目名/ admin /h1 , 需要先指定类的路径再指定方法的路径;


 浙公网安备 33010602011771号