Booting LPC-Link2, Updating LPCXpresso firmware
Booting LPC-Link2
The recommended way to use LPC-Link2 with the LPCXpresso IDE is to boot and soft load a debug firmware image at the start of a debug session.
Normally, LPC-Link 2 is booted automatically, however under certain circumstances - such as when using the command line flash utility, you may need to boot it manually.
Note: Both the LPCXpresso V2/V3 boards and RDB4078 incorporate a built in LPC-Link2 debug probe, so this FAQ equally applies to these boards.
Note: This FAQ only applies to LPC-Link2 hardware when configured to operate in DFU mode, it does not apply if the LPC-Link2 hardware is configured to boot from a debug firmware image held in flash such as CMSIS-DAP.
Background
When powered on, LPC-Link 2 hardware makes use of the DFU mechanism (Device Firmware Update)
to allow the LPCXpresso IDE to download debug firmware into the on-board RAM.
This scheme offers great flexibility and ensures that the latest compatible firmware will be used for a given version of the IDE.
Before boot, LPC-Link 2 appears as a USB device with details:
For LPCXpresso IDE prior to v7.8: After boot, LPC-Link2 will by default appear as a USB device with details:
From LPCXpresso IDE v7.8 onwards: After boot, LPC-Link2 will by default appear as a USB device with details:

For information on setting the LPCXpresso IDE default debug firmware see: Configuring which LPC-Link2 firmware image to soft-load
Note: the standard utilities to explore USB devices on our supported host platforms are:
- Windows - Device Manager
- LPCXpressoIDE also provides a listusb utility in:
- <install_dir>\lpcxpresso\bin\Scripts
- LPCXpressoIDE also provides a listusb utility in:
- Linux - terminal command: lsusb
- Mac OSX - terminal command: system_profiler SPUSBDataType
The procedure to manually boot the probe is shown below.
Using the Command Line
From LPCXpresso IDE version 7.3x and later, we now supply a boot script for all supported platforms. To make use of this script:
- cd <install_dir>\lpcxpresso\bin and run
- boot_link2
For version of LPCXpresso IDE earlier than version 7.3 - you will need to locate the dfu-util utility and pass the parameters for the device and code etc. as below:
-
cd <install_dir>\lpcxpresso\bin and run
- dfu-util -d 1FC9:000C -c 0 -t 2048 -R -D LPC432x_Redlink_V4_30.bin.hdr
- LPC432x_Redlink_V4_30.bin.hdr is the file name for the firmware supplied in LPCXpresso IDE V 7.2.0
- Note: The exact name of the .hdr file may change between different tools releases, please ensure you use the name of the correct name!
- LPC432x_Redlink_V4_30.bin.hdr is the file name for the firmware supplied in LPCXpresso IDE V 7.2.0
Using the GUI
It is also possible to manually boot LPC-Link 2 from the GUI, on occasion this may be a more convenient solution than using the command line.
To do this, locate the red Boot icon on the Toolbar:

Troubleshooting
If you have been able to use LPC-Link 2 in a debug session but now see issues such as "No compatible emulator available"
or "Priority 0 connection to this core already taken" when trying to perform a debug operation ...
- ensure you have shut down any previous debug session
- You must close a debug session (press the Red 'terminate' button) before starting another debug session
- It is possible that the debug driver is still running in the background. Use the task manager or equivalent to kill any tasks called:
- redlinkserv
- arm-none-eabi_gdb*
- crt_emu_*
If your host has never worked with LPC-Link 2, first perform some basic checks with reference to the background information at the beginning of this FAQ.
- Try a different USB cable!
- Try a different USB port. If your host has USB3 and USB2, then try a USB2 port
- there are know issues with motherboard USB3 firmware, ensure your host is using the latest driver from the manufacturer
- Note: this is not referencing the host OS driver but the motherboard firmware of the USB port
- there are know issues with motherboard USB3 firmware, ensure your host is using the latest driver from the manufacturer
- If using a USB hub, first try a direct connection to the host computer
- Try completely removing and re-installing the host device driver. See also LPC-Link2 fails to enumerate with CMSIS-DAP
- If using Windows 8.1, then sometimes the Windows USB power settings can cause problems.
For more details use your favourite search engine to search for "windows 8 usb power settings" or similar. For example:
Updating LPCXpresso firmware
LPCXpresso range of development boards from NXP which include the LPC-Link 2 interface can be firmware updated to include mbed USB disk programming capabilities.
Below is a quick guide to how to carry out this update.
Requirements
- A Windows computer
- Download and install the latest DFU Boot drivers
- Download and install the latest NXP DFU Download utility
Instructions
1. Fit jumper JP3
2. Connect the "link" micro-B connector to the PC

3. Run dfusec.exe
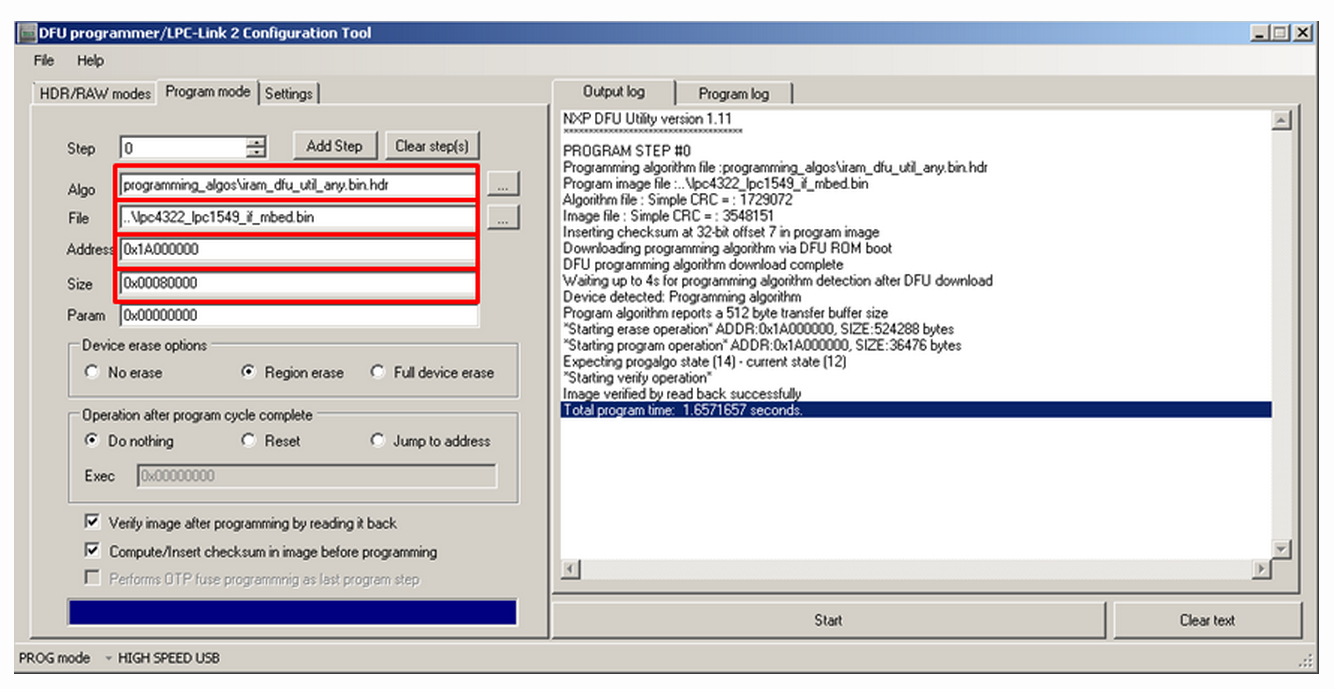
- Browse to the correct Algorithm file (the correct one should be selected by default)
- Download the binary for your board from the list below, and then :
- Browse to the binary
- Set the parameter : "Address"
- Set the parameter : "Size"
- Press the start button on the PC application... wait... done :-)
4. Remove the jumper JP3 and unplug/plug in the LPCXpresso
You should now have an mbed flash disk for drag and drop programming
Binary Downloads
- LPCXpresso1549
- LPCXpresso1549 firmware image 2015-07-14 v0221 (fixed the MBED.HTM file only)
- LPCXpresso1549 firmware image 2015-04-18 v0221
- LPCXpresso1549 firmware image 2014-04-03 v0202
- Address : 0x1A000000
- Size : 0x00080000
- LPCXpresso11U68
- LPCXpresso11U68 firmware image 2015-04-28 v0221
- LPCXpresso11U68 firmware image 2014-04-03 v0202
- Address : 0x1A000000
- Size : 0x00080000
- LPCXpresso4337
- LPCXpresso4337 firmware image 2015-04-27 v0221
- Address : 0x1A000000
- Size : 0x00080000

 浙公网安备 33010602011771号