
随时可能更新的springboot学习笔记
学习自狂神说秦疆
第一个SpringBoot程序
官方:提供了一个快速生成的网站,IDEA集成了这个网站。
- 可以在官网直接下载后,导入IDEA开发
- 直接使用IDEA创建一个springboot项目(一般使用该方式,只有企业版才有该功能)
几点注意事项:
- 用idea创建一般不需要添加什么额外依赖
- 创建时经常会出现连接错误,建议使用https://start.aliyun.com
- 所有的代码需要放在项目目录下,否则无效
- 彩蛋:在resources文件夹下新建一个bannner.txt,在里面可以放一些其他东西来代替spring自带的ascii画。推荐网站:Spring Boot banner在线生成工具
- application.properties:springboot核心配置文件
- 通过server.port修改默认端口
# 应用服务 WEB 访问端口
server.port=8080
原理初探
自动配置:
pom.xml
- spring-boot-dependencies:核心依赖在父工程中
- 我们在写或者引入一些springboot依赖的时候,不需要指定版本,因为有这些版本仓库
启动器:
<!--启动器-->
<dependency>
            <groupId>org.springframework.boot</groupId>
            <artifactId>spring-boot-starter</artifactId>
</dependency>
- 其实就是springboot的启动场景。
- 比如spring-boot-starter-web,他就会帮我们自动导入web环境所有的依赖
- springboot会将所有的功能场景,都变成一个个的启动器
- 我们要使用什么功能,就只需要找到对应的启动器就可以了
starter
主程序
//程序的主入口,标注这个类是一个springboot的应用,spring类下的所有资源被导入
@SpringBootApplication
public class HelloworldApplication {
    //SpringApplication
    public static void main(String[] args) {
        SpringApplication.run(HelloworldApplication.class, args);
    }

}
-
注解
- @SpringBootConfiguration:springboot的配置
- @Configuration:spring配置类
- @Component:说明这也是一个spring的组件
- @EnableAutoConfiguration:自动配置
- @AutoConfigurationPackage:自动配置包
- @Import({Registrar.class}):导入选择器
包注册
- @Import({Registrar.class}):导入选择器
- @Import({AutoConfigurationImportSelector.class}):自动配置导入选择
- @AutoConfigurationPackage:自动配置包
//获取所有的配置
List<String> configurations = this.getCandidateConfigurations(annotationMetadata, attributes);


//获取候选的配置
protected List<String> getCandidateConfigurations(AnnotationMetadata metadata, AnnotationAttributes attributes) {
    List<String> configurations = SpringFactoriesLoader.loadFactoryNames(this.getSpringFactoriesLoaderFactoryClass(), this.getBeanClassLoader());
    Assert.notEmpty(configurations, "No auto configuration classes found in META-INF/spring.factories. If you are using a custom packaging, make sure that file is correct.");
    return configurations;
}
META-INF/spring.factories:自动配置的核心文件
Properties properties = PropertiesLoaderUtils.loadProperties(resource); //所有资源加载到配置类中 - @SpringBootConfiguration:springboot的配置
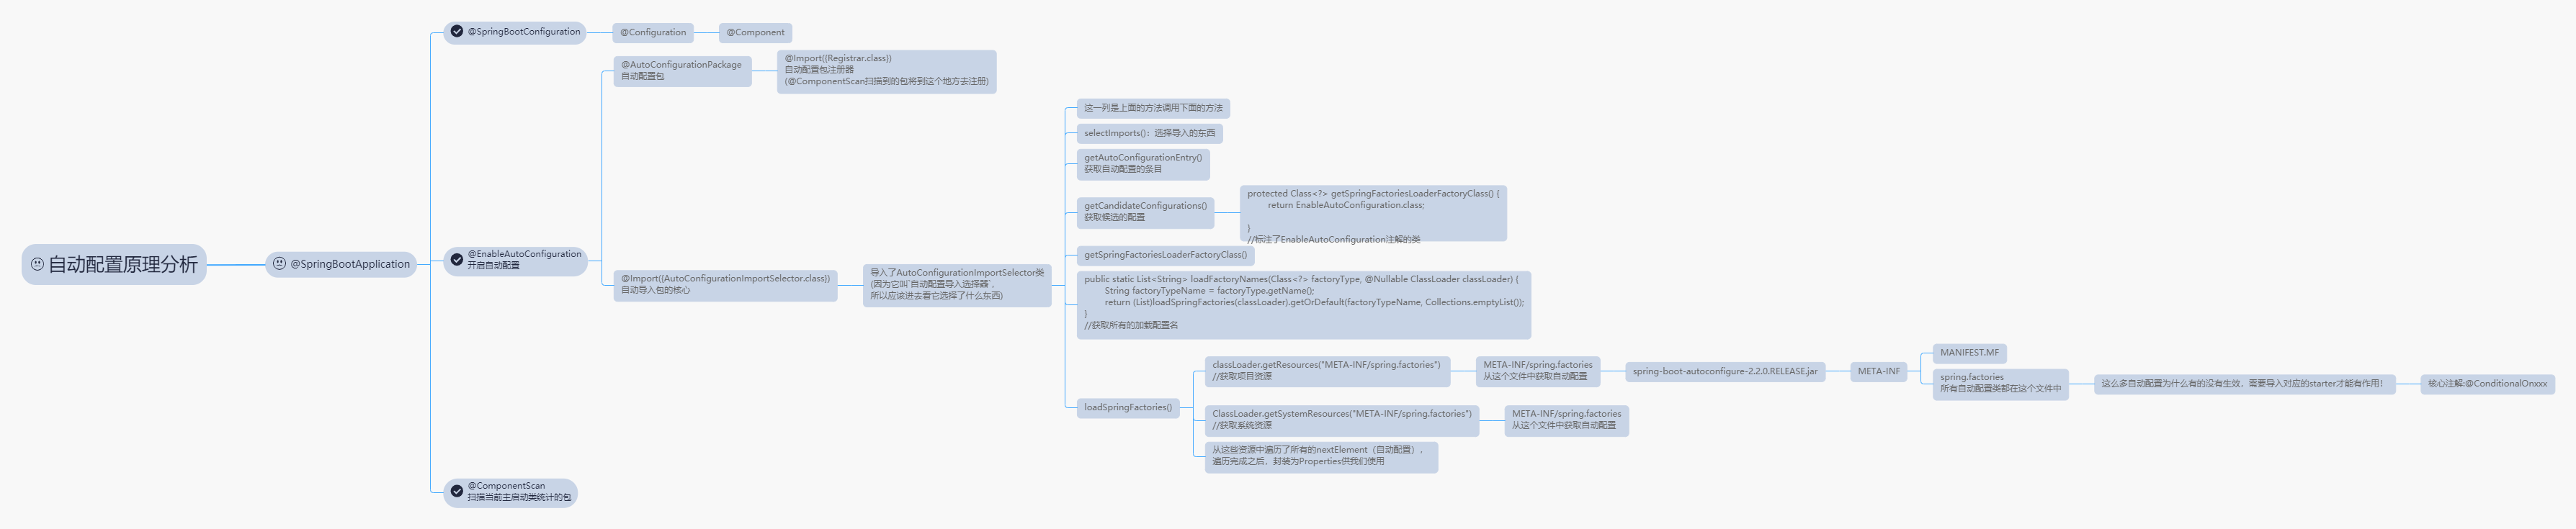
结论:springboot所有自动配置都是在启动的时候扫描并加载:spring.factories所有的自动配置类都在这里面,但是不一定生效,要判断条件是否成立,只要导入了对应的start,就有对应的启动器了,有了启动器,我们自动装配就会生效,然后就配置成功。
1.srpingboot在启动的时候,从类路径下META-INF/spring.factories获取指定的值;
2.将这些自动配置的类导入容器,自动配置类就会生效,帮我们进行自动配置
3.以前我们需要自动配置的东西,现在springboot帮我们做了
4.整合javaEE,解决方案和自动配置的东西都在spring-boot-test-autoconfigure-2.3.7.RELEASE.jar这个包下
5.它会把所有需要导入的组件,以类名的方式返回,这些组件就会被添加到容器;
6.容器中也会存在非常多的xxxAutoConfiguration的文件(@Bean),就是这些类给容器中导入了这个场景需要的所有组件,并自动配置,@Configuration,JavaConfig;
7.有了自动配置类,免去了我们手动编写配置文件的工作了
JavaConfig @Configuration @Bean
Docker:进程
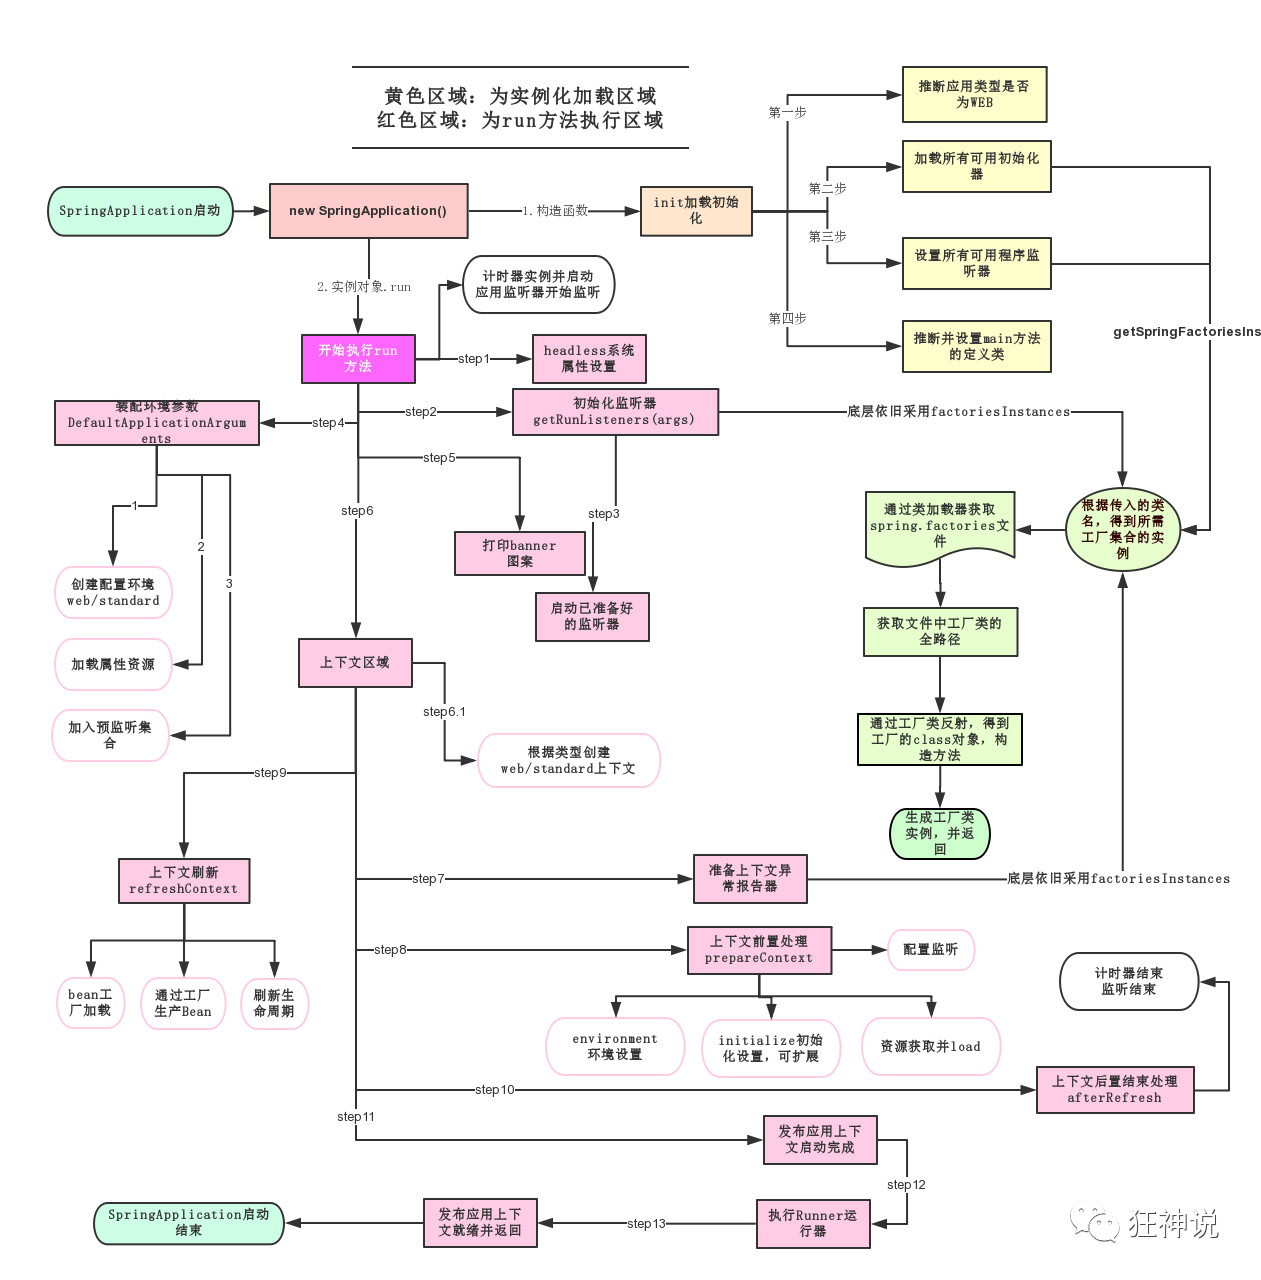
SpringApplication
这个类主要做了以下四件事情:
1、推断应用的类型是普通的项目还是Web项目
2、查找并加载所有可用初始化器 , 设置到initializers属性中
3、找出所有的应用程序监听器,设置到listeners属性中
4、推断并设置main方法的定义类,找到运行的主类
yaml配置
# springboot这个配置文件中到底可以配置哪些东西呢?官方的配置太多了,了解原理,一通百通
# 对空格的要求十分高

#可以注入到我们的配置类中

# 普通的key-value
name: ysy

# 应用服务 WEB 访问端口
server:
  port: 8081

# 对象
student:
  name: ysy
  age: 22

# 行内写法
student1: {name: ysy, age: 22}

# 数组
pets:
  - cat
  - dog
  - pig

# 数组行内写法
pets1: [cat, dog, pig]
yaml可以直接给实体类赋值
/*
@ConfigurationProperties作用:
将配置文件中配置的每一个属性的值,映射到这个组件中;
告诉SpringBoot将本类中的所有属性和配置文件中相关的配置进行绑定
参数 prefix = “person” : 将配置文件中的person下面的所有属性一一对应
*/
@Component
@ConfigurationProperties(prefix = "person")
public class Person {
    private String name;
    private Integer age;
    private Boolean happy;
    private Date birth;
    private Map<String, Object> maps;
    private List<Object> lists;
    private Dog dog;
}
person:
  name: ysy
  age: ${random.int}
  happy: false
  birth: 2021/08/06
  maps: {k1: v1, k2: v2}
  lists: [code, music, girl]
  dog:
    name: wangcai
    age: 3
测试类:
@SpringBootTestclass Springboot02ConfigApplicationTests { @Autowired private Person person; @Test void contextLoads() { System.out.println(person); }}
松散绑定:
last-name,这个和lastName是一样的, - 后面跟着的字母默认是大写的。这就是松散绑定。
结论:
配置yaml和配置properties都可以获取到值 , 强烈推荐 yaml;
如果我们在某个业务中,只需要获取配置文件中的某个值,可以使用一下 @value;
如果说,我们专门编写了一个JavaBean来和配置文件进行一一映射,就直接@configurationProperties,不要犹豫!
数据校验:
@Validated //数据校验,报红记得添加依赖

@NotNull(message="名字不能为空")
private String userName;
@Max(value=120,message="年龄最大不能查过120")
private int age;
@Email(message="邮箱格式错误")
private String email;

/*空检查
@Null       验证对象是否为null
@NotNull    验证对象是否不为null, 无法查检长度为0的字符串
@NotBlank   检查约束字符串是不是Null还有被Trim的长度是否大于0,只对字符串,且会去掉前后空格.
@NotEmpty   检查约束元素是否为NULL或者是EMPTY.

Booelan检查
@AssertTrue     验证 Boolean 对象是否为 true
@AssertFalse    验证 Boolean 对象是否为 false

长度检查
@Size(min=, max=) 验证对象(Array,Collection,Map,String)长度是否在给定的范围之内
@Length(min=, max=) string is between min and max included.

日期检查
@Past       验证 Date 和 Calendar 对象是否在当前时间之前
@Future     验证 Date 和 Calendar 对象是否在当前时间之后
@Pattern    验证 String 对象是否符合正则表达式的规则

.......等等
除此以外,我们还可以自定义一些数据校验规则
*/
run方法流程分析
配置文件优先级
springboot 启动会扫描以下位置的application.properties或者application.yaml文件作为Spring boot的默认配置文件:
优先级1:项目路径下的config文件夹配置文件
优先级2:项目路径下配置文件
优先级3:资源路径下的config文件夹配置文件
优先级4:资源路径下配置文件
优先级由高到底,高优先级的配置会覆盖低优先级的配置;
SpringBoot会从这四个位置全部加载主配置文件;互补配置;
# springboot的多环境配置,可以选择激活哪一个配置
# 要使用application-dev.properties中的配置,只需要在默认配置下添加如下语句:
spring.profiles.active=dev
也可以在一个配置文件里写入多个配置:
server:
  port: 8081

# 选择激活哪一个配置
spring:
  profiles:
    active: dev

--- # 相当于一个文件分割符
server:
  port: 8082
spring:
  profiles: dev # 给文件命名

---
server:
  port: 8083
spring:
  profiles: test

# 可以通过debug=true来查看,哪些自动配置类生效,哪些没有生效
springboot web开发
要解决的问题:
- 导入静态资源
- 首页
- jsp,模板引擎Thymeleaf
- 装配扩展SpringMVC
- 增删改查
- 拦截器
- 国际化
静态资源
public void addResourceHandlers(ResourceHandlerRegistry registry) {
    if (!this.resourceProperties.isAddMappings()) {
        logger.debug("Default resource handling disabled");
    } else {
        Duration cachePeriod = this.resourceProperties.getCache().getPeriod();
        CacheControl cacheControl = this.resourceProperties.getCache().getCachecontrol().toHttpCacheControl();
        if (!registry.hasMappingForPattern("/webjars/**")) {
            this.customizeResourceHandlerRegistration(registry.addResourceHandler(new String[]{"/webjars/**"}).addResourceLocations(new String[]{"classpath:/META-INF/resources/webjars/"}).setCachePeriod(this.getSeconds(cachePeriod)).setCacheControl(cacheControl));
        }

        String staticPathPattern = this.mvcProperties.getStaticPathPattern();
        if (!registry.hasMappingForPattern(staticPathPattern)) {
            this.customizeResourceHandlerRegistration(registry.addResourceHandler(new String[]{staticPathPattern}).addResourceLocations(WebMvcAutoConfiguration.getResourceLocations(this.resourceProperties.getStaticLocations())).setCachePeriod(this.getSeconds(cachePeriod)).setCacheControl(cacheControl));
        }

    }
}
总结:
- 在springboot,我们可以使用以下方式处理静态资源
- webjars
localhost:8080/webjars/ - public, static, /**, resources
localhost:8080/
- webjars
- 优先级:resources > static(默认) > public
模板引擎
结论:只要需要使用thymeleaf,只需要导入对应的依赖就可以了。我们将html页面放在templates目录下
依赖:
<dependency>
    <groupId>org.thymeleaf</groupId>
    <artifactId>thymeleaf-spring5</artifactId>
</dependency>

<dependency>
    <groupId>org.thymeleaf.extras</groupId>
    <artifactId>thymeleaf-extras-java8time</artifactId>
</dependency>
index.html:
<!DOCTYPE html>
<html lang="en" xmlns:th="http://www.thymeleaf.org">
<head>
    <meta charset="UTF-8">
    <title>Title</title>
</head>
<body>

<!--所有的html元素都可以被thymeleaf替换接管   th:元素名-->
<div th:text = "${msg}"></div>
</body>
</html>
controller:
//在templates目录下的所有页面,只能通过controller来跳转。这个需要模板引擎的支持:thymeleaf
@Controller
public class IndexController {

    @RequestMapping("/index")
    public String index(Model model){
        model.addAttribute("msg", "hello,springboot");
        return "index";
    }
}
springMVC自动配置
//如果你想diy一些定制化的功能,只要写这个组件,然后将它交给springboot,springboot就会帮我们自动装配
//扩展springMVC
@Configuration
public class MyMvcConfig implements WebMvcConfigurer {

    //public interface ViewResolver: 实现了视图解析器接口的类,我们就可以把它看做视图解析器

    @Bean
    public ViewResolver myViewResolver(){
        return new MyViewResolver();
    }

//自定义了一个自己的视图解析器
    public static class MyViewResolver implements ViewResolver {
        @Override
        public View resolveViewName(String s, Locale locale) throws Exception {
            return null;
        }
    }

}
//如果我们要扩展MVC,官方建议我们这样去做
@Configuration
public class MyMvcConfig implements WebMvcConfigurer {

//    视图跳转
    @Override
    public void addViewControllers(ViewControllerRegistry registry) {
        registry.addViewController("/ysy").setViewName("index");
    }
}
全面接管即:SpringBoot对SpringMVC的自动配置不需要了,所有都是我们自己去配置!
只需在我们的配置类中要加一个@EnableWebMvc。不推荐使用。
@EnableWebMvc //这就是导入了一个类:DelegatingWebMvcConfiguration: 从容器中获取所有的webmvcconfig
接下来是写一个模拟数据库操作,代码就不放上来了。
#关闭模板引擎的缓存
spring.thymeleaf.cache=false
-
首页配置:
-
注意点:所有页面的静态资源都要使用thymeleaf接管。
-
url: @{}
-
-
页面国际化:
- 我们需要配置i18n文件
- 我们如果需要在项目中进行按钮自动切换,需要自定义一个组件LocaleResolver
- 记得将自己写的组件配置到Spring容器中
Bean -
{}
-
登录 + 拦截器
-
员工列表展示
-
提取公共页面
th:fragment="sidebar"<div th:replace="~{commons/commons :: topbar}"></div>
-
如果要传递参数,可以直接用()传参,接收判断
-
列表循环展示
-
-
添加员工
- 按钮提交
- 跳转到添加页面
- 添加员工成功
- 返回首页
-
CRUD搞定
-
404
前端:
-
模板:别人写好的,我们拿来改成自己需要的
-
框架:组件:自己手动组合拼接。Bootstrap, Layui, Semantic-ui
-
栅格系统
-
导航栏
<nav class="navbar navbar-dark sticky-top bg-dark flex-md-nowrap p-0" th:fragment="topbar"> <div th:insert="~{commons/commons :: topbar}"></div> -
侧边栏
<nav class="col-md-2 d-none d-md-block bg-light sidebar" th:fragment="sidebar"> <div th:insert="~{commons/commons :: sidebar}"></div> -
表单
-
整合JDBC,DRUID
首先导入依赖:
        <dependency>
            <groupId>org.springframework.boot</groupId>
            <artifactId>spring-boot-starter-jdbc</artifactId>
        </dependency>

        <dependency>
            <groupId>log4j</groupId>
            <artifactId>log4j</artifactId>
            <version>1.2.17</version>
        </dependency>

<!--        Druid-->
        <dependency>
            <groupId>com.alibaba</groupId>
            <artifactId>druid</artifactId>
            <version>1.1.21</version>
        </dependency>

<!--        Mysql-->
        <dependency>
            <groupId>mysql</groupId>
            <artifactId>mysql-connector-java</artifactId>
            <scope>runtime</scope>
        </dependency>
application.yaml:
spring:
  datasource:
    url: jdbc:mysql://localhost:3306/photovoltaic?serverTimezone=UTC&useUnicode=true&characterEncoding=utf-8
    username: root
    password: 1472583690
    driver-class-name: com.mysql.cj.jdbc.Driver
    type: com.alibaba.druid.pool.DruidDataSource
    #Spring Boot 默认是不注入这些属性值的,需要自己绑定
    #druid 数据源专有配置
    initialSize: 5
    minIdle: 5
    maxActive: 20
    maxWait: 60000
    timeBetweenEvictionRunsMillis: 60000
    minEvictableIdleTimeMillis: 300000
    validationQuery: SELECT 1 FROM DUAL
    testWhileIdle: true
    testOnBorrow: false
    testOnReturn: false
    poolPreparedStatements: true

    #配置监控统计拦截的filters,stat:监控统计、log4j:日志记录、wall:防御sql注入
    #如果允许时报错  java.lang.ClassNotFoundException: org.apache.log4j.Priority
    #则导入 log4j 依赖即可,Maven 地址:https://mvnrepository.com/artifact/log4j/log4j
    filters: stat,wall,log4j
    maxPoolPreparedStatementPerConnectionSize: 20
    useGlobalDataSourceStat: true
    connectionProperties: druid.stat.mergeSql=true;druid.stat.slowSqlMillis=500
JDBCController:
@RestController
public class JDBCController {

    @Autowired
    JdbcTemplate jdbcTemplate;

    @GetMapping("/userList")
    public List<Map<String, Object>> userList(){
        String sql = "select * from user";
        List<Map<String, Object>> maps = jdbcTemplate.queryForList(sql);
        return maps;
    }

}
DruidConfig:
@Configuration
public class DruidConfig {

    @ConfigurationProperties(prefix = "spring.datasource")
    @Bean
    public DataSource druidDataSource(){
        return new DruidDataSource();
    }

//    后台监控 : 相当于web.xml
//    因为springboot内置了servlet容器,所以没有web.xml,替代方法:ServletRegistrationBean
    @Bean
    public ServletRegistrationBean statViewServlet(){
        ServletRegistrationBean<StatViewServlet> bean
                = new ServletRegistrationBean<>(new StatViewServlet(), "/druid/*");
//        后台需要有人登陆,账号密码配置
        HashMap<String, String> initParameters = new HashMap<>();
//        增加配置
        initParameters.put("loginUsername", "admin");//登陆key是固定的 loginUsername loginPassword
        initParameters.put("loginPassword", "123456");

//        允许谁可以访问
        initParameters.put("allow", "");

//        禁止谁能访问
//        initParameters.put("468", "127.123.132.12");

        bean.setInitParameters(initParameters);//设置初始化参数
        return bean;
    }


    @Bean
    public FilterRegistrationBean webStatFilter(){
        FilterRegistrationBean bean = new FilterRegistrationBean();
        bean.setFilter(new WebStatFilter());
//可以过滤哪些请求呢
        Map<String, String> initParameters = new HashMap<>();
        initParameters.put("exclusions", "*.js, *.css, /druid/*");//这些东西不进行统计


        bean.setInitParameters(initParameters);
        return bean;
    }
}
Spring Security
在web开发中,安全第一位。
做网站,安全应该在设计之初考虑
shiro,springsecurity
AOP:横切,配置类
securityconfig:
//AOP:拦截器
@EnableWebSecurity
public class SecurityConfig extends WebSecurityConfigurerAdapter {

    //    链式编程
    @Override
    protected void configure(HttpSecurity http) throws Exception {
//        首页所有人可以访问,但是功能页只有对应有权限的人才能访问
//        请求授权的规则
        http.authorizeRequests().antMatchers("/").permitAll()
                .antMatchers("/level1/**").hasRole("vip1")
                .antMatchers("/level2/**").hasRole("vip2")
                .antMatchers("/level3/**").hasRole("vip3");

        //没有权限默认会到登录页面,需要开启登录的页面
        http.formLogin();
    }

//    认证,springboot 2.1.x可以直接使用
//    密码编码:PasswordEncoder
//    在Spring Security5中新增了很多了加密方式
    @Override
    protected void configure(AuthenticationManagerBuilder auth) throws Exception {
//        这些数据正常应从数据库中读取
        auth.inMemoryAuthentication().passwordEncoder(new BCryptPasswordEncoder())
                .withUser("1").password(new BCryptPasswordEncoder().encode("1")).roles("vip2", "vip1")
                .and()
                .withUser("2").password(new BCryptPasswordEncoder().encode("2")).roles("vip1", "vip2", "vip3")
                .and()
                .withUser("3").password(new BCryptPasswordEncoder().encode("3")).roles("vip1");
    }
}
RouterController:
@Controller
public class RouterController {

    @RequestMapping({"/index", "/"})
    public String index(){
        return "index";
    }

    @RequestMapping("/toLogin")
    public String toLogin(){
        return "views/login";
    }

    @RequestMapping("/level1/{id}")
    public String level1(@PathVariable("id") int id){
        return "views/level1/" + id;
    }

    @RequestMapping("/level2/{id}")
    public String level2(@PathVariable("id") int id){
        return "views/level2/" + id;
    }

    @RequestMapping("/level3/{id}")
    public String level3(@PathVariable("id") int id){
        return "views/level3/" + id;
    }

}

 浙公网安备 33010602011771号