升级 AngularJS 至 Angular
Victor Savkin 大神撰写了一系列文章详细介绍如何升级 AngularJS 应用:
- NgUpgrade in Depth
- Upgrade Shell
- Two Approaches to Upgrading Angular Applications
- Managing Routers and URL
- Lazy Loading AngularJS Applications
深入理解 NgUpgrade
原理
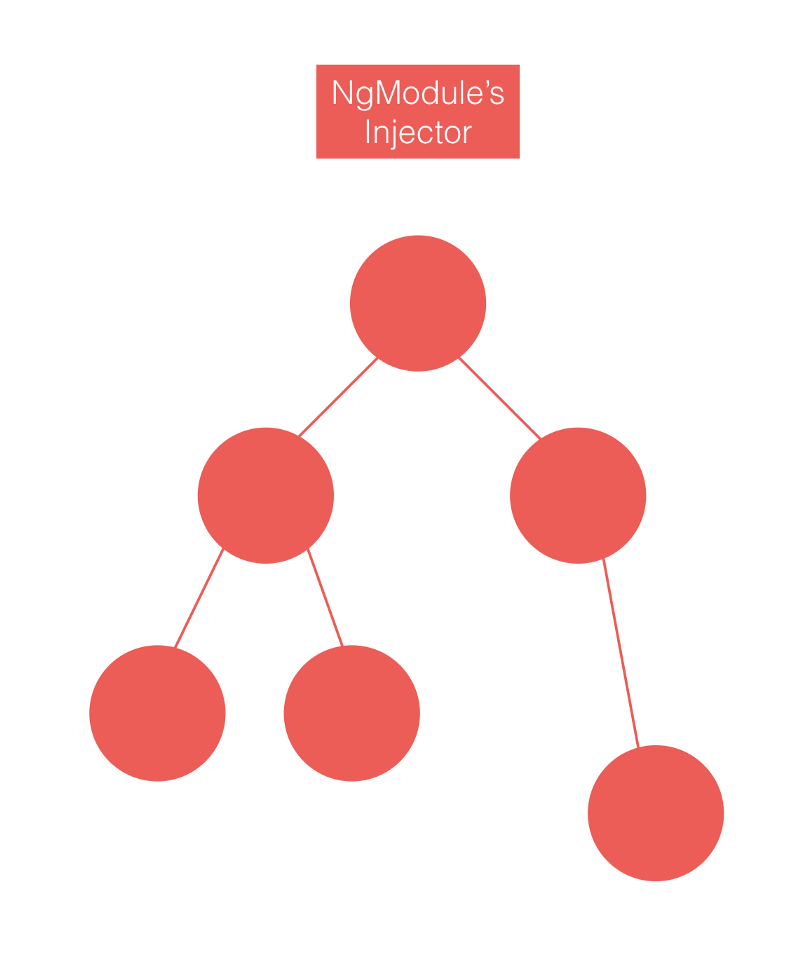
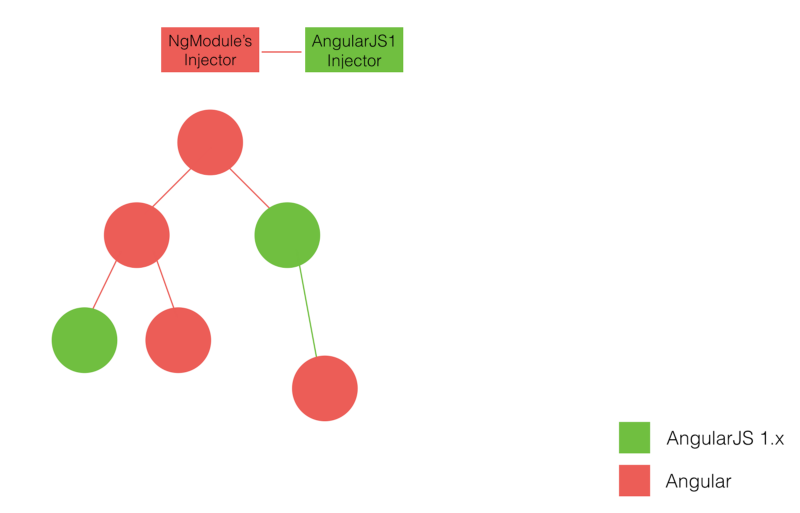
Angular 应用由组件树构成,每个组件都拥有一个 注入器,并且应用的每个 NgModule 也有注入器。框架在解析组件依赖时,会首先试图从组件树获取,找不到后才去 NgModule 的注入器中查找依赖。
借助 NgUpgrade 我们可以在 Angular 应用中启动一个已经加载好的 AngularJS 应用,通常我们称其为 * 混合应用*( HybridApplication,不是移动端的那个 Hybrid)。因此我们便能混合使用两个框架的组件和 DI 系统。
启动
最简单的启动方式就是在根模块(一般是 AppModule)的 ngDoBootstrap 方法执行:
@Component({
  selector: 'app-root',
  templateUrl: './app.component.html'
})
export class AppComponent {}
// Access global AngularJS 1.x object
const m = angular.module('AngularJsModule', []);
m.directive('appRoot', downgradeComponent({component: AppComponent}));

@NgModule({
  declarations: [
    AppComponent
  ],
  imports: [
    BrowserModule,
    UpgradeModule
  ]
})
export class AppModule {
  constructor(private upgrade: UpgradeModule) {}

  ngDoBootstrap() {
    this.upgrade.bootstrap(document.body, ['AngularJsModule']);
  }
}
默认情况下这是一个很好的方式,确保了升级的组件能够访问到 AngularJS 原组件。但在懒加载启动 AngularJS 应用的场景下就行不通了,因为只有用户导航到指定的路由时才能获取 AngularJS 相关的引用。
UpgradeModule.bootstrap 与 angular.bootstrap 方法签名相同,如果我们查看它的实现,会发现本质上也是调用了 angular.bootstrap,不过做了如下变动:
-
确保
angular.bootstrap运行在正确的区域 -
添加额外的模块配置来确保 Angular 与 AngularJS 能相互引用
-
适配 API 使用 Protractor 确保混合应用的可测试性
有一点需要注意, @angular/upgrade/static 获取的是全局的 window.angular,所以我们需要在导入升级模块前导入 AngularJS 框架:
import 'angular';
import { UpgradeModule } from '@angular/upgrade/static';
否则会看到 AngularJSv1.xisnotloaded 字样的报错。
在懒加载 AngularJS 时,需要我们手动设置全局 angular 对象:
import * as angular from "angular";
// ...
setAngularJSGlobal(angular);
读者在别的地方可能看到升级使用的是 @angular/upgrade,那到底用哪个?
由于历史原因, NgUpgrade 模块有两个入口,如上的 @angular/upgrade/static 和 @angular/upgrade,而我们应该使用前者,它提供了更完善的报错并且支持 AOT 模式。
依赖注入
现在我们知道了如何启动一个混合应用,现在来看如何桥接 AngularJS 和 Angular 依赖注入系统。
在升级过程中,升级 服务(在 Angular 中称为 Injectable,可注入对象)是最重要的工作之一。通常不需要对可注入对象本身做额外的更改,只需在 DI 中正确地设置好它们即可。
假设我们的 AngularJS 应用有一个如下的可注入对象:
const m = angular.module('AngularJsModule', []);
m.value('angularJsInjectable', 'angularJsInjectable-value');
在 Angular 部分,可以通过 UpgradeModule 提供的 $injector 访问到它。
const m = angular.module('AngularJsModule', []);
m.value('angularJsInjectable', 'angularJsInjectable-value');

function needsAngularJsInjectableFactory($injector) {
  return `needsAngularJsInjectable got ${$injector.get('angularJsInjectable')}`;
}

@NgModule({
  imports: [
    BrowserModule,
    UpgradeModule
  ],
  providers: [
    {
      provide: 'needsAngularJsInjectable',
      useFactory: needsAngularJsInjectableFactory,
      deps: ['$injector'] // $injector is provided by UpgradeModule
    }
  ]
})
export class AppModule {
  constructor(private upgrade: UpgradeModule) {}

  ngDoBootstrap() {
    this.upgrade.bootstrap(document.body, ['AngularJsModule']);
    console.log(this.upgrade.injector.get('needsAngularJsInjectable'));
  }
}
UpgradeModule 引入了 $injector(保存了AngularJS 应用的注入器),所以我们可以在 AppModule 或它的子模块中访问它。
注意在 upgrade.bootstrap 调用之后, $injector 才会被定义,如果在启动前访问则会抛出错误。
借助 UpgradeModule 的 downgradeInjectable 方法,我们可以在 AngularJS 应用中访问到 Angular 的可注入对象:
import { downgradeInjectable, UpgradeModule } from '@angular/upgrade/static';

export class AngularInjectable {
  get value() { return 'angularInjectable-value'; }
}

const m = angular.module('AngularJsModule', []);
m.factory('angularInjectable', downgradeInjectable(AngularInjectable));
m.factory('needsAngularInjectable', (angularInjectable: AngularInjectable) => `needsAngularInjectable [got ${angularInjectable.value}]`);

@NgModule({
  imports: [
    BrowserModule,
    UpgradeModule
  ],
  providers: [
    AngularInjectable
  ]
})
export class AppModule {
  constructor(private upgrade: UpgradeModule) {}

  ngDoBootstrap() {
    this.upgrade.bootstrap(document.body, ['AngularJsModule']);
    console.log(this.upgrade.$injector.get('needsAngularInjectable')); // 'angularInjectable-value'
  }
}
注意 Angular 的依赖注入运行使用任何类型的 Token 标识可注入对象的依赖,但 AngularJS 只能使用字符串,所以上述代码中的 m.factory('angularInjectable',downgradeInjectable(AngularInjectable)) 会将 AngularInjectable 映射成 angularInjectable 字符串。
组件
NgUpgrade 模块提供的另一重要功能是 AngularJS 和 Angular 组件的混合使用。
借助 downgradeComponent 方法,我们可以降级 Angular 组件给 AngularJS 上下文使用:
const m = angular.module('AngularJsModule', []);

// The root component of the application, downgraded to AngularJS.
@Component({
  selector: 'app-root',
  template: `
    AppComponent written in Angular and downgraded to AngularJS'
    <angularjs-component></angularjs-component>
  `
})
export class AppComponent {}
m.directive('appRoot', downgradeComponent({component: AppComponent}));
所有降级的组件都需要声明在 Angular 的入口组件列表里:
@NgModule({
  declarations: [
    AppComponent,
    AngularJSComponent,
    AngularComponent
  ],
  // All downgraded components have to be listed here.
  entryComponents: [
    AppComponent,
    AngularComponent
  ],
  imports: [
    BrowserModule,
    UpgradeModule
  ]
})
export class AppModule {
  constructor(private upgrade: UpgradeModule) {}

  ngDoBootstrap() {
    this.upgrade.bootstrap(document.body, ['AngularJsModule']);
  }
}
具体来看, m.directive('appRoot',downgradeComponent({component:AppComponent}));,将会创建一个选择器为 appRoot 的 AngularJS 指令,而该指令将会使用 AppComponent 来渲染它的模板。由于这层间接关系,我们需要把 AppComponent 注册为入口组件。
<app-root> 元素由 AngularJS 所有,意味着我们可以给它应用其它 AngularJS 指令。不过,它的模板,依然是由 Angular 渲染。
downgradeComponent 方法会设置好所有的 AngularJS 绑定关系,即 AppComponent 的输入输出。
升级 AngularJS 组件给 Angular 使用则需将它们声明为指令,并继承 UpgradeComponent:
// An AngularJS component upgraded to Angular.
// Note that this is @Directive and not a @Component.
@Directive({selector: 'angularjs-component'})
export class AngularJSComponent extends UpgradeComponent {
  constructor(ref: ElementRef, inj: Injector) {
    super('angularjsComponent', ref, inj);
  }
}
m.component('angularjsComponent', {
  template: `
    angularjsComponent written in AngularJS and upgraded to Angular
    <angular-component></angular-component>
  `
});
假设我们的组件之间有如下输入输出配置:
const m = angular.module('AngularJsModule', []);

@Component({
  selector: 'app-root',
  template: `
    AppComponent written in Angular and downgraded to AngularJS:
    counter {{counter}}
    <angularjs-component [counterTimes2]="counter * 2" (multiply)="multiplyCounter($event)">
    </angularjs-component>
  `
})
export class AppComponent {
  counter = 1;

  multiplyCounter(n: number): void {
    this.counter *= n;
  }
}
m.directive('appRoot', downgradeComponent({component: AppComponent}));


@Directive({selector: 'angularjs-component'})
export class AngularJSComponent extends UpgradeComponent {
  @Input() counterTimes2: number;
  @Output() multiply: EventEmitter<number>;

  constructor(ref: ElementRef, inj: Injector) {
    super('angularjsComponent', ref, inj);
  }
}
m.component('angularjsComponent', {
  bindings: {
    counterTimes2: `<`,
    multiply: '&'
  },
  template: `
    angularjsComponent written in AngularJS and upgraded to Angular
    counterTimes2: {{$ctrl.counterTimes2}}
    <button ng-click="$ctrl.multiply(2)">Double</button>
    <angular-component [counter-times-4]="$ctrl.counterTimes2 * 2" (multiply)="$ctrl.multiply($event)">
    </angular-component>
   `
});

@Component({
  selector: 'angular-component',
  template: `
    AngularComponent written in Angular and downgraded to AngularJS:
    counterTimes4: {{counterTimes4}}
    <button (click)="multiply.next(3)">Triple</button>
  `
})
export class AngularComponent {
  @Input() counterTimes4: number;
  @Output() multiply = new EventEmitter();
}
m.directive('angularComponent', downgradeComponent({ component: AngularComponent }));
为降级组件添加输入输出无需额外的配置, downgradeComponent 都为我们自动做了,只需在原组件中声明好即可。
export class AngularComponent {
  @Input() counterTimes4: number;
  @Output() multiply = new EventEmitter();
}
然后在 AngularJS 上下文中即可使用绑定关系:
<angular-component [counter-times-4]="$ctrl.counterTimes2 * 2" (multiply)="$ctrl.multiply($event)">
</angular-component>
注意在 Angular 模板中,我们需要使用中括号和小括号分别标识输入和输出。
在升级组件中,我们需要分别在两处列出输入输出绑定:
@Directive({selector: 'angularjs-component'})
export class AngularJSComponent extends UpgradeComponent {
  @Input() counterTimes2: number;
  @Output() multiply: EventEmitter<number>; // Do not create an instance of EventEmitter here
  constructor(ref: ElementRef, inj: Injector) {
    super('angularjsComponent', ref, inj);
  }
}
和
m.component('angularjsComponent', {
  bindings: {
    counterTimes2: '<', // < corresponds to @Input
    multiply: '&' // & corresponds to @Output
  },
  template: `
    ...
  `
});
AngularJS 与 Angular 实现双向绑定的方式完全不同,AngularJS 拥有特殊的双向绑定机制,而 Angular 则是简单地利用了输入/输出对。NgUpgrade 负责桥接它们。
@Component({
  selector: 'app-root',
  template: `
    AppComponent written in Angular and downgraded to AngularJS:
    counter {{counter}}
    <angularjs-component [(twoWay)]="counter">
    </angularjs-component>
  `
})
export class AppComponent {
}
m.directive('appRoot', downgradeComponent({component: AppComponent}));


@Directive({selector: 'angularjs-component'})
export class AngularJSComponent extends UpgradeComponent {

  // We need to declare these two properties.
  // [(twoWay)]="counter" is the same as [twoWay]="counter" (twoWayChange)="counter=$event"
  @Input() twoWay: number;
  @Output() twoWayChange: EventEmitter<number>;

  constructor(ref: ElementRef, inj: Injector) {
    super('angularjsComponent', ref, inj);
  }
}
m.component('angularjsComponent', {
  bindings: {
    twoWay: '='
  },
  template: `
    angularjsComponent written in AngularJS and upgraded to Angular
    Bound via a two-way binding: <input ng-model="$ctrl.twoWay">
  `
});
AngularJS 与 Angular 的变更检测机制也完全不同。AngularJS 中需要借助 $scope.apply 来触发一次变更检测循环,亦称为 digest循环。在 Angular 中,不再使用 $scope.apply,而是依赖于 Zone.js,每一个浏览器事件都会触发一次变更检测。
由于混合应用是 Angular 应用,使用 Zone.js,所以我们不再需要关注 $scope.apply。
Angular 还提供了严格的机制来确保变更的顺序是可预测的,混合应用也保留了这些机制。
AngularJS 和 Angular 都提供了投射内容 DOM 到视图 DOM 的方式,AngularJS 中称为 transclusion,Angular 中称为 reprojection。
@Component({
  selector: 'app-root',
  template: `
    AppComponent written in Angular and downgraded to AngularJS
    <angularjs-component>
      Projected from parent
    </angularjs-component>
  `
})
export class AppComponent {}
m.directive('appRoot', downgradeComponent({component: AppComponent}));


@Directive({selector: 'angularjs-component'})
export class AngularJSComponent extends UpgradeComponent {
  constructor(ref: ElementRef, inj: Injector) {
    super('angularjsComponent', ref, inj);
  }
}
m.component('angularjsComponent', {
  template: `
    angularjsComponent written in AngularJS and upgraded to Angular
    <ng-transclude></ng-transclude>
    <angular-component>
      Projected from parent
    </angular-component>
  `
});


@Component({
  selector: 'angular-component',
  template: `
    AngularComponent written in Angular and downgraded to AngularJS:
    <ng-content></ng-content>
  `
})
export class AngularComponent {
}
m.directive('angularComponent', downgradeComponent({ component: AngularComponent }));
就像例子中的那样,一切正常。AngularJS 中使用 <ng-transclude></ng-transclude>,Angular 中使用 <ng-content></ng-content>。多插槽投射(Multi-slot reprojection)可能还有些问题,希望不久能修复。
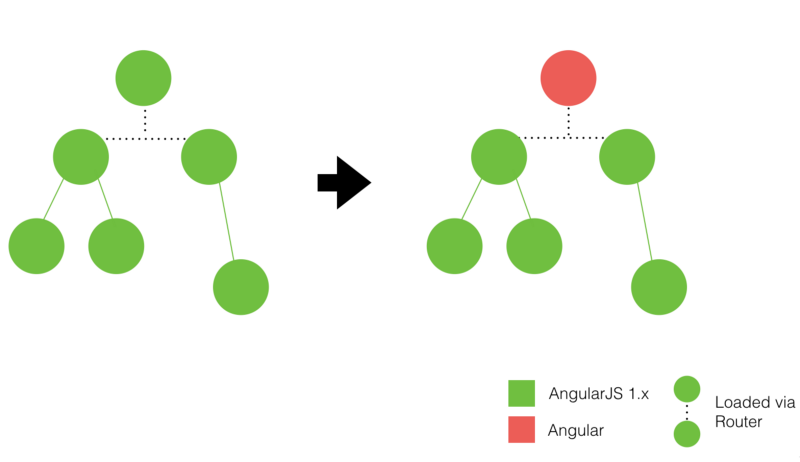
外壳升级
外壳升级(Upgrade Shell)是大多数应用所采用的升级策略。在此策略下,我们替换或引入 AngularJS 应用的根组件为 Angular 组件。
假设我们的 AngularJS 应用如下:
const m = angular.module('AngularJSAppModule', [deps]);
m.component(...);
m.service(...);
angular.bootstrap(document, ['AngularJSAppModule']);
首先移除启动调用:
const m = angular.module('AngularJSAppModule', [deps]);
m.component(...);
m.service(...);
// angular.bootstrap(document, ['AngularJSAppModule']); - No longer needed
接着定义一个只渲染 ng-view 的根组件:
@Component({
  selector: 'app-component',
  template: `<div class="ng-view"></div>`,
})
class AppComponent {}
然后降级注册到 AngularJS 模块:
m.directive('appRoot', downgradeComponent({component: AppComponent}));
最后我们定义一个 Angular 模块,导入 UpgradeModule:
@NgModule({
  imports: [
    BrowserModule,
    UpgradeModule,
  ],
  declarations: [AppComponent],
  entryComponents: [AppComponent]
})
class AppModule {
  constructor(private upgrade: UpgradeModule) {}

  ngDoBootstrap() {
    this.upgrade.bootstrap(document, ['AngularJsAppModule']);
  }
}
这里我们使用注入的 UpgradeModule 在 ngDoBootstrap 方法内启动已加载的 AngularJS 应用。为了使升级模块工作正常,只能在 Angular 范围内执行 upgrade.bootstrap。
设置完成后,应用启动执行顺序将会是:
-
Angular 应用启动
-
AngularJS 应用启动
-
AppComponent 被创建
-
AngularJS 路由介入并插入视图到
ng-view
作为升级应用的第一步,我们通过此策略,不到5分钟,便拥有了一个新的 Angular 应用,尽管内部实现都是 AngularJS。
升级 Angular 应用的两种方式
在我们把应用包裹进上述的外壳后,剩余部分的升级方式分为垂直切片(Vertical Slicing)和水平切片(Horizontal Slicin)两种。
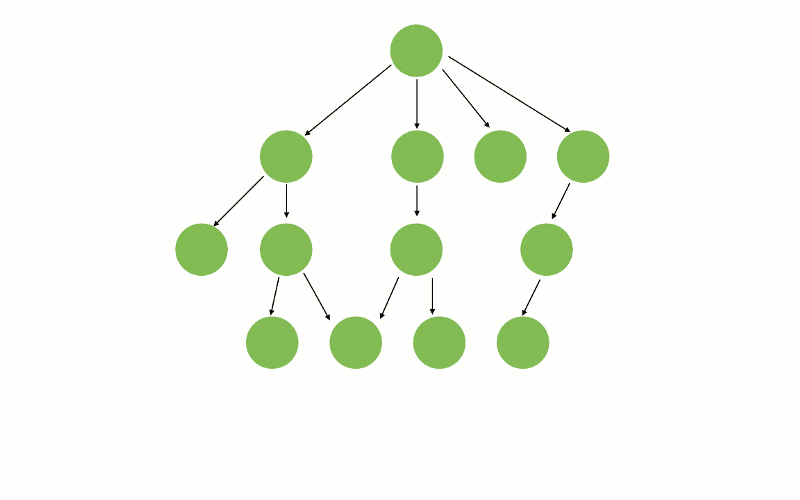
垂直切片
垂直切片的意义在于,尽管一次性重写整个应用不太实际,但按路由、按功能来重写通常是可行的。此种场景下,路由页面可能是 AngularJS 写的,也可能是 Angular 写的。

换句话说,我们看到的页面上的所有东西,要么是 AngularJS 写的,要么是 Angular 写的。
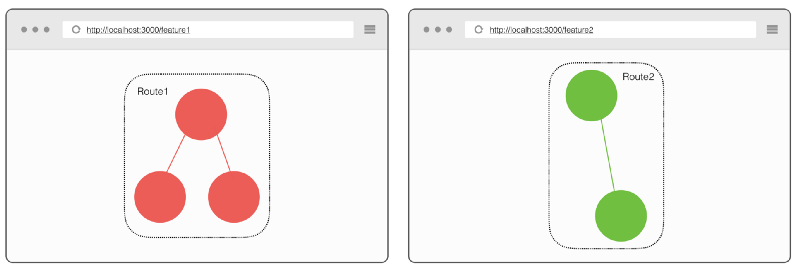
此策略可视化如下:
它的劣势之一就是 某段时间内不得不为某些公共组件编写两个不同的版本,一个使用AngularJS,另一个使用Angular。
水平切片
水平切片与之相反。

先从公共组件开始升级,比如输入框、日期选择器等,然后升级使用它们的组件,最后一步步直至升级完根组件。
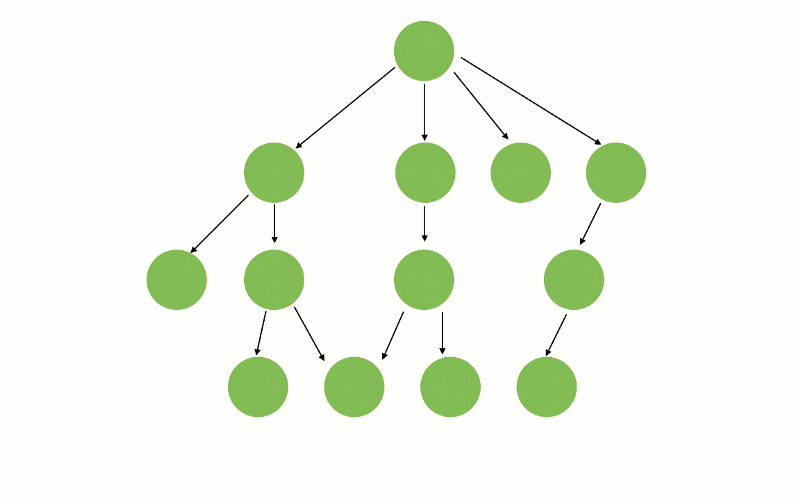
此种方式的主要特点是无论你打开哪个页面,都同时运行着两个框架。
垂直切片的主要优势是同一时刻我们的应用只会运行单个框架,意味着代码更容易 debug,也更容易理解。其次,使用垂直切片可以使我们的升级过程抽象为单个路由,这对于某些多人维护的大型项目来说尤为重要,因为少了很多相互协作调试的成本。最后,垂直切片允许我们在导航到遗留路由时才懒加载 NgUpgrade 和 AngularJS,对于应用的体积和加载速度能够有所改善。
水平切片的最大优势是更加细粒度,开发人员可以升级某个组件并立即发布到生产环境,而升级路由可能花费数月。
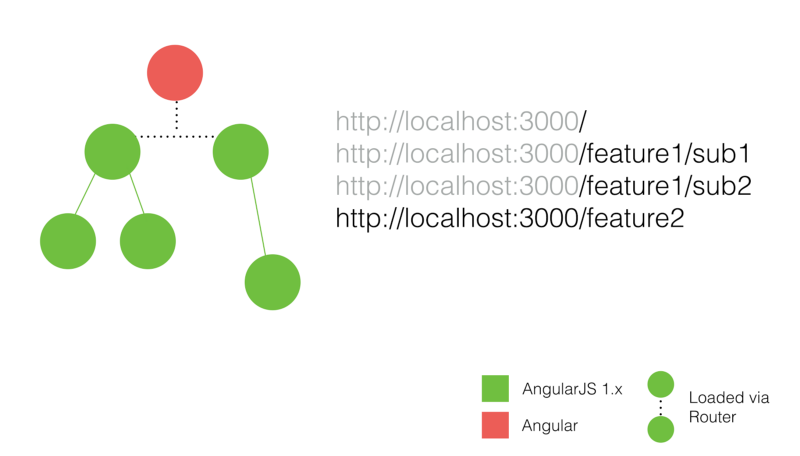
管理路由和 URL
绝大多数的 AngularJS 应用都有使用路由,Angular 应用亦然,那我们在升级过程中就不得不同时处理两个路由系统。
URL,具体来说是 window.location,是一个全局的、可变的状态,要管理好它并不是一件容易的事儿,同时使用不同的框架和路由系统时尤甚。升级过程中多个路由器都会被激活,我们需要知道怎样做才不会出错。
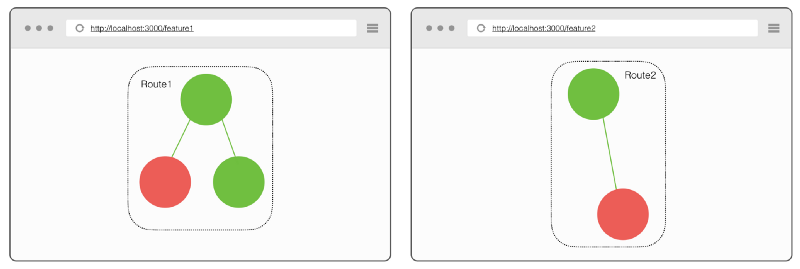
升级时有两种 URL 管理设置可选: 单一所有权(SingleOwnership) 和 混合所有权(mixed ownership)。
单一所有权
假设我们的混合应用有四个路由。
使用垂直切片升级部分路由后:

在单一所有权设置中,升级到 Angular 的功能由 Angular 路由器管理,其他遗留的功能由 AngularJS 路由器(或是 UI-router)管理。也就是说,每一个路由都有一个唯一的所有者,要么是新的 Angular Router,要么是 AngularJS Router。
混合所有权
在混合所有权设置中,URL 能够同时被 Angular Router 和 AngularJS Router 所管理,其中可能一部分是 AngularJS,而另一部分是 Angular。

通常可能发生在我们想要展示某个使用 AngularJS 编写的对话框,而其它部分已经升级到 Angular 这种场景下。
那到底选哪个?
尽量可能的话,我们应该使用单一所有权设置,它能够使我们的应用在新老部分之间的过渡更加清晰。同一时刻只升级一个路由,可以避免某些相关衍生问题。
相邻出口
相邻出口(SiblingOutlets) 是升级使用多个路由的应用最有用的策略之一,最简单的实现方式是由 Angular 的 router-outlet 指令和 AngularJS 的 ng-view 指令组成,也就是说有两个相邻路由出口,一个给 Angular,另一个给 AngularJS:
@Component({
  selector: 'app-component',
  template: `
    <router-outlet></router-outlet>
    <div class="ng-view"></div>
  `
})
class AppComponent { }
在单一所有权设置中,同一时刻只有一个出口是激活的,另一个为空。而在混合所有权中,它俩能同时激活。
然后为已经升级的功能定义 Angular 路由配置,而且我们要限定路由只处理已升级的功能。主要有两种实现方式,覆盖 UrlHandlingStrategy 和空路径 凹槽路由(SinkRoute)。
UrlHandlingStrategy
我们可以提供一个自定义的 URL 控制策略来告诉 Angular 路由应该处理哪些 URL,对于不符合规则的 URL,它将卸载所有组件并把根路由出口置空。
class CustomHandlingStrategy implements UrlHandlingStrategy {
  shouldProcessUrl(url) { return url.toString().startsWith("/feature1") || url.toString() === "/"; }
  extract(url) { return url; }
  merge(url, whole) { return url; }
}

@NgModule({
  imports: [
    BrowserModule,
    UpgradeModule,
    RouterModule.forRoot([
      { path: '', pathMatch: 'full', component: HomeComponent },
      { path: 'feature1/sub1', component: Feature1Sub1Component },
      { path: 'feature1/sub2', component: Feature1Sub2Component }
    ])
  ],
  providers: [
    { provide: UrlHandlingStrategy, useClass: CustomHandlingStrategy }
  ],
  bootstrap: [AppComponent],
  declarations: [AppComponent, HomeComponent, Feature1Sub1Component, Feature1Sub2Component]
})
class AppModule {}
凹槽路由
Angular 处理路由是按照顺序来的,如果我们在配置列表末尾放一个空路径路由,那匹配不到任何路由后就会匹配任意 URL,此时让它渲染一个空组件,就实现了同样的效果。
@Component({selector: 'empty', template: ''})
class EmptyComponent {}

@NgModule({
  imports: [
    BrowserModule,
    UpgradeModule,
    RouterModule.forRoot([
      { path: '', pathMatch: 'full', component: HomeComponent },
      { path: 'feature1/sub1', component: Feature1Sub1Component },
      { path: 'feature1/sub2', component: Feature1Sub2Component },
      { path: '', component: EmptyComponent }
    ])
  ],
  bootstrap: [AppComponent],
  declarations: [AppComponent, HomeComponent, Feature1Sub1Component, Feature1Sub2Component, EmptyComponent]
})
class AppModule {}
对于 AngularJS 部分,我们仍使用 $routeProvider 配置遗留路由,同样需要设置凹槽路由。
angular.config(($routeProvider) => {
  $routeProvider
    .when('/feature2', {template : '<feature2></feature2>'})
    .otherwise({template : ''});
});
在 AngularJS 中要实现自定义的 URL 控制策略,可以订阅 UI-router 的 $stateChangeStart 事件后调用 preventDefault 来阻止应用导航到已升级的部分。
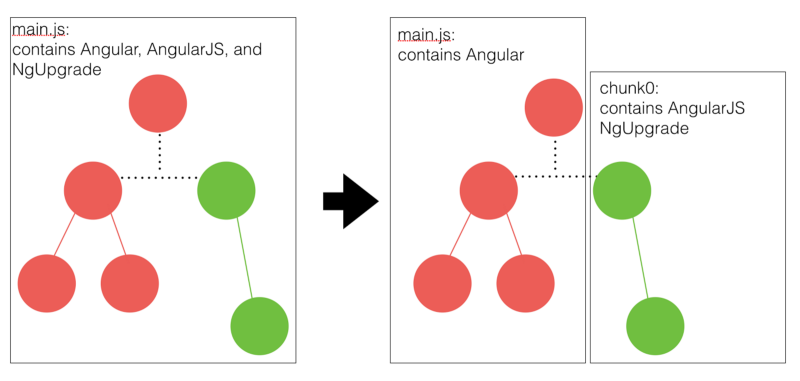
懒加载 AngularJS 应用
Angular 路由最棒的一点是支持懒加载,它可以让我们在渲染应用首屏时所需的静态资源打包体积尽可能小。
上述混合应用的一大特点就是同时给客户端打包了两个框架,但这在初始包中其实是没必要的。
我们可以设置在只有用户导航到遗留路由,才去加载 AngularJS 框架、NgUpgrade 模块和 AngularJS 相关的业务代码。
假设我们的混合应用有四个路由, /angular_a 和 /angular_b 由 Angular 控制,遗留的 AngularJS 应用通过 UI-router 控制着 /angularjs_a 和 /angularjs_b,入口是 /angular_a。

相邻路由出口
@Component({
  selector: 'app-root',
  template: `
    <router-outlet></router-outlet>
    <div ui-view></div>
  `
})
export class AppComponent {}

@NgModule({
  declarations: [
    AppComponent
  ],
  imports: [
    BrowserModule,
    RouterModule.forRoot([
      //...
    ])
  ],
  providers: [],
  bootstrap: [AppComponent]
})
export class AppModule { }
根组件配置了相邻路由出口策略,其中 <divui-view> 只有在 AngularJS 框架加载后才会激活,在那之前只是一个普通的 DOM 元素。
在 AngularJS 路由配置列表中设置凹槽路由:
export const module = angular.module('AngularJSApp', ['ui.router']);

module.config(($locationProvider, $stateProvider) => {
  //...

  $stateProvider.state('sink', {
    url: '/*path',
    template: ''
  });
});
Angular 中也定义一个凹槽路由来捕获不匹配的 URL。
@NgModule({
  declarations: [
    AppComponent,
    AngularAComponent,
    AngularBComponent
  ],
  imports: [
    BrowserModule,
    RouterModule.forRoot([
      {path: '', redirectTo: 'angular_a', pathMatch: 'full'},
      {path: 'angular_a', component: AngularAComponent},
      {path: 'angular_b', component: AngularBComponent},
      {path: '', loadChildren: './angularjs.module#AngularJSModule'}
    ])
  ],
  providers: [],
  bootstrap: [AppComponent]
})
export class AppModule { }
Angular 应用会假设没匹配到的路由交由 AngularJS 处理,所以凹槽路由这里会去加载 AngularJS 应用的代码。
加载 AngularJS
AngularJSModule 是 AngularJS 应用的一层简易 Angular 包装器。
//angularjs.module.ts
import {Component, NgModule} from '@angular/core';
import {RouterModule} from '@angular/router';

import {module} from './angularjsapp';
import {UpgradeModule} from '@angular/upgrade/static';
import {setUpLocationSync} from '@angular/router/upgrade';

@Component({template: ``})
export class EmptyComponent {}

@NgModule({
  declarations: [
    EmptyComponent
  ],
  imports: [
    UpgradeModule,
    RouterModule.forChild([
      {path: '**', component: EmptyComponent}
    ])
  ]
})
export class AngularJSModule {
  // The constructor is called only once, so we bootstrap the application
  // only once, when we first navigate to the legacy part of the app.
  constructor(upgrade: UpgradeModule) {
    upgrade.bootstrap(document.body, [module.name]);
    setUpLocationSync(upgrade);
  }
}
为了使 Angular 路由成功运行,我们需要渲染一个空组件。然后在模块的构造函数里启动 AngularJS 应用,并设置地址同步,监听 window.location 变更。
概览
至此整个混合应用搭建完毕,我们来看下应用具体加载过程。
当用户打开网页时,Angular 应用启动,路由重定向到 /angular_a,实例化 AngularAComponent 组件,放入 AppComponet 定义的路由出口 <router-outlet>。
此时我们尚未加载 AngularJS、NgUpgrade 和其他 AngularJS 应用代码,可以随意在 /angular_a 和 /angular_b 路由间切换。
当用户导航到 /angularjs_a 时,Angular 路由器将会匹配到 {path:'',loadChildren:'./angularjs.module#AngularJSModule'} 路由,执行加载 AngularJSModule。
这个 chunk 包中的模块包含了 AngularJS、NgUpgrade 和其他 AngularJS 应用代码。
一旦该模块加载,将会调用 upgrade.bootstrap 方法启动 AngularJS 应用,触发 UI-router,匹配到 /angularjs_a,放入 <divui-view>。与此同时,Angular 将会把 EmptyComponent 放入 <router-outlet>。
当用户从 /angularjs_a 导航到 /angular_a,UI-router 将会匹配到凹槽路由并将空模板放入 <divui-view>。 setUpLocationSync 帮助方法将会通知 Angular 路由器 URL 发生变更,那 Angular 路由器就会把 AngularAComponent 放入 <router-outlet>。
此时 AngularJS 应用仍在运行,并没有被卸载。卸载一个真实的 AngularJS 应用几乎是不可能的,所以我们把它继续留在内存中。
当用户从 /angular_a 导航到 /angular_b 时,UI-router 仍然匹配到凹槽路由,Angular 路由器则更新 <router-outlet>。
最后,当用户再导航到 /angularjs_a 时,Angular 路由器匹配到凹槽路由,而正在运行的 UI-router,将会匹配到相应的状态。此时我们没必要再去加载启动 AngularJS 应用,因为已经执行过一次。
大功告成,现在只有在用户导航到受 AngularJS 控制的路由时,我们才会加载 AngularJS,这使得首次加载变得很快,但会使用户初次导航到 /angularjs_a 时加载变慢,我们可以开启预加载来修复这个场景。
//app,module.ts
import {PreloadAllModules, RouterModule} from '@angular/router';

@NgModule({
  declarations: [
    AppComponent,
    AngularAComponent,
    AngularBComponent
  ],
  imports: [
    BrowserModule,
    RouterModule.forRoot([
      {path: '', redirectTo: 'angular_a', pathMatch: 'full'},
      {path: 'angular_a', component: AngularAComponent},
      {path: 'angular_b', component: AngularBComponent},
      {path: '', loadChildren: './angularjs.module#AngularJSModule'}
    ], {
      enableTracing: true,
      preloadingStrategy: PreloadAllModules // ADD THIS!
    })
  ],
  providers: [],
  bootstrap: [AppComponent]
})
export class AppModule { }
通过设置预加载策略,当用户在使用 Angular 应用时,路由器会在背后预加载 AngularJSModule。
更有趣的是,路由器将会实例化 AngularJSModule,致使 AngularJS 应用启动,这意味着整个启动过程也是发生在背后。
真是两全其美,我们既拥有了体积更小的初始化包,随后又拥有了更快的路由切换。

 浙公网安备 33010602011771号