转自:https://blog.csdn.net/or_7r_ccl/article/details/54986393
在UnrealEngine4中使用Google Protobuf
UE有一套自己的编译规则,如何在游戏中添加第三方库官方有一篇很详细的文档(Linking Static Libraries Using The Build System)。
简单来说,第三方库一般放在’Source/ThirdParty’目录下,建一个目录,把需要包含的头文件以及编译好的库都放在这里,然后写一个对应的[LIBNAME].Build.cs文件,在这个文件里需要告诉编译器需要修改的设置,例如添加那些包含目录以及链接库。在游戏工程使用时,需要在本工程文件的[APPNAME].Build.cs中添加对该库的引用,就像下面这样
PublicDependencyModuleNames.AddRange(new string[] {
   "Core", "CoreUObject", "Engine", "InputCore", "HeadMountedDisplay", "libprotobuf" });
对第三方库的使用,可以参照UnrealEngine的源码,在它的源码目录’Source/ThirdParty’里,有一大堆第三方库,不过这些库都是预先编译好的.lib和.a,如何编译出这些库官方并没有提供详细的文档说明。对于Windows环境来说比较简单,首先是使用和UE编辑器同样的VisualStudio版本,例如目前最新的4.14使用的是VS2015,并且在编译中使用/MD选项。google protobuf本身提供了一套cmake编译脚本,可以很方便的编译出所需要的lib文件。
比较麻烦的是Linux平台,UE提供了专门的clang工具链来作为Linux和Android平台的编译工具,可以参照官方的这篇文档下载安装(Compiling For Linux),不过这套工具链中并没有对应的make工具,所以我从UE源码中的UnrealBuildTool工具中把编译参数还原出来,手动写了一套python脚本来完成probobuf的编译。
为了适应UE4的环境,需要做一些改动,首先是protobuf中使用了类似于UINT这样的数据类型,而这种数据类型在UE4的源码中已经被屏蔽,具体可以参考UE源码中DisableOldUETypes.h文件的说明,为了使两者兼容,需要在protoc产生的.pb.h文件中添加#include “AllowWindowsPlatformTypes.h”和#include “HideWindowsPlatformTypes.h”两行代码。
#ifdef _MSC_VER
#include "AllowWindowsPlatformTypes.h"
#endif

//include other header file

#ifdef _MSC_VER
#include "HideWindowsPlatformTypes.h"
#endif
另外protobuf源码中有一个文件使用了byteswap.h这个头文件,不幸的是,UE4源码中有一个ByteSwap.h文件,在clang编译器中产生编译错误,需要做一定的修改。
//google/protobuf/stubs/port.h, line 91
//#include <byteswap.h>  // IWYU pragma: export
#include <bits/byteswap.h>
#define bswap_16(x) __bswap_16 (x)
#define bswap_32(x) __bswap_32 (x)
#define bswap_64(x) __bswap_64 (x)
我把最终编译好的库以及所使用的的编译脚本放到了github上,所需环境如下
软件    版本    备注
Google Protobuf    3.1.0
Visual Studio    2015
clang    3.9.0    EPIC提供改造过的工具链,需要参照这篇官方文档下载安装
CMake    2.8以上    需要把cmake.exe所在路径加入到PATH路径中
Unreal Engine Source    4.14.3    参照官方文档下载并编译源码
Python    3.x or 2.x
This entry was posted in 未分类 and tagged 程序. Bookmark the permalink.
Project Settings -》 packaging -》 Packaging选项中,有多个设置项来设置打包时要排除或者包含的文件夹,比如:设置哪些目录不参与cook,以及哪些目录在打包时需要拷贝进来的目录(比如与UE4的文件IO API无关的配置文件等等)
注意:这些设置的目录必须在Content目录下
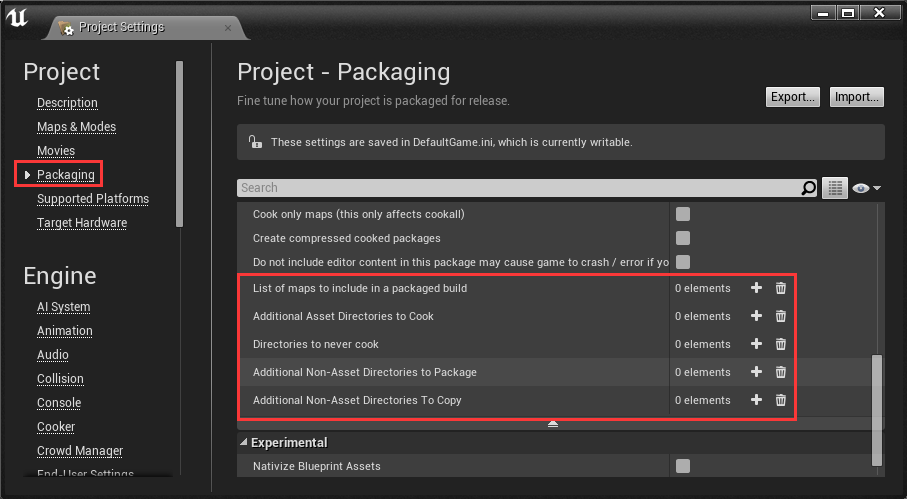
对于这些自定义文件(非UE4支持的文件格式,比如text文本),安装后的相对路径也不同:
Adding custom files to the Android content.
https://answers.unrealengine.com/questions/120796/adding-custom-files-to-the-android-content.html
On UE 4.7.3 I found a better solution.
On Android I'm using a PathToAndroidPaths function fromEngine\Source\Runtime\Core\Private\Android\AndroidFile.cpp
On IOS I'm using a ConvertToIOSPath function from Engine\Source\Runtime\Core\Private\IOS\IOSPlatformFile.h
On PC I'm using a FPaths::ConvertRelativePathToFull function fromEngine\Source\Runtime\Core\Public\Misc\Paths.h
Most of those function are private, so I made a new, public function that use them for converting relative path to the absolute one.
The ConvertRelativePathToFull from FPaths works correctly only for PC, it doesn't return correct absolute paths for mobile devices.
其他参考:
Additional Asset Directories not Copied to Packaged Build
https://answers.unrealengine.com/questions/241947/additional-asset-directories-not-copied-to-package.html
ios开发使用xcode6打包protobuf静态库 解决了 官方引用 protobuf 导致的冲突问题 包含 arm64 支持
转自:https://blog.csdn.net/xiaofei125145/article/details/39697145
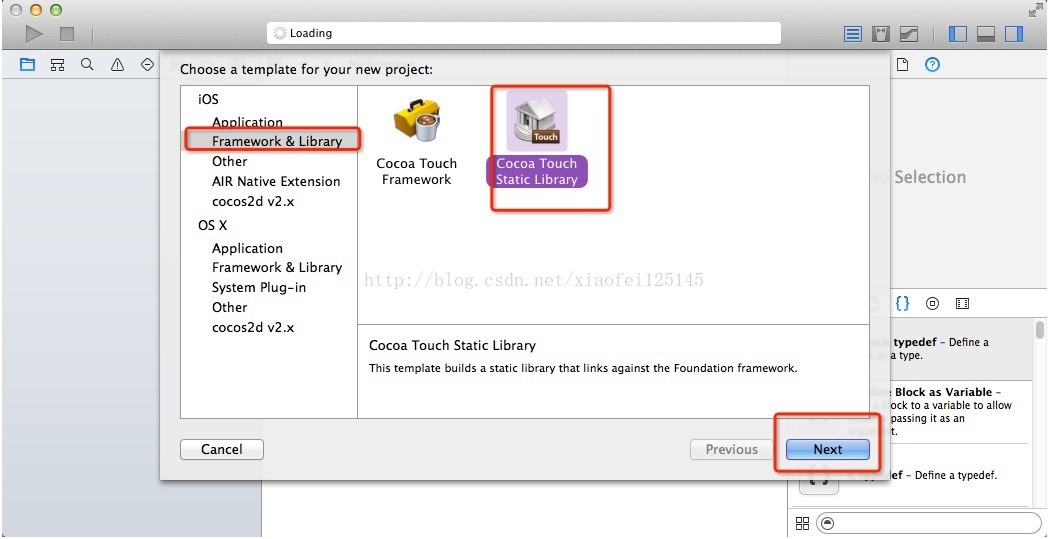
1、下载 protobuf-2.5.0-mast ,并解压
2、在解压后的 目录内部建立一个 目录 名字随便写,我这里写的 是 xcodeProject 如图:


3、新建一个 静态库工程 在刚才 的 xcodeProject 文件夹内.
4,将工程中 自带的 哪个 类 删除 ,也就是删除 下图 中 的 protobufXcode6 那个类 。
5, 将 protobuf-2.5.0-master/src/google 文件夹 添加到 刚才新建的 静态库工程 中 ,注意 不需要 勾选 copy 复选框,注意勾选add to target ,如图 。

6、 将 google/protobuf/compiler/文件夹 从工程中 移除 。
7、 将 google 中所有的 test 文件 删除 ,可在 文件中 搜 test 如图 ,然后 删除 google 文件夹中 包含 test 的文件 如图。


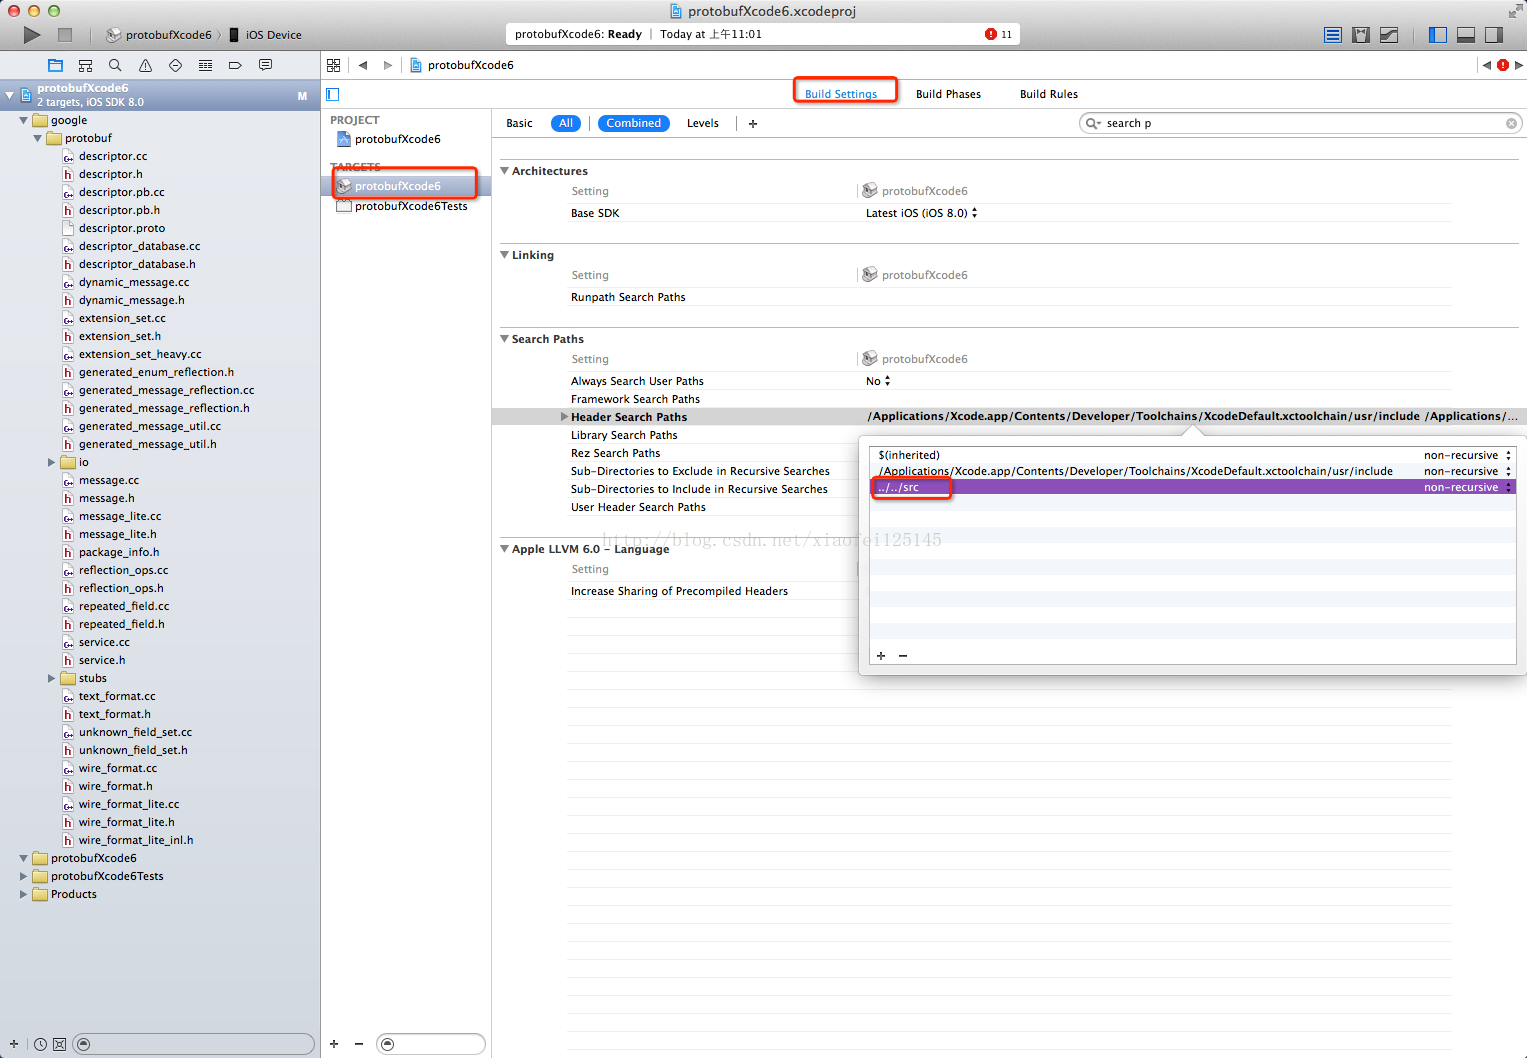
8、添加 头文件 引用 路径,如图。

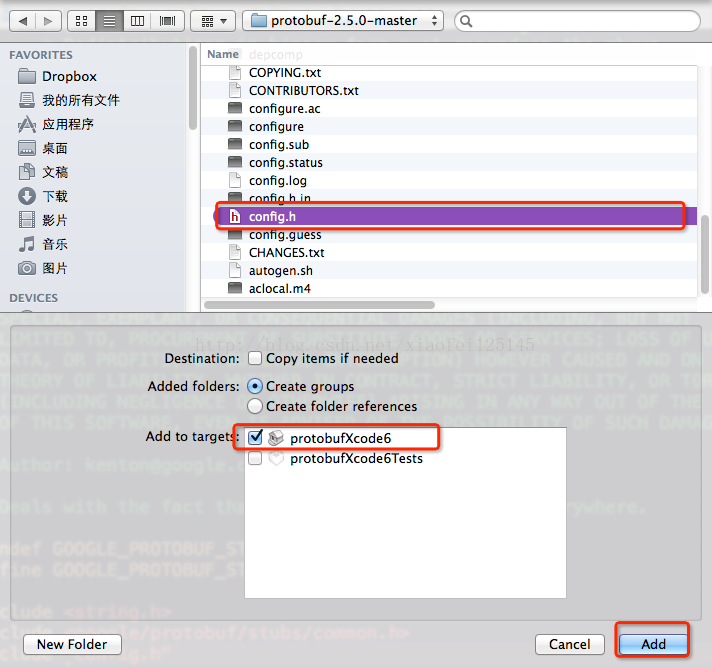
9、生成 config.h 头文件 。 打开终端 , cd 到 protobuf 跟目录下 , 运行 ./configure 脚本 就可以生成 config.h 文件 ,生成后 将 config.h 文件 添加到 xcode 工程 中 ,如图
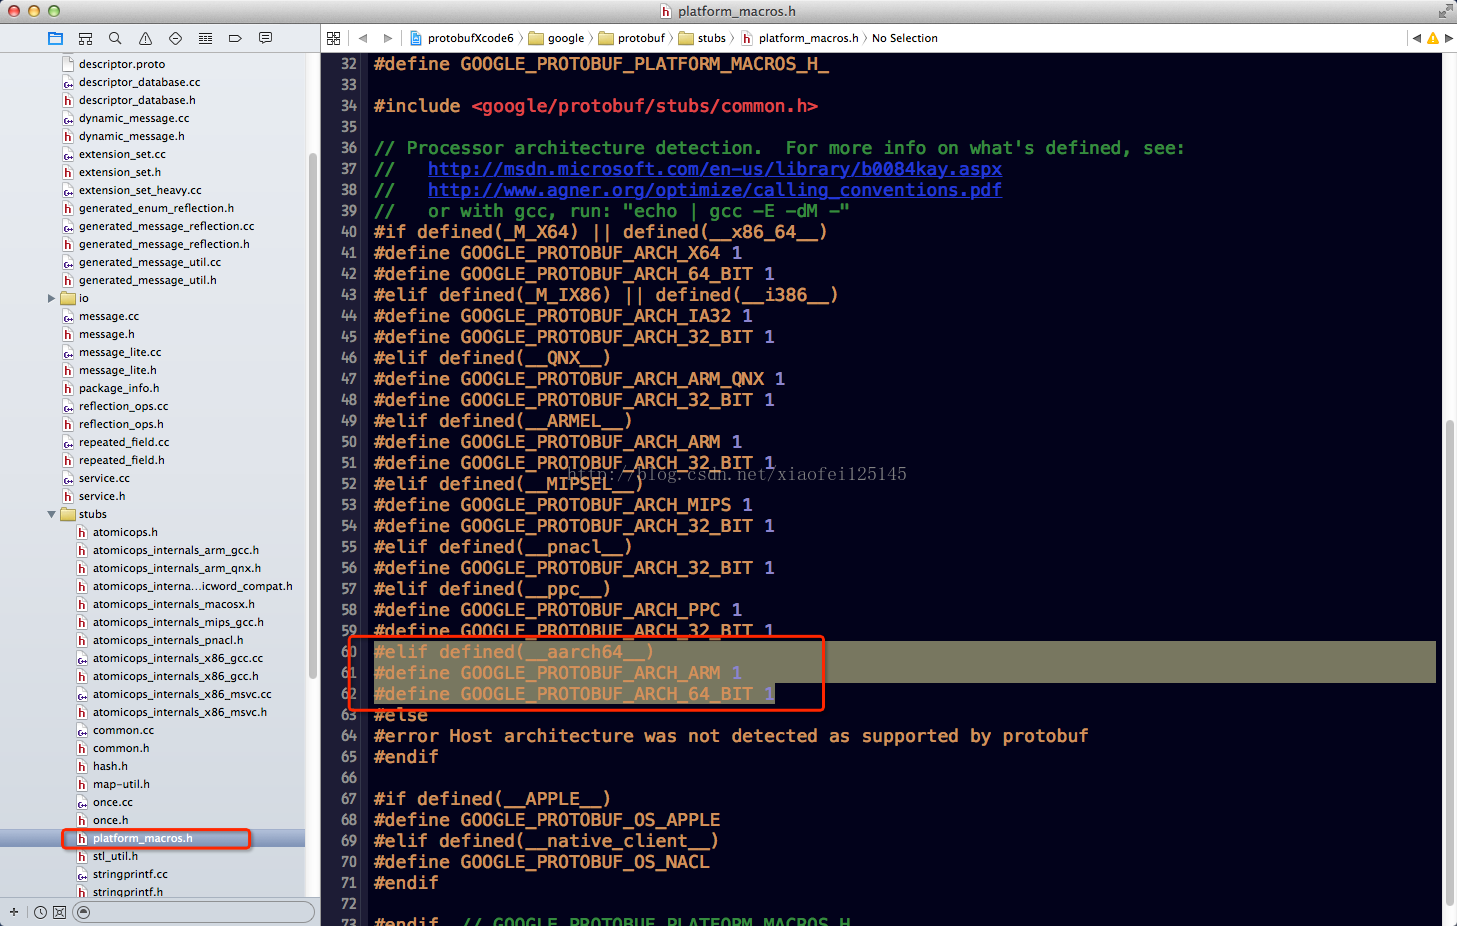
10、 修改 平台 支持 宏定义 , 将下面三行 添加到 stubs/platform_macros.h 中 ,如下图。
#elif defined(__aarch64__)
#define GOOGLE_PROTOBUF_ARCH_ARM 1
#define GOOGLE_PROTOBUF_ARCH_64_BIT 1

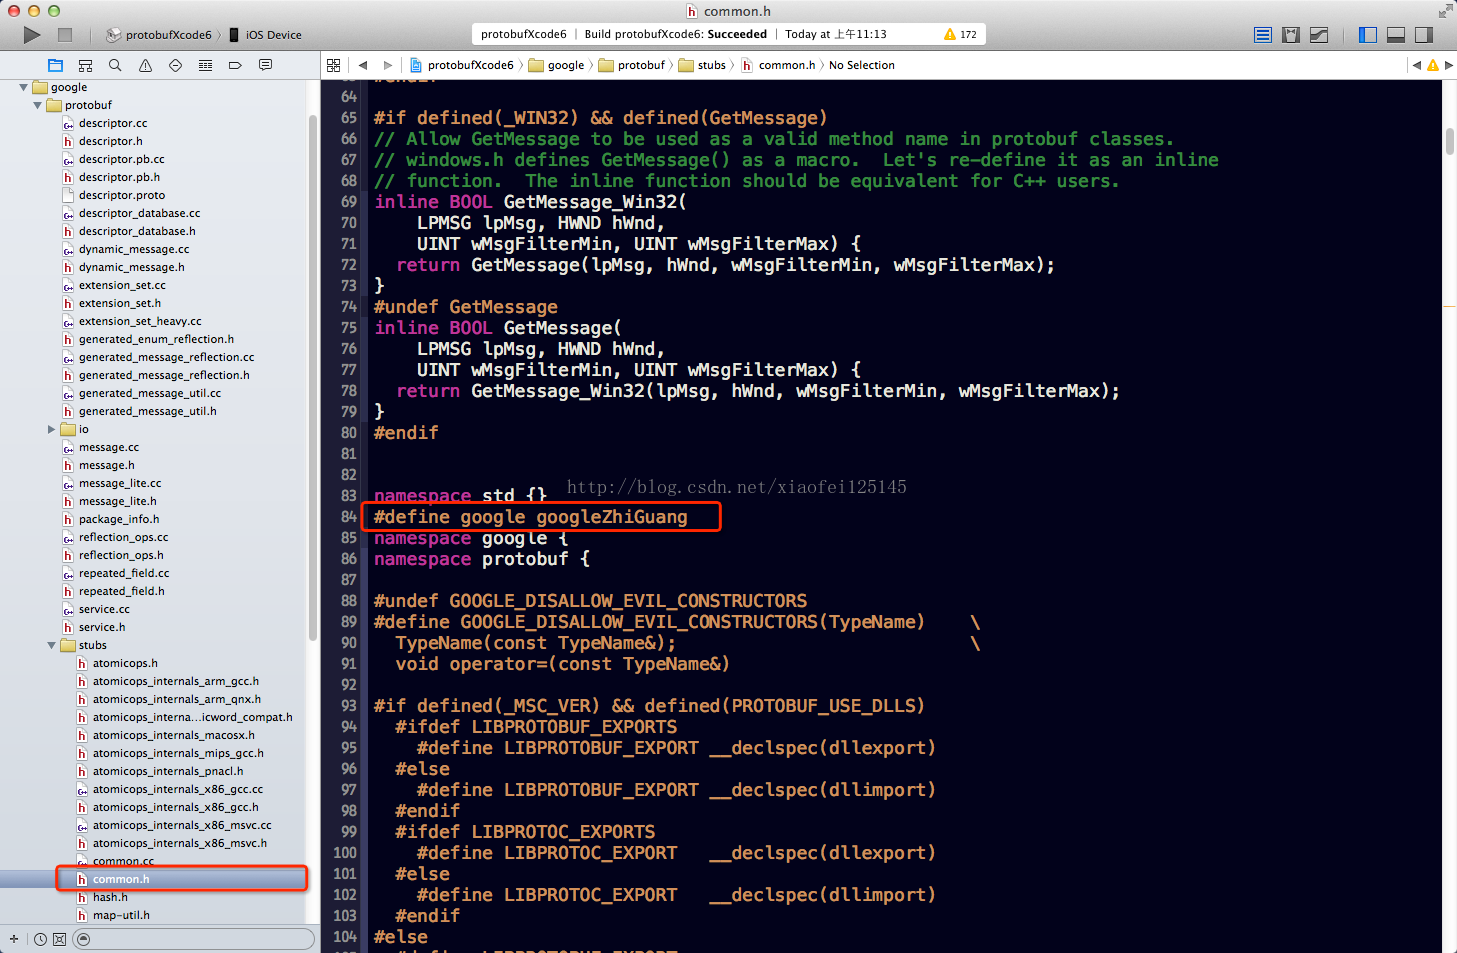
11、 命名空间修改 ,由于 APPLE 官方 已经 在 手机的 框架内 使用了 google 的 protobuf ,如果你 依然使用 protobuf 中的 命名空间 google 的话 ,在 64 的 系统中 会 导致 崩溃 ,所以 需要修改 命名空间 ,如下图 添加 一行 宏定义 ,
添加位置 , google/protobuf/stubs/common.h 如图
#define google googleZhiGuang

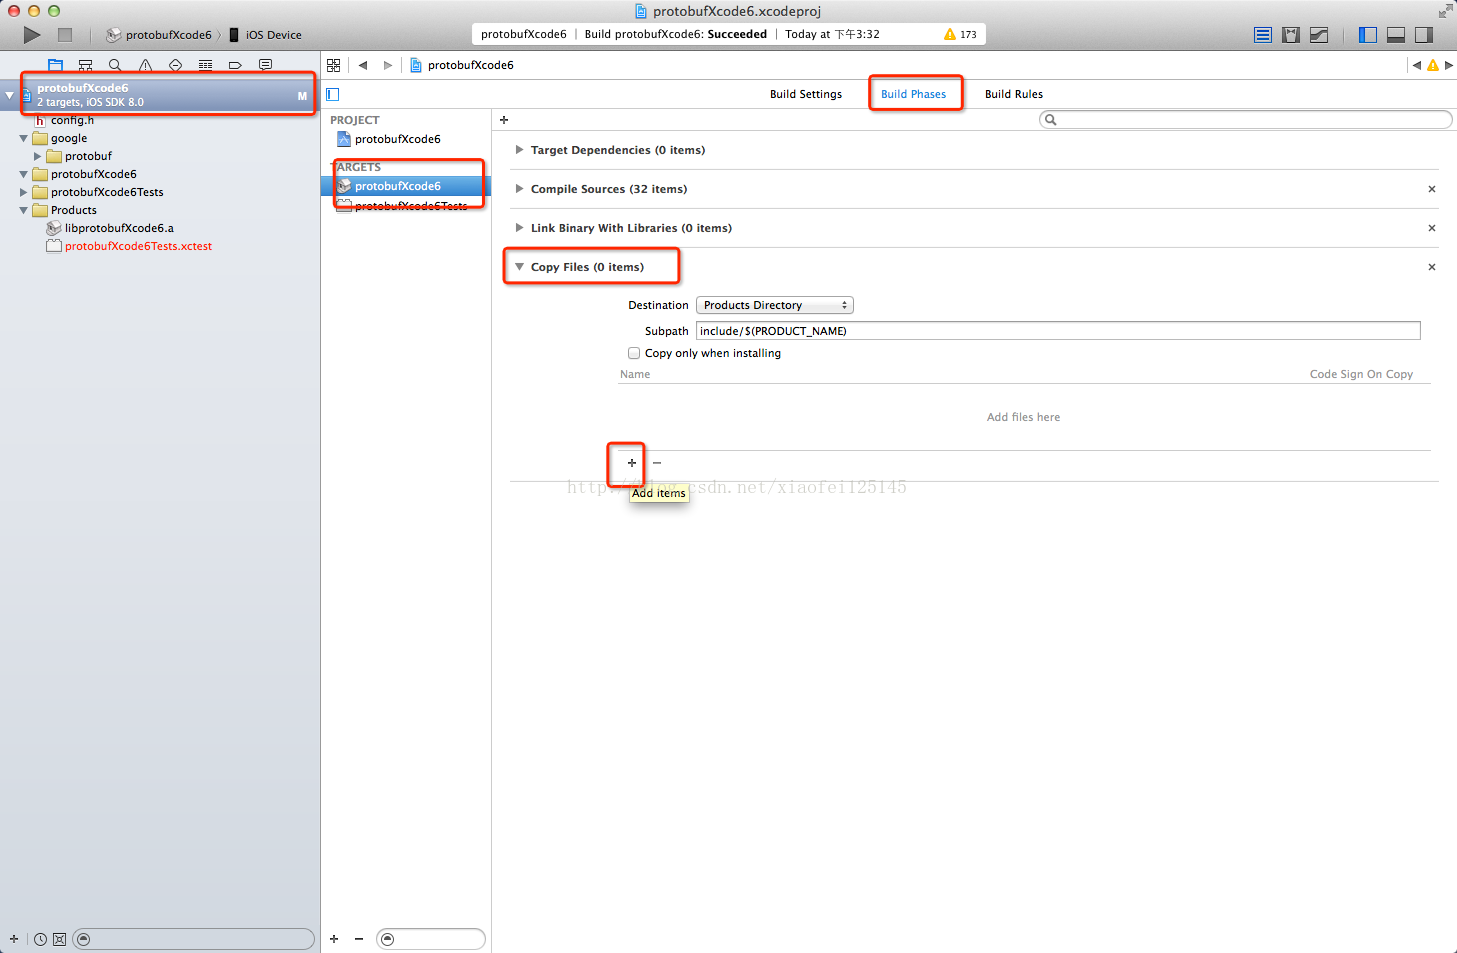
12、添加需要 copy 的 头文件 ,如下图 ,点击 加号 以后 选中 所有的 .h 文件 然后 点击 Add
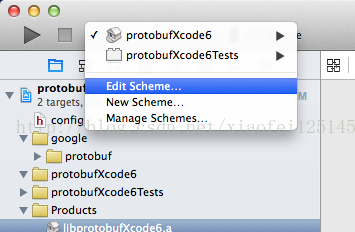
13 、修改 Scheme ,切换到 Run 选项 ,点击 右侧的 info ,build configuration 设置为 Release , 如图 。

14、最后接 build 就可以生成了 ,注意 编译的时候 选择 模拟器的话 编译 出来的 是 模拟器 对应 的 i386 的 架构的 ,编译 armv7,armv7s,arm64 的 需要 选择 手机 ,没有手机的话就 选 ios Device 。
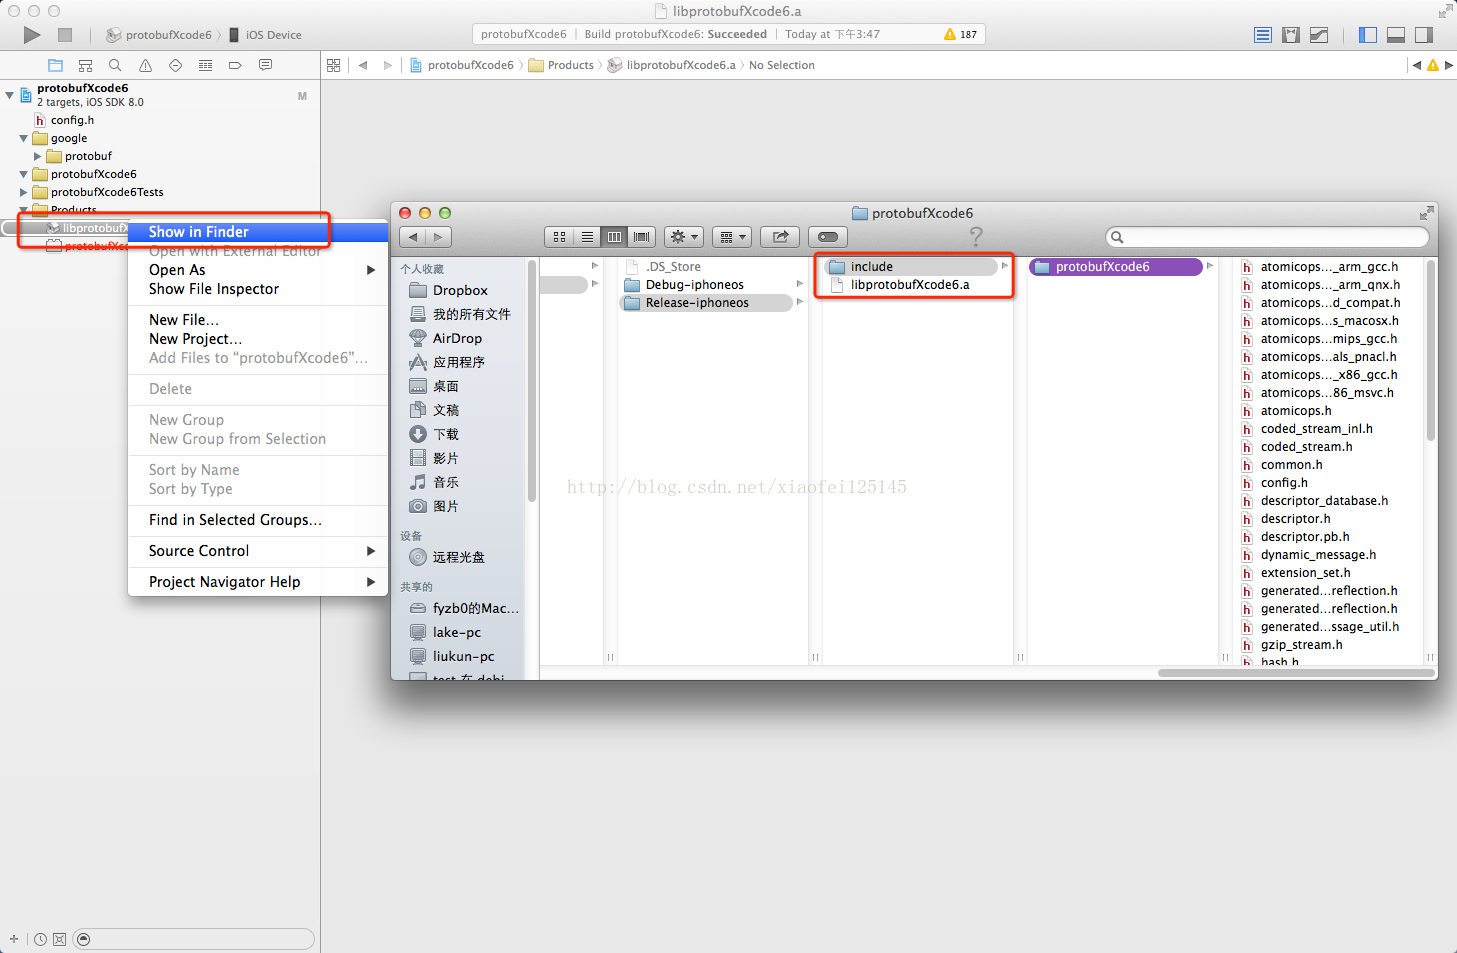
15、 找到 lib 和 头文 件 ,
build 完 之后 ,如图 ,在 product 文件 上 点击 右键 showinfinder 就可以了 ,include 文件夹中是 对应的 头文件 。

UE4+Protobuf
需要把protobuf 源码直接复制到UE4c++项目里面
修改 libprotobuf 源码
主要是去掉两个宏开关 GOOGLE_PROTOBUF_NO_RTTI 和 HAVE_PTHREAD
去掉 HAVE_PTHREAD 宏
在非 Windows 平台下都要打开 HAVE_PTHREAD 宏
打开 google/protobuf/stubs/common.cc,把两个地方的 elif defined(HAVE_PTHREAD) 改成 #else
并且把第一处以下两行代码删除
#else
#error "No suitable threading library available."
去掉 GOOGLE_PROTOBUF_NO_RTTI 宏
在所有平台下都要禁用 RTTI,因为 UE4 禁用了 C++ 的运行时类型识别(typeid 和 dynamic_cast)
打开 google/protobuf/arena.h,将
#ifndef GOOGLE_PROTOBUF_NO_RTTI
#define RTTI_TYPE(type) (&typeid(type))
#else
#define RTTI_TYPE_ID(type) (NULL)
#endif

改为
#define RTTI_TYPE_ID(type) (NULL)

打开 google/protobuf/generated_message_reflection.h,将
#if defined(GOOGLE_PROTOBUF_NO_RTTI) || (defined(_MSC_VER)&&!defined(_CPPRTTI))
	return NULL;
#else
	return dynamic_cast<To>(from);
#endif

改为
return NULL;

将
#if defined(GOOGLE_PROTOBUF_NO_RTTI) || (defined(_MSC_VER)&&!defined(_CPPRTTI))
	bool ok = &T::default_instance9) == from->GetReflection()->GetMessageFactory()->GetPrototype(from->GetDescriptor());
		return ok ? down_cast<T*>(from) : NULL;
#else
	return dynamic_cast<To>(from);
#endif

改为
bool ok = &T::default_instance9) == from->GetReflection()->GetMessageFactory()->GetPrototype(from->GetDescriptor());
return ok ? down_cast<T*>(from) : NULL;

打开 google/protobuf/stubs/casts.h,删除以下两处代码
#if !defined(NDEBUG) && !defined(GOOGLE_PROTOBUF_NO_RTTI)
	assert(f == NULL || dynamic_cast<To>(f) != NULL); // RTTI: debug mode only!
#endif
#if !defined(NDEBUG) && !defined(GOOGLE_PROTOBUF_NO_RTTI)
	// RTTI: debug mode only!
	assert(dynamic_cast<ToAsPointer>(&f) != NULL);
#endif
禁用编译警告
因为 UE4 会将一些编译警告当成错误,所以要将编译过程中 libprotobuf 中的警告禁用掉
转载:https://github.com/jashking/UE4Protobuf

 浙公网安备 33010602011771号