超参数进化 Hyperparameter Evolution
前言
yolov5提供了一种超参数优化的方法–Hyperparameter Evolution,即超参数进化。超参数进化是一种利用 遗传算法(GA) 进行超参数优化的方法,我们可以通过该方法选择更加合适自己的超参数。
提供的默认参数也是通过在COCO数据集上使用超参数进化得来的。由于超参数进化会耗费大量的资源和时间,如果默认参数训练出来的结果能满足你的使用,使用默认参数也是不错的选择。
ML中的超参数控制训练的各个方面,找到一组最佳的超参数值可能是一个挑战。像网格搜索这样的传统方法由于以下原因可能很快变得难以处理:
高维度的搜索空间;
维度之间未知的相关性;
在每个点上评估fitness的代价很高
由于这些原因使得遗传算法成为超参数搜索的合适候选。
1. 初始化超参数
YOLOv5有大约25个用于各种训练设置的超参数,它们定义在/data目录下的yaml文件中。好的初始参数值将产生更好的最终结果,因此在演进之前正确初始化这些值是很重要的。如果有不清楚怎么初始化,只需使用默认值,这些值是针对COCO训练优化得到的。
yolov5/data/hyp.scratch.yaml
# Hyperparameters for COCO training from scratch
# python train.py --batch 40 --cfg yolov5m.yaml --weights '' --data coco.yaml --img 640 --epochs 300
# See tutorials for hyperparameter evolution https://github.com/ultralytics/yolov5#tutorials


lr0: 0.01 # initial learning rate (SGD=1E-2, Adam=1E-3)
lrf: 0.2 # final OneCycleLR learning rate (lr0 * lrf)
momentum: 0.937 # SGD momentum/Adam beta1
weight_decay: 0.0005 # optimizer weight decay 5e-4
warmup_epochs: 3.0 # warmup epochs (fractions ok)
warmup_momentum: 0.8 # warmup initial momentum
warmup_bias_lr: 0.1 # warmup initial bias lr
box: 0.05 # box loss gain
cls: 0.5 # cls loss gain
cls_pw: 1.0 # cls BCELoss positive_weight
obj: 1.0 # obj loss gain (scale with pixels)
obj_pw: 1.0 # obj BCELoss positive_weight
iou_t: 0.20 # IoU training threshold
anchor_t: 4.0 # anchor-multiple threshold
# anchors: 3 # anchors per output layer (0 to ignore)
fl_gamma: 0.0 # focal loss gamma (efficientDet default gamma=1.5)
hsv_h: 0.015 # image HSV-Hue augmentation (fraction)
hsv_s: 0.7 # image HSV-Saturation augmentation (fraction)
hsv_v: 0.4 # image HSV-Value augmentation (fraction)
degrees: 0.0 # image rotation (+/- deg)
translate: 0.1 # image translation (+/- fraction)
scale: 0.5 # image scale (+/- gain)
shear: 0.0 # image shear (+/- deg)
perspective: 0.0 # image perspective (+/- fraction), range 0-0.001
flipud: 0.0 # image flip up-down (probability)
fliplr: 0.5 # image flip left-right (probability)
mosaic: 1.0 # image mosaic (probability)
mixup: 0.0 # image mixup (probability)
2. 定义fitness
fitness是我们寻求最大化的值。在YOLOv5中,定义了一个fitness函数对指标进行加权。
yolov5/utils/metrics.py
def fitness(x):
    # Model fitness as a weighted combination of metrics
    w = [0.0, 0.0, 0.1, 0.9] # weights for [P, R, mAP@0.5, mAP@0.5:0.95]
    return (x[:, :4] * w).sum(1)
3. 进化
使用预训练的yolov5s对COCO128进行微调
python train.py --epochs 10 --data coco128.yaml --weights yolov5s.pt --cache
基于这个场景进行超参数进化选择,通过使用参数--evolve:
# Single-GPU
python train.py --epochs 10 --data coco128.yaml --weights yolov5s.pt --cache --evolve

# Multi-GPU
for i in 0 1 2 3; do
  nohup python train.py --epochs 10 --data coco128.yaml --weights yolov5s.pt --cache --evolve --device $i > evolve_gpu_$i.log &
done
# 其中多GPU运行时的`nohub`是`no hang up`(不挂起),用于在系统后台不挂断地运行命令,退出终端不会影响程序的运行。
# `&`符号的用途:在后台运行。
# 一般两个一起用`nohup command &`。

# 查看进程:
ps -aux|grep train.py

# #终止进程:
kill -9 进程号
代码中默认进化设置将运行基本场景300次,即300代
yolov5/train.py
for _ in range(300): # generations to evolve
主要的遗传操作是交叉和变异。在这项工作中,使用了90%的概率和0.04的方差的变异,以所有前几代最好的父母的组合来创造新的后代。结果记录在yolov5/evolve.txt,fitness最高的后代保存在yolov5/runs/evolve/hyp_evolved.yaml
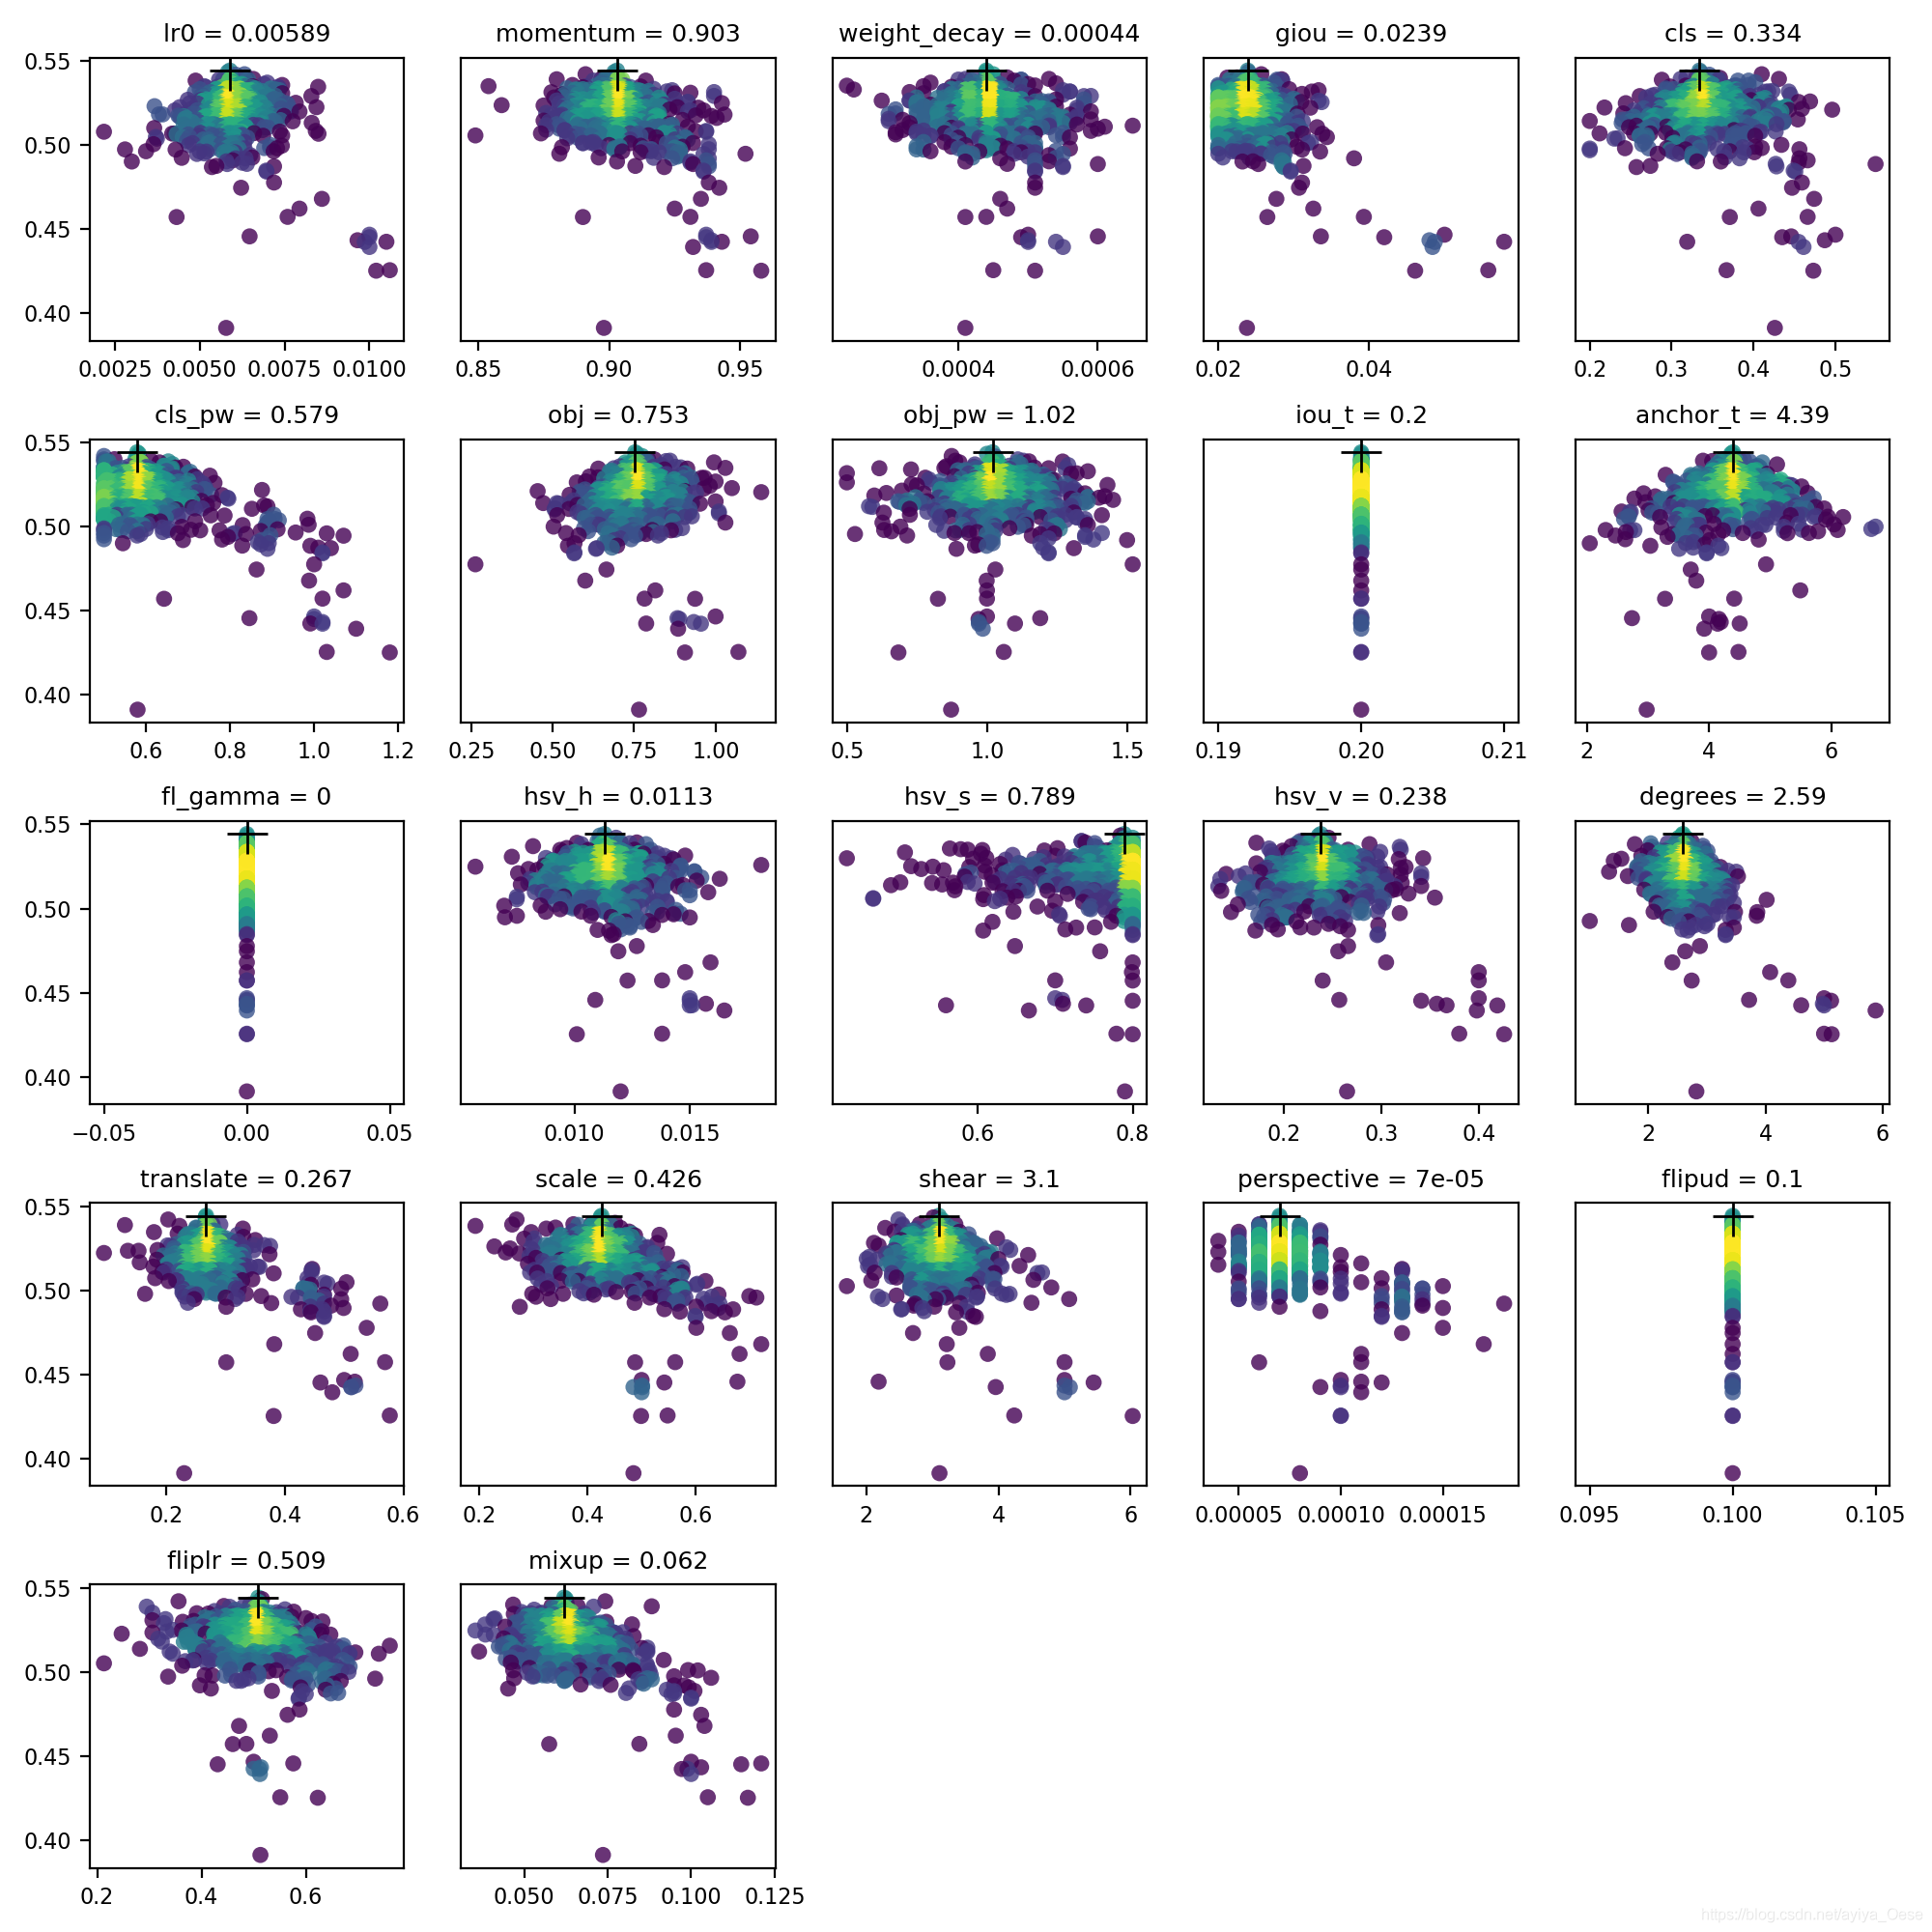
4. 可视化
结果被保存在yolov5/evolve.png,每个超参数一个图表。超参数的值在x轴上,fitness在y轴上。黄色表示浓度较高。垂直线表示某个参数已被固定,且不会发生变化。这是用户在train.py上可选择的meta字典,这对于固定参数和防止它们进化是很有用的。
报错问题
报错1:KeyError: ‘anchors’ :
issues/2485
issues/1411
pull/1135
I think commenting the same field in the meta dictionary can work… yes that should work, it will act as if the field does not exist at all. Anchor count will be fixed at 3, and autoanchor will be run if the Best Possible Recall (BPR) dips below threshold, which is set at 0.98 at the moment. Varying the hyps can cause your BPR to vary, so its possible some generations may use it and other not. - - glenn-jocher
EDIT: BTW the reason there are two dictionaries is that the meta dictionary contains gains and bounds applied to each hyperparameter during evolution as key: [gain, lower_bound, upper_bound]. meta is only ever used during evolution, I kept it separated to avoid complicating the hyp dictionary, again not sure if that’s the best design choice, we could merge them, but then each hyp.yaml would be busier and more complicated to read. - - glenn-jocher
原因是data/hyp.scratch.yaml里面的anchors被注释掉,取消注释继续运行,出现下面的错误
报错2:IndexError: index 34 is out of bounds for axis 0 with size 34 :
pull/1135
将data/hyp.scratch.yaml里面的anchors注释掉;同时将train.py中的mate字典中的anchors也注释掉。运行成功
如果为hyp['anchors']设置一个值,autoanchor将创建新的锚覆盖在model.yaml中指定的任何锚信息。比如:你可以设置anchors:5强制autoanchor为每个输出层创建5个新的锚,取代现有的锚。超参数进化将使用该参数为您进化出最优数量的锚。issue
————————————————
版权声明:本文为CSDN博主「ayiya_Oese」的原创文章,遵循CC 4.0 BY-SA版权协议,转载请附上原文出处链接及本声明。
原文链接:https://blog.csdn.net/ayiya_Oese/article/details/115369068
1. 超参数
YOLOv3中的 超参数在train.py中提供,其中包含了一些数据增强参数设置,具体内容如下:
hyp = {'giou': 3.54,  # giou loss gain
       'cls': 37.4,  # cls loss gain
       'cls_pw': 1.0,  # cls BCELoss positive_weight
       'obj': 49.5,  # obj loss gain (*=img_size/320 if img_size != 320)
       'obj_pw': 1.0,  # obj BCELoss positive_weight
       'iou_t': 0.225,  # iou training threshold
       'lr0': 0.00579,  # initial learning rate (SGD=1E-3, Adam=9E-5)
       'lrf': -4.,  # final LambdaLR learning rate = lr0 * (10 ** lrf)
       'momentum': 0.937,  # SGD momentum
       'weight_decay': 0.000484,  # optimizer weight decay
       'fl_gamma': 0.5,  # focal loss gamma
       'hsv_h': 0.0138,  # image HSV-Hue augmentation (fraction)
       'hsv_s': 0.678,  # image HSV-Saturation augmentation (fraction)
       'hsv_v': 0.36,  # image HSV-Value augmentation (fraction)
       'degrees': 1.98,  # image rotation (+/- deg)
       'translate': 0.05,  # image translation (+/- fraction)
       'scale': 0.05,  # image scale (+/- gain)
       'shear': 0.641}  # image shear (+/- deg)
2. 使用方法
在训练的时候,train.py提供了一个可选参数--evolve, 这个参数决定了是否进行超参数搜索与进化(默认是不开启超参数搜索的)。
具体使用方法也很简单:
python train.py --data data/voc.data
				--cfg cfg/yolov3-tiny.cfg
				--img-size 416
				--epochs 273
				--evolve
实际使用的时候,需要进行修改,train.py中的约444行:
for _ in range(1): # generations to evolve
将其中的1修改为你想设置的迭代数,比如200代,如果不设置,结果将会如下图所示,实际上就是只有一代。

3. 原理
整个过程比较简单,对于进化过程中的新一代,都选了了适应性最高的前一代(在前几代中)进行突变。以上所有的参数将有约20%的 1-sigma的正态分布几率同时突变。
s = 0.2 # sigma
整个进化过程需要搞清楚两个点:
- 如何评判其中一代的好坏?
- 下一代如何根据上一代进行进化?
**第一个问题:**判断好坏的标准。
def fitness(x):
    w = [0.0, 0.0, 0.8, 0.2]
    # weights for [P, R, mAP, F1]@0.5
    return (x[:, :4] * w).sum(1)
YOLOv3进化部分是通过以上的适应度函数判断的,适应度越高,代表这一代的性能越好。而在适应度中,是通过Precision,Recall ,mAP,F1这四个指标作为适应度的评价标准。
其中的w是设置的加权,如果更关心mAP的值,可以提高mAP的权重;如果更关心F1,则设置更高的权重在对应的F1上。这里分配mAP权重为0.8、F1权重为0.2。
**第二个问题:**如何进行进化?
进化过程中有两个重要的参数:
第一个参数为parent, 可选值为single或者weighted,这个参数的作用是:决定如何选择上一代。如果选择single,代表只选择上一代中最好的那个。
 if parent == 'single' or len(x) == 1:
 	x = x[fitness(x).argmax()]
如果选择weighted,代表选择得分的前10个加权平均的结果作为下一代,具体操作如下:
elif parent == 'weighted':  # weighted combination
    n = min(10, len(x))  # number to merge
    x = x[np.argsort(-fitness(x))][:n]  # top n mutations
    w = fitness(x) - fitness(x).min()  # weights
    x = (x * w.reshape(n, 1)).sum(0) / w.sum()  # new parent
第二个参数为method,可选值为1,2,3, 分别代表使用三种模式来进化:
# Mutate
method = 2
s = 0.2  # 20% sigma
np.random.seed(int(time.time()))
g = np.array([1, 1, 1, 1, 1, 1, 1, 0, .1, \
              1, 0, 1, 1, 1, 1, 1, 1, 1])  # gains
# 这里的g类似加权
ng = len(g)
if method == 1:
    v = (np.random.randn(ng) *
         np.random.random() * g * s + 1) ** 2.0
elif method == 2:
    v = (np.random.randn(ng) *
         np.random.random(ng) * g * s + 1) ** 2.0
elif method == 3:
    v = np.ones(ng)
    while all(v == 1):
        # 为了防止重复,直到有变化才停下来
         r = (np.random.random(ng) < 0.1) * np.random.randn(ng)
         # 10% 的突变几率
         v = (g * s * r + 1) ** 2.0

for i, k in enumerate(hyp.keys()):
    hyp[k] = x[i + 7] * v[i]
    # 进行突变
另外,为了防止突变过程,导致参数出现明显不合理的范围,需要用一个范围进行框定,将超出范围的内容剪切掉。具体方法如下:
# Clip to limits
keys = ['lr0', 'iou_t', 'momentum',
        'weight_decay', 'hsv_s',
        'hsv_v', 'translate',
        'scale', 'fl_gamma']
limits = [(1e-5, 1e-2), (0.00, 0.70),
          (0.60, 0.98), (0, 0.001),
          (0, .9), (0, .9), (0, .9),
          (0, .9), (0, 3)]

for k, v in zip(keys, limits):
    hyp[k] = np.clip(hyp[k], v[0], v[1])
最终训练的超参数搜索的结果可视化:

参考资料:
官方issue: https://github.com/ultralytics/yolov3/issues/392
官方代码:https://github.com/ultralytics/yolov3
本文分享自微信公众号 - GiantPandaCV(BBuf233),作者:pprp
原文出处及转载信息见文内详细说明,如有侵权,请联系 yunjia_community@tencent.com 删除。
原始发表时间:2020-01-19

如果这篇文章帮助到了你,你可以请作者喝一杯咖啡


 浙公网安备 33010602011771号