高通Android UEFI XBL 代码流程分析
背景
之前学习的lk阶段点亮LCD的流程算是比较经典,但是高通已经推出了很多种基于UEFI方案的启动架构。
所以需要对这块比较新的技术进行学习。在学习之前,有必要了解一下高通UEFI启动流程。
原文(有删改):https://blog.csdn.net/Ciellee/article/details/113519478
参考文档:80_P2484_117_B_UEFI_With_XBL_On_MSM8998_SDM660_SDM
总览
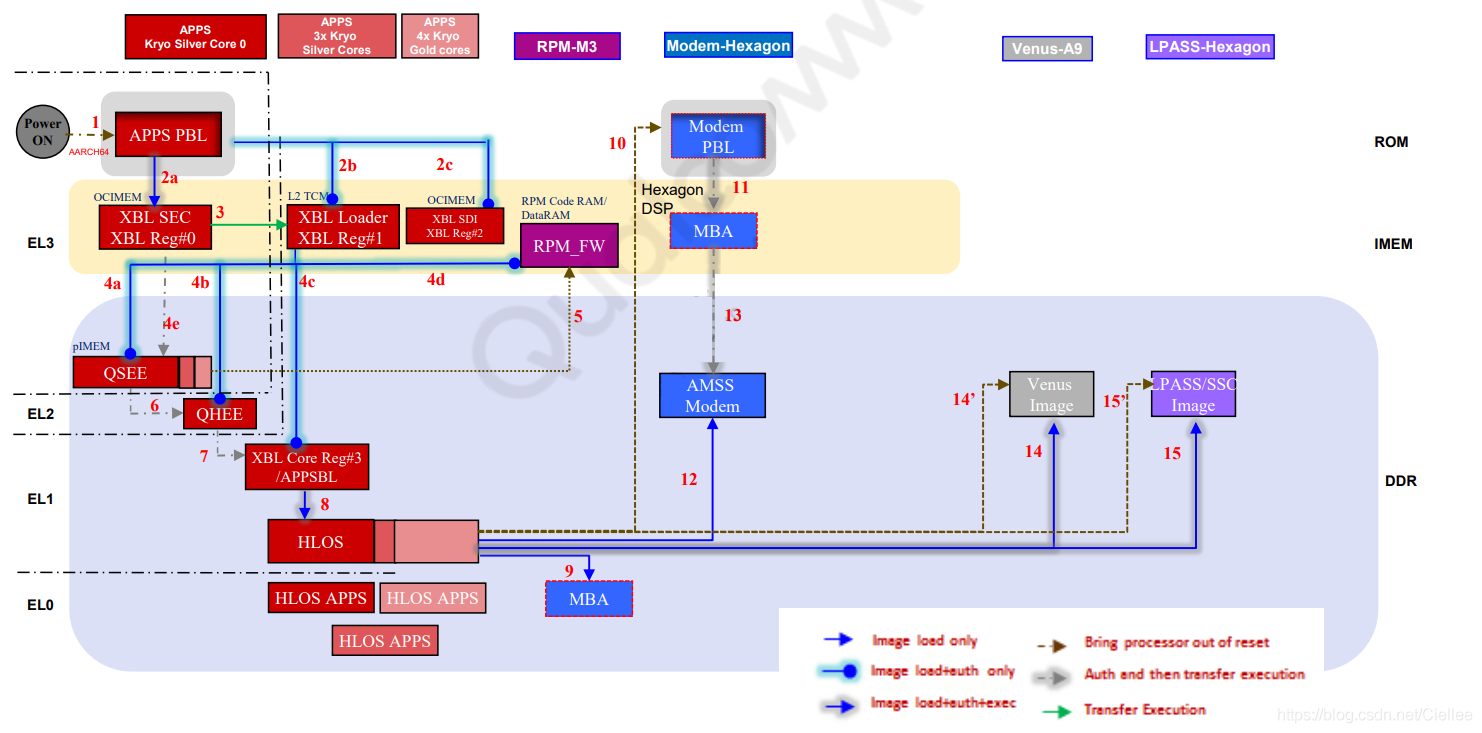
先来看下SDM660芯片冷启动的流程。可以看出,在设备上电后,先跑的是 APPS PBL,接着运行XBL SEC、XBL Loader,通过Loader引出XBL CORE APPSBL,最后进入HLOS。
我们来看下这几个涉及的模块大概功能:
1、Application primary boot loader (APPS PBL)
PBL 启动时,CPU只开启了第一个核心 CPU Core 0,运行固件在ROM中,这部分是高通写死在芯片中的固件,外部开发人员是无法修改这部份的。
主要功能为:
(1)系统安全环境的初始化,以确保后续的XBL中的APPS 能够正常运行。
(2)根据boot gpio的配置选择从什么设备启动操作系统(如 Nand,USB等)。
(3)通过检测GPIO判断是否进入Emergency Download mode,用户可以通过FILE来下载完整的系统镜像。
(4)通过L2 TCM来加载XBL1 ELF,OCIMEM 和 RPM CodeRAM 代码。
2、Extensible boot loader (XBL)
从XBL开始,跑的就是我们编译下载进eMMC/UFS的系统镜像了,在XBL中主要是初始化相关的硬件环境,及代码安全环境。
(1)初始化 Buses、DDR、Clocks、CDT,启动QSEE,QHEE,RPM_FW, XBL core images。
(2)使能memory dump through USB and Sahara(系统死机时memory dump),看门狗,RAM dump to SD support等功能。
(3)初始化 USB驱动,USB充电功能,温升检测,PMIC驱动初始化,和 DDR training模块。
3、XBL core (UEFI or LK,ABL)
XBL core,就是之前的bootloader,主要功能就是初始化display驱动,提供fastboot功能,引导进入HLOS kernel操作系统。
注意,在ABL中,同样也只有CPU Core0在工作,其他的CPU核以是在进入HLOS Kernel后才开始初始化启用的。
本文中,我们重点关注的是Extensible boot loader (XBL),主要来学学UEFI XBL架构,及UEFI XBL代码流程。
一、UEFI XBL
代码目录分析
UEFI XBL代码路径位于:BOOT.XF.1.4\boot_images\
# BOOT.XF.1.4\boot_images

ArmPkg					----> ARM 架构相关的Protocols
ArmPlatformPkg			----> ARM 开发板相关的UEFI代码
BaseTools				----> 编译EDK和EDK2相关的工具,如
EmbeddedPkg				---->
FatPkg
IntelFrameworkModulePkg
IntelFrameworkPkg
MdeModulePkg
MdePkg
QcomPkg					----> 高通定制的相关pkg,如display和usb充电都在里面
ShellPkg				----> UEFI shell 环境
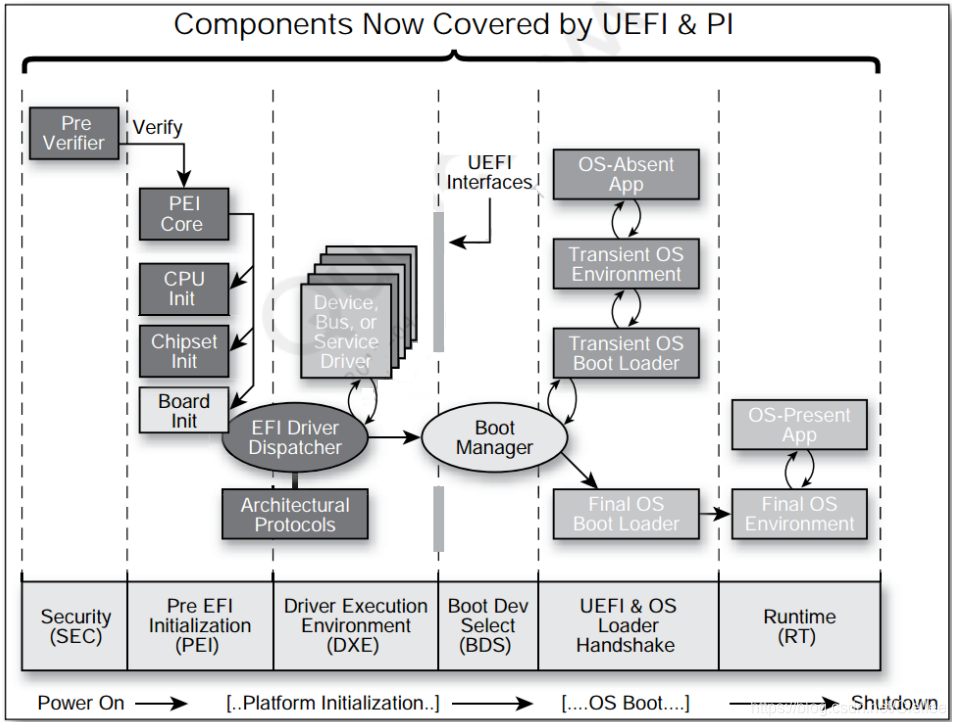
UEFI代码运行流程
从图中可以看出,UEFI代码运行流程为:
SEC(安全验证)--->PEI(EFI前期初始化)--->DXE(驱动执行环境)--->BDS(启动设备选择)--->UEFI Loader(操作系统加载前期)--->RT(Run Time)。
接下来,我们根据这个流程来分析下UEFI代码。
SEC (安全验证)
SEC的汇编代码入口位于:
BOOT.XF.1.4\boot_images\QcomPkg\XBLCore\AARCH64\ModuleEntryPoint.masm的 _ModuleEntryPoint中
入口汇编代码分析
分析看看ModuleEntryPoint.masm 这个文件
该汇编代码中,主要工作为:
1、关闭所有中断
2、关闭MMU和Caches
3、关闭TLB缓存表
4、获得当前运行的安全环境:EL1、EL2、EL3
5、初始化ELX 安全环境
6、使能 Cache
7、初始化栈
8、调用 CEntryPoint,传参 _StackBase(0x80C00000)、_StackSize(0x00040000)
#include <AsmMacroIoLibV8.h>
#include <Base.h>
#include <Library/PcdLib.h>
#include <AutoGen.h>

    AREA    |.text|,ALIGN=8,CODE,READONLY

# BOOT.XF.1.4\boot_images\QcomPkg\XBLCore\AARCH64\ModuleEntryPoint.masm
IMPORT CEntryPoint				// 导入CEntryPoint()函数
EXPORT _ModuleEntryPoint		// 输出 _ModuleEntryPoint段
IMPORT InitStackCanary			// 导入InitStackCanary()函数 初始化栈

IMPORT  ArmDisableInterrupts	// 导入ArmDisableInterrupts()函数 禁用arm 中断
IMPORT  ArmDisableCachesAndMmu  // 导入ArmDisableCachesAndMmu()函数 禁用cache, mmu
IMPORT  ArmWriteCptr
IMPORT  ArmWriteHcr
IMPORT  ArmWriteVBar

EXPORT _StackBase 				// 输出栈起始地址,起始地址为:0x80C00000
EXPORT _StackSize				// 输出栈大小,栈大小为 0x00040000,256k
EXPORT CNTFRQ 					// 输出时钟频率,19200000

//定义于: BOOT.XF.1.4\boot_images\QcomPkg\Sdm660Pkg\Common\Sdm660Pkg_Loader.dsc
_StackBase
  dcq FixedPcdGet64(PcdPrePiStackBase)

_StackSize
  dcq FixedPcdGet64(PcdPrePiStackSize)

CNTFRQ
  dcq FixedPcdGet32(PcdArmArchTimerFreqInHz)

_ModuleEntryPoint
  mov x0, #0
  // 1、关闭所有中断	 /* First ensure all interrupts are disabled */
  bl ArmDisableInterrupts

  // 2、关闭MMU和Caches	 /* Ensure that the MMU and caches are off */
  bl ArmDisableCachesAndMmu

  // 3、关闭TLB缓存表	 /* Invalidate Instruction Cache and TLB */
  bl ArmInvalidateInstructionCache
  bl ArmInvalidateTlb
  // 4、获得当前运行的安全环境:EL1、EL2、EL3
  /* Get current EL in x0 */
  EL1_OR_EL2_OR_EL3(x0)
  // CurrentEL : 0xC = EL3; 8 = EL2; 4 = EL1
  // This only selects between EL1 and EL2 and EL3, else we die.
  // Provide the Macro with a safe temp xreg to use.
        //mrs    x0, CurrentEL
        cmp    x0, #0xC			// 比较 x0寄存器是否为 0xc,如果是跳转到 标签3
        beq   %F3
        cmp    x0, #0x8			// 比较 x0寄存器是否为 0x8,如果是跳转到 标签2
        beq   %F2
        cmp    x0, #0x4			// 比较 x0寄存器是否为 0x4
        bne   、                   // We should never get here
// EL1 code starts here

1  beq _Start
2  beq _Start					// 如果当前是 EL2,直接跳转到_Start
  /* Do not trap any access to Floating Point and Advanced SIMD in EL3、*/
  /* Note this works only in EL3, x0 has current EL mode */
3  mov x0, #0
  bl ArmWriteCptr				// 如果当前是 EL3,直接跳转到ArmWriteCptr
  // msr cptr_el3, x0  // EL3 Coprocessor Trap Reg (CPTR)

// 5、初始化ELX 安全环境
_SetupELx
  mov x0, #0x30           /* RES1 */				// x0 = 0x30
  orr x0, x0, #(1 << 0)   /* Non-secure bit */		// 使能第0位为1
  orr x0, x0, #(1 << 8)   /* HVC enable */			// 使能第8位为1
  orr x0, x0, #(1 << 10)  /* 64-bit EL2 */			// 使能第10位为1
  msr scr_el3, x0									// 配置通用寄存器 scr_el3 为-
  msr cptr_el3, xzr       /* Disable copro、traps to EL3 */
  ldr x0, CNTFRQ
  //msr cntfrq_el0, x0
  msr sctlr_el2, xzr
  .......省略一部分代码.......
// 6、使能 Cache
_EnableCache
#ifdef PRE_SIL
  LoadConstantToReg (FixedPcdGet32(PcdSkipEarlyCacheMaint), x0)
  cmn x0, #0
  b.ne _PrepareArguments
#endif
  bl ArmInvalidateDataCache
  bl ArmEnableInstructionCache
  bl ArmEnableDataCache
// 7、初始化栈
_PrepareArguments
  /* Initialize Stack Canary */
  bl InitStackCanary
// 8、调用 CEntryPoint,传参 _StackBase(0x80C00000)、_StackSize(0x00040000)
  /* x0 = _StackBase and x1 = _StackSize */
  ldr x0, _StackBase     /* Stack base arg0 */
  ldr x1, _StackSize     /* Stack size arg1 */
  bl CEntryPoint
初始化C运行环境
前面汇编代码中主要目的是初始化C运行环境,初始化栈,以便可以调C代码运行。
SEC的C代码入口位于: BOOT.XF.1.4\boot_images\QcomPkg\XBLCore\Sec.c的 CEntryPoint 中
/**  Entry point
  @param  StackBase       pointer to the stack base
  @param  StackSize       stack size
**/
VOID CEntryPoint (IN  VOID  *StackBase,IN  UINTN StackSize){
  UefiDebugModeEntry();		// 如果支待jtag调试的话,此处会循环等待,直到debug指向的地址匹配
  TargetEarlyInit()
  Main (StackBase, StackSize);	//进入main函数,传参 _StackBase(0x80C00000)、_StackSize(0x00040000)
}
接下来,我们进入 main函数分析下:
VOID Main (IN  VOID  *StackBase, IN  UINTN StackSize){
  // 1、获得fdf文件所在的地址,fdf可以说是UEFI的配置文件,
  // 在fdf文件中包含所有的inf文件所在路径,及相关的bmp图片资源路径,以及相关的cfg配置文件路径。
  // ## FD Base offset (refer to .fdf for FD size)
  UefiFdBase = FixedPcdGet64(PcdEmbeddedFdBaseAddress);		// 0x80200000

  SecHeapMemBase = UefiFdBase + SEC_HEAP_MEM_OFFSET;		// 0x300000
  HobStackSize = StackSize;
  // 2、初始化栈
  InitStackCanary();
  // 3、启动定时器周期计数
  StartCyclCounter ();
  // 4、初始化UART,主要是serial port端口初始化,及 serial buffer初始化  /* Start UART debug output */
  UartInit();
  // 5、打印"UEFI Start" 串口信息
  PrintUefiStartInfo();
  // 6、初始化CPU异常处理入口
  InitializeCpuExceptionHandlers (NULL);
  // 7、打印从开机到现在的时间差
  PrintTimerDelta();
  // 8、如果支持的话,启动程序流预测 /* Enable program flow prediction, if supported */
  ArmEnableBranchPrediction ();
  // 9、/* Initialize Info Block */
  UefiInfoBlkPtr = InitInfoBlock (UefiFdBase + UEFI_INFO_BLK_OFFSET);
  UefiInfoBlkPtr->StackBase = StackBase;
  UefiInfoBlkPtr->StackSize = StackSize;
  // 10、初始化 RAM 分区表,起始地址0x80000000,内存大小512M,检查地址是否非法,是否可正常访问
  InitRamPartitionTableLib ();
  ValidateFdRegion(UefiFdBase);

  //TODO: Move this to ACPI-specific location
  InitializeFBPT();

  /* Get nibble from random value to adjust SEC heap */
  SecHeapAslrVal = AslrAdjustRNGVal(ASLR_HEAP_RNG_BITS);
  // 11、初始化hoblist,有关hob可参考:https://blog.csdn.net/z190814412/article/details/85330324
  InitHobList(SecHeapMemBase,SEC_HEAP_MEM_SIZE - (SecHeapAslrVal*ASLR_HEAP_ALIGN), UefiInfoBlkPtr);
  /* Add the FVs to the hob list */
  BuildFvHob (PcdGet64(PcdFlashFvMainBase), PcdGet64(PcdFlashFvMainSize));
  // 12、打印RAM 分区信息
  /* Should be done after we have setup HOB for memory allocation  */
  PrintRamPartitions ();
  // 13、初始化cache
  Status = EarlyCacheInit (UefiFdBase, UEFI_FD_SIZE);

  // 14、加载并解析 uefiplat.cfg平台配置文件,/* Load and Parse platform cfg file, cache re-initialized per cfg file */
  Status = LoadAndParsePlatformCfg();

  // 15、更新系统内存区相关信息 /* Add information from all other memory banks */
  Status = UpdateSystemMemoryRegions();
  Status = InitCacheWithMemoryRegions();

  // 16、初始化所有的共享库 /* All shared lib related initialization */
  // 初始化的lib源码位于 BOOT.XF.1.4\boot_images\QcomPkg\Sdm660Pkg\Library\
  // 配置文件位于 BOOT.XF.1.4\boot_images\QcomPkg\Sdm660Pkg\LA\Sdm660Pkg_Core.dsc
  Status = InitSharedLibs();
  InitDbiDump();

  // 17、获得DXE Heap堆内存信息,/* Look for "DXE Heap" memory region in config file */
  Status = GetMemRegionInfoByName("DXE Heap", &DxeHeapMemInfo);
  /* Get nibble from random value to adjust DXE heap */
  DxeHeapAslrVal = AslrAdjustRNGVal(ASLR_HEAP_RNG_BITS);

  /* Re-initialize HOB to point to the DXE Heap in CFG */
  ReInitHobList(DxeHeapMemInfo.MemBase,
                DxeHeapMemInfo.MemSize - (DxeHeapAslrVal*ASLR_HEAP_ALIGN),
                UefiInfoBlkPtr);
  // 18、初始化分页池缓存区
  /* Now we have access to bigger pool, move pre-pi memory allocation pool to it */
  ReInitPagePoolBuffer ();
  // 19、创建Stack、CPU Hob信息
  BuildStackHob ((EFI_PHYSICAL_ADDRESS)StackBase, HobStackSize);
  BuildCpuHob (PcdGet8 (PcdPrePiCpuMemorySize), PcdGet8 (PcdPrePiCpuIoSize));
  // 20、打印早期信息
  DisplayEarlyInfo();

  AddMemRegionHobs ();

  /* Start perf here, after timer init, start at current tick value */
  InitPerf();

  /* SEC phase needs to run library constructors by hand */
  ExtractGuidedSectionLibConstructor ();
  LzmaDecompressLibConstructor ();
  ZlibDecompressLibConstructor ();

  /* Build HOBs to pass up our Version of stuff the DXE Core needs to save space */
  BuildPeCoffLoaderHob ();
  BuildExtractSectionHob (
    &gLzmaCustomDecompressGuid,
    LzmaGuidedSectionGetInfo,
    LzmaGuidedSectionExtraction
    );

  BuildExtractSectionHob (
    &gZlibDecompressGuid,
    ZlibGuidedSectionGetInfo,
    ZlibGuidedSectionDecompress
    );
  /* Check PRODMODE flag */
  ProdmodeInfo = PRODMODE_ENABLED;
  /* Build HOB to pass up prodmode info for security applications */
  BuildGuidDataHob (&gQcomProdmodeInfoGuid, &ProdmodeInfo, sizeof(BOOLEAN));
  UefiStartTime = ConvertTimerCountms(gUEFIStartCounter);
  BuildGuidDataHob (&gEfiStartTimeHobGuid, &UefiStartTime, sizeof(UINT32));


  /* Assume the FV that contains the SEC (our code) also contains a compressed FV */
  DecompressFirstFv ();

  /* Any non-critical initialization */
  TargetLateInit();

  /* Build memory allocation HOB for FV2 type
     Need to remove for decompressed image */
  BuildMemHobForFv(EFI_HOB_TYPE_FV2);

  /* Load the DXE Core and transfer control to it */
  LoadDxeCoreFromFv (NULL, 0);

  /* DXE Core should always load and never return */
  ASSERT (FALSE);
  CpuDeadLoop();
}
1、获得fdf文件所在的地址,
在fdf文件中包含所有的inf文件所在路径,及相关的bmp图片资源路径,以及相关的cfg配置文件路径。
fdf可以说是UEFI的配置文件。
2、初始化栈
3、启动定时器周期计数
4、初始化UART,主要是serial port端口初始化,及 serial buffer初始化
5、打印"UEFI Start" 串口信息
6、初始化CPU异常处理入口
7、打印从开机到现在的时间差
8、如果支持的话,启动程序流预测 /* Enable program flow prediction, if supported */
9、Initialize Info Block
10、初始化 RAM 分区表,起始地址0x80000000,内存大小512M,检查地址是否非法,是否可正常访问
11、初始化hoblist,有关hob可参考:https://blog.csdn.net/z190814412/article/details/85330324
12、打印RAM 分区信息
13、初始化cache
14、加载并解析 uefiplat.cfg平台配置文件
15、更新系统内存区相关信息 /* Add information from all other memory banks */
16、初始化所有的共享库 /* All shared lib related initialization */
初始化的lib源码位于 BOOT.XF.1.4\boot_images\QcomPkg\Sdm660Pkg\Library
配置文件位于 BOOT.XF.1.4\boot_images\QcomPkg\Sdm660Pkg\LA\Sdm660Pkg_Core.dsc
17、获得DXE Heap堆内存信息,/* Look for “DXE Heap” memory region in config file */
18、初始化分页池缓存区
19、创建Stack、CPU Hob信息
20、打印早期信息
PEI (EFI前期初始化)
BOOT.XF.1.4\boot_images\MdeModulePkg\Core\Pei\PeiMain\PeiMain.c的 PeiCore 函数中
DXE (驱动执行环境)
DXE的加载位置在:
BOOT.XF.1.4\boot_images\EmbeddedPkg\Library\PrePiLib\PrePiLib.c的 LoadDxeCoreFromFv中
DXE的入口代码位于:
BOOT.XF.1.4\boot_images\MdeModulePkg\Core\Dxe\DxeMain\DxeMain.c的 DxeMain中
BDS (启动设备选择)
代码位于:
BOOT.XF.1.4\boot_images\QcomPkg\Drivers\BdsDxe\BdsEntry.c 的 BdsEntry 中
代码位于:
BOOT.XF.1.4\boot_images\QcomPkg\Drivers\QcomBds\QcomBds.c 的 BdsEntry 中
XBL Loader
代码位于:
BOOT.XF.1.4\boot_images\QcomPkg\XBLLoader\boot_loader.c
RT(Run Time)
代码位于:
BOOT.XF.1.4\boot_images\MdeModulePkg\Core\RuntimeDxe\Runtime.c的 RuntimeDriverInitialize 中
若在页首无特别声明,本篇文章由 Schips 经过整理后发布。
博客地址:https://www.cnblogs.com/schips/

 浙公网安备 33010602011771号