Java 设计模式--策略模式,枚举+工厂方法实现
如果项目中的一个页面跳转功能存在10个以上的if else判断,想要做一下整改
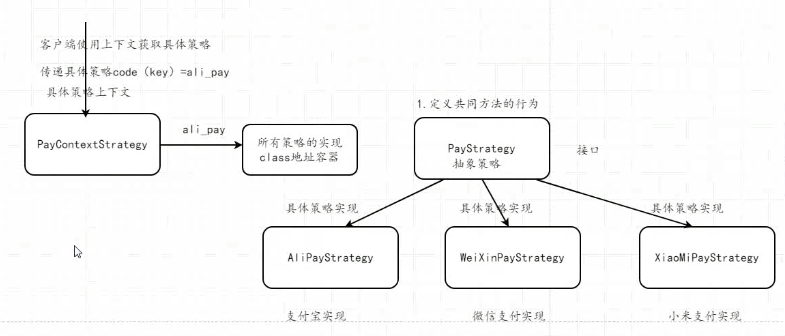
一、什么是策略模式
策略模式是对算法的包装,是把使用算法的责任和算法本身分割开来,委派给不同的对象管理,最终可以实现解决多重If判断问题。
1.环境(Context)角色:持有一个Strategy的引用。
2.抽象策略(Strategy)角色:这是一个抽象角色,通常由一个接口或抽象类实现。此角色给出所有的具体策略类所需的接口。
3.具体策略(ConcreteStrategy)角色:包装了相关的算法或行为。
(定义策略接口→实现不同的策略类→利用多态或其他方式调用策略。)
二、策略模式优缺点
优点:
算法可以自由切换(高层屏蔽算法,角色自由切换)
避免使用多重条件判断(如果算法过多就会出现很多相同的判断,很难维护)
扩展性好(可自由添加取消算法,而不影响整个功能)
缺点:
策略数量增多(每一个策略类复用性小,如果需要增加算法,就只能新增类)
所有的策略类都需要对外暴露(使用的人必须了解使用策略,这个就需要其他模式来补充,比如工厂模式、代理模式)
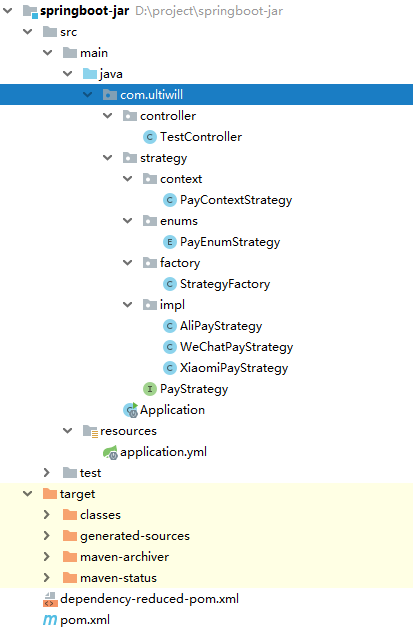
三、代码示例
1.定义共同的方法和行为
package com.ultiwill.strategy;

public interface PayStrategy {

    /**
     * 共同的行为方法
     * @return
     */
    String toPayHtml();

}
2. 三种具体策略的实现 (阿里支付, 微信支付, 小米支付)
package com.ultiwill.strategy.impl;
import com.ultiwill.strategy.PayStrategy;
/**
* @author chong.zuo
* @date 2020/9/24 15:21
*/
public class AliPayStrategy implements PayStrategy {
@Override
public String toPayHtml() {
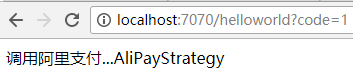
return "调用阿里支付...AliPayStrategy";
}
}
package com.ultiwill.strategy.impl;
import com.ultiwill.strategy.PayStrategy;
/**
* @author chong.zuo
* @date 2020/9/24 15:29
*/
public class WeChatPayStrategy implements PayStrategy {
@Override
public String toPayHtml() {
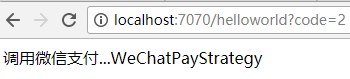
return "调用微信支付...WeChatPayStrategy";
}
}
package com.ultiwill.strategy.impl;

import com.ultiwill.strategy.PayStrategy;

/**
 * @author chong.zuo
 * @date 2020/9/24 15:34
 */
public class XiaomiPayStrategy implements PayStrategy {
    @Override
    public String toPayHtml() {
        return "调用小米支付...XiaomiPayStrategy";
    }
}
3. 枚举类定义映射地址
package com.ultiwill.strategy.enums;

import org.apache.commons.lang.StringUtils;

/**
 * 枚举
 * @author chong.zuo
 * @date 2020/9/24 15:45
 */
public enum PayEnumStrategy {
    /**
     * 阿里支付
     */
    ALI_PAY("1","com.ultiwill.strategy.impl.AliPayStrategy"),
    /**
     * 微信支付
     */
    WECHAT_PAY("2","com.ultiwill.strategy.impl.WeChatPayStrategy"),
    /**
     * 小米支付
     */
    XIAOMI_PAY("3","com.ultiwill.strategy.impl.XiaomiPayStrategy");


    private String code;
    private String className;

    PayEnumStrategy() {
    }

    PayEnumStrategy(String code, String className) {
        this.code = code;
        this.className = className;
    }

    public static String getClassNameByCode(String code) {
        String className = "";
        if (StringUtils.isEmpty(code)) {
            return className;
        }

        for (PayEnumStrategy e : PayEnumStrategy.values()) {
            if (e.code.equalsIgnoreCase(code)) {
                className = e.className;
                break;
            }
        }
        return className;
    }

    public String getCode() {
        return code;
    }

    public String getClassName() {
        return className;
    }

}
4.工厂类反射执行
package com.ultiwill.strategy.factory;

import com.ultiwill.strategy.PayStrategy;
import com.ultiwill.strategy.enums.PayEnumStrategy;

/**
 * @author chong.zuo
 * @date 2020/9/24 16:10
 */
public class StrategyFactory {

    /**
     * 使用策略工厂获取具体策略实现
     * @param code
     * @return
     */
    public static PayStrategy getPayStrategy(String code) {
        try {
            return (PayStrategy) Class.forName(PayEnumStrategy.getClassNameByCode(code)).newInstance();
        } catch (InstantiationException e) {
            e.printStackTrace();
        } catch (IllegalAccessException e) {
            e.printStackTrace();
        } catch (ClassNotFoundException e) {
            e.printStackTrace();
        }
        return null;
    }
}
5.上下文获取具体策略
package com.ultiwill.strategy.context;

import com.ultiwill.strategy.PayStrategy;
import com.ultiwill.strategy.enums.PayEnumStrategy;
import com.ultiwill.strategy.factory.StrategyFactory;
import org.apache.commons.lang.StringUtils;

/**
 * 上下文
 *
 * @author chong.zuo
 * @date 2020/9/24 15:41
 */
public class PayContextStrategy {

    /**
     * 获取具体的策略实现
     *
     * @param code
     * @return
     */
    public static String toPayHtml(String code) {
        if (StringUtils.isBlank(code)) {
            return "code不能为空...";
        }
        PayStrategy payStrategy = StrategyFactory.getPayStrategy(code);
        if (payStrategy == null) {
            return "没有找到具体的策略...";
        }
        return payStrategy.toPayHtml();
    }
}
四、测试
controller:
package com.ultiwill.controller;

import com.ultiwill.strategy.context.PayContextStrategy;
import org.springframework.web.bind.annotation.RequestMapping;
import org.springframework.web.bind.annotation.RestController;

/**
 * @author c
 * @date 2020/5/14 9:59
 */
@RestController
public class TestController {

    @RequestMapping("/helloworld")
    public String hello(String code) {
        return PayContextStrategy.toPayHtml(code);
        /*if ("0".equals(code)) {
            return "调用阿里支付...AliPayStrategy";
        } else if ("1".equals(code)) {
            return "调用微信支付...AliPayStrategy";
        } else if ("2".equals(code)) {
            return "调用小米支付...AliPayStrategy";
        }
        return "调用接口不存在";
        */
    }

}
pom:
<?xml version="1.0" encoding="UTF-8"?>
<project xmlns="http://maven.apache.org/POM/4.0.0"
         xmlns:xsi="http://www.w3.org/2001/XMLSchema-instance"
         xsi:schemaLocation="http://maven.apache.org/POM/4.0.0 http://maven.apache.org/xsd/maven-4.0.0.xsd">
    <modelVersion>4.0.0</modelVersion>

    <groupId>com.ultiwill</groupId>
    <artifactId>springboot-jar</artifactId>
    <version>1.0-SNAPSHOT</version>
    <packaging>jar</packaging>


    <dependencies>
        <dependency>
            <groupId>org.springframework.boot</groupId>
            <artifactId>spring-boot-starter-tomcat</artifactId>
            <version>2.1.8.RELEASE</version>
        </dependency>

        <dependency>
            <groupId>org.springframework.boot</groupId>
            <artifactId>spring-boot-starter-actuator</artifactId>
            <version>2.1.8.RELEASE</version>
        </dependency>

        <dependency>
            <groupId>org.springframework.boot</groupId>
            <artifactId>spring-boot-starter-web</artifactId>
            <version>2.1.8.RELEASE</version>
        </dependency>

        <dependency>
            <groupId>commons-lang</groupId>
            <artifactId>commons-lang</artifactId>
            <version>2.6</version>
        </dependency>

    </dependencies>

    <build>
        <plugins>
            <plugin>
                <groupId>org.apache.maven.plugins</groupId>
                <artifactId>maven-compiler-plugin</artifactId>
                <configuration>
                    <source>1.8</source>
                    <target>1.8</target>
                    <encoding>UTF-8</encoding>
                </configuration>
            </plugin>
            <plugin>
                <groupId>org.springframework.boot</groupId>
                <artifactId>spring-boot-maven-plugin</artifactId>
                <version>2.1.8.RELEASE</version>
                <configuration>
                    <includeSystemScope>true</includeSystemScope>
                    <mainClass>com.ultiwill.Application</mainClass>
                </configuration>
                <executions>
                    <execution>
                        <goals>
                            <goal>repackage</goal>
                        </goals>
                    </execution>
                </executions>
            </plugin>
        </plugins>
    </build>


</project>
五、结果
六、在spring中通过Autowired注解实现策略模式
使用AutowireCapableBeanFactory手动注入
使用.newInstance();创建对象的话,如果其他对象都使用Spring Autowired,还需要手动创建所有依赖的Bean:
private @Autowired AutowireCapableBeanFactory beanFactory;

public void process() {
  MyBean obj = new MyBean();
  beanFactory.autowireBean(obj);
  // obj will now have its dependencies autowired.
}
本例中可以使用
private @Autowired AutowireCapableBeanFactory beanFactory;
    /**
     * 使用策略工厂获取具体策略实现
     * @param code
     * @return
     */
    public  PayStrategy getPayStrategy(String code) {
        String className = PayEnumStrategy.getClassNameByCode(code);
        try {
            PayStrategy str = (PayStrategy) Class.forName(className).getDeclaredConstructor().newInstance();
            beanFactory.autowireBean(str);
            return str;
        } catch (InstantiationException |
                NoSuchMethodException |
                ClassNotFoundException |
                IllegalAccessException |
                InvocationTargetException e) {
            e.printStackTrace();
        }
       return null;
    }
使用Map<String,?> 自动注入
先附上如下的代码:
public interface TalkService {
    void talk(String content);
}
@Service(value = "withSisterTalkService")
public class WithSisterTalkService implements TalkService {
    @Override
    public void talk(String content) {
        System.out.println(this.getClass().getName() + ":" + content);
    }
}
@Service(value = "withGirlFriendTalkService")
public class WithGirlFriendTalkService implements TalkService {
    @Override
    public void talk(String content) {
        System.out.println(this.getClass().getName() + ":" + content);
    }
}
@Service
public class TalkServiceStrategyContext implements TalkService {

    private Map<String, TalkService> strategyMap = new ConcurrentHashMap<>();

    @Autowired
    public TalkServiceStrategyContext(Map<String, TalkService> strategyMap) {
        this.strategyMap.clear();
        this.strategyMap.putAll(strategyMap);
    }

    @Override
    public void talk(String content) {

    }

}
注意,这里必须是Map<String, TalkService>类型!
@Autowired
private Map<String, TalkService> talkServiceMap;

    @GetMapping(value = "doTest")
    public String doTest() {
        Set<String> strings = talkServiceMap.keySet();
        for (String string : strings) {
            System.out.println(string + ":" + talkServiceMap.get(string).toString());
        }
        return this.getClass().getName();
    }
其访问测试controller后,打印的信息如下:
talkServiceStrategyContext:com.haiyang.onlinejava.complier.service.impl.TalkServiceStrategyContext@2f0b1419
withGirlFriendTalkService:com.haiyang.onlinejava.complier.service.impl.WithGirlFriendTalkService@1cf19a02
withSisterTalkService:com.haiyang.onlinejava.complier.service.impl.WithSisterTalkService@1ef3c76d
看了后感觉很奇怪,在上方只定义了一个map<String,TalkService>的map,居然它就能自动找到实现了TalkService的所有bean,并将service的beanName作为了key,感觉还是牛逼啊,spring的注解居然还能这样用。
然后简单看了下Autowired的源码,其javaDoc文档里也有说明:
package org.springframework.beans.factory.annotation;

import java.lang.annotation.Documented;
import java.lang.annotation.ElementType;
import java.lang.annotation.Retention;
import java.lang.annotation.RetentionPolicy;
import java.lang.annotation.Target;

/**

 * Marks a constructor, field, setter method or config method as to be

 * autowired by Spring's dependency injection facilities.
   *

 * <p>Only one constructor (at max) of any given bean class may carry this

 * annotation, indicating the constructor to autowire when used as a Spring

 * bean. Such a constructor does not have to be public.
   *

 * <p>Fields are injected right after construction of a bean, before any

 * config methods are invoked. Such a config field does not have to be public.
   *

 * <p>Config methods may have an arbitrary name and any number of arguments;

 * each of those arguments will be autowired with a matching bean in the

 * Spring container. Bean property setter methods are effectively just

 * a special case of such a general config method. Such config methods

 * do not have to be public.
   *

 * <p>In the case of multiple argument methods, the 'required' parameter is

 * applicable for all arguments.
   *

 * <p>In case of a {@link java.util.Collection} or {@link java.util.Map}

 * dependency type, the container will autowire all beans matching the

 * declared value type. In case of a Map, the keys must be declared as

 * type String and will be resolved to the corresponding bean names.
   *

 * <p>Note that actual injection is performed through a

 * {@link org.springframework.beans.factory.config.BeanPostProcessor

 * BeanPostProcessor} which in turn means that you <em>cannot</em>

 * use {@code @Autowired} to inject references into

 * {@link org.springframework.beans.factory.config.BeanPostProcessor

 * BeanPostProcessor} or

 * {@link org.springframework.beans.factory.config.BeanFactoryPostProcessor BeanFactoryPostProcessor}

 * types. Please consult the javadoc for the {@link AutowiredAnnotationBeanPostProcessor}

 * class (which, by default, checks for the presence of this annotation).
   *

 * @author Juergen Hoeller

 * @author Mark Fisher

 * @since 2.5

 * @see AutowiredAnnotationBeanPostProcessor

 * @see Qualifier

 * @see Value
   */
   @Target({ElementType.CONSTRUCTOR, ElementType.METHOD, ElementType.PARAMETER, ElementType.FIELD, ElementType.ANNOTATION_TYPE})
   @Retention(RetentionPolicy.RUNTIME)
   @Documented
   public @interface Autowired {

   /**

    * Declares whether the annotated dependency is required.

    * <p>Defaults to {@code true}.
      */
      boolean required() default true;

}
关注这句:
In case of a java.util.Collection or java.util.Map dependency type, the container will autowire all beans matching the declared value type. In case of a Map, the keys must be declared as type String and will be resolved to the corresponding bean names.
它大致是说Autowired当使用在Collection里时,会将所申明类的所有实现类都放在那个指定的Collection里;
如果Autowired和map使用的话呢,它将它bean的名称作为key,所有的bean作为value.
使用Set<?>自动注入
如果不想使用bean的名字作为map的Key的话,我们可以自定义寻址方式,自动注入时候使用Set<?>:
public interface Strategy {
    void doStuff();
    StrategyName getStrategyName();
}
public enum StrategyName {
  StrategyA,
  StrategyB,
  StrategyC
}
@Component
public class StrategyA  implements Strategy{
  @Override
  public void doStuff() {
      //implement algorithm A here
  }
  @Override
  public StrategyName getStrategyName() {
    return StrategyName.StrategyA;
  }
}
@Component
public class StrategyB  implements Strategy{
  @Override
  public void doStuff() {
     //implement algorithm B here
   }
  @Override
  public StrategyName getStrategyName() {
     return StrategyName.StrategyB;
  }
}
@Component
public class StrategyC  implements Strategy{
  @Override
  public void doStuff() {
  }
  @Override
  public StrategyName getStrategyName() {
    return StrategyName.StrategyC;
  }
}
import java.util.HashMap;
import java.util.Map;
import java.util.Set;
import org.springframework.stereotype.Component;
@Component
public class StrategyFactory {
  private Map<StrategyName, Strategy> strategies;

  @Autowired
  public StrategyFactory(Set<Strategy> strategySet) {
     createStrategy(strategySet);
  }

  public Strategy findStrategy(StrategyName strategyName) {
     return strategies.get(strategyName);
  }
  private void createStrategy(Set<Strategy> strategySet) {
      strategies = new HashMap<StrategyName, Strategy>();
      strategySet.forEach(
   strategy ->strategies.put(strategy.getStrategyName(), strategy));
}
}
Now we can inject StrategyFactory using @Autowired annotation. Here is the sample code using our StrategyFactory.
import org.springframework.beans.factory.annotation.Autowired;
import org.springframework.stereotype.Service;
@Service
public class SomeService {
  @Autowired
  private StrategyFactory strategyFactory;
public void findSome(){

 // Now get the strategy by passing the name
 Strategy strategy = strategyFactory.findStrategy(StrategyName.StrategyA);
   // you can now call the methods defined in strategy.
    strategy.doStuff();
  }
}

 浙公网安备 33010602011771号