
ISTIO 学习笔记(一)之 安装
一、背景
serviceMesh 目前 在服务治理方面 作为新兴技术 已逐步被使用,其对应的 产品为 Istio。
二、部署
1、前提条件
在物理服务器上或虚拟机中部署好 kubernetes集群。 (参考:kubernetes 学习笔记之安装)
2、部署 Istio
Istio目前最新版本为1.7.3,但是由于1.7.3提供的 demo profile 不支持默认安装 grafana、kiali、prometheus、tracing 等第三方组件,但 1.6.12支持,且1.6.12和1.7.3 在架构上是一致的,所以选择安装1.6.12。
(1) 下载包
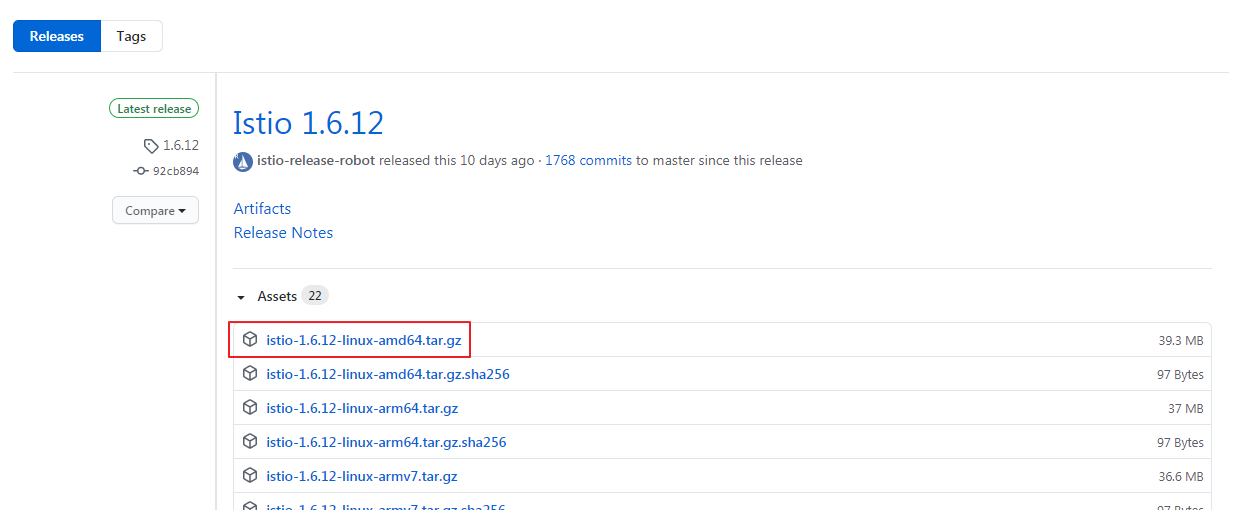
在 https://github.com/istio/istio/releases 中下载
(2) 配置 istioctl
将istio-1.6.12-linux-amd64.tar.gz上传到安装kubernetes集群的物理机或虚拟机上,执行以下命令。
#切换到包所在目录

cd /root/wf

#解压包

tar -zxvf  istio-1.6.12-linux-amd64.tar.gz

#重命名

mv istio-1.6.12 istio

#添加环境变量

vi /etc/profile

export PATH=/root/wf/istio/bin:$PATH

#修改的环境变量生效

source /etc/profile

#验证istioctl命令是否存在

istioctl
(3) 安装 istio
a) 查看 profile demo
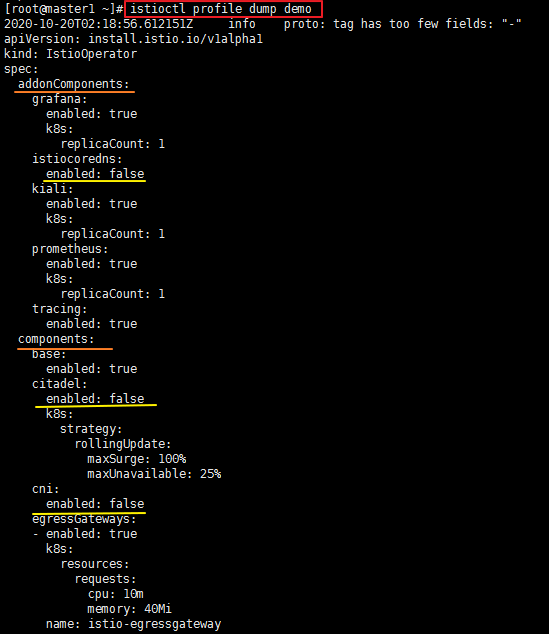
说明:
- addonComponents:表示要安装的第三方组件,这里显示:istiocoredns不默认安装,grafana\kiali\prometheus\tracing默认安装;
- components:表示istio内部组件,这里显示,citadel\cni不默认安装。
b) 执行部署命令
为了最大限度的能够使用istio的特性功能,这里选择安装所有支持的addonComponents及components。
istioctl manifest apply --set profile=demo --set addonComponents.istiocoredns.enabled=true --set components.citadel.enabled=true --set components.cni.enabled=true

c) 配置 kiali kubernetes 集群外可访问
- 在kubernetes中创建gateway及vritualservice,文件信息如下:
apiVersion: networking.istio.io/v1alpha3
kind: VirtualService
metadata:
  name: kiali
  namespace: istio-system
spec:
  gateways:
  - kiali-gateway  #该虚拟服务的路由规则适用于流入kiali-gateway网关的流量
  hosts:
  - "*"
  http:
  - match:
    - uri:
        prefix: /
    route:
    - destination:
        host: kiali
        port:
          number: 20001
---
apiVersion: networking.istio.io/v1alpha3
kind: Gateway
metadata:
  name: kiali-gateway
  namespace: istio-system
spec:
  selector:
    istio: ingressgateway   #使用 istio 提供的 ingressgateway服务
  servers:
  - port:
      number: 80
      name: http
      protocol: HTTP
    hosts:
          - "*"
- gateway 及 vritualservice(PS:其实vritualservice可以直接用于所有集群入口流量路由的配置)
#部署gateway\virtualservice
kubectl apply -f /root/wf/docker/kiali-virtualservice.yaml
#查看istio-system 安装的 istio-ingressgateway 对外提供的访问端口
kubectl get svc -n istio-system
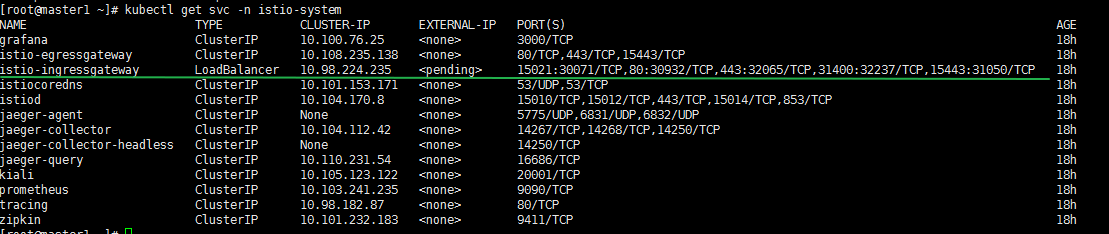
图中显示 istio-ingressgateway 80 对外对应的端口为 30932
- 在浏览器中输入 http://x.x.x.x:30932/ 访问kiali,账号为:admin/admin
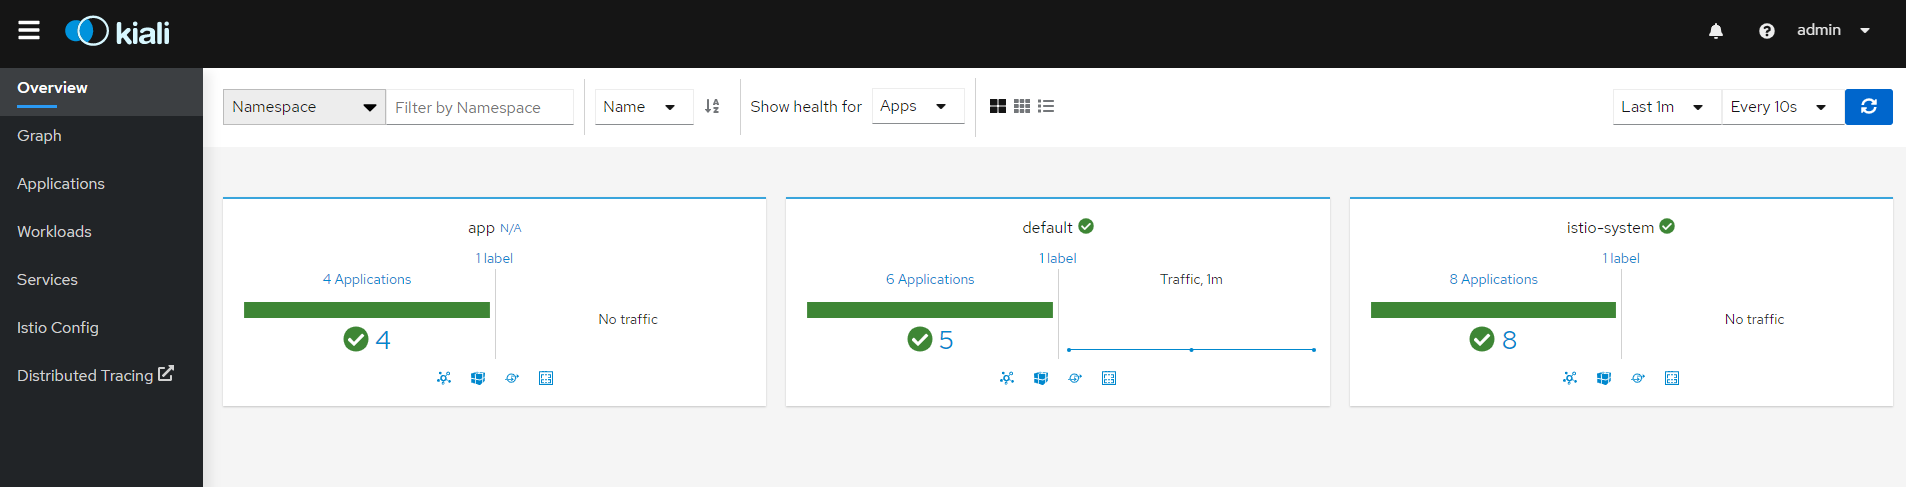
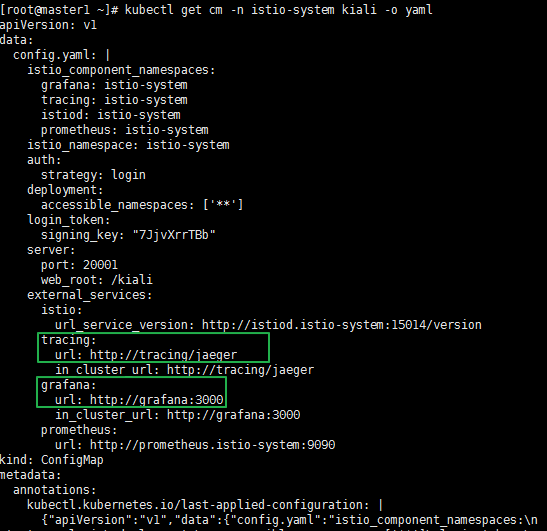
- 配置 grafana 到 kiali 中
#查看kiali的configmap内容,其实可以看到kiali挂载的配置文件config.yaml 中grafana.url值为空
kubectl get cm -n istio-system kiali -o yaml
#编辑configmap
kubectl edit cm –n istio-system kiali

配置完成后,可以在services/workload下的 Inbound Metrics/ Outbound Metrics 看到内容。
(3) 部署 bookinfo 示例程序
- 部署
#查看集群中所有的命名空间
kubectl get namespaces
#查看default命名空间的信息
kubectl describe ns default
#给default命名空间添加标签,该标签添加成功则部署在该命名空间中的pod会自动注入sidecar容器
kubectl label namespace default istio-injection=enabled
#部署bookinfo 官方示例程序
kubectl apply-f /root/wf/istio/samples/bookinfo/platform/kube/ bookinfo.yaml
#检查是否bookinfo相关的pod都是running状态
kubectl get pods
#当发现通过以上部署pod时,未创建pod且原因 为 sidecar容器自动失败,此时可以采用手动注入方式
#卸载bookinfo示例程序
kubectl delete -f /root/wf/istio/samples/bookinfo/platform/kube/ bookinfo.yaml
#手动注入sidecar容器
istioctl kube-inject -f /root/wf/istio/samples/bookinfo/platform/kube/ bookinfo.yaml |kubectl apply -f -
- 配置 bookinfo kubernetes 集群外可访问
在配置kiali的时候已经创建了针对kubernetes集群外访问集群内服务的gateway,因此这里直接使用这个gateway,现在要做的是创建virtualservice,内容如下:
apiVersion: networking.istio.io/v1alpha3
kind: VirtualService
metadata:
  name: bookinfo
spec:
  hosts:
  - "*"
  gateways:
  - istio-system/kiali-gateway
  http:
  - match:
    - uri:
        exact: /productpage
    - uri:
        prefix: /static
    - uri:
        exact: /login
    - uri:
        exact: /logout
    - uri:
        prefix: /api/v1/products
    route:
    - destination:
        host: productpage
        port:
            number: 9080
执行命令:
kubectl apply –f /root/wf/istio/samples/bookinfo/networking/bookinfo-gateway.yaml
在浏览器输入 http://x.x.x.x:30932/productpage 即可访问集群内的 bookinfo系统,不断刷新会发现页面右侧的星级状态一直在发生变化。
三、部署过程中遇到的问题
1、镜像拉取不成功
(1) 在通过istioctl manifest部署的时候,会遇到timeout的情况,导致部署不成功。
排查方法:
#istio内部组件及第三方组件默认安装在 istio-system命名空间
#查看该命名空间上的所有pod,会看到部分不是running的状态
kubectl get pods –n istio-system
#查看失败的pod的描述信息,在events 一栏可以看到错误信息,这里会提示是imagepull失败,xxx 为 pod name
kubectl describe pod xxx –n istio-system
解决办法:
方法一:让kubernetes 所属服务器能够连上外网(这种是最好的,这样部署的时候,会自动从外网拉取所需镜像文件);
方法二:在方法一不可行的情况下使用,提前下载好所有需要的image.
a) 在kubernetes服务器上,通过以下命令获取所有需要下载的image
kubectl get deployment –n istio-system –o yaml > test.yaml
打开test.yaml文件,其中image 的值就是需要的image.
grafana/grafana:6.7.4
docker.io/istio/proxyv2:1.6.12
docker.io/jaegertracing/all-in-one:1.16
coredns/coredns:1.6.2
istio/coredns-plugin:0.2-istio-1.1
docker.io/istio/pilot:1.6.12
quay.io/kiali/kiali:v1.18
docker.io/prom/prometheus:v2.15.1
docker.io/istio/install-cni:1.6.12
b) 使用一台可以连接外网的服务器,且该服务器上已经安装了docker;
c) 在可连接外网的服务器上执行以下命令,save image
docker pull xxxx
docker images
docker save –o /root/wf/kiali.tar quay.io/kiali/kiali:v1.18
d) 在kubernetes 服务器上,load image 到docker中(PS: kubernetes集群的master 和worker node所属服务器都要操作)
将连接外网上save下来 image文件都上传到kubernetes所属服务器上,并执行以下命令。
#加载镜像文件
docker load -i kiali.tar
#显示本地docker中所有的镜像文件
docker images
e) 重新部署 istio
#卸载
istioctl manifest generate --set profile=demo --set addonComponents.istiocoredns.enabled=true --set components.citadel.enabled=true --set components.cni.enabled=true | kubectl delete -f -
#安装
istioctl manifest apply --set profile=demo --set addonComponents.istiocoredns.enabled=true --set components.citadel.enabled=true --set components.cni.enabled=true
(2) 部署 bookinfo 中也会出现 pod 状态部署 running,且是由于镜像拉取失败造成的,按照以上方式提前准备好镜像。
#卸载
kubectl delete -f /root/wf/istio/samples/bookinfo/platform/kube/ bookinfo.yaml
#部署
kubectl apply-f /root/wf/istio/samples/bookinfo/platform/kube/ bookinfo.yaml
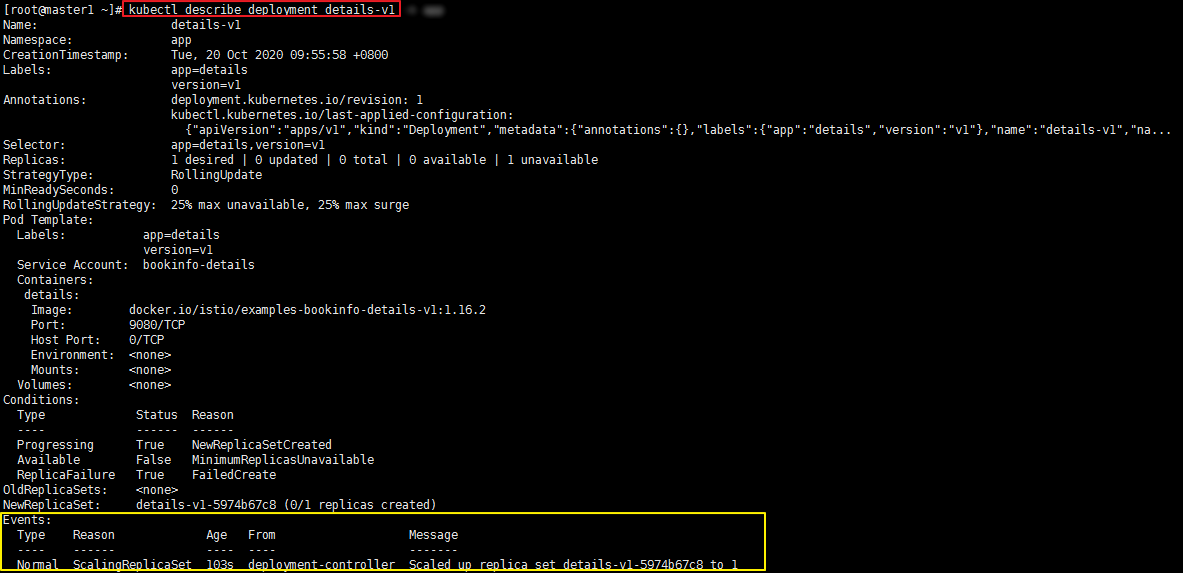
2、部署 bookinfo 发现对应的 pod 没有创建
排查方法:
#查看default命名空间中所有已创建的 deployment
kubectl getdeployment
#查看default命名空间中 name为details-v1 的deployment信息
kubectl describe deployment details-v1
#查看副本资源数据信息
kubectl describe rs/details-v1-5974b67c8

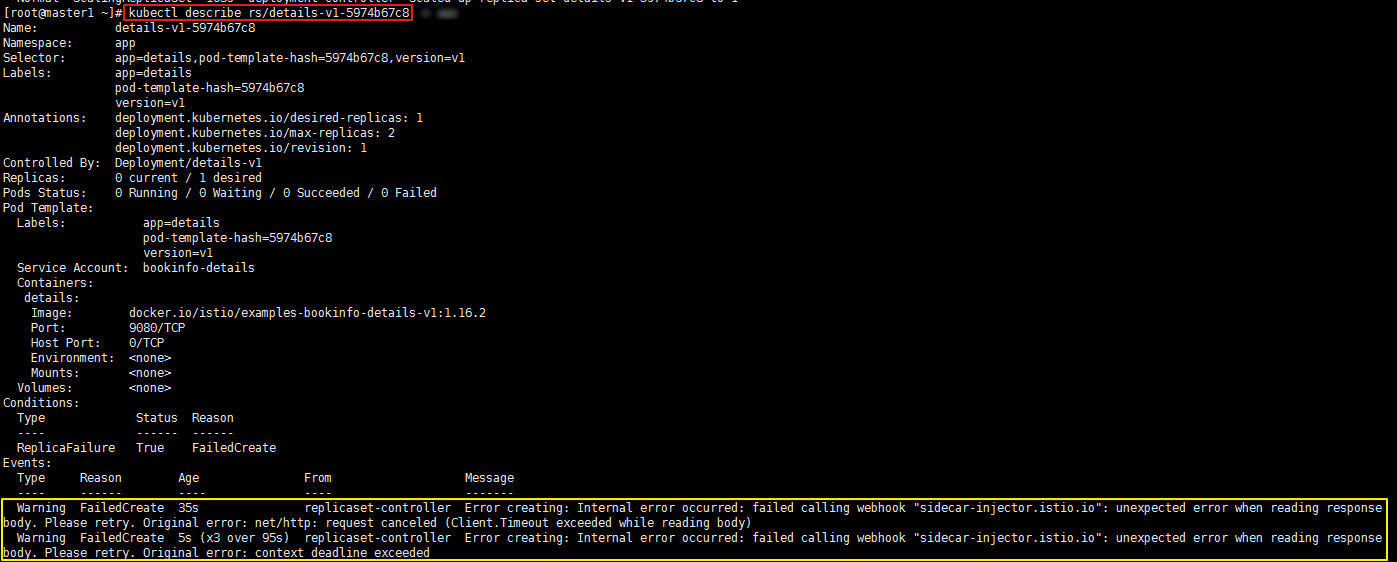
有时副本资源报的错误信息如下:

通过如下命令也可以查看到错误日志:
kubectl logs kube-controller-manager-master1 -n kube-system

或者

kubectl logs kube-apiserver-master1 -n kube-system

解决方法:
以上是网络插件存在问题,在istio的deployment部署文件中添加 hostNetwork:true,表示使用宿主机网络,即没有问题。但是具体原因,好需要研究。

 浙公网安备 33010602011771号