Linux安装Nginx1.20.2
一、简介
1.Nginx是什么?
Nginx是一个高性能的HTTP和反向代理web服务器,占内存极少,同时也提供了IMAP/POP3/SMTP服务。
Nginx可以作为静态页面的web服务器,专门为性能优化而开发,能经受高负载,有报告白表明能支持高达5000个并发连接数。
2.反向代理
正向代理:
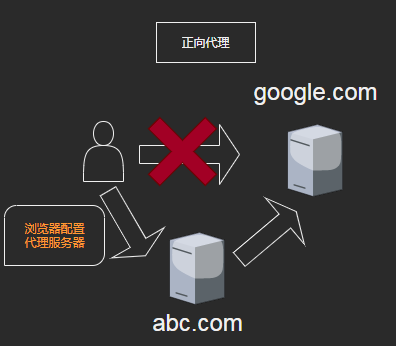
反向代理:
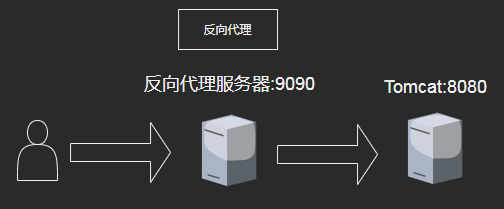
客户端对代理是无感知的,因为客户端不需要任何配置就可以访问,我们只需要将请求发送到反向代理服务器,由反向代理服务器去选择目标服务器获取数据后,在返回给客户端,此时反向代理服务器和目标服务器对外就是一个服务器,暴露的是代理服务器地址,隐藏了真实服务器IP地址。
3.负载均衡
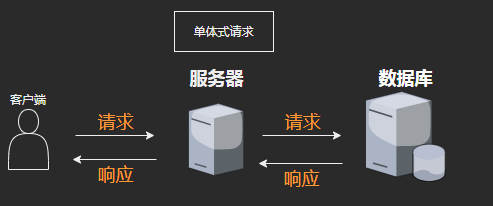
普通的单体式请求
负载均衡

当单个服务器解决不了并发问题,我们可以增加服务器数量,然后将请求分发到多个服务器上,负载分发到各个服务器。
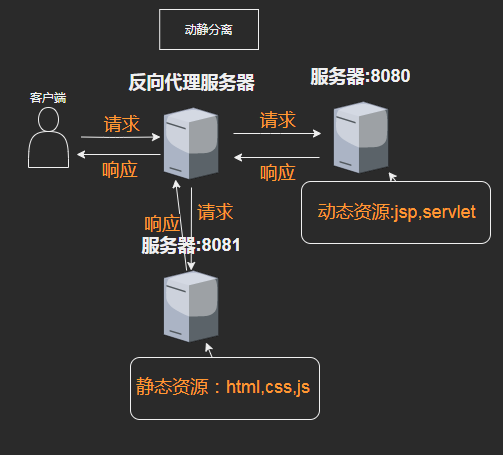
4.动静分离
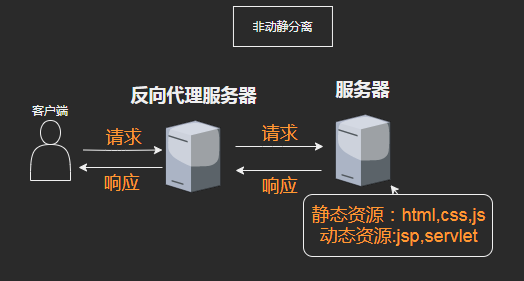
非动静分离
动静分离
二、安装
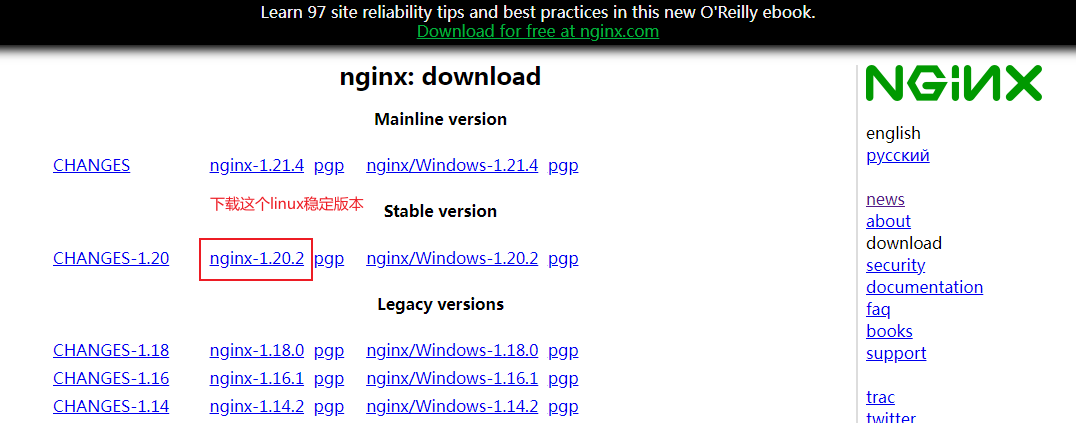
1.Nginx下载地址:http://nginx.org/en/download.html
pcre作用是让 Nginx 支持 rewrite 功能。因此,在安装Nginx前要先安装pcre。
使用wget下载pcre安装包
wget http://downloads.sourceforge.net/project/pcre/pcre/8.35/pcre-8.35.tar.gz
tar zxvf pcre-8.37.tar.gz // 解压 pcre 安装包
yum update //更新系统软件
yum install gcc build-essential //gcc编译软件
cd pcre-8.37 // 进入 pcre-8.37 目录
./configure // 配置 pcre-8.37
make && make install // 编译安装 pcre-8.37
pcre-config --version // pcre 安装成功后,查看其版本号
如果报错:make: *** No targets specified and no makefile found. Stop.
#  make
make: *** No targets specified and no makefile found.  Stop.
# yum install gcc gcc-c++ gcc-g77
-bash: /usr/bin/yum: /usr/bin/python: bad interpreter: No such file or directory
#  ll /usr/bin/yum
-rwxr-xr-x. 1 root root 801 Apr 13  2018 /usr/bin/yum
# ll python
ls: cannot access python: No such file or directory   # python的软连接源文件已经不存在

mv /usr/bin/python /usr/bin/python_old    // 去除原来存在的软连接

# ln -s /usr/bin/python2.7 /usr/bin/python   #重新做一个python的软连接
# yum install gcc gcc-c++ gcc-g77

# make
make: *** No targets specified and no makefile found. Stop.
# wget http://ftp.gnu.org/pub/gnu/ncurses/ncurses-5.6.tar.gz

# ./configure -prefix=/usr/local -with-shared-without-debug
# make
安装其他依赖
yum -y install make zlib zlib-devel gcc-c++ libtool openssl openssl-devel
把下载好的nginx放到目录下
tar -zxvf nginx-1.20.2.tar.gz //解压
cd nginx-1.12.2    // 进入 nginx-1.12.2.tar.gz 目录
./configure        // 配置 nginx-1.12.2
make && make install        // 编译安装 nginx-1.12.2
先检查一下/usr/local/nginx/conf/nginx.conf server port 是不是 要访问的0端口!!
访问nginx
cd /usr/local/nginx/sbin/nginx              // 进入 nginx 文件夹
./nginx                      //启动nginx
/usr/local/nginx/sbin/nginx -s stop        // 停止 nginx
ps -ef | grep nginx                        // 查看 nginx 进程状态
可以在 /etc/init.d/下创建名为nginx的启动脚本,内容如下:
#!/bin/bash
#
# chkconfig: - 85 15
# description: Nginx is a World Wide Web server.
# processname: nginx

nginx=/usr/local/nginx/sbin/nginx
conf=/usr/local/nginx/conf/nginx.conf
case $1 in
start)
echo -n "Starting Nginx"
$nginx -c $conf
echo " done"
;;
stop)
echo -n "Stopping Nginx"
killall -9 nginx
echo " done"
;;
test)
$nginx -t -c $conf
;;
reload)
echo -n "Reloading Nginx"
ps auxww | grep nginx | grep master | awk '{print $2}' | xargs kill -HUP
echo " done"
;;
restart)
$0 stop
$0 start
;;
show)
ps -aux|grep nginx
;;
*)
echo -n "Usage: $0 {start|restart|reload|stop|test|show}"
;;
esac
注意,保存一定要保存成UNIX格式(notepad++:编辑--文档格式转换--转为UNIX格式),否则会如下报错的

设置执行权限:chmod +x /etc/init.d/nginx

注册成服务:chkconfig-add nginx

设置开机启动:chkconfig nginx on


之后,就可以使用以下命令了

service nginx start

service nginx stop

service nginx restart
service nginx reload
防火墙设置
// 查看开放的端口号
firewall-cmd --list-all

// 设置开放的端口号
firewall-cmd --add-service=http –permanent        // 在防火墙中永久开启 http 服务
firewall-cmd --add-port=80/tcp --permanent        // 在防火墙中永久开启 80 端口

// 重启防火墙
firewall-cmd --reload
nginx常用命令
./nginx -v                    # 查看 nginx 的版本号
./nginx                       # 启动 nginx
./nginx -s stop               # 停止 nginx
./nginx -s reload             # 重载 nginx,一般在修改 nginx.conf 配置后需要重载 nginx
Nginx配置文件
nginx 配置文件位置——/usr/local/nginx/conf/nginx.conf
第一部分全局块
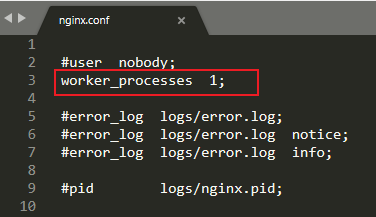
worker_processes 值越大,支持处理并发数量越多!
第二部分events块
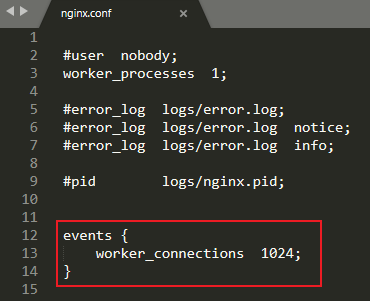
worker_connections 表示支持最大连接数是1024!
第三部分http全局块和server块
Nginx配置实例-反向代理 (实例一)
1.实现效果
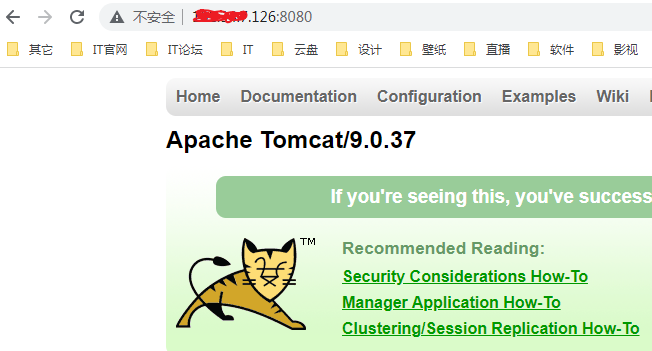
打开浏览器,在浏览器地址栏输入地址www.123.com,跳转到liunx系统tomcat主页面中
2.准备工作
在liunx系统安装tomcat,使用默认端口8080
*tomcat9.0.37 安装文件放到liunx系统中并解压。
*进入tomcat的bin目录中,/startup.sh启动tomcat服务器
对外开放访问的端口。(云服务器要去安全组再开放端口)
firewall-cmd--add-port=8080/tcp-permanent //开放8080端口
firewall-cmd --reload //重启防火墙
firewall-cmd --list-all //查看开放的全部端口
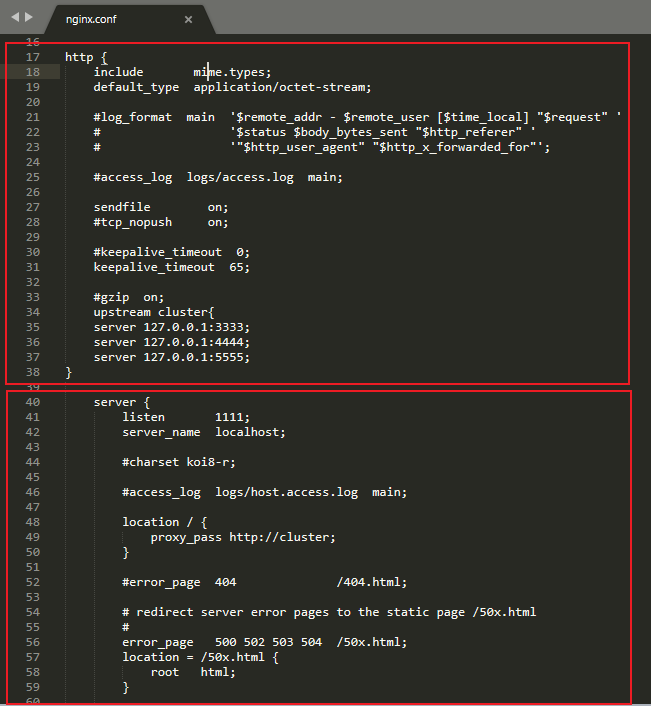
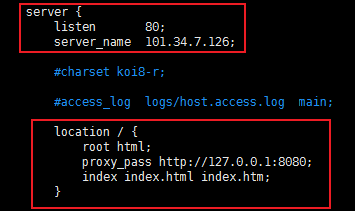
去nginx/conf/nginx.conf修改成这样:就可以反向代理8080端口了!
Nginx配置实例-反向代理 (实例二)
先准备两个tomcat,一个8080端口另一个8081端口。
创建tomcat8080 和 tomcat8081文件夹
分别把tomcat压缩包解压到这两个文件目录下
进入tomcat8081 /conf目录下
vim server.xml
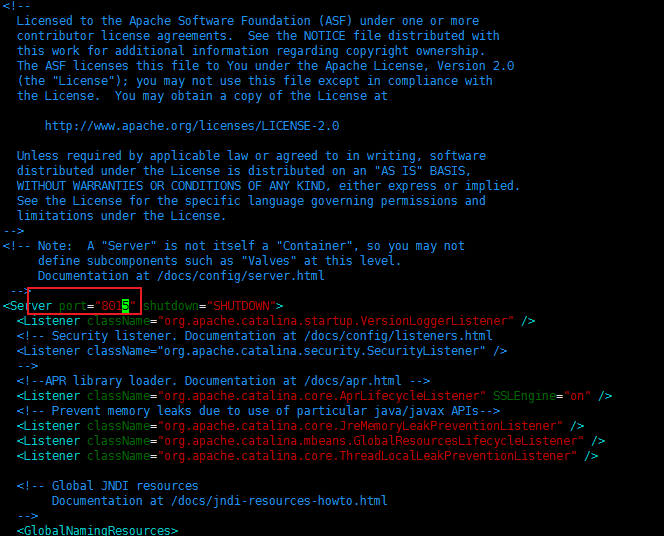
修改端口号防止跟tomcat8080冲突
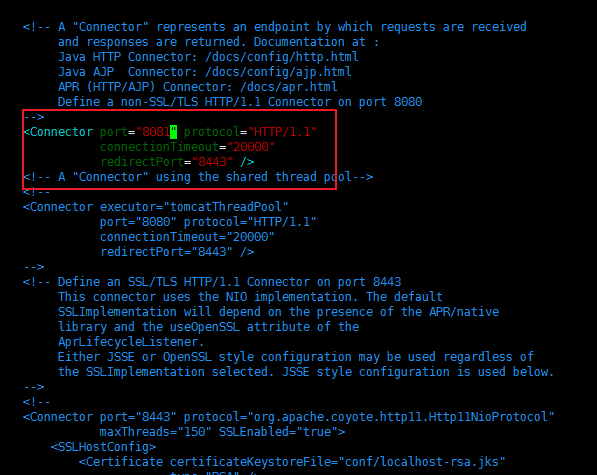
修改成8081
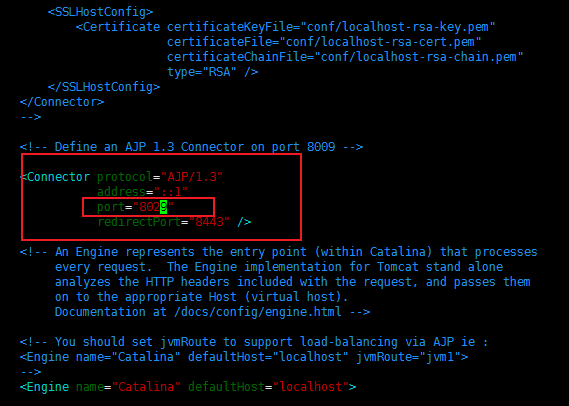
把这个注释放开并修改端口号
进入nginx /conf目录下
vim nginx.conf
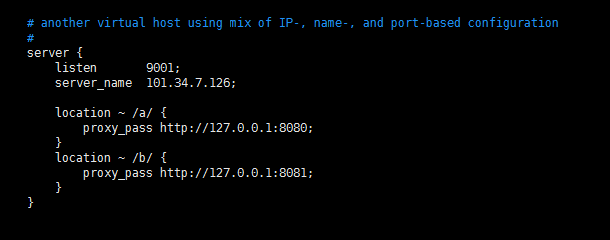
这样配置
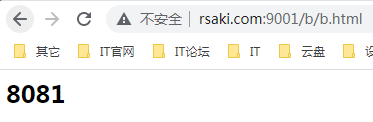
再写两个html分别丢到tomcat8080 tomcat8081 webapp目录下创建一个目录用来访问html
就可以访问html了!


 浙公网安备 33010602011771号