Nginx快速入门
【一句话总结】Nginx快速入门:在一个新安装的Linux系统上安装并使用Nginx。
一、Nginx的使用场景:通过配置,使用域名即可访问服务
我有一个项目。其有多个微服务模块,部署在同一个主机上,访问地址分别是:
192.168.0.1:801【后台管理服务admin.myhome.com】
192.168.0.1:18001【图片服务img.myhome.com】
192.168.0.1:18002【音频服务music.myhome.com】
一般来说,我们通过ip:port即可访问该服务,但是,这里希望可以只输入域名即可访问。 比如admin.myhome.com 就进入后台管理。
附:传统的访问方式,【域名:端口】,配置流程如下:
1.修改本机hosts文件 192.168.0.1 admin.myhome.com img.myhome.com music.myhome.com 这样,当访问这三个域名时都会映射到该ip
2.域名解析与访问
admin.myhome.com:801 会被解析为192.168.0.1:801,即可访问后台管理系统
img.myhome.com:18001 会被解析为192.168.0.1:18001,即可访问图片服务
music.myhome.com:18002 会被解析为192.168.0.1:18002,即可访问音频服务【当然,如果不在hosts文件里写这些域名对应的ip,那么它就会通过本机的DNS域名解析在网络上寻找对应域名并访问。hosts文件里的localhost或127.0.0.1都是代表本机】
为什么要使用反向代理:项目一般都有开发、生产、预发布等多个环境,如果不同环境使用不同的ip去访问,可能会出现一些问题。
为了保证所有环境的一致,我们会在各种环境下都使用域名来访问。
二、Nginx的使用:
1安装
1)安装其运行环境:gcc、pcre-devel、zlib-devel、openssl-devel
yum -y install gcc pcre-devel zlib-devel openssl openssl-devel 一次性把这几个环境都安装完毕 -y则不再需要去手动确定,都选择默认安装即可
2)下载:Nginx[以1.8.1为例]:https://nginx.org/download/
3)拷贝下载的压缩文件到指定位置
将下载好的“nginx-1.8.1.tar.gz”压缩包,复制到/usr/local/下,我个人一般软件都安装在这个目录下。
这里或许需要先开启windows和linux的互相复制的功能,请自行百度。
4)解压:
打开终端面板,先使用【cd /urs/local】再使用指令【tar -zxvf nginx-1.8.1.tar.gz】解压缩。
此时local文件夹下有该压缩包,还有解压后的文件
5)配置:
先用【cd nginx-1.8.1】进入解压后的文件夹,再用【./configure --prefix=/usr/local/nginx】配置
6)编译和安装:
先执行【make】,再执行【make install】,则此时已安装完成,local文件夹下多了一个【nginx文件夹,即安装好的nginx】
这里,可以用小写的LS或LL来查看当前文件夹下都有什么。
安装完之后usr/local下有【nginx-1.8.1.tar.gz】【nginx-1.8.1】 【nginx】三个文件夹,前两个都可以删除。
7)尝试启动:【cd usr/local/nginx/sbin】到sbin目录 ,再用【./nginx】来启动
这里,可以先用【ps -A | grep nginx】查看Nginx是否启动 有返回结果则是已经启动的,避免意外,需杀掉进程重启nginx。
然后,【lsof -i:80】查看80端口占用 【kill -9 端口号】 关闭此端口
8)测试:
在Linux中启动浏览器,并访问localhost,即可访问【localhost:80】,则会弹出Ningx的欢迎界面
9)Nginx安装使用的常用命令
【./nginx -s reload】重启nginx 【/usr/local/nginx/sbin/nginx】在任意目录下时启动Nginx
【./nginx】在sbin目录下时启动nginx 【ps -A | grep nginx】查看Nginx是否启动 有返回结果则是已经启动的
【lsof -i:80】查看80端口占用 【kill -9 端口号】 关闭此端口
2存在的问题处理-这三个都必须自查一遍
1)安装时未自动生成logs文件夹
报【could not open error log file: open() "/usr/local/nginx/logs/error.log" failed (2: No such file or directory)】错
则【cd /usr/loca/nginx/】到nginx目录下 【mkdir logs】创建日志文件夹 【chmod 700 logs】设置该文件夹logs的读写权限
2)防火墙禁止了80端口
解决方案一:先永久开放80端口【firewall-cmd --permanent --add-port=80/tcp】
再重启防火墙【firewall-cmd --reload】
解决方案二:用【vi /etc/sysconfig/iptables】打开ip端口配置文件,在里面添加开放80端口的设置
【-A INPUT -p tcp -m state --state NEW -m tcp --dport 80 -j ACCEPT】
可能问题:启动防火墙时出现Unit is masked错误,则在这取消防火墙锁定【systemctl unmask firewalld】-->
而后期如有需要用【systemctl mask firewalld】锁定防火墙
常用指令:systemctl status firewalld查看防火墙状态 systemctl start firewalld开启防火墙
systemctl stop firewalld关闭防火墙
3)SELinux配置问题
解决方案一:SELinux配置将http网络连接关闭,启用即可【setsebool -P httpd_can_network_connect 1】 参考网
解决方案二:直接关闭SELiunx配置 进入【vi/etc/selinux/config】 修改【SELINUX=disabled】 参考网
3和项目联合使用
1)配置Nginx
【cd /usr/local/nginx/conf】进入配置文件夹 --->打开【nginx.conf】文件 ---> 添加配置


 1 #user  nobody;
 2 worker_processes  1;
 3
 4 #error_log  logs/error.log;
 5 #error_log  logs/error.log  notice;
 6 #error_log  logs/error.log  info;
 7
 8 #pid        logs/nginx.pid;
 9
10
11 events {
12     worker_connections  1024;
13 }
14
15
16 http {
17     include       mime.types;
18     default_type  application/octet-stream;
19
20     #log_format  main  '$remote_addr - $remote_user [$time_local] "$request" '
21     #                  '$status $body_bytes_sent "$http_referer" '
22     #                  '"$http_user_agent" "$http_x_forwarded_for"';
23
24     #access_log  logs/access.log  main;
25
26     sendfile        on;
27     #tcp_nopush     on;
28
29     #keepalive_timeout  0;
30     keepalive_timeout  65;
31
32     #gzip  on;
33
34     # 后端管理的代理
35     server {
36         listen       80;
37         server_name  www.admin.myhome.com;
38
39         #charset koi8-r;
40
41         #access_log  logs/host.access.log  main;
42
43         location / {
44             proxy_pass   http://192.168.0.1:801;
45         }
46     }
47
48     # 图片服务的代理
49     server {
50         listen       80;
51         server_name  img.myhome.com;
52
53         #charset koi8-r;
54
55         #access_log  logs/host.access.log  main;
56
57         location / {
58             proxy_pass   http://192.168.0.1:18001;
59         }
60     }
61
62     # 音频服务的代理
63     server {
64         listen       80;
65         server_name  music.myhome.com;
66
67         #charset koi8-r;
68
69         #access_log  logs/host.access.log  main;
70
71         location / {
72             proxy_pass   http://192.168.0.1:18002;
73         }
74     }
75
76     # 初始的代理 localhost 有这个nginx才能访问自己主页 不然就会404
77     server {
78         listen       80;
79         server_name  localhost;
80
81         #charset koi8-r;
82         #access_log  logs/host.access.log  main;
83
84         location / {
85             root   html;  #这里也可以添加一个自定义的Nginx主页 用路径即可
86             index  index.html index.htm;
87         }
88         #error_page  404页面的处理              /404.html;
89         # redirect server error pages to the static page /50x.html
90         error_page   500 502 503 504  /50x.html;
91         location = /50x.html {
92             root   html;
93         }
94     }
95
96 }
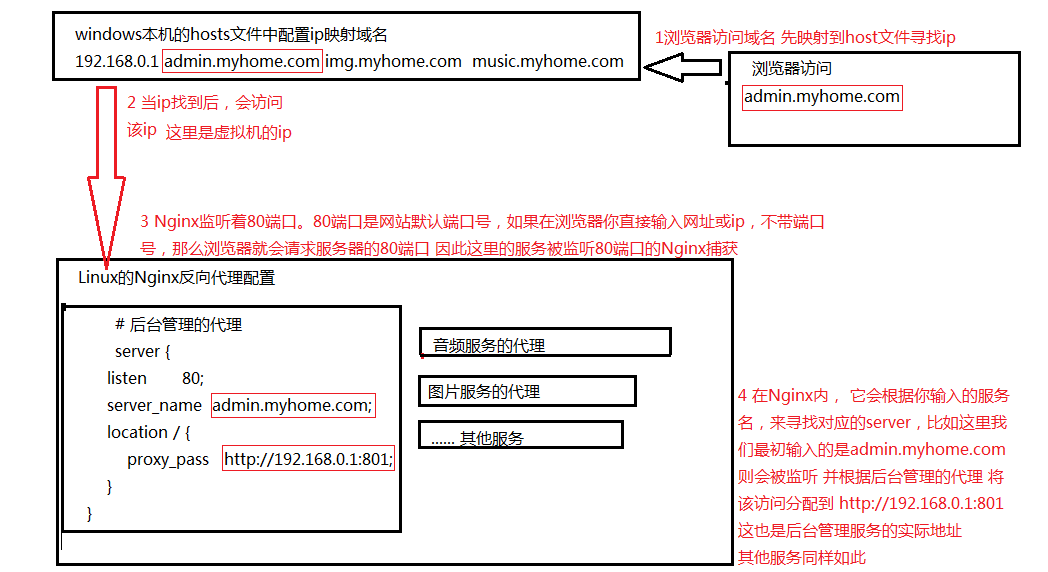
2)Nginx反向代理的示意图
附:第二种下载安装方式:使用wegt下载nginx
附:本文参考:安装Nginx参考

 浙公网安备 33010602011771号