

React Native纯干货总结
随着项目也渐渐到了尾声,之前的项目是mobile开发,采用的是React Native。为即将要开始做RN项目或者已经做过的小伙伴可以参考借鉴,也顺便自己做一下之前项目的总结。
文章比较长,可以选择自己感兴趣的章节了解下。
项目整体技术栈:
- React Native
- React Navigation
- Firebase
- Jotai(项目后期加入)
- Typescript
- Jest
1. 配置项目绝对路径
一般的项目都会有一个源代码目录src ,并且随着项目的膨胀,会出现越来越多的子目录,这时候如果不加控制的话,会出现一大堆类似这种../../.. 的相对路径,找文件也不是非常方便。
1.1 没有集成Typescript
You can simply create a package.json file inside the folder you want to import it. Yes, at a glance this probably seems a little weird, but with practice, you get used to it. It should have a single property with the folder name as its value. Let’s create our package.json file inside the components folder.
配置绝对路径需要做的事就是在你需要引入的文件中添加一个package.json
{
  "name": "components"
}
然后你就可以使用了
import MyComponent from "components/MyComponent";
1.2 集成了Typescript
如果项目集成了typescript,可能还需要做一些额外的操作,首先添加一个库:react-native-typescript-transformer。
yarn add --dev react-native-typescript-transformer
然后需要配置tsconfig.json
{
  "compilerOptions": {
    "target": "es2015",
    "jsx": "react",
    "noEmit": true,
    "moduleResolution": "node",
    "paths": {
      "src/*": ["./*"],
    },
  },
  "exclude": [
    "node_modules",
  ],
}
然后在metro.config.js 中配置transformer.babelTransformerPath(我在项目中后来去掉了这个配置,发现也能使用😄😁)
module.export = {
  transformer: {
    babelTransformerPath: require.resolve('react-native-typescript-transformer')
  }
};
通过上面的配置,你就可以使用绝对路径了。
1.3 一些问题
ESLint: 'react-native' should be listed in the project's dependencies.
Run 'npm i -S react-native' to add it(import/no-extraneous-dependencies)

'import/no-extraneous-dependencies': [
  'error',
  { packageDir: path.join(__dirname) }
]
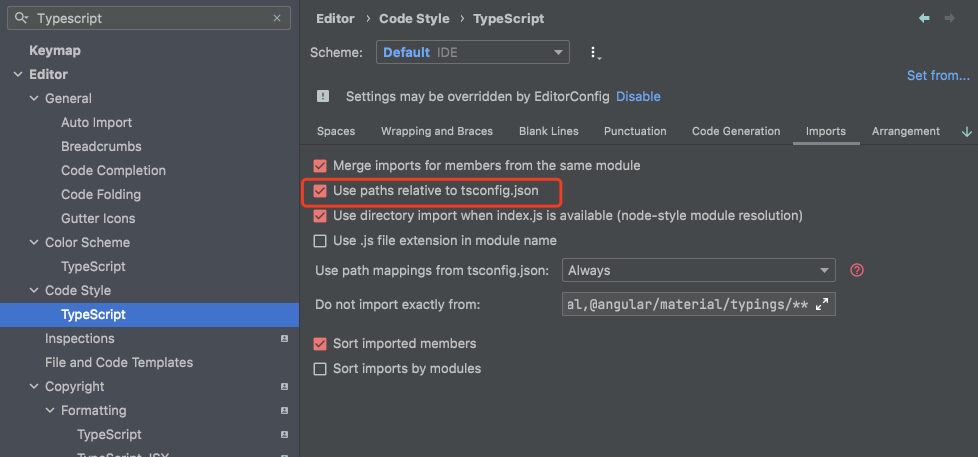
1.4 自动在intellij中启用绝对路径
Editor → Code Style → Typescript → Imports → Use paths relative to tsconfig.json
2. 图标处理
React Native不支持动态的require,所以图标处理的方法就是提前引入,动态生成。
首先将需要的图标放在assets 目录下,然后依次引入只有导出,生成类型声明(为了能够智能提示)。下面是一个例子
// icons.ts

import AlertIcon from 'xxx/assets/icons/alert.svg';

export const ICONS = {
  alert: AlertIcon
  // ...
}

export type IconNameType =
  | 'alert';
编写一个Icon组件,在组件中根据传入属性引入
const percentToHex = (percent: number) => {
    const formattedPercent = Math.max(0, Math.min(100, percent));
    const intValue = Math.round((formattedPercent / 100) * 255);
    const hexValue = intValue.toString(16);
    return hexValue.padStart(2, '0').toUpperCase();
};

const Icon = ({
    style,
    name,
    size = spacing.lg,
    color = definedColor.text.primary,
    opacity = 100,
    testId,
    width = size,
    height = size
}: IconProps) => {
    const RequiredIcon = ICONS[name];
    const colorWithOpacity = `${color}${percentToHex(opacity)}`;

    return (
        <RequiredIcon
            style={[styles.icon, style]}
            testID={testId}
            width={width}
            height={height}
            color={colorWithOpacity}
        />
    );
};

// usage
import Icon from 'components/icon/Icon';

<Icon
  style={styles.icon}
  name="group"
  color={color.brand.primary}
  size={spacing.lg}
  opacity={100}
/>
为了方便之后的图标引入,同时编写了一个脚本,在每次加入图标的时候自动重新刷新icons.ts文件。
// scripts/update-icon.js

const { exec } = require('child_process');
const fs = require('fs');
const path = require('path');
const { upperFirst, camelCase } = require('lodash');

const root = path.resolve(__dirname, '..');
const iconsDir = path.resolve(root, 'assets/icons');
const destPath = path.resolve(root, 'src/constants/icons.ts');
const indent = '    ';

const getFolderIcons = (iconFolderPath) => {
    const iconNames = [];
    fs.readdirSync(iconFolderPath).forEach((file) => {
        if (file.endsWith('.svg')) {
            iconNames.push(file.replace('.svg', ''));
        }
    });
    return iconNames.sort();
};

const assembleTypes = (iconNames) => {
    let code = iconNames.map((name) => `${indent}| '${name}'`).join(`\n`);
    code = `export type IconNameType =\n${code};\n`;
    return code;
};

const formatIconFile = () => {
    const command = `npx prettier --write ${destPath}`;
    exec(command, (error) => {
        if (error) {
            console.error('error', error.message);
            process.exit(1);
        }
    });
};

const assembleIcons = (iconNames) => {
    const imports = [];
    const transformer = (name) => {
        const icon = `${upperFirst(camelCase(name))}Icon`;
        imports.push(
            `import ${icon} from 'xxx/assets/icons/${name}.svg';\n`
        );
        return `${indent}'${name}': ${icon},\n`;
    };
    let code = iconNames.map(transformer).join('');

    code = `${imports.join('')}\nexport const ICONS = {\n${code}}`;
    return code;
};

const generateScript = (relativeFilePath, script) => {
    const autoGeneratedNote =
        "// This is auto generated by script, please don't modify it manually!\n\n";
    const scriptContent = autoGeneratedNote + script;
    const absolutePath = path.resolve(__dirname, '..', relativeFilePath);
    fs.writeFile(absolutePath, scriptContent, (err) => {
        if (err) {
            console.error(`Failed: writing to ${relativeFilePath}`);
            process.exit(1);
        }
        // eslint-disable-next-line no-console
        console.info(`Success: Writing to ${relativeFilePath}`);
        formatIconFile();
    });
};

const iconNames = getFolderIcons(iconsDir);
const iconTypesContent = assembleTypes(iconNames);
const icons = assembleIcons(iconNames);
const iconsContent = `${icons}\n\n${iconTypesContent}`;

generateScript('src/constants/icons.ts', iconsContent);
然后在package.json中配置两个执行命令
{
    "scripts": {
        "update-icon": "node ./scripts/update-icon.js",
        "watch:update-icon": "watch 'yarn update-icon' ./assets/icons"
    }
}
3. React Native适配
为了更好的视觉与用户操作体验,目前流行的移动端适配方案,在大小上都是进行宽度适配,在布局上垂直方向自由排列。这样做的好处是:保证在页面上元素大小都是按设计图进行等比例缩放,内容恰好只能铺满屏幕宽度;垂直方向上内容如果超出屏幕,可以通过手指上滑下拉查看页面更多内容。
在iPhone 6/7/8 Plus(414X736)机型上,渲染一个设计图375尺寸元素的话,很容易计算出,我们实际要设置的宽度应为:375 * 414/375 = 414。这里的414/375就是设备逻辑像素宽度比例。
公式: WLR = 设备宽度逻辑像素/设计图宽度
WLR(width logic rate 缩写),散装英语,哈哈。在这里,设备的宽度逻辑像素我建议用
Dimensions.get('window').width获取,具体缘由,后面会进行解释。
那么,在目标设备上要设置的尺寸计算公式就是:size = 设置图上元素size * WLR
3. 1 局部盒子全部按比例
局部盒子全部按比例。意思就是RN页面中的元素大小、位置、内外边距等涉及尺寸的地方,全部按上述一比例中的尺寸计算公式进行计算。如下图所示:
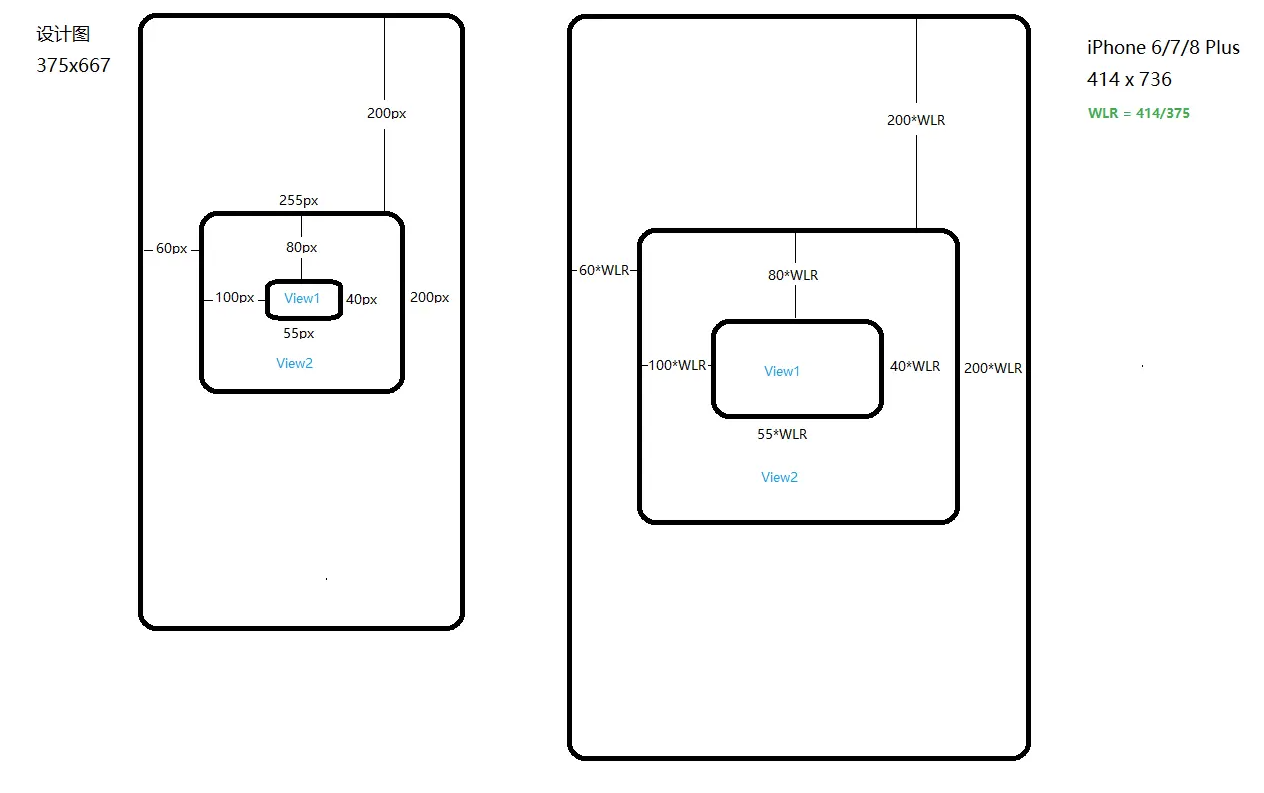
这样渲染出来的效果,会最大限度的保留设计图的大小与布局设计效果。
4. 根据环境变量加载不同的配置
4.1 Setup
yarn add react-native-config

cd ios && pod install
4.2 基本用法
在项目的根路径下创建一个.env 文件
API_URL=https://myapi.com
GOOGLE_MAPS_API_KEY=abcdefgh
在React Native程序中访问,默认会读取.env文件中的内容
import Config from "react-native-config";

Config.API_URL; // 'https://myapi.com'
Config.GOOGLE_MAPS_API_KEY; // 'abcdefgh'
💡 请记住,这个模块不会对秘密进行混淆或加密包装,所以不要在.env中存储敏感密钥。基本上不可能防止用户对移动应用程序的秘密进行逆向工程,所以在设计你的应用程序(和API)时要考虑到这一点。
4.3 多环境配置
为多环境创建不同的文件,比如.env.dev,.env.staging,.env.prod,然后在文件中配置不同的变量。
默认情况下 react-native-config 会读取.env文件中的内容,如果需要读取不同环境中的配置文件,则需要在脚本中指定读取的文件。
$ ENVFILE=.env.staging react-native run-ios           # bash
$ SET ENVFILE=.env.staging && react-native run-ios    # windows
$ env:ENVFILE=".env.staging"; react-native run-ios    # powershell
4.3.1 集成到Fastlane中
使用fastlane提供的action或者直接设置
## action
## TODO ???
environment_variable

## manully set
ENV['ENVFILE'] = '.env.staging'
4.3.2 注意
如果采用的是fastlane [lane] --env [beta|production],这个需要你将.env文件放置在你的fastlane文件夹中,这点和react-native-config不能搭配使用
Using react-native-config with fastlane
5. 调试工具
5.1 React Native Debugger
brew install --cask react-native-debugger
如果想监听不同的端口,可以使用 CMD + T 来创建一个新窗口。
5.2 Flipper
如果想拥有更加全面的调试功能,可以使用Flipper
brew install --cask flipper
5.2.1 使用最新的Flipper SDK
By default React Native might ship with an outdated Flipper SDK. To make sure you are using the latest version, determine the latest released version of Flipper by running npm info flipper.
Android:
- Bump the
FLIPPER_VERSIONvariable inandroid/gradle.properties, for example:FLIPPER_VERSION=0.103.0. - Run
./gradlew cleanin theandroiddirectory.
iOS:
- Call
use_flipperwith a specific version inios/Podfile, for example:use_flipper!({ 'Flipper' => '0.103.0' }). - Run
pod installin theiosdirectory.
6. 视觉回归测试
目前支持RN的视觉回归测试并不是特别多,就算是有,像素的比较也经常出现偏差,要么就是特别复杂。这里列几种web端以及RN端常用的视觉测试工具。
Web端
- BackStopJs
- Storybook (@storybook/addon-storyshots)
- Chromatic
- jsdom-screenshot + jest-image-snaphost
React Naitve端
- Storybook + Loki (React Native Supported), 使用loki可能实现图像比较,但是比较会经常出现偏差,另一方面,图像比较需要开启模拟器,在CI上build可能会比较耗资源
- React-Native-View-Shot + Jest-Image-Snapshot(这个需要手动实现)
7. Mobile E2E
我在项目中没有写过React Native的E2E测试,这里只作下记录
- Appium
- Detox
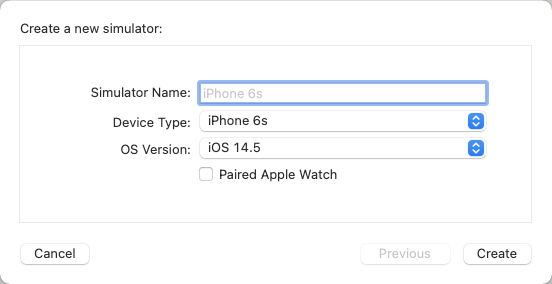
8. 模拟器
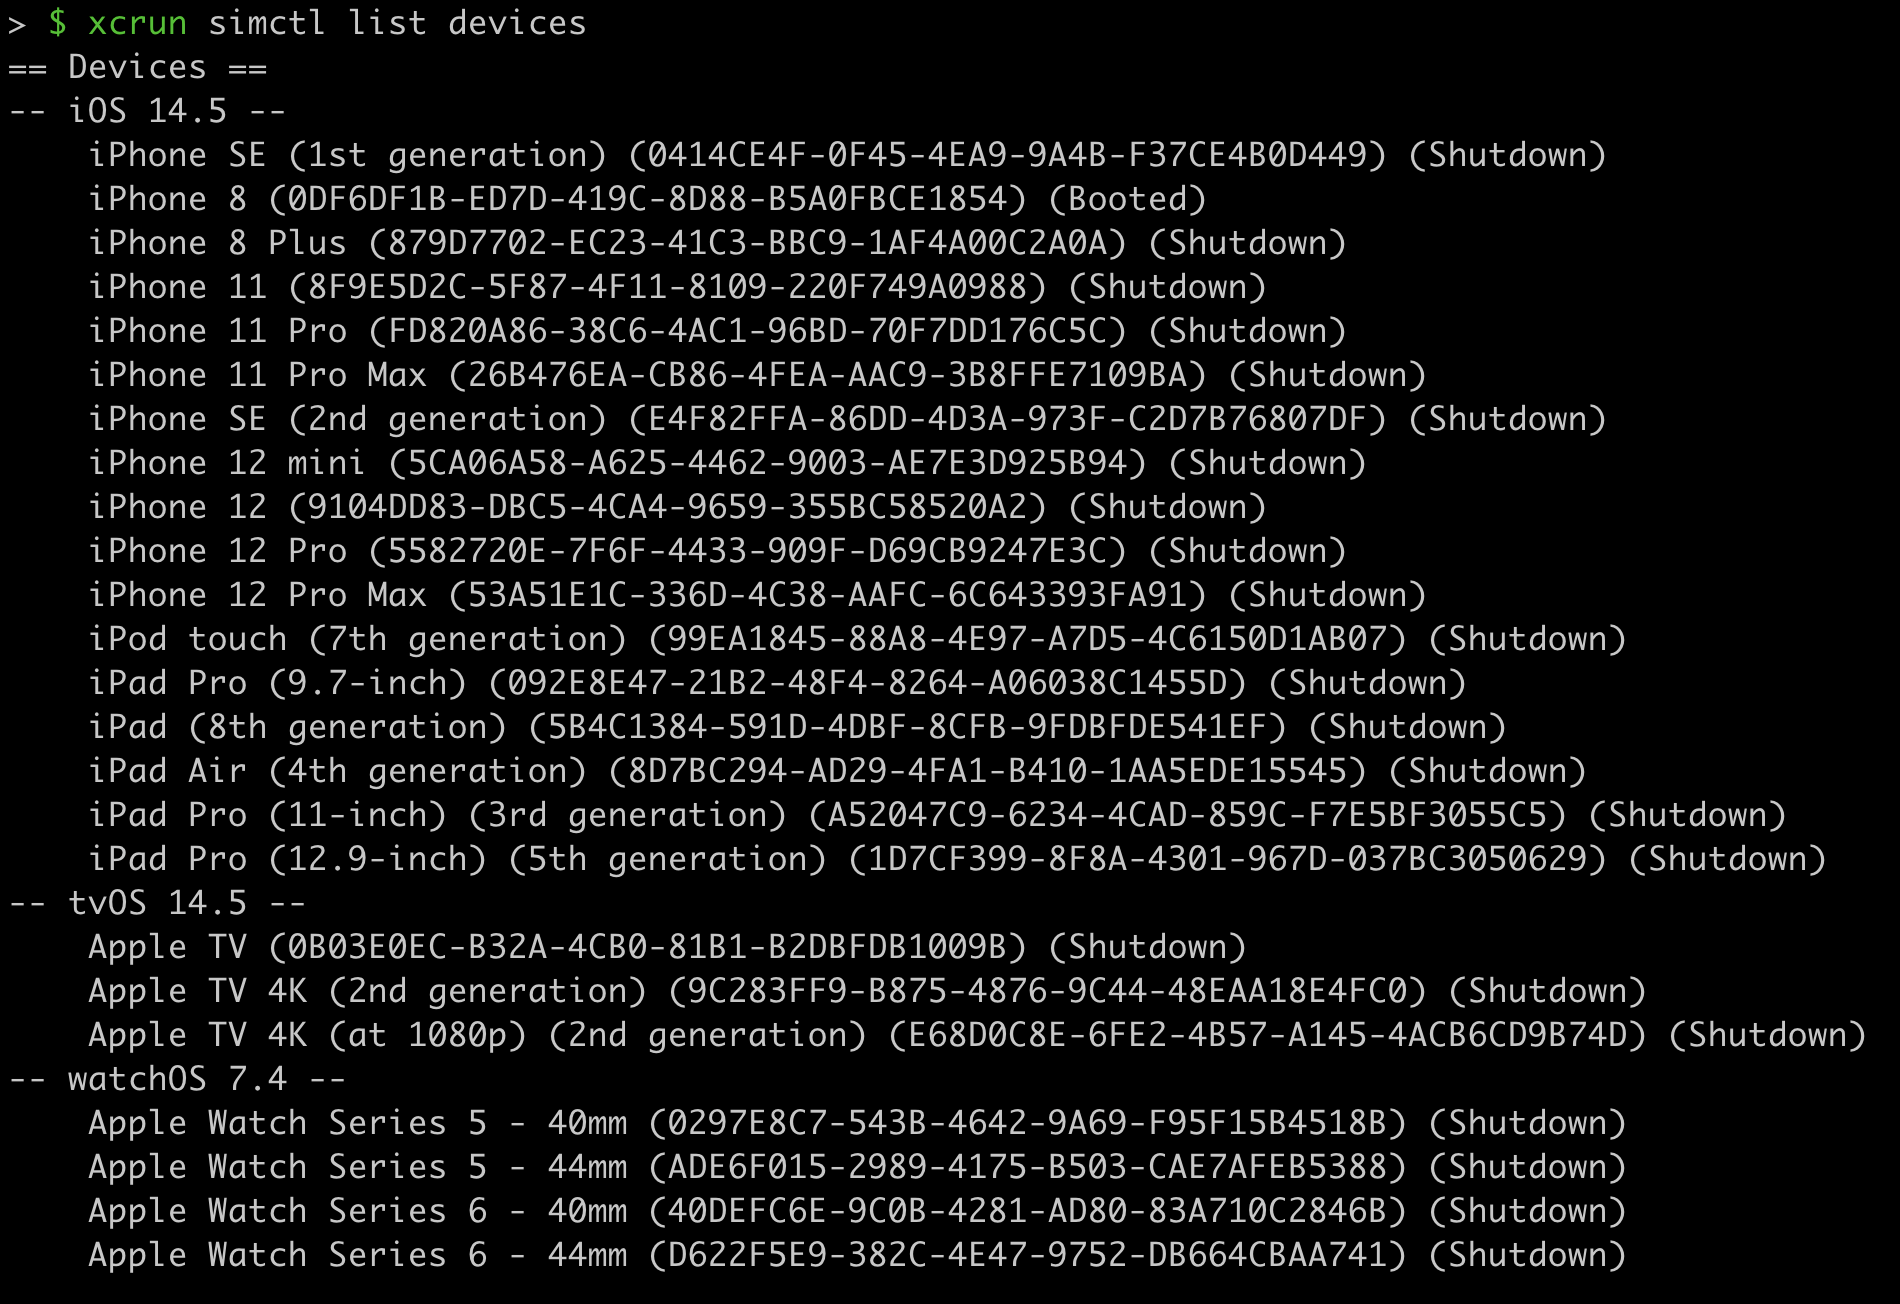
8.1 查看模拟器名称
xcrun simctl list devices
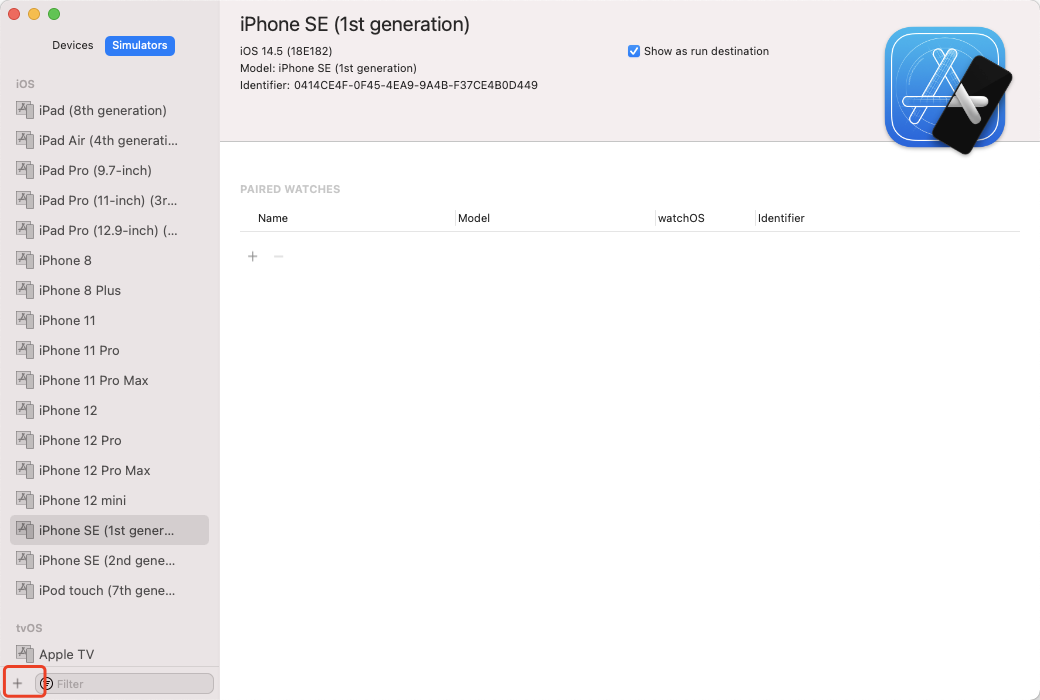
8.2 添加新的模拟器
Window → Devices and Simulators → +
8.3 模拟网络
下载 Additional Tools for Xcode 12.5 ,找到Hardware文件夹,进入后就能见到Network Link Conditioner.prefPane文件,系统的sytem preference会出现Network Link Conditioner ,模拟各种网络
9. Firebase
9.1 Api设计
整体的设计还是比较中规中矩,抽离Service单独调用调用Repository层,在Service层中处理关于超时以及如何使用缓存的一些策略,跟firesotre打交道的操作全部封装到firestore模块中。
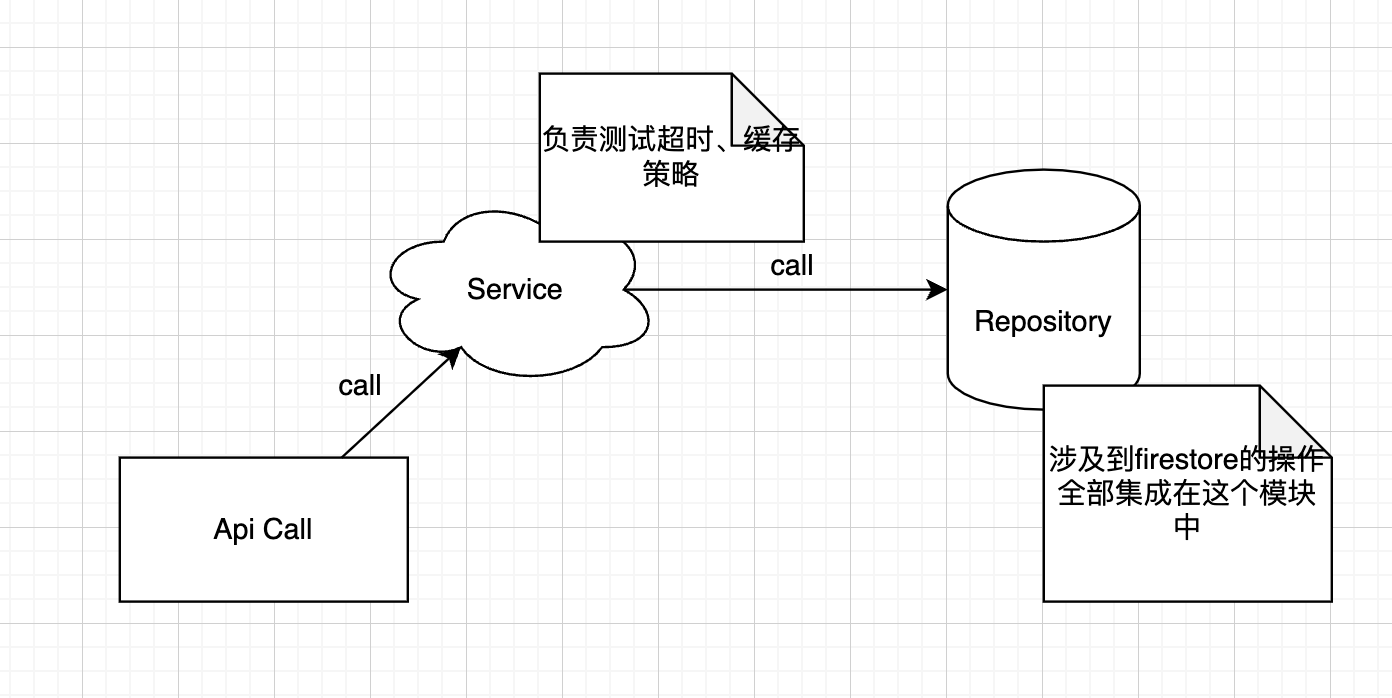
这里主要列举两个常用到的方法
get: async <T>(path: string, opts?: DataServiceGetOptions<T>) => {
  const options = { ...DEFAULT_OPTIONS, ...opts };
  const fetchOptions = pick(opts, FILTER_FIELDS) as FetchOptions;
  const ref = await getRef<T>(path, fetchOptions);
  const { strategy } = options;

  // 选择缓存策略
  const getOptions = await buildGetOptions(strategy);

  // 处理超时
  const resultData = await handleTimout(
    () => getSnapshots(ref, getOptions),
    (snapshot: GetSnapshot<T>) => getDataFromSnapshot<T>(snapshot),
    options
  );

  if (isCacheFirst(strategy)) {
    if (strategy.cacheKey && getOptions.source === SOURCE_TYPE.SERVER) {
      // 首次更新cache key的时间戳
      await updateLocalUpdatedTime(strategy.cacheKey);
    }
  }

  return resultData;
}

onSnapshot: <T>(
  path: string,
  onNext: OnNextHandler<T>,
  options?: FetchOptions<T>
): (() => void) => {
  const ref = getRef<T>(path, options);
  // 得到的ref类型不一致,作为查询来说,选择一种类型就好
  return (ref as Query<T>).onSnapshot((snapshots) => {
      const data = getDataFromSnapshot(snapshots) as DocsResultData<T>;
      onNext(data);
  });
}

// usage

// 缓存优先
export const getData = () =>
  DataService.get<Data>(`${Collections.Data}/xxx`, {
    strategy: { cacheKey: 'DATA' }
  });

// 只走缓存
export const getData2 = (userId: string) =>
  DataService.get<Data>(`${Collections.Data}/${userId}`, {
    strategy: 'cacheOnly'
  });

// 只走服务器
export const getData2 = (userId: string) =>
  DataService.get<Data>(`${Collections.Data}/${userId}`, {
    wheres: [['property1', '==', 'xxx']]
    strategy: 'serverOnly'
  });

export const onDataChange = (
    docPath: string,
    onNext: OnNextHandler<Data>
) => DataService.onSnapshot<Data>(docPath, onNext);
一些tips
-
获取单个doc和列表的时候,可以将返回的结果处理成一致的,比如获取单个doc,可以使用res[0]来获取
-
再返回的doc中,加上
id,方便查找export type WithDocId<T> = T & { docId: string }; -
有关联的collection,存储路径进行查找,无需直接存储引用ref
export type Path<T> = string; // just for label return value

export interface Collection1 {
    ref1: Path<Collection2>;
    ref2: Path<Collection3>;
}
9.2 Notification
这里采用的是firebase的messaging模块做消息推送。
9.2.1 权限请求
    // https://rnfirebase.io/messaging/ios-permissions#reading-current-status

    import messaging from '@react-native-firebase/messaging';

    async function requestUserPermission() {
      const authorizationStatus = await messaging().requestPermission();

      if (authorizationStatus === messaging.AuthorizationStatus.AUTHORIZED) {
        console.log('User has notification permissions enabled.');
      } else if (authorizationStatus === messaging.AuthorizationStatus.PROVISIONAL) {
        console.log('User has provisional notification permissions.');
      } else {
        console.log('User has notification permissions disabled');
      }
    }
9.2.2 发送消息
在发送消息之前,我们需要知道往哪台手机发送消息,就需要知道设备的token,所以首先得获取设备token
    // https://rnfirebase.io/messaging/server-integration#saving-tokens

    import React, { useEffect } from 'react';
    import messaging from '@react-native-firebase/messaging';
    import auth from '@react-native-firebase/auth';
    import firestore from '@react-native-firebase/firestore';
    import { Platform } from 'react-native';

    async function saveTokenToDatabase(token) {
      // Assume user is already signed in
      const userId = auth().currentUser.uid;

      // Add the token to the users datastore
      await firestore()
        .collection('users')
        .doc(userId)
        .update({
          tokens: firestore.FieldValue.arrayUnion(token),
        });
    }

    function App() {
      useEffect(() => {
        // Get the device token
        messaging()
          .getToken()
          .then(token => {
            return saveTokenToDatabase(token);
          });

        // If using other push notification providers (ie Amazon SNS, etc)
        // you may need to get the APNs token instead for iOS:
        // if(Platform.OS == 'ios') { messaging().getAPNSToken().then(token => { return saveTokenToDatabase(token); }); }

        // Listen to whether the token changes
        return messaging().onTokenRefresh(token => {
          saveTokenToDatabase(token);
        });
      }, []);
    }
    POST https://fcm.googleapis.com/v1/projects/myproject-b5ae1/messages:send HTTP/1.1

    Content-Type: application/json
    Authorization: Bearer ya29.ElqKBGN2Ri_Uz...HnS_uNreA

    {
       "message":{
          "token":"bk3RNwTe3H0:CI2k_HHwgIpoDKCIZvvDMExUdFQ3P1...",
          "data":{},
          "notification":{
            "body":"This is an FCM notification message!",
            "title":"FCM Message"
          }
       }
    }
-
Firebase Cloud Messaging Bearer Token
What Bearer token should I be using for Firebase Cloud Messaging testing?
9.2.3 处理交互
    import React, { useState, useEffect } from 'react';
    import messaging from '@react-native-firebase/messaging';
    import { NavigationContainer, useNavigation } from '@react-navigation/native';
    import { createStackNavigator } from '@react-navigation/stack';

    const Stack = createStackNavigator();

    function App() {
      const navigation = useNavigation();
      const [loading, setLoading] = useState(true);
      const [initialRoute, setInitialRoute] = useState('Home');

      useEffect(() => {
        // Assume a message-notification contains a "type" property in the data payload of the screen to open
        messaging().onNotificationOpenedApp(remoteMessage => {
          console.log(
            'Notification caused app to open from background state:',
            remoteMessage.notification,
          );
          navigation.navigate(remoteMessage.data.type);
        });

        // Check whether an initial notification is available
        messaging()
          .getInitialNotification()
          .then(remoteMessage => {
            if (remoteMessage) {
              console.log(
                'Notification caused the app to open from quit state:',
                remoteMessage.notification,
              );
              setInitialRoute(remoteMessage.data.type);// e.g. "Settings"}
            setLoading(false);
          });
      }, []);

      if (loading) {
        return null;
      }

      return (
        <NavigationContainer>
          <Stack.Navigator initialRouteName={initialRoute}>
            <Stack.Screen name="Home" component={HomeScreen} />
            <Stack.Screen name="Settings" component={SettingsScreen} />
          </Stack.Navigator>
        </NavigationContainer>);
    }
如果集成了React Native Navigation
https://reactnavigation.org/docs/deep-linking
    const config = {
      screens: {
        [HOME_STACK_SCREEN]: {
          screens: {
            initialRouteName: HOME,
            Page: {
              path: 'path/:key',
              parse: {
                key: (parameters: string) => JSON.parse(parameters)
              }
            }
          }
        },
        NoMatch: '*'
      }
    };

    export const linking: LinkingOptions<ReactNavigation.RootParamList> = {
      prefixes: [PREFIX],
      config,
      getInitialURL: async () => {
        const url = await Linking.getInitialURL();

        if (url != null) {
          return url;
        }

        const message = await getInitialNotification();
        return handleNotification(message);
      },
      subscribe: (listener) => {
        const onReceiveURL = ({ url }: { url: string }) => listener(url);
        Linking.addEventListener('url', onReceiveURL);

        const unsubscribe = onNotification(async (message) => {
          // URL need contains [PREFIX][path/:key]
          const url = await handleNotification(message);
          if (url) {
            listener(url);
          }
        });

        return () => {
          Linking.removeEventListener('url', onReceiveURL);
          unsubscribe();
        };
      }
    };

    function App() {
      return (
        <NavigationContainer linking={linking} fallback={<Text>Loading...</Text>}>
          {/* content */}
        </NavigationContainer>
      );
    }
9.2.4 Badge显示
firebase messaging的消息分为两种,一种是带notification 字段的(这种情况发送消息会会自动有消息弹窗),一种是data-only的(就是不带notification字段的)
在官方的文档中,在后台监听消息到来,需要使用setBackgroundMessageHandler这个callback
Cloud Messaging | React Native Firebase
    // index.js
    import { AppRegistry } from 'react-native';
    import messaging from '@react-native-firebase/messaging';
    import notifee from '@notifee/react-native';
    import App from './App';

    // Register background handler
    messaging().setBackgroundMessageHandler(async remoteMessage => {
      console.log('Message handled in the background!', remoteMessage);
    	await notifee.incrementBadgeCount();
    });

    AppRegistry.registerComponent('app', () => App);
| Foreground | Background | Quit | |
|---|---|---|---|
| Notification | onMessage | setBackgroundMessageHandler | setBackgroundMessageHandler |
| Notification + Data | onMessage | setBackgroundMessageHandler | setBackgroundMessageHandler |
| Data | onMessage | setBackgroundMessageHandler | setBackgroundMessageHandler |
根据文档上来看,带有notification的消息,在后台情况下也能在setBackgroundMessageHandler函数中监听到,但是就实际的测试情况来看,貌似不太行(应该是这个原因,项目太久了,不太知道当时测试的情况了),所以不得不迫使我们采用data-only的消息来发送,那么这时处理消息的弹窗就需要自己来实现了。这里有几个库可以推荐
Firebase Admin SDK
    // Data-only message

    admin.messaging().sendToDevice(
      [], // device fcm tokens...
      {
        data: {
          owner: JSON.stringify(owner),
          user: JSON.stringify(user),
          picture: JSON.stringify(picture),
        },
      },
      {
        // Required for background/quit data-only messages on iOS
        contentAvailable: true,
        // Required for background/quit data-only messages on Android
        priority: 'high',
      },
    );
Rest API
    {
      "message": {
        "token": "your token",
        "data": {
          "payload": "your payload",
          "type": "0"
        },
        "apns": {
          "payload": {
            "aps": {
              "content-available": 1
            }
          }
        }
      }
    }
在应用激活时清除badge数量
push notification app badges in v6.x · Issue #3419 · invertase/react-native-firebase
    // AppDelegate.m

    - (void)applicationDidBecomeActive:(UIApplication *)application {
      [UIApplication sharedApplication].applicationIconBadgeNumber = 0;
    }
push notification app badges in v6.x · Issue #3419 · invertase/react-native-firebase
solution for iOS works fine, what's left is android, looking at Shourtcut Badger but if it appears abandoned then I might be a bit skeptical using it, will try to test on android and see if it works fine though.
If you're looking for a way to reset the badge at Launch you can use the solution above for iOS, however, this does not reset the badge count if the app was not in quiet mode at the point of being launched.
As for Android, you can check out Shourtcut Badger, hope this helps.
10. 在pre-commit hook中让tsc只检查你改动的文件
配置了lint-stage用来在提交代码时,只检查你改动的文件,但是对于tsc --noEmit却发现每次在提交代码的时候,进行了整个codebase的检查,问题的原因在一篇blog中发现,摘录如下
The issue I found - and at the time of writing, it is still being discussed - is that lint-staged would pass each staged file to the npx tsc command like
npx tsc --noEmit file1.ts file2.tsand that causes TypeScript to simply ignore your tsconfig.json.
解决的办法是使用tsc-files这个库,原理就是在每次检查的时候,使用—project指定生成的config,而摒弃项目自带的tsconfig
10.1 手动实现
// .lintstagedrc.js

const fs = require('fs');

const generateTSConfig = (stagedFilenames) => {
    const tsconfig = JSON.parse(fs.readFileSync('tsconfig.json', 'utf8'));
    tsconfig.include = stagedFilenames;
    fs.writeFileSync('tsconfig.lint.json', JSON.stringify(tsconfig));
    return 'tsc --noEmit --project tsconfig.lint.json';
};

module.exports = {
    '*.{ts,tsx}': ['eslint --ext .ts,.tsx --fix', generateTSConfig]
};
11. 遇到的一些问题
11.1 Unable to lookup item 'Path' in SDK 'iphoneos'
Luckily enough, the fix is very simple: open a new terminal window and type the following command:
sudo xcode-select --print-path
If XCode is installed, you should see a wrong installation path, such as /Library/Developer/ or something like that: it’s very likely that your XCode installation is located somewhere else – such as in the /Applications/ folder. If that’s so, you can fix your issue by typing the following command:
sudo xcode-select --switch /Applications/Xcode.app
If the xcode-select command return a “not found” error, it most likely means that XCode is not installed: just install it and try again.
Mac - XCode - SDK "iphoneos" cannot be located - how to fix
11.2 Invariant Violation: Native module cannot be null. - RNFBNativeEventEmitter
jest.mock('react-native/Libraries/EventEmitter/NativeEventEmitter')
11.3 ReferenceError: Property 'Intl' doesn't exist, js engine: hermes
dayjs/huxon → Intl
Plan A (not working)
Intl polyfills for React Native 0.63 and hermes
For those who have the same problem. I've posted the same on reddit.
I was finally able to get intl to work updating react native from 0.63.3 to 0.64.1 and installing the polyfills from @formatjs and import them in index.js in the order shown in the graph
Plan B (not working)
Intl Support · Issue #23 · facebook/hermes
// index.js

import { AppRegistry } from 'react-native';
import App from './App.tsx';
import { name as appName } from './app.json';

if (global.HermesInternal) {
    require('@formatjs/intl-getcanonicallocales/polyfill');
    // require('@formatjs/intl-locale/polyfill');
    // require('@formatjs/intl-pluralrules/polyfill');
    // require('@formatjs/intl-pluralrules/locale-data/en');
    // require('@formatjs/intl-numberformat/polyfill');
    // require('@formatjs/intl-numberformat/locale-data/en');
    // require('@formatjs/intl-datetimeformat/polyfill');
    // require('@formatjs/intl-datetimeformat/locale-data/en');
    // require('@formatjs/intl-datetimeformat/add-golden-tz');
}

AppRegistry.registerComponent(appName, () => App);
Plan C (work)
use dateformat library to format date only.
moment-timezone
11.4 Port 8080 is not open on localhost, could not start Firestore Emulator.
Port 8080 is not open on localhost, could not start Firestore Emulator.
> lsof -i :8080

COMMAND   PID USER   FD   TYPE             DEVICE SIZE/OFF NODE NAME
java    57931 yhhu  200u  IPv6 0x6ad5a0f10de7daa1      0t0  TCP localhost:http-alt (LISTEN)
java    57931 yhhu  202u  IPv6 0x6ad5a0f107a7d761      0t0  TCP localhost:56123->localhost:http-alt (ESTABLISHED)
java    57931 yhhu  203u  IPv6 0x6ad5a0f107a7caa1      0t0  TCP localhost:http-alt->localhost:56123 (ESTABLISHED)

# kill
kill 57931
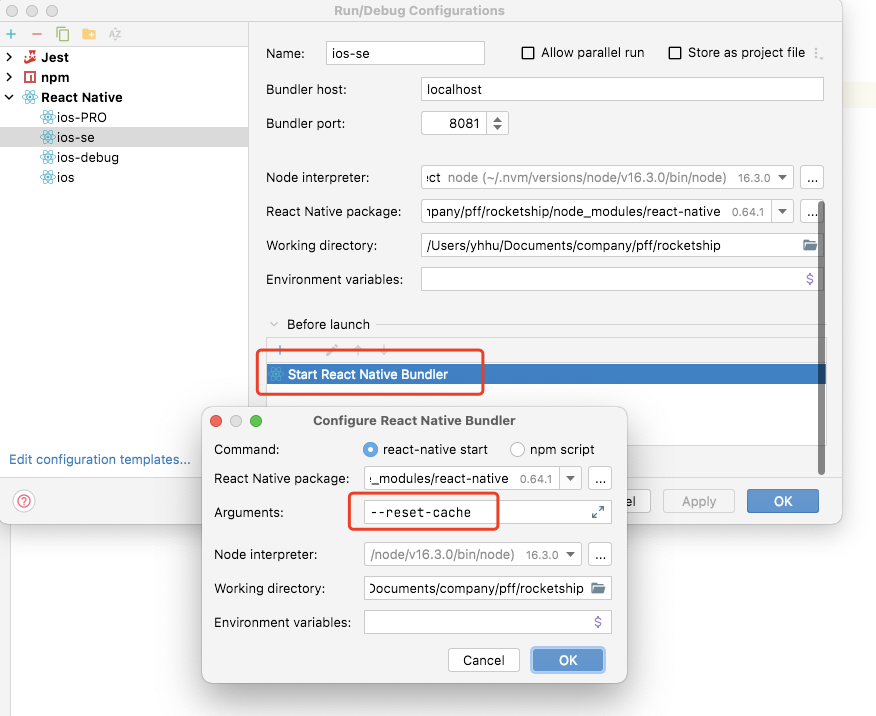
11.5 clear cache
RN < 0.50
watchman watch-del-all
rm -rf $TMPDIR/react-*
rm -rf node_modules/
npm cache clean
npm install
npm start -- --reset-cache
RN ≥ 0.50
watchman watch-del-all
rm -rf $TMPDIR/react-native-packager-cache-*
rm -rf $TMPDIR/metro-bundler-cache-*
rm -rf node_modules/
npm cache clean
npm install
npm start -- --reset-cache
RN ≥ 0.63
watchman watch-del-all
rm -rf node_modules
npm install
rm -rf /tmp/metro-*
npm run start --reset-cache
npm >= 5
watchman watch-del-all
rm -rf $TMPDIR/react-*
rm -rf node_modules/
npm cache verify
npm install
npm start -- --reset-cache
windows
del %appdata%\Temp\react-native-*
cd android
gradlew clean
cd ..
del node_modules/
npm cache clean --force
npm install
npm start -- --reset-cache
11.6 React Native Storybook doesn't work with iOS/Android Hermes Engine in React Native v0.64.0
解决办法 inlineRequires: false
/**
 * Metro configuration for React Native
 * <https://github.com/facebook/react-native>
 *
 * @format
 */

module.exports = {
    transformer: {
        getTransformOptions: async () => ({
            transform: {
                experimentalImportSupport: false,
                **inlineRequires: false**
            }
        }),
        babelTransformerPath: require.resolve(
            'react-native-typescript-transformer'
        )
    }
};
11.7 Parsing error: "parserOptions.project" has been set for @typescript-eslint/parser.
createDefaultProgram: true
module.exports = {
    root: true,
    parser: '@typescript-eslint/parser',
    parserOptions: {
        createDefaultProgram: true,
        project: './tsconfig.json',
        sourceType: 'module'
    },
    extends: ['@react-native-community', 'airbnb-typescript', 'prettier'],
    rules: {
        semi: ['error', 'always'],
        'import/no-extraneous-dependencies': ['off'],
        'import/prefer-default-export': ['off'],
        'react/require-default-props': ['off'],
        'react/jsx-props-no-spreading': ['off']
    }
};

 浙公网安备 33010602011771号