Windows窗体应用开发3--配置标准控件1
1.掌握主要的Windows窗体控件的功能
2.掌握使用SplitContainer控件的方法
3.掌握使用TreeView控件的方法
注:新建一个WindowsForm 命名为Form2.cs
主要用到这四个控件:TreeView、ToolStrip、SplitContainer、ListView
在main函数中进行代码更改:
namespace WindowsFormsApplication1
{
    static class Program
    {
        /// <summary>
        /// The main entry point for the application.
        /// </summary>
        [STAThread]
        static void Main()
        {
            Application.EnableVisualStyles();
            Application.SetCompatibleTextRenderingDefault(false);
            Application.Run(new Form1());
        }
    }
}
原先Application.Run(new Form1())改成新建的Form2也就是使用另一个窗体。在窗体2中进行修改
(1)改掉第二个窗口的名字
(2)添加Toolstrip,并选择添加的类型
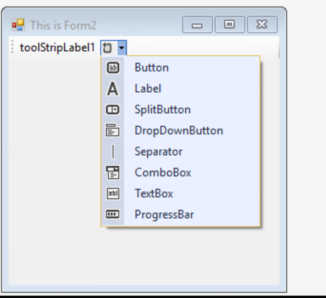


通过这些控件的添加可以复习前面所学的几种基本控件。Button、Label、SplitButton、DropDownButton、Separator、ComboBox、TextBox、ProgressBar...
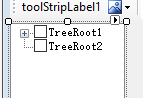
添加TreeView:
目录结构:用树的思想来做,可以参考数据结构。
树状结构中,每一个项称为标记项,标记项用一个TreeNode对象来表。右键添加根目录

此外也可以在Form的构造函数中添加代码
public partial class Form2 : Form
    {
        public Form2()
        {
            InitializeComponent();
            TreeNode rootNode1 = new TreeNode("TreeRoot1");
            TreeNode rootNode2 = new TreeNode("TreeRoot2");
            TreeNode ChildNode1 = new TreeNode("ChildNode1");
            TreeNode ChildNode2 = new TreeNode("ChildNode2");
            TreeNode ChildNode3 = new TreeNode("ChildNode3");
            //Add the root Nodes to the set of treeview
            treeView1.Nodes.Add(rootNode1);
            treeView1.Nodes.Add(rootNode2);
            //add the child 1&2 to the set of the Treeroot1
            rootNode1.Nodes.Add(ChildNode1);
            rootNode1.Nodes.Add(ChildNode2);

            ChildNode2.Nodes.Add(ChildNode3);

        }
}
也可以实现相同的功能,此时可以去看看
InitializeComponent();
在这个初始化的过程中,右键点击Go to defination,找到定义
// treeView1
            //
            this.treeView1.Location = new System.Drawing.Point(0, 28);
            this.treeView1.Name = "treeView1";
            treeNode1.Name = "ChildNode1";
            treeNode1.Text = "ChildNode1";
            treeNode2.Name = "ChildNode3";
            treeNode2.Text = "ChildNode3";
            treeNode3.Name = "ChildNode2";
            treeNode3.Text = "ChildNode2";
            treeNode4.Name = "RootNode";
            treeNode4.Text = "TreeRoot1";
            treeNode5.Name = "TreeNode2";
            treeNode5.Text = "TreeRoot2";
            this.treeView1.Nodes.AddRange(new System.Windows.Forms.TreeNode[] {
            treeNode4,
            treeNode5});
            this.treeView1.Size = new System.Drawing.Size(115, 221);
            this.treeView1.TabIndex = 1;
            this.treeView1.AfterSelect += new System.Windows.Forms.TreeViewEventHandler(this.treeView1_AfterSelect);
这部分由Visual Studio的可视化编程软件可以自动添加。

要显示CheckBox可以将其设置为True,可以显示为勾选框

 浙公网安备 33010602011771号