
SpringBoot(一)原理剖析:SpringApplication启动原理
通常搭建一个基于spring的web应用,我们需要做以下工作:
- pom文件中引入相关jar包,包括spring、springmvc、redis、mybaits、log4j、mysql-connector-java 等等相关jar ...
- 配置web.xml,Listener配置、Filter配置、Servlet配置、log4j配置、error配置 ...
- 配置数据库连接、配置spring事务
- 配置视图解析器
- 开启注解、自动扫描功能
- 配置完成后部署tomcat、启动调试
- ......
而用springboot后,一切都变得很简便快速。
一、springboot的启动类入口
@SpringBootApplication
@EnableDiscoveryClient
@ComponentScan(basePackages = {"org.ryj.product", "org.ryj.common"})
public class ProductApplication {

    public static void main(String[] args) {
        SpringApplication.run(ProductApplication.class, args);
    }
}
二、@SpringBootApplication注解分析
SpringBootApplication注解如下:


 1 @Target(ElementType.TYPE)  //注解的适用范围,其中Type用于描述类、接口或Enum声明
 2 @Retention(RetentionPolicy.RUNTIME)  //注解的生命周期,保留到Class文件中
 3 @Documented  //表明这个注解应该被javadoc记录
 4 @Inherited   //子类可以继承该注解
 5 @SpringBootConfiguration  //继承了Configuration,表示当前是注解类
 6 @EnableAutoConfiguration  //开启SpringBoot的注解功能,借助@import的支持,收集和注册依赖包中的bean定义
 7 @ComponentScan(excludeFilters = { @Filter(type = FilterType.CUSTOM, classes = TypeExcludeFilter.class),
 8         @Filter(type = FilterType.CUSTOM, classes = AutoConfigurationExcludeFilter.class) }) //自动扫描并加载符合条件的组件
 9 public @interface SpringBootApplication {
10
11     /**
12      * Exclude specific auto-configuration classes such that they will never be applied.
13      * @return the classes to exclude
14      */
15     @AliasFor(annotation = EnableAutoConfiguration.class)
16     Class<?>[] exclude() default {};
17
18     /**
19      * Exclude specific auto-configuration class names such that they will never be
20      * applied.
21      */
22     @AliasFor(annotation = EnableAutoConfiguration.class)
23     String[] excludeName() default {};
24
25     /**
26      * Base packages to scan for annotated components. Use {@link #scanBasePackageClasses}
27      * for a type-safe alternative to String-based package names.
28      */
29     @AliasFor(annotation = ComponentScan.class, attribute = "basePackages")
30     String[] scanBasePackages() default {};
31
32     /**
33      * Type-safe alternative to {@link #scanBasePackages} for specifying the packages to
34      * scan for annotated components. The package of each class specified will be scanned.
35      */
36     @AliasFor(annotation = ComponentScan.class, attribute = "basePackageClasses")
37     Class<?>[] scanBasePackageClasses() default {};
38
39     /**
40      * The {@link BeanNameGenerator} class to be used for naming detected components
41      * within the Spring container.
42      */
43     @AliasFor(annotation = ComponentScan.class, attribute = "nameGenerator")
44     Class<? extends BeanNameGenerator> nameGenerator() default BeanNameGenerator.class;
45
46     /**
47      * Specify whether {@link Bean @Bean} methods should get proxied in order to enforce
48      * bean lifecycle behavior
49      */
50     @AliasFor(annotation = Configuration.class)
51     boolean proxyBeanMethods() default true;
52
53 }
除了普通修饰注解类的原信息,还有@SpringBootConfiguration、@EnableAutoConfiguration、@ComponentScan 3个注解。
2.1.@SpringBootConfiguration
SpringBootConfiguration注解如下:
@Target(ElementType.TYPE)
@Retention(RetentionPolicy.RUNTIME)
@Documented
@Configuration
public @interface SpringBootConfiguration {

    /**
     * Specify whether {@link Bean @Bean} methods should get proxied in order to enforce
     * bean lifecycle behavior
     */
    @AliasFor(annotation = Configuration.class)
    boolean proxyBeanMethods() default true;

}
可以看到类上有@Configuration注解,说明它本身也是一个配置类。SpringBoot社区推荐使用基于JavaConfig的配置方式来定义Bean,所以这里的启动类标注了@Configuration之后,本身也可以认为是一个Spring Ioc容器的配置类。
2.1.1 xml配置文件的形式注入bean
<bean id="mockService" class="..MockServiceImpl">
...
</bean>
2.1.2 javaconfiguration的配置形式注入bean
任何一个标注了@Bean的方法,其返回值将作为一个bean定义注册到Spring的IoC容器,方法名将默认成该bean定义的id。
@Configuration
public class MockConfiguration{
    @Bean
    public MockService mockService(){
        return new MockServiceImpl();
    }
}
2.2.@ComponentScan
@ComponentScan注解如下:
  1 @Retention(RetentionPolicy.RUNTIME)
  2 @Target(ElementType.TYPE)
  3 @Documented
  4 @Repeatable(ComponentScans.class)
  5 public @interface ComponentScan {
  6
  7     /**
  8      * Alias for {@link #basePackages}.
  9      */
 10     @AliasFor("basePackages")
 11     String[] value() default {};
 12
 13     /**
 14      * Base packages to scan for annotated components.
 15      */
 16     @AliasFor("value")
 17     String[] basePackages() default {};
 18
 19     /**
 20      * Type-safe alternative to {@link #basePackages} for specifying the packages to scan for annotated components.
 21      */
 22     Class<?>[] basePackageClasses() default {};
 23
 24     /**
 25      * The {@link BeanNameGenerator} class to be used for naming detected components within the Spring container.
 26      */
 27     Class<? extends BeanNameGenerator> nameGenerator() default BeanNameGenerator.class;
 28
 29     /**
 30      * The {@link ScopeMetadataResolver} to be used for resolving the scope of detected components.
 31      */
 32     Class<? extends ScopeMetadataResolver> scopeResolver() default AnnotationScopeMetadataResolver.class;
 33
 34     /**
 35      * Indicates whether proxies should be generated for detected components, which may be necessary when using scopes in a proxy-style fashion.
 36      */
 37     ScopedProxyMode scopedProxy() default ScopedProxyMode.DEFAULT;
 38
 39     /**
 40      * Controls the class files eligible for component detection.
 41      */
 42     String resourcePattern() default ClassPathScanningCandidateComponentProvider.DEFAULT_RESOURCE_PATTERN;
 43
 44     /**
 45      * Indicates whether automatic detection of classes annotated with {@code @Component}
 46      * {@code @Repository}, {@code @Service}, or {@code @Controller} should be enabled.
 47      */
 48     boolean useDefaultFilters() default true;
 49
 50     /**
 51      * Specifies which types are eligible for component scanning.
 52      */
 53     Filter[] includeFilters() default {};
 54
 55     /**
 56      * Specifies which types are not eligible for component scanning.
 57      * @see #resourcePattern
 58      */
 59     Filter[] excludeFilters() default {};
 60
 61     /**
 62      * Specify whether scanned beans should be registered for lazy initialization.
 63      * @since 4.1
 64      */
 65     boolean lazyInit() default false;
 66
 67
 68     /**
 69      * Declares the type filter to be used as an {@linkplain ComponentScan#includeFilters
 70      * include filter} or {@linkplain ComponentScan#excludeFilters exclude filter}.
 71      */
 72     @Retention(RetentionPolicy.RUNTIME)
 73     @Target({})
 74     @interface Filter {
 75
 76         /**
 77          * The type of filter to use.
 78          * <p>Default is {@link FilterType#ANNOTATION}.
 79          * @see #classes
 80          * @see #pattern
 81          */
 82         FilterType type() default FilterType.ANNOTATION;
 83
 84         /**
 85          * Alias for {@link #classes}.
 86          * @see #classes
 87          */
 88         @AliasFor("classes")
 89         Class<?>[] value() default {};
 90
 91         /**
 92          * The class or classes to use as the filter.
 93          */
 94         @AliasFor("value")
 95         Class<?>[] classes() default {};
 96
 97         /**
 98          * The pattern (or patterns) to use for the filter, as an alternative
 99          */
100         String[] pattern() default {};
101
102     }
@ComponentScan注解对应原有XML配置中的元素。@ComponentScan的功能是自动扫描并加载符合条件的组件(如@controller、@Component等),最终将这些Bean的定义加载到Ioc容器中。
我们可以通过basePackages等属性来细粒度的定制@ComponentScan自动扫描的范围,如果不指定,则默认Spring框架实现会从声明@ComponentScan所在类的package进行扫描。所以通常我们在定义SpringBoot启动类的时候,会把它放到root package下,这样就能扫描到所有需要定义的类。
2.3.@EnableAutoConfiguration
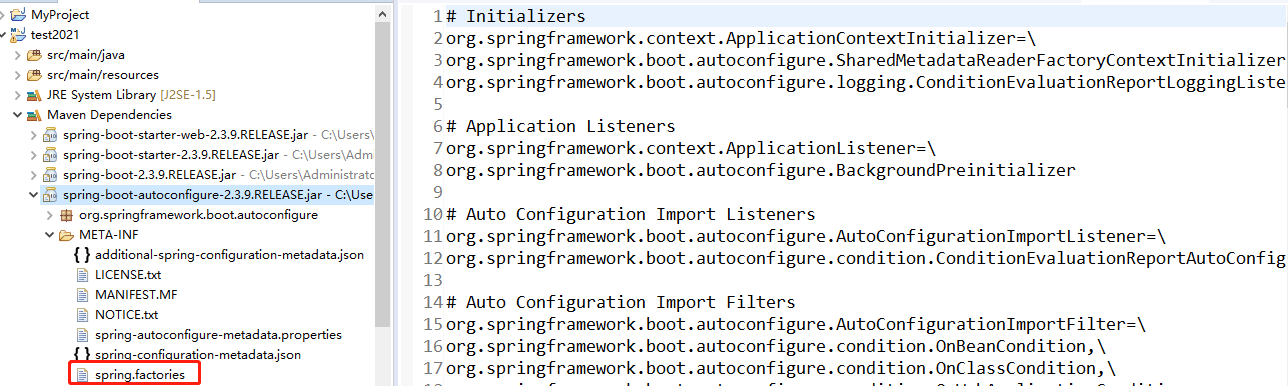
EnableAutoConfiguration的作用是从classpath中搜寻所有的META-INF/spring.factories配置文件,并将其中org.springframework.boot.autoconfigure.EnableutoConfiguration对应的配置项通过反射(Java Refletion)实例化为对应的标注了@Configuration的JavaConfig形式的IoC容器配置类,然后汇总为一个并加载到IoC容器。
@EnableAutoConfiguration注解如下:
@Target(ElementType.TYPE)
@Retention(RetentionPolicy.RUNTIME)
@Documented
@Inherited
@AutoConfigurationPackage
@Import(AutoConfigurationImportSelector.class)
public @interface EnableAutoConfiguration {

    /**
     * Environment property that can be used to override when auto-configuration is
     * enabled.
     */
    String ENABLED_OVERRIDE_PROPERTY = "spring.boot.enableautoconfiguration";

    /**
     * Exclude specific auto-configuration classes such that they will never be applied.
     * @return the classes to exclude
     */
    Class<?>[] exclude() default {};

    /**
     * Exclude specific auto-configuration class names such that they will never be
     * applied.
     * @return the class names to exclude
     * @since 1.3.0
     */
    String[] excludeName() default {};

}
@EnableAutoConfiguration注解对应原有XML配置中的元素。它之所以能自动根据条件来注册我们需要的Bean实例,主要是由其上的注解@Import导入的。
2.3.1@AutoConfigurationPackage
@AutoConfigurationPackage注解如下:
@Target(ElementType.TYPE)
@Retention(RetentionPolicy.RUNTIME)
@Documented
@Inherited
@Import(AutoConfigurationPackages.Registrar.class)
public @interface AutoConfigurationPackage {

    /**
     * Base packages that should be registered with {@link AutoConfigurationPackages}.
     */
    String[] basePackages() default {};

    /**
     * Type-safe alternative to {@link #basePackages} for specifying the packages to be
     * registered with {@link AutoConfigurationPackages}.
     */
    Class<?>[] basePackageClasses() default {};

}
@AutoConfigurationPackage注解的作用是将 添加该注解的类所在的package 作为 自动配置package 进行管理。可以通过 AutoConfigurationPackages 工具类获取自动配置package列表。也就是说当SpringBoot应用启动时默认会将启动类所在的package作为自动配置的package。
核心方法是:
static class Registrar implements ImportBeanDefinitionRegistrar, DeterminableImports {
        @Override
        public void registerBeanDefinitions(AnnotationMetadata metadata, BeanDefinitionRegistry registry) {
            register(registry, new PackageImports(metadata).getPackageNames().toArray(new String[0]));
        }
}
其中【new PackageImports(metadata).getPackageNames().toArray(new String[0])】就是启动类的包路径
2.3.2@Import(AutoConfigurationImportSelector.class)
在AutoConfigurationImportSelector中会调用如下方法:
protected List<String> getCandidateConfigurations(AnnotationMetadata metadata, AnnotationAttributes attributes) {
        List<String> configurations = SpringFactoriesLoader.loadFactoryNames(getSpringFactoriesLoaderFactoryClass(),
                getBeanClassLoader());
        Assert.notEmpty(configurations, "No auto configuration classes found in META-INF/spring.factories. If you "
                + "are using a custom packaging, make sure that file is correct.");
        return configurations;
    }
SpringFactoriesLoader.loadFactoryNames 方法会加载外部配置文件:
public static final String FACTORIES_RESOURCE_LOCATION = "META-INF/spring.factories";
以spring-boot-autoconfigure-**.jar中spring.factories为例,如下图所示:
3.springboot启动流程
public ConfigurableApplicationContext run(String... args) {
        Startup startup = SpringApplication.Startup.create();
        if (this.properties.isRegisterShutdownHook()) {
            shutdownHook.enableShutdownHookAddition();
        }

        DefaultBootstrapContext bootstrapContext = this.createBootstrapContext();
        ConfigurableApplicationContext context = null;
        this.configureHeadlessProperty();
        SpringApplicationRunListeners listeners = this.getRunListeners(args);
        listeners.starting(bootstrapContext, this.mainApplicationClass);

        try {
            ApplicationArguments applicationArguments = new DefaultApplicationArguments(args);
            ConfigurableEnvironment environment = this.prepareEnvironment(listeners, bootstrapContext, applicationArguments);
            Banner printedBanner = this.printBanner(environment);
            context = this.createApplicationContext();
            context.setApplicationStartup(this.applicationStartup);
            this.prepareContext(bootstrapContext, context, environment, listeners, applicationArguments, printedBanner);
            this.refreshContext(context);
            this.afterRefresh(context, applicationArguments);
            startup.started();
            if (this.properties.isLogStartupInfo()) {
                (new StartupInfoLogger(this.mainApplicationClass, environment)).logStarted(this.getApplicationLog(), startup);
            }

            listeners.started(context, startup.timeTakenToStarted());
            this.callRunners(context, applicationArguments);
        } catch (Throwable ex) {
            throw this.handleRunFailure(context, ex, listeners);
        }

        try {
            if (context.isRunning()) {
                listeners.ready(context, startup.ready());
            }

            return context;
        } catch (Throwable ex) {
            throw this.handleRunFailure(context, ex, (SpringApplicationRunListeners)null);
        }
    }
第一阶段:启动准备 (1-5)
    // 1. 启动计时器 - 用于后续打印启动时间
    Startup startup = SpringApplication.Startup.create();

    // 2. 注册关闭钩子 - 确保JVM退出时优雅关闭容器
    if (this.properties.isRegisterShutdownHook()) {
        shutdownHook.enableShutdownHookAddition();
    }

    // 3. 创建引导上下文 - 用于早期启动时的SPI加载
    DefaultBootstrapContext bootstrapContext = this.createBootstrapContext();

    ConfigurableApplicationContext context = null;

    // 4. 配置headless模式 - 无显示器环境下运行
    this.configureHeadlessProperty();

    // 5. 获取并启动运行监听器 - 事件发布机制的开始
    SpringApplicationRunListeners listeners = this.getRunListeners(args);
    listeners.starting(bootstrapContext, this.mainApplicationClass);
-
启动计时器:SpringBoot 最后打印的"Started Application in 2.5 seconds"就来自这里
-
关闭钩子:保证
ApplicationContext在JVM退出时能调用close()方法 -
引导上下文:SpringBoot 3.0+ 的新特性,用于早期初始化
-
运行监听器:从
spring.factories加载SpringApplicationRunListener,后续在各个阶段发布事件
第二阶段:环境与上下文准备 (6-10)
        // 6. 封装命令行参数
        ApplicationArguments applicationArguments = new DefaultApplicationArguments(args);

        // 7. 准备环境 - 加载application.properties/yml
        ConfigurableEnvironment environment = this.prepareEnvironment(listeners, bootstrapContext, applicationArguments);

        // 8. 打印Banner - 启动时的ASCII艺术字
        Banner printedBanner = this.printBanner(environment);

        // 9. 创建应用上下文 - 根据应用类型创建对应容器
        context = this.createApplicationContext();
        context.setApplicationStartup(this.applicationStartup);

        // 10. 准备上下文 - 关联环境、应用参数、Banner等
        this.prepareContext(bootstrapContext, context, environment, listeners, applicationArguments, printedBanner);
-
prepareEnvironment:这里读取了所有的配置文件,并将系统属性、环境变量、配置文件整合到
Environment对象中 -
createApplicationContext:根据推断的应用类型创建具体容器
-
Servlet Web →
AnnotationConfigServletWebServerApplicationContext -
Reactive Web →
ReactiveWebServerApplicationContext -
普通应用 →
AnnotationConfigApplicationContext
-
-
prepareContext:给容器设置环境、添加
BeanFactoryPostProcessor、执行初始化器等
第三阶段:容器刷新与启动完成 (11-16)
        // 11. 刷新上下文 - **Spring最核心的方法**
        this.refreshContext(context);

        // 12. 刷新后回调 - 目前为空方法,保留给子类扩展
        this.afterRefresh(context, applicationArguments);

        // 13. 启动完成计时
        startup.started();

        // 14. 打印启动日志
        if (this.properties.isLogStartupInfo()) {
            (new StartupInfoLogger(this.mainApplicationClass, environment)).logStarted(this.getApplicationLog(), startup);
        }

        // 15. 发布上下文已启动事件
        listeners.started(context, startup.timeTakenToStarted());

        // 16. **调用Runners - 对应你问的CommandLineRunner/ApplicationRunner**
        this.callRunners(context, applicationArguments);
-
refreshContext:这是 SpringFramework 的核心方法,内部做了12个步骤(如BeanFactory准备、注册BeanPostProcessor、实例化单例Bean等)。自动配置类的加载和Bean的创建都发生在这里。
-
callRunners:这里就是
CommandLineRunner和ApplicationRunner被调用的地方。它会在所有Bean都创建完成后执行。
第四阶段:收尾与返回 (17-18)
try {
        // 17. 发布上下文已就绪事件
        if (context.isRunning()) {
            listeners.ready(context, startup.ready());
        }

        // 18. 返回容器
        return context;
    } catch (Throwable ex) {
        throw this.handleRunFailure(context, ex, (SpringApplicationRunListeners)null);
    }
-
listeners.ready:发布
ApplicationReadyEvent,标志着应用已经完全就绪,可以处理请求了 -
返回容器:将配置好的
ApplicationContext返回给调用者
启动流程时序图
"计时关钩引监听,参数环境印Banner,创建准备刷新完,最后调用Runners"


 浙公网安备 33010602011771号